CHAPTER 8
Databases on AWS
In this chapter, you will
• Learn about relational databases and Amazon Relational Database Service (RDS)
• Understand Amazon Aurora
• Learn about Amazon Redshift
• Learn about Amazon DynamoDB
• Learn about Amazon ElastiCache
Understanding Relational Databases
A database management system (DBMS) is the software that controls the storage, organization, and retrieval of data. A relational database management system (RDBMS), as defined by IBM researcher Dr. E.F. Codd, adapts to the relation model with well-defined object stores or structures. These stores and structures, commonly known as operators and integrity rules, are clearly defined actions meant to manipulate and govern operations on the data and structures of the database. All the relational databases use Structured Query Language (SQL) for querying and managing the day-to-day operations of the database.
In a relational database, the information is stored in tables in the form of rows and columns. Data in a table can be related according to common keys or concepts, and the ability to retrieve related data from a table is the basis for the term relational database. A DBMS handles the way data is stored, maintained, and retrieved. In the case of a relational database, the RDBMS performs these tasks. DBMS and RDBMS are often used interchangeably.
Relational databases follow certain rules to ensure data integrity and to make sure the data is always accessible. The first integrity rule states that the rows in an RDBMS table should be distinct. For most RDBMSs, a user can specify that duplicate rows are not allowed, in which case the RDBMS prevents duplicates. The second integrity rule states that column values must not have repeating groups or arrays. The third integrity rule is about the concept of a NULL value. In an RDBMS, there might be a situation where the value of a column is not known, which means the data is not available. NULL does not mean a missing value or zero.
Relational databases also have the concepts of primary keys and foreign keys. A primary key uniquely identifies a record in the table, and the unique column containing the unique record is called the primary key. For example, in Table 8-1, there are five employees in an employee table.

Table 8-1 Employee Table
This employee table is a scenario that occurs in every human resource or payroll database. In this employee table, you cannot assign the first name to the primary key because many people can have the same first name, and the same is true for the last name. Similarly, two employees can join the company on the same day; therefore, the date of join also can’t be the primary key. In addition, there are always multiple employees from a state, and thus the state can’t be the primary key. Only the employee number is a unique value in this table; therefore, the primary key is the Employee_Number record. The primary key can’t contain any NULL value, and a table can have only one primary key, which can consist of a single field or multiple fields.
As described previously, the employee table can be maintained by the human resource department as well as the payroll department with a different set of columns. For example, the payroll table will have full details of the salary information, the tax deductions, the contributions toward retirement, and so on, whereas the employee table maintained by the human resource department may not have the columns related to tax deductions, and so on. Since both the tables contain the information related to the employee, often you need to link the tables or establish a relationship between the two tables. A foreign key is a field in one table that uniquely identifies rows in another table or the same table. The foreign key is defined in a second table, but it refers to the primary key or a unique key in the first table. Let’s assume the name of the table that the HR department maintains is employee, and the name of the table that the payroll department maintains is employee_details. In this case, employee_number will be a primary key for the employee table. The employee_details table will have a foreign key that references employee_number to uniquely identify the relationship between both tables.
Relational databases use SQL for all operations. There are a basic set of SQL commands that can be used across all RDBMSs. For example, all RDBMS engines use a SELECT statement to retrieve records from a database.
SQL commands are divided into categories, the two main ones being Data Manipulation Language (DML) commands and Data Definition Language (DDL) commands. The DML commands deal with the manipulation of the data such as inserting, updating, and deleting, and DDL deals with creating, altering, and dropping (deleting) the table structure.
Some common examples of DML are
• SELECT This command is used to query and display data from a database. Here’s an example:
![]()
• INSERT This command adds new rows to a table. INSERT is used to populate a newly created table or to add a new row or rows to an existing table. Here’s an example:
![]()
• DELETE This command removes a specified row or set of rows from a table. Here’s an example:
![]()
• UPDATE This command changes an existing value in a column or group of columns in a table. Here’s an example:
![]()
Some common DDL commands are
• CREATE TABLE This command creates a table with the column names given in the CREATE TABLE syntax.
• DROP TABLE This command deletes all the rows and removes the table definition from the database.
• ALTER TABLE This command modifies the table structure. You can add or remove a column from a table using this command. You can also add or drop table constraints and alter column attributes.
The most common RDBMS software includes Oracle, MySQL, PostgreSQL, MariaDB, and so on.
Understanding the Amazon Relational Database Service
AWS provides a service for hosting and managing relational databases called Amazon Relational Database Service (RDS). Using this service, you can host the following seven RDBMS engines:
• Aurora MySQL
• Aurora PostgreSQL
• Oracle
• SQL Server
• MySQL
• PostgreSQL
• MariaDB
Before understanding RDS, let’s evaluate the various ways you can host your database. The traditional method is to host the database in your data center on-premises. Using AWS, you can host the relational database either on EC2 servers or in RDS. Let’s understand what it takes to host a relational database in all these scenarios.
Scenario 1: Hosting the Database in Your Data Center On-Premises
If you host the database in your own data center, you have to take care of all the steps shown in Figure 8-1. Specifically, you have to manage your data center including setting up the power, configuring the networking, configuring the server, installing the operating system, configuring the storage, installing the RDBMS, maintaining the OS, doing OS firmware upgrades, doing database software upgrades, backing up, patching, configuring high availability, configuring scalability, optimizing applications, and so on. In short, you have to take care of everything.
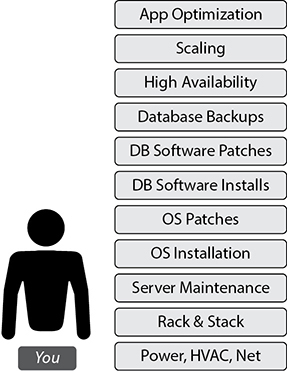
Figure 8-1 Hosting the database in your data center on-premises
Scenario 2: Hosting the Database on Amazon EC2 Servers
If you host the database on EC2 servers, then you need to take care of the stuff on the left of Figure 8-2, and AWS takes care of the stuff on the right. AWS takes care of OS installation, server maintenance, racking of the servers, power, cooling, networking, and so on. You are responsible for managing the OS, OS patches installation required for RDBMS installation, database installation and maintenance, and all the other tasks related to databases and application optimization.
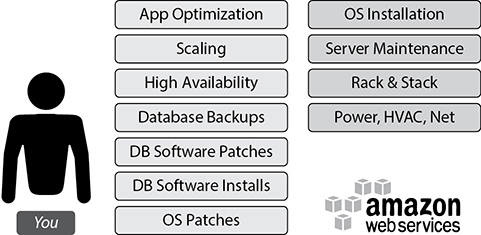
Figure 8-2 Hosting the database on Amazon EC2 servers
Scenario 3: Hosting the Database Using Amazon RDS
As shown in Figure 8-3, if you host the database using RDS, AWS does all the heavy lifting for you. From installation to maintenance of the database and patching to upgrading, everything is taken care of by AWS. Even high availability and scalability are taken care of by AWS. You just need to focus on application optimization, and that’s all. It is a managed database service from AWS.
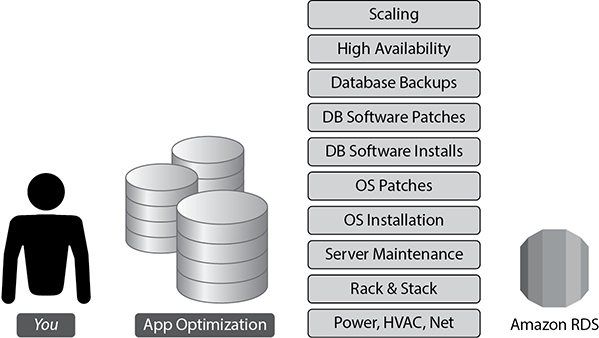
Figure 8-3 Hosting the database using Amazon RDS
The following are the benefits you get by running your database on RDS:
• No infrastructure management You don’t have to manage any infrastructure for the databases. As discussed previously, AWS takes care of everything.
• Instant provisioning Provisioning a database on RDS is almost instant. With a few clicks, you can deploy an RDBMS of your choice in a few minutes. When you need to launch a new database, you can do it instantly, without waiting for days or weeks.
• Scaling RDS is easy to scale; with a few clicks you can scale up or scale down. You can change your configuration to meet your needs when you want. You can scale compute and memory resources up or down at any point in time. I will discuss various ways of scaling a database later in this chapter.
• Cost effective RDS is really cost effective. You pay only for what you use, and there are no minimum or setup fees. You are billed based on using the following database instance hours: the storage capacity you have provisioned to your database instance, the I/O requests per month, the Provisioned IOPS number per month (only if you are using this feature), backup storage, and data transfer including Internet data transfer in and out of your database instance.
• Application compatibility Since RDS supports seven engines, most of the popular applications or your custom code, applications, and tools you already use today with your existing databases should work seamlessly with Amazon RDS. If you are using one of the engines that are currently supported, then there is a good chance you can get it working on RDS.
• Highly available Using RDS, you can provision a database in multiple AZs. Whenever you provision the database in multiple AZs, Amazon RDS synchronously replicates your data to a standby instance in a different AZ.
• Security RDS supports the encryption of data both at rest and in transit. You can encrypt the databases and manage your keys using the AWS Key Management System. With RDS encryption, the data stored at rest in the storage is encrypted. Amazon RDS also supports SSL, which is used to take care of encrypting the data in transit.
Hosting a Database in Amazon EC2 vs. Amazon RDS
If you need to decide whether to host the database in Amazon EC2 or Amazon RDS, you should clearly understand the differences in both the offerings so you can choose the right solution for your needs. Of course, you should give RDS a try first because it eliminates a lot of routine work your DBAs have to contend with, but depending on your application and your requirements, one might be preferable over the other. RDS is a managed service, so in some cases you cannot do everything like you might do with a database running on EC2 or in your own data center. AWS does some of the administration, so there are some trade-offs. It is important for you to understand some of the limitations that exist within RDS when making a choice.
RDS fully manages the host, operating system, and database version you are running on. This takes a lot of burden off your hands, but you also don’t get access to the database host operating system, you have limited ability to modify the configuration that is normally managed on the host operating system, and generally you get no access to functions that rely on the configuration from the host operating system. You also don’t have superuser privilege on the database.
All of your storage on RDS is also managed. Once again, this takes a lot of burden off of you from an administrative standpoint, but it also means there are some limits. There are storage limits of 16TB with MySQL, SQL server, MariaDB, PostgreSQL, and Oracle; and 64TB with Aurora. Please note these numbers are as of writing this book. AWS is continuing to increase the storage limits for RDS, so please refer to the AWS documentation to find the latest information on the storage limits.
You should choose RDS if
• You want to focus on tasks that bring value to your business
• You don’t want to manage the database
• You want to focus on high-level tuning tasks and schema optimization
• You lack in-house expertise to manage databases
• You want push-button multi-AZ replication
• You want automated backup and recovery
You should choose EC2 if
• You need full control over the database instances
• You need operating system access
• You need full control over backups, replication, and clustering
• Your RDBMS engine features and options are not available in Amazon RDS
• You size and performance needs exceed the Amazon RDS offering
High Availability on Amazon RDS
Amazon RDS supports high availability (HA) architectures, so if you have a database with important data, there are many ways to configure HA. It is important to have an HA architecture in place since the database is the heart of everything. If the database goes down, everything goes down. For example, if your application has a HA but the database goes down, the application won’t be usable. Let’s evaluate the various architectures for RDS including the HA architectures.
Simplest Architecture: Single-AZ Deployment
If you just want to get started on Amazon RDS, do some sort of proof of concept, deploy development environments, or deploy noncritical nonproduction environments, you may not need a highly available architecture since you can live with downtime in these scenarios. Therefore, in the previously mentioned scenarios, you can launch the Amazon RDS instance in a single AZ. With this you get a single RDS instance inside a VPC with the necessary attached storage. Figure 8-4 shows this architecture.
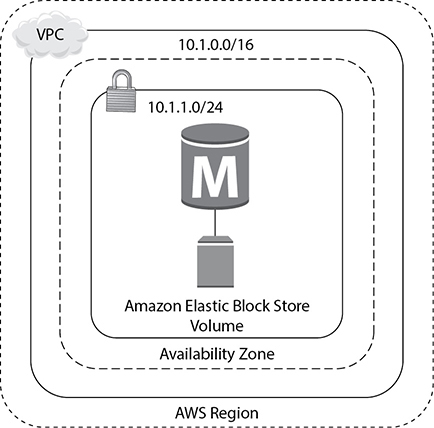
Figure 8-4 Amazon RDS in a single AZ
High Availability: Multiple AZs
If you are planning to run a mission-critical database, want to have an architecture where you can’t afford to lose data, have a tight recovery point objective, or can’t afford much downtime, you must deploy the database in a multi-AZ architecture.
When you deploy a database in a multi-AZ architecture, you can choose which availability zone you want your primary database instance to be in. RDS will then choose to have a standby instance and storage in another availability zone of the AWS region that you are operating in. The instance running in the standby will be of the same type as your master, and the storage will be of the same configuration and size as of your primary.
Figure 8-5 shows the HA architecture.
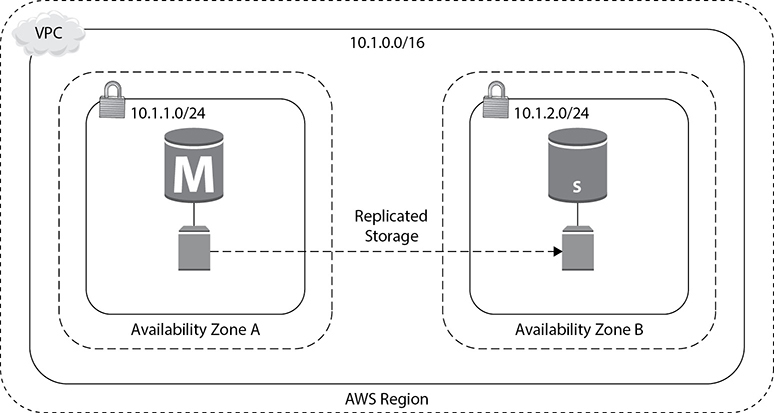
Figure 8-5 HA architecture in AWS
In the case of a multi-AZ architecture, the primary database, also known as the master database, handles all the traffic. The standby database is always kept ready and is in a state that whenever the master or the primary goes down, it takes the role of the master or primary and supports the application.
RDS takes responsibility for ensuring that your primary is healthy and that your standby is in a state that you can recover to. The standby database does not remain open when it acts as a standby database, so you can’t direct the traffic to the primary and standby databases at the same time. This is like having an active/passive database. Your data on the primary database is synchronously replicated to the storage in the standby configuration. As discussed in the previous chapter, the AZs are built in such a way that provides the ability to synchronously replicate the data; hence, there is no data loss.
There can be various types of failover that RDS can handle automatically. For example, the host instance can go down, the underlying storage can fail, the network connectivity to the primary instance is lost, the AZ itself goes down, and so on.
When the failover happens, the standby is automatically propagated to the master, and all the application traffic fails over to the new master. In the multi-AZ architecture of RDS, the application connects to the database server using a DNS endpoint that is mapped to the master and standby instances. As a result, you don’t have to repoint the application to the new master or change anything from the application side. In the case of failover, RDS automatically does the DNS failover, which typically takes about 30 to 60 seconds. Once it happens, you are again up and running, and you do not need to do anything. Figure 8-6 shows this behavior. In this figure, users and applications are connected to the database using the endpoint rdsdbinstance.1234.us-west-2.rds.amazonaws.com:3006. (Since this is a MySQL database, the port is 3006.) Now this endpoint is mapped to both the master and the slave. When the failover happens, the users and application are reconnected to the standby that gets propagated to the master. The application and users continue to connect to the same endpoint (rdsdbinstance.1234.us-west-2.rds.amazonaws.com:3006). They don’t have to change anything at their end.
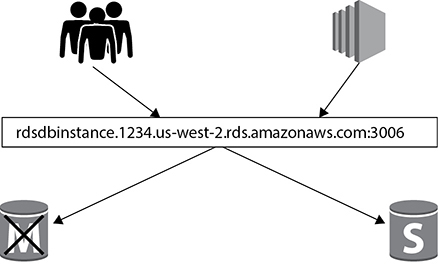
Figure 8-6 DNS failover using multi-AZ on Amazon RDS
Scaling on Amazon RDS
There are multiple ways you can scale your databases running on RDS. There could be many reasons you would like to scale up the databases running in RDS. For example, your application workload has increased, your users have grown up, you have started seeing performance degradation, or your database queries are showing a wait on the CPU or in memory. Or, when you started the application, you had no idea about the workload and now to support the business, you need to scale up. Scaling up always helps you to handle the additional workload.
Similarly, there could be reasons when you may want to scale down. For example, during the weekends, there may not be much activity in the database node, and you don’t want to pay more over the weekend; you may want to scale down for the weekend.
Changing the Instance Type
The simplest way to scale up or down is to change the instance type. You can change from one class of instance to another class or move up and down between the same classes of instance. You can move up or down between any class of instance supported by Amazon RDS. It is simple to scale up or down the instance type in RDS. The steps are as follows:
1. Choose the Modify option from the Instance Actions menu of the RDS console.
2. Choose what you want your new database instance class to be.
3. Determine whether you want to apply the change immediately.
If you choose to apply the change immediately, there could be some downtime since the instance type is changed. You should make sure that the business or application can handle the small downtime. If you can’t have the small outage, then don’t apply the change immediately. If you do not apply the change immediately, then the change will be scheduled to occur during the preferred maintenance window that you defined when creating the database.
You can also scale up and down using the AWS CLI and AWS API. For example, if you want to scale up to a c4 large instance for your database, you can run the following command from AWS CLI and modify the instance type:
![]()
You can even automate this by running a cron job in a cheap EC2 instance.
Since RDS is not integrated with Auto Scaling, you can’t use this technology to scale up or down as you do in an EC2 instance. But you can achieve this by writing a Lambda function. For example, you can have two Lambda functions. The first one is for scaling down over the weekend, and the second one is for scaling up at the end of the weekend. The Lambda function can call the modify db instance API to either scale up or scale down.
Similarly, you can also automate the scale-up of the instance based on certain events. For example, if the CPU of your database instance goes up by 75 percent, you want to automatically increase the instance size. This can be done using a combination of Lambda, CloudWatch, and SNS notifications. For example, from the CloudWatch metrics, you can monitor the CPU utilization of the RDS instance. You can have an alarm that sends a notification to SNS when the CPU goes up by 75 percent, and you can have a Lambda function subscribed to that notification that calls the modify db instance API and triggers the job to move the database to a higher class of server.
Read Replica
A read replica is a read-only copy of your master database that is kept in sync with your master database. You can have up to 15 read replicas in RDS depending on the RDBMS engine. A read replica helps you to offload the read-only queries to it, thereby reducing the workload on the master database. There are several benefits of running a read replica:
• You can offload read-only traffic to the read replica and let the master database run critical transaction-related queries.
• If you have users from different locations, you can create a read replica in a different region and serve the read-only traffic via the read replica.
• The read replica can also be promoted to a master database when the master database goes down.
You can also use a read replica as a mechanism for high availability; for example, if you have a master database and a read replica and the master database goes down, the read replica can be promoted to master. The only thing you need to be careful about with this architecture is the asynchronous replication of data.
You can create the read replica in a different AZ in the same region, or you can have a read replica in a different region called a cross-regional read replica. A cross-regional read replica may or may not be available for all the RDBMS engines. Figure 8-7 shows a cross-regional read replica.
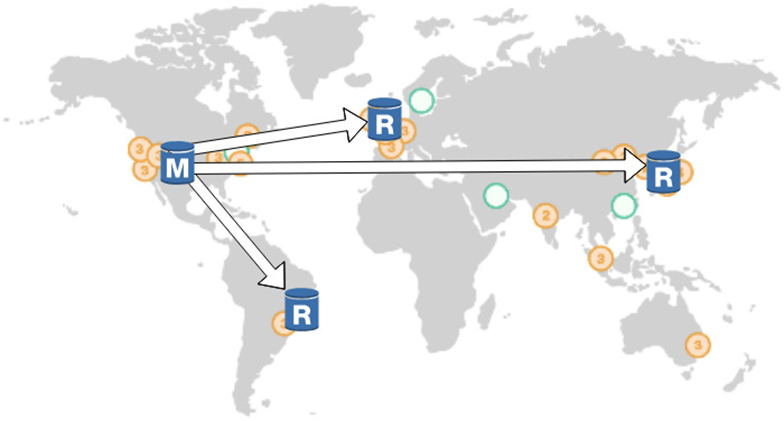
Figure 8-7 Cross-regional read replica
An intra-region allows you to create additional read replicas within the same AWS region, but in the same or different availability zones from your master database. This functionality is supported by MySQL, MariaDB, PostgreSQL, Aurora MySQL, and Aurora PostgreSQL.
Cross-regional replication allows you to deploy the read replica into an AWS region that is different from the region that your master is located in. This functionality is supported by MySQL, MariaDB, PostgreSQL, Aurora MySQL, and Aurora PostgreSQL.
Currently RDS does not support read replicas for Oracle and SQL Server. However, you can still accomplish this on RDS. For Oracle you can use Oracle Golden Gate. You can also use some of the AWS partner products such as Attunity and SnapLogic to replicate data between two RDS instances of Oracle or SQL Server.
Security on Amazon RDS
There are multiple ways of securing the databases running on Amazon RDS. In this section, you will learn all the different ways of securing the database.
Amazon VPC and Amazon RDS
When you launch an Amazon RDS instance, it launches in Amazon Virtual Private Cloud (VPC). I discussed VPC in Chapter 3. Since a database always stays behind the firewall, it is recommended that you create the database in the private subnet. Of course, you may have a legitimate reason to create the database in a public subnet, but again, that could be a one-off scenario. So, with your database launched inside of VPC, you get to control which users and applications access your database and how they access it. When the database runs in the VPC, you have multiple ways of connecting to it.
• You can create a VPN connection from your corporate data center into the VPC so that you can access the database in a hybrid fashion.
• You can use Direct Connect to link your data center to an AWS region, giving you a connection with consistent performance.
• You can peer two different VPCs together, allowing applications in one VPC to access your database in your VPC.
• You can grant public access to your database by attaching an Internet gateway to your VPC.
• You can control the routing of your VPC using route tables that you attach to each of the subnets in your VPC.
You can create security groups within RDS and can control the flow of traffic using them. You have already read about security groups in Chapter 3. You can control the protocol, port range, and source of the traffic that you allow into your database. For the source, you can restrict it to a specific IP address, a particular CIDR block covering multiple IP addresses, or even another security group, meaning that your RDS instance will accept traffic only if it comes from instances in that particular security group. This gives you the flexibility to have a multitier architecture where you grant connections only from the parts of the tier that actually need to access the database.
Data Encryption on Amazon RDS
Encryption is important for many customers, and Amazon RDS provides the ability to encrypt the database. Many customers have a compliance requirement to encrypt the entire database. RDS provides you with the ability to encrypt the data at rest. RDS-encrypted instances provide an additional layer of data protection by securing your data from unauthorized access to the underlying storage. You can use Amazon RDS encryption to increase the data protection of your applications deployed in the cloud and to fulfill compliance requirements for data-at-rest encryption.
When you encrypt your RDS database with AWS-provided encryption, it takes care of encrypting the following:
• The database instance storage
• Automated backups
• Read replicas associated with the master database
• Standby databases associated with the master database
• Snapshots that you generate of the database
Thus, the entire ecosystem where the data is stored is encrypted.
If you use Oracle or Microsoft SQL Server’s native encryption like Transparent Database Encryption (TDE), you can also use it in Amazon’s RDS. But make sure you use only one mode of encryption (either RDS or TDE) or it will have an impact on the performance of the database.
When you choose to encrypt, the data in it uses the industry-standard AES-256 encryption algorithm to encrypt your data on the server that hosts your Amazon RDS instance. Once the data is encrypted, RDS automatically handles the decryption of the data. When you create an RDS instance and enable encryption, a default key for RDS is created in the Key Management Service (KMS) that will be used to encrypt and decrypt the data in your RDS instance. This key is tied to your account and controlled by you. KMS is a managed service that provides you with the ability to create and manage encryption keys and then encrypt and decrypt your data with those keys. All of these keys are tied to your own AWS account and are fully managed by you. KMS takes care of all the availability, scaling, security, and durability that you would normally have to deal with when implementing your own key store. When KMS is performing these management tasks, it allows you the ability to focus on using the keys and building your application.
You can also use your own key for managing the encryption. Let’s take a deep dive on this. As discussed, when you are launching an RDS instance and choose to make the database encrypted, it results in an AWS managed key for RDS. This is good if you just want encryption and don’t want to think about anything else related to the key. Once this key is created, it can be used only for RDS encryption and not with any other AWS service. Therefore, the scope of this key is limited to RDS. The other option is to create your own master key. If you create your own master key within KMS and then reference that key while creating your RDS instance, you have much more control over the use of that key such as when it is enabled or disabled, when the key is rotated, and what the access policies are for the key.
When RDS wants to encrypt data on the instance, it will make a call to KMS using the necessary credentials. KMS will then give RDS a data key that is actually used to encrypt the data on that instance. This data key is encrypted using the master key that was created when you launched the instance or using the key you created and specified during the instance creation. This data key is specific to that RDS instance and can’t be used with another RDS instance.
Therefore, it is a two-tiered key hierarchy using encryption:
• The unique data key encrypts customer data inside the RDS.
• The AWS KMS master keys encrypt data keys.
This is depicted in Figure 8-8.
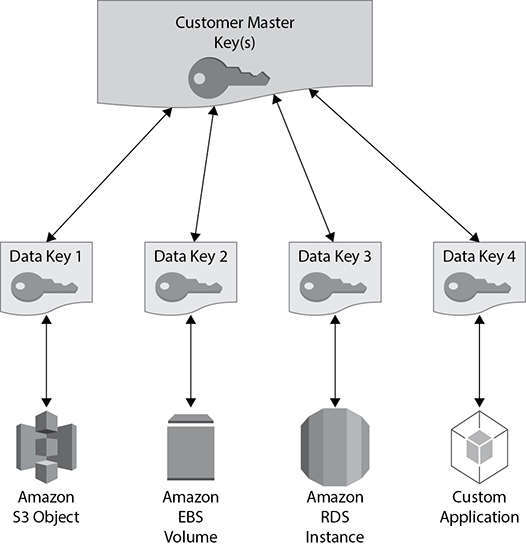
Figure 8-8 Two-tiered key hierarchy for Amazon RDS
There are several benefits of using this approach. Encryption and decryption are handled transparently, so you don’t have to modify your application to access your data. There are limited risks of a compromised data key. You get better performance for encrypting large data sets, and there is no performance penalty for using KMS encryption with your RDS instance. You only have to manage a few master keys and not many data keys. You get centralized access and audit of key activity via CloudTrail so that you can see every time a key is accessed and used from your KMS configuration.
Let’s understand how keys are used to protect your data. This is shown in Figure 8-9.

Figure 8-9 How keys are used to protect the data
1. The RDS instance requests an encryption key to use to encrypt data and passes a reference to the master key in the account.
2. The client requests authentication based on the permissions set on both the user and the key.
3. A unique data encryption key is created and encrypted under the KMS master key.
4. The plaintext and encrypted data key is returned to the client.
5. The plaintext data key is used to encrypt data and is then deleted when practical.
6. The encrypted data key is stored; it’s sent back to the KMS when needed for data decryption.
Using RDS you can encrypt the traffic to and from your database using SSL. This takes care of encrypting the data in transit. Each of the seven RDS engines supports the ability to configure an SSL connection into your database. The steps to implement the SSL connection to the database might be different for different RDBMS engines.
Here are a couple of important things to note about encryption from the examination’s point of view:
• You can encrypt only during database creation. If you already have a database that is up and running and you want to enable encryption on it, the only way to achieve this is to create a new encrypted database and copy the data from the existing database to the new one.
• Once you encrypt a database, you can’t remove it. If you choose to encrypt an RDS instance, it cannot be turned off. If you no longer need the encryption, you need to create a new database instance that does not have encryption enabled and copy the data to the new database.
• The master and read replicas must be encrypted. When you create a read replica, using RDS, the data in the master and read replicas is going to be encrypted. The data needs to be encrypted with the same key. Similarly, when you have a master and standby configuration, both are going to be encrypted.
• You cannot copy those snapshots of an encrypted database to another AWS region, as you can do with normal snapshots. (You will learn about snapshots later in this chapter.) KMS is a regional service, so you currently cannot copy things encrypted with KMS to another region.
• You can migrate an encrypted database from MySQL to Aurora MySQL. You will read about Aurora later in this chapter.
Backups, Restores, and Snapshots
For all the Amazon RDS engines, except Amazon Aurora (MySQL and PostgreSQL), MySQL, PostgreSQL, MariaDB, Oracle, and SQL Server, the database backup is scheduled for every day, in other words, one backup per day. You can schedule your own backup window as per your convenience. You can also monitor the backups to make sure they are completing successfully. The backup includes the entire database, transaction logs, and change logs. By default, the backups are retained for 35 days. If you want to retain a backup for a longer period of time, you can do so by opening a support ticket. Multiple copies of the backup are kept in each availability zone where you have an instance deployed.
In the case of Aurora, you don’t have to back up manually since everything is automatically backed up continuously to the S3 bucket. But you can also take a manual backup at any point in time. For Aurora, also the backups are retained for 35 days, which again can be extended by a support ticket.
When you restore a database from the backup, you create a new exact copy of the database or a clone of a database. Using RDS, it is simple to restore a database. Using backups, you can restore the database to any point in time. When you restore the database, you have the ability to restore the database to any class of server, and it doesn’t have to be the same type of instance where the main database is running.
Restoring is pretty simple. You need to choose where to restore (your database instance) and when (time) to restore. While restoring a database, you define all the instance configurations just like when creating a new instance. You can choose to restore the database up to the last restorable time or do a custom restore time of your choosing. When you select both of the options, the end result is a new RDS instance with all your data in it.
Creating a snapshot is another way of backing up your database. Snapshots are not automatically scheduled, and you need to take the snapshots manually. When you take the snapshot of a database, there is a temporary I/O suspension that can last from a few seconds to a few minutes. The snapshots are created in S3, and you can also use these snapshots to restore a database. If you take the snapshot of an encrypted database and use it for a restore, the resulting database also will be an encrypted database. There are many reasons you would use database snapshots. For example, you can use a snapshot to create multiple nonproduction databases from the snapshot of the production database to test a bug, to copy the database across multiple accounts, to create a disaster recovery database, to keep the data before you delete the database, and so on.
Monitoring
Amazon provides you with multiple ways of monitoring your databases running on RDS. The basic monitoring is called standard monitoring, and if you want fine granular details, you can opt for advanced monitoring. RDS sends all the information for these metrics to Amazon CloudWatch, and then you are able to view the metrics in the RDS console, in the CloudWatch console, or via the CloudWatch APIs.
• Standard monitoring Using standard monitoring, you can access 15 to 18 metrics depending on the RDBMS engine. The common ones are CPU utilization, storage, memory, swap usage, database connections, I/O (read and write), latency (read and write), throughput (read and write), replica lag, and so on. Figure 8-10 shows the standard monitoring. Using standard monitoring you can get the metrics at one-minute intervals.
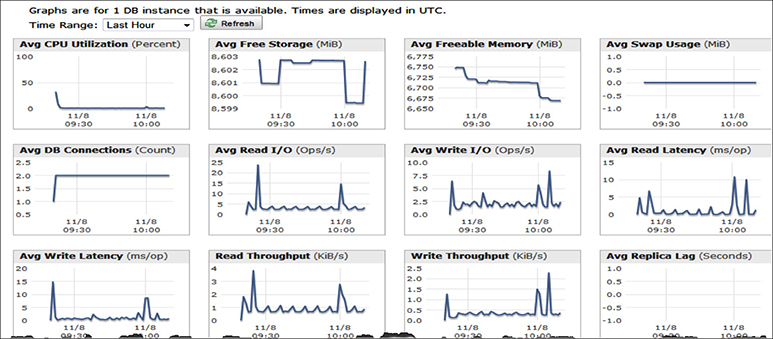
Figure 8-10 Standard monitoring
• Enhanced monitoring If you want fine granular metrics, then you can opt for enhanced monitoring. Using enhanced monitoring, you can access additional 37 more metrics in addition to standard monitoring, making a total of more than 50 metrics. You can also get the metrics as low as a one-second interval. The enhanced monitoring is also available for all the RDBMS engines that RDS supports.
• Event notification Using event notifications in RDS, you can quickly get visibility into what’s going on in your RDS instance. These event notifications allow you to get notifications, via Amazon SNS, when certain events occur in RDS. There are 17 different categories of events that you can choose from such as availability, backup, configuration change, creation, deletion, failure, failover, maintenance, recovery, restoration, and so on. You can choose to get notified on the occurrences of those events, for example, when the database is running low on storage, when the master database is failing over to the standby database, and so on.
• Performance Insights Performance Insights expands on existing Amazon RDS monitoring features to illustrate your database’s performance and helps you analyze any issues that impact it. With the Performance Insights dashboard, you can visualize the database load and filter the load by waits, SQL statements, hosts, or users. Performance Insights is on by default for the Postgres-compatible edition of the Aurora database engine. If you have more than one database on the database instance, performance data for all of the databases is aggregated for the database instance. Database performance data is kept for 35 days.
The Performance Insights dashboard contains database performance information to help you analyze and troubleshoot performance issues. On the main dashboard page, you can view information about the database load and drill into details for a particular wait state, SQL query, host, or user. By default, the Performance Insights dashboard shows data for the last 15 minutes. You can modify it to display data for the last 60 minutes if desired. Figure 8-11 shows the details of SQL statements from the Performance Insights page.
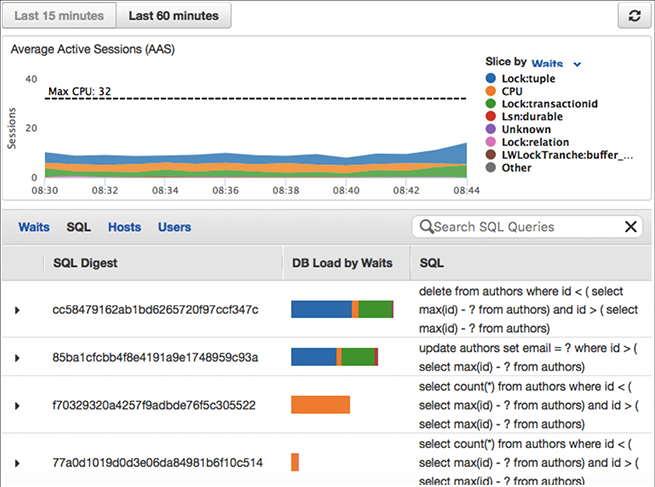
Figure 8-11 Details of SQL from the Performance Insights page
Amazon Aurora
Amazon Aurora is a cloud-optimized, MySQL- and PostgreSQL-compatible, relational database. It provides the performance and availability of commercial databases and the simplicity and cost effectiveness of open source databases. Amazon Aurora provides performance and durability by implementing a fully distributed and self-healing storage system, and it provides availability by using the elasticity and management capabilities of the AWS cloud in the most fundamental ways.
There are two flavors of Amazon Aurora; one is compatible with MySQL, and the other is compatible with PostgreSQL. For MySQL currently it is compatible with version 5.6 and 5.7 using the InnoDB storage engine, and for PostgreSQL it is compatible with the 9.6 version. This means the code, applications, drivers, and tools you already use with your MySQL or PostgreSQL databases can be used with Amazon Aurora with little or no change. And you can easily migrate from MySQL or PostgreSQL to Amazon Aurora.
With Aurora the storage is a bit different compared to regular RDS. There is a separate storage layer that is automatically replicated across six different storage nodes in three different availability zones. This is an important factor since the data is mirrored at six different places at no additional cost. All this data mirroring happens synchronously, and hence there is zero data loss. Amazon’s Aurora uses a quorum system for reads and writes to ensure that your data is available in multiple storage nodes. At the same time, all the data is also continuously backed up to S3 to ensure that you have durable and available data. With Amazon Aurora, the storage volume automatically grows up to 64TB. Figure 8-12 shows the replication of Aurora storage across three different AZs.
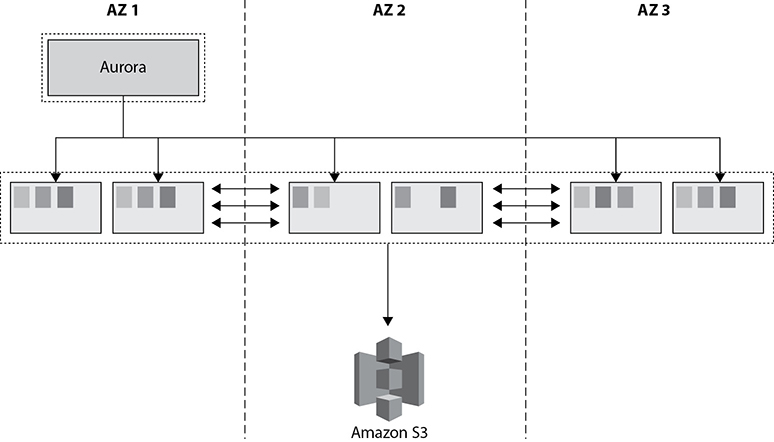
Figure 8-12 Replication of Amazon Aurora storage at three different AZs
Amazon Aurora supports up to 15 copies of read replica. Please note in the case of Amazon Aurora the data replication happens at the storage level in a synchronous manner. Therefore, between the primary database node (which is also referred as master) and the read replica, the data replication happens in a synchronous fashion. In the case of Aurora, there is no concept of standby database, and the read replica is prompted to a master or primary database node when the primary node goes down. Figure 8-13 shows a primary node and read replica for Amazon Aurora.
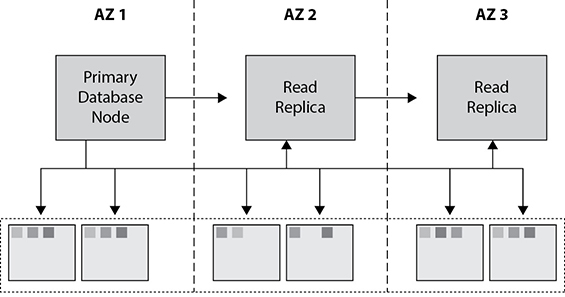
Figure 8-13 Primary node and read replica for Amazon Aurora
On average, you get up to a five times increase in performance by running an Aurora MySQL database compared to a regular MySQL engine.
Amazon Redshift
Amazon Redshift is the managed data warehouse solution offered by Amazon Web Services. A data warehouse is a database designed to enable business intelligence activities; it exists to help users understand and enhance their organization’s performance. It is designed for query and analysis rather than for transaction processing and usually contains historical data derived from transaction data but can include data from other sources. Data warehouses are consumers of data. They are also known as online analytical processing (OLAP) systems. The data for a data warehouse system can come from various sources, such as OLTP systems, enterprise resource planning (ERP) systems such as SAP, internally developed systems, purchased applications, third-party data syndicators, and more. The data may involve transactions, production, marketing, human resources, and more.
Data warehouses are distinct from OLTP systems. With a data warehouse, you separate the analytical workload from the transaction workload. Thus, data warehouses are very much read-oriented systems. They have a far higher amount of data reading versus writing and updating. This enables far better analytical performance and does not impact your transaction systems. A data warehouse system can be optimized to consolidate data from many sources to achieve a key goal. OLTP databases collect a lot of data quickly, but OLAP databases typically import large amounts of data from various source systems by using batch processes and scheduled jobs. A data warehouse environment can include an extraction, transformation, and loading (ETL) solution, as well as statistical analysis, reporting, data mining capabilities, client analysis tools, and other applications that manage the process of gathering data, transforming it into actionable information, and delivering it to business users.
Benefits of Amazon Redshift
These are the important attributes of Amazon Redshift:
• Fast Since Redshift uses columnar storage, it delivers fast query performance. A query is parallelized by running it across several nodes. As a result, the query runs fast, and IO efficiency is improved.
• Cheap Redshift costs less than any other data warehouse solution on the market. It is almost one-tenth the price of tools from other vendors. It starts as low as $1,000 per terabyte.
• Good compression The data remains in a compressed format, which provides three to four times more compression, which allows you to save money.
• Managed service Since Redshift is a managed service, Amazon takes care of all the heavy-duty work. You don’t have to manage the underlying clusters, networking, or operating system. Amazon takes care of patching, upgrading, backing up, and restoring. You can also automate most of the common administrative tasks to manage, monitor, and scale your data warehouse.
• Scalable Redshift uses a distributed, massively parallel architecture that scales horizontally to meet throughput requirements. The cluster size can go up and down depending on your performance and capacity needs. You can resize the cluster either via the console or by making API calls.
• Secure Redshift supports the encryption of data at rest and data in transit. You can even create a cluster inside a VPC, making it isolated. You can use the AWS Key Management Service (KMS) and Hardware Security Modules (HSMs) to manage the keys.
• Zone map functionality Zone maps help to minimize unnecessary IO. They track the minimum and maximum values for each block and skip over blocks that don’t contain the data needed for a given query.
Amazon Redshift Architecture
An Amazon Redshift cluster consists of a leader node and compute nodes. There is only one leader node per cluster, whereas there could be several compute nodes in a cluster. Figure 8-14 shows the Redshift architecture.
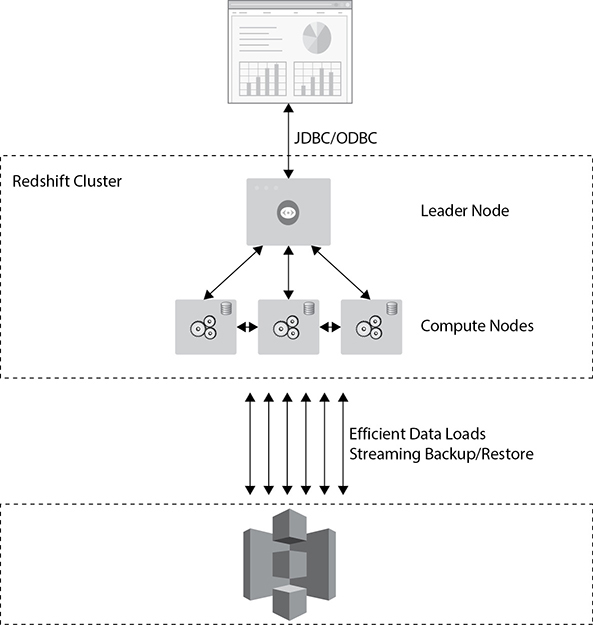
Figure 8-14 Amazon Redshift architecture
The leader node performs a few roles. It acts as a SQL endpoint for the applications. It performs database functions and coordinates the parallel SQL processing. All the Postgres catalog tables also exist in the leader node. Since Redshift is built on Postgres, some additional metadata tables specific to Redshift also exist in the leader node. This is where you connect to your driver; you can use JDBC and ODBC. In addition to Redshift drivers that you can download from the AWS web site, you can connect with any Postgres driver. Behind the leader node are the compute nodes; you can have up to 128 of them.
The leader node communicates with the compute nodes for processing any query. The compute nodes process the actual data. The compute nodes also communicate with each other while processing a query. Let’s see how a query is executed.
1. The application or SQL client submits a query.
2. The query is submitted to the leader node. The leader node parses the query and develops an execution plan.
3. The leader node also decides which compute nodes are going to do the work and then distributes the job across multiple compute nodes.
4. The compute nodes process the job and send the results to the leader node.
5. The leader node aggregates the results and sends it back to the client or the application.
The leader node does the database functions, such as encrypting the data, compressing the data, running the routing jobs like vacuum (covered later in this chapter), backing up, restoring, and so on.
All the compute nodes are connected via a high-speed interconnected network. The end client (application) can’t communicate with the compute nodes directly. It has to communicate via the leader node. But the compute node can talk with services such as Amazon S3. The data is ingested directly from the S3 to the compute nodes, and Amazon constantly backs up the cluster to Amazon S3, which happens in the background.
A compute node is further divided or partitioned into multiple slices. A slice is allocated a portion of a node’s CPU, memory, and storage. Depending on the size of the compute node, a node can have more or fewer slices. Figure 8-15 shows compute nodes with two slices in each one with an equal amount of compute, memory, and storage.
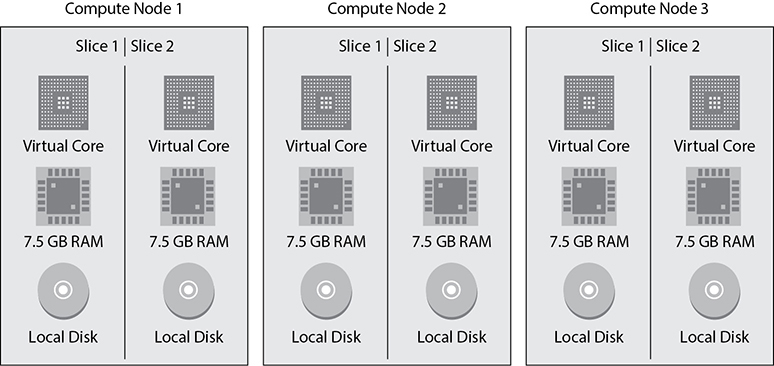
Figure 8-15 Slice in a compute node
When the leader node distributes the job, it actually distributes it to the slices, and each slice processes the job independently. Similarly, when the data is loaded in the tables of Redshift, it is kept in the slices.
There are two types of Redshift clusters: single-node clusters and multinode clusters. In single-node clusters, there is only one node that performs the tasks of both the leader and compute nodes. There is only one node in a single-node cluster, so if the node goes down, then everything goes down, and you need to restore the cluster from the snapshot. You should not use a single-node cluster for production environments. It can be used for test/development environments.
In a multinode cluster, the leader node is separate from the compute node, and there is only one leader node per cluster. During the creation of a cluster, you can specify the number of compute nodes you need, and a multinode cluster is created with that many compute nodes. For example, if you choose three nodes during your cluster creation, then a cluster will be created with one leader node and three compute nodes. In a multinode cluster, the data is automatically replicated among the compute nodes for the data redundancy. So, even if the compute node fails, you don’t have to restore it from the snapshot. When a compute node fails, it is replaced automatically, and the cluster automatically take cares of redistributing the data. This should be used for running production workloads.
There are two types of instance you can choose for Redshift clusters. One is a dense compute that has the SSD drives, and the other is dense storage, which has the magnetic hard drives. If you need faster performance and compute, then you should choose a dense compute cluster, and if you have a large workload and would like to use a magnetic hard drive, choose the dense storage cluster. The dense compute is called DC, and the dense storage type is called DS. At the time of writing this book, Amazon Redshift supports the following cluster types. Redshift uses an EC2 instance for both the cluster types.
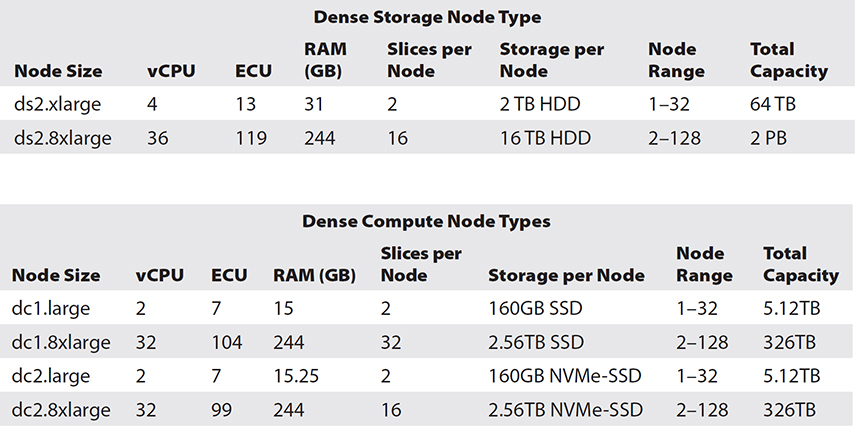
• vCPU is the number of virtual CPUs for each node.
• ECU is the number of Amazon EC2 compute units for each node.
• RAM is the amount of memory in gigabytes (GB) for each node.
• Slices per Node is the number of slices into which a compute node is partitioned.
• Storage per Node is the capacity and type of storage for each node.
• Node Range is the minimum and maximum number of nodes that Amazon Redshift supports for the node type and size.
Sizing Amazon Redshift Clusters
When you size an Amazon Redshift cluster, first you need to decide what type of cluster you need, dense storage or dense compute. Most of the time it depends on the business needs; if the business needs faster processing, you should go with dense compute. Then you need to decide how much data you have, including the predicted data growth. You may also want to consider compression. On average, customers get about a three to four times compression ratio. Since the compression ratio depends on the data set, you should check with your data set to see how much compression you are getting and then size accordingly.
Since the data mirroring is already included, you don’t have to account for additional storage for mirroring. For example, say you have a 6TB data warehouse and you want to run that in dense compute storage. In this case, you can select three nodes of dc1.8xlarge. The capacity of each storage node is 2.56TB; therefore, with three of these nodes, you can store up to 7.68TB of data. Thus, your 6TB data warehouse is easily going to fit in the three compute nodes. The data will be mirrored as well within the three nodes, and you don’t have to worry about additional storage for mirroring.
Networking for Amazon Redshift
An Amazon Redshift cluster can be run inside a VPC. If you are running a cluster using EC2-Classic (legacy), then it won’t be using the VPC. A VPC is mandatory for all new cluster installations, and by using a VPC, the cluster remains isolated from other customers. You can choose a cluster subnet group (a cluster subnet group consists of one or more subnets in which Amazon Redshift can launch a cluster) for a Redshift cluster, which can be either in the private subnet or in the public subnet. You can also choose which AZ the cluster will be created in. When you choose it in the public subnet, you can either provide your own public IP address (which is EIP) or have the Redshift cluster provide an EIP for you. When you run the cluster in a private subnet, it is not accessible from the Internet. This public or private subnet is applicable only for the leader node. The compute node is created in a separate VPC, and you don’t have any access to it.
A Redshift cluster provides an option called enhanced VPC routing. If you choose to use it, then all the traffic for commands such as COPY unload between your cluster and your data repositories are routed through your Amazon VPC. You can also use the VPC features to manage the flow of data between your Amazon Redshift cluster and other resources. If you don’t choose that option, Amazon Redshift routes traffic through the Internet, including traffic to other services within the AWS network.
To recap, when you launch a Redshift cluster, either the EC2-VPC platform is available or the EC2-classic platform is available. (EC2-classic is available to certain AWS accounts, depending on the date the account was created.) You must use the EC2-VPC platform unless you need to continue using the EC2-classic platform that is available to you. You can access only the leader node. When running in EC-VPC, you can use the VPC security group to define which IP address can connect to the port in the Redshift cluster.
Encryption
Optionally you can choose to encrypt all the data running in your Redshift cluster. Encryption is not mandatory, and you should choose this option only if you have a business need. If you are going to keep sensitive data in your Redshift cluster, you must encrypt the data. You can encrypt the data both in transit and at rest. When you launch the cluster, you can enable encryption for a cluster. If the encryption is enabled in a cluster, it becomes immutable, which means you can’t disable it. Similarly, if you launch a cluster without encryption, the data remains unencrypted during the life of the cluster. If at a later phase you decide to encrypt the data, then the only way is to unload your data from the existing cluster and reload it in a new cluster with the encryption setting.
You can use SSL to encrypt the connection between a client and the cluster. For the data at rest, Redshift uses AES-256 hardware-accelerated encryption keys to encrypt the data blocks and system metadata for the cluster. You can manage the encryption using the AWS KMS, using the AWS CloudHSM, or using your on-premise HSM.
All Redshift cluster communications are secured by default. Redshift always uses SSL to access other AWS services (S3, DynamoDB, EMR for data load).
Security
Since Redshift is an RDBMS, just like with any other relational database, you need to create database users who will have superuser or user permissions with them. A database superuser can create a database user or another superuser. A database user can create database objects in Redshift depending on your privileges. In Redshift, a database contains one or more than one schema, and each schema in turn contains tables and other objects. The default name of a schema in a Redshift database is Public. When you create the Redshift cluster for the first time, you need to provide a master username and password for the database. This master username is the superuser in which you log in to the database. You should never delete the master user account.
To use the Redshift service, you can create IAM policies on IAM users, roles, or groups. You can use the managed policies Redshift has to grant either administrative access or read-only access to this service, or you can create your own custom policy to provide fine granular permission.
Back Up and Restore
Amazon Redshift takes automatic backups in the form of snapshots of your cluster and saves them to Amazon S3. Snapshots are incremental. The frequency of the snapshot is eight hours or 5GB of block changes. You can turn off the automated backups. Automation is available to ensure snapshots are taken to meet your recovery point objective (RPO). You can define the retention period for the automated snapshots. You can also take a manual snapshot of the cluster that can be kept as long as you want. In addition, you can configure cross-region snapshots, and by doing so, the snapshots can be automatically replicated to an alternate region. If you want to restore the Redshift cluster to a different region, the quickest way would be to enable a cross-region snapshot and restore the cluster from the snapshot.
You can restore the entire database from a snapshot. When you restore the entire database from a snapshot, it results in a new cluster of the original size and instance type. During the restore, your cluster is provisioned in about ten minutes. Data is automatically streamed from the S3 snapshot. You can also do a table-level restore from a snapshot.
Data Loading in Amazon Redshift
There can be various ways in which the data can be loaded in an Amazon Redshift cluster. You can load the data directly from Amazon S3, which is called file-based loading. File-based loading is the most efficient and high-performance way to load Redshift. You can load data from CSV, JSON, and AVRO files on S3.
You can load streaming data or batch data directly to Redshift using Kinesis Firehose. In addition, you can connect to the database and insert data, including doing a multivalue insert.
You can load the data either via the leader node or directly from the compute nodes. It depends on how you are going to load the data. For example, if you are going to insert the data, insert multiple values, update the data, or delete the data, you can do it by using a client from the leader node. Since Redshift supports SQL commands, you can use basic SQL statements to insert records into the table (for example, to insert into table <table_name> values), and so on. If you want to use Redshift-specific tools for loading or unloading the data or, for example, use the COPY or UNLOAD command to export the data, you can do it directly from the compute nodes. If you run CTAS (create table as select), you can run it from the compute node. The compute node also supports loading the data from Dynamo DB, from EMR, and via SSH commands.
The COPY command is the recommended method to load data into Amazon Redshift since it can be used to load the data in bulk. It appends new data to existing rows in the table.

The mandatory parameters are table name, data source, and credentials. Other parameters you can specify are compression, encryption, transformation, error handling, date format, and so on.
While loading the data using the COPY command, you should use multiple input files to maximize throughput and load data in parallel. Since each slice loads one file at a time, if you use a single input file, then only one slice will ingest data. Depending on the size of the cluster, you will have a specific number of slices. If your cluster has 16 slices, you can have 16 input files and thus can have slices working in parallel so that you can maximize the throughput.
The UNLOAD command is the reverse of COPY. You can export the data out of the Redshift cluster via the UNLOAD command. It can write output only to S3. It can run in parallel on all compute nodes. This command can generate more than one file per slice for all compute nodes. The UNLOAD command supports encryption and compression.
In addition to loading and unloading the data, you need to perform some additional maintenance tasks on a regular basis. One of the tasks you would be doing often is running the command VACUUM. Whenever you load the data in the Redshift cluster using the COPY command, you need to reorganize the data and reclaim the space after the deletion. The VACUUM command take cares of that, so ideally after every COPY command, you should run the VACUUM command as well. Whenever you load new data to the Redshift cluster, it is important to update the statistics so that the optimizer can create a correct execution plan for running the query. You can run the ANALYZE command to update the statistics. Run the ANALYZE command whenever you’ve made a nontrivial number of changes to your data to ensure your table statistics are current.
Data Distribution in Amazon Redshift
In Amazon Redshift, you have three options to distribute data among the nodes in your cluster: EVEN, KEY, and ALL.
With the KEY distribution style, the slice is chosen based on a distribution key that is a hash of the defined column.
The ALL distribution style distributes a copy of the entire table to the first slice on each node. Though the ALL distribution helps to optimize joins, it increases the amount of storage. This means that operations such as LOAD, UPDATE, and INSERT can run slower than with the other distribution styles. The ALL distribution style can be a good choice for smaller dimension tables that are frequently joined with large fact tables in the center of your star schemas and for tables that you don’t need to update frequently. Table data is placed on slice 0 of each compute node.
Use the EVEN distribution style when there is no clear choice between the KEY and ALL distribution styles. It is also recommended for small dimension tables, tables without JOIN or GROUP BY clauses, and tables that are not used in aggregate queries. Data is evenly distributed across all slices using a round-robin distribution. Figure 8-16 shows each of the three data distribution options.
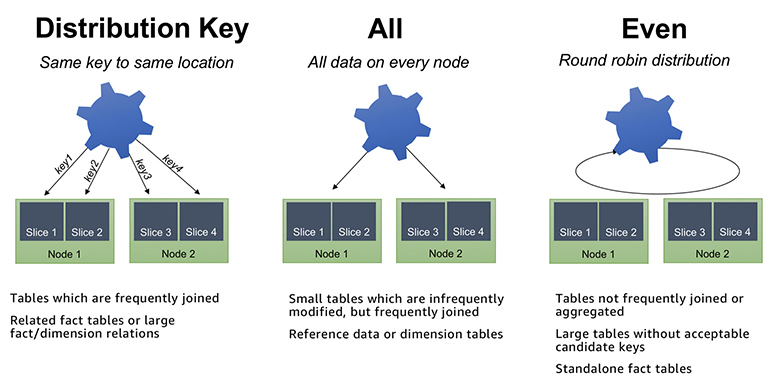
Figure 8-16 Data distribution in Amazon Redshift
When you create a table, you can define one or more of its columns as sort keys. When data is initially loaded into the empty table, the rows are stored on disk in sorted order. Information about sort key columns is passed to the query planner, and the planner uses this information to construct plans that exploit the way the data is sorted. It is used like an index for a given set of columns. It is implemented via zone maps, stored in each block header. It increases the performance of MERGE JOIN because of a much faster sort.
Amazon DynamoDB
Amazon DynamoDB is a fully managed NoSQL database service that provides fast and predictable performance with seamless scalability. NoSQL is a term used to describe high-performance, nonrelational databases. NoSQL databases use a variety of data models, including graphs, key-value pairs, and JSON documents. NoSQL databases are widely recognized for ease of development, scalable performance, high availability, and resilience.
Amazon DynamoDB supports both document and key-value data structures, giving you the flexibility to design the best architecture that is optimal for your application. Average service-side latencies are typically in single-digit milliseconds. A key-value store provides support for storing, querying, and updating collections of objects that are identified using a key and values that contain the actual content being stored, and a document store provides support for storing, querying, and updating items in a document format such as JSON, XML, and HTML.
Amazon DynamoDB is a fully managed cloud NoSQL database service. You simply create a database table, set your throughput, and let the service handle the rest. When creating a table, simply specify how much request capacity is required for the application. If your throughput requirements change, simply update your table’s request capacity using the AWS Management Console or the Amazon DynamoDB APIs. Amazon DynamoDB manages all the scaling behind the scenes, and you are still able to achieve your prior throughput levels while scaling is underway.
These are some common use cases for DynamoDB. It can be used in advertising for capturing browser cookie state, in mobile applications for storing application data and session state, in gaming applications for storing user preferences and application state and for storing players’ game state, in consumer “voting” applications for reality TV contests, in Super Bowl commercials, in large-scale websites for keeping session state or for personalization or access control, in application monitoring for storing application log and event data or JSON data, and in Internet of Things devices for storing sensor data and log ingestion.
Benefits of Amazon DynamoDB
These are the benefits of Amazon DynamoDB:
• Scalable NoSQL databases are designed for scale, but their architectures are sophisticated, and there can be significant operational overhead in running a large NoSQL cluster. DynamoDB is scalable and can automatically scale up and down depending on your application request. Since it is integrated with Auto Scaling, Amazon take cares of scaling up or down as per throughput consumption monitored via CloudWatch alarms. Auto Scaling take cares of increasing or decreasing the throughput as per the application behavior.
• Managed service Since this is a totally managed service, the complexity of running a massively scalable, distributed NoSQL database is managed by Amazon, allowing software developers to focus on building applications rather than managing infrastructure. Amazon take cares of all the heavy lifting behind the scenes such as hardware or software provisioning, software patching, firmware updates, database management, or partitioning data over multiple instances as you scale. DynamoDB also provides point-in-time recovery, backup, and restore for all your tables.
• Fast, consistent performance Since DynamoDB uses SSD technologies behind the scenes, the average service-side latencies are typically in single-digit milliseconds. As your data volumes grow, DynamoDB automatically partitions your data to meet your throughput requirements and deliver low latencies at any scale.
• Fine-grained access control DynamoDB is integrated with AWS Identity and Access Management (IAM), where you can provide fine-grained access control to all the users in your organization.
• Cost-effective DynamoDB is cost-effective. With DynamoDB, you pay for the storage you are consuming and the IO throughput you have provisioned. When the storage and throughput requirements of an application are low, only a small amount of capacity needs to be provisioned in the DynamoDB service. As the number of users of an application grows and the required IO throughput increases, additional capacity can be provisioned on the fly, and you need to pay only for what you have provisioned.
• Integration with other AWS services Amazon DynamoDB is integrated with AWS Lambda so that you can create triggers. With triggers, you can build applications that react to data modifications in DynamoDB tables. Similarly, Amazon DynamoDB can take care of automatically scaling up or down your DynamoDB tables depending on the application usage.
Amazon DynamoDB Terminology
Tables are the fundamental construct for organizing and storing data in DynamoDB. A table consists of items just like a table in a relational database is a collection of rows. Each table can have an infinite number of data items. An item is composed of a primary key that uniquely identifies it and key-value pairs called attributes. Amazon DynamoDB is schemaless, in that the data items in a table need not have the same attributes or even the same number of attributes. Each table must have a primary key. While an item is similar to a row in an RDBMS table, all the items in the same DynamoDB table need not share the same set of attributes in the way that all rows in a relational table share the same columns. The primary key can be a single attribute key or a “composite” attribute key that combines two attributes. The attributes you designate as a primary key must exist for every item as primary keys uniquely identify each item within the table. There is no concept of a column in a DynamoDB table. Each item in the table can be expressed as a tuple containing an arbitrary number of elements, up to a maximum size of 400KB. This data model is well suited for storing data in the formats commonly used for object serialization and messaging in distributed systems.
• Item An item is composed of a primary or composite key and a flexible number of attributes. There is no explicit limitation on the number of attributes associated with an individual item, but the aggregate size of an item, including all the attribute names and attribute values, cannot exceed 400KB.
• Attribute Each attribute associated with a data item is composed of an attribute name (for example, Name) and a value or set of values (for example, Tim or Jack, Bill, Harry). Individual attributes have no explicit size limit, but the total value of an item (including all attribute names and values) cannot exceed 400KB.
Tables and items are created, updated, and deleted through the DynamoDB API. There is no concept of a standard DML language like there is in the relational database world. Manipulation of data in DynamoDB is done programmatically through object-oriented code. It is possible to query data in a DynamoDB table, but this too is done programmatically through the API. Because there is no generic query language like SQL, it’s important to understand your application’s data access patterns well to make the most effective use of DynamoDB.
DynamoDB supports four scalar data types: Number, String, Binary, and Boolean. A scalar type represents exactly one value. DynamoDB also supports NULL values. Additionally, DynamoDB supports these collection data types: Number Set, String Set, Binary Set, heterogeneous List, and heterogeneous Map.
When you create a table, you must specify the primary key of the table. A primary key is a key in a relational database that is unique for each record. The primary key uniquely identifies each item in the table so that no two items can have the same key.
DynamoDB supports two different kinds of primary keys.
• Partition key This is also known as a simple primary key. It consists of one attribute known as the partition key. The partition key of an item is also known as its hash attribute. The term hash attribute derives from the use of an internal hash function in DynamoDB that evenly distributes data items across partitions, based on their partition key values. In a table that has only a partition key, no two items can have the same partition key value.
• Partition key and sort key This is also known as a composite primary key. This type of key is composed of two attributes. The first attribute is the partition key, and the second attribute is the sort key. All items with the same partition key are stored together, in sorted order by sort key value. The sort key of an item is also known as its range attribute. The term range attribute derives from the way DynamoDB stores items with the same partition key physically close together, in sorted order by the sort key value. In a table that has a partition key and a sort key, it’s possible for two items to have the same partition key value. However, those two items must have different sort key values.
A primary key can be either a single-attribute partition key or a composite partition-sort key. A composite partition-sort key is indexed as a partition key element and a sort key element. This multipart key maintains a hierarchy between the first and second element values.
Each primary key attribute must be a scalar. The only data types allowed for primary key attributes are string, number, or binary. There are no such restrictions for other, nonkey attributes.
When you create a table, the items for a table are stored across several partitions. DynamoDB looks at the partition key to figure out which item needs to be stored at which partition. All the items with the same partition key are stored in the same partition. During the table creation, you need to provide the table’s desired read and write capacity. Amazon DynamoDB configures the table’s partition based on that information. A unit of write capacity enables you to perform one write per second for items of up to 1KB in size. Similarly, a unit of read capacity enables you to perform one strongly consistent read per second (or two eventually consistent reads per second) of items up to 4KB in size. Larger items will require more capacity. You can calculate the number of units of read and write capacity you need by estimating the number of reads or writes you need to do per second and multiplying by the size of your items.
• Units of capacity required for writes = Number of item writes per second × Item size in 1KB blocks
• Units of capacity required for reads = Number of item reads per second × Item size in 4KB blocks
Global Secondary Index
Global secondary indexes are indexes that contain a partition or partition-sort keys that can be different from the table’s primary key. For efficient access to data in a table, Amazon DynamoDB creates and maintains indexes for the primary key attributes. This allows applications to quickly retrieve data by specifying primary key values. However, many applications might benefit from having one or more secondary (or alternate) keys available to allow efficient access to data with attributes other than the primary key. To address this, you can create one or more secondary indexes on a table and issue query requests against these indexes.
Amazon DynamoDB supports two types of secondary indexes.
• A local secondary index is an index that has the same partition key as the table but a different sort key. A local secondary index is “local” in the sense that every partition of a local secondary index is scoped to a table partition that has the same partition key.
• A global secondary index is an index with a partition or a partition-sort key that can be different from those on the table. A global secondary index is considered global because queries on the index can span all items in a table, across all partitions.
Consistency Model
Amazon DynamoDB stores three geographically distributed replicas of each table to enable high availability and data durability. Read consistency represents the manner and timing in which the successful write or update of a data item is reflected in a subsequent read operation of that same item. DynamoDB exposes logic that enables you to specify the consistency characteristics you desire for each read request within your application. Amazon DynamoDB supports two consistency models. When reading data from Amazon DynamoDB, users can specify whether they want the read to be eventually consistent or strongly consistent.
• Eventually consistent reads This is the default behavior. The eventual consistency option maximizes your read throughput. However, an eventually consistent read might not reflect the results of a recently completed write. Consistency across all copies of data is usually reached within a second. Repeating a read after a short time should return the updated data.
• Strongly consistent reads In addition to eventual consistency, Amazon DynamoDB also gives you the flexibility and control to request a strongly consistent read if your application, or an element of your application, requires it. A strongly consistent read returns a result that reflects all writes that received a successful response prior to the read.
Global Table
Global tables build on Amazon DynamoDB’s global footprint to provide you with a fully managed, multiregion, and multimaster database that provides fast, local, read, and write performance for massively scaled, global applications. Global tables replicate your DynamoDB tables automatically across your choice of AWS regions. Global tables eliminate the difficult work of replicating data between regions and resolving update conflicts, enabling you to focus on your application’s business logic. In addition, global tables enable your applications to stay highly available even in the unlikely event of isolation or degradation of an entire region.
Global tables also ensure data redundancy across multiple regions and allow the database to stay available even in the event of a complete regional outage. Global tables provide cross-region replication, data access locality, and disaster recovery for business-critical database workloads. Applications can now perform low-latency reads and writes to DynamoDB around the world, with a time-ordered sequence of changes propagated efficiently to every AWS region where a table resides. With DynamoDB global tables, you get built-in support for multimaster writes, automatic resolution of concurrency conflicts, and CloudWatch monitoring. You simply select the regions where data should be replicated, and DynamoDB handles the rest.
Amazon DynamoDB Streams
Using the Amazon DynamoDB Streams APIs, developers can consume updates and receive the item-level data before and after items are changed. This can be used to build creative extensions to your applications on top of DynamoDB. For example, a developer building a global multiplayer game using DynamoDB can use the DynamoDB Streams APIs to build a multimaster topology and keep the masters in sync by consuming the DynamoDB Streams APIs for each master and replaying the updates in the remote masters. As another example, developers can use the DynamoDB Streams APIs to build mobile applications that automatically notify the mobile devices of all friends in a circle as soon as a user uploads a new selfie. Developers could also use DynamoDB Streams to keep data warehousing tools, such as Amazon Redshift, in sync with all changes to their DynamoDB table to enable real-time analytics. DynamoDB also integrates with ElasticSearch using the Amazon DynamoDB Logstash plug-in, thus enabling developers to add free-text search for DynamoDB content.
Amazon DynamoDB Accelerator
For even more performance, Amazon DynamoDB Accelerator (DAX) is a fully managed, highly available, in-memory cache for DynamoDB that delivers up to a ten times performance improvement—from milliseconds to microseconds—even at millions of requests per second. DAX does all the heavy lifting required to add in-memory acceleration to your DynamoDB tables, without requiring developers to manage cache invalidation, data population, or cluster management. Now you can focus on building great applications for your customers without worrying about performance at scale. You do not need to modify the application logic because DAX is compatible with existing DynamoDB API calls.
Encryption and Security
Amazon DynamoDB supports encryption at rest. It helps you secure your Amazon DynamoDB data by using AWS managed encryption keys stored in the AWS KMS. Encryption at rest is fully transparent to users, with all DynamoDB queries working seamlessly on encrypted data without the need to change the application code.
Amazon DynamoDB also offers VPC endpoints with which you can secure the access to DynamoDB. Amazon VPC endpoints for DynamoDB enable Amazon EC2 instances in your VPC to use their private IP addresses to access DynamoDB with no exposure to the public Internet.
Amazon ElastiCache
Amazon ElastiCache is a web service that makes it easy to deploy, operate, and scale an in-memory cache in the cloud. Amazon ElastiCache manages the work involved in setting up an in-memory service, from provisioning the AWS resources you request to installing the software. Using Amazon ElastiCache, you can add an in-memory caching layer to your application in a matter of minutes, with a few API calls. Amazon ElastiCache integrates with other Amazon web services such as Amazon Elastic Compute Cloud (Amazon EC2) and Amazon Relational Database Service (Amazon RDS), as well as deployment management solutions such as AWS CloudFormation, AWS Elastic Beanstalk, and AWS OpsWorks.
Since this is a managed service, you no longer need to perform management tasks such as hardware provisioning, software patching, setup, configuration, monitoring, failure recovery, and backups. ElastiCache continuously monitors your clusters to keep your workloads up and running so that you can focus on higher-value application development. Depending on your performance needs, it can scale out and scale in to meet the demands of your application. The memory scaling is supported with sharding. You can also create multiple replicas to provide the read scaling.
The in-memory caching provided by Amazon ElastiCache improves application performance by storing critical pieces of data in memory for fast access. You can use this caching to significantly improve latency and throughput for many read-heavy application workloads, such as social networking, gaming, media sharing, and Q&A portals. Cached information can include the results of database queries, computationally intensive calculations, or even remote API calls. In addition, compute-intensive workloads that manipulate data sets, such as recommendation engines and high-performance computing simulations, also benefit from an in-memory data layer. In these applications, large data sets must be accessed in real time across clusters of machines that can span hundreds of nodes. Manipulating this data in a disk-based store would be a significant bottleneck for these applications.
Amazon ElastiCache currently supports two different in-memory key-value engines. You can choose the engine you prefer when launching an ElastiCache cache cluster.
• Memcached This is a widely adopted in-memory key store and historically the gold standard of web caching. ElastiCache is protocol-compliant with Memcached, so popular tools that you use today with existing Memcached environments will work seamlessly with the service. Memcached is also multithreaded, meaning it makes good use of larger Amazon EC2 instance sizes with multiple cores.
• Redis This is an increasingly popular open source key-value store that supports more advanced data structures such as sorted sets, hashes, and lists. Unlike Memcached, Redis has disk persistence built in, meaning you can use it for long-lived data. Redis also supports replication, which can be used to achieve multi-AZ redundancy, similar to Amazon RDS.
Although both Memcached and Redis appear similar on the surface, in that they are both in-memory key stores, they are actually quite different in practice. Because of the replication and persistence features of Redis, ElastiCache manages Redis more as a relational database. Redis ElastiCache clusters are managed as stateful entities that include failover, similar to how Amazon RDS manages database failover.
When you deploy an ElastiCache Memcached cluster, it sits in your application as a separate tier alongside your database. Amazon ElastiCache does not directly communicate with your database tier or indeed have any particular knowledge of your database. You can begin with a single ElastiCache node to test your application and then scale to additional cluster nodes by modifying the ElastiCache cluster. As you add cache nodes, the EC2 application instances are able to distribute cache keys across multiple ElastiCache nodes. When you launch an ElastiCache cluster, you can choose the availability zones that the cluster lives in. For best performance, you should configure your cluster to use the same availability zones as your application servers. To launch an ElastiCache cluster in a specific availability zone, make sure to specify the Preferred Zone(s) option during cache cluster creation. The availability zones that you specify will be where ElastiCache will launch your cache nodes.
Figure 8-17 shows the architecture of an ElastiCache deployment in a multi-AZ deployment with RDS engines. Similarly, you can deploy ElastiCache with DynamoDB as well. The combination of DynamoDB and ElastiCache is popular with mobile and game companies because DynamoDB allows for higher write throughput at a lower cost than traditional relational databases.
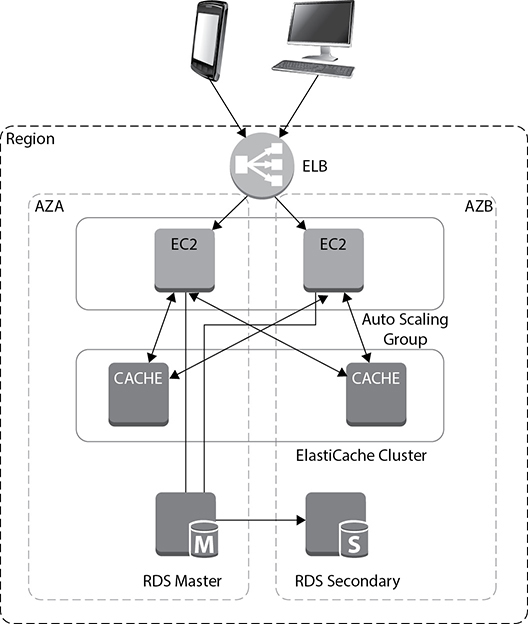
Figure 8-17 Amazon ElastiCache deployment on RDS with multi-AZ
Lab 8-1: RDS: Creating an Amazon Aurora Database
In this lab, you will log in to the AWS console, spin off an Amazon Aurora database, and then connect to it.
1. Log in to the AWS Console, choose your region, and select RDS.
2. From the RDS main page or dashboard, click Launch a DB instance. Select Amazon Aurora and choose MySQL 5.6 compatible.
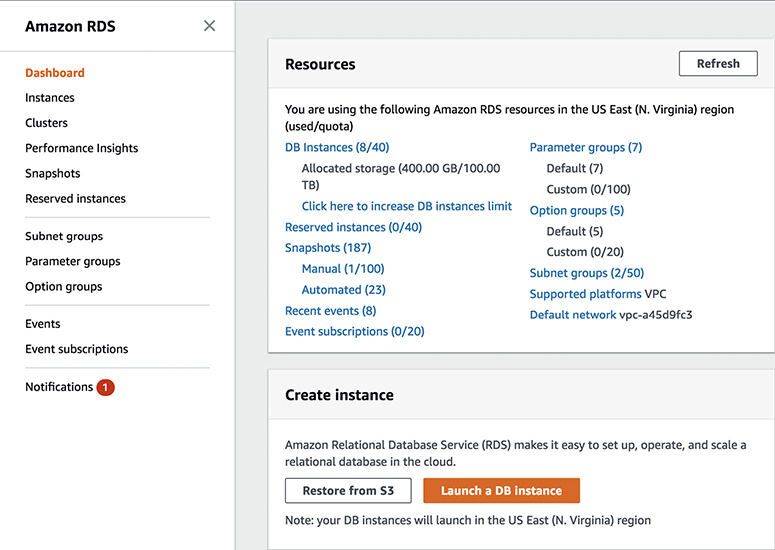
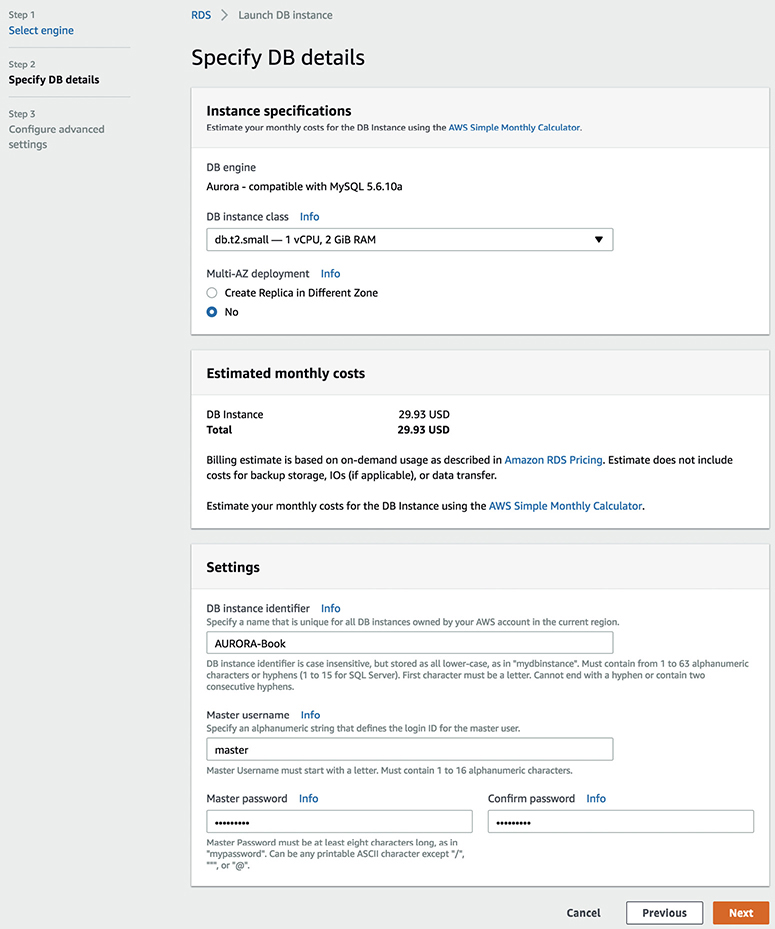
3. On the Specify DB Details screen, shown next, set the following:
a. DB Instance Class: db.t2.small 1 vCPU, 2 GiB RAM
b. Multi-AZ Deployment: No
c. DB Instance Identifier: AURORA-Book
d. Master Username: master
e. Master Password: master123
f. Confirm Password: master123
g. Click Next to go to the next screen.

4. On the Configure Advanced Settings screen, set the following:
a. VPC: Default VPC
b. Subnet Group: Choose the default
c. Publicly Accessible: Yes
d. Availability Zone: No Preference
e. VPC Security Group(s): Create New Security Group
f. DB Cluster Identifier: AuroraBook
g. Database Name: AuroraDB
h. Database Port: 3306
i. DB Parameter Group: default.aurora5.6
j. DB Cluster Parameter Group: default.aurora5.6
k. Option Group: default.aurora-5-6
l. Enable Encryption: No
m. Please keep the default options for the rest.
5. Click Launch DB Instance.
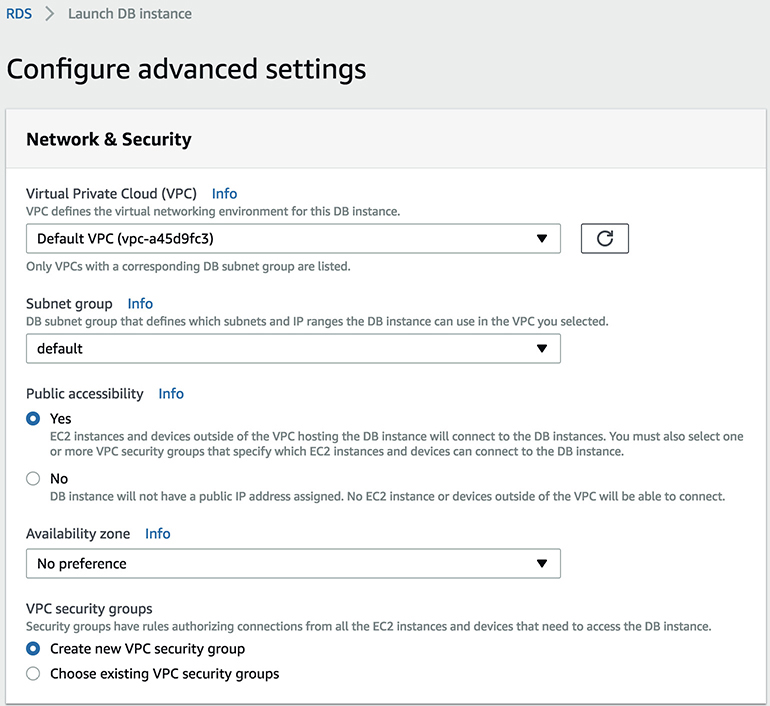
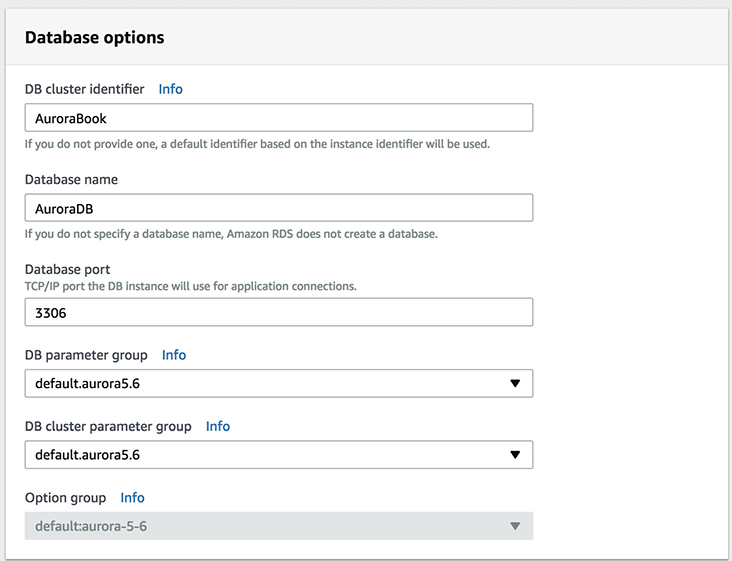
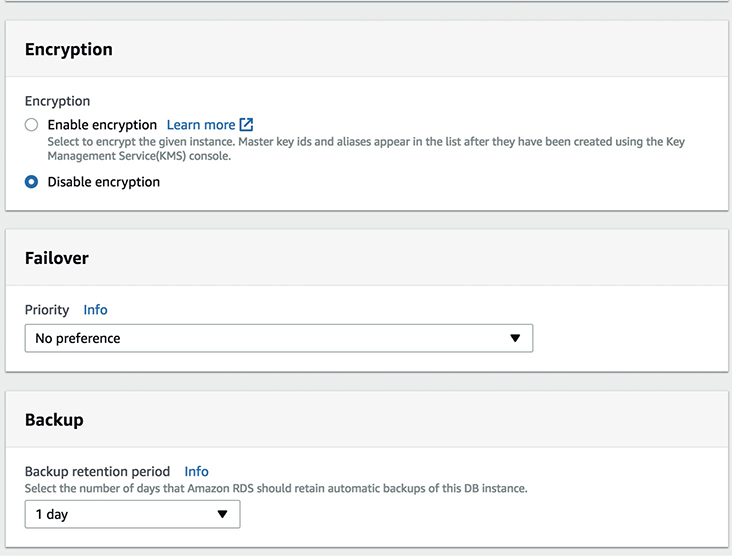
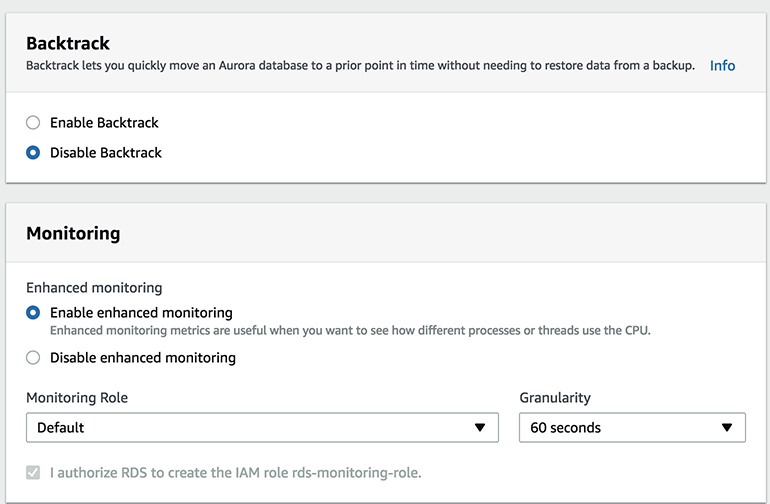
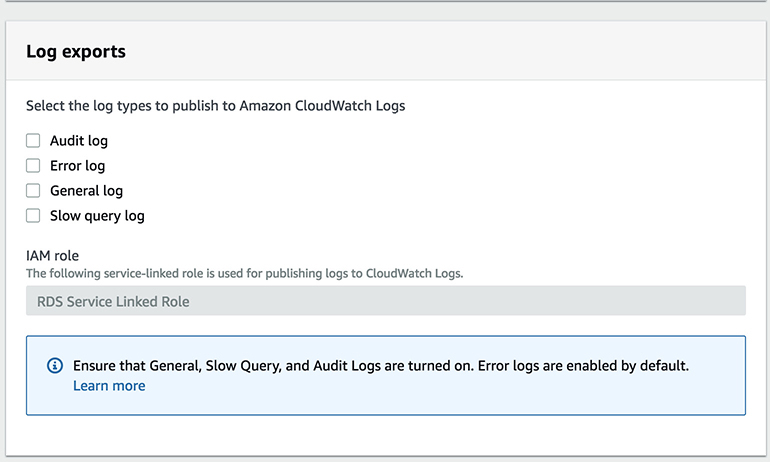
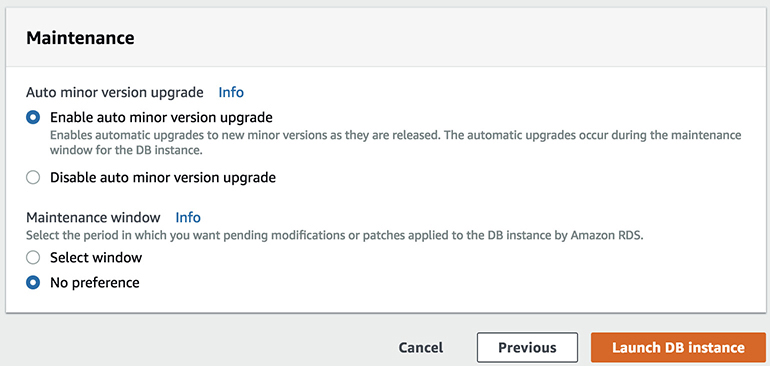
6. You will get the message “Your DB Instance is being created.” Click View Your DB Instance.

7. You will notice that when the instance is in the process of getting created, the status will show Created, and when the instance is ready, it will show Available.
8. Expand the newly created database. It will show you the details for the instance. You will notice a unique cluster endpoint. You are going to use this endpoint for connecting to the database. The endpoint for the Aurora instance in this example is aurora-book.cluster-cnibitmu8dv8.us-east-1.rds.amazonaws.com:3306.

9. Download the mysqlworkbench tool from https://dev.mysql.com/downloads/workbench/ and install it on your machine.
10. Install and launch mysqlworkbench from your local machine. Click the + sign to create a new connection and enter all the details for the database. For the host, put the database endpoint excluding the port since the next prompt is for the port. Thus, the host will be similar to aurora-book.cluster-cnibitmu8dv8 .us-east-1.rds.amazonaws.com. For the port, enter 3306, and for the username, put master. Enter the password in the keychain as master123.
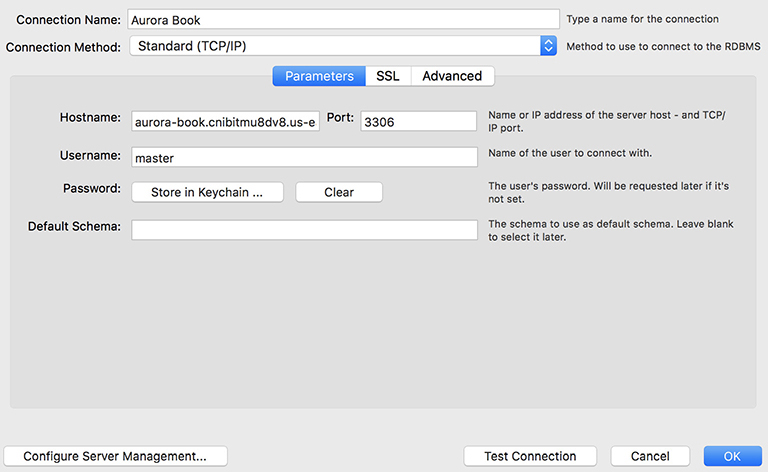
11. Once you are able to connect, you will see a success screen saying the connection to the database is successful.
Lab 8-2: Taking a Snapshot of a Database
In this lab, you will take a snapshot of the database and use that snapshot to create a new instance.
1. Expand the newly created database (step 8 from Lab 8-1). Click the Instance Actions button, and select Take Snapshot.
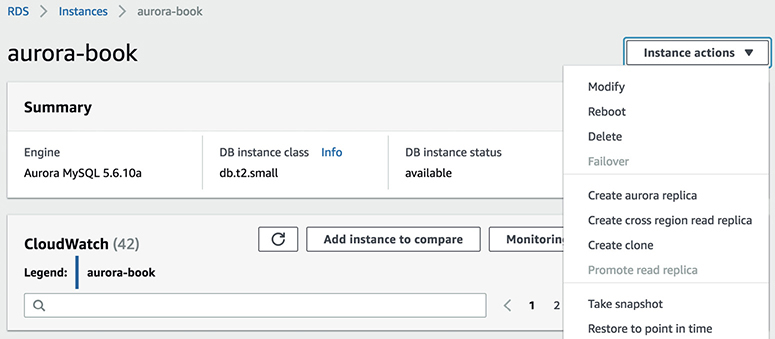
2. The system will prompt for the snapshot name. Enter AWSBOOK for the same and click Take Snapshot.
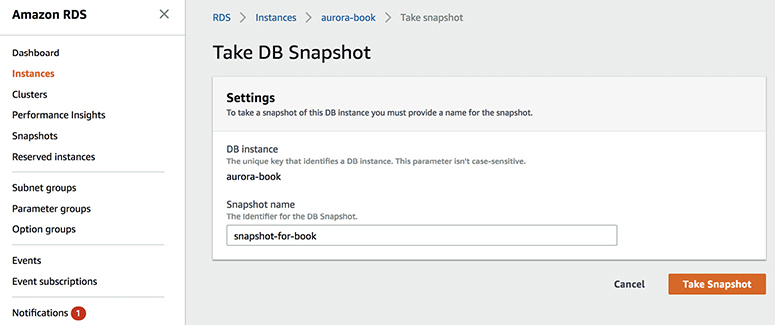
3. The console will start creating the snapshot. Once it is finished, you will be able to view it.
4. Now you will use this snapshot for restoring it and creating a new database. Select the snapshot and click Snapshot Actions; a pop-up will appear. Click Restore Snapshot.
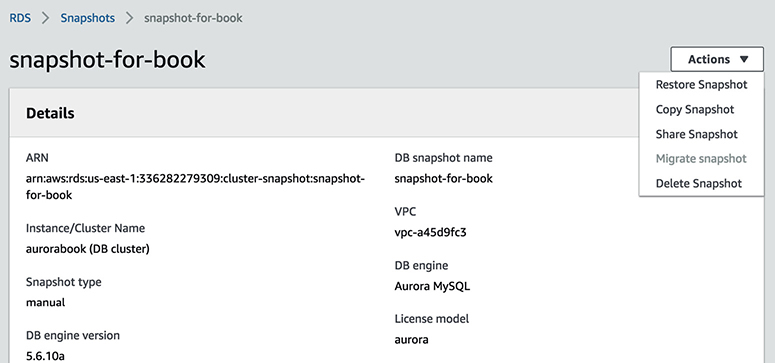
5. Now the system will ask you for details of the database as detailed in Lab 8-1, steps 3 and 5. Input all the details and click Restore DB.
Congrats, you have successfully restored a database from the snapshot!
Lab 8-3: Creating an Amazon Redshift Cluster
In this lab, you will create and launch an Amazon Redshift cluster. The goal is to get familiar with how to launch a cluster and networking involved while creating the cluster.
1. Log in to the AWS Console, choose your region, and select Redshift.
2. Click Launch Cluster.
3. On the Cluster Details screen, specify the following:
a. Cluster Identifier: testrs
b. Database Name: redshiftdb
c. Database Port: 5439
d. Master User Name: dbauser
e. Master User Password: set any password
f. Confirm Password: specify the same password again
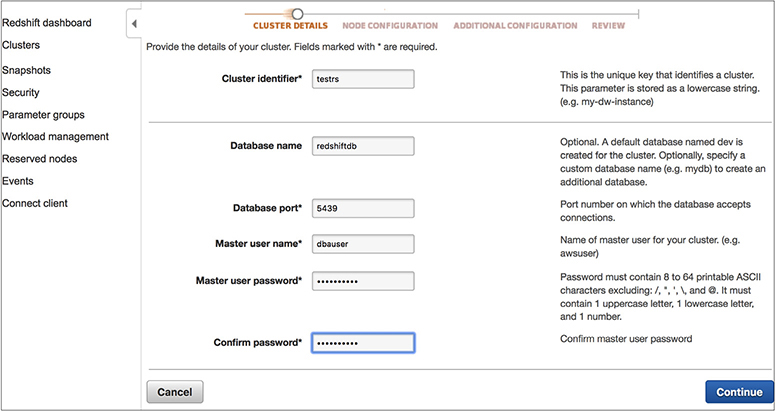
4. Click Continue.
5. On the Node Configuration screen, set the following:
a. Node Type: dc2.large. In this example, I have chosen dc2.large; you can select a different one if you’d like. Once you select a instance, the screen displays all the CPU, memory, and storage details associated with that instance.
b. For Cluster Type, choose Multi Node since you are creating a multinode cluster.
c. For Number Of Compute Nodes, use 2. The system displays the maximum and minimum compute nodes you can have.
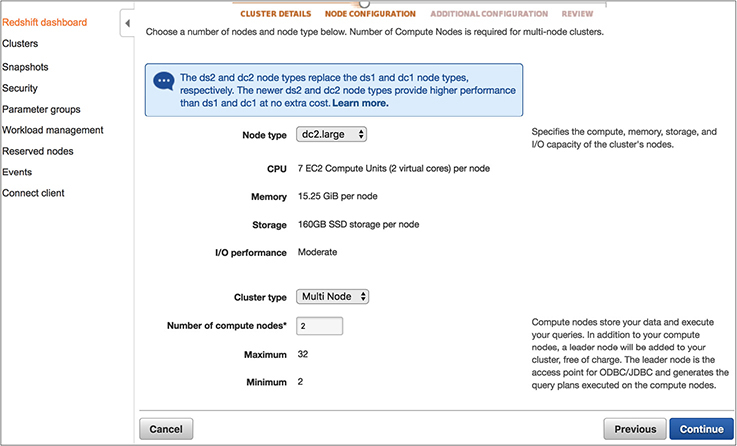
6. Click Continue.
7. In the Additional Configurations screen, set the following:
a. Encrypt Database: None
b. Choose A VPC: Default VPC
c. Cluster Subnet Group: leave the default
d. Publicly Accessible: Yes
e. Enhanced VPC Routing: No
f. Availability Zone: No Preference
g. VPC Security Groups: the default security group
h. Create CloudWatch Alarm: No
i. The IAM role is optional, so don’t select any role.
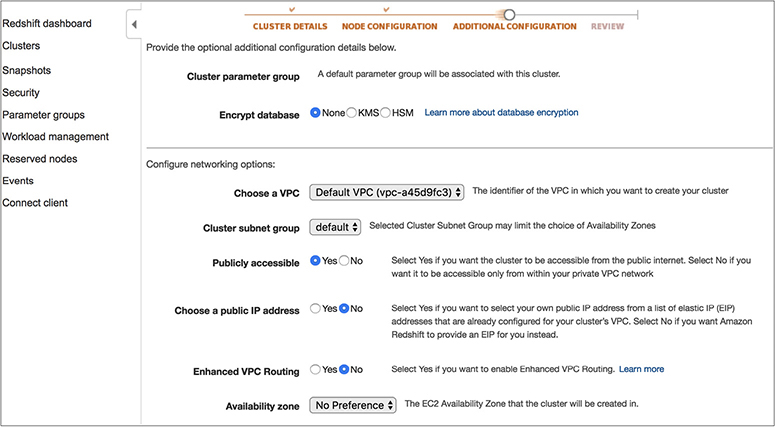
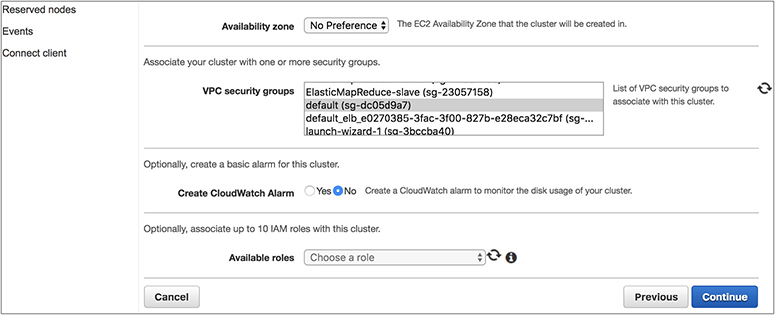
8. Click Continue.
9. The system displays all the options on the Review screen.
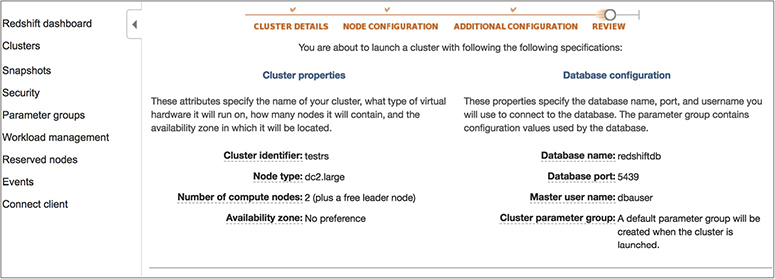
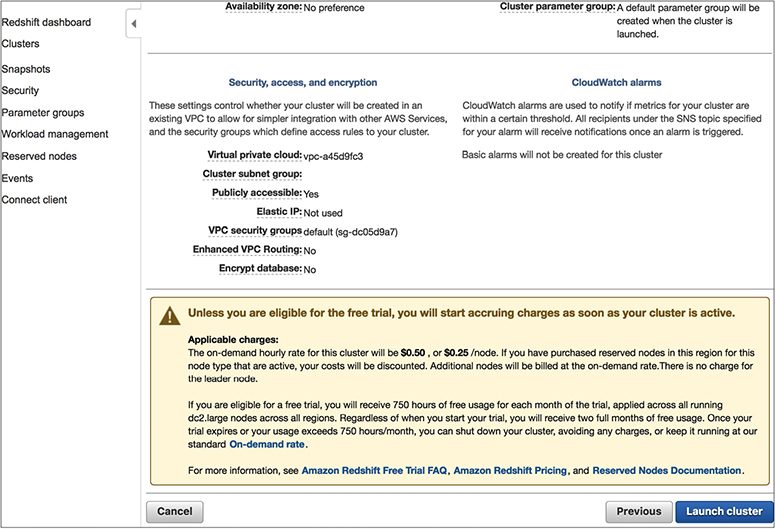
10. Click Launch Cluster to launch your cluster.
11. Congrats! You have launched the Redshift cluster. Now go to the dashboard and connect to it using a client.
Lab 8-4: Creating an Amazon DynamoDB Table
In this lab you will be creating an Amazon DynamoDB table. The goal is to get familiar with the table creation process.
1. Log in to the AWS Console, choose your region, and select DynamoDB.
2. Click Create Table.
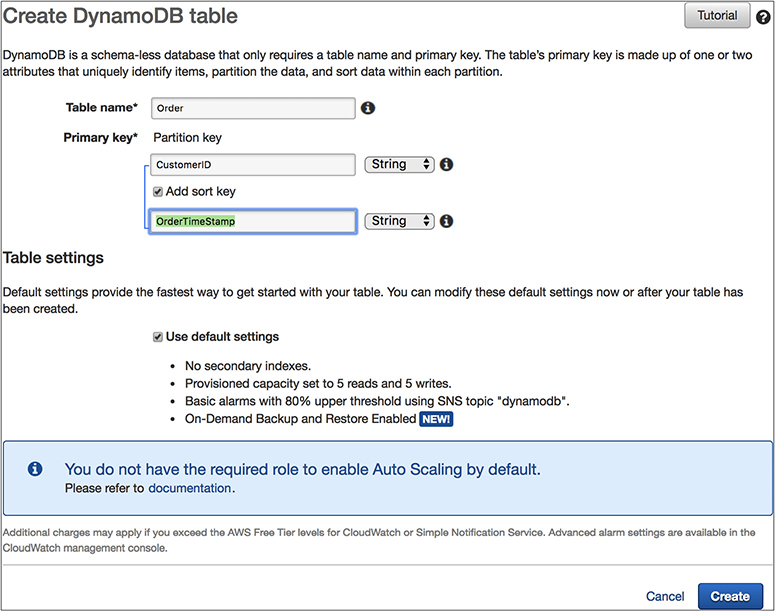
3. For Table Name, select Order.
4. For Primary Key, enter Customer ID.
5. Select the Add Sort Key box and enter OrderTimeStamp as the sort key.
6. Select Use Default Settings.
7. Click Create.
Congrats! You have created your first DynamoDB table.
8. Go to the dashboard and select the table.
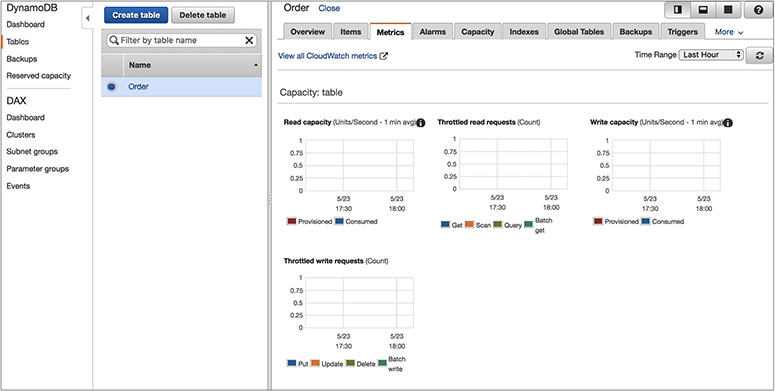
9. Look at all the options (Items, Metrics, Alarms, Capacity, Indexes, and so on) at the top.
Chapter Review
In this chapter, you learned about all the database offerings from Amazon.
Using the RDS service, you can host the following seven RDBMS engines:
• Aurora MySQL
• Aurora PostgreSQL
• Oracle
• SQL Server
• MySQL
• PostgreSQL
• MariaDB
For high availability, RDS allows you to deploy databases in multiple AZs. When you deploy a database in a multi-AZ architecture, you can choose which availability zone you want your primary database instance to be in. RDS will then choose to have a standby instance and storage in another availability zone. In the case of a multi-AZ architecture, the primary database, also known as the master database, handles all the traffic. The standby database is always kept ready and is in a state that whenever the master or primary goes down, it takes the role of the master or primary and supports the application.
When you host the database using RDS, AWS take cares of managing the database. From installation to maintenance of the database and from patching to upgrading, everything is taken care of by AWS. Even high availability and scalability are taken care of by AWS.
RDS allows the creation of read replica. Depending on the RDMBS engine, it can have up to 15 read replicas. This functionality is supported by MySQL, MariaDB, PostgreSQL, Aurora MySQL, and Aurora PostgreSQL.
Amazon Aurora is a cloud-optimized, MySQL- and PostgreSQL-compatible, relational database. It provides the performance and availability of commercial databases and the simplicity and cost effectiveness of open source databases. Amazon Aurora provides performance and durability by implementing a fully distributed and self-healing storage system, and it provides availability by using the elasticity and management capabilities of the AWS cloud in the most fundamental ways.
Amazon Redshift is the managed data warehouse solution offered by Amazon Web Services. A Redshift cluster consists of a leader node and compute nodes. There is only one leader node per cluster, whereas there could be several compute nodes in a cluster. The leader node acts as a SQL endpoint for the applications. It performs database functions and coordinates the parallel SQL processing. The compute node processes the actual data. All the compute nodes are connected via a high-speed interconnected network. A compute node is further divided or partitioned into multiple slices. A slice is allocated a portion of a node’s CPU, memory, and storage. Depending on the size of the compute node, a node can have more or fewer slices. The leader node distributes the job across multiple compute nodes. You can create a single node or multiple-node Redshift cluster.
Amazon DynamoDB is a fully managed NoSQL database service that provides fast and predictable performance with seamless scalability. Amazon DynamoDB supports both document and key-value data structures. A key-value store provides support for storing, querying, and updating collections of objects that are identified using a key and values that contain the actual content being stored, and a document store provides support for storing, querying, and updating items in a document format such as JSON, XML, and HTML.
Amazon ElastiCache is a web service that makes it easy to deploy, operate, and scale an in-memory cache in the cloud. Amazon ElastiCache currently supports two different in-memory key-value engines: Memcached and Redis. You can choose the engine you prefer when launching an ElastiCache cache cluster.
Questions
1. You are running your MySQL database in RDS. The database is critical for you, and you can’t afford to lose any data in the case of any kind of failure. What kind of architecture will you go with for RDS?
A. Create the RDS across multiple regions using a cross-regional read replica
B. Create the RDS across multiple AZs in master standby mode
C. Create the RDS and create multiple read replicas in multiple AZs with the same region
D. Create a multimaster RDS database across multiple AZs
2. Your application is I/O bound, and your application needs around 36,000 IOPS. The application you are running is critical for the business. How can you make sure the application always gets all the IOPS it requests and the database is highly available?
A. Install the database in EC2 using an EBS-optimized instance, and choose a I/O optimized instance class with an SSD-based hard drive
B. Install the database in RDS using SSD
C. Install the database in RDS in multi-AZ using Provisioned IOPS and select 36,000 IOPS
D. Install multiple copies of read replicas in RDS so all the workload gets distributed across multiple read replicas and you can cater to the I/O requirement
3. You have a legacy application that needs a file system in the database server to write application files. Where should you install the database?
A. You can achieve this using RDS because RDS has a file system in the database server
B. Install the database on an EC2 server to get full control
C. Install the database in RDS, mount an EFS from the RDS server, and give the EFS mount point to the application for writing the application files
D. Create the database using a multi-AZ architecture in RDS
4. You are running a MySQL database in RDS, and you have been tasked with creating a disaster recovery architecture. What approach is easiest for creating the DR instance in a different region?
A. Create an EC2 server in a different region and constantly replicate the database over there.
B. Create an RDS database in the other region and use third-party software to replicate the data across the database.
C. While installing the database, use multiple regions. This way, your database gets installed into multiple regions directly.
D. Use the cross-regional replication functionality of RDS. This will quickly spin off a read replica in a different region that can be used for disaster recovery.
5. If you encrypt a database running in RDS, what objects are going to be encrypted?
A. The entire database
B. The database backups and snapshot
C. The database log files
D. All of the above
6. Your company has just acquired a new company, and the number of users who are going to use the database will double. The database is running on Aurora. What things can you do to handle the additional users? (Choose two.)
A. Scale up the database vertically by choosing a bigger box
B. Use a combination of Aurora and EC2 to host the database
C. Create a few read replicas to handle the additional read-only traffic
D. Create the Aurora instance across multiple regions with a multimaster mode
7. Which RDS engine does not support read replicas?
A. MySQL
B. Aurora MySQL
C. PostgreSQL
D. Oracle
8. What are the various ways of securing a database running in RDS? (Choose two.)
A. Create the database in a private subnet
B. Encrypt the entire database
C. Create the database in multiple AZs
D. Change the IP address of the database every week
9. You’re running a mission-critical application, and you are hosting the database for that application in RDS. Your IT team needs to access all the critical OS metrics every five seconds. What approach would you choose?
A. Write a script to capture all the key metrics and schedule the script to run every five seconds using a cron job
B. Schedule a job every five seconds to capture the OS metrics
C. Use standard monitoring
D. Use advanced monitoring
10. Which of the following statements are true for Amazon Aurora? (Choose three.)
A. The storage is replicated at three different AZs.
B. The data is copied at six different places.
C. It uses a quorum-based system for reads and writes.
D. Aurora supports all the commercial databases.
11. Which of the following does Amazon DynamoDB support? (Choose two.)
A. Graph database
B. Key-value database
C. Document database
D. Relational database
12. I want to store JSON objects. Which database should I choose?
A. Amazon Aurora for MySQL
B. Oracle hosted on EC2
C. Amazon Aurora for PostgreSQL
D. Amazon DynamoDB
13. I have to run my analytics, and to optimize I want to store all the data in columnar format. Which database serves my need?
A. Amazon Aurora for MySQL
B. Amazon Redshift
C. Amazon DynamoDB
D. Amazon Aurora for Postgres
14. What are the two in-memory key-value engines that Amazon ElastiCache supports? (Choose two.)
A. Memcached
B. Redis
C. MySQL
D. SQL Server
15. You want to launch a copy of a Redshift cluster to a different region. What is the easiest way to do this?
A. Create a cluster manually in a different region and load all the data
B. Extend the existing cluster to a different region
C. Use third-party software like Golden Gate to replicate the data
D. Enable a cross-region snapshot and restore the database from the snapshot to a different region
Answers
1. B. If you use a cross-regional replica and a read replica within the same region, the data replication happens asynchronously, so there is a chance of data loss. Multimaster is not supported in RDS. By creating the master and standby architecture, the data replication happens synchronously, so there is zero data loss.
2. C. You can choose to install the database in EC2, but if you can get all the same benefits by installing the database in RDS, then why not? If you install the database in SSD, you don’t know if you can meet the 36,000 IOPS requirement. A read replica is going to take care of the read-only workload. The requirement does not say the division of read and write IO between 36,000 IOPS.
3. B. In this example, you need access to the operating system, and RDS does not give you access to the OS. You must install the database in an EC2 server to get complete control.
4. D. You can achieve this by creating an EC2 server in a different region and replicating, but when your primary site is running on RDS, why not use RDS for the secondary site as well? You can use third-party software for replication, but when the functionality exists out of the box in RDS, why pay extra to any third party? You can’t install a database using multiple regions out of the box.
5. D. When you encrypted a database, everything gets encrypted including the database, backups, logs, read replicas, snapshot, and so on.
6. A, C. You can’t host Aurora on a EC2 server. Multimaster is not supported in Aurora.
7. D. Only RDS Oracle does not support read replicas; the rest of the engines do support it.
8. A, B. Creating the database in multiple AZs is going to provide high availability and has nothing to do with security. Changing the IP address every week will be a painful activity and still won’t secure the database if you don’t encrypt it.
9. D. In RDS, you don’t have access to OS, so you can’t run a cron job. You can’t capture the OS metrics by running a database job. Standard monitoring provides metrics for one minute.
10. A, B, C. Amazon Aurora supports only MySQL and PostgreSQL. It does not support commercial databases.
11. B, C. Amazon DynamoDB supports key-value and document structures. It is not a relational database. It does not support graph databases.
12. D. A JSON object needs to be stored in a NoSQL database. Amazon Aurora for MySQL and PostgreSQL and Oracle are relational databases.
13. B. Amazon Redshift stores all the data in columnar format. Amazon Aurora for MySQL and PostgreSQL store the database in row format, and Amazon DynamoDB is a NoSQL database.
14. A, B. MySQL and SQL Server are relational databases and not in-memory engines.
15. D. Loading the data manually will be too much work. You can’t extend the cluster to a different region. A Redshift cluster is specific to a particular AZ. It can’t go beyond an AZ as of writing this book. Using Golden Gate is going to cost a lot, and there is no need for it when there is an easy solution available.
