
Home Canning to Preserve Food
Five Things You Can Do Now
- Determine what types of food you would like to preserve through home canning.
- Purchase a Ball Blue Book: Guide to Preserving.
- Collect canning jars at thrift shops.
- Purchase a boiling bath canner or steam canner and other canning tools.
- Locate local farmers’ markets and farms where you can purchase fruits for canning.
Food can be preserved at home in a variety of ways, the characteristics of a particular food determining the best method. It will also depend on climate and storage conditions as well as space and equipment. A combination of several methods is usually best. Table 29.1 gives comparisons of the relative costs, energy needs, effort, time required, and vulnerability during a crisis.
Table 29.1
|
|||||
|
Method |
Cost |
Energy |
Effort |
Time |
Vulnerability |
|
Cold Storage |
Low |
Low |
Moderate |
Low |
Moderate |
|
Canning |
Moderate |
Moderate |
High |
Moderate |
Moderate |
|
Freezing |
High |
High |
Moderate |
Moderate |
High |
|
Dehydrating |
Moderate |
Moderate |
Moderate |
High |
Low |
|
Pickling |
Moderate |
Low |
Moderate |
High |
Moderate |
|
Smoking |
Moderate |
Low |
Moderate |
Moderate |
Moderate |
This chapter gives you an overview of canning and a list of the equipment and supplies needed. Each of the references at the end of this chapter will give you detailed information necessary to safely can a large variety of foods at home. Subsequent chapters provide an overview of other preservation methods.
Home canning is the most common way to preserve food at home. It’s inexpensive whether you are canning produce you have grown or animals you raise, hunt, or fish, and it requires a moderate amount of labor and skill.
Home Canned Products
Whole Fruits and Vegetables
Canning is an excellent method for preserving fruits and vegetables that are normally thoroughly cooked. It is ideal for preserving whole fruits, like peaches, pears, apples, cherries, plums, figs, and berries. Vegetables suited for canning are tomatoes, asparagus, green beans, lima beans, beets, carrots, corn, peas, potatoes, pumpkin, and winter spinach.
Jellies, Jams, and Preserves
Fruit that is too large, too small, or irregularly shaped can be made into jellies, jams, preserves, conserves, and marmalades that add delicious variety to your diet.
Proper amounts of pectin and acid are necessary to make jellied fruit products. Some fruits, such as apples and plums, are high in natural pectin, but you’ll have to add it to others. Lemon juice or citric acid is added for flavor and to aid in gel formation. There is more natural pectin in slightly underripe fruit than in ripe fruit. To get enough pectin when making jams and jellies, use about one-fourth underripe fruit to three-fourths ripe.
Jellies, jams, and preserves should all be canned in jars with rings. They require five to ten minutes of processing in a water bath or steam canner. Sealing the jar with paraffin is not recommended.
Personally Speaking
Growing up in Oregon gave us easy access to all kinds of berries. We picked strawberries at the local patches and grew our own boysenberries, blackberries, and blueberries. So, at an early age, I was introduced to the art of jam making. My mother believed in making things simple, so she used commercial pectin packages. I learned that if you followed the directions exactly, you ended up with close-to-perfect jam. In the Intermountain West, where I live now, we have more access to fruit grown on trees than we do berries. My three favorite jams to make now are apricot, peach, and plum. I’ve learned that peaches have enough natural pectin that packaged pectin isn’t necessary. When we eat peach jam made from peaches grown on our own peach trees, it is like eating a bite of captured sunshine.
I encourage you to try making homemade jam! It is not hard, and it is so, so much better than the mass-produced national brands! I know you’ll be proud of your own gourmet jam—it will rival those sold in gift shops and boutiques. And this is not a gender-specific skill—my brothers have been making jam since they were teenagers.
You will find several of my favorite jam recipes on our website, CrisisPreparedness.com.
Juices and Ciders
Juices are a good way to use less-than-perfect fruits and vegetables after completely removing any bruised, spoiled, or overripe portions. Juices may be canned and stored as concentrates or made into ciders, vinegars, and wines.
Apple Cider
The best apple cider is made from blending apple varieties, including sweet, sharp, and bittersharp. If you have apples you would like made into cider, you may be able to find someone in your area who presses small batches. Alternatively, you may purchase the presses.
Pickles and Relishes
Pickles and relishes can be made from many different fruits and vegetables and will add variety in your diet. Pickling can be accomplished through fermentation in a crock or by freshpack in canning jars. Both use brine and vinegar as preservatives. Sugar, herbs, and spices are added for flavor. Pickles are usually canned using the water-bath method unless they will be eaten soon after being made.
Meat, Poultry, and Fish
You will need a pressure cooker to safely can beef, pork, poultry, game, fish, and seafood at home in either glass jars or tin cans. Combinations like stews, soups, and chili may also be canned.
Home-Canning Safety
Although some home-nutrition experts caution about the safety of canning at home, it is completely safe if the directions followed are from a reliable source, such as the USDA canning guide, National Center for Home Food Preservation, or a current extension guide (see the resource section). Like most of the survival skills described in this book, it’s best if you practice this skill before a crisis. Home-canned foods are often superior in quality to purchased canned foods, and home canning is a great way to enjoy your homegrown food and save money.
Home-Canning Methods
Boiling-Water-Bath Canning
Water-bath canning is suitable for high-acid produce. This includes all fruits, tomatoes, and pickled vegetables. The food can be put in the jars uncooked, then cooked during processing. This is called raw pack. Or the food can be cooked and placed in jars hot and then processed. This is called hot-pack canning.
Water-Bath Canner
Boiling-water-bath canners are large pots that come with a jar rack to securely hold jars and keep them off the bottom of the pot. The most common, smaller canner size is 21.5 quarts; it will hold seven pints or quarts. The typical large thirty-three-quart canner will hold nine quart jars and fourteen pints. Traditionally, canners are made from granite ware—an enamel-covered steel, but aluminum and stainless-steel canners are also available. Make sure the canner is deep enough to allow two to four inches of space over the jars.
Steam Canning

Steam canning is also suitable for high-acid produce. The products may be raw packed or hot packed. Steam canning uses about half the energy and takes less time because you do not have to wait for a large amount of water to boil. It also eliminates most boil-over messes. Best of all, product quality is superior. For details about how to use a steam canner and further information, consult the two extension bulletins from Utah State University and the University of Wisconsin listed in the resource section.
Steam Canner
Most steam canners consist of a shallow pan with a tall cover that fits over pint or quart jars. Jars are placed on a rack that sits above the boiling water, and hot steam circulates to process the product. Excess steam vents through small holes on the cover. The canner pictured is the Victorio 7-Quart Aluminum Steam Canner.
Dual Purpose Canner
Victorio makes a dual-purpose canner with a unique double-sided rack system that sits flat for water-bath canning or may be inverted for steam canning. Its built-in temperature gauge allows you to monitor the temperature, and a glass lid lets you see the contents. It is also stainless-steel and can be used on induction-stove surfaces.
Pressure Canning
Pressure canning is required for all low-acid vegetables and meat. This is because the dangerous bacteria found in low-acid foods are only killed completely at 240° F (116° C), and that temperature can be attained only under pressure. As altitude increases, so must the pressure necessary to attain the correct temperature. Consult a canning book for adjustments needed. Pressure canning can be done with either glass jars or tin cans.
Pressure canning is not recommended for high-acid produce. It will result in a lower-quality product due to the longer total time spent at high temperatures.
Pressure Canners
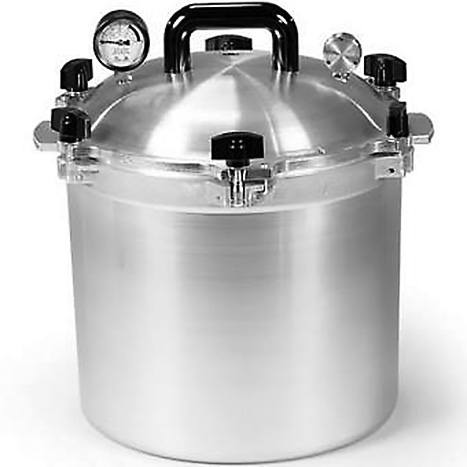
One of the most important pieces of canning equipment is a pressure canner, especially if you intend to can vegetables and meats. There are several brands and all will work well if properly used. They are larger than a pressure cooker and need a rack to place the jars on. Check the capacity of the canner. Some are large enough that you can double-stack pint jars.
All-American Pressure Canners (pictured) are unmatched in quality and use a clamp system that requires no gaskets. They use a gauge to measure pressure and are durable enough to last a lifetime. They are also more expensive than other brands.
Presto and Mirror also make good pressure canners. Both have locking handles and a rubber gasket seal. Presto pressure canners use a gauge, and Mirror canners use five-, ten-, and fifteen-PSI pressure controls. The Granite Ware Pressure Canner is relatively new on the market and includes a steamer insert
If your pressure canner needs them, be sure to store extra pressure-release valves or gaskets. No matter which brand you have, make sure the pressure gauge is checked regularly to verify its accuracy. If it uses fixed weights instead of a gauge, have it properly adjusted to the correct altitude. A canner that uses fixed weights may be better for long-term survival use because it does not require periodic calibration like the gauge type does. Maintain the pressure canner in working order by periodically cleaning the petcock and safety-valve openings.
Home Canning with Cans
Table 29.2
|
||
|
|
|
Canning with cans requires heating the contents and exhausting the air before sealing the cans and processing them in the canner. To achieve the necessary vacuum, the food in the can must be at 170° F (77° C) or higher. The can is then sealed, processed in the canner, and cooled in cold water. The quicker cooling results in slightly better produce texture and less heat damage to vitamins.
Home-Canning Equipment
Table 29.3
|
|||
|
Canning Fruits |
Canning |
Jelly Making |
Pickle Making |
|
|
|
|
Not only will you need the canners described in the previous section, you’ll need a variety of canning tools to increase the number of products you are able to can and to make canning easier. Even if you do not presently can food, it is a good idea to have the necessary equipment and supplies stored. Not only might you use them in the future, but they could be valuable for bartering. Tables 29.2 and 29.3 list canning supplies you might find useful.
Food Strainer and Sauce Maker
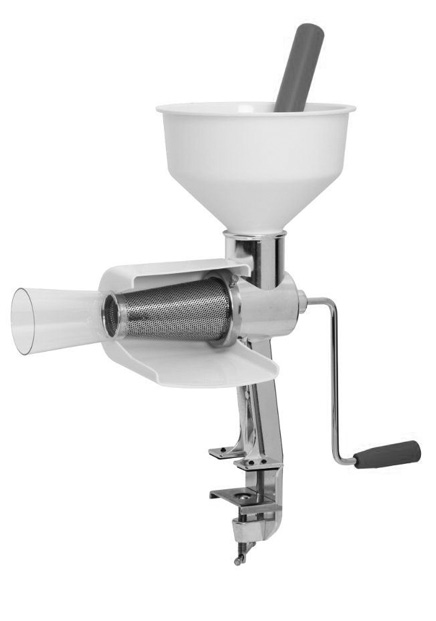
A food strainer is a valuable piece of canning equipment because it extends the versatility of the products you can. A food strainer makes it easy to process apples and tomatoes into sauce. Two well-known brands are VKP and Squeezo. The one pictured here is the VKP Food Strainer. You may also want to purchase the berry and pumpkin screens.
Steam Juicer
A steam juicer is a three-part pan that steams the fruit to extract and collect the juice. It will effortlessly extract the juice from grapes, berries, and apples with no need to strain them. Steam juicers may be aluminum or stainless steel.
Equipment for Canning Jams and Jellies
Unless you are using a steam juicer exclusively to make juice, you’ll need a muslin or canvas jelly-bag strainer. Or you can make your own from cheesecloth. For jellies, jams, and other preserves, you may want a jelmeter—a graduated glass tube that helps you determine the amount of pectin in the fruit. You will also need tools for mashing the fruit and an eight to ten-quart flat-bottomed kettle for cooking. I recommend a candy thermometer to take the guesswork out.
Equipment for Canning Pickles
Pickles require utensils and containers made of stainless steel, aluminum, or glass to avoid reactions with acids or salts. Fermenting is done in a crock or stone jar, plastic food storage bucket, large glass jar, or an unchipped, enamel-lined pan. You will need covers and a weight to hold the produce below the brine’s surface. A plastic bag filled with water placed on top of a plate will work.
Equipment for Canning in Cans
Home canning with cans is also an option. Tin cans are more durable than glass jars and can be stored in the light, but they cannot be reused and require an extra step to seal.

Wet-pack canning requires specialized cans and a can sealer. Sealers are set to seal a specific size can, but additional sized chucks for sealing may be purchased. Dry-pack canning requires a sealer that seals #10 cans. The sealer will also allow you to seal seeds, ammunition, and other things in cans. All American and Ives-Way make several hand-operated can sealers. Ives-Way Model 900 can sealer is pictured. (See page 85.)
All American and Ives-Way make several hand-operated can sealers. Expect to pay from $300 to $1,500 for a sealer. Wells Cans and Ives-Way make hand-operated can sealers. Ives-Way Model 900 can sealer is pictured.
You will also need a glass food thermometer. And you will need a bottle capper if you anticipate capping bottles.
Home-Canning Supplies
Jars and Lids
Stockpile all the glass jars you’ll need for your family. A good time to stock up is at the end of the growing season when the canning season is over. Stores mostly sell half-pints, pints, and quarts. Use the jar size your family can eat at one meal. Store extra jars to replace any that might get broken. Wide mouth are a little more expensive but are easier to clean and are best for tomatoes and larger fruits. Narrow-mouth are fine for smaller produce, sauces, and juices.
Store at least two seasons’ worth of lids and enough rings for your jars. Jar lids could be in extremely short supply in a prolonged crisis. Keep them cool and dry, and they’ll keep five years or longer.
Reusing Jar Lids
Tattler makes a two-piece reusable lid that includes a nitrile rubber seal and a food-grade plastic lid. A regular jar ring is needed. They are warrantied for five years, but in practice may be used longer.
Gasket Seals
Luminarc and Bormioli Rocca are two companies that make canning jars with their own attached, reusable lids. They are made of heavy glass with a hinged glass lid. The seal is a rubber-ring gasket. They are more expensive than regular jars, but the rings can be reused.
Cans
Cans come in a variety of sizes, ranging from three- to twenty-eight-ounce. The handiest sizes are normally the #303, #2, and #2½. Cans are available with plain lids or pull-tab lids and in a range of sizes. Large #10 cans are frequently used for dry-pack canning, and cans cost from one to two dollars, depending on quantity and size. They are expensive for a one-time use, so use them only for high-value products, like meat or fish. Cans come in different qualities. Select better cans for longer storage.
Pectin
Include pectin, either powder or liquid, in your storage. You can make your own pectin from tart apples if necessary.
Ascorbic and Citric Acid
Ascorbic or citric acid crystals prevent discoloring of fruit. Powdered ascorbic acid compounds should be stored in a cool place where they will not absorb moisture. They will keep at least two years.
Sugar, Vinegar, and Salt
Store extra sugar for canning and jam making. For pickles and relishes, store vinegar with a 5 to 6 percent acidity. Also store pickling or canning salt, sugar, and spices.