
Before we start looking at specific techniques and recipes for drying food, you first need to know a little more about what it all entails.
A Little History
Though it may seem that drying food for storage is a novel idea, it has been around for centuries (certainly longer than freezing or canning). Native Americans often dried strips of meat or fish out in the sun to create jerky, and they dried berries, corn, and squash to save them for long winter months. When Europeans took to the sea, the men would take many dried provisions with them to last the months between resupply stops. As settlers worked their way across the new United States, dried foods were important as a way to preserve crops for the winter.
These are just a few examples of how people have been drying foods for thousands of years. If it was good enough for our ancestors, it surely is good enough for us. This extensive history also proves that you can dry food without special or modern equipment.
Dried Foods Today
Today, people do use dehydration around the house for food preservation, although not as frequently as in the past. There are few other areas where dried food has become important in the modern world.
Those of us old enough to be familiar with the early space program probably associate dried foods with astronauts. Although most dried foods that went up into space were actually freeze-dried, they do still rely on standard dehydrated foods for storage while at the International Space Station today. These foods can be stored for long periods without any additional power being used, and they are extremely light. Dried fruits and jerky are common as snacks because they can be eaten without rehydrating.
The military has been using dried foods for some time as well to create rations for soldiers that are light to carry and will not spoil. The MRE (Meals Ready to Eat) is the most common example and still is used frequently today. MREs contain dehydrated meals such as spaghetti with meat sauce, chicken fajita, meatloaf, and jambalaya (depending on the menu for the year). You can see that dried food has been a significant part of our past as well as our current culture.
How Food Dehydration Works
The basic premise in food dehydration is to remove as much moisture as possible in order to make the food inhospitable for any harmful bacteria, fungus, mold, or mildew. All of these need moisture to survive, and they will not be able to infect your food if it is too dry for them to live.
In order to take all the moisture out, you need to expose your pieces of food to warm moving air. The heat causes the water to evaporate, and the air then draws away that moisture. Dehydrating using only one or the other (heat or air) may work, but it will take much longer and might leave you at risk of your food starting to spoil before it is dry enough to be safe.
And spoilage is always a possibility if you are trying to dry your foods in less than ideal circumstances. Commercial dehydrators and ovens typically will work just fine to dry out your food safely, but there can be risks of spoilage if you are using air drying or sun drying. There is more on these specific methods later in this chapter for more details. Any food can start to spoil if the drying takes too long; so, you need to plan your dehydrating so that it is completed in a short period.
Why Home Dry?
You might be wondering why you should use drying as a way to preserve and store your food. It is not as common as freezing or canning, so why do people dry their foods in the first place? Actually, there are several good reasons why you would want to go this route.
Cost savings
One important aspect of using home drying is to save money. There are several ways you can stay frugal by drying or just by preserving your own food in general.
Buying in Bulk
When something is on sale or in season, you are going to want to buy lots of that item in order to maximize your savings. Unfortunately, that does not always work well if you are buying any kind of perishable goods. So, having an easy way to preserve your purchases for later use means you can take advantage of that sale by buying a large quantity.
Another aspect of “bulk buying” is that you often can get better pricing when you buy larger quantities even if they are not on sale. That can mean shopping at a warehouse store (such as Costco® or Sam’s Club®) or even just buying packaged food in larger containers. Either way means a lower cost for you as long as you are able to properly preserve it all for use later. There is no sense in buying a ton of any food product if it is going to go to waste later.
Reducing Food Waste
And speaking of wasting food, this is a cost-saving benefit all on its own. By drying perishable food on a regular basis, you will find you have less waste due to spoilage than if you try to use it all at once. Of course, that depends on how much food you buy in the first place, but a good storage routine helps a great deal with waste in any case.
Eliminating the Need for Commercially Dried Foods
If you use dried fruits, vegetables, or meats in your home and usually buy them that way, you can have some further savings by doing it yourself. Dried foods can be expensive, and there is no reason why you cannot save the extra cost by drying those foods at home.
Whether it is a package of dried fruit and nuts for trail mix or dried vegetables for a soup mix, you can make these things at home for a fraction of the cost of a purchased item.
Health benefits
Cost is only one factor you should consider when thinking about home drying your food. Another one is health and keeping your food as nutritious as possible.
One of the best benefits of home drying is that the slow application of heat does not destroy the vitamins, minerals, and other nutrients in your food. For the most part, the only change that takes place is the loss of moisture, so your dried food is nearly as nutritious as it was before you dehydrated it. Iron, fiber, and several B vitamins are retained with virtually no loss at all. Vitamin A will be partially lost, and you, unfortunately, will lose most of the vitamin C in your foods because it is a “water soluble” chemical.
Unlike commercially preserved foods, you will not need to add any chemicals to your dried foods. They naturally will stay preserved for months (if not years) without any additives, preservatives, or other chemicals you might not want in your food.
You also can see benefits to drying food when it comes to the taste and quality of the final product. When the water has been removed, the taste becomes more concentrated. If you are going to eat your dried food without rehydrating it first (as with meat jerky or dried fruit), you will find the flavor is much stronger than in the original form. That is why sun-dried tomatoes are such a wonderful ingredient and so different from fresh tomatoes.
Rehydrating your food by adding water again will dilute this effect, and your reconstituted foods will taste “normal” again.
Powdered Foods
Being able to make your own food powders is a good way to add extra flavor to your cooking. A custom blend of dried and then powderized vegetables (such as onions, peppers, celery, or carrots) can be used as an addition to many other dishes such as soups, stews, pasta or just about anything. Not only does this add extra taste but also a load of nutrients you would otherwise not have.
Not all dried foods will work as a powder. Some will dry to a tough leathery consistency and might not crumble well enough to make a powder. A little experimentation should show you what you could do along these lines. A blender or even a mortar and pestle are all you need to make your own powdered foods.
Compared to other preservation techniques
These are all excellent points, but it is also helpful to know how the qualities of dehydration measure up against other forms of food preservation.
When compared to the most common way of preserving food (freezing), drying comes out ahead in cost because it will not use electricity during the entire shelf life of the food like a freezer does. You also do not have to worry about any losses or waste due to a power outage or freezer failure. Freezing might be the easiest, but there are more cost issues while the food is being stored.
The other main way to preserve food is by canning in glass jars. This method does not have any costs associated with ongoing storage like the freezer does, but there is a much larger initial investment when you start canning. Not only do you have to buy a canner, but you also need a sizable collection of canning jars along with their matching lids. The jars themselves are a one-time expense, but you will have to buy new lids for each jar whenever you do more canning. Each time you can a jar of food, the lid becomes slightly warped with the vacuum, and they will not hold a seal more than once.
Dried foods can be stored without any additional costs for containers, and there is no cost to maintain your preserved food. Overall, it is the cheapest method available.
Once dried, most foods are a fraction of their original size. This is unique to dehydrating, and it makes storage a lot more efficient compared to preserved foods by other methods. You can store more dried food in a quart jar than food that still has all its water content in place. With canning, you even have extra fluid so your food will take up more space.
In terms of health benefits, drying holds on to nutrients during processing, but so does freezing. Frozen foods are remarkably healthy once they are thawed out. Canned foods are treated at a high heat, and that can destroy some of the healthy compounds in your foods. Taste is also the same issue. Dried foods are much like their original states once rehydrated, but canned foods can be soft and bland due to the extra heat that goes into the processing. Frozen food will taste as though you were cooking fresh, or at least close to fresh.
One last comparison is the ease of processing. Canning takes the most work, with the filling of the jars and cooking each one to exactly the right pressure. Freezing is usually quick but can take time to properly package foods and to do any blanching. Blanching involves a short exposure to boiling water to kill any active enzymes in your food before drying. There are more details on this in Chapter 6, the chapter on vegetables.
Drying may take a long time (12 hours to several days), but there is hardly any effort to it once the dehydrator is filled up. It sits and dries on its own with no extra work, and then the food can be packaged away.
Basic Methods for Home Drying
This topic will be covered in more detail in Chapter 2, so this is only an overview to provide an introduction.
The basic premise for drying food is to expose it to a warm flow of dry air that will remove most (if not all) of the moisture in your food. That is all there is to it. It is not the same as “freeze drying,” which is far more complicated and not something most people are ever going to do at home.
What is Freeze Drying?
Freeze drying puts frozen foods in a vacuum, which then draws the moisture out as the water rapidly changes from solid directly to a gas. This process removes more water than standard dehydration and creates a dried food product that can still be edible for years. Freeze dried foods are rehydrated by the addition of hot water, much like typical dehydrated food.
You can give dehydrating a shot with just your oven before investing in an actual food dehydrator, and some people stick with the oven anyway because it is handy. A true dehydrator does work better if you do not mind buying another small appliance. In some cases, you actually can use your microwave for some dehydrating as well.
Some people choose to go a more natural way and use the sun for food drying. This method has the added benefit of not using hours of electricity, though it can be hard to control and manage. This is the method used most often through history; so, it certainly can be mastered with a little practice and effort.
The bottom line is that you can go about starting a food drying routine in several ways, and by learning more about them all, you can choose which one will work best for your own needs and lifestyle. You might find that you use one method for some foods and another for something else.
No matter which method you use, there are some basic principles to keep in mind when dehydrating. Always wash and clean anything you are going to dry. Lay your thinly sliced food out on your screens or trays, evenly and in one layer. Nothing should be overlapping. Allow a little bit of space between each piece so air can flow freely between everything.
When you go to check for “doneness,” remember that foods will be softer while still warm. You may have to take a few pieces out of the dehydrator to cool before you can assess their progress accurately. This is important with heavier fruits and vegetables.
Use the guidelines presented in this book as a starting point, but always use your own judgment when dehydrating. There are always variables to consider, such as climate and humidity in the air, the ripeness of the food you are drying, and even how thinly you are slicing. Check your drying food periodically, and never leave it alone for 12 hours until you are more familiar with the process. If the book says 12 hours, you may get a shock to find over-dried food that should have been taken out at the ten-hour point. After a few sessions, you will know how things dry in your own kitchen. It is always a good idea to take notes so you can remember what worked and what did not work for the next season.
Storage Methods
Dried foods have the wonderful feature of being preserved no matter how you store them (within reason); so, you will have many different options on how to store your food. The most important feature is that the container is airtight to make sure damp air does not begin to rehydrate your food and add moisture back into your container.
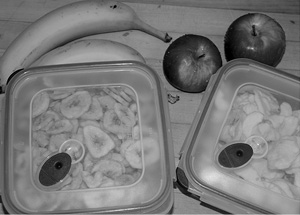
Photo courtesy of Douglas and Sherri Brown
Plastic storage tubs are excellent, and you can use glass jars with a tightly fitting lid. Because dried foods are extremely light, many people hate to use heavy storage containers if they do not have to. Tupperware®-style containers are the most common way to store your foods. You can then keep them any place that is not overly humid (basements might be a bad idea).
For short-term storage, you even can use plain paper bags. If your home has any chance of animal pests, just remember that paper is not much of a protection against teeth.
When drying large quantities of food, you can use food-grade buckets with a rubber gasket seal. These are ideal for beans or any other dried food you want to have on-hand in volume. Dried food might not seem like “real” food, but you do need to make sure all storage containers are graded for use with food. Buckets intended for paint are probably not a good idea. Even dry food can pick up contaminants from the plastic.
An additional way to protect your dehydrated food is with vacuum sealing, which removes all the air from your storage container for added security and preservation. You can buy small vacuum devices for the kitchen that can be used for this, and they can be used together with plastic bags or even glass jars. If you are going to use plastic bags, you might want to get bags designed for vacuum packing. A strong zip-close bag might suffice, but they are not designed to stay “locked” when there is the pressure of a vacuum inside the bag.

Photos courtesy of Douglas and Sherri Brown
Plastic bags will collapse down to create a solid pack that is great for storage. To use jars, you have to make a small hole in the lid that you then quickly cover up once the vacuum is achieved inside. Many vacuum sealing machines will come with seals you can use for this or at least instructions on how to do so when using jars. Because the vacuum will be broken each time you open the jar or bag, it is not a good idea to use this for any foods you will be using frequently unless you want to run the sealer every time.
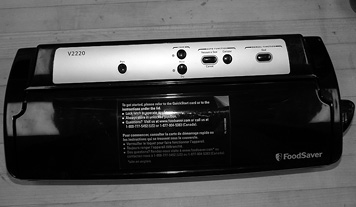
Vacuum Sealer Photo courtesy of Douglas and Sherri Brown
When dehydrating with imprecise methods (such as the sun or oven), take one extra step before packing your food up for long-term storage. Food that you will use in the shorter term will not need this. Temporarily pack your dry foods in plastic bags and leave them in the freezer to kill off any potential bacteria. Leave them for 48 hours, and then pack as you would for pantry storage. This is called “pasteurizing” and can be done by heating in the oven, but the freezer method requires the least amount of work.
Safety with Dried Foods
The reason that dried foods preserve so well is that bacteria, fungus, or mold, at least not the types of bacteria that are harmful to humans, cannot survive where there is no moisture. Where there is no water, there will be no bacteria. This is why dried rice and beans are so ideal for long-term storage and why they last so long without any special storage conditions. You can reproduce those conditions with any kind of food when you dehydrate it to remove the moisture.
But you do need to be careful when you dry that all the moisture has been removed. Any pieces that are still soft or damp can add bacteria or mildew to the entire container, and you run the risk of contaminating all of your food. The drying instructions will indicate what the final product should be like. Some will be leathery, but some will be brittle and crisp. Knowing what to expect means you can judge accurately when something has been dried enough for safe storage. Let a few pieces cool off before assessing their dryness. Something like banana slices will seem soft and damp while still warm, but they will be hard once they cool down.
For any dried foods you plan to use in the near future, such as a blend of dried fruit for trail mix; you will not have to be quite so concerned about perfect drying.
What Can Be Dried?
Just about any kind of food product can be dried for preservation, though many liquids can be a challenge. This is not just a technique for herbs and fruit slices. You can dry all manner of fruits, vegetables, herbs, mushrooms, and even meat and dairy products, too.
Knowing the right length of time and temperature for drying is the key. Once you know how long it takes, you can dry any kind of food. There are no limits.
However, you do need to watch out for high-fat foods. Avocados and peanut butter are mentioned again later in the book, but they are not suitable for dehydrating because there is too much oily fat in them to dry properly. Only water and moisture can be removed, and high-fat foods are prone to going rancid, so they are not used for any long-term storage purposes.
Using Dehydrated Foods
It is fine to know how to dry foods, but you also need to know what to do with them afterwards. Dried foods are versatile; so, you have many options. Many dried fruits are eaten as is. That is, they are not rehydrated or prepared in any way. Depending on the fruit, you can just eat the dried slices as they are. Banana and apple both work well for this. Dried kale or zucchini is a little more unusual and can be eaten just as it is like a healthy chip. Fruit leathers and meat jerky also are eaten in their dried form.
For any other uses, you will have to rehydrate your food, which means to put the water back in. The most effective way to rehydrate your food involves a little heat as well as water, usually just by simmering until everything is softened up again. You can do this by itself or add your dried foods to other liquids already cooking (such as a soup or stew). With the proper recipes, you also can use dried foods in place of non-dried as long as the recipe has been adapted to include the extra liquid it will need. Otherwise, you will have to rehydrate before using it in the recipe.