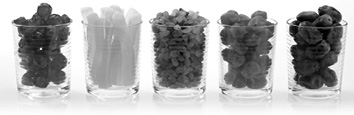
Though several types of dehydrating methods are included in this book, most people are going to do their food drying with an actual dehydrator. So, you need to know the details on these machines before you buy or even build one.
When you think about dehydrators, you likely are thinking of the typical electric models that you plug in to operate. But if you want to use the sun for your power source, you also can have a dehydrator for that.
Electric Dehydrators
Electric dehydrators can cost you anywhere from $30 to several hundred dollars. And so, you can expect to find quite a range of sizes and features when you go to purchase one.
The less expensive models are the simplest. They usually are made up of a stack of slotted trays (four or five layers) that sit on one another with a base that includes the heating element and fan. These types of dehydrators are great entry units, but they do lack features that can be helpful to a more experienced dehydrator.
One of the main drawbacks with this form of machine is that they do tend to dry unevenly. You can get half of one tray (usually at the bottom) that is finished while other parts of the batch are not. As long as you are around to remove pieces as they are finished, it should not be a huge problem. Of course, it would be better to leave it for the designated time and not have to pull it apart continually.
The stacked types of dehydrators do have the benefit of being expandable. Depending on the model, you can get additional trays to make the machine larger (up to 20 trays in some cases). The fan will not get any stronger, though, which does mean the top trays definitely will take longer to dry than the bottom ones, but it is still an option. A good point about these models is that they expand upward, so they do not take up any more counter space if you add more trays.
The other main type of electric model is the cabinet type, with an enclosed cabinet or box the trays slide into. These dehydrators are able to regulate their temperature better and can be used for other things, such as making yogurt or rising bread dough, when you remove the trays. Drying is much more even with a cabinet dehydrator, and they are usually quieter when running. Because each tray slides out independently, you do not have to necessarily dismantle several trays to access the one at the bottom.
Specific makes and models
Trying to cover every possible make of food dehydrator is beyond the scope of this book, so only the larger manufacturers are listed. This is mainly for comparison purposes, so you can see which machines offer which features.
American Harvest
This is one of the best names in entry-level dehydrators, and they are sometimes referred to as Nesco® dehydrators (that is the company that makes them). All of their machines are the stackable kind, though different lines have different features. Their Gardenmaster dehydrators are the most expensive and offer the most features.
The Gardenmaster Pro has four trays but can be expanded to 30, and its adjustable thermostat runs from 90 F to 155 F. For something a little fancier, there is a digital version of the Gardenmaster Pro. Not only are the controls digital but also with a 90 F to 160 F thermostat, you also can set a timer to shut off when you are not home. That is excellent feature can help prevent overdrying. The digital model is also expandable, but only up to 20 trays. Both of these models will cost around $120, with the digital one being the more costly.
The less expensive versions are Snackmaster® dehydrators, which will run you between $50 and $75 depending on the specific model. Their Snackmaster Entr’ee is usually under $50, which makes it a popular choice for the novice. There are no thermostat controls, and this one has the fan unit on the top instead of the bottom. You will get about 400 watts of power (compared to the 1,000 watts of the Gardenmaster models). The other two Snackmasters, the Encore and the Express, do have thermostats and can be expanded from their original four trays (to either seven or ten).
The last two options with American Harvest do not have names but are models FD-37 and FD-39. They have no thermostats and only 400 watts of power. Like the Entr’ee model, they are less than $50 each.
Aside from their line of dehydrators, Nesco also has several good accessories to go with their machines. You can buy additional trays to stack your machine higher, and they have both fruit leather sheets and finer mesh screen sheets that you can insert onto the trays for easier drying. If you want to use your dehydrator to make jerky, they offer a kit that comes with an extruding gun, spices, and instructions.
Excalibur
Excalibur is a well-known name in dehydrators, and they make high-quality machines. All of their machines are the cabinet variety and so cannot be expanded. They currently have four-, five-, or nine-tray models available. You should note that the trays are considerable larger than the trays in a stacked model. For costs, the four-tray model is just over $100, and you will be paying at least $200 for the others.
The big difference in cost between the four-tray and the five-tray can be attributed to the added features. The four-tray version is a basic dehydrator with less power than the larger models. It has 220 watts of power and thermostat settings, while the five-tray can give you 440 watts of power, and the fan is larger. So there is more difference than just the number of trays.
The five-tray version has a thermostat to control the temperature and comes in a version with a timer and auto shut-off (up to 26 hours). You get these same features in the nine-tray models, but there is also more power with 600 watts. The nine trays provide about 15 square feet of drying space.
Like American Harvest, Excalibur also carries a line of accessories. They have nonstick leather sheets and jerky tools, too.
L’Equip®
Not as well known as the others, the L’Equip machines are also worth looking into. They only have three varieties, and they are all stackable styles. Their smaller model is under $100 and has four trays of dehydrating space. The motor is 500 watts, and you can control the temperature between 93 F and 153 F. It can be expanded by adding extra trays (up to 12).
Their largest model is around $160 and has six trays. They have a unique twist by offering two deep trays with four regular ones to accommodate unusual items such as a loaf pan or large flowers. This model also comes with fruit leather sheets and yogurt cups (for making yogurt rather than drying it). It comes with six trays but can be expanded up to 12, and there is a timer and thermostat control.
The L’Equip machines are rectangular and narrow compared to the Excalibur, so they do take up less counter space.
Weston®
Weston dehydrators are cabinet style, and they come in six-, eight-, and ten-tray sizes. For these machines, each tray will provide about 1 square foot of space, so you can figure out how much total drying space you get with each model. There are 5-inch fans in all three machines mounted in the back to blow air forward rather than up through all the trays. This can help with flavor mixing and the problem of having the bottom trays dry first.
The thermostat is adjustable and will handle temperatures between 84 and 155 F. The six-tray version has a 500-watt heater, but the other two are a bit stronger at 600 watts. Other than the size and power, all their models are the same in terms of features. You also can buy kits for making jerky that have extruding guns and special drying racks. The Westons will run between $100 and $140, depending on the size you choose.
Good4U®
The Good4U dehydrators often are compared to the Excalibur line, as they are quite similar. There are two sizes, one with six trays, and one with ten. One big difference compared to the Excalibur machines is that there is no door for the Good4U machines; the front of each tray slides in tightly against the ones above and below it. That does make access easier, but that means you cannot use this cabinet-style machine for other purposes (such as rising bread dough) because once you pull out one tray, the machine is no longer closed in.
The ten-tray model has a timer, and they both have adjustable thermostats. They also come with handy accessories, such as nonstick fruit leather sheets and a finer mesh liner for small items. The smaller unit is around $150, and the larger one will be closer to $200.
Other Manufacturers
The above companies are known for their dehydrators because they either specialize in these machines or just have a large line of them. Other kitchen appliance companies do make dehydrators that should be mentioned as well.
Salton® makes a simple stacking dehydrator with no thermostat or any other controls. It is another inexpensive way to get started while you try this out. You can find Salton machines at many department stores.
You may have heard of Ronco® dehydrators because they are well known in the world of infomercials. They are cheap stacking units, and the quality is not the best. If you were going to spend the money, other models would do better.
And at the other end of the spectrum is the Sedona® dehydrator. They only make the one model, and it typically costs over $300. This unit is clearly not for a beginner. It is a cabinet machine with nine large trays and two separate fan and heating units. All the controls are digital, and you can change the temperature or set a timer that runs for 99 hours.
Choosing one right for you
With so many models available, it can be hard to choose the right one. This is doubly true if you are new to dehydrating, and you have no experience with these machines to draw on. How to make your choice?
The main thing you want to think about is how much food you plan to dehydrate. With a small garden or just the occasional dehydrating chore, you really do not need a huge nine-tray machine. A smaller one is better until you find yourself with more drying tasks than it can handle. A stackable machine will let you do some expanding, which is a nice feature until you determine your needs.
Cost cannot be ignored either. There is a wide range of potential prices, from $50 to $300. Make sure you get a machine that is within your budget, especially if you are just starting out.
Cheaper machines do tend to be louder, with cabinet models being the quietest. Because there is an internal fan running all the time, there is bound to be some sound no matter what. It might not be a consideration for you, depending on where in the house you will be running it and whether it will disturb you.
Also, consider what you are going to be drying. Having a thermostat control is extremely helpful if you are going to use your dehydrator for a number of different applications. If you know you are only going to be drying vegetables, then you can forgo that and save some money.
And this is just the electric dehydrators. The next section will cover a little more on the solar varieties that might also be suitable for your circumstances.
Solar Dehydrators
If you are interested in using the sun’s energy for dehydrating, you most likely will have to construct your own setup. Complete solar driers typically are not sold commercially, though you can sometimes buy plans or kits. This is going to be a bit of a do-it-yourself project.
There is more to making a solar dehydrator than just laying food out on a cookie sheet in the sun. Although that does work, you can build a much more efficient type of dehydrator to maximize your sun power when drying food. There are many ways to build a good solar food dryer, so feel free to get creative once you have a few ideas.
Electric models usually have trays that nest one on top of the next because the fan will move air through them all. A solar drier does not have that feature; so, you will want to build them so your food is spread out in one layer. This does mean that it can take up quite a bit of space.
First, you will want to make sure your food is as enclosed as possible. Cheesecloth draped over baking sheets will work in a pinch, but it is not an ideal approach. So, you could build a flat box (as long and wide as you wish) that has a screened-in lid to keep out debris and insects. Inside, you could lay your food out on regular baking sheets. This would be the simplest design for a solar dryer, and you would only need wood, screws, and some window screening.
This type of solar dryer can be improved if you want to get fancier with your construction. Using a solid sheet to hold your food inside is fine (and easy), but without ventilation under your food, you will have to flip things over part way through in order to get a decent drying. You also could consider building mesh trays to hold the food inside your box.
Trays can be made from a simple wooden frame with screening through the middle. You can use window screens for the lid of the box, but you should not use that material for any trays your food will be sitting on. It is not safe for food use. Stainless steel is much better, although you could make small trays with cheesecloth bottoms instead. However, trays made with fabric might sag once you put food on them.
With these mesh trays, your overall dehydrator box needs to be a little larger to accommodate space underneath the trays. Otherwise, it will work the same.
These approaches are great for ventilation but are not as good for heat accumulation. If you live in a cooler climate, you can further adapt your dryers to help heat things up a little more. The best way to concentrate the heat for drying is to change the lid from mesh to glass. This does make construction a little harder, although you can often use old wooden framed windows to make things easier.
A glass lid will keep the heat inside, but as you are trying to dry food rather than cook it, this can also be a problem. When using glass this way, you must have lots of side and/or bottom ventilation to keep the air moving around your food inside the box. If you are particularly handy, you could even incorporate a solar-powered fan inside to get the air moving.
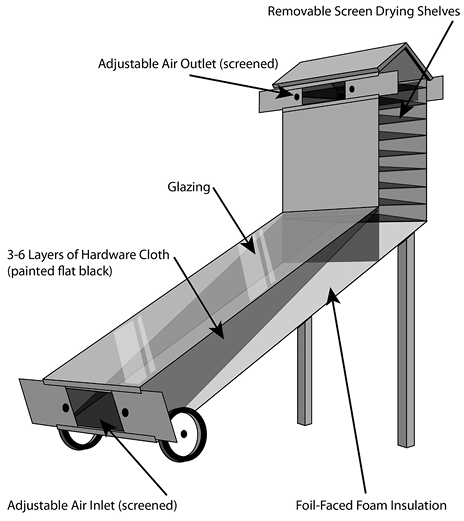
Sample design of a solar dehydrator
These are just some concepts and ideas to get you thinking about how to build your own solar dehydrator. For a good collection of designs, plans, and ideas, read The Solar Food Dryer by Eben Fodor. There are actual construction plans within this book that will get you going.
If you really do not want to build your own unit, you can experiment with solar dehydrating with a hanging mesh dehydrator from Food Pantrie. These five-tray units are completely enclosed in mesh to keep insects out and to allow for air ventilation. They look a little like hanging closet organizers. Although they do a fair job, they are not designed to expose your food to the sunlight well. They are a good choice for a starter unit or to dry things that do not require heavy heat (foods that dry in just a few hours).