After herbs, fruit is the most commonly dried food for people who dehydrate at home. It is a great way to store it, and it often can be eaten while still dry (banana chips or fruit leather, for example). People probably dry more to be eaten that way rather than as a storage method.
Preparing Fruit to Be Dried
Taking a little time at the beginning can make a big difference in the quality of your final dried fruit.
Harvesting or buying fruit for drying
If you are growing your own fruit, you should pick at the peak of ripeness. Fruit with spots or holes still can be used as long as you cut out the bad parts. You are going to be slicing it up anyway. Take care to be gentle with your fruit to minimize bruising. Depending on the fruit, you might have one big harvest all at once or be able to do small batches of dehydrating through the season as you pick ripened fruit.
For drying, you will want to get fruit at its cheapest in order to maximize the savings. That means buying in season more than anything else. Many stores also will drop their prices dramatically for fruit that is getting overripe. For many purposes, it would not be suitable, but overripe fruit is just fine for drying as long as you are going to do your drying soon after buying.
And do not forget farmers markets as a great source for fresh fruit in larger quantities, too. Talk to the vendors if you really want to do up a large batch. They might give you additional price breaks if you buy a few bushels instead of just a small basket. Just make sure you are up to the task, or you can end up with wasted fruit.
When fresh fruit is not available, you can do some drying with canned. It might not have the same cost savings, but you can create some good dried fruit snacks just the same.
Cleaning and preparing fruit
Depending on the fruit, you will need to peel and seed each piece and cut out any brown or damaged spots. Any fruit you are not peeling should be washed as well and then patted dry. Fruit should be sliced evenly, about ¼ inch in thickness, but you can vary this to your own tastes and needs. Some fruits can behalved or even dried whole. It just takes longer. In some cases, the peel actually does not need to be removed but should be cut or pierced to let the moisture out. If you omit this step, your fruit will take a long time to dry. Grapes, cranberries, and blueberries are notable for this.
Additional fruit preparations
One unique problem with drying fruit is that some fruits will darken considerably when exposed to air (apples and bananas, for example). A little browning will not have any effect on the taste or quality of your dried fruit, but the final product can be a little unappetizing. You can take a few different steps to keep your fruit looking fresher. Blanching in boiling water is one option, but using a dip is the more common option when drying food because it does not add as much extra moisture.
An acid-based dip will stop the enzyme action, and you can do this in a few ways. The easiest is a commercial product that comes as a powder. You just mix it with water as per the instructions and give your fruit slices a short soak. You can use a few homemade solutions. Crushing vitamin C tablets and dissolving them in water can make an ascorbic acid dip. A good dip can be made with about five 500 mg strength tablets in a ½ quart of water. Ascorbic acid powder also can be purchased. Lemon juice works well in a solution of one part juice to one part water. Neither one will really alter the taste of your dried fruit.
Whichever route you take, you will want to soak your sliced fruit for about five to ten minutes. Then strain out the fruit, and drain well. Do not pat dry or do anything else to remove excess solution. Then load up your dehydrator.
Another way to protect the color of your dried fruit is with sulphur, which is commonly used in commercially produced dried fruit. It is not easy to do at home, and the health concerns of adding sulphur can be an issue. Most home dehydrators prefer to stick to the acid dip method.
One more dip option is honey. This is more for taste than anything else, but a quick dip in a dilute honey mixture can add extra sweetness to your final fruit. It is a nice touch for any dried fruit that will be eaten while dry. Stir one cup of liquid honey into 2 cups of hot water. Dip the fruit slices in the mixture for a few moments before loading up the dehydrator.
Assessing dryness
Herbs are done when they crumble, which makes them easy to judge. Fruit is different, and you will not always be looking for the same results. Typically, a completely dry piece of fruit will be leathery and pliable rather than dried to a crisp. This is perfectly acceptable and what most people are looking for, especially in fruit you intend to eat while still dry.
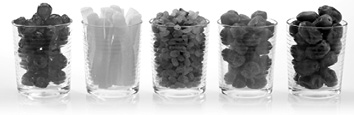
Dried apples and bananas. Photo courtesy of Douglas and Sherri Brown
Some fruits, such as apples or raspberries, can be dried to a hard texture if the slices are thin enough. They might last longer this way but are not as appetizing to eat dry this way. They work better for rehydrating purposes.
Methods for Drying Fruit
Most methods except for the microwave will work well enough for fruit, though the high moisture content does make some methods better than others.
Sun drying fruit
Drying fruit outdoors in the sun can be difficult because the sugar will attract insects and animal pests. However you set up your drying racks or trays, they must be covered with screen or mesh. Cheesecloth also works well as long as you do not just drape it over your trays of sliced food. It will stick and become permanently attached to your slices of dried fruit.
Fruit contains a lot of moisture, so sun drying can take a long time — often more than two days of exposure. You can take advantage of the full sun because fruits are sturdier than the delicate herbs.
Air drying fruit
Air drying is not generally suitable for fruit because fruit will start to mold before the drying is complete. There is just too much moisture for passive drying like this unless you have thin slices of fruit and a warm area to work in.
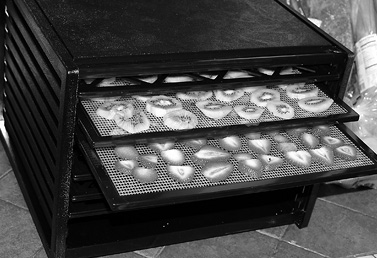
Photo courtesy of Douglas and Sherri Brown
Dehydrating fruit
Using a dehydrator is really the best way to dry fruit, particularly if you do not want to wait days to use the sun. Fruit can be sticky, so spraying your dehydrator racks or trays with a nonstick cooking spray can make your life easier later on when it comes time to pry the dry pieces off.
Some fruits can be dried within eight to ten hours, but some should be left overnight or longer. Unless you know your food still requires a full night of drying, you might be better off turning the machine off and then restarting it in the morning when you are around to monitor the dryness.
Oven drying fruit
You will be able to turn your oven up slightly compared to drying herbs. But it still may be too low for some ovens (about 115 F). Like with the dehydrator, drying fruit will stick to your pans. Coat with parchment paper or spray with a non-stick spray before you lay out your sliced fruits.
More moisture will be coming out of fruit than from herbs, so you must leave the door of the oven open while you are drying or the excess water will stay trapped within the oven. This will create a humid environment, and moisture will not come out of the fruit.
Microwaves are not suitable at all for drying fruit. There is just too much water to be removed for a microwave to handle the job.
Storing Dried Fruit
Dried fruit sometimes still can be sticky even after fully dry, so storing in paper is not suitable. Any type of airtight container in glass or plastic will do. Light can discolor fruit and turn it dark or brown, so your container should either be opaque or kept in a dark cupboard or cabinet.
When your fruit is fresh out of the dehydrator, let it cool down to room temperature before packing it away in a container.
Because of the natural stickiness of dried fruit, vacuum packing may not be the best approach unless you have dried your fruit to a hard or brittle texture. A vacuum-sealed bag will collapse in on itself, and your fruit is much more likely to stick together. After time in storage, this can lead to a hard-to-manage lump inside the bag.
Specific Instructions for Drying Fruits
The previous chapter on herbs was simpler because all herbs are generally the same size, shape, and thickness (for the most part). Fruit gets more complicated because you are dealing with more variables. The ripeness of your particular batch of fruit and how thinly you cut your slices will both alter the drying time considerably. Instructions here are a good starting point, but always use your own judgment when determining whether your batch is dry.
If you are using a sun- or oven-drying technique with a solid tray or baking sheet, you should turn your fruit pieces over halfway through the estimated time to make sure they are drying evenly. The ventilated trays of a dehydrator do not need this step.
As mentioned in the section above, some fruits should be pre-treated before drying. These instructions will be included below as well, as are tips on how to rehydrate your fruit. Most of these are eaten dry, but if you prefer to soften them up, then their texture will be more like cooked fruit. You cannot make dried fruit be truly “fresh” in texture again.
Apples
Some people peel their apples before drying; some do not. The peel can be a little tough if left on. Once cored, you can cut across into rings or cut lengthwise into slices. Depending on your taste, you can dry apples until they are brittle, but a leathery texture is fine as well.
Dehydrator: Set at 115 F, six to eight hours.
Sun drying: Two to three days
Oven: Set at 115 F, six to eight hours.
Treatment: Will brown, so treat with an acid dip.
To rehydrate: Eat dry or simmer for about half an hour in equal parts fruit and water.
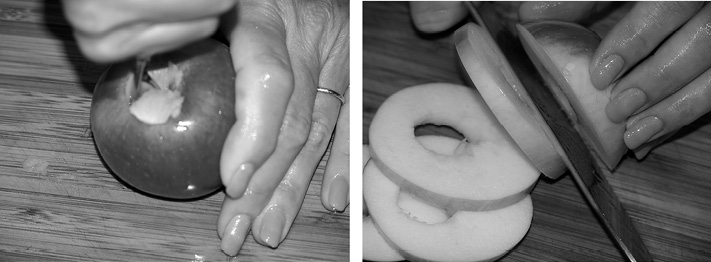
Coring and slicing apples. Photos courtesy of Douglas and Sherri Brown
Bananas
If you have purchased store-bought banana chips in the past, do not be surprised if the taste and texture of your dried banana slices are different. Most bagged banana chips have been fried rather than dried. They are much crisper and sweeter. To dry bananas, just peel, and slice to about a ¼-inch thickness. Banana is sticky and will certainly stick to your pans or trays. To be thoroughly dry, they should be hard.
Dehydrator: Set at 115 F, eight to ten hours.
Sun drying: Two to three days
Oven: Set to 115 F, eight to ten hours.
Treatment: Treat with a dip to prevent browning.
To rehydrate: Dried bananas are eaten dry. They do not refresh well.
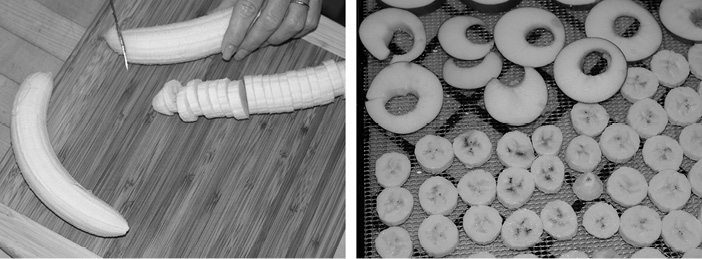
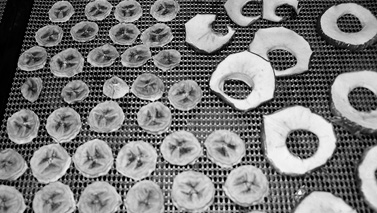
Slicing and placing bananas on the dehydrator tray. Photos courtesy of Douglas and Sherri Brown
Oranges
Oranges are not as commonly dried as some other fruits, but it can be done. Because of the membrane between the segments, dried oranges will be tough and are not eaten like other dried fruits. They can be used to flavor drinks or add to brewed teas. Just wash and slice into rounds, with the peels on. Because you are not going to be eating the dried pieces, the added peel gives more flavor. It also helps the slices hold their shape better.
Dehydrator: Set at 130 F, eight to 12 hours or more.
Sun drying: Two days
Oven: Set to 130 F, anywhere from six to ten hours.
Treatment: None needed
To rehydrate: Not usually rehydrated, just used dry
Pineapples
Use either a whole fresh pineapple that has been peeled, cored and sliced, or canned slices. Chunked pineapple might also work, but the pieces might be too thick. Drying pineapple takes much longer than most other fruits, so prepare your timing accordingly.
Dehydrator: Set at 115 F, 24 to 36 hours (continuous time).
Sun drying: Up to five days
Oven: Set to 115 F, 30 to 40 hours.
Treatment: Not necessary
To rehydrate: Eat dry, or simmer 40 minutes with equal parts fruit and water.
Apricots
Your fruit will need to be sliced open to remove the pits, and you can either chop the fruit or dry the entire halves. The skins can be tough after drying; so, try to peel apricots before you dehydrate them. Submerge whole fruit in boiling water for just a minute, and then cool quickly in ice water. You should be able to pull the skins off with no trouble.
Dehydrator: Set at 115 F, halves — 36 to 40 hours, slices — ten to 14 hours.
Sun drying: Halves — four days, slices — two days
Oven: Set at 115 F, Halves — 36 hours, slices — 12 hours.
Treatment: Dip treatment is necessary.
To rehydrate: Eat dry or simmered in water for 45 minutes.
Strawberries
Strawberries should have no soft spots when being dried and require little preparation. Just remove the leafy hulls and slice into ¼-inch slices. They dry quickly for fruit, but unlike most other fruits, your slices will be brittle when dry rather than leathery.
Dehydrator: Set at 115 F, ten to 16 hours.
Sun drying: One to two days in direct sun
Oven: Set at 115 F, 18 to 22 hours.
Treatment: Not necessary
To rehydrate: Eat dry, or simmer 1 cup of fruit in 1 cup of water for 30 minutes.
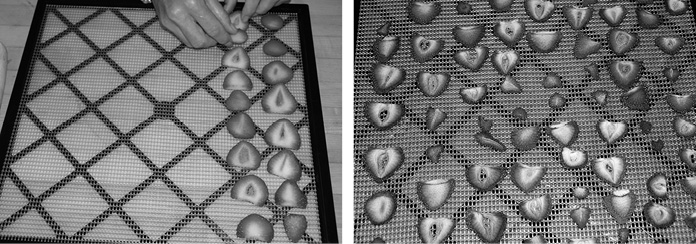
Photos courtesy of Douglas and Sherri Brown
Raspberries
You can use the same techniques and timing for raspberries, blackberries, boysenberries, and loganberries. Wild berries of these types can be dried, but if they are very seedy, they will produce tough fruit after dehydrating. They just need to be washed and can be dried whole. You will want to dry them until they are hard, and you should move them around on their trays during drying.
Dehydrator: Set at 115 F, 24 to 36 hours.
Sun drying: Three to four days, in full sunlight
Oven: Set at 115 F, two to three days.
Treatment: No treatment is required
To rehydrate: Simmer 1 cup berries in 1 cup water for 45 minutes to an hour.
Blueberries
The skin on a blueberry needs to be opened up before drying, which can be a little tedious. You either can slice your berries in half or dunk them in boiling water until their skins split naturally. That should only take a few seconds. Just make sure to pat them dry before loading them into the oven or dehydrator. Unlike the raspberries, a thoroughly dry blueberry still will have a little give to it and not be completely brittle.
Dehydrator: Set at 115 F, 12 to 24 hours.
Sun drying: Two to three days
Oven: Set at 115 F, 12 to 24 hours.
Treatment: None
To rehydrate: Eat or cook with dry, or soak for three to four hours in an equal amount of water.
Peaches
You can use the same technique as apricots to remove the skin; just dunk the fruit in boiling water for about a minute and then into ice water. The skin will practically fall off. Also, like apricots, you can dry peaches in halves or slices. But because peaches are larger, trying to dry halves can take a long time. Most people just stick to slices to speed things up a little. These instructions apply to nectarines as well. When completely dried, slices of peach will be quite hard and leathery but not actually brittle.
Dehydrator: Set at 115 F, ten to 12 hours.
Sun drying: Two to three days, in full sun
Oven: Set at 115 F, 12 to 14 hours.
Treatment: Will darken without acid dip
To rehydrate: Eat as is, or simmer in water for about 20 minutes to refresh.
Pears
Some varieties of pear have a distinctive light grittiness to their flesh, which can be magnified if you dry your slices too thinly. For just preserving the fruit, that is fine, but if you want to snack on dried pieces, make sure you do not let them dry hard and brittle. You can leave the skin on if you wish. Make sure your fruit is well ripened before drying.
Dehydrator: Set at 115 F, 12 to 16 hours.
Sun drying: Two to three days in full sun
Oven: Set at 115 F, 14 to 18 hours.
Treatment: Pears need dip treatment.
To rehydrate: Might be too tough for dry eating, rehydrate by simmering for 30 to 45 minutes.
Cherries
Cherries will require a bit more work because they need to be pitted before drying. Once pitted, you should cut each cherry in half so it dries better. Either sweet or tart cherries can be dried the same way. A properly dried cherry will be a lot like a raisin in texture.
Dehydrator: Set at 115 F, 12 to 14 hours.
Sun drying: One to two days in sunlight
Oven: Set to 115 F, 12 to 16 hours.
Treatment: No pretreating is needed.
To rehydrate: Either simmer until soft, or soak 1 cup fruit in 1 cup water overnight.
Kiwi Fruit
You definitely need to peel the fuzzy kiwi before drying. Cut your slices no thicker than ¼ inch, usually cutting across the fruit rather than into wedges. The dark seeds in a kiwi are edible and should pose no problems when drying, so you do not need to worry about removing them. When done, kiwi slices will be leathery.
Dehydrator: Set at 115 F, 12 to 14 hours.
Sun drying: About two days
Oven: Set to 115 F, 16 to 20 hours.
Treatment: Treat to prevent discoloration.
To rehydrate: Eat dry, or simmer in equal parts water for about 40 minutes.

Photos courtesy of Douglas and Sherri Brown
Cantaloupe
Cantaloupe is a dense fruit, but it can be dried, too. Remove the heavy rind, and slice into small pieces (no thicker than ¼ inch). Slices or chunks would be fine. Smaller pieces will dry faster if you do not want to wait quite so long. Dried pieces will be pliable but tough.
Dehydrator: Set at 115 F, 24 to 36 hours (including overnight).
Sun drying: Up to five days
Oven: Set to 115 F, 24 to 30 hours.
Treatment: Not necessary
To rehydrate: Simmer for 20 minutes to half an hour.
Mangoes
For successful drying, get only ripe mangos that are slightly soft to the touch. You must peel them because their skin is not edible even when eaten fresh off the fruit. There is a large pit in a mango, so cut slices around that. Mangoes will be very sticky when drying, so treat your pan or trays with a light cooking oil spray.
Dehydrator: Set at 115 F, ten to 12 hours
Sun drying: 24 to 30 hours
Oven: Set at 115 F, 14 to 16 hours.
Treatment: May be necessary, but mango only darkens slightly without it.
To rehydrate: One part water and one part fruit, and simmer for about half an hour.
Lemons
As with oranges, the segmented form in lemons (any citrus fruit, actually) makes them poor candidates for drying. But a dried slice of lemon can be nice to flavor cold drinks, so there is still a use for it even if it is not a fruit you will likely eat as a dried snack. You can use these instructions to dry limes in the same way. Slice your lemons with the peel on into ¼ inch slices. Remove any seeds before drying if you can. The dried slices should be brittle and hard when done.
Dehydrator: Set at 130 F, eight to 12 hours or more.
Sun drying: Two days
Oven: Set to 130 F, anywhere from six to ten hours.
Treatment: None needed
To rehydrate: Not usually rehydrated, just used dry
Watermelon
Even though it is mostly water inside, watermelon works surprisingly well as a dried fruit. It also dries quicker than you might think. Use a seedless variety if you can, and only dry the pink flesh. Quarter-inch slices will dry the fastest but will be thin when they are done (not much thicker than fruit leather). You can dry ½-inch pieces instead as long as you adjust the timing. Because so much moisture is released, do not use the oven because it does not ventilate well enough. The timing for drying watermelon is difficult to narrow down because the fruit can vary greatly in moisture content. Make sure to keep an eye on your drying fruit.
Dehydrator: Set at 115 F, eight to 14 hours (or longer).
Sun drying: Ten to 16 hours
Oven: Not recommended for oven drying
Treatment: No treatment necessary
To rehydrate: Should be eaten dry only, will not rehydrate well
Plums
A dried plum is more commonly known as a prune. They do not need to be peeled, and you can either dry them in halves or chop them into smaller pieces. Halves will be rubbery, but small pieces will be harder.
Dehydrator: Set at 115 F, halves — 18 to 22 hours, chopped pieces — eight to 12 hours.
Sun drying: Halves — three to four days, chopped pieces — one to two days
Oven: Set at 115 F, Halves — 24 hours, slices — 18 to 20 hours.
Treatment: Dip treatment is not needed.
To rehydrate: Simmer in water for about half an hour, or soak overnight.
Grapes
Considering how easy and inexpensive it is to buy dried grapes (also known as raisins), not many people dry grapes at home. But if you have an abundance of fresh grapes to preserve, drying is a good option because raisins are such a versatile dried fruit. You can dry any sort of grape, green or red. They can be cut in half or dried whole. Whole grapes will need their skins sliced or pricked open so the moisture can get out. You should dry only seedless ones whole. It is usually quickest to cut them in half. A dried grape will be just like a store-bought raisin when done.
Dehydrator: Set at 115 F, 24 to 36 hours.
Sun drying: Three to four days
Oven: Set at 115 F, two to three days.
Treatment: Not needed
To rehydrate: Simmer for half an hour, though many recipes do call for raisins rather than rehydrated grapes.
Cranberries
Drying a cranberry is a lot like drying a blueberry. You will have to open up the skin; so, either score them with a knife, or drop the fruit into boiling water until the skins split open. Dry them well afterward before putting them in the dehydrator or oven.
Finished cranberries will have a raisin-like texture.
Dehydrator: Set at 115 F, 12 to 24 hours.
Sun drying: Two to three days
Oven: Set at 115 F, 12 to 24 hours.
Treatment: Unnecessary
To rehydrate: Soak for two to three hours.
Figs
Slice fresh figs in half and remove the seeds. Like apricots, they typically are dried in halves, but you can dice it up if you prefer smaller pieces. Because they are so fleshy, figs dry better a little warmer than most other fruits, so note the change in temperature. They will be pliable and leathery when completely dried.
Dehydrator: Set at 120 F, ten to 14 hours.
Sun drying: Two days in direct sunlight
Oven: Set at 120 F, 12 to 14 hours.
Treatment: No pretreatment for figs
To rehydrate: You can eat figs dry; otherwise, simmer them in water for about 45 minutes.
Currants
You need to split the skins before drying, which you can do in several ways. You can pierce your currants with a fork before drying or drop them in boiling water for about 30 seconds. Their skins will pop naturally this way, although you will have to drain and thoroughly pat them dry before you load them into the dehydrator. When ready, they will be chewy like a raisin.
Dehydrator: Set at 115 F, 18 to 22 hours.
Sun drying: Two to three days in direct sun
Oven: Set at 115 F, 24 to 30 hours.
Treatment: Just the boiling dip to split the skins
To rehydrate: Currants do not rehydrate well; so, you can just use them as a dry fruit in any recipe you might use raisins.
Persimmons
The persimmon may not be as common a fruit as others here, but it is quite popular in many Asian regions. You will want to choose a firm fruit rather than a soft one for drying, which means you have to have a sweet variety. The astringent types are only sweet once they soften almost to a jelly, and they cannot be dried well. Peel, and slice into ¼-inch slices. A properly dried persimmon will be leathery to the touch.
Dehydrator: Set at 115 F, 18 to 20 hours.
Sun drying: Three to four days
Oven: Set at 115 F, 24 to 30 hours.
Treatment: No pretreatment required
To rehydrate: Once dried, persimmons are usually used that way. Chopped, they can be added to most baked goods.
Quince
Quinces are too sour and astringent to eat unless cooked or extremely ripe. For drying purposes, you should make sure you have a ripe fruit, or your dehydrated fruit will not taste good. You can peel them if you wish, and slice them into ¼-inch pieces.
Dehydrator: Set at 115 F, 12 to 16 hours.
Sun drying: Two to three days in full sun
Oven: Set at 115 F, 14 to 16 hours.
Treatment: Quinces should be dipped to prevent browning.
To rehydrate: Soften up quinces by simmering for half an hour to 45 minutes in equal parts water.
Papaya
Papayas are a little tropical to be found in most gardens, but if you can get fresh ones at the supermarket, you can dry them into tasty fruit snacks. Peel the fruit, and remove the pit; then slice into ½-inch slices. Dried papaya will be tough but not brittle when done.
Dehydrator: Set at 125 F, 14 to 22 hours.
Sun drying: Two to three days, set in direct sunlight
Oven: Set at 125 F, 18 to 24 hours.
Treatment: Use an acid dip for papaya.
To rehydrate: Eat dry, or simmer in water for about 30 minutes.
Avocado
This is one of the few foods that does not dehydrate well. The avocado has an extremely high fat content, and those oils do not dehydrate away. Even if you were able to get a reasonable level of moisture out, the pieces of fruit would go rancid quickly. A dehydrator is not recommended with avocado.
Dates
Dates generally are found in the stores already dried, but it is possible to dry your own dates if you have access to fresh ones. Even some dried dates can be dried further for longer storage life, as they are probably not completely dry. For fresh dates, slice open the fruit, and take out the pit. Slice into halves for drying. Dates will be leathery when fully dry.
Dehydrator: Set at 115 F, 14 to 16 hours.
Sun drying: About one day in full sunlight
Oven: Set at 115 F, 18 to 20 hours.
Treatment: You do not need to treat dates.
To rehydrate: Dried dates typically are eaten dry rather than rehydrated.
Grapefruit
Grapefruit is another option for drying citrus fruit, and the tart flavor is a nice change from dried oranges. Slice your fruit into ¼ inch pieces, and remove what seeds you can. When dry, the hard slices can be used in potpourri or to add flavor to lemonade or even plain water.
Dehydrator: Set at 130 F, eight to 12 hours or more.
Sun drying: Two days in full sun
Oven: Set to 130 F, six to ten hours.
Treatment: None is needed.
To rehydrate: Not usually rehydrated, just used dry
Recipes Using Dried Fruit
Although using dried fruits as a snack is common, you can use all kinds of dehydrated fruit in baking and cooking, too. If you are using a standard recipe that calls for fresh fruit, you should rehydrate as per the above instructions before using the fruit because the recipe will not have enough liquid otherwise. Or you can use one of these recipes designed specifically for dried fruit.
These are recipes for actual cooking or baking with fruit. To make mixes for trail mix, refer to Chapter 12 for dry mixes later in the book. Also, Chapter 7 talks about making fruit leather.
Dried Apple Cobbler
A cobbler is a crustless fruit dish, with a fluffy baked topping over sweet cooked fruit. You can be creative with this one and substitute one cup of peaches, apricots, or pears to change the flavor.
For the fruit:
• 2 cups dried apples
• ¼ cup white sugar
• 1 Tbsp. flour
• 1 cup apple juice, or water
For the topping:
• ¼ cup brown sugar
• ½ cup milk
• ¼ cup vanilla yogurt
• ¼ cup butter
• 1 cup flour
• 1 Tbsp. cinnamon
• ½ tsp. baking powder
• ¼ tsp. baking soda
Before you start, preheat your oven to 375 F.
Combine the first four ingredients for the fruit in an 8-inch baking dish. Bake for about 20 minutes until it begins to bubble.
While that is baking, you can prepare the batter for the topping. Beat sugar, milk, yogurt, and softened butter together in a large mixing bowl. Add in the remaining topping ingredients, and stir until it is all just combined (do not overmix).
Pour the batter over the cooked fruit in the baking dish. Put it back in the oven to bake for another half hour until the topping starts to brown on top. Serve your cobbler warm.
Banana Chip Cookies
Both banana chips and chocolate chips give these easy cookies great taste.
• 2 cups flour
• ½ tsp. baking soda
• ½ tsp. baking powder
• ¼ tsp. salt
• ½ cup butter
• 1 cup brown sugar
• 2 eggs
• 2 tsp. vanilla
• 1 cup dried banana chips, chopped
• 2/3 cup chocolate chips
Preheat your oven to 375 F. You will need two baking sheets for this recipe.
In a mixing bowl, stir together the flour, baking soda, baking power, and salt. Set that aside, and beat the butter and sugar together in another bowl until thick. Keep beating, and add the eggs. Mix in the vanilla extract at this point. Then slowly add in the earlier flour mixture, mixing until moist and blended. Fold in banana and chocolate chips
Use a heaping tablespoon of dough to make cookies with at least 2 inches between them (they will spread). Bake for 7 to 8 minutes. They might not seem done, but do not bake them any longer. Let them cool on a rack before eating. You should get about 2 dozen cookies.
Dried Fruit Granola Bars
This is an excellent recipe for using several different types of dried fruit, and you can adjust it to suit your own tastes. Just about any type of chopped dried fruit could be used in place of the ones listed in the recipe.
• 2 cups rolled old-fashioned oats
• 1/3 cup almonds
• 3 Tbsp. sunflower seeds
• 2 Tbsp. flax seeds
• 1 Tbsp. sesame seeds
• ¼ cup dried cherries
• ¼ cup dried apricots
• ¼ cup dried cranberries
• ¼ cup raisins
• ¼ cup peanut butter
• 2 Tbsp. brown sugar
• ¼ cup honey
• 1 tsp. vanilla
Preheat your oven to 350 F, and chop all dried fruits into small pieces. Grease an 8-inch baking pan, and set it aside.
On a cookie or baking sheet, spread out oats, almonds, sunflower seeds, flax seeds, and sesame seeds, and bake for about ten minutes (the oats will start to brown). Pour all your roasted seeds into a mixing bowl. Stir in your dried fruit.
In a small saucepan, heat peanut butter, sugar, honey, and vanilla until it melts and starts to bubble a little bit. Pour the liquid peanut butter mixture over the mix of grains and fruit, and stir through. Spread into the greased baking pan. Make sure it spreads into the corners and is patted down well. Refrigerate until cooled through and firm. Cut into bars.
Spiced Pear Compote
A sweet and spicy way to serve up some dried pears. This would work well with apples, peaches, or apricots, too.
• 2 cups hot water
• 1 cup dried pears
• 3 Tbsp. brown sugar
• 1 tsp. dried lemon zest
• 3 whole cloves
• Cinnamon
Combine all the ingredients together (except for the cinnamon), and simmer together for about half an hour. Serves about four. Top with a sprinkle of ground cinnamon.
Pineapple Muffins
You can still get a moist muffin even when cooking with dried fruit. In this particular recipe, you will need to soften the fruit up a bit before baking instead of just mixing in the dry pieces.
• 1 cup dried pineapple pieces
• 1 ¼ cup boiling water
• 2 ½ cups flour
• ½ cup bran
• 2 tsp. baking powder
• ½ tsp. baking soda
• ¼ tsp. salt
• ½ tsp. nutmeg
• ½ tsp. ginger
• ¾ cup dark brown sugar
• 1 egg
• ¾ cup plain yogurt or sour cream
• ¼ cup butter, melted
First, pour boiling water over the pineapple pieces, and let it sit for half an hour until softened up. While that is soaking, heat up the oven to 375 F.
Add the soaked pineapple to a blender, and purée. Set aside. In another large bowl, sift together flour, bran, baking powder, baking soda, salt, nutmeg, and ginger. Beat the brown sugar, egg, yogurt, and butter into the puréed pineapple until everything is mixed and dissolved.
Then, add the liquid mixture into the bowl with the dry ingredients, and stir a few times so everything mixed and moist. Do not stir more than necessary.
Pour batter into a muffin tray to make 12 muffins. Bake for about 25 minutes until a toothpick comes out clean.
Spicy Mango Salsa
Not all dried fruit recipes have to be baked goods. A mix of dried mango and a few fresh ingredients can make an excellent summer dish or condiment.
• 1 cup dried mango pieces, chopped
• 2 Roma tomatoes, chopped
• ½ small onion, diced
• 1 small avocado, chopped
• Juice from 1 lime
• 1 tsp. jalapeno pepper, minced (more if you like it hot)
• ¼ cup fresh cilantro, minced
Let dried mango pieces soak in water for about 15 minutes, then drain, and combine all the other ingredients together. Let it chill in the refrigerator for half an hour before serving.
Cream and Berry Pie
It is a good idea to soften up the berries first, but they will finish rehydrating during the rest of the cooking process on their own. It is a rich and creamy way to use several kinds of dried berries.
• ½ cup dried strawberries
• ¼ cup dried blueberries
• ¼ cup dried raspberries
• 1 envelope packet of unflavored gelatin
• 2 tsp. vanilla
• 1 ½ cups heavy whipping cream (35%)
• ½ icing sugar
• 1 9-inch piecrust, already baked
• Water
Soak strawberry slices in water for about 15 minutes to start softening them up. Simmer the dried blueberries and raspberries over low heat to do the same. Let all your fruit cool once soft.
In a small mixing bowl, combine the gelatin powder with ¼ cup of water, and let it sit for about five minutes. Pour the gelatin mixture over the strawberries, and stir over low heat until completely dissolved. Let it cool down to room temperature, and then stir in the other berries and the vanilla extract.
Next, whip the cream in a chilled bowl until it starts to develop soft peaks. Then beat in the icing sugar until you get more firm peaks in the cream. Stir the berries gently into the cream; then fill up the pie shell. Refrigerator for an hour if you need to serve it right away, but overnight will be better to let it firm up.
Mediterranean Apricot and Ginger Chicken
This recipe is a little more in-depth than the others, but it is a delicious and unusual way to use dried apricots.
• 2 boneless chicken breast halves
• 1 tsp. cumin
• 3 Tbsp. olive oil
• 2 cloves garlic, minced
• ¾ cup sliced dry apricots
• ¾ cup white wine
• ¼ cup vegetable broth
• 12 pitted green olives
Sprinkle chicken with cumin and fry with olive oil in a skillet until well browned. Remove from heat, and set aside. Cook garlic in the skillet for about 30 seconds; then add the apricots, wine, broth, and olives. Bring to a low boil and simmer until you have a thick sauce. It should take about five minutes. Move the chicken back to the skillet, and cook until the chicken is done and the apricots are tender. Serve right away.
Dried Apple Pie
You should rehydrate the apples a little for this recipe, but they do the rest of their softening while the pie is baking.
• Apple juice
• 4 cups dried apples
• ¼ cup lemon juice
• ¼ cup flour
• 1 cup sugar
• 2 tsp. cinnamon
• ½ tsp. nutmeg
• ¼ tsp. ground cloves
• 3 Tbsp. butter
• Double piecrust
Pour enough warm apple juice over the dried apples to just cover them, and let them sit for half an hour. When they are soft, start your oven preheating to 425 F.
Drain the apples and stir the lemon juice through the fruit. In another small mixing bowl, combine flour, sugar, cinnamon, nutmeg, and cloves. Stir the flour mixture through the apples to cover everything. Pour into your bottom piecrust.
Dot small pats of butter over the apples, and cover with the second crust. Cut a few slits in it, and crimp the edges down. Bake for 15 minutes; then turn the temperature in the oven down to 375 F. Bake for an additional half hour. Serve warm.
Banana Pancakes
These easy pancakes are quick in the mornings, and the added bananas make them healthy and tasty too.
• ½ cup dried banana slices
• 2 cups milk
• 1 ¾ cups flour
• 2 tsp. baking powder
• 2 eggs
• 2 Tbsp. brown sugar (more if you like sweet pancakes)
Simmer banana pieces in milk until they start to soften up, then remove from heat, and let the mixture cool down. Add to a blender canister (do not strain out the milk), and purée until smooth. Add eggs, sugar, and butter until well combined. In a mixing bowl, sift together the flour and baking powder. Mix the banana mixture and the dry ingredients until everything is smooth and moist.
Drop about a quarter cup of batter onto a hot skillet, and cook until you start to see bubbles on the top. Then flip them over, and do the other side until each pancake is nicely browned. Serve with syrup while they are still warm.
Cran-Oat Cookies
These healthful oat cookies could also be made with dried cherries or blueberries for a change of flavor.
• 2/3 cup brown sugar
• 2/3 cup butter, soft
• 2 eggs
• 1 ½ cups rolled oats (not quick oats)
• 1 ½ cups flour
• 1 tsp. baking soda
• 1 cup dried cranberries
Preheat the oven to 375 F.
Beat sugar and butter together with a mixer until they are smoothly mixed and fluffy. Add the eggs, and keep mixing until smooth.
In another bowl, stir together the oats, flour, and baking soda. Then add this mixture to the beaten sugar mixture. Stir until everything is combined and moist. Fold in the dried berries. Drop spoonfuls of batter on a cookie sheet, and bake for about ten minutes. You should get about 24 cookies.
Irish Barm Brack
Barm Brack is a traditional Irish dessert that uses several different types of dried fruit. You will need to start preparing this the night before.
• ½ cup chopped dried apricots
• ½ cup chopped dried peaches
• ½ cup chopped dried cherries or cranberries
• 1 cup brewed black tea
• 1 cup sugar
• 1 egg, light beaten
• 1 Tbsp. orange marmalade
• ½ tsp. cinnamon
• ¼ tsp. allspice
• 1 ¾ cup flour
Stir together all the dried fruit, and soak overnight in tea.
The next day, preheat the oven to 350 F. Then add sugar, marmalade, and beaten egg to the soaked fruit. Stir until sugar is dissolved and everything is mixed. Next, slowly stir in the flour and spices.
Spread the batter into a 9-inch baking pan, and bake for 35 minutes. Serve warm.
Cherry Marmalade
You can really substitute any dried fruit for this marmalade recipe. Apricots, peaches, strawberries, or blueberries will all work nicely.
• 2 cups dried cherries
• 2 cups hot water
• 1 orange, diced up (including peel)
• 1 pkg. of pectin powder
• 3 cups of sugar
• 2 Tbsp. dried lemon peel
Simmer cherries and pieces of orange in water for about half an hour. Take from heat, and stir in pectin, sugar, and lemon peel. Stir well; then bring the mixture back up to a boil and cook for about two minutes. Stir often to keep it from sticking to the bottom.
Pour the fruit mixture into hot pint jars (should make two). You can either let it set up in the fridge if you are going to use it right way, or process the jars in a boiling water canner for ten minutes to seal them up. If you are not familiar with canning, you should omit this step and use the marmalade right away.
Raspberry and Pear Cake Topping
You need your own cake for this (pound cake or angel food cake), and this makes a rich fruity topping. This should make enough topping for about eight slices of cake, depending on how generous you are with each piece.
• ½ cup dried raspberries
• ½ cup dried pears, chopped
• ½ cup water
• ½ cup sherry
• 1/3 cup cream cheese
• ¼ cup whipped cream
• 3 Tbsp. sugar
Mix the dried fruit with water and sherry, and let sit at room temperature for 20 minutes. Start to heat the mixture until it boils, and then drop the heat down to a simmer. Let it cook for another five minutes. The fruit should be soft, and the liquid should be starting to thicken up. Take the pot from the stove, and let it cool completely.
Meanwhile, in a mixing bowl, beat sugar with cream cheese until it is smooth, and then fold in the whipped cream. Mix the cheese mixture in with the fruit mixture, but only stir a few times so that there are clear swirls of cheese within the fruit. Spoon over slices of cake, and serve.
Apricot Citrus Fruit Topping
Here is another topping recipe that can be used over cake or ice cream.
• ½ cup water
• 1 cup orange juice
• 1 ½ cups dried apricots, chopped
• ¾ cup sugar
• 1 Tbsp. lemon juice
Combine water, juice, and fruit in a saucepan. Heat until it reaches a simmer, and then continue to cook for about 20 minutes. Add the sugar and lemon juice, and stir until the sugar is dissolved. Remove from heat, and either serve as a warm or cold topping.
Golden Dried Fruitcake
This is an ideal recipe for using up a mix of dried fruits all at once. You can adjust the specific fruits to suit your taste or availability. There is enough batter to make two loaves of cake.
• 3 eggs
• 1 cup butter, softened
• 1 cup brown sugar
• 2 cups flour
• ½ tsp. baking soda
• 2 cups of dried peaches or apricots (or a mix)
• ½ cup dried cherries
• ½ cup dried pineapple
• 1 cup raisins
• 1 cup chopped or slivered nuts
• 1 tsp. grated lemon peel
Preheat oven to 300 F, and grease two standard-sized loaf pans.
Separate the eggs, and beat the whites until you have soft peaks. In another bowl, beat butter and sugar together until creamy and smooth. Add in the egg yolks, and beat until combined. Fold the whipped eggs into the sugar mixture.
Add 1 ½ cups of flour and baking soda to the mix and stir well. In another bowl, combine the rest of the flour with the dried fruit, nuts, and lemon peel. Stir through, and add that to the main bowl of batter. Pour into your loaf pans, and bake for just over an hour. A toothpick in the middle should pull out clean.
Blueberry Cheesecake Bars
These rich dessert bars taste like they were made with fresh blueberries. You will be surprised at how easy they are to make.
• ½ cup shortening
• ¾ cup sugar
• 3 eggs
• 1 tsp. almond extract
• 1/3 cup milk
• 1 cup flour
• 1 ¼ tsp. baking powder
• 1 cup dried blueberries
• ¾ cup water
• ½ cup icing sugar
• 6 Tbsp. cream cheese, soft
• 1 tsp. almond extract
Preheat oven to 350 F, and grease a 9-inch baking pan.
First, you mix the water and blueberries and leave them to soak for about an hour.
Next, you need to make the crust for the bars. Mix the shortening, sugar, one of the eggs, milk, and first measure of almond extract into a cream. Then add the flour and baking powder, and stir until everything is moist and combined. Spread the mixture over the bottom of your baking pan, flattening it out to be even.
Spread your softened berries over the crust. Then, in another bowl, beat the last two eggs with the cream cheese and icing sugar. Fold in the almond extract, and spread the creamed mixture over the berries. Bake for an hour, and then let it cool in the pan before you start cutting the bars.
Raisin Sugar Cookies
Though raisins are the most common dried fruit around and recipes are not hard to find, here is one for an easy cookie. You will get about three dozen cookies from each batch.
• ½ cup raisins
• ½ cup water
• ½ tsp. vanilla
• ¼ cup shortening
• ¼ cup butter
• ¾ cup white sugar
• 1 egg
• 1 ¾ cups flour
• ½ tsp. baking soda
• 1 tsp. vanilla
Combine the raisins and water in a saucepan, and stir in first measure of vanilla. Bring it to a boil, and then remove the pot from the heat. Set aside for the moment, and start your oven heating to 350 F.
Mix the shortening, butter, and sugar together until fluffy. Whisk in the egg and the second measure of vanilla. In another bowl, mix the flour with baking soda, and then slowly mix into the creamed sugar mixture. Drain any excess water from the raisins, and then add them in as well.
Roll the soft dough into small balls, and set them out on the cookie sheet about two inches apart. They will spread; so do not crowd them. Bake for eight to ten minutes, and let them cool on a wire rack.
Strawberry Loaf
It is a bit of a cross between a cake and bread. This sweet loaf can be eaten at breakfast or served as a quick casual dessert.
• 1 cup dried strawberries
• 1 cup water
• 1 ½ cups flour
• 1 cup brown sugar
• 2 tsp. cinnamon
• ½ tsp. salt
• ½ tsp. baking soda
• ½ cup vegetable oil
• 2 eggs, lightly beaten
• ½ cup chopped nuts of your liking
Combine dried berries and water, and let soak for about half an hour to an hour. Strain out any extra liquid, and set aside. Then start preheating the oven to 350 F.
In a larger mixing bowl, stir together flour, sugar, cinnamon, salt, and baking soda. Stir the oil and eggs into the strawberries, and then pour into the dry ingredients while you stir. Mix until just moistened (do not overmix), and then fold in the chopped nuts. Pour the batter into a loaf pan, and bake for 50 minutes.
Sweet Apple Squares
These sweet squares are soft like cake but have a crisper crumble topping.
• 1 cup dried apple pieces
• 1 cup water
• 1 cup flour
• 1 tsp. baking powder
• ¼ tsp. cinnamon
• ¼ cup melted butter
• ½ cup brown sugar
• ½ cup white sugar
• 1 egg
• 1 tsp. vanilla
• ½ chopped walnuts or pecans
Before you begin, soak the apple pieces in 1 cup of water for about half an hour. They do not need to be completely rehydrated, just starting to soften up.
When that is done, preheat the oven to 350 F.
In a mixing bowl, sift the flour and baking powder together along with the cinnamon. Set this aside for now. Then in another bowl, mix butter, brown sugar, and white sugar together until the mixture is smooth, and then mix in the egg and vanilla. Slowly add the flour mixture to the butter and sugar mixture until everything is moist, but do not stir more than needed. Fold in the nuts and apples.
Spread the batter into a 9 x 9-inch pan, and bake for 30 to 35 minutes. The tops should be firm when finished. Let them cool in the pan before you slice into squares.
Baked Pears with Currants
Unfortunately, you cannot make this with dried pears, but it is a fine recipe to use dried currants you have on hand. The recipe makes ten pears, so it is suitable for those occasions where you need to serve a crowd.
• 10 firm pears
• 2/3 cup white sugar
• 2/3 cup brown sugar
• 2 tsp. cinnamon
• 1 cup dried currants
• ¾ cup water
Use an apple corer to take the core out of the pear, but leave the pear otherwise intact. If it is uneven on the bottom, slice a little off so it stands upright on its own. Start your oven heating to 350 F at this point. Set up your hollow pears (standing up) in a glass baking dish.
In a small bowl, stir both types of sugar, cinnamon, and the currants. Pour about half of this mixture into the pear holes. Add water to the remaining currant mix, and pour over the pears. Bake until the pears are soft. If the syrup gets too thick in the meantime, add a little water while it bakes. Spoon some of the syrup over the pears while it bakes as well. It should take about 45 minutes. Serve while still warm.
Fig and Cranberry Nut Stuffing
This may not be a typical everyday kind of recipe, but it is a nice gourmet touch to serve with a turkey or any meal you like.
• 1 loaf of bread (any style, your preference)
• ¾ cup dried cranberries
• 1 cup apple juice
• 1 onion, diced
• 1 cup dried figs, diced
• 1 cup walnuts
• 2 tsp. dried sage
• ¼ cup butter, melted
• 2/3 cup vegetable stock
Preheat oven to 375 F (or whatever temperature you need for your turkey), and cut bread into small cubes. You should have about 6 cups of bread for this recipe to be its best.
In a small saucepan, heat dried cranberries in ¾ cup of apple juice until they are soft. Drain off the extra juice, and then stir the berries into the bowl of bread cubes. Add onion, figs, walnuts, and sage. Back in the saucepan, heat up the last ¼ cup of apple juice, butter, and vegetable stock. Toss the liquid with the bread mixture until everything is slightly moist.
Stuff your turkey or whatever you are stuffing, or pour the mixture out into a casserole dish, and bake on its own for 50 minutes at 375 F.
Chocolate and Prune Brownies
This is not your typical fruit recipe, but it really is an excellent way of using dried plums and making some healthy brownies. With less butter and egg, the prunes keep these treats low fat.
• ¼ cup dried plums, chopped
• ¼ cup water
• 4 oz. semi-sweet chocolate pieces (chips would work)
• 2 Tbsp. butter
• 1 cup sugar
• 1 egg
• 1 egg white
• 2 tsp. vanilla
• ½ tsp. salt
• ¾ cup flour
• 1/3 cup cocoa powder
Before you begin, soak your dried plums (prunes) in water until they are soft. Drop them into the blender and process until pureed.
Preheat your oven to 350 F, and grease an 8-inch baking pan.
Melt chocolate by your preferred method, whether in a double boiler over water or in the microwave. Whisk melted chocolate into sugar, egg and egg white, pureed prunes, vanilla, and salt. Keep whisking until you have a smooth mixture.
In another bowl, stir flour and cocoa powder together. Then add the dry mixture to the liquid chocolate mix, and stir until just combined. Pour batter into the pan, and bake for about half an hour. An inserted toothpick should come out clean.
Mango Squares
These sweet squares are a great dessert and a nice change from the more typical fruits we usually have around the house.
For the crust:
• 1 cup flour
• ¼ cup icing sugar
• ½ cup butter
For the filling:
• 1 cup dried mango pieces, chopped
• 1 cup brown sugar
• 1/3 cup flour
• 2 eggs, lightly beaten
• ½ tsp. baking powder
• ¼ tsp. lemon extract
Preheat your oven to 350 F, and then start to simmer the dried mango pieces in just enough water to cover. They will take about 15 minutes to soften up. Meanwhile, you can start the crust.
In a mixing bowl, mix the first measure of flour with icing sugar. Once they are mixed, cut in the butter until you have a mix of coarse crumbs. Spoon this into a greased 9 x 9-inch baking pan. Press down and into the corners to make a firm crust. Bake for about ten minutes until it starts to brown.
For the filling, stir together the softened mango along with the remaining ingredients in another bowl. Mix until well blended. Pour out over the baked crust. Spread it to cover evenly. Cover the pan, and bake for 20 minutes until the filling firms up. Let it cool before cutting into squares or bars.
Blueberry and Lemon Scones
These baked treats are not that sweet, and they are nice as a dessert or just to go with a cup of coffee.
• 3 cups flour
• 4 ¼ tsp. baking powder
• 1 tsp. salt
• ½ cup sugar
• ¾ cup butter, cut up
• 1 ½ cups dried blueberries
• 1 cup milk
• 3 Tbsp. grated dry lemon peel
Start your oven heating to 425 F.
Whisk flour and sugar together, and then cut in the butter until you have coarse crumbs. Stir in blueberries. Add milk and lemon peel, and stir until you have firm dough. Turn out onto a floured surface, and give it a few kneads. Split in half, and form each piece into a thick disk. Slice each into six wedges.
Place pieces on a greased baking sheet. Bake for about 20 minutes or until a toothpick comes out clean.
Growing Your Own Fruit
Fruit is easy to grow on your own, although some might not be that suitable for small spaces. In general, fruits are perennials, which mean your plants will continue to grow and produce fruit for years after you initially plant them. It also can mean that it can take a few years to grow large enough to begin giving you a harvest, so patience will be required.
This goes for trees and some bush fruit, such as blueberries. Raspberries and grapes may take a year or two to get established as well. For a quicker fruit harvest, cantaloupe, watermelon, and strawberries will all produce fruit in their first year. Cranberries can give fruit in their first year, but they are finicky when it comes to their soil, and home gardeners do not commonly grow them.
Because it can last several years, make sure you plant your fruit garden in a location where it will not be disturbed. Sunny and fertile locations with good drainage are best. Plan to add a dose of compost or aged manure each year (or more frequently) to keep the soil filled with nutrients.
Some fruit, such as raspberries, grapes, and possibly cantaloupes, should have some kind of support in place to keep the branches and vines up off the ground. There is nothing wrong with letting them grow naturally, but you will get a better fruit harvest with a few stakes, string, or a trellis. Fruit trees are self-sufficient but can require some pruning to keep the trees small and productive. Trimming back dead growth is a good practice even with smaller bushes such as blueberries and raspberries.
You also should know that some fruits, particularly the trees, would require two or more plants to get proper fertilization. Look for trees that are identified as being “self-fertile” if you only have room or need for one. A tree that requires a “mate” will not bear any fruit if planted alone.
Check your local growing zone (www.usna.usda.gov/Hardzone/ushzmap.html) on the next page to see what fruit plants can survive the winters in your area. Do not assume a fruit is too exotic or tropical for your backyard. Many fruit trees and plants have varieties that can survive in colder weather than you might expect.
For the novice gardener, look into starting strawberries first. They can be grown in a small area (even a container) and require little work to get your first berries. Cantaloupes and watermelon are two other good choices to start with because they are annuals. You will just need a little more room because they do spread out unless you use supports. Even someone new at gardening can do well with trees, although they represent a larger cash and time investment and can produce many fruit.