Chapter 3
Implement Solutions for Apps
Azure App Service is a managed platform used to quickly build, deploy, and scale web apps in the cloud. App Service supports applications built using common frameworks such as .NET, .NET Core, Node.js, Java, PHP, Ruby, or Python. One of the biggest advantages to using App Service is the ability to instantly achieve enterprise-grade performance, security, and compliance without having to worry about routine maintenance and operational tasks.
In this chapter, you learn how to create and deploy web applications that run in the Azure App Service environment, and you’ll gain an understanding of modern patterns and practices used to build and deploy containerized applications.
Skills covered in this chapter:
Skill 3.1: Implement an Application Infrastructure
Azure App Service gives you the ability to build and host web apps, mobile back ends, and RESTful APIs without getting bogged down in the depths of managing traditional infrastructure. Offloading the heavy lifting of server maintenance, patching, and backups gives you the freedom to concentrate on your application. App Service includes Microsoft’s best practices for high availability and load balancing as part of this managed service offering. You can easily enable and configure autoscaling and deploy Windows or Linux-based applications from common deployment sources such as GitHub, Azure DevOps, or any local Git repo.
This skill covers how to:
Create and configure Azure App Service
Microsoft offers a variety of methods for deploying web apps in Azure App Service. The term web app simply refers to a managed application running in App Service. You can use the Azure portal to create a web app, and you also can use the Azure CLI, PowerShell, and other IDE-based tools such as Visual Studio that provide integration with the Azure platform.
To create an Azure App Service web app, start by signing in to the Azure portal and use the following procedure: Navigate to the App Services bookmark on the left side of the Azure portal.
Click on Add to create a new web app.
On the Web App screen (see Figure 3-1), configure the following options and then click Review And Create:
■ Subscription. Select the appropriate subscription for the web app resource. You can have different subscriptions in your enterprise that are dedicated to development or production environments or are dedicated for use by specific teams in your organization.
■ Resource Group. Select an existing or new resource group where the web app will reside. Remember that you can deploy multiple resources into a group and delegate access control at the resource group level if needed.
■ Name. Enter a globally unique host name for your web app under azurewebsites.net. This might take several attempts because many host names are already in use. Enter the name for your web app in all lowercase letters. It should have between 3 and 24 characters.
■ Publish. Select Code as the Publish option unless you’re deploying a web app that has been packaged into a Docker container image.
■ Runtime Stack. Select the appropriate runtime stack for your application. Multiple runtimes are supported in App Service, including .NET Core, ASP.NET, Java, Node, and Python.
■ Region. Choose the appropriate region to host your web app. Keep in mind that proximity between users and application infrastructure might be very sensitive, depending on the type of web application you’re deploying. It’s a common practice to host cloud resources in regions closest to users.
■ App Service Plan. Select a new or existing App Service Plan, which is the managed infrastructure hosting your web apps. Various pricing tiers are available that provide everything from basic capability all the way to very advanced capabilities. The Standard S1 plan is the recommended minimum pricing tier for production web apps.

FIGURE 3-1 Creating an App Service Web App
 Exam Tip
You can also use the command line to deploy your web apps. For example, use the az webapp create command with the Azure CLI to perform this task from your local terminal or Azure Cloud Shell instance.
Create an App Service web app for containers
The ease of Azure App Service makes deploying Windows or Linux container–based web apps a simple process. You can pull Docker container images hosted in the Docker Hub or use your own private Azure Container Registry. One of the greatest benefits to this approach is that you can include all the dependencies you need for your application inside your container images. Microsoft will take care of the patching, high availability, and load balancing that powers the underlying infrastructure.
Creating a web app for containers is a similar process to building a standard web app. Use the following procedure in the Azure portal to create a containerized web app in App Services:
Exam Tip
Azure PowerShell is a common command-line alternative used to deploy web apps. You can use the New-AzWebApp cmdlet to script the deployment of standard or containerized web apps in App Service.
Navigate to the App Services bookmark on the left side of the Azure Portal.
Click Add to create a new web app.
Provide all the required details for your web app and make sure to set the Publish option to Docker Image; then click Next.
Enter the following details for your Docker container image, as shown in Figure 3-2, and then click Review And Create:
■ Options. Selecting Single Container is the most common option. Multi-container support using Docker Compose is currently planned for a future release.
■ Image Source. The Docker Hub is the default container registry for public images. You also can select your own private registry or an Azure Container Registry resource.
■ Access Type. Public images are the default access type for Docker Hub; however, private images are also supported with App Service web apps. If you select Private for your access type, you’re prompted to enter your registry credentials.
■ Image And Tag. Enter the name of your container image and corresponding tag (optional).
■ Startup Command. Optional startup scripts or commands are supported. This is often unnecessary because container images can be built to use a specific startup command by default.

FIGURE 3-2 Configuring the Docker image settings
Need More Review? App Service Overview
To review further details about Azure App Service, refer to the Microsoft Azure documentation at https://docs.microsoft.com/en-us/azure/app-service/overview.
Configure networking for an App Service
Azure Virtual Networks (VNets) allow you to place many Azure resources in a private and fully isolated virtual network used to host virtual machines, load balancers, and more. Azure App Service provides a VNet integration feature that allows your apps to access resources inside a VNet.
For example, imagine you were hosting a Microsoft SQL database on an Azure Virtual Machine. You could use VNet integration to allow your App Service to communicate with the SQL server, without sending that traffic over the public Internet.
It’s important to note that the VNet integration functionality is a mechanism that allows your apps to access isolated network resources. It doesn’t place the App Service inside the VNet.
If you want to enforce private network access for your App Service applications, then you should choose the App Service Environments (ASE) service plan that offers fully isolated and dedicated networking for App Service. ASE places your App Service resources within your Azure VNet.
If you’re not using ASE, you can follow the process for giving your App Services access to resources in your VNet requires using the following procedure:
Go to the Networking UI in the App Service portal. Under VNet Integration, select Click Here To Configure.
Select Add VNet, as shown in Figure 3-3.

FIGURE 3-3 Enabling VNet Integration in App Service
The Virtual Network drop-down menu contains all the Azure Resource Manager virtual networks in your subscription in the same region. Select the VNet you want to integrate with, as shown in Figure 3-4.

FIGURE 3-4 Selecting a VNet and Subnet for App Service VNet Integration
Create and manage deployment slots
Azure App Services running in the Standard, Premium, or Isolated App Service plan tiers support the concept of deployment slots, which allow you to run different live apps with their own host names. Deployment slots are typically used to stage new versions of your application and ultimately, swap new versions into production.
Each production-grade App Service plan tier supports a different number of deployment slots. There’s always an implicit production slot.
Deploying your application to a non-production slot allows you to validate app changes in a staging slot before swapping it into a production slot.
Use the following procedure to add a slot and swap the code into your production environment:
Navigate to the properties of an existing web app in the Azure portal.
Scroll down on the left-hand side and select Deployment Slots.
After clicking the Add Slot button, give the slot a name and choose the default clone setting in the Clone Settings From menu, as shown in Figure 3-5. You can then deploy new versions of your application to this new slot.

FIGURE 3-5 Creating an App Service Deployment Slot
Finally, you can bring a new version of your application into production, as shown in Figure 3-6.
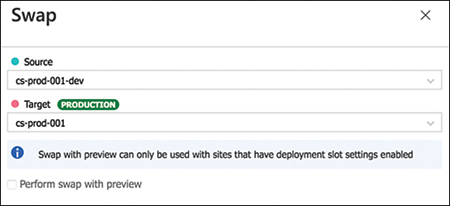
FIGURE 3-6 Creating an App Service deployment slot
When you swap two slots (usually from a staging slot into the production slot), App Service ensures that the target slot doesn’t experience downtime.
Implement Logic Apps
Azure Logic Apps help you schedule, automate, and orchestrate tasks, business processes, and workflows. You can use Logic Apps to integrate applications, data, systems, and services across enterprises or organizations.
Every logic app workflow starts with a trigger, which fires when a specific event happens. Each time that the trigger fires, the Logic Apps engine creates a logic app instance that runs the actions in the workflow. These actions can also include data conversions and workflow controls, such as conditional statements, switch statements, loops, and branching.
For example, you can use Logic Apps to send email notifications with Office 365 when events take place in different apps and services. Or you can move files uploaded via SFTP to Azure Storage. Another common workflow pattern would be to monitor social media to analyze the sentiment of tweets and create alerts or tasks for items that need to be reviewed.
Complete the following steps to create your first Azure Logic App:
From the Azure portal, in the search box, find and select Logic Apps.
On the Logic Apps page, select Add.
On the Logic App pane, provide details about your logic app. After you’re done, select Create.
After Azure deploys your app, on the Azure toolbar, select Notifications > Go To Resource for your deployed logic app.
The Logic Apps Designer opens and shows a page with an introduction video and commonly used triggers. Under Templates, select Blank Logic App. This will take you to a blank canvas in the Logic App designer, as shown in Figure 3-7.

FIGURE 3-7 Creating a blank Logic App
Exam Tip
Make sure that you understand the process for creating a blank Logic App, along with how to build a trigger and an action to a Logic App, such as sending new RSS items via email.
Once you have a blank Logic App, create a trigger and an action using the following process. This example explains how to send new RSS feed items via email:
With the Logic App designer, within the search box, enter rss to find the RSS connector. From the Triggers list, select the When A Feed Item Is Published trigger.
Provide the RSS Feed URL and define the frequency at which you want to check for new items by setting a value in How Often Do You Want To Check For Items?, as shown in Figure 3-8.

FIGURE 3-8 Creating an RSS trigger for a Logic App
Now add an action that sends an email when a new item appears in the RSS feed. Under the When A Feed Item Is Published trigger, select New Step.
Under Choose An Action and the search box, select All.
In the search box, enter send an email to find connectors that offer this action. From the Actions list, select the Send An Email action for the email service that you want to use, as shown in Figure 3-9.

FIGURE 3-9 Creating an email action for a Logic App
If your selected email connector prompts you to authenticate your identity, complete that step now to create a connection between your logic app and your email service.
Save your logic app. To manually start your logic app, on the designer toolbar bar, select Run.
Note Logic Apps Quickstart
Learn how to build your first workflow by using Azure Logic Apps, such as creating a blank logic app, adding a trigger and an action, and then testing your logic app at http://docs.microsoft.com/en-us/azure/logic-apps/quickstart-create-first-logic-app-workflow.
Implement Azure Functions
Azure Functions allows you to focus on code without worrying about application infrastructure. With Azure Functions, the cloud infrastructure provides the compute environment you need to keep your application running at any scale.
Functions are “triggered” by a specific type of event, which includes triggers responding to changes in data, responding to messages, running on a schedule, or as the result of an HTTP request. Integration with other services is streamlined by using bindings. Bindings give you declarative access to a wide variety of Azure and third-party services.
Functions are a great solution for processing bulk data, integrating systems, working with the Internet of Things (IoT), and building simple APIs and micro-services.
Complete the following steps to create your first Azure Function App and serverless function:
Navigate to Function App on the left side of the Azure portal.
Click Create Function App.
Complete the form fields to define the desired Resource Group, Function App Name, and Runtime Stack for your application, as shown in Figure 3-10, and then click Next. These are the available language frameworks that can be used to develop and run your functions.
■ .NET Core
■ Java
■ Python
■ PowerShell Core

FIGURE 3-10 Creating an Azure Function App
Select the appropriate pricing Plan Type and click Create to build your function app, as shown in Figure 3-11. These are the Plan Type options:
■ Consumption Plan. When you’re using the Consumption plan, instances of the Azure Functions host are dynamically added and removed based on the number of incoming events. This serverless plan scales automatically, and you’re only charged for compute resources only when your functions are running. On a Consumption plan, a function execution times out after a configurable period of time.
■ Premium Plan. When you’re using the Premium plan, instances of the Azure Functions host are added and removed based on the number of incoming events just like the Consumption plan.
■ Dedicated (App Service) Plan. Your function apps can also run on the same dedicated VMs as other App Service apps (Basic, Standard, Premium, and Isolated SKUs). Consider an App Service plan when you have existing, underutilized VMs that are already running other App Service instances.

FIGURE 3-11 Configuring Azure Function App hosting options
Exam Tip
Make sure that you understand that you can publish code directly to a Function App from development tools like Visual Studio Code and Visual Studio, or from continuous delivery systems such as Azure DevOps.
After you have a function app up and running you can complete the following steps to build your first function:
Navigate to your Function App in the Azure portal.
Click Functions > Add.
Select a template to trigger your function. In this example, we’ll select HTTP Trigger.
Note HTTP Trigger Template
The HTTP Trigger template creates a function that accepts input from an HTTP post operation. The function is looking specifically for a “name” key in the query string or in the request body. This code can be replaced with any logic that makes sense for your application.
Give your function a name, set your authorization level, and click Create Function.
Click the Code + Test option to bring up the code editor.
Click Test/Run to invoke your function with a query string parameter for a “Name” key, as shown in Figure 3-12.

FIGURE 3-12 Configuring test inputs for an Azure Function in the portal
Review the output in the portal, as shown in Figure 3-13.

FIGURE 3-13 Reviewing the output from an Azure Function in the portal
Note Create Azure Functions with Visual Studio Code
Learn how to use Visual Studio Code to create a C# class library-based function that responds to HTTP requests at http://docs.microsoft.com/en-us/azure/azure-functions/functions-create-first-function-vs-code.
Skill 3.2: Implement Container-based Applications
Containerization has completely disrupted the IT industry over the past several years, and there’s no sign of the trend slowing down. The Azure team understands this and has gone to great lengths to make it incredibly simple to deploy containerized applications in App Service.
This skill covers how to:
Create a container image
Container images are the artifacts that make it possible to deploy modern applications at speeds never seen before. Applications run inside containers, which are launched from container images. Think of container images as templates that can be used to start up containers. We use container images to package up our code and application dependencies, and then we can invoke running instances of these images to create containers. The Docker toolset has become the gold standard for managing this entire process.
You need to be familiar with the following procedure for creating Docker container images:
Create a new text file called Dockerfile (make sure you do not add a file extension).
Add commands, like those shown in Figure 3-14, to automate the build process for a Node.js application packaged into a container image. Each instruction in the Dockerfile adds a read-only layer to the container image.
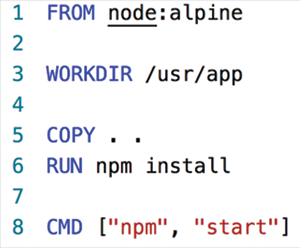
FIGURE 3-14 Writing a Dockerfile
■ FROM. Create a layer using the official Node.js container image based on Alpine Linux.
■ WORKDIR. Set the working directory for the application.
■ COPY. Add files from the developer machine into the Docker image.
■ RUN. Install all the required npm packages that the application will need.
■ CMD. Use to specify the command to run when the container is started.
The final step is to use the Docker client to build your container image. Docker Desktop, which runs on Mac and Windows, is used by millions of developers to develop apps locally with Docker. You can use the Docker Build command after you’ve installed Docker Desktop to create a container image using your Dockerfile, as shown in Figure 3-15.

FIGURE 3-15 Running a Docker Build
Note Dockerfile Reference
The Docker image build process is incredibly versatile. To learn more about writing your own Dockerfile, visit the official Docker reference at https://docs.docker.com/engine/reference/builder/.
Publish and automate image deployment to the Azure Container Registry
Container registry services are used as a central location for storing container images. The Azure Container Registry (ACR) is a fully managed Docker registry service based on the open-source Docker Registry. You can build an ACR resource and integrate a variety of Azure services with your container registry. This is useful for keeping images in close proximity to application infrastructure, and you can use native security controls in Azure to permit or deny access to ACR.
After you’ve built your own container images, you can push them to an ACR instance. Complete the steps in the following procedure to build an ACR resource to store your container images:
Log into the Azure portal and click Create A New Resource.
Select Containers from the Azure Marketplace and click Container Registry.
Enter the registry details, as shown in Figure 3-16, and click Create.

FIGURE 3-16 Creating an ACR resource
■ Registry Name. Enter a globally unique hostname under azurecr.io. Follow standard DNS naming rules and use alphanumeric characters only.
■ Admin User. Enable to use an ACR-specific username and password to log into the registry using tools like the Docker CLI.
■ SKU. Select the pricing tier. The tier you select dictates the performance and scalability of your ACR resource.
Navigate to the properties of your ACR resource after provisioning has completed. Click Access Keys under Settings to retrieve the log-in server details and password for your ACR admin user account.
Log in to your ACR instance using the Docker client (for example, docker login <your ACR name>.azurecr.io).
After logging into ACR, you can publish images using the Docker CLI, as shown in Figure 3-17.

FIGURE 3-17 Tagging and pushing a container image to ACR
■ docker tag. Use the docker tag command to tag your image with the ACR name in the format of <ACR hostname>/<your image name>. Note that this can also be done during build time when creating the image with docker build.
■ docker push. Publish the image to ACR using the registry hostname included as part of the image name.
Exam Tip
You can use an Azure AD service principal to delegate access to your ACR resource in addition to an admin user.
Implement an application that runs on an Azure Container Instance
The ability to quickly spin up applications inside containers opens numerous possibilities. In addition to running containers in App Service, you also can take advantage of a model that provides containers as a service. Azure Container Instances (ACI) are a service offering that allows you to spin up containers on demand, without any existing infrastructure such as virtual machines or even App Service Plans. ACI enables you to design and deploy your applications instead of managing the infrastructure that runs them.
Use the following procedure to create an Azure Container Instance:
Log into the Azure portal and click Create A New Resource.
Select Containers from the Azure Marketplace and click Container Instances.
Enter the ACI details, as shown in Figure 3-18, and click Create. These inputs provide the details about your container instance, including name, image type, and location.
■ Container Name. Enter a meaningful name for your container.
■ Image Type. Select Public if your image is hosted in a public registry. Otherwise, choose Private to enable the options to include your registry log-in details.
■ Image Name. Enter the exact name of your container image.
■ Image Registry Login Server. Provide the fully qualified domain name of your log-in server. If you’re using ACR, this will be your ACR login server name.
■ Image Registry User Name. Enter the username for your registry.
■ Image Registry Password. Provide your registry password.
■ OS Type. ACI supports both Linux and Windows-based containers. Select the appropriate OS type from the list.
■ Size. ACI requires that you set resource limits for each instance of your application. This also controls the pricing for the ACI resource, and you can change the size at any time after the ACI resource has been provisioned.

FIGURE 3-18 Creating an Azure Container Instance
Exam Tip
ACI is a great solution for basic applications and task automation. For production scenarios that require full orchestration, Microsoft recommends running containers on Azure Kubernetes Service (AKS).
Manage container settings by using code
The Azure platform provides access to numerous language-specific SDKs and tools that you can use to programmatically manage your infrastructure. Developers can use .NET, Java, Node.js, PHP, Python, and Go to build applications that interact with your Azure resources.
In addition to the SDKs, Microsoft offers support for PowerShell and the Azure CLI for authoring operational scripts and for running ad-hoc administration commands locally or in the interactive Cloud Shell.
Azure solution architects are expected to understand how to tap into these automation capabilities to manage container settings using code. This is true whether the code is part of a robust application built by developers or used in provisioning scripts created by the DevOps team. Since the SDKs and command-line tools are all leveraging the Azure RESTful APIs behind the scenes, Azure solution architects can leverage any tool of their choice to get the job done.
Use the following procedure with Azure CLI to discover the commands you can use to manage container settings using code:
Navigate to shell.azure.com in your web browser and start a new Cloud Shell instance.
Run the following command to review all the subcommands available to manage your Azure Container Registry (ACR) instances:
az acr --help
Run the following command to review all the subcommands available to manage your Azure Container Instances (ACIs):
az container --help
To create a resource, such as an Azure Container Instance (ACI), use the az container create command:
az container create \
--resource-group Core-Infrastructure \
--name mynodeapp \
--image mynodeapp:latest \
--cpu 1 \
--memory 1
Once you have an ACI instance running, you can manage the settings and lifecycle of the instance using code, as shown in the following command that restarts the instance:
az container restart --name mynodeapp
![]() Exam Tip
Exam Tip
Microsoft might test your knowledge using performance-based, hands-on tasks that need to be completed in the Azure portal. Be prepared to use the Cloud Shell to gain access to Azure CLI or PowerShell, and make sure you understand how to use the help system to discover commands and the appropriate syntax to complete the task.
Configure Azure Kubernetes Service
For production-grade applications, Microsoft recommends running containers using the fully managed Azure Kubernetes Service (AKS), making it quick and easy to deploy and manage containerized applications. AKS eliminates the burden of ongoing operations and maintenance required by managing your own Kubernetes deployment. As a hosted service, Azure handles critical Kubernetes tasks like health monitoring and maintenance, and the AKS is free to use. You pay only for the agent nodes within your clusters, not for master nodes controlling your clusters.
Use the following procedure to create an Azure Kubernetes Service (AKS) cluster using the Azure CLI:
Navigate to shell.azure.com in your web browser and start a new Cloud Shell instance.
Create a new resource group using the following Azure CLI command:
az group create \
--name AKS \
--location eastus
Create a new AKS cluster using the following Azure CLI command:
az aks create \
   --resource-group AKS \
   --name AKSCluster01 \
   --node-count 1 \
   --enable-addons monitoring \
   --generate-ssh-keys
After the AKS cluster has been created, you can connect and manage the cluster from the command line. First, install the AKS CLI inside your cloud shell instance using the following command:
az aks install-cli
Download your AKS credentials and configure the AKS CLI to use them within your shell session:
az aks get-credentials \
--resource-group AKS \
--name AKSCluster01
Verify that your connection to the AKS cluster is working properly by using the kubectl command to retrieve a list of cluster nodes.
kubectl get nodes
Note Azure Container Service (ACS)
Prior to releasing the Azure Kubernetes Service (AKS), Microsoft offered the Azure Container Service (ACS) as a managed solution that provided multiple orchestration systems as a service, including Kubernetes, Docker Swarm, and DC/OS. ACS has been deprecated, and existing ACS customers will need to migrate to AKS.
Chapter summary
■ Azure App Service gives you the ability to build and host web apps, mobile back ends, and RESTful APIs without having to manage server, network, and storage infrastructure.
■ App Service supports applications built using common frameworks such as .NET, .NET Core, Node.js, Java, PHP, Ruby, or Python.
■ You can deploy web apps using the Azure portal, CLI, PowerShell, or any of the available SDKs provided by Microsoft.
■ App Service supports both Windows and Linux applications, including Docker containers.
■ Azure web apps are instances of an App Service that run within an App Service Plan.
■ Azure Container Instances have no dependencies on an App Service Plan.
■ Azure provides rich support for Docker containers and images can be built and stored in the Azure Container Registry (ACR).
■ The Azure Kubernetes Service (AKS) is a fully managed container orchestration system that makes it easier for teams to run containers in production.
Thought experiment
In this thought experiment, demonstrate your skills and knowledge of the topics covered in this chapter. You can find answers to this thought experiment in the next section.
You’re an Azure architect for Contoso Ltd. You’ve been asked to design and implement a solution to run a collection of line-of-business applications in the Azure cloud. Answer the following questions about leveraging Azure App Service to deploy your solution for Contoso.
1. You need to move a web application to Azure that the Human Resources department uses to train corporate employees in the Los Angeles branch office. The web app implements an embedded video player that serves video training content to each user. All videos are produced in the highest possible quality. How should you architect the solution to reduce the latency between the users and the application infrastructure?
2. You’ve been tasked with refactoring an on-premises web application to run inside a Docker container in Azure App Service. You need to ensure that container images can be accessed only by certain members of the IT staff. How can you accomplish this with the least amount of administrative effort?
3. You currently have a nightly task that runs a PowerShell script on an on-premises Windows server. The process generates a report and sends the output to the IT support staff at Contoso headquarters. You need to move this process as part of Contoso’s migration to Azure, but you need to do so using the least amount of administrative effort. You already have plans to deploy several websites in Azure App Service. What should you do to run the nightly process in Azure?
Thought experiment answers
This section contains the solution to the thought experiment. Each answer explains why the answer choice is correct.
1. Deploy the App Service infrastructure in a west coast–based Azure region. This will put the infrastructure in close proximity to the users in the Los Angeles branch office. For global applications, consider using the Azure CDN service to distribute static content to edge locations available across the Azure global infrastructure.
2. Deploy an Azure Container Registry (ACR) resource inside your Azure subscription. Disable admin access and delegate control to the ACR resource using Role-Based Access Control (RBAC).
3. Create an Azure WebJob within one of the existing web app resources running in your Azure subscription. Upload the PowerShell script and configure a triggered WebJob that runs on a daily schedule.