Chapter 4
Implement and manage data platforms
In today’s era of modern application development in the cloud, the strategy for storing application data in the cloud is critical for any application success. Cloud-native applications require you to adapt to new approaches and various modern tools and services to manage data in the cloud securely and efficiently.
Microsoft Azure platform provides a rich set of data storage solutions designed specifically for different data classification requirements of your application in the cloud.
The AZ-303 exam expects you to know the different data platform storage solutions and choose the optimal solution based on the classification of application data, its usage pattern, and performance requirements.
Skills covered in this chapter:
Skill 4.1: Implement NoSQL Databases
Nowadays, the data generated and consumed by applications, including a wide variety of IoT devices, social networking sites, is enormous. Handling such massive data with traditional Relational Database Management Systems (RDBMS) sometimes becomes daunting and inefficient. The heterogeneity and complexity of the data (also known as Big Data) emitted by numerous connected devices is also difficult to manage using traditional database storage solutions.
To efficiently handle such a large volume of data, the concept of NoSQL databases comes in. NoSQL databases are non-relational databases that offer horizontal scalability and are cost-efficient compared to relational database systems. NoSQL databases also provide more flexible data models and data access patterns optimized for large and complex datasets. NoSQL databases offer the following data models:
■ Key-value databases. A key-value database is a non-relational database that uses a key-value pair method to store data. The key represents a unique identifier for a given collection of data values that allows you to perform simple commands like GET, PUT, or DELETE. Key-value databases are highly partitionable and support horizontal scaling at a massive scale. Microsoft Azure platform provides the following popular key-value database visualizations:
■ Azure Table Storage
■ Azure Cosmos DB Table API
■ Azure Cache for Redis
■ Document databases. A document database model enables us to store data using a markup language like XML, JSON, and YAML or even use plain text. The document databases are schema-agnostic and do not require all the documents to have the same structure. Azure Cosmos DB is a popular document database that supports a wide variety of powerful and intuitive APIs, software SDKs, and languages to manage a large volume of semi-structured data.
■ Graph databases. Graph databases are typically designed to store and visualize the relationship between data entities. A graph database has two types of information: nodes and edges. Nodes denote a body, and the edges indicate the relationship between entities.
■ Column family databases. Column family databases look similar to relational databases, with data stored in rows and columns. Column family databases allow you to group columns based on logically related entities to form a column family, wherein each column holds the data for all grouped entities. Apache HBase is a column family database.
This skill covers how to:
Configure storage account tables
Azure Table storage service provides a massively scalable data storage option for structured, NoSQL, and key-value data storage. Azure Table storage is schemaless storage that stores data values in an entity that can change over time as application data evolves. The service provides REST APIs to interact with the data for insert, update, delete, and query operations using the OData protocol and LINQ queries using .NET libraries. The following are some common use cases for Azure Table storage:
■ You need cost-effective storage to handle terabytes (TBs) of structured data that scales at-large and on-demand.
■ Your application stores a massive dataset, and you need high throughput and low latency.
■ Your application data needs to be secured with disaster recovery, reliable backup strategy, load balancing, replication, and high availability.
In the following section, you learn the underlying data model of the Azure Table storage service.
Azure Table storage service underlying data model
As we learned in the previous section, Azure Table storage service lets you store structured, NoSQL datasets using a schemaless design. Figure 4-1 shows the underlying data model of Azure Table storage service.

FIGURE 4-1 Azure Table storage data model
The following are the key elements of the Azure Table Storage as you see in the previous figure 4-1.
■ Storage Account. The storage account name is a globally unique identifier that serves as parent namespace for a Table service. Authentication and authorization on the Table service is done at the storage account level. You can create one or many tables within the storage account. For example, in the previous figure 4-1, we have two separate tables: traveler and reservation to store the respective information. All tables you create underneath the storage account would get a unique base URI to interact with the service using REST APIs, PowerShell, or Azure CLI. An example of a base URI is https://<storage-account>.table.core.windows.net/. Storage account comes with two SKUs as follows:
■ General-Purpose V2. Microsoft recommends using General-Purpose V2 to take advantage of Azure storage’s latest features.
■ General-Purpose V1. This type is the legacy SKU and is kept for backward compatibility with older deployments. General-Purpose V1 does not support the new Hot, Cool, or Archive access tiers or zone-level replication.
■ Table, Entities, and Properties. Table within the storage account store a collection of entities in rows. Entities have a collection of properties with a key-value pair that is similar to a column. An entity in the storage account can store up to 1MB of data and include up to 252 properties. Each entity has three system-defined properties, as mentioned below.
■ PartitionKey. A partition key is a unique identifier for a given partition of data within a table. It is designed to support load balancing across different storage nodes for better performance and throughput. The partition key is the first part of the clustered index, and it is indexed by default for faster lookup. The name of the partition key can be a string up to 1KB in size.
■ RowKey. A row key is a unique identifier within a partition and is designed to form a second part of the clustered index for a given entity. You must specify both a row key and a partition key while performing CRUD operation for an entity within a table. Like the partition key, a row key is an index column with a size limit of 1KB.
■ Timestamp. The Timestamp property is a date-time system-derived attribute value applied automatically on the server-side to record the time an entity was last modified. The Azure Table storage service does not allow you to set a value externally and uses the previous modified Timestamp (LTM) internally to manage optimistic concurrency.
The REST API lets you interact with the tables within a storage account and perform insert, update, and delete operations on the entities.
https://<storage-account>.table.core.windows.net/<tablename>
The simple Azure Table storage service design is shown in Figure 4-2.

FIGURE 4-2 A simple table design
As you see in Figure 4-2, the schemaless nature of the table allows you to store entities with a different set of properties within the same table.
The custom, user-defined properties for each of the separate entities can have a data type, such as a string or integer. By default, properties have the string data type unless you specify otherwise. The Azure Table storage service also allows storing complex data types in the properties using a different serialized format, such as JSON or XML.
More Information? Design a Scalable Partition
While Azure storage is massively scalable, it is crucial to design table partitions to take advantage of auto-scaling and load balancing across different server nodes. See the comprehensive Microsoft documentation “Design a scalable partitioning strategy for Azure Table storage” at https://docs.microsoft.com/en-us/rest/api/storageservices/designing-a-scalable-partitioning-strategy-for-azure-table-storage#gdft.
Create an Azure Table storage service
As stated in the previous section, before you create an Azure Table storage service, you need a storage account as its base unit. You can accomplish this using the Azure portal, Azure PowerShell, or Azure CLI.
 Exam Tip
The AZ-303 exam expects that you have at least basic knowledge of the PowerShell az module or Azure CLI (cross-platform command-line interface) to interact with Azure services. The comprehensive list of PowerShell and Azure CLI commands to manage Azure Table storage service is published at https://docs.microsoft.com/en-us/cli/azure/storage/table?view=azure-cli-latest#az-storage-table-create.
More Information? Learn More about Azure CLI
To learn more about the Azure CLI commands and different native thin client SDKs for cross-platform, visit the Microsoft documentation at https://docs.microsoft.com/en-us/cli/azure/?view=azure-cli-latest.
This code snippet is an example of an Azure CLI command to create an Azure Table storage service within an Azure storage account:
az storage table create --name [--account-key] [--account-name]
■ --name The name is a required parameter representing the unique name of the table to be created. It should contain only alphanumeric characters and cannot begin with a numeric character. It is case insensitive and must be from 3 to 63 characters long.
■ --account-key This is a secure storage account key.
■ --account-name This represents a storage account name.
Follow these steps to create an Azure Table storage using Azure Cloud Shell. The steps assume that you already have an Azure subscription and a storage account. If not, visit https://azure.microsoft.com/en-in/free/ to create one.
Log in to the Azure portal at https://portal.azure.com/ with your subscription credentials.
On the top right corner, below the user information, click on the Cloud Shell button, as shown in Figure 4-3.

FIGURE 4-3 Azure Portal Icon to Open Cloud Shell
Choose the bash runtime and run the following command on the cloud shell, as shown in Figure 4-4.
az storage table create --name az303table --account-key cMwq9LmP06vGxxxxxxxxxxxxx
xxxxxxxxalUDpKJ7irIjLdZe8o+lH38c8ZKIlsT5pu/y/YCupazeNGgA== --account-name sgaz303

FIGURE 4-4 Azure Cloud shell console
Once the command is executed, you will see a created: true message, as shown in Figure 4-4. The message indicates that the table has been created. You can see the table by navigating to the storage account within the Azure portal, as shown in Figure 4-5.

FIGURE 4-5 Azure Table storage blade
Configure Table Storage Data Access
You can use storage account keys that Azure generates when you spin up a storage account. Using the native storage keys or exposing these keys to developers might not be a good practice from a security standpoint. Also, using keys would not give you the ability to configure granular, time-bound access to one or more storage account services or allow you to revoke access on the services when needed. This is where shared access signature (SAS) and stored access policies come in:
■ Shared Access Signature. Shared access signature (SAS) on the storage account allows you to configure delegated and granular access to the storage account services. A shared access signature is available in the following types:
■ User delegation SAS. This kind is secured using Azure AD (AAD) and applies to Blob storage only.
■ Service SAS. This is a service SAS that is secured by a storage account key and is typically used to delegate access to only one of the Azure storage services.
■ Account SAS. Account SAS is also secured by a storage account key and is used to delegate access to one or more storage account services simultaneously.
■ Stored access policy. Stored access policy is an additional level of granular control on the service level SAS. When you use a service SAS with a stored access policy, it allows you to revoke or change the SAS access parameters, such as start time, expire time, and permissions on the signature after the SAS has been issued.
The following steps show how you would configure a stored access policy on the Azure Table storage service using Azure CLI.
Log in to the Azure portal at https://portal.azure.com/ using your subscription credentials.
Open the browser-based cloud shell and follow the previous set of steps.
Run the following CLI command, the components of which are explained following the command:
az storage table policy create --name readupdateonly --table-name az303table
--account-name sgaz303 --account-key <account-key goes here> --expiry
2020-12-30'T'16:23:00'Z' --start 2020-3-01'T'16:23:00'Z' --permission ru
■ --name Specifies the policy name.
■ --table-name Specifies the table name on which the policy is created.
■ --account-name The storage account name.
■ --account-key A secure storage account key.
■ --expiry Expiration UTC datetime in (Y-m-d'T'H:M:S'Z').
■ --start start time in UTC datetime in (Y-m-d'T'H:M:S'Z')
■ --permission Specifies the allowed operations. In this example, we allowed only read and update operations. Allowed values are as follows:
■ (r) for read/query
■ (a) for add
■ (u) for update
■ (d) for delete
After running the command on the cloud shell, you will see a stored access policy created on the Azure Table account service, as shown in Figure 4-6.

FIGURE 4-6 Stored access policy on Azure Table storage
Choose between Azure Table storage service and Cosmos DB Table API
Azure Cosmos DB Table API is the latest futuristic NoSQL database offering from the Azure Cosmos DB product family. Microsoft recommends that you use Cosmos DB Table API for new applications so that you take advantage of the latest product features, such as multi-model database support, turnkey global distribution, auto-failover, and auto-indexing for better performance.
Cosmos DB Table API and Azure Table storage use the same data model for CRUD operations. Therefore, for existing applications, you can seamlessly migrate from Azure Table storage to Azure Cosmos DB without changing the application code. In the upcoming section, you learn about Azure Cosmos DB and its supported APIs at length.
Azure Cosmos DB
In this section, you learn what Cosmos DB is, why it has been such a popular database for enterprise-grade applications, and what tools, languages, and industry-standard APIs it supports.
What is Cosmos DB?
Azure Cosmos DB is Microsoft’s globally distributed, multi-model database. Azure Cosmos DB enables you to elastically and independently scale the throughput and storage across the globe with guaranteed throughput, low latency, and high availability.
The Cosmos DB offers the following benefits:
■ Guaranteed throughput. Cosmos DB guarantees the throughput and the performance at peak load. The performance level of Cosmos DB can be scaled elastically by setting Request Units (RUs).
■ Global distribution. With an ability to have multi-master replicas globally and built-in capability to invoke failover, Cosmos DB enables 99.999 percent read/write availability in each data center where Azure has its presence. The Cosmos DB multi-homing API is an additional feature to configure the application to point to the closest data center for low latency and better performance.
■ Multiple query model or multi query-API. The multi-model database support allows you to store data in your desired format, such as document, graph, or a key-value data model.
■ Choices of consistency modes. The Azure Cosmos DB replication protocol offers five well-defined, practical, and intuitive consistency models. Each model has a trade-off between consistency, performance throughput, and latency.
■ No schema or index management. The database engine is entirely schema-agnostic. Cosmos DB automatically indexes all data for faster query response.
Understand the Cosmos account
Azure Cosmos account is a logical construct that has a globally unique DNS name. For high availability, you can add or remove regions to your Cosmos account at any time with an ability to set up multiple masters/write replicas across different regions.
You can manage the Cosmos account in an Azure subscription either by using the Azure portal, Azure CLI, AZ PowerShell module, or by different language-specific SDKs. This section describes the essential fundamental concepts and mechanics of an Azure Cosmos account.
As of the writing of this book, you can create a maximum of 100 Azure Cosmos accounts under one Azure subscription. Under the Cosmos account, you can create one or more Cosmos databases, and within the database, you can create one or more containers. In the container, you put your data in the form of documents, key-value entities, column-family data, or graph data by choosing its appropriate APIs. Figure 4-7 gives you the visual view of what we’ve shared about the Cosmos account thus far.

FIGURE 4-7 Azure Cosmos account entities
Create a Cosmos account
To set up a Cosmos account using the Azure portal, use the following steps:
Sign in to the Azure portal https://portal.azure.com.
Under your subscription in the upper-left corner, select Create A Resource and search for Cosmos DB.
Click Create (see Figure 4-8).

FIGURE 4-8 Creating an Azure Cosmos account
On the Create Cosmos DB Account page, supply the basic mandatory information, as shown in Figure 4-9.
■ Subscription. The Azure subscription you need to create an account under.
■ Resource Group. Select existing or create a new resource group.
■ Account Name. Enter the name of the new Cosmos account. Azure appends documents.azure.com to the name to construct a unique URI.
■ API. The API determines the type of account to be created. We will look at supported APIs in the coming section.
■ Location. Choose the geographic location you need to host your Cosmos account.
■ Capacity In the capacity option, keep the default selected capacity as the Provisioned throughput, which is in general availability (GA). You can set up throughput at the container level or a database level. The provisioned throughput can be set up upfront, or you can Opt-in for auto-scale.
■ Apply Free Tier: The tier gives you 5 GB of data storage and the first 400 RUs (Request Units) free forever.
■ Account Type Pretty understood, you need to select Production for production workload and Non-Production for stating or Dev/Test workload.
■ You can skip the Network and TAG section and click Review + Create. It takes a few minutes for the deployment to complete. You can see the Cosmos account created by navigating to the Resource Group resources.

FIGURE 4-9 Create an Azure Cosmos Account wizard
Set appropriate consistency level for operations
In geo-distributed databases, you’re likely reading the data that isn’t the latest version, which is called a “dirty read.” The data consistency, latency, and performance don’t seem to show much of a difference within a data center as data replication is much faster and takes only a few milliseconds. However, in the geo-distribution scenario, when data replication takes several hundred milliseconds, the story is different, which increases the chances of dirty reads. The Cosmos DB provides the following data consistency options to choose from with trade-offs between latency, availability, and performance.
■ Strong. A strong consistency level ensures no dirty reads, and the client always reads the latest version of committed data across the multiple read replicas in single or multi-regions. The trade-off with a strong consistency option is the performance. When you write to a database, everyone waits for Cosmos DB to serve the latest writes after it has been saved across all read replicas.
■ Bounded Staleness. The bounded staleness option gives you the ability to decide how much stale data an application can tolerate. You can specify the out of date reads that you want to allow either by (X) version of updates of an item or by time interval (T) reads could lag behind by the writes.
■ Session. Session ensures that there are no dirty reads on the write regions. A session is scoped to a client session, and the client can read what they wrote instead of having to wait for data to be globally committed.
■ Consistent Prefix. Consistent prefix guarantees that reads are never out of order of the writes. For example, if an item in the database is updated three times with versions V1, V2, and V3, the client would always see V1, V1V2, or V1V2V3. The client would never see them out of order, like V2, V1V3, or V2V1V3.
■ Eventual. You probably use eventual consistency when you’re least worried about the freshness of data across the read replicas and the order of writes over time. All you care about is the highest level of availability and low latency.
To set up a desired consistency on the Cosmos DB, perform the following steps:
Log in to the Azure portal and navigate to your Cosmos account under Resource Group.
On the Default Consistency pane (see Figure 4-10), select the desired consistency from the five available consistency levels.
For Bounded Staleness, define the lag in time or operations an application can tolerate.
Click Save.

FIGURE 4-10 Setting Cosmos DB consistency
Note Business Continuity and Disaster Recovery
For high availability, it’s recommended that you configure Cosmos DB with multi-region writes (at least two regions). In the event of a regional disruption, the failover is instantaneous, and the application doesn’t have to undergo any change; it transparently happens behind the scene. If you’re using a default consistency level of Strong, there will not be any data loss before and after the failover. For bounded staleness, you might encounter a potential data loss up to the lag (time or operations) you’ve set up. For the Session, Consistent Prefix, and Eventual consistency options, the data loss could be up to a maximum of five seconds.
Select appropriate Cosmos DB APIs
Azure Cosmos DB currently provides the following APIs in general availability (GA). See Figure 4-11.
■ Core (SQL) API and MongoDB API for JSON document data.
■ Cassandra for a columnar or column-family datastore.
■ Azure Table API for key-value datastore.
■ Gremlin (graph) API for graph data.
 Exam Tip
You can create only one Cosmos DB API per Cosmos account. For example, if you need to create a Cosmos DB that uses SQL API and a Cosmos DB that uses MongoDB API, you will need to create two Cosmos accounts.
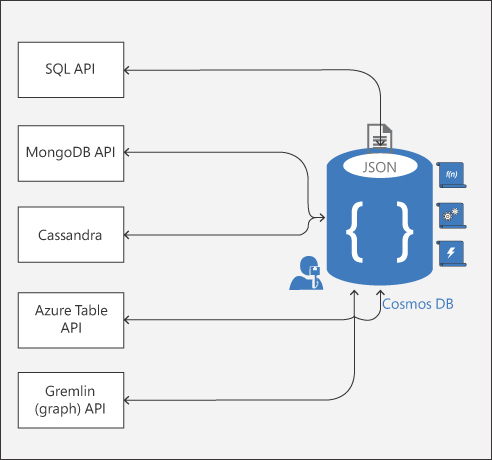
FIGURE 4-11 Cosmos DB APIs
The choice of selecting APIs ultimately depends on your use case. You’re probably better off selecting SQL API if your team already has a T-SQL skillset, and you’re moving from a relational to a non-relational database. If you’re migrating an existing application that uses a MongoDB and you don’t want to make any changes in the current application, you must select a MongoDB API; the same is true for the Cassandra API. Similarly, to take advantage of better performance and global scale, use Table API if you’re using Azure Table storage. The Gremlin API is used for graph modeling between entities.
SQL API
Structured Query Language (SQL) is the most popular API adopted by the industry to access and interact with Cosmos DB data with existing SQL skills. When using SQL API or Gremlin API, Cosmos DB also gives you an ability to write server-side code using stored procedures, user-defined functions (UDFs), and triggers, as shown in Figure 4-12. These are JavaScript functions written within the Cosmos DB database and scoped at the container level.

FIGURE 4-12 SQL API
Following are the key considerations when you choose writing server-side code with Cosmos DB:
■ Stored procedures and triggers are scoped at the partition key and must be supplied with an input parameter for the partition key, whereas UDFs are scoped at the database level.
■ Stored procedures and triggers guarantee atomicity ACID (Atomicity, Consistency, Isolation, and Durability) like in any relational database. Transactions are automatically rolled back by Cosmos DB in case of any exception; otherwise, they’re committed to the database as a single unit of work.
■ Queries using stored procedures and triggers are always executed on the primary replica as these are intended for write operations to guarantee strong consistency for a secondary replica. In contrast, UDFs can be written to the primary or secondary replica as UDFs are for read operations only.
■ The server-side code must complete within the specified timeout threshold limit, or you must implement a continuation batch model for long-running code. If the code doesn’t complete within the time, Cosmos DB rolls back the whole transaction automatically.
■ There are two types of triggers you can set up:
■ Pre-triggers. As the name defines, you can invoke some logic on the database containers before the items are created, updated, or deleted.
■ Post-triggers. Post-triggers are run after the data is written or updated.
Need More Review? SQL Query Reference Guide for Cosmos DB
To learn more about SQL Query examples and operators, visit the Microsoft Doc “Getting started with SQL queries” at https://docs.microsoft.com/en-us/azure/cosmos-db/sql-query-getting-started#GettingStarted.
MongoDB API
You can switch from MongoDB to Cosmos DB and take advantage of excellent service features, scalability, turnkey global distribution, various consistency levels, automatic backups, and indexing without having to change your application code. All you need to do is create a Cosmos DB for MongoDB API (see figure 4-13). As of the writing of this book, Cosmos DB’s MongoDB API supports the latest MongoDB server version 3.6, and you can use existing tooling, libraries, and open-source client MongoDB drivers to interact with Cosmos DB.

FIGURE 4-13 Cosmos DB supported APIs
Table API
Similar to MongoDB API, applications that are originally written for Azure Table storage can seamlessly be migrated to Cosmos DB without having to change the application code. In this case, you would create a Cosmos DB for Azure Table from the API options.
The client SDKs in .Net, Java, Python, and Node.js are available for Table API. Migrating from Azure Table storage to Cosmos DB provides you the service’s premium capabilities, as we’ve discussed since the start of this chapter.
Cassandra API
You can switch from Apache Cassandra and migrate to Cosmos DB and take advantage of Cosmos DB’s best-of-class features without having to change your application code. As of the time of this writing, Cosmos DB’s Cassandra API supports Cassandra Query language V4, and you can use existing tooling, libraries, and open-source client Cassandra drivers to communicate with Cosmos DB.
Gremlin API
The Gremlin API is used for generating and visualizing a graph between data entities. The Cosmos DB fully supports an open-source graph computing framework called Apache TinkerPOP. You use this API when you would like to present complex relationships between entities in graphical form. The underlying mechanics of data storage are similar to what you have learned in the previous sections for other APIs, such as SQL or Table. That said, your graph data gets the same level of
■ Scalability
■ Performance and throughput
■ Auto-indexing
■ Global distribution with guaranteed high availability
The critical components of any graph database are the following:
■ Vertices. Vertices denote a discrete object such as a person, a place, or an event. If you think about the analogy of an airline reservation system that we discussed in the SQL API example, a traveler is a vertex.
■ Edges. Edges denote a relationship between vertices. The relationship could be unidirectional or bidirectional. For instance, in our analogy, an airline carrier is a vertex. The relationship between the traveler and the airline that defines which airline you traveled within a given year is considered an edge.
■ Properties. Properties include the information between vertices and edges—for example, the properties for a traveler, comprised of his or her name, date of birth, address, and so on. The properties for the edge (airline) could be an airline name, travel routes, and so on.
Gremlin API is widely used in solving problems in a complex business relationship model like social networking, the geospatial, or scientific recommendation in retail and other businesses.
Here’s a quick look at the airline reservation analogy and how to create vertices and edges using the Azure portal. You can do this programmatically using SDKs available in .NET and other languages.
Creating Vertices
Use the following steps to create a vertex traveler in the graph database:
Log in to the Azure portal and navigate to your Cosmos DB account that you created for Gremlin API.
On the Data Explorer blade, create a new graph database by specifying the name, storage capacity, throughput, and a partition key for the database. You must provide the value for the partition key that you define. In our example, the partition key is graphdb, and its value is az303 while creating vertices.
After the database is created, navigate to the Graph Query window, as shown in Figure 4-14, and run the following commands to create vertices, edges, and several properties for travelers and airlines:
g.addV('traveller').property('id', 'thomas').property('firstName', 'Thomas').
property('LastName', 'Joe').property('Address', 'Ohio').property('Travel Year',
2018).property('graphdb', 'az303')

g.addV('traveller').property('id', 'Gurvinder').property('FirstName',
'Gurvinder').property('LastName', 'Singh').property('Address', 'Chicago').
property('Travel Year', 2018).property('graphdb', 'az303')

g.addV('Airline Company').property('id', 'United Airlines').
property('CompanyName', 'United Airlines').property('Route 1', 'Chicago').
property('Route 2', 'Ohio').property('graphdb', 'az303')

g.addV('Airline Company').property('id', 'American Airlines').
property('CompanyName', 'American Airlines').property('Route 1', 'California').
property('Route 2', 'Chicago').property('graphdb', 'az303')

g.addV('Airline Company').property('id', 'Southwest Airlines').
property('CompanyName', 'Southwest Airlines').property('Route 1', 'Chicago').
property('Route 2', 'California').property('graphdb', 'az303')

g.addV('Airline Company').property('id', 'Delta Airlines').property('CompanyName',
'Delta Airlines').property('Route 1', 'Chicago').property('Route 2', 'Ohio').
property('graphdb', 'az303')

FIGURE 4-14 Gremlin API
In the preceding Gremlin commands, g represents your graph database, and g.addV() is used to add vertices. Properties () is used to associate properties with vertices.
Creating Edges
Now that you’ve added vertices for travelers and airlines, you need to define the relationship in a way that explains which airline a traveler has traveled within a given year and if travelers know each other.
Create an edge on the vertex ‘traveler’ that you created previously. Like the vertices you created in step 3 in the preceding section, follow the same method and run the following commands on the graph window to create edges, as shown in Figure 4-14:
g.V('thomas').addE('travelyear').to(g.V('Delta Airlines'))
g.V('thomas').addE('travelyear').to(g.V('American Airlines'))
g.V('thomas').addE('travelyear').to(g.V('United Airlines'))
g.V('Gurvinder').addE('travelyear').to(g.V('Delta Airlines'))
g.V('Gurvinder').addE('travelyear').to(g.V('United Airlines'))
g.V('thomas').addE('know').to(g.V('Gurvinder'))
In this example, addE() defines a relationship with a vertex traveler and an airline using g.V(). After you run the preceding commands, you can see the connection between entities on the graph using the Azure portal, as shown in Figure 4-15.

FIGURE 4-15 Gremlin API Graph
You now understand the different industry-standard APIs that are available to choose from, but the question is, how do you make a choice? Table 4.1 outlines the decision criteria, which will help you choose the right API.
TABLE 4-1 API decision criteria
Criteria |
CORE SQL |
MongoDB |
Cassandra |
Table API |
Gremlin |
Are you starting a new project, and does your team have the SQL queries skill set? |
X |
||||
Does your current application use MongoDB, and do you want to use existing skills, code, and seamless migration? |
X |
||||
Does your application need to drive the relationship between entities and visualize them in a graph? |
X |
||||
Does your existing application use Table storage and have large volumes of data? Do you want to minimize the migration time and use current application code when switching to Cosmos DB? |
X |
X |
Set up replicas in Cosmos DB
For globally distributed applications, you might want to distribute your application database in multiple data center—for better performance and low read/write latency. In addition to replicating databases across multiple data center, you might also want to enable active-active patterns using multi-master features. The multi-master allows the application to write to the database closest to the application’s region. Azure Cosmos DB has all these capabilities, and it automatically takes care of eventual consistency on cross-region databases to ensure that global consistency and data integrity is maintained.
To set up the global distribution of your Cosmos DBs and enable multiple replicas across regions, use the following steps:
In the Azure Portal, navigate to the Cosmos account.
Click the Replicate Data Globally menu (see Figure 4-16). In the right-side pane, you can add a region by selecting the hexagon icon for your desired region on the map, or you can choose from the drop-down menu after you click +Add Region.
To remove regions, clear one or more regions from the map by selecting the blue hexagon(s) displayed with checkmarks.

FIGURE 4-16 Setting up multi-region replicas for Azure Cosmos DB
Click Enable Multi-Region Writes. The multi-master or multi-region writes allow you to take advantage of a supplemental feature called Availability Zone recommended for production workloads.
Click Save to commit the changes.
Table 4-2 provides a fair understanding of different Cosmos account configurations that you can choose from depending upon your application availability and performance requirements.
TABLE 4-2 Cosmos DB account configurations
Single Region |
Multi-Region with Single Region Writes |
Multi-Region with Multi-Region Writes |
Provides SLA of 99.99 percent on read/write operations. |
Provides SLA of 99.999 percent on read operations and 99.99 percent on write operations. |
Provides SLA of 99.999 percent on read/write operations. |
Availability zone capability is not available in a single region. |
Availability zone capability is not available with a single master. |
Availability zone support provides additional resilience and high availability within the data center. |
Single region account might experience disruption during regional outages. |
With multi-region read and single write master, production workloads should have the Enable Automatic Failover setting switched to On to allow Azure to automatically failover your account when there is a regional disaster. In this configuration, the availability and data loss are subject to the type of consistency level being used. |
In multi-region writes, all read regions that you currently have on the account will become read/write regions and hence, this setting provides the highest availability and lowest latency for workload reads and writes. |
Important Geo-Redundant Paired Azure Regions
For BCDR, you must choose regions based on Azure-paired regions for a higher degree of fault isolation and improved availability. See Microsoft’s documentation at https://docs.microsoft.com/en-us/azure/best-practices-availability-paired-regions.
Skill 4.2: Implement Azure SQL Databases
Small, medium and large enterprise companies have been using relational databases for decades as a preferred way to store data for their small or large-scale applications. In a relational database, the data is stored as a collection of data items with a predefined relationship between them. The data in any relational database is stored in rows and columns. Each row of the table has a unique key that represents a collection of values associated with an entity and can be associated with rows of other tables in the database that defines the relationship between entities. Each column of a row holds the values of an entity or object. In addition to it, the relational databases come with built-in capability of managing data integrity, transactional consistency, and ACID (Atomicity, Consistency, Isolation, and Durability) compliance.
As part of the platform as a service (PaaS) offerings, Microsoft provides the following managed databases to choose from for your application needs:
■ Azure SQL Database. Azure SQL Database is a Microsoft core product and the most popular relational database in the cloud.
■ Azure Synapse Analytics. Formerly known as Azure SQL Data Warehouse is a relational database for Big Data analytics and enterprise data warehousing.
■ Azure Database for MySQL. Azure Database for MySQL is a fully managed database-as-a-service where Microsoft runs and manages all mechanics of MySQL Community Edition database in the cloud.
■ Azure Database for PostgreSQL. Like MySQL, this is a fully managed database-as- a-service offering based on the open-source Postgres database engine.
■ Azure Database for MariaDB. Azure Database for MariaDB is also a managed, highly available, and scalable database-as-a-service based on the open-source MariaDB server engine.
Regardless of the database you select for your application needs, Microsoft manages the following key characteristics of any cloud-based service offerings:
■ High availability and on-demand scale
■ Business continuity
■ Automated backups
■ Enterprise-grade security and compliance
This skill covers how to:
Provision and configure relational databases
In this section, we dive into the critical aspects of how you set up a relational database in the cloud and configure the cloud-native features that come with the native service offerings.
Azure SQL Database
Azure SQL Database is the Microsoft core and most popular managed relational database. The service has the following flavors of database offerings.
■ Single database. With a single database, you assign pre-allocated compute and storage to the database.
■ Elastic pools. With elastic pools, you create a database inside the pool of databases, and they share the same resources to meet unpredictable usage demand.
■ Managed Instance. The Managed Instance flavor of the service gives close to 100 percent compatibility with SQL Server Enterprise Edition with additional security features.
Note Regional Availability of SQL Azure Service Types
Although the AZ-303 exam does not expect you to get into the weeds of regional availability of the Azure SQL Database service, as an architect, you must know this part. See “Products available by region” at https://azure.microsoft.com/en-us/global-infrastructure/services/?products=sql-database®ions=all.
It is crucial to understand the available purchasing models, so that you choose the right service tier that meets your application needs. Azure SQL Database comes with the following purchasing models:
■ DTUs (Database Transaction Units) model. DTUs are the blend of compute, storage, and IO resources that you pre-allocate when creating a database on the logical server. For a single database, the capacity is measured in DTUs; for elastic databases, capacity is measured in eDTUs. Microsoft offers three service tiers, as listed below in this model, which provide the flexibility of choosing compute size with a pre-configured and fixed amount of storage, fixed retention period, and fixed pricing.
■ Basic. Suited for dev/test or generic workload, not demanding high-throughput and low-latency. Backed by 99.99 percent SLA and IO latency of 5 ms (read) and 10 ms (write). The maximum point-in-time backup retention for the basic tier is 7 days.
■ Standard. Suited for dev/test or generic workload, not demanding high-throughput and low-latency. Backed by 99.99 percent SLA and IO latency of 5 ms (read) and 10 ms (write). The maximum point-in-time backup retention for the standard tier is 35 days.
■ Premium. Suited for production workload demanding high-throughput and low-latency. Backed by 99.99 percent SLA and IO latency of 2 ms (read/write). The maximum point-in-time backup retention for the premium tier is 35 days.
■ vCore (Virtual Core) model. The vCore-based model is the Microsoft recommended purchasing model where you get the flexibility of independently scaling compute and storage to meet your application needs. Additionally, you get an option to use your existing SQL Server license to save up to 55 percent of the cost with Azure Hybrid Benefit (AHB) or take advantage of the significant discount by reserving compute resources with Azure SQL Database reserved instance (RI). The vCore purchasing model provides two service tiers as listed below:
■ General Purpose. Suited for dev/test generic workload and backed by 99.99 percent SLA with IO latency of 5-10 ms. The compute and storage in the General Purpose tier has three options:
■ Provisioned. Pre-allocated compute and storage and it is billed per hour.
■ Serverless. Designed for a single database that needs auto-scaling on demand.
■ Hyperscale. Suited for production workload and primarily intended for customers with many databases with scaling needs up to 100 TB.
■ Business Critical. Recommended for production workload and backed by 99.99 percent SLA with IO latency of 1-2 ms and a higher degree of fault tolerance. You can also configure Read Scale-Out to offload your read-only workload automatically at no extra cost.
You might choose a vCore model instead of a DTU model for the following reasons:
■ You can leverage the hybrid benefit feature and save up to 55 percent of the database cost by using your on-premises SQL server licenses.
■ You can independently scale compute, IOPS, and storage.
■ You can choose the hardware generation that could improve the performance of your database. The available hardware generation in the vCore model includes Gen4/Gen5, M-series (memory-optimized), and FsV2 series (compute optimized).
Configuring Azure SQL Database settings
In this section, you learn how to use the different features of the Azure SQL Database. We start by creating a database server and a single Azure SQL Database. A database server is a logical construct that acts as a database container. You can add one or more Azure SQL Databases on the container and configure settings such as database logins, firewall rules, auditing, backups, and security policies. The settings applied at the database server level automatically apply to all the databases on the server. You can also overwrite them for individual databases. Follow the steps below to create an Azure SQL Database.
Log in to the Azure portal.
On the navigation blade on the left side of the portal, click Create A Resource and search for SQL Database; which opens the page shown in Figure 4-17.
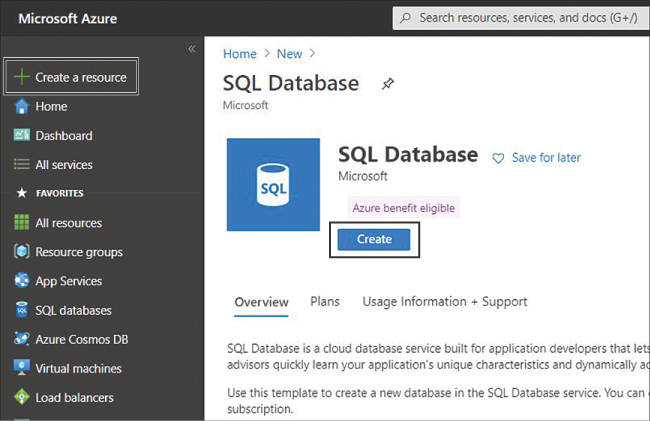
FIGURE 4-17 Create a SQL Database
On the Create SQL Database screen (see Figure 4-18), fill in the Database Name field, and select the Subscription, Resource Group, and Server. If the SQL Server doesn’t exist, you can create one by clicking Create New (see Figure 4-19).
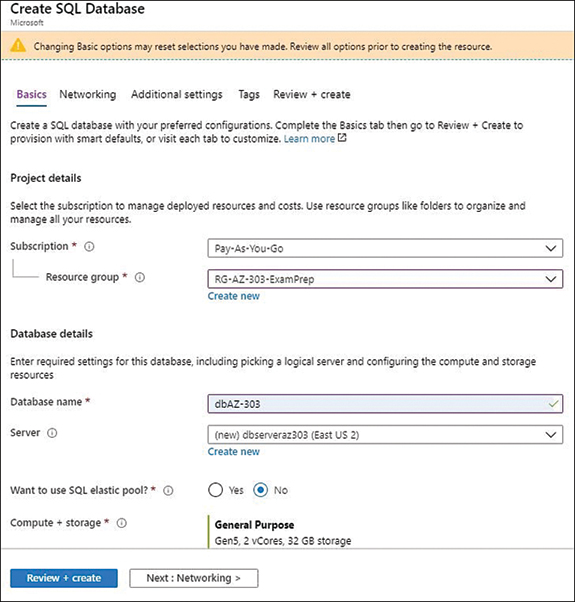
FIGURE 4-18 Create SQL Database

FIGURE 4-19 Create a SQL Server
Click Next Networking to move on to the Networking tab. By default, the database is accessible using public endpoint, but you can restrict access over the public Internet in the Networking tab. You can skip this, as we are just creating a database for demonstration purposes.
You can also ignore the Additional Settings tab that allows you to set up optional settings, such as geo-replication. Click Next Tags.
The next tab is Tags. Tags are used to tag your resources and group them for chargebacks, billing, and governance purposes. You can skip this step and click Review + Create.
On the review screen, you can review your configuration and click Create to initiate database deployment, as shown in Figure 4-20.

FIGURE 4-20 Review and Create
After the database is created, you can navigate to the database in the Azure portal by searching for the SQL database in the Search Resources, Services, and Docs search box at the top. The Azure SQL Database blade appears as shown in Figure 4-21.
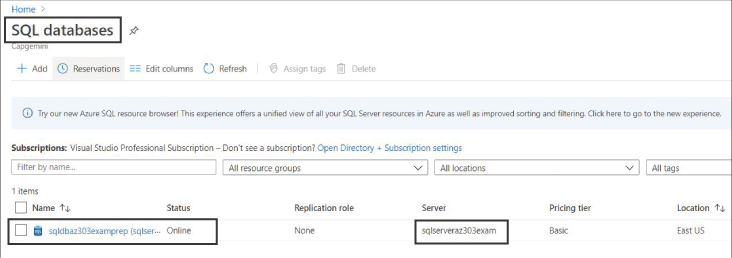
FIGURE 4-21 SQL Databases blade
Now we have Azure SQL Database up and running. In the following section, you will learn about various database settings for the Azure SQL Database that you can configure for your specific business scenarios.
■ Manage backups. The backup policy is imperative for business continuity and disaster recovery of any line-of-business (LOB) application. The backup strategy protects your database from human errors, such as accidental data deletion or data corruption or data center outages. The backups are automatically encrypted at rest using transparent data encryption (TDE). Azure SQL Database provides you the following options to manage database backups.
■ Automated Backups. Regardless of the service tier you choose, the Azure SQL Databases are automatically backed up in read-access-geo-redundant-blob storage (RA-GRS) to facilitate high availability of backups even in the event of a data center outage. The automatic backups are known as a point-in-time restore (PITR). In PITR, the full backup is taken weekly, a differential backup is taken every hour, and a transactional log backup is taken every 5–10 minutes. The PITR backups are kept for 7 days for the basic tier and up to 35 days for the standard premium tier in the DTU purchasing model. For the vCore purchasing model, the retention period is 7–35 days for the General Purpose and Business Critical tiers and 7 days for the Hyperscale tier.
■ Long-Term Backup Retention. The Long-Term Backup Retention option, also known as LTR, keeps the full database backup and is used to retain the database backups beyond 35 days, up to 10 years. LTR can be enabled for single or pooled databases. At the time this book was written, LTRs are not available for managed-instance databases.
Follow these steps to set up long-term backup retention using the Azure portal:
Log in to the Azure portal at https://portal.azure.com with your subscription credentials and search for SQL Server in the search box.
In the SQL Server blade, choose Manage Backups, as shown in Figure 4-22.

FIGURE 4-22 Setting up backup policies
Choose the database for which you want to configure a backup policy and click Configure Policies. See Figure 4-23.
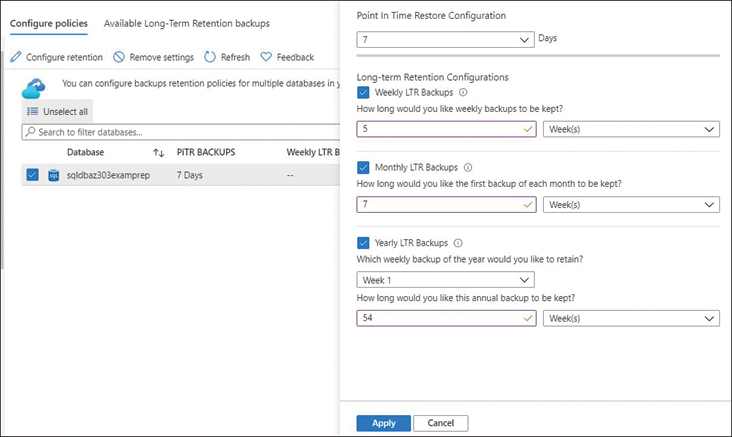
FIGURE 4-23 Configuring long-term retention
As you see, PITR backup policies are automatically created, and you can modify the retention period between 7 and 35 days. Long-term retention policies can be set to days, weeks, months, or years. The LTR policy shown in Figure 4-23 is set as follows:
■ Weekly LTR Backups. Every backup is retained for 5 weeks.
■ Monthly LTR Backups. The first backup is made each month and is retained for 7 weeks.
■ Yearly LTR Backups. The first backup is made on week 1 of the year and is retained for 54 weeks.
Finally, click Apply at the bottom for policy to apply. The LTR backups might take up to 7 days to become visible and available for restoration.
![]() Exam Tip
Exam Tip
At the time this book was written, the Azure portal did not support restoring LTRs to servers within the same subscription as the primary database, and it only supported restoring the database on the same server as the primary database. Therefore, for such cases, you must use Azure PowerShell or Azure CLI. It is recommended you go through the list of AZ SQL (Azure CLI) and AZ.sql commands given at the links below:
Use the following AZ PowerShell script to create and restore LTRs, use the following scripts.
To create an LTR, use this command:
Set-AzSqlDatabaseBackupLongTermRetentionPolicy -ServerName {serverName} -DatabaseName
{dbName} -ResourceGroupName {resourceGroup} -WeeklyRetention P1W -MonthlyRetention
P4M -YearlyRetention P10Y -WeekOfYear 11
■ -ServerName. This is the name of the SQL server on which you want to configure the LTR policy.
■ -DatabaseName. This is the name of the Azure SQL Database you want to back up.
■ -WeeklyRetention. This is the retention period for the weekly backup taken every 7 days for up to 10 years.
■ -MonthlyRetention. This is the retention period for the monthly backup taken every 30 days for up to 10 years.
■ -YearlyRetention. This is the retention period for the yearly backup taken every 365 days up to 10 years.
■ -WeekOfYear. This is the week defined for yearly backup; you can choose a value of 1 to 52.
To restore an LTR, use this command:
Restore-AzSqlDatabase -FromLongTermRetentionBackup -ResourceId $ltrBackup.ResourceId
-ServerName $serverName -ResourceGroupName $resourceGroup -TargetDatabaseName $dbName
-ServiceObjectiveName P1
■ FromLongTermRetentionBackup. This indicates that the backup be restored from long term retention.
■ ResourceId. This is the ID of the resource that will be restored.
■ ServerName. This specifies the name of the SQL Server.
■ ResourceGroupName. This specifies the name of the resource group.
■ TargetDatabaseName. This specifies the name of the target database that will be restored.
■ ServiceObjectiveName. This specifies the name of the service tier.
Note How to Set up Long Term Retention for Managed Instance
You cannot configure LTR for databases on Managed Instances. Instead, you can use an SQL Agent Server job to schedule copy-only database backups. To learn more, visit the Microsoft documentation at https://docs.microsoft.com/en-us/sql/relational-databases/backup-restore/copy-only-backups-sql-server?view=sql-server-ver15.
Manual backups
You can generate an on-demand manual backup of existing databases and store them on Azure Blob storage. The backup created manually is stored in Blob storage in the form of a BACPAC zip file that contains both data and schema. You can use the file to restore a database when required. To initiate an export to a BACPAC file using the Azure portal, go to the Azure SQL Database blade and click Export on the top, as shown in Figure 4-24. Once initiated, you can see the export status by navigating to the SQL server that contains the database. The exported BACPAC files can be used to restore the database using SSMS, Azure portal, or PowerShell.
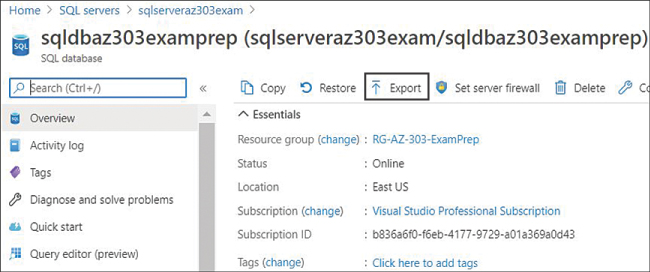
FIGURE 4-24 Exporting a database BACPAC file to Azure Blob storage
Scaling an Azure SQL Database
The SQL Azure database can be scaled up or down (vertical scaling) by adding more compute, storage, or switching to higher or lower service tiers. SQL Azure does not provide horizontal scaling out of the box.
Follow the below-mentioned steps below to scale your database using the Azure portal.
Log in to the Azure portal at https://portal.azure.com with your subscription.
Navigate to your Azure SQL Database blade and click Configure, as shown in Figure 4-25.

FIGURE 4-25 Scaling Azure SQL Database service tiers
As shown in Figure 4-25, the horizontal blade displays the different service tiers for DTU and vCore model that allow you to change the service tier to scale up or down without affecting the database performance. In this example, we have selected the Business Critical tier.
Scroll down and choose other scaling parameters, such as Hardware Generation, vCores, and Storage Size. Opt-in for hybrid benefits if you own the SQL server license already and click Apply, as shown in Figure 4-26, for the scaling to take effect.
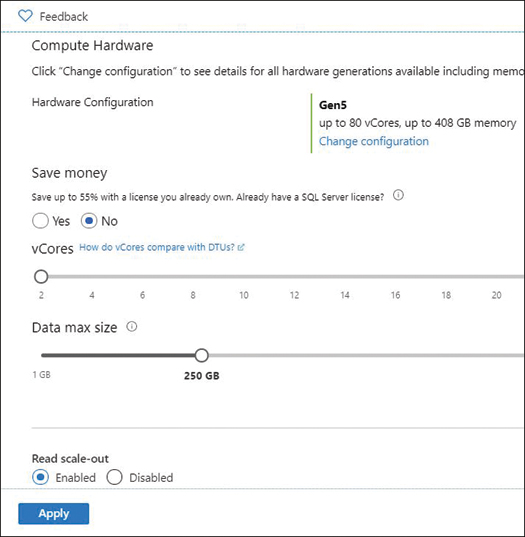
FIGURE 4-26 Setting the Azure SQL Database throughput and storage
Read scale-out
Read scale-out is a promising feature to load balance the read and write for improved performance. The feature is available for Premium, Hyperscale, and Business Critical tiers at no extra cost. Read scale-out is enabled by default for available service tiers when you create a new database. After you enable it, you get a read-only replica of your database to offload the read workload, such as reports, by specifying the ApplicationIntent=ReadOnly in the connection string.
Note Using Read-Scale-Out with Geo-Redundant Databases
If the Azure SQL Database is Geo-replicated for HADR, ensure that read scale-out is enabled on both the primary and the geo-replicated secondary databases. This configuration will ensure that the same load-balancing experience continues when your application connects to the new primary after failover.
Azure SQL Database security
For any organization using the cloud, the security and the privacy of customer data is always the first and foremost priority. The Azure SQL Database has a built-in multi-layer defense-in-depth strategy to protect your data at multiple layers, including physical, logical, and data in transit and at rest. Because the Azure SQL Database is a managed service, securing the database becomes a shared responsibility.
You can use the following defense-in-depth layers to set up a robust security posture for your database:
■ Network security. When you create a new database server (single or pooled), the database gets a public endpoint by default. For example, a database server named mydbAZ303 would be named mydbAZ303.database.windows.net, and it would be accessible on TCP port 1433. The database firewall is the first level of defense against unauthorized access; by default, the database firewall blocks all incoming requests to the SQL server public endpoint. The network security settings allow you to set up the firewall rules, as described in the next bullet.
■ Server-level firewall rules. Server-level firewall rules enable clients to access all the databases on the server if the originating client IP address is present in the allow rule. Server-level rules can be configured at a virtual network level or for a specific IP address or IP range.
■ Database-level firewall rules. Database firewall rules allow a particular IP address or IP ranges to connect to the individual database. You can only configure IP addresses and not the virtual network on the database-level rules.
As far as best practices go, you should configure a database-level firewall unless the access requirements are the same for all the databases on the server. Regardless of the firewall rules, the connection toward the database always traverses over the public Internet. Though SQL Azure encrypts the data in transit and at rest, a connection over the public Internet might not be aligned with the security requirements of your organization. You can leverage a new offering known as Azure private link, which allows you to eliminate the exposure over the public Internet and keep traffic toward the Azure SQL Database from the Azure VNet/Subnet over the Microsoft backbone network.
You can use the Azure portal, PowerShell, TSQL, or Azure CLI to configure network firewall rules. In this example, we will look at a few examples using the Azure portal. You must have at least the SQL DB Contributor or the SQL Server Contributor RBAC role to manage database-level or server-level firewall rules.
Note Network Security in Managed Azure SQL Database Instance
Unlike the Azure SQL Database, the Managed-Instance Azure SQL Database connectivity architecture works differently. By default, the database endpoint is exposed through a private IP address from Azure or hybrid networks. Refer to the connectivity architecture of the Managed-Instance database later in this chapter.
Follow these steps to configure server-level firewall rules using the Azure portal.
Log in to the Azure portal.
Navigate to Azure SQL Database blade and click Set Server Firewall, as shown in Figure 4-27.

FIGURE 4-27 Setting up SQL server firewall rules
Figure 4-28 shows a variety of settings in addition to firewall rules:
■ Deny Public Network Access. The default is No, which means a client can connect to the database via a private and public endpoint. Switching it to Yes will allow a connection only via private endpoints.
■ Connection Policy. Azure SQL Database supports the following three connection policies:
■ Redirect. This is the recommended policy for low latency and better performance and throughput. Redirect enables clients to connect to the database host directly. All connections originating within Azure use the Redirect connection policy by default. From outside Azure, if you enforce a Redirect policy, make sure you enable outbound connections in addition to default TCP port 1433 from the client network for Azure IP addresses in the region on port range 11000-11999.
■ Proxy. In this mode, the connections to the database host go via a database gateway. All connections outside Azure default to Proxy policy.
■ Allow Access To Azure Services. This enables connectivity from IPs within Azure services to access the database.
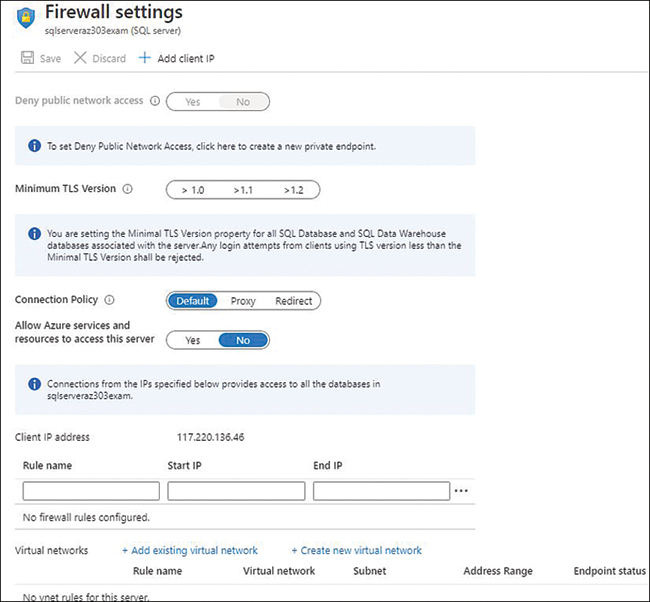
FIGURE 4-28 SQL Server Firewall pane
As shown in Figure 4-28, click Add Client IP to add the IP address of your network and then click Save. You can update the IP addresses at any point, or you can delete them by clicking the ellipsis on the IP rule. If you want to enable access from the subnet from within an Azure virtual network, click Add Existing Virtual Network.
Click Save.
Azure SQL Database also gives you leeway to configure the database-level firewall using the TSQL commands. The sample code snippet is shown below:
EXECUTE sp_set_database_firewall_rule N'Allow Rule, '{0.0.0.0}', '{0.0.0.0}'; Go;
In the command above, you must specify Go for the command to execute. You can view the database level rules by using the view sys.database_firewall_rules option with the following TSQL command:
SELECT * FROM sys.database_firewall_rules
Access control
The firewall rules enable the client to connect to the Azure SQL Database. The next layer of protection is access control, which requires the client to go through the authentication and authorization process. Let us look at the authentication process first. Azure SQL Database supports two types of authentication methods:
■ SQL Authentication. In this process of authentication, you create a database user, also called a contained user, either on the master database or on the individual database. Log in with your SQL Server admin account, the one you created while setting up SQL server, and use the following TSQL command to create database users:
CREATE USER dbUser WITH PASSWORD = 'strongpassword'; GO
■ Azure AD (AAD) authentication. This is the recommended method to connect to the Azure SQL Database using the identities managed in Azure Active Directory a.k.a (AAD).
Authenticated users, by default, do not get any access to the data. The access to the data is further controlled by the database roles/permission groups, such as db_datawriter and db_datareader. The db_datawriter command provides read/write access, while the db_datareader command provides the read access to the database. Use the following TSQL command to add a user to the groups:
ALTER ROLE db_datareader ADD MEMBER dbUser;
Data protection and encryption
The Azure SQL Database protects your data at rest and in-transit using transparent data encryption (TDE). Security is enforced for any newly created Azure SQL Database and Managed Instance, which means TDE is enabled by default. If TDE is enabled, the data encryption and decryption happens in real-time and transparently for all database operations within Azure. The default encryption key is a managed key within Azure, but you have an option to bring in your encryption key with a popularly known concept: Bring Your Own Key (BYOK).
In addition to TDE, you can further protect your sensitive information, such as personally identifiable information (PII), by enabling Dynamic Data Masking. You can use the Azure portal to configure Dynamic Data Masking and transparent data encryption by navigating to the Azure SQL Database blade and selecting the corresponding security setting, as shown in Figure 4-29.
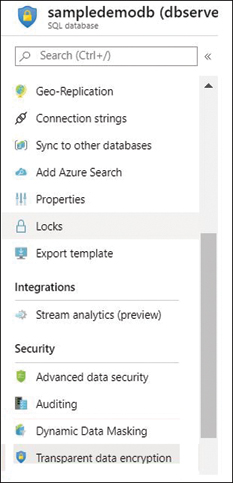
FIGURE 4-29 SQL Azure Database security settings
Advanced threat protection
Azure SQL Database provides advanced threat protection through its advanced data security (ADS) capabilities, including data discovery and data classification for sensitive data and vulnerability assessment. ADS helps discover potential database security loopholes, such as an unencrypted database, anonymous and unusual activities, and suspicious data access patterns that could lead to data exploitation.
ADS also provides smart alerts for potential database vulnerabilities, SQL injection and brute force attacks, suspicious actions, and data exfiltration, and it provides recommendations to investigate and mitigate threats.
You can enable the ADS feature for single, pooled, or managed-instance databases using Azure Portal or Azure CLI. Follow the steps below to configure ADS.
Log in to the Azure portal and navigate to the SQL Server Database blade.
Click Advanced-Data Security under the Security Settings pane, as shown in Figure 4-30.
Specify the email addresses for alerts on vulnerability reports.
In the Advanced Threat Protection Types section, opt out or in for security scan configuration.
Click Save.
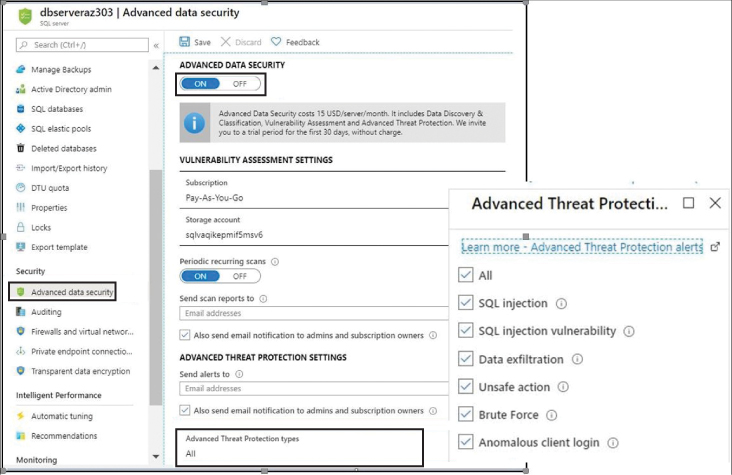
FIGURE 4-30 Configuring Azure SQL Database Advanced Threat Protection
Auditing
Auditing is an essential aspect of database monitoring that helps investigate database security breaches such as suspicious activities or unauthorized access. When auditing is enabled, you can configure all database operations to be recorded in Azure Storage or Log Analytics workspace, or Event Hubs. It is recommended that you enable auditing at the database server level that is automatically inherited for all the databases on the server unless you have a specific need to allow database-level auditing. Follow the steps below to enable database server-level auditing:
Log in to the Azure portal and navigate to the SQL Server blade.
Under the Security heading in the left menu, click Auditing, as shown in Figure 4-31.
In the right-hand menu, toggle Auditing to ON and specify your preferred storage service.
Click Save.
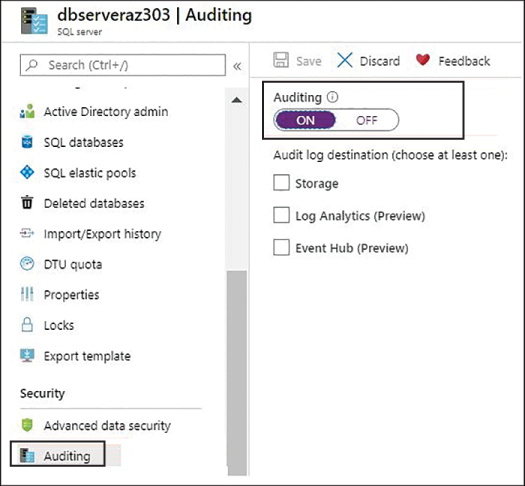
FIGURE 4-31 SQL Azure Database Auditing settings
Implement Azure SQL Database Managed Instance
Azure SQL Database Managed Instance is another flavor in the Azure SQL Database product family that provides nearly 100 percent compatibility with an on-premises SQL Server (Enterprise Edition) database engine. It is exposed only through a private IP address that allows connectivity only from the peered virtual networks or on-premises network using Azure VPN Gateway or ExpressRoute.
Managed Instance is provisioned on a single tenant with dedicated infrastructure (compute and storage) under the vCore purchasing model. Figure 4-32 shows the high-level connectivity architecture of the Azure SQL Managed Instance Database.
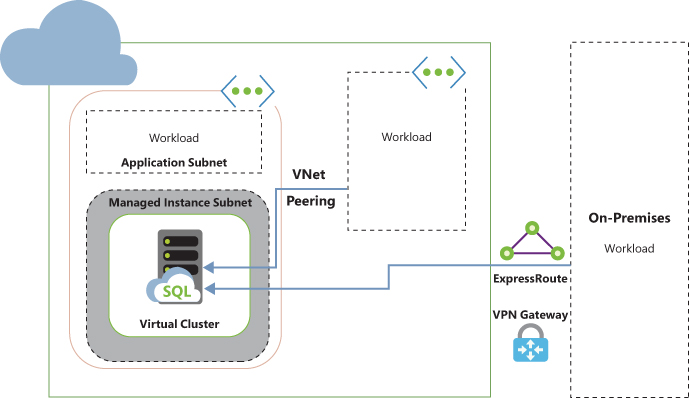
FIGURE 4-32 SQL Azure Database Managed Instance connectivity architecture
As you can see in figure 4-32, Azure SQL Managed Instance Database is hosted inside its dedicated subnet. In the dedicated virtual network subnet, Azure automatically creates isolated virtual machines that form a virtual cluster to host one or multiple Managed Instances. You cannot host any other service inside the Managed Instance’s dedicated subnet. The virtual cluster and virtual machines are entirely transparent and managed by Azure.
Client applications can connect to a Managed Instance via a peered virtual network, VPN, ExpressRoute connections, or from a subnet within the same VNet as a Managed Instance. You use the hostname <databasename.dns_name.database.windows.net>, which automatically resolves to the private IP address that belongs to the Managed Instance internal load balancer. The traffic is then redirected to the Managed Instance gateway, facilitating the connection to the specific database instance within a virtual cluster.
Follow these to create an Azure SQL Database Managed Instance using the Azure Portal.
Log in to Azure using your Azure subscription credentials.
On the left menu, click Create A Resource and search for Azure SQL Managed Instance. You will see the screen shown in Figure 4-33.
Next, click Create.
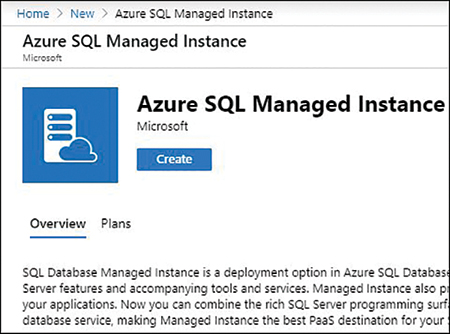
FIGURE 4-33 Creating an Azure SQL Managed Instance
On the Create Azure SQL Database Managed Instance screen, as shown in Figure 4-34, provide the mandatory information, such as a Unique Database Name, Resource Group, Region, SKU, and Administrator Username and Password.
Click Next: Networking.
On the Networking tab (see Figure 4-35), create a mandatory virtual network and dedicated subnet for the Managed Instance; if you do not do so, Azure automatically creates one for you.

FIGURE 4-34 Creating an Azure SQL Managed Instance

FIGURE 4-35 Configuring the network configuration for a Managed Instance
The next step is to specify the Connection Type (see Figure 4-35).
-
■ Proxy (Default). The proxy connection enables connectivity to a Managed Instance via a gateway component (GW). It uses port 1433 for a private connection and port 3342 for a public connection.
■ Redirect. The redirect mode provides low latency and better performance because it connects to the database directly. You can only use this mode for private connections. You must enable the firewall and NSGs to allow connections on port 1433 and ports 11000–11999.
Next, we have the public endpoint. Switch the toggle button to Enable if you want to allow public endpoints.
Next, select Azure Services, Internet, or No Access for your connectivity requirements. See the previous Figure 4-35.
You may skip the optional settings such as Database Timezone, Geo-Replication, and Collation on the Additional Settings tab. If you skip them, Azure will automatically apply the default settings. Next, click the Review + Create button (See Figure 4-36). As you can see in the notification at the top, unlike the single/pooled database, the Managed Instance Database deployment takes up to 6 hours on average, especially when you are creating a virtual network along with it. Changing the service tier on the existing Instances takes up to 2.5 hours, and deleting a database takes up to 1.5 hours.
Review the configuration and click Create (see Figure 4-36).
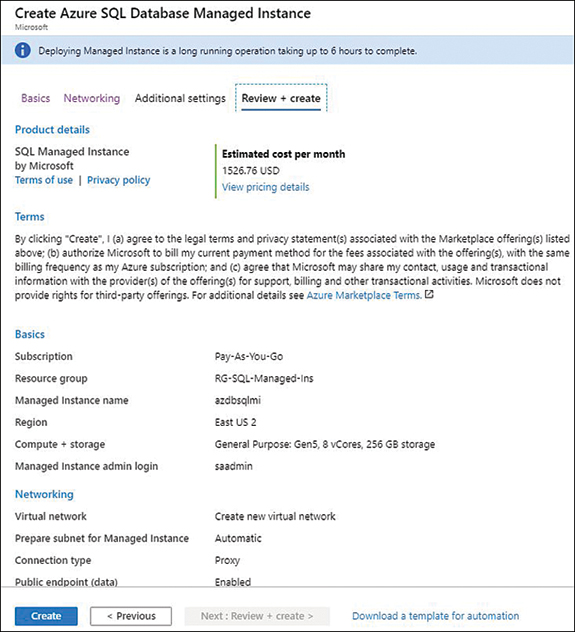
FIGURE 4-36 SQL Database Managed Instance review screen
Configure HA for an Azure SQL Database
The Azure SQL Database has build-in robust high availability architecture that guarantees an SLA of 99.99 percent uptime, even during the maintenance operations or underlying hardware or network failure. In this section, you learn the key features you get out of the box for the high availability of Azure SQL Database and recommendations for you to implement business continuity and disaster recovery procedures. Before we go deeper, let us look at the basics to understand the terms High Availability (HA), Business Continuity, and Disaster Recovery (BCDR).
■ High availability. The phrase “high availability” refers to key characteristics that is intended to keep the system up and running as per the defined service level agreement (SLA) regardless of the underlying hardware, network failures, or planned maintenance operations.
■ Business continuity. The phrase “business continuity” refers to the set of procedures and policies that you put together to keep your applications and businesses operational in the event of adverse impact on the data center that may cause a data center outage or data loss. Although the Azure SQL Database provides an SLA of 99.99 percent, specific disruptive scenarios such as data deletion by a human error, regional data center outages, etc., are not automatically handled by the Azure SQL Database. You will have to do exclusive planning and implement procedures to achieve the desired state of business continuity. We will talk about these procedures later in this chapter.
■ Disaster recovery. The phrase “disaster recovery” refers to the procedures that we implement to recover from an outage, data loss, and downtime caused by a disaster such as regional data center outages or human errors.
Designing a business continuity and disaster recovery strategy requires immense planning, end-to-end understanding of application workload, application infrastructure, and dependencies. There are two key factors you must consider when designing a BCDR:
■ Recovery Point Objective (RPO). RPO defines the maximum data loss a business can afford before the application is restored to its normal state. RPO is measured in units of time, not the volume of data; for example, if your application can afford to lose up to one hour of uncommitted transactional data, then your RPO is one hour.
■ Recovery Time Objective (RTO). RTO is a maximum duration of acceptable downtime an application can afford before the restoration. For example, if your application database takes eight hours to restore, you may define acceptable downtime to be nine hours considering an additional one hour for validation and fail-fast testing; thus your RTO becomes nine hours.
As stated earlier, the default built-in high availability architecture of Azure SQL Database gives you an SLA of 99.99 percent uptime regardless of the different service tiers you choose. The availability architecture has two models:
■ Standard availability model Basic, Standard, and General Purpose tiers use the standard model, where the compute and storage are managed separately. The availability of compute is managed by a Service Fabric controller that triggers the failover to another physical node in the same region in case of failure of the current node. The data layer that contains the data files (.mdf/.ldf) is managed on the highly redundant Azure Blob storage. When the failover happens, the persistent storage of data and log files stored on the Azure storage is automatically attached to the new physical node.
■ Premium availability model This model works on the similar principle of the SQL Server Always On feature. The Premium and Business critical tier uses the premium availability model to opt-in for zone-redundancy that further enhances availability and fault tolerance by spreading the replicas across the availability zone within the region. The data files (.mdf/.ldf) in this mode are managed on the same local attached SSD storage, thus providing low latency and high throughput. This mode is typically for business-critical applications.
Additionally, the premium model maintains the three secondary replicas and the primary node in the same region. At least one secondary replica is always synchronized before committing the transactions. The failover is managed by a Service Fabric that initializes the failover to the synchronized secondary replica when needed.
With the additional three secondary replicas, you also get a feature called Read Scale-Out (at no extra cost) to separate read workload to one of the secondary replicas within a primary region, which seems like a promising feature for improved performance.
Azure SQL Database provides the following options that you can leverage to design your business continuity, disaster recovery, and high availability strategy:
■ Automated Backups. As we saw earlier in this chapter, the built-in automated backups and point-in-time restore (PITR) help you restore the database in the event of a failure.
■ Long-Term Backup Retention. Allows you to retain the backups for up to 10 years.
■ Active Geo-Replication. Enables you to create up to four read-only replicas of your database within the same or different regions so that you can manually failover to any secondary replica in case of failure of the primary database. Active geo-replication is not supported for Azure SQL Managed Instance Database. You would use the Auto-failover group instead.
■ Auto-Failover Group. Works on the similar principle of active geo-replication that helps you automatically perform the failover in case of a catastrophic event that can cause a data center outage. With auto-failover enabled, you cannot create secondary replicas in the same region as a primary database.
The geo-replication strategy does not form a complete BCDR solution and requires you to think through all potential failure scenarios and design a robust plan. For example, in the event of human error, such as data deletion or data corruption, the replication would synchronize the data to all secondary databases that result in secondary databases being in the same state as the primary database. In this case, you would have to restore the data from the available backups such as point-in-time restore (PITR) or long-term retention (LTR) backups.
If you are using LTR and geo-replication or a failover group as a BCDR solution, you need to make sure you configure the LTR on all secondary replicas so that LTR backup continues when failover happens, and your secondary replica becomes primary.
Configure an auto-failover group
As we learned earlier, the auto-failover group is the recommended method for a high degree of fault tolerance and disaster recovery. The failover group feature in the Azure SQL Database product family uses the same underlying technology as geo-replication. It allows you to seamlessly manage auto-failover of databases (single, pooled, or Managed Instance) configured on the primary and secondary server in different Azure regions. The failover can be configured to trigger automatically, or you can also do it manually when an outage occurs.
Auto-failover supports only one secondary server that must be in a different Azure region from the primary server. If you need multiple secondary replicas, consider using active geo-replication to create four replicas in the same region as the primary server or in the different Azure regions from a primary server.
The following are the steps to configure the failover group for Azure SQL Databases. We will look at a single database in our example. (The steps are the same for the elastic pool databases.)
Log in to Azure using your Azure subscription credentials.
Navigate to the Azure SQL Database Server blade, and under the Settings menu, choose Failover Groups > Add Group at the top (see Figure 4-37).

FIGURE 4-37 Failover Groups settings
The database server dbserveraz303 is our primary server in the East US, on which we want to set up a failover group.
Click Add group, and the screen shown in Figure 4-38 appears. Fill in the following required information:
■ Provide the name of failover group.
■ Select or create the secondary server in a different region from the primary.
■ Specify the failover policy that defines the grace period before the failover is triggered upon outage on the primary server. The default is 1 hour.
■ Select the databases on the primary server to be part of the failover group as you see them on the Databases blade in Figure 4-38.
Click Create.
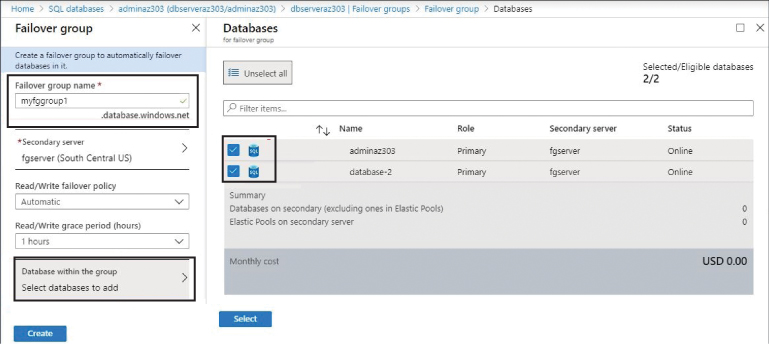
FIGURE 4-38 Creating a Failover group
Note Secondary SQL Server in the Failover Group
The secondary server you create in the different regions for the failover group should not have a database with the same name as the primary server unless it is an existing secondary database.
Adding databases to the failover group automatically triggers the geo-replication for all the databases in the failover group to the selected secondary region; see Figure 4-39. As you can see, when a failover group is created, Azure forms the two CNAME records:
■ Read/Write Listener (Primary Server), which is formed as <fgname.database.windows.net>
■ Read-Only Listener (Secondary Server), which is formed as <fgname.secondary.database.windows.net>
To connect to a geo-replicated database on the secondary server, use the secondary listener endpoint to perform functions such as offload the read queries. By default, the failover on the secondary listener is not enabled. You must allow it by explicitly using the AllowReadOnlyFailoverToPrimary property to automatically redirect the read traffic to the primary server if the secondary server is offline.

FIGURE 4-39 geo-replicated databases in a failover group
Note Read scale-Out Versus Failover Group
The failover group gives you a geo-replicated secondary read-only database in the different regions with a cost equal to 100 percent of the primary database cost. The read scale-out, when enabled on the geo-replicated database, provides another pair of read-only replicas at no additional cost.
Important Deleting a Database that is Part of the Failover Group
You must remove the secondary database from the failover group if you want to delete it. Deleting a secondary database before removing it from the failover group is not permitted.
Publish an Azure SQL Database
Migrating on-premises SQL Server databases to Azure SQL Database (single, pooled, or Managed Instance) requires immense planning and assessment to develop the robust migration strategy using the appropriate methods that are deemed fit for a given workload type. In this section, you learn how to select the appropriate migration strategy to publish an existing on-premises SQL Database to the Azure SQL Database.
The database migration process typically consists of the following methods.
■ Discovery. Discovery mode starts with identifying your existing database workload, usage scenarios, and database version compatibility level and exploring the right target database and service tier available on the target platform.
■ Assessment. In the assessment phase, you discover any compatibility issues between the source and target platform. For example, if you migrate from on-premises SQL Server to Azure SQL Database (single or pooled), you might need to look at SQL server features such as cross-database queries as an example and validate if the target database supports it.
■ Transform. In the transform phase, you make changes to the existing SQL script to resolve any incompatibility issues or adapt to the new features available on the target platform instead.
■ Migrate and Monitor. In this phase, you migrate your database to the selected Azure SQL Database, validate your migration, monitor remediation, and optimize cost.
Microsoft Azure provides the following database migration methods for the on-premises SQL Server database to the Azure SQL Database.
■ Offline migration using Database Migration Assistant (DMA). The Azure Data migration assistant (DMA) is a free tool that you can download on the local machine and use for assessment to identify compatibility issues before you attempt to migrate. This method does not support the Managed Instance. They are typically used for supported databases when an application can afford to have more extended downtime.
■ Online migration using Azure Database Migration Service (DMS). The Azure Database Migration Service (DMS) is the recommended way to migrate databases at scale with minimal downtime. The DMS supports both online and offline migration for single, pooled, and Managed Instance databases. In the offline migration, the application downtime begins when you initiate the migration. With the online migration, the downtime is minimal and is limited to the time required to perform actual cutover.
More Information? SQL Azure Database Migration Tips
When you migrate your database, you want to see comparatively improved performance on the Azure SQL Database. It requires you to carefully evaluate your on-premises SQL server usage scenario, workload, and source and target database compatibility. The blog post on cloudskills.io has a comprehensive guide on key considerations that you must take before you migrate. Learn more by visiting https://cloudskills.io/blog/azure-sql-database-performance.
The overall migration process consists of the migration of the two elements, the schema and data. In the assessment phase of the migration, you start with determining the compatibility issues between the source SQL Server and the target Azure SQL Database using a database migration assistant (DMA) tool followed by fixing the reported issues if there are any. After you have fixed all the identified compatibility issues, you must deploy the script generated by DMA on the target pre-created Azure SQL Database. After the schema has been migrated, you start with the next step of data migration.
The following step-by-step instructions describe the end-to-end process for publishing your on-premises SQL Server database to the Azure SQL Database using the Azure database migration service (DMS).
Download and install the Azure Database migration assistant from https://www.microsoft.com/en-us/download/details.aspx?id=53595.
Using the DMA tool, create an assessment project by clicking the + icon on the left blade and providing the project name. Select an SQL server as a source, select an Azure SQL Database as the target, and click Create.
In this example, because we are accessing the on-premises SQL Server database with Azure SQL Database for any incompatibility, you must choose Check Database Compatibility and Check Feature Parity (see Figure 4-40). Click Next.
Connect to the source SQL Server database by using database credentials and start an assessment. Note that the credential used to connect to the SQL server must be a member of the sysadmin server role.
After the assessment results are ready, the next step is to resolve the issues or any migration blockers that might affect the migration. Repeat the assessment steps until all the issues are fixed.

FIGURE 4-40 Database migration assistant
After you are confident that all issues have been addressed and the on-premises SQL Server database has become a good candidate for migration, continue with the following steps to deploy a schema on Azure SQL Database:
Log in to Azure Portal and create a blank Azure SQL Database.
Once the database is ready, navigate to its blade and create a firewall allow rule on Azure SQL Database for a source machine outbound IP address where you are running your DMA tool.
Next, in the DMA tool, create a new migration project by selecting the Migration option, as shown in Figure 4-40. The wizards on the DMA tool will guide you to provide a source and target database details. You must use a credential with control server permission to connect to the source database and control database permission to connect to the target database.
Using the DMA tool, select the database schema objects to generate a script. After the script is ready, use the deploy schema feature of DMA to deploy the schema to the target database.
Now that we have successfully deployed the schema of the on-premises SQL database on the Azure SQL Database, we will create an Azure Database Migration Service for data migration. Follow these steps:
In the Azure portal, search for Azure Database Migration Service resource and click Add (see Figure 4-41).

FIGURE 4-41 Azure Database Migration Services
Consider the following critical points while creating a database migration service (DMS):
■ The DMS requires a virtual network that facilitates connectivity to the source server. That said, you must either create a new virtual network along with the setup of a DMS or choose from the existing one. You would use either site-to-site VPN or ExpressRoute for on-premises connectivity. The service endpoint, Microsoft.Sql must be added on the VNet to allow outbound connection to the Azure SQL Database.
■ Ensure the NSGs on the Azure virtual network allow inbound connectivity for DMS on TCP ports 443, 53, 1433, 9354, 445, and 12000.
■ You must choose the location of the DMS service closest to your source database data center for low latency and faster migration. It is recommended you select higher SKUs on the target database to speed up the data migration process. You can scale down the database SKU after the migration is complete.
Now that the DMS has been created, navigate to the overview blade of DMS and click New Migration Project, as shown in Figure 4-42.

FIGURE 4-42 Adding a new migration project in DMS
Fill in the required fields, as shown in Figure 4-43. Set Source Server Type to SQL Server and set Target Server Type to Azure SQL Database. Under Type Of Migration/Activity, choose Online Data Migration, and click Save.

FIGURE 4-43 Configuring a database migration project
For online migration, continuous data replication is required. Therefore, you must do the following configurations on the source database for replication.
The replication feature must be installed on the source SQL server. Use the following TSQL commands to check whether the replication component is installed. You will see an error if it isn’t:
USE master; DECLARE @installed int; EXEC @installed = sys.
sp_MS_replication_installed;
SELECT @installed as installed;
Use the following TSQL to enable replication:
USE master
EXEC sp_replicationdboption @dbname = <databasename>, @optname = 'publish', @
value = 'true' GO
After the replication is enabled, configure the distributor role for the source SQL Server. The steps for publishing SQL server distribution are given on the Microsoft documentation at https://docs.microsoft.com/en-us/sql/relational-databases/replication/configure-publishing-and-distribution?view=sql-server-ver15.
The database must be in full recovery mode. Use the following TSQL commands to check for and enable full recovery mode:
USE master;
SELECT name, recovery_model_desc   FROM sys.databases WHERE name =
<databasename>
ALTER DATABASE <databasename>  SET RECOVERY FULL;
Ensure all the tables on the source database have a clustered index (primary key). Use the TSQL commands below to find tables without a clustered index and create them accordingly:
USE <databasename>; go
SELECT is_tracked_by_cdc, name AS TableName FROM sys.tables WHERE type = 'U' and
is_ms_shipped = 0 AND
OBJECTPROPERTY(OBJECT_ID, 'TableHasPrimaryKey') = 0;
Ensure the full backup of the source database is taken.
Ensure you configure a Windows firewall rule to allow the Azure Database Migration Service to access the source SQL Server; by default, this is TCP port 1433.
Ensure the TCP/IP protocol is enabled on the source SQL server.
Important Online Migration Limitations and Workaround for a Single Database
The DMS service has some limitations at the writing of this book, and workarounds for such limitations are detailed on the Microsoft document posted at https://docs.microsoft.com/en-us/azure/dms/known-issues-azure-sql-online. Make sure you evaluate all of them before you adapt to on-line migration.
In the migration wizard shown in Figure 4-44, select the source and the target database, as shown in steps 1 and 2 on the Migration Wizard pane.
On the source database pane, Migration Source Detail, provide the connection details for the source database. It is recommended that you use the trusted certificate on the source server to encrypt the connection credentials. In case you do not have it installed, you can use a self-signed certificate created by DMS by selecting a trust server certificate.
Click Save.
On the target database pane, under Migration Target Detail, specify the connection details for the Azure SQL Database that you created in step 6. It is recommended that you encrypt the connection between source and target databases by selecting Encrypt Connection (see Figure 4-44).
Click Save.

FIGURE 4-44 Configuring source and target database connectivity details
Under Map To Target Databases, map the source and target databases unless the name of the target database is the same as the source database.
Under Configure migration settings, select the tables on the source database to be migrated.
Lastly, on the summary screen, click Run Migration, as shown in Figure 4-45.
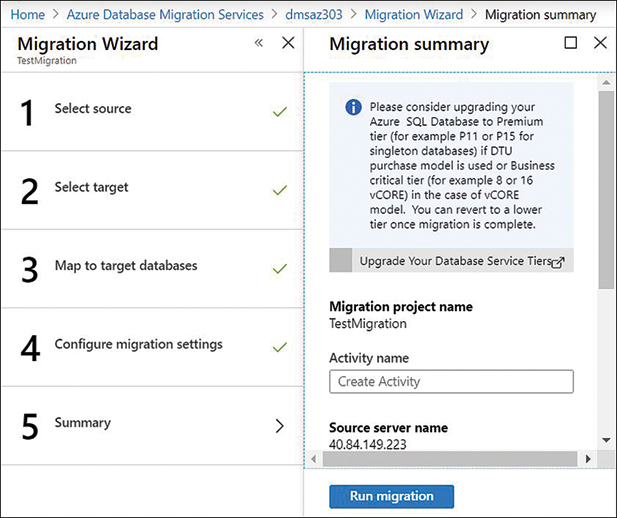
FIGURE 4-45 Database migration service summary wizard
Figure 4-46 shows the migration activity. From here, you can monitor the migration status. Once it is completed, you can plan for the final cutover by clicking the Start Cutover button. Before you plan to cutover, make sure you stop new transactions on the source database or wait for existing pending transactions to complete. After the migration is done, perform data validation on the target Azure SQL Database and connect the application to the new Azure SQL Database.

FIGURE 4-46 A database migration status wizard
Chapter summary
■ NoSQL databases are non-relational databases designed to provide a flexible data model and access patterns for various complex datasets.
■ Typical types of NoSQL database include key-value data store, document databases, graph databases, and column-family databases.
■ Azure Table storage is a highly scalable key-value data storage for structured data.
■ Azure Cosmos DB is a globally distributed, multi-master database that enables you to independently scale throughput and storage across the globe with guaranteed throughput and performance.
■ Azure Cosmos DB supports five programming APIs: SQL API, Mongo API, Cassandra API, Gremlin Graph API, and Table API.
■ Azure Cosmos DB allows you to set up multi-master replicas across regions to facilitate failover and high availability in case of a disruptive event in the primary region.
■ Azure SQL Database is one of the most popular managed relational databases. The service has different tiers to choose from based upon your application performance needs.
■ Database transactional units (DTUs) are a blended measure of compute, storage, and IO resource that you pre-allocate when you create a database on the logical server.
■ The vCore-based model is the Microsoft recommended purchasing model where you get the flexibility of independently scaling compute and storage to meet your application needs.
■ Point-in-time restore backups in the Azure SQL Database are stored up to 35 days in geo-replicated Blob storage. If you need backup to be retained beyond 35 days, you can configure long-term backup retention policies.
■ Azure SQL Managed Instance Database provides close to 100 percent compatibility with on-premises SQL Server. The database can only be created within a dedicated VNet and exposed over a private endpoint by default.
■ Azure database migration service supports both online and offline database migration. The service uses the database migration assistant tool for schema migration and synchronous replication between source and target database for data migration.
Thought experiment
In this thought experiment, demonstrate your knowledge and skills that you have learned throughout the chapter. The answers to the thought experiment are given in the next section.
You’re an architect of an online education institution. The institution has its own IT and software development department. The institution has its student base across the world and provides online study courses on various subjects, conducts exams, and provides online degrees upon successful completion of the course. The course content is made available online during weekdays, and instructor-led training is held over the weekend. The online web portal used by the institution is built-in .NET core, and the backend is an SQL server for storing details of available courses and MongoDB NoSQL for application custom auditing. The application is hosted in the U.S. The institution is facing several challenges and getting complaints from students around the world that application for online courses and practice exams work very slowly at times. The management of the institution wants to leverage cloud technologies to address slowness challenges and approaches you to answer the following questions:
1. The institution has a limited budget and cannot afford to rewrite the application code to adopt the cloud. The management does not want to change the bunch of batch jobs written in the SQL server.
2. The institution management has security concerns using the cloud databases in terms of keeping databases outside of the private network in the cloud.
Thought experiment answers
This section contains solutions to the thought experiment.
1. Because the application is built on Microsoft technology stack, you can host it on Azure App Services and configure autoscaling. Regarding SQL server backend, Azure SQL Database Managed Instance provides you close to 100 percent SQL Server compatibility. Therefore, you will not have to change the application code when you migrate from SQL Server to Azure SQL Managed Instance.
2. For the NoSQL backend, MongoDB, you can use Cosmos DB MongoDB API and migrate without changing any application code.
3. To address security concerns, the security posture of Azure SQL Managed Instance provides native integration with Azure virtual network where your application traffic does not go over the public Internet and remains in the Microsoft backbone network.