
NOTES on FREQUENTLY USED INGREDIENTS & RELATED TECHNIQUES
BREAD
THE BREAD I CALL FOR MOST OFTEN IN THESE RECIPES, AND EXCLUSIVELY WHEN IT IS to be cooked into a dish, is chewy white peasant-style bread. I usually call for it to be slightly stale, because it tends to have better flavor and texture for cooking. The bread should not be dry and hard, but the crumb should be firm, not squishy-tender; day-old is right for most such loaves. {After a day, I place the loaf or partial loaf in a plastic bag, where it will keep well for another few days at room temperature or in the refrigerator, or for a few weeks in the freezer.} The original shape of the loaf isn’t critical, but content is: choose one made with only white flour, yeast, water, and salt~no milk, eggs, fat, seeds, or rye, whole wheat, or other grains. Firm loaves with an open, irregular crumb-and-hole structure, and that are slightly heavy for their size, are usually chewy. They will likely have been made with fairly wet dough and have enjoyed a slow rise before being baked, both of which encourage great flavor. Such loaves have the right character for bread-based dishes, whereas a soft or dense loaf would produce a doughy texture and could taste too sweet. The bread we use at Zuni is called pagnotta, but I have experimented with variety of breads sold variously as pain de campagne, country bread, boule de campagne, Italian country loaf, pugliese, even a fat ciabatta that felt heavy for its size. But beware; names tend to be a function of marketing trends, making them the least useful guideline in choosing this sort of bread; rely instead on the look, the feel, and the ingredient list on the label.
For garnished crostini, I generally call for plain fresh white baguette. Seeded varieties may clash with the flavor of the toppings.
I very rarely call for any type of sourdough bread, whether the tangy, all-white-flour “San Francisco”-type or the mellower, mixed-flour levain-type breads. While many types are delicious for eating by themselves or with meals, I find their flavor is usually too strong and too rich to use in dishes like bread salad, pappa al pomodoro, or Pearà sauce. Where I do use sourdough, it is only for occasional crostini or salad croûtons. For example, we use levain bread to make super-crunchy croûtons for our Caesar Salad.
Measuring Bread I generally provide both weight and volume measurements for bread, although weight is distinctly more reliable, and that is critical for recipes where bread acts as a thickening agent, as in romesco or Pearà sauce. Knowing that your quantity of bread or bread crumbs is correct is particularly reassuring if you are not familiar with using bread this way. But once you have made such a dish successfully, you can probably gauge the bread by volume or even by eye in the future. I do occasionally specify the thickness of slices or size of chunks of bread, where the finesse of a dish depends on it, as for the croûton-wads for Madeleine’s Omelette, or even the thinly sliced bread for a simple sage-grilled cheese. Nevertheless, don’t feel that you need to measure every piece with a ruler.
Fresh Bread Crumbs By fresh bread crumbs I mean fluffy, soft crumbs made from chewy, peasant-style bread. You’ll need to make them in the processor~I’ve never seen this type of crumb marketed. Do not substitute fine, dry, toasted bread crumbs, whether store-bought or homemade. For the best and most reliable results, use day-old bread. It is less humid and tends to make lighter, looser crumbs than fresh. Occasionally, when some types of peasant bread are very fresh, they turn into heavy, gummy nibs rather than fluffy crumbs when you process them. There is no foolproof way to stale such bread artificially~I’ve tried slicing it and leaving it in the refrigerator to dehydrate as well as slow-drying it in the oven at the lowest-possible heat. In nearly every case, I got either gummy crumbs or sawdusty ones. The best solution is to keep a little stale bread around, or identify a type of peasant bread in your market that makes light crumbs even when it is fresh.
To make fresh bread crumbs: Carve off all of the crust. {Set aside to use for croûtons, see below.} Cut or tear the tender insides of the loaf into walnut-sized wads and grind in a food processor. Don’t grind too fine or evenly. Variation in the size of the crumbs makes them more fun to eat; every batch should have some fat “snowflakes” and some mustard-seed–sized crumbs. A cup of these tender crumbs will usually weigh about 2 ounces and shrink by about one-third when toasted. But the precise character of the bread you use and how fine you grind it can skew these numbers. If not using the crumbs immediately, place in a plastic bag and refrigerate for up to a few days. You can also double-bag them and freeze for a week or so.
Chapons: Croûtons Made from Crusts Anytime you make tender bread crumbs, you can salvage most of the orphaned crust for croûtons we call chapons. Pick through the pieces of crust, and select those from the top and sides of the loaf; the bottom crust tends to be tough. Don’t worry if they are irregular in size and shape. Crusts that still have a little of the white part of the loaf will be particularly good. Brush the crusts evenly all over with mild-tasting olive oil and toast in a preheated 400° oven until just golden on the edges, then break into bite-sized pieces to float on soup or toss in a salad. In Gascony, in southwestern France, chapons are always rubbed with raw garlic.
CITRUS
RELIABLE GUIDELINES FOR CHOOSING CITRUS ARE ELUSIVE. No standard of scent, size, or heaviness indicates good flavor~although fruit that is light for its type and size tends to be dry and have poor flavor. Knowing peak season for each type helps~as with most fruit, citrus that is allowed to fully ripen on the tree will be the best. Saturated skin color is generally a reliable sign of ripeness, although make sure you don’t confuse hue with color saturation {a deep-orange Satsuma mandarin may be paler than a deep-red-orange Page tangerine, but both may be very ripe}. And, unfortunately, skin color can be manipulated with ethylene gas.
Given these vagaries, the best way to learn to choose citrus is to buy and taste it. Try every variety of mandarin, or grapefruit, or orange you see over the course of the year. Although the particular sweetness or juiciness of a given piece of fruit depends on where it was grown, how it was farmed, and when it was harvested, you can at least develop a sense of the typical flavors of each variety and of which ones are most likely to be full flavored, acidic, delicate, bland, fragrant, and so on.
Citrus Zests Zest is the aromatic, pigmented outer rind of a citrus fruit. Use unwaxed citrus, organic whenever possible, for zesting. {Commercial citrus is bathed in wax to make the surface shiny and to keep it from dehydrating. It can contain fungicides. This practice means perfect-looking citrus is abundant in markets year-round. Although the waxing products are deemed safe for consumption, my instinct is to avoid eating them. Where you can’t get unwaxed fruit, washing treated citrus in warm water and then completely rubbing off the haze that appears is a reasonable compromise.} Carve zest just when you need it and, except when it needs to be chopped, directly into the dish. This way it arrives with a maximum of its delicate perfume aboard. Zesting in advance will not save time and will squander flavor. For last-minute additions of flavor, usually uncooked, I favor the tendrils you get with a zester. For wide bands of zest or zests that are cooked into stews and compôtes, I use a vegetable peeler. In either case, make sure your tool is sharp, and don’t dig deeply into the skin.
Turning and Filleting Citrus By “turned” citrus, I mean fruit that has had the skin and pith completely and neatly carved off with a knife, to produce bright, smooth, juicy spheres. These you can either slice into pretty pinwheels or “fillet,” which means using a knife to remove only the tender sections, leaving all the membrane behind. I detail both of these techniques in Citrus Risotto {here}.
EGGS
FOR ADVICE ON CHOOSING EGGS, SEE HERE.
Hard-Cooked Eggs Place cold eggs in a pot of not quite simmering water to cover by an inch or two. Bring to a gentle simmer. Timed from that simmer, cook large eggs for 9 minutes for yolks that are just pasty in the middle and set on the edges. For softer yolks, cook a minute less. For extra-large or jumbo eggs, count nearly 10 minutes. If you like your eggs more cooked, remove the pot from the heat and leave to cook for another minute or two in the hot water.
The eggs will continue cooking until they are cool, so once they are cooked as you like, promptly run them under cold water or place in a large bowl of ice water and roll gently to fracture all of the shells~this will let cooling water inside. Only then begin peeling the lot of them. Very fresh eggs will cling to the shell membrane, but the resulting imperfect surface is not a great offense. The cure, toughening the white with a bout of hard-boiling, is worse than the flaw. I always cook eggs close to when I need them; chilling them turns the flavor toward stodgy and spoils the delicate texture.
GARLIC
CHOOSE HEADS OF GARLIC THAT ARE HARD, DRY, AND HEAVY FOR THEIR SIZE. Squeeze a few different spots; while some of the outer cloves may feel perfect, others may be desiccated or rotten. Don’t buy heads of garlic that are sprouting green “cowlicks.” Garlic tastes best within a few months of harvest~which usually occurs in July in California. When choosing garlic, condition can be more important than variety~I love the flavor of many red-skinned varieties but will pass over them if white garlic is in better shape. Don’t substitute elephant garlic; its flavor is dull and stale tasting.
Deciding How Much to Use and How to Prepare It Garlic varies wildly in flavor, as does people’s taste for it. And heads and cloves vary in size. Consequently, the amounts of garlic in these recipes are negotiable; feel free to adjust to suit your taste, and your garlic. Although the character of the garlic you choose and the quantity you use is obviously important, its flavor in a finished dish is also a function of how you prepare it and when you add it. In general, fine chopping and/or long cooking mellows the flavor, as does cooking whole garlic in its skin. Coarsely chopped garlic will be more assertive, especially if it is barely cooked. Pounded raw garlic delivers the most intense and, usually, the brightest, cleanest flavor and perfume. Hence a single clove of garlic, “bruised” with the side of the knife and dropped into a vinaigrette, sauce, or broth, can perfume the whole preparation, without adding any harsh notes. I am not fond of the flavor of browned garlic; I always add garlic to dishes when the heat is low enough for it to infuse without scorching.
Peeling and Preparing Garlic Always peel and prepare garlic just before you use it. Remove as many cloves as needed from the head of garlic~or break up the whole head, if you need that much~by laying it on its sloped shoulder and pressing on the root end with the heel of your hand. This usually splits the outer layers of skin, sending the cloves skittering across the counter. If you are using the cloves in their skins, squeeze each one to make sure it is well formed. If a clove feels hollow or spongy, discard it.
To peel garlic, first fracture and loosen the skin by gently crushing each clove with the flat side of a wide knife or a cleaver. Press just hard enough to split the skin. Use the tip of a paring knife to cut off the root end, then trim away the papery skin. Discard any cloves that are shrunken or rubbery, and trim the remainder of discoloration. Split each clove lengthwise and remove any green sprouts. Then crush, sliver, chop, or pound as needed. For pounded garlic, first cut each clove into a few pieces, then place in a mortar and pound. For the smoothest result, add a pinch of salt once the garlic is pasty, then continue pounding.
The only way I know of to remove the smell of raw garlic from your hands is also a foolproof way: wash your hands well before you start the project, then wash them promptly afterward in cold tap water with no soap or detergent of any kind. Don’t handle anything oily before you wash off the garlic.
NUTS
NUTS ARE A FRAGILE TYPE OF PRODUCE THAT OFFER WONDERFUL NUANCES OF flavor and texture. Buy nuts in small quantities, as you would any perishable product, and from stores where stocks are replenished regularly. Store in a sealed container in a cool spot and use within a few weeks. Walnuts in particular are season-sensitive; they are best when freshly harvested in the fall and rapidly decline in flavor once they are shelled. Always toast, roast, or warm nuts shortly before you plan to use them. Heating heightens their perfume and reveals subtle flavors, and it usually makes them crunchier; although they may be slightly soft when they first come out of the oven, they become crisp as they cool.
Oven temperatures are fairly negotiable when you are heating nuts, as long as you keep an eye {or nose} on their progress. In general, the oven needn’t be fully preheated. A toaster oven is convenient for warming nuts.
OLIVE OIL
WE STOCK A FEW DIFFERENT COLD-PRESSED EXTRA-VIRGIN OLIVE OILS, CHOOSING among them according to their flavor and how it will show in concert with the other ingredients. In these recipes, I specify extra-virgin olive oil where I feel the dish will showcase the virtues of a full-flavored oil. This is usually where the oil is not heated at all or where the heating is gentle or brief. I specify a mild-tasting olive oil where it is likely to experience high or very prolonged heat, or where an assertively flavored extra-virgin olive oil might clash with other flavors in a dish. This oil may or may not be extra-virgin, depending on your supplies and budget. In either case, the oil is never just a “cooking medium,” so make sure the oil you use tastes good straight from the bottle.
OLIVES
MY FAVORITE GREEN OLIVES, IN NO PARTICULAR ORDER, ARE CRUNCHY, BRINY Picholines; softer, mellower Lucques; fat Sicilian Ceregnola; and meaty Ascolane. For black olives, I use small, mild Niçoise, Ligurian, Greek elitses, and Spanish arbequiñas or plumper, brinier Gaetas or Kalamatas. We also use oil-cured black Nyons olives, which are soft, nutty, and pleasantly leathery. We sometimes marinate whole olives with thyme and orange zest to serve as an antipasto, but we don’t use commercially marinated olives and I don’t specify them in any of these recipes. Although these medleys can be tasty, the seasonings may clash with the dish in question. Never substitute canned “Lindsay” olives.
When cooking with olives, I often recommend you rinse them, soak them in warm water, or even blanch them to leach out some of the brine. Even so, consider their residual saltiness when you add them to the dish.
Pitting Olives Rinse, drain, and roll between towels to dry. Leaving the olives sandwiched between the towels, tap them firmly with a meat pounder, mallet, or the bottom of a small heavy pot. Remove the pits from the split fruit.
ONIONS
CHOOSE ONIONS THAT ARE HARD, DRY, AND HEAVY FOR THEIR SIZE. Avoid specimens that have sprouted.
In general, prepare onions only when you need them~sliced and diced onion does not improve in flavor and can become acrid tasting {likewise shallots}. I make an exception when I want to soften onions before I cook them: In this case, I cut and lightly salt them in advance. This forces them to release moisture, which means they will cook to tenderness without high heat, or in less time, and without coloring.
Sometimes cutting onions will make your eyes tear; this depends primarily on the onions themselves but is exacerbated by lack of ventilation. I usually tough it out if I am only slicing an onion or two~or I move the cutting board to a better-ventilated spot in my kitchen. If you have to slice a lot of aggressive onions, it will help somewhat to array the halves cut face down on a clean, dry towel as you prepare for the slicing operation. The towel will wick some of the offending juice from the onions. The match-between-your-teeth trick has never provided me much relief.
Measuring Onions For accuracy, quantifying onions by prepared weight is the most reliable index. Measuring by volume works pretty well for diced onions, but it is awkward for sliced ones. Confident descriptions, like “1 large onion,” are terrific for shopping lists but permit huge variation in yield. {My “large” onion may be half again larger than yours, and one’s idea of large onion may vary from day to day. And the yield of one onion can vary plenty from that of another similar-looking specimen, once you trim the papery skin, root, neck, tough outer layers, or spongy cores.} Consequently, I generally list onions by prepared weight and then include whole weight or prepared volume in function of how the onions are used in the dish. All of this said, onions head the category of ingredients where you can fudge somewhat without debacle. Once you have bought, trimmed, and prepared a few onions, whether by weight or by volume, you should be able to estimate your needs by eye. Keep an extra pound or so on hand to prevent shortfalls.
Peeling Onions Use the tip of a paring knife to carve out the tassel end with a shallow circular incision~this will leave a conical pit. If you plan on slicing the onion, carve out the root end as well; this way the slices will not be attached to each other. Where you don’t want the onion to fall apart, say for stock making, trim the root end flat. Peel away dry outer layers and trim partially dry inner layers.
Slicing Onions Use a chef’s knife to cut the onion in half from end to end. Remove any newly revealed sprouts. Set face down and slice into the desired thickness, again from end to end. Hold the onion in place with your fingertips curled under and bent slightly away from the knife blade, and rest the flat face of the knife against the first knuckle above your fingertip. Use your gradually retreating knuckle to control the thickness of the slices. Watch for and remove any sprouts that reveal themselves as you slice. When you can barely hold the diminishing heel of onion, turn it widest face down on the cutting board, pivot it 180 degrees, and slice your way from the cut edge toward the rounded heel.
Dicing Onions By diced onions, I mean bits of onion that are fairly regular in size and are cleanly cut, though most won’t be perfect cubes. They are the result of a series of even parallel cuts. Randomly chopping onions produces much more uneven results; some bits are so small they will shrivel before larger ones have begun to soften. In many cases, this matters little, but where even cooking does matter, it is nice to be able to produce a pretty dice. There are a number of ways to dice onions. Some suggest you leave the root end intact to help keep the onion from sliding apart. But the elegance of any technique depends on the sharpness of the knife. You can substitute force for sharpness when you are merely slicing onions, but a dull knife makes the second or third set of cuts for a dice problematic at best, regardless of whether the slices are tethered to the root or not.
The usual method of dicing onions is to start by cutting a peeled onion into halves with the root end intact. Then make a series of parallel cuts end to end, as for slicing, each of which stops just short of the root end. Next, holding the onion in place from above, make a second series of parallel cuts, this time with the blade of the knife parallel to the counter, working your way up to your vulnerable steadying hand. Again, stop short of the root end. Don’t press too hard from above, or you’ll pinch the blade in place. Finish the project by cradling the onion from the sides and slicing crosswise. Discard the root stub.
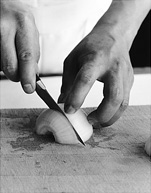
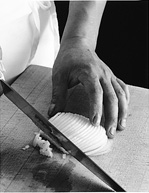
A better alternative is an ingenious method devised by Quang Nguyen. His technique is faster and more efficient, and it requires only two sets of cuts. Prepare onion halves, coring both ends. Use a razor-sharp slender-bladed paring knife to slice neatly crosswise through the onion. The halves should emerge neat and assembled like a pre-sliced ham. Now, gently press down on the sliced onion-ham, so the slices recline evenly away from your hand. Switch to a very sharp chef’s knife for the second set of cuts. Line the knife blade up with the tips of the reclining onion slices and make a series of parallel cuts, adjusting the angle of the knife two times as you progress through the onion {see illustrations}.
 |
 |
| 1 | 2 |
 |
 |
| 3 | 4 |
 |
|
| 5 | |
1. Slice the onion crosswise.
2. After pressing the onion flat, start dicing with the knife angled toward 2 o’clock.
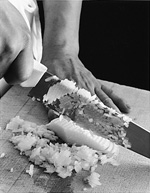
3. About one third of the way through, switch the knife angle to 12 o’clock and continue dicing.
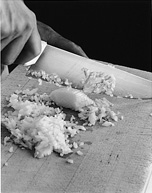
4. About two thirds of the way through, switch the knife angle to about 10 o’clock and dice the remaining onion.
5. A schematic illustration of steps 2, 3, and 4.
SALTED ANCHOVIES
WE USE COMMERCIAL SALT-PACKED ANCHOVIES EXTENSIVELY, FOR MANY DIFFERENT sauces and condiments, for pizza toppings, and for our Caesar Salad in particular. They are far more delicate than most commercial oil-packed fillets; they have a clear fish flavor but are slightly nutty. Some delicatessens sell them individually, but often you will have to buy a whole can, usually a kilogram or more, much more than you will need right away. In that case, simply remove as many fish as you need, make sure the remaining fish are covered with moist salt, wipe the exposed inside rim clean and dry, and double-bag the whole can in plastic. Refrigerate. The anchovies should keep well for months.
Filleting Salt-Packed Anchovies Rinse the fish under cool water, rubbing gently to remove the scales. Slide a fingertip into the belly of each anchovy and rinse the cavity. Pull off the dorsal and ventral fins. When you’ve removed all the scratchy surface parts, place the fish in a bowl of cool water and soak until it begins to feel pliable, a minute or so. Slide your finger back into the belly cavity and gently pry one fillet from the bone; if the flesh wants to rip, it’s still too dry~return it to the soaking water for another minute. Once you’ve peeled off the first fillet, you can pull the central bone off the second fillet. Rinse the fillets in cool water, rubbing gently to remove any scratchy bones. Don’t worry about the silky bones you can see but barely feel. Drain and lay the fillets, not touching one another, on a dry towel. Lay a second dry towel on top and press to draw out excess water. Lift and replace the towel in a different position, then press again to draw out a little more water. Pinch off a bit of fish and taste. It should be nutty and not all that salty, and toothy-tender, not mushy. If it is still too salty, soak for another minute or so; if too soft, press again between towels. Chop, pound, or sliver as directed in the recipes, or add olive oil to just cover, then cover and refrigerate. They will keep well this way for weeks. At home I usually fillet a few more fish than I actually need; having a few ready to use is an easy way to start a dinner project.
Other Preserved Anchovies Commercial oil-packed anchovy fillets are usually quite salty and sometimes taste metallic, bitter, or muddy, or all three. The oil they are packed in generally starts out or becomes dreadful tasting. However, if you are forced to use them, they can be improved. First drain off and discard the oil. Gently rinse or soak the fillets in tepid water. Press dry between towels as described above. The oil makes it difficult to leach out the salt, but this rinsing usually mellows it somewhat and minimizes the taste of the bad oil.
White anchovy fillets, especially the Spanish version sold as boccarones, have lately become more available in American specialty markets and can be delicious. Do not, however, confuse them with or substitute them for salted anchovies. They are “cooked” in vinegar and have a very different texture and flavor. Likewise, don’t substitute Zuni House-Cured Anchovies for the commercial version.
Although anchovies vary in size, count on 2 to 3 fish {4 to 6 fillets}, whole or chopped, per tablespoon.
TOMATOES
WHILE IT IS POSSIBLE TO GET FRESH TOMATOES YEAR-ROUND, I ENCOURAGE YOU TO honor their season. The fragrance, flavors, and silkiness of sun-ripened summer and early fall fruit justify eight or nine months’ abstinence; the bland, scentless crops that burden the market the rest of the year rarely deliver more than a little color and moisture. Most varieties ought to be heavy for their size, just yielding but not soft, and they should have saturated color~whether red, orange, yellow, oxblood, or a streaky, multicolored palette~and be virtually free of green blushes {barring the few varieties that ripen to a rich, saturated green}. Handle gently and store at room temperature~refrigeration disables the perfume while damaging the texture. If you do find yourself with a bounty of slightly overripes that you must refrigerate, plan on turning them into sauce or soup {see Tomato Coulis, here, and Pappa al Pomodoro, here}.
Peeling Tomatoes I don’t peel fresh tomatoes all that often~never when serving raw, since the peeling process {heat} mutes much of their delicate perfume, and for most cooked dishes, I like to include at least some of the skin for flavor and texture. But when you do need peeled fresh tomatoes, you can choose between blanching and blistering.
For peeling just a few tomatoes, blistering is the easier and quicker of these two methods, but it can be tricky with really large, heavy fruit or extremely ripe soft fruit that can sink into the hot burner grate. {Blistering under the broiler is an option, although it tends to cook much more than just the skins.} I like the rich flavor open-flame blistering encourages and, in particular, I like the flavor of the charred skin~I make a point to not rub it all off. Blanching is more efficient for large quantities and where you can’t risk insulting the tender flesh with brand marks or where you want to preserve the delicate flavor of the surface of the fruit from caramelizing heat. It is also the obvious choice if your stove is electric. If blanching, you can core the tomatoes before or after boiling them; if blistering, wait until you have charred the skins.
Blanching method: Lower a few tomatoes at a time into a pot of rapidly boiling water. Leave just long enough to loosen the skins, usually 15 seconds or less, then remove and cool them in ice water. Drain promptly and slide off the skins.
Blister method: Set each tomato directly in the flame of a gas burner and leave just long enough to split and shrink the skin~usually less than 30 seconds. If the tomatoes are less than perfectly ripe, or if you just like the charry skin, turn them to shrink the other side.
Canned Tomatoes Outside of tomato season, we use a large quantity of canned whole, peeled organic tomatoes. We chop them as needed, rather than use canned chopped tomatoes. They are packed in their own juice with salt and no other aromatics. They are obviously far more cooked than peeled fresh tomatoes, so when substituting one for the other, flavor differences are inevitable, and I sometimes specify a little extra if the peeled tomato is to be fresh.
WILD MUSHROOMS
WILD MUSHROOMS ARE UNLIKE MOST OTHER PRODUCE IN THAT YOU DON’T WANT specimens that are quite heavy for their size~weighty mushrooms are usually waterlogged ones. The water you are paying for will need to be evaporated, and if you are cooking the mushrooms sliced in a pan, this will give them a boiled quality. Beyond that concern, look for perky mushrooms, ones that bounce back when you prod or bend them. The best mushrooms will be free of discoloration and feel fleshy-humid, not outright moist, and never slimy. As long as the mushrooms are reasonably dry, don’t worry if they are a little dirty; they will be easy to clean. {Although do factor in the weight of the dirt when you make your purchase, or harvest.} Remember that fresh mushrooms are a living fungus that is primed to decompose. Don’t put them in a plastic bag~even at the market. Place them, uncrowded, in a brown paper bag, so they won’t sweat and won’t crush or soil one another. Store refrigerated, or in a very cool spot.
Cleaning Mushrooms Pick off loose dirt or debris or brush it off with a clean, dry towel or pastry brush. {An old brush whose bristles you crop short is more effective than one with long, soft bristles.} A brush works especially well to clean fluted gills. Use a sharp paring knife to scrape or carve off crusty dirt. Trim bruised, discolored, or soft spots; the fungus is past its prime there. Split trumpet-shaped mushrooms lengthwise to expose the inside of the tubular stem. If cleaning porcini, check under the cap~if the sponge is firm and creamy beige, leave it in place. If it is very soft or greenish-brown, remove and discard it. Cut porcini in half and check for worms, or wormholes; trim any colonized sections. Refrigerate mushrooms promptly after cleaning. On occasion, black chanterelles {also known as horns of plenty and trumpets of death} are dusted with fine grit that cannot be seen, much less scraped off. We rinse and swish them in tepid water, then press dry between towels. This is the only instance where washing is a good option for mushrooms. Fortunately, black chanterelles are thin and slightly leathery, so they don’t absorb much water, and they tolerate the sort of cooking it requires to evaporate it without turning mushy.