

POLENTA
I CREDIT OUR SIMPLE FIVE-DOLLAR BOWL OF WARM POLENTA WITH KEEPING ZUNI alive through the first days after the 1989 earthquake~business was terrible all over town, but we stayed pretty busy, selling many more bowls than usual. Inexpensive, reliable, and comforting, a well-seasoned bowl of polenta is satisfying by itself, but, soft, grilled, roasted, or fried, it also finds its way into dozens of dishes at the restaurant, alongside, or under, beef, pork, or game birds. In any of its forms, it is great with sausage or bacon.
We use organic polenta ground from a variety of yellow corn called Pioneer {see Sources and Resources, here}. The grits are irregular and larger than American cornmeal, and coarser than most commercial polenta I have seen in Italy. It has lovely flavor, great body, and wonderful texture. {If you use a fine-textured polenta, it will need less water; consult the package for the water-to-meal ratio. It may cook somewhat more rapidly as well.}
There is a persistent superstition that polenta needs to be stirred constantly, but we stir it only often enough to be sure it’s not sticking and scorching. Steady, gentle heat and a heavy-bottomed pot will also help prevent that. The light, tender, creamy, slightly viscous texture I prize, and our clients love, is the result of a high ratio of water to meal and long, slow cooking, followed by a holding period where the polenta meal swells and softens even more. This technique means you can make the polenta up to a few hours in advance, which can be very convenient.
Serve soft polenta by the spoonful as a side dish, or by itself in warm bowls with freshly grated Parmigiano-Reggiano, mascarpone, or crumbled Gorgonzola and freshly cracked black pepper over the top. Alternatively, serve with a spoonful of rich tomato or meat sauce. Cook at least 1 cup of polenta at a time~it is difficult to cook less without much of the water evaporating before it can be absorbed. Lots of suggestions for capitalizing on leftover polenta follow the recipe.
Wine: Merlot delle Venezie, Livio Felluga, 1999
FOR ABOUT 4-1/2 CUPS, OR 4 TO 8 SERVINGS:
5 cups water
1 cup coarsely ground polenta
About 2 teaspoons salt, or to taste
Unsalted butter, to taste {optional}
Bring the water to a simmer in a 2-quart saucepan. Whisk or stir in the polenta, then stir until the water returns to a simmer. Reduce the heat until the polenta only bubbles and sputters occasionally~use a Flame Tamer if necessary~and cook uncovered for about 1 hour, stirring as needed, until thick but still fluid. If the polenta becomes stiff, add a trickle of water. Taste. Add salt and a generous lump of butter, if you like.
Transfer the polenta to a double boiler set over simmering water, to rest for at least 30 minutes {or up to a few hours, if it suits your schedule}. Wrap the lid tightly in plastic wrap and cover the polenta. This will keep the polenta from developing a skin. If you don’t have a double boiler, you can make do by setting the polenta pan on a small, ovenproof ramekin {or any small piece of heat-resistant crockery} centered inside a wider, deeper pot, and surrounding it with just-simmering water. Cover the pan as above.
 Variation POLENTA with FRESH CORN
Perhaps better than plain polenta. Don’t be tempted to stir the corn in raw, as some sweet corn may turn the thick polenta runny. Cooking the corn disables the guilty enzyme.
FOR ABOUT 5 CUPS:
2 tablespoons unsalted butter
About 1 cup fresh corn kernels and their milky juice {3 to 4 small ears} {see here}
1 recipe polenta, made without butter and kept warm
Salt
Melt the butter in a 10-inch skillet over low heat. Add the corn, stir, and cook until hot through, about 3 minutes. Stir into the waiting soft polenta. Taste for salt. Serve immediately, or spread on a sheet pan to firm up for roasting or grilling.
Variation SAGE & ONION POLENTA
Very delicious by itself or with pork or poultry.
FOR ABOUT 5-1/2 CUPS:
4 tablespoons unsalted butter
About 2 cups diced yellow onions {8 ounces, about 1 medium onion}
A dozen fresh sage leaves, coarsely chopped
Freshly cracked black pepper
Salt
1 recipe polenta, made without butter
While the polenta is cooking, melt the butter in a 10- or 12-inch skillet over medium-low heat. Stir in the onions, sage, and lots of freshly cracked pepper. Salt lightly and cook slowly until the onions are translucent and soft, about 8 minutes.
Stir the onions into the thick polenta. Taste.
FIRM POLENTA & THREE WAYS TO SERVE IT
SPREAD SOFT POLENTA ABOUT AN INCH DEEP ON A LIGHTLY OILED SHEET PAN TO cool. You can leave the surface smooth, or wait until it is partially set and then churn the surface somewhat, giving it shallow valleys and little crags, which will become especially crispy when you later grill or roast it.
Note: For any of these side dishes, allow 5 to 6 ounces polenta per person.
ROASTED POLENTA
Leftover polenta {plain or either variation} becomes delicate, if such a thing is possible, when patiently roasted this way. Cut into 2- to 3-inch triangles and brush on all sides with melted unsalted butter or olive oil. Arrange, widely spaced, on a sheet pan or in a shallow gratin dish and roast for about 30 minutes at 275°. Rather than drying out, the polenta will become crunchy outside, and surprisingly succulent and almost fluffy inside. Serve with hearty stews and braises.
SAGE & ONION POLENTA GRATIN
An obvious idea, but one that takes a little bit of care to steer clear of stodginess. The cooked onions make it particularly tender and succulent. Serve by itself, or with roasted or grilled birds, pork, or beef. It is great with pot roast, or with warm, leftover pot roast juices added to the edge of the dish as you pull it from the oven~trust the hot dish to bring the juices to a simmer.
Preheat the oven to 350°.
Cut firm Sage and Onion Polenta {here} into rough 3/4-inch chunks. Ragged edges are good. Choose a baking dish that will hold the chunks in about two loose layers. Brush the dish with melted unsalted butter. Arrange the chunks of polenta in the dish, making sure that some poke higher than others so they will produce a nice irregular surface and brown more than the rest. Include the broken bits and crumbles. Dab the tips with more melted butter, or top with a lacy layer of grated Fontina or Swiss Gruyère.
Bake until the high points are quite brown, 20 minutes or longer. Don’t shortcut the oven time, or the chunks of polenta will be heavy. Serve immediately.
POLENTA HASH
Serve with sausage, fried eggs, grilled birds, or saucy pot roast. You will get the crunchiest results if you make this in a well-seasoned cast-iron pan or on a steel griddle, but it is easiest to manage in a nonstick skillet.
Break firm polenta into irregular 1- to 3-inch chunks. This will produce some crumbles. If using plain polenta, prepare a few spoonfuls of diced onion or of a mixture of diced carrot, celery, and onion per serving.
Heat 1/8 inch of mild-tasting olive oil in the chosen pan over low heat. Add the vegetables, if using, and stir to coat. Pile on the chunks and crumbles of polenta, to cover the bottom of the pan in a loose, craggy, 1-inch thick layer. Press gently to encourage surface contact. {Don’t add salt~the polenta is fully seasoned.} Turn the heat up until the oil begins to pop discreetly. Cook uncovered and undisturbed until the polenta sets a firm golden crust, about 10 minutes. Reduce the heat as needed so the vegetables don’t burn.
Turn the polenta over, a spatula-full at a time, making sure you break a few pieces as you go, creating new faces to brown. Leave to set a crust, another 8 to 10 minutes, then turn the polenta again. Don’t rush the hash; turning it when the crust is too thin will result in polenta mush. Continue turning and crisping until you have a nice balance of small and large bits and of slightly under- and slightly overcooked vegetable bits. Serve immediately, or hold in the pan, uncovered, in a 250° oven for up to 20 minutes.
ABOUT RISOTTO
RISOTTO MAKERS ARE MUCH ESTEEMED IN KITCHENS AND DINING ROOMS, AS though risotto were somehow more demanding than a fine plate of pasta. In fact, producing a satiny-creamy risotto, the grains still al dente, is not such a tricky operation and is only unforgiving when it comes to mediocre raw ingredients.
For traditional risotto, we use Italian Carnaroli or Arborio rice. Look for a brand that boasts its harvest date; rice from the most recent harvest will have better flavor than the prior year’s crop. And make sure the single variety is listed on the package. A cheerful box labeled “rice for risotto” may contain a profitable mix of rices that won’t cook evenly. {You can make risotto with other types of rice, such as the Italian Vialone Nano, Baldo, and Sant’Andrea or, for that matter, Spanish and starchy Asian rices. I’ve made delicious risotto-y dishes with all at home. Perhaps the grains are smaller and have a different flavor from Carnaroli or Arborio, but the cooking method is certainly friendly to them.} Store rice in a cool, dark spot, and, if you choose a brand sold in cloth bags, be aware it may absorb surrounding odors. Rice packaged in unlined cardboard may taste faintly of that.
Regarding stock: Most of the unfixable, bland risotto I have tasted in my kitchen owes to mediocre stock. No high-concept, earnest technique, added salt, extra cheese, glamour vegetables, or final splash of great wine will mask it. Delicious stock, on the other hand, can carry a risotto by itself, and will harmonize with carefully dosed embellishments. Taste your stock critically~if it doesn’t taste bright enough to sip “as is,” it will likely compromise the risotto. If your stock is lackluster, consider serving pasta instead. {Or ponder water. I have made tastier risotto using water than I can conjure with bland stock. The water effort is at least bursting with a clean rice flavor, preferable to the muddy, noncommittal result you get with dull stock.}
Concerning technique, I use a heavy, deep saucepan~2-quart for up to 1-1/2 cups rice, 4-quart for 2 to 3-1/2 cups rice, and so on. I find that a saucepan has advantages over wide sauté pan or skillet. A deep layer of rice has less surface area than a shallow layer, which makes it much easier to control evaporation and favors even absorption of liquid. {This decreased evaporation, by the way, means you may use less liquid than when you use a shallow pan.} As you cook the risotto, aim for something close to a gentle simmer, but don’t worry if the rate of simmer varies. I avoid high heat, if only to prevent scorching and splattering. Gentle, regular stirring encourages even absorption of liquid and keeps things from sticking.
In my experience, risotto is forgiving when it comes to the temperature of the stock, wine, or other liquid you add to it. Although for years I added only simmering stock to the rice, I never found that this rigor guaranteed creaminess, or any other measure of risotto success. Then, after I casually made a fine risotto using room-temperature stock, I started experimenting with cold, warm, and hot stock and found I could make a creamy risotto with any one. Whatever its temperature when you add it, the stock will reach nearly 200° as it is absorbed by the rice. At home, I most often use cold or cool stock~which conserves burner space and means one less pot to clean. This convenient heresy alarms even longtime cooks at Zuni, but it has not failed me. A simmering stock will speed things up, and allows you to nearly standardize cooking time, but, all other things being equal, you can get fine results with less-than-simmering stock. {But don’t take this to mean you can leave stock for hours at room temperature. “Just-warm” stock should be that way only because it simmered recently.} You’ll tend to use less stock if it is cold than if it is simmering away on the back burner.
In the initial phases of a risotto, adding the stock or other liquid requires no great rigor; you can add larger or smaller increments than I suggest. Likewise, exactly how “absorbed” each early dose is is not critical to the final result, so long as you don’t let the rice dry out completely. It is only the final doses that require thoughtful judgment, to make sure you don’t add more stock than an al dente grain needs. At that point, treat each addition as though it will be the final one, waiting for the liquid to be absorbed and turn viscous before adding more. Add little doses of the liquid until the grains are nutty-tender. The rice should still be uniform and smooth on the outside~not rough on the surface from oversaturation. Bite into a grain~and look for a speck of white at the core. Err on the side of undercooking; the rice will continue to absorb liquid and soften after you turn off the heat. Once the rice is al dente, a final splash of liquid, brought to a simmer, will give the dish a saucy all’onda {wavelike} quality. With regards to timing, expect most batches of risotto to take under 20 minutes to absorb hot stock; allow a little more time if you use colder stock. I allow about 30 minutes overall for most risottos.
A cup of rice will yield about 2-1/2 cups of plain al dente risotto, a little more if you like it all’onda, and then more as you stir in other things~I advocate restraint here. Too much “stuff” will distract from and disintegrate the carefully nurtured texture of risotto, and you risk overwhelming the lovely flavor of the rice as well.
CITRUS RISOTTO
THIS FRAGRANT RISOTTO SURPRISES AND DELIGHTS EVERYONE WHO MAKES, OR EATS, it. In our menu meeting before going upstairs to prepare for dinner service, cooks often look at me as if I’ve slipped a little when I explain what goes into it. It doesn’t sound as if it will fall into balance, but it does. Use sweet, ripe, pink or red grapefruit. If you can get ripe limes~which have yellow rinds~they will be more fragrant and sweeter than the bright green, unripe supermarket standard.
We sometimes serve this risotto as a bed for sweet spot prawns or fat white shrimp, both of which we sauté in their shells.
Wine: Pinot Grigio, Alto Adige, J. Hofstätter, 2000
FOR 4 TO 6 SERVINGS:
1 to 2 medium grapefruit, to yield 3/4 cup sections {about 16 small sections} plus juice
1 lime, to yield a scant 1/4 cup sections {about 8 sections}
2 tablespoons unsalted butter
1/2 cup finely diced yellow onion {2 ounces}
Salt
2 cups Carnaroli or Arborio rice
3-1/2 to 5 cups Chicken Stock {here}
1/4 cup mascarpone
Slice both ends off the grapefruit and lime, cutting just deeply enough to expose the juicy flesh. Setting the citrus on end, use a paring knife to carve away the skin and pith in a series of smooth, curved strokes from top to bottom, rotating the citrus a little with each stroke. If you don’t get all the pith on the first go-round, go back and trim any you missed. Next, cradling the citrus in one hand, slide the blade of the knife close to the membranes on either side of each segment and gently pry out the sections; work over a bowl so you capture the juice. Tease out any seeds you encounter as you go, and don’t worry if some of the sections break. Squeeze the remaining juice from the grapefruit “carcasses” into the bowl.
Warm the butter in a 4-quart saucepan over medium-low heat. Add the onions and a few pinches of salt. Cook, stirring regularly, until the onions are tender and translucent, about 6 minutes. Add the rice and stir until the grains are warm and coated with fat. Add about 2 cups of the stock, adjusting the heat to maintain a gentle simmer, then stir as needed until it has been mostly absorbed. Add another cup of stock and do likewise. The risotto should look like a shiny porridge of pearls. Taste: the rice will still be hard and a little raw tasting. Correct the satiny liquid for salt. Add another 1/2 cup or so of stock and stir as needed until just absorbed. Taste again, checking flavor and doneness.
Break the citrus sections into irregular pieces as you add them, and the grapefruit juice, to the risotto. Continue to cook as described above. Taste again. If the rice is still quite firm, add more stock about a tablespoon at a time and cook until it is al dente. If your grapefruit was very juicy, you may use little of the remaining stock. Turn off the heat and, with a little vigor, stir in the mascarpone. The citrus will be reduced to pretty flecks in the creamy rice. Serve promptly.
RISOTTO with WILD RICE, SQUASH, & WILD MUSHROOMS
I LIKE TO STIR A LITTLE COOKED WILD RICE INTO RISOTTO TO INTRODUCE TEXTURAL contrast and nutty flavor. Here the austere wild rice balances the sweet, soft squash and earthy mushrooms. This is a good autumn combination; in the springtime, try a similar combination of wild rice with favas or asparagus tips and morel mushrooms. You can also try stirring in cooked whole-grain farro {see here} in place of the wild rice.
For any version of the dish, I cook the mushrooms separately and then add them to the risotto when it is about half-cooked. This heightens the flavor of the mushrooms and keeps them from having a boiled texture. Likewise, I add the squash late enough that it will reach peak flavor and be just tender at the same moment the rice is al dente.
Wine: Toar, Rosso del Veronese, Masi, 1997
FOR 4 TO 6 SERVINGS:
About 1/4 cup wild rice
3/4 cup water
Salt
4 tablespoons unsalted butter
About 6 ounces cleaned, sliced wild mushrooms, such as porcini, chanterelles, or hedgehogs {see here}
About 1 cup peeled butternut, Kabocha, or Red Kuri squash cut into 3/8-inch dice {about 4 ounces}
1/2 cup finely diced yellow onions {2 ounces}
2 cups Carnaroli or Arborio rice
4 to 5 cups Chicken Stock {here}.
About 1/4 cup freshly grated Parmigiano-Reggiano
Place the wild rice and water in a 2-quart or smaller saucepan. Bring to a simmer over low heat and stir in salt to taste. Adjust the heat to achieve a nearly imperceptible simmer and cover tightly. Cook until tender, about 45 minutes, checking occasionally to make sure the water hasn’t begun to boil hard. The rice will not cook perfectly evenly; the majority should be splitting along the length of the grain, and as many as one-third of them may spread wide open and curl before the whole lot is tender. Drain in a strainer and capture the excess cooking water. You should have about 3/4 cup cooked rice and a few tablespoons of flavorful cooking water.
Melt 2 tablespoons of the butter in a 10- or 12-inch skillet over medium-low heat. Add the mushrooms, salt lightly, and cook, stirring or tossing a few times, until they color slightly, 3 to 6 minutes, depending on how wet the mushrooms are. You should just begin to smell their nutty aroma. Add the squash cubes, salt lightly, and stir or sauté just to warm through, about 3 more minutes. Remove from the heat, cover, and set aside.
Warm the remaining 2 tablespoons butter in a 4-quart saucepan over medium-low heat. Add the onions and a few pinches of salt. Cook, stirring regularly, until the onions are tender and translucent, about 6 minutes. Add the risotto rice and stir until the grains are warm and coated with fat. Add the wild rice cooking water and about 2 cups of the stock. Adjust the heat to bring it to and maintain a gentle simmer, then stir as needed until it has been mostly absorbed. Add another cup of stock and do likewise. The risotto should look like a shiny porridge of pearls. Taste: the rice will be hard and a little raw tasting. Correct the satiny liquid for salt.
Stir the mushrooms, squash, and wild rice into the risotto, then add another cup or so of stock and stir as needed until just absorbed. Taste again, checking the flavor and doneness. Add additional stock a few spoonfuls at a time until the rice is al dente; the squash ought to be nutty-tender as well.
Stir in the Parmigiano-Reggiano, off the heat.
FARROTTO with DRIED PORCINI
FARRO, OR EMMER WHEAT {TRITICUM DICOCCUM}, GROUND INTO MEAL AND cooked into a porridge, was the life-sustaining puls {the original polenta} that fueled the legionnaires. This “farrotto,” made like a risotto but with whole kernels of farro, would be the wealthy modern descendant, still elemental and nourishing, but lavishly concocted with meat stock, mushrooms, and fine oil. It is substantial winter fare. Use whole farro {which may be labeled variously as “decorticato,” “perlato,” or “semiperlato”}; cracked farro cooks much more rapidly and will lack the requisite nutty-chewy consistency that gives this dish character.
Wine: Falerno del Massico Rosso, Villa Matilde, 1999
FOR ABOUT 4 CUPS, OR 4 TO 6 SERVINGS:
1/4 cup extra-virgin olive oil, plus a little for drizzling
1/4 cup diced yellow onion {1 ounce}
3 garlic cloves, coarsely chopped
3 fresh sage leaves, coarsely chopped
Salt
About 1/4 ounce dried porcini {about 1/2 cup loosely packed}, rinsed and coarsely chopped, or about 2 ounces fresh porcini or chanterelles, cleaned and diced {see here}
1-1/3 cups whole-grain farro
4 to 5 cups Chicken Stock {here} or Beef Stock {here}
Freshly cracked black pepper
Warm about half of the olive oil in a 2- to 4-quart saucepan over medium heat. Add the onion, garlic, sage, and a few pinches of salt, then add the fresh mushrooms, if using. Cook, stirring regularly, until the onion is translucent, about 4 minutes. Reduce the heat to medium-low.
Add the farro and the rest of the olive oil and stir to coat the farro. Add about one-third of the stock and, if using them, the dried mushrooms and cook at a gentle simmer, stirring regularly, until the stock has been absorbed. Repeat with another third of the stock, then add the last third more gradually, checking for tenderness as each addition is absorbed; taste and adjust the salt as you go. Depending on your pan and your burner, it should take between 20 and 30 minutes for the farro to become nutty-tender. You may not need all of the stock.
Farrotto is forgiving, timing-wise; covered and held in a warm spot, it will hold for up to a half hour without the texture of the grain suffering, although you will need to add a splash of hot stock to restore the consistency. Serve very hot, drizzled with extra-virgin olive oil. Offer black pepper.
TURNING FARROTTO into FARRO SOUP:
Leftover farrotto is a good base for soup. We add cooked shelling beans, greens, and my favorite leftover, stale bread. Here is a flexible recipe for how you might do that; adjust the amounts to your supplies and your taste.
FOR 3-1/2 TO 5 CUPS:
A handful of greens {kale, mature mustard, collard, turnip greens, or Savoy cabbage}, cut into bite-sized pieces
1 bay leaf
1 to 2 cups Chicken Stock {here} or water
About 2 cups leftover farrotto
1/2 to 1 cup cooked white beans, flageolets, or lentils {see here}, with their cooking liquid.
About 2 ounces slightly stale, chewy, peasant-style bread, torn into bite-sized wads
Extra-virgin olive oil, to taste
Freshly cracked black pepper
Place the greens and bay leaf in a saucepan and add stock or water to cover by an inch. Cover and simmer gently until the greens are tender, about 10 minutes.
Stir in the farrotto and the beans {with their liquid} and bring to a simmer. Add more stock or water if the result is pasty. Don’t worry if it seems a little thin. Taste for salt. Simmer gently, uncovered, for about 15 minutes, until the farro is very tender and the flavors have melded. Stir in the bread and return to a simmer. Add more stock or water as needed to make a soft porridge. Cover tightly and turn off the heat. Leave to swell for about 10 minutes, then stir, taste, and serve. Offer extra-virgin olive oil and freshly cracked black pepper.

GENERAL NOTES on PASTA COOKERY
 Consider the package instructions concerning cooking times as guidelines only, and check the pasta regularly. With some experience and attention, you will be able to judge doneness by the color of the noodle and its “droop factor” as you dangle it from tongs, but biting into the pasta is a reliable test for all experience levels. “Al dente” means the pasta should just resist your tooth~it should have a faint trace of white at the core when you bite through and inspect the cut face of the noodle.
Drain cooked pasta immediately and shake hard in a colander or strainer. Don’t rinse; the surface starch helps bind the sauce to the pasta.
Make sure the sauce or topping is piping hot when you combine it with the steaming pasta. Beware of adding pasta to a sizzling-hot pan~it will stick wherever sauce does not insulate it instantly.
Serve on warm plates or bowls. Most pasta preparations lose their savor as they cool.
PASTA with CORN, PANCETTA, BUTTER, & SAGE
ONCE THE FIRST LOCAL SWEET CORN ARRIVES IN JUNE, WE MAKE THIS PASTA, IN one form or another, a few times a week. My favorite version is whichever one we are making on a given day. The formula is delicious with or without the Parmigiano-Reggiano, with a little cream added at the end, with prosciutto in lieu of the pancetta, or without meat at all. An unmeasured scatter of sweet peas in addition to the corn is another pretty and delicious variation.
Buy fresh-picked corn, and when choosing ears, root around for the young ones with small kernels~you’ll get less corn per cob, but what you sacrifice in yield is inconsequential, given the difference in quality. Fat, full kernels tend to be tougher, dry, and starchy. Juicy, young kernels need less butter to make a succulent pasta dish. Otherwise, you can’t skimp on butter without stripping the dish of succulence. {If less butter is your goal, reducing portion size makes more sense}. I have tried this dish with various olive oils and found the flavor disappointing.
Wine: Ruchè di Castagnola Monferrato, Na Vota, Cantine Sant’Agata, 2000
FOR 4 OR 5 SERVINGS:
2 to 3 ounces pancetta, minced {1/3 to 1/2 cup}
Up to 1/2 pound {2 sticks} unsalted butter
A trickle of water
6 fresh sage leaves, coarsely chopped
Freshly cracked black pepper
1 pound fettuccine, tagliarini, or other slender egg pasta
Salt
2-1/2 cups freshly scraped corn kernels and their milky juice {5 to 10 small, young ears, depending on yield; see here}
A small chunk of Parmigiano-Reggiano
Cook the pancetta in a few tablespoons of the butter in a 12-inch skillet over medium-low heat. Stir and scrape to make sure it cooks evenly. When the pancetta has browned slightly on the edges and is starting to sizzle, turn off the heat, add a few drops of water to cool the pan, and stir, then add another few tablespoons of butter, the sage, and a few grinds of black pepper. Swirl the pan, then leave the aromatics to infuse the melting butter.
Drop the pasta into 6 quarts of rapidly boiling water seasoned with a scant 2 tablespoons salt {a little more if using kosher salt}. Stir, and cook until the pasta is al dente.
Meanwhile, turn the heat under the skillet to medium, and add another 6 to 8 tablespoons butter, sliced. Swirl the pan. When the butter is nearly melted, add the corn, stir, and cook until heated through. Taste for salt. If the corn seems dry, add a trickle of pasta water and some or all of the remaining butter, to taste. Reduce the heat to low.
When the pasta is cooked, drain well, then toss with the corn, taste again for salt, and serve. Offer freshly grated Parmigiano-Reggiano.
PASTA with SPICY BROCCOLI & CAULIFLOWER
A DISH CELEBRATING MOST OF MY FAVORITE SEASONINGS AND CONDIMENTS: CAPERS, garlic, chili flakes, olives, anchovies, bread crumbs. You can use all broccoli or all cauliflower if you like. You can try minced fennel bulb in lieu of seeds for a sweeter, more subtle note, or dash both and use freshly chopped mint instead. Substitute pecorino romano if you don’t feel like bread crumbs, trade black olives for green ones, or skip the olives and add more capers or anchovies. But don’t sacrifice the 8 to 10 minutes of care it takes to cook the vegetables to the delicately frazzled crispness that gives the dish its great texture and variety. The sautéed vegetables are great by themselves, or as a side dish with grilled or roasted poultry or meat.
This formula works with all sorts of chewy pastas~penne, spaghetti, orecchiette, or shells.
Wine: Somontano Chardonnay, Enata, 1999
FOR 4 TO 5 SERVINGS:
About 1 cup fresh, soft bread crumbs {about 2 ounces} made from crustless, slightly stale, chewy, white peasant-style bread {see here} {optional}
About 3/4 cup mild-tasting olive oil
About 12 ounces broccoli, trimmed, with a few inches of stem intact
About 12 ounces cauliflower, leaves removed and stem end trimmed flush
Salt
1 generous tablespoon capers, rinsed, pressed dry between towels, and slightly chopped
1 pound penne, spaghetti, orecchiette, fusilli, or medium shells
1 tablespoon chopped salt-packed anchovy fillets {4 to 6 fillets} {optional}
6 small garlic cloves, coarsely chopped
About 1/2 teaspoon fennel seeds, lightly pounded in a mortar
4 to 8 pinches dried chili flakes
1 tablespoon tightly packed, coarsely chopped, fresh flat-leaf parsley
4 to 5 tablespoons coarsely chopped pitted black olives, such as Niçoise, Gaeta, or Nyons {rinsed first to rid them of excess brine}
If using bread crumbs, preheat the oven to 425°.
Toss the bread crumbs with 2 teaspoons of the oil, spread on a baking sheet, and bake for about 5 minutes, until golden. Keep the crumbs on the stove top until needed.
Slice the broccoli and cauliflower about 1/8 inch thick, and generally lengthwise. Most of the slices will break apart as you produce them, yielding a pile of smooth stem pieces, tiny green broccoli buds, loose cauliflower crumbs, and a few delicate slabs with stem and flower both. Don’t worry if the slices are of uneven thickness; that will make for more textural variety.
Warm about 1/4 cup of the oil in a 12-inch skillet over medium heat. Add most of the sliced broccoli and cauliflower, conveniently leaving the smallest bits behind on the cutting board for the moment. {They’ll burn if you add them too soon.} The oil should sizzle quietly. Swirl the pan, and leave the vegetables to cook until you see the edge bits browning, about 3 minutes. Salt very lightly and toss or stir and fold gently. Add a few more spoonfuls of oil and scrape the remaining bits of broccoli and cauliflower into the pan. Add the capers and swirl gently. Continue cooking over medium heat until the edges begin to brown, another few minutes, then give the pan another stir or toss. Don’t stir too soon or too often, or you will get a homogenous, steamy pile of vegetables instead of a crispy, chewy one. Most of the capers and vegetable crumbs will shrink into crispy confetti-like bits.
Meanwhile, drop the pasta into 6 quarts of rapidly boiling water seasoned with a scant 2 tablespoons salt {a little more if using kosher salt}. Stir, and cook al dente. Set a wide bowl or platter on the stovetop {or in the still-warm oven if you made crumbs} to heat.
Once the mass of broccoli and cauliflower has shrunken by about one-third and is largely tender, reduce the heat, add another few spoonfuls of oil, and scatter the chopped anchovy, garlic, fennel, and chili over all. Give the vegetables a stir or toss to distribute. Cook for another few minutes, then add the parsley and olives. Taste~every flavor should be clamoring for dominance. Adjust as needed.
Toss with the well-drained pasta and garnish with the warm, toasted bread crumbs, if desired.
PASTA with BRAISED BACON & ROASTED TOMATO SAUCE
OUR VERSION OF THE MUCH-LOVED DISH FROM ABRUZZO, PASTA ALL’AMATRICIANA. Since the traditional signature ingredient, guanciale {tender pig-cheek bacon}, is not available to us, we blanch and slow-cook a piece of slab bacon, which renders much of the fat and mellows strong cures. Consider braising a larger chunk of bacon than you think you will need; you can use the extra for other recipes {Lentil-Sweet Red Pepper Soup, here; Lentils Braised in Red Wine, here; or Salmon Cooked with Bacon and Red Wine Flageolets, here} or wherever you ordinarily use bacon. I like the tender leftover bits and scraps fried in the same pan with eggs, with a trickle of the bacon braising juices spooned over the top. You can prepare this multipurpose bacon up to a week in advance, which is a boon. But for those times when braised bacon is not an option, make this dish with little strips of thickly sliced bacon. {Brown them while the pasta boils, then drain off most of the fat, stir in the peppery tomato sauce, and simmer together for a minute or two.}
We always make this sauce with canned tomatoes~roasting them concentrates their flavor and gives them a fleshy texture. If you make extra sauce, you can use it for Pasta with Sardines and Tomato Sauce {here}.
Pasta all’amatriciana is traditionally made with bucatini {also called perciatelle}, but penne, penne rigate, and spaghetti are good alternatives. Offer freshly grated pecorino romano or pecorino sardo to garnish; the salty, feral flavor is a good match for this aggressive sauce. Parmigiano-Reggiano would taste out of place here.
Wine: Rioja Reserva Viña Ardanza, La Rioja Alta, 1995
FOR 4 TO 5 SERVINGS:
For the braised bacon {makes 1/2 to 3/4 pound}:
3/4 to 1 pound slab bacon, in one piece, skin removed
1 small carrot, peeled and coarsely chopped
1 stalk celery, coarsely chopped
1 small yellow onion, thickly sliced
1 bay leaf, crumbled
About 1/2 cup dry white wine
About 1/2 cup dry white vermouth
About 1/2 cup Chicken Stock {here} or water
For the roasted tomato sauce {makes about 2-1/2 cups}:
2-1/2 cups drained canned whole tomatoes, juice reserved
About 1/2 cup extra-virgin olive oil
8 ounces sliced yellow onion {about 1 medium onion}
6 garlic cloves, coarsely chopped
1 teaspoon freshly cracked black pepper, plus more for serving
1 bay leaf
Salt
Sugar, if needed
1 pound bucatini, penne, penne rigate, or spaghetti
Freshly grated pecorino romano or pecorino sardo, to taste
Preparing the braised bacon:
Preheat the oven to 300°.
Place the bacon in a wide pot and add cold water to cover by a few inches. Set over medium heat, bring to a simmer, and cook until the bacon softens a little, 5 to 10 minutes. Drain and rinse. {This process will draw out some of the sweet-salty brine and more important, rehydrate the bacon, to produce a tender, succulent result.}
Place the bacon fat side up in a shallow flameproof baking dish just large enough to hold it and the vegetables in a single layer {A 1-quart gratin dish should work; cut the bacon into 2 pieces if necessary}. Add the carrot, celery, onion, and bay leaf and moisten with equal parts of the wine, vermouth, and stock, adding enough to come to a depth of 1/2 inch. Place over medium heat and bring to a simmer. Cover with parchment paper and then with foil, dull side out, transfer to the oven, and bake until melting tender, about 2-1/2 hours.
Uncover the baking dish, raise the-heat to broil, and leave just long enough the color the surface, 3 to 5 minutes. By now the bacon will have rendered about 30 percent of its weight, most of it in fat. Leave to cool completely in the baking dish, then skim or scrape off and discard the rendered fat. Strain and save the braising liquid to flavor beans, soups, or braised greens. {I usually discard the braising vegetables as too strong and too cooked to be of interest.}
If not using the bacon right away, cool completely, then replace in a clean baking dish, add the strained liquid, cover, and refrigerate.
Preparing the tomato sauce:
Preheat the oven to 500°.
Halve the tomatoes and place cut side down in a shallow roasting pan or gratin dish that holds them in one crowded layer. They shouldn’t be stacked, or they will steam and stew rather than dry out and color. Add any juice they released when you cut them in half, plus enough of the reserved juice to come to a depth of 1/4 inch. Drizzle with a tablespoon or two of the olive oil.
Roast until the tomatoes char slightly and are bubbling around the edges, about 15 minutes. Use a dough cutter to very coarsely chop in the roasting dish.
Shortly before the tomatoes are done, in a 12-inch skillet, cook the onions in about 3 tablespoons of the olive oil over medium-high heat until they begin to color at the edges, about 3 minutes. Reduce the heat and stir in the garlic, pepper, and bay leaf.
When the onions are just beginning to soften through, stir in the warm tomatoes and another few tablespoons of olive oil. Salt lightly to taste, and add a pinch or two of sugar if you find the tomatoes too tart. Add a spoonful of the reserved tomato juice if needed to keep the tomatoes saucy. Simmer briefly, just long enough to combine the elements, but without sacrificing their textures and individuality. Set aside.
Cooking and saucing the pasta:
Cut the braised bacon into strips about 1/4 inch thick and 1 inch long.
Drop the pasta into 6 quarts rapidly boiling water seasoned with a scant 2 tablespoons salt {a little more if using kosher salt}. Stir, and cook until al dente.
Meanwhile, brown the bacon strips in a 12-inch skillet or 3-quart sauté pan over medium heat, stirring as needed, until both sides are slightly colored, a few minutes at most. If the bacon seems dry, add a trickle of olive oil. Stir in the tomato sauce. Simmer together for a minute or so.
Drain the pasta well and fold into the tomato sauce. Offer the pecorino and additional black pepper.
PASTA with SARDINES & TOMATO SAUCE
THIS DELICIOUS, TRADITIONAL PASTA IS FOR VERA AND JIM CALCAGNO. I’d forgotten how good it was until my business partner, Vince, their son, reminded me how his parents loved pasta con le sarde and asked if we could put it on the menu to honor their visit from Ohio. What it really celebrates is their roots in southern-most Italy. This recipe has become a Zuni mainstay and is one of my favorites, but it might have languished in the crowded bin of also-rans if the Calcagno clan hadn’t made it the Zuni family pasta.
The pasta here has only a light dressing of tomato sauce, so you can taste the delicate sardines. Serve with bucatini, sometimes called perciatelle, which are long, skinny tube noodles. Penne and spaghetti are good alternatives.
It is worth preparing extra sardines to fillet and preserve in warm Chimichurri {here}, or simply bathe them in extra-virgin olive oil with bay leaf, chili flakes, slivered garlic, a splash of vinegar, and salt. Let them cool, then cover and store refrigerated to use later on crostini {see here}. So long as they are well salted and thoroughly cooked, they will keep, and improve, for a week or even longer.
Wine: Regaleali, Conte Tasca d’Almerita, 2000
FOR 4 TO 5 SERVINGS:
4 to 6 fresh sardines {2 to 3 ounces each}
Salt
About 2 tablespoons mild-tasting olive oil
1 pound bucatini, penne, or spaghetti
About 2 tablespoons extra-virgin olive oil
A few fennel seeds, lightly crushed {optional}
A pinch of dried chili flakes
About 1-1/2 cups Roasted Tomato Sauce {here}
A sprig fresh flat-leaf parsley, or a fennel frond, or both, coarsely chopped
Preheat the broiler.
Clean the sardines: Cut off the heads, which should pull out most of the viscera. Slide a finger into the belly cavity and pry it open. Gently rinse out the bellies and rub off the scales under cold, running water. Pat dry inside and out. Salt evenly all over and drizzle and roll in the mild-tasting olive oil. Place on a small baking sheet and roast under the hot broiler until firm and cooked through, about 2 minutes per side. Adjust the height of the broiler rack so the fish doesn’t char. Cool completely.
By hand, ease the sardine fillets off the bones. Once you have filleted all of the fish, go back and recheck for bones, looking especially for remnants of the fins.
Drop the pasta into 6 quarts rapidly boiling water seasoned with a scant 2 tablespoons salt {a little more if using kosher salt}. Stir, and cook until al dente.
Meanwhile, warm the extra-virgin olive oil in a 12-inch skillet or 3-quart sauté pan over low heat. Add the fennel seeds, if using, and the chili flakes. Add the sardine fillets and swirl the pan as you warm them through. Add the tomato sauce, parsley, and/or fennel frond. Continue to swirl the pan over low heat to combine the flavors, without completely breaking down the delicate fish fillets. Taste for salt. Once the sauce comes to a simmer, turn off the heat and leave on the burner until the pasta is ready.
Drain the pasta well, slide into the pan of warm sauce, and fold to distribute, then serve.
PASTA alla CARBONARA
THIS ROGUE VERSION OF CARBONARA IS BASED ON ONE I HAD IN ROME. It is not very saucy, and the ricotta makes it pleasantly curdy. The bacon should be crispy-tender and aromatic; don’t be tempted to cook it in advance~you will sacrifice much of its aroma to convenience, and it will tend to harden. And don’t substitute Parmigiano-Reggiano for the aged pecorino.
Serve with a chewy, dried semolina pasta shape that does not grab too much sauce: spaghetti, spaghettini, penne, or bucatini.
Wine: Bodega Norton, Mendoza, Argentina, Malbec Reserve, 1999
FOR 4 TO 5 SERVINGS:
5 ounces bacon {4 or 5 thick slices}, cut into 1/4- to 1/2-inch segments
5 tablespoons extra-virgin olive oil
4 large or 5 small eggs, at room temperature
1/2 cup fresh ricotta cheese, at room temperature
1 pound spaghetti, penne, or bucatini
Salt
About 3/4 cup shucked sweet English peas or mature sugar snap peas or double-peeled favas {see here}
About 2 ounces pecorino romano or pecorino sardo, grated {1 cup lightly packed}
Freshly cracked black pepper
Warm the bacon in the olive oil in a 12-inch skillet or 3-quart sauté pan {see Note below} over low heat. It should gradually render a little fat, which will mix with the oil.
Meanwhile, lightly beat the eggs with the ricotta.
Drop the pasta into 6 quarts rapidly boiling water seasoned with a scant 2 tablespoons salt {a little more if using kosher salt}. Stir, and cook until al dente.
When the pasta is about 1 minute from being al dente, add the peas or favas to the water, and raise the heat under the bacon. Cook the bacon until it is just crispy on the edges but still tender in the middle. Turn off the heat, slide the pan from the heat, and swirl it a few times to cool it slightly.
Drain the pasta, shake off the excess water, and slide the pasta and peas or favas into the pan of bacon; you’ll hear a discreet sizzle. Place back on the burner {the one you used to cook the bacon, which should still be quite warm}. Immediately pour the beaten eggs all over the steaming pasta, add most of the pecorino and lots of cracked black pepper, and fold to combine. Work quickly so the heat of the noodles, bacon, and bacon fat slightly cooks the eggs. The eggs and ricotta will coat the pasta and form tiny, soft, golden curds.
Serve in warm bowls and offer the remaining pecorino and black pepper.
Note: If you prefer the egg cooked further, return the pan to low heat, but use a nonstick pan, or else much of the egg, and some of the pasta, will stick to the pan.
PASTA with PRESERVED TUNA & PINE NUTS
THIS TUNA CONSERVATION TECHNIQUE IS A BY-PRODUCT OF THE “SUNDAY NIGHT Fish Problem,” and my culinary apprenticeship in confit country. Zuni is closed on Monday, and writing off leftover yellowfin tuna would be a fiscal nightmare. But salting and then slowly cooking it to tenderness in fragrant fat, as you would duck confit, transforms tuna completely and yields a delicious, versatile larder staple. Bluefin or Bigeye tuna are even better preserved this way; they are softer than yellowfin to begin with, and stay tender with long cooking. I like their strong flavor here. This preserved tuna appears frequently as an antipasto at Zuni, tossed with white beans and fennel or crumbled into Artichoke Caponata {here} or traditional eggplant caponata. As little as a thimbleful of preserved tuna pounded into a few spoonfuls of Orange-Olive Tapenade {here} makes a good crostini topping.
But this popular pasta dish is where we use most of our preserved tuna. Use a small tube shape: penne, ziti, or ditali. And, if you aren’t burdened, or blessed, with fresh tuna, leftover or otherwise, you can stir together this pasta with canned tuna~I include instructions for that as well.
Wine: Signorello Seta, Napa Valley, 1999
FOR 4 TO 5 SERVINGS:
For the preserved tuna {makes about 10 to 14 ounces, plus the preserving oil}:
3/4 to 1 pound tuna, trimmed
Salt
1 tablespoon thin strips lemon zest removed with a zester
2 bay leaves
Scant 1 teaspoon dried chili flakes
Scant 1 teaspoon freshly cracked black peppercorns
2 garlic cloves, slivered
1/4 teaspoon fennel seeds
3/4 to 1 cup extra-virgin olive oil
For the pasta:
1/4 cup pine nuts {1-1/4 ounces}
About 10 ounces preserved tuna with its preserving oil {from above} or excellent-quality oil-packed canned tuna, drained
2 tablespoons capers, rinsed, pressed dry between towels, and chopped, or 2 tablespoons coarsely chopped, pitted green olives, such as Picholine
1 tablespoon rinsed, drained, and chopped Preserved Lemon or Limequat {here} {optional}
1 pound penne, ziti, or ditali
Seasoning the tuna {for the best flavor, do this step 2 to 3 hours in advance}:
Cut the tuna into walnut-sized chunks and sprinkle evenly all over with salt {we use a scant 3/4 teaspoon sea salt per pound}. This will help tenderize the tuna as it seasons it throughout. Cover and refrigerate.
Cooking the tuna:
Pat the tuna dry. Crowd the chunks of tuna in a 2-quart saucepan, distributing the zest, bay leaves, chili flakes, black pepper, garlic, and fennel between the pieces. It should be a snug fit~this minimizes oil consumption. Add olive oil to barely cover the tuna. Set over the lowest-possible heat and bring to a hesitant simmer. Don’t let the oil boil. Cook uncovered, stirring and prodding a few times to coax flavor from the aromatics and to favor even doneness, for about 30 minutes. The tuna will initially turn quite hard but will gradually soften a little. Leave the tuna to cool in the oil, stirring once or twice. Store in the oil, refrigerated, until needed~but if using the same day, don’t bother refrigerating the tuna; this would harden it needlessly.
Preparing the sauce:
Warm the pine nuts in a 12-inch skillet or 3-quart sauté pan over low heat. Use a slotted spoon to lift the preserved tuna from the oil, then crumble it into thumbnail-sized bits as you add it to the pan. Using a fork or wooden spoon, smash a few of the tuna bits: These will disperse into the oil and encourage it, and the seasonings, to cling to the pasta. Stir in the capers or olives. Use a fork to scoop up as much of the delicious “sludge” of zest, chili, pepper, garlic, and fennel seeds from the preserving oil as you want~if you use it all, the pasta will be quite spicy~and add to the pan. Then add about 6 tablespoons of the oil itself. If there is any tuna “broth” at the bottom of the preserving pan or container {it will be beige and slightly gelatinous}, drain off the remaining oil, taste the liquid, and, if you like it, add a spoonful to the sauce as well. Add the preserved lemon or limequat, if using. Raise the heat to medium-low, stir, and warm through. When the tuna and oil are hot, turn off the heat, but leave the pan on the warm burner while you cook the pasta.
Cooking and saucing the pasta:
Drop the pasta into 6 quarts rapidly boiling water seasoned with a scant 2 tablespoons salt {a little more if using kosher salt}. Stir, and cook until al dente.
Drain the pasta well and spill into the warm tuna mixture. Toss to distribute the oil, tuna, and seasonings. Add more preserving oil, if you have it, to taste.
If using canned tuna: Warm 1/2 cup extra-virgin olive oil with half the amounts of lemon zest, bay leaves, chili flakes, black pepper, garlic, and fennel seeds. Leave to infuse for about 15 minutes over the lowest-possible heat. Stir in the canned tuna, pine nuts, capers or olives, and preserved lemon or limequat, if using, and warm through, then turn off the heat.
PASTA with GIBLET-MUSHROOM SAUCE
WE MAKE A DOZEN DIFFERENT MEAT SAUCES FOLLOWING THIS BASIC FORMULA AT Zuni~using bits of beef {skirt, onglet, cheek}, fresh pork, sausage, duck, squab, or rabbit, but this version is my favorite. It has a deep, solid flavor and texture owing to the unique character of giblet meat~it is worth the watchful cooking it requires. I use only the gizzards and hearts here, ask for them where they carry duck and other game birds. You may have to order them, and you may have to settle for frozen ones, but this preparation will forgive that fact.
Substituting more tender cuts of meat is easy. Mince and cook them as described, but expect that they may cook more quickly and contribute more moisture to the sauce. You may not need to cover the sauce for so much of the cooking time. You can also make the sauce with a combination of giblets and game bird meat. In that case, start with the chewy giblets and add the tender cuts about 15 minutes later.
I don’t recommend making less than a full recipe; smaller quantities tend to cook too fast to develop flavor, and it is difficult to keep the heat low enough to avoid scorching the sauce. Furthermore, it keeps well and a little leftover sauce is a nice thing to have on hand. Spooned onto warm crostini, it makes an easy and welcome appetizer {here}.
We serve this sauce with trenne~a big, chewy, triangular penne-like noodle~but substitute penne, mostaccioli, or rigatoni if you like. This sauce is also great with garganelli or wide egg noodles.
Wine: Priorato, Barranc dels Closos, Mas Igneus, 1999
FOR 4 TO 5 SERVINGS, WITH SAUCE TO SPARE:
For the sauce {makes about 3 cups}:
8 ounces duck, goose, chicken, or squab gizzards and hearts
About 1/2 cup extra-virgin olive oil
1-1/2 cups chopped portobello mushrooms {caps and/or stems} {4 ounces} or fresh porcini, chanterelles, black trumpets, or morels or scant 1/2 ounce dried porcini, rinsed, minced, and moistened with 2 tablespoons water
3/4 cup finely diced carrots {3 ounces}
3/4 cup finely diced celery {3 ounces}
3/4 cup finely diced yellow onions {3 ounces}
1 ounce pancetta, minced {about 3 tablespoons packed} {optional}
Salt
2 garlic cloves, chopped
1-1/2 cups chopped canned tomatoes, drained of about half their juice
1 bay leaf
1 dried chili or a few pinches of dried chili flakes
1/2 cup hearty red wine, such as Cabernet Sauvignon, Zinfandel, or Syrah
A few leaves fresh flat-leaf parsley, coarsely chopped
Sugar {optional}
1 teaspoon tomato paste {optional}
To finish the pasta:
1 pound trenne {see Sources and Resources, here}, penne, mostaccioli, rigatoni, garganelli, or wide egg pasta
A small chunk of Parmigiano-Reggiano {about 2 ounces}
Preparing the sauce:
Rinse the gizzards and hearts, then press dry between towels. Use a paring knife to removing the silverskin from the gizzards. Chop them finely. Chop the hearts.
Warm about 1/4 cup of the olive oil in a 4-quart saucepan over medium heat. Add the gizzards and hearts and cook, stirring almost constantly, until they begin to turn a little golden on the edges, about 5 minutes. Don’t worry if they stick a little and the bottom of the pan colors slightly~but don’t let it scorch. Stir in the mushrooms, carrots, celery, onions and the pancetta, if using. Add a few pinches of salt and enough additional oil to coat the vegetables. Once the mixture begins to sizzle, reduce the heat to low, cover, and stew for about 15 minutes, stirring occasionally. The vegetables will throw off some moisture as they soften; this will dissolve any delicious browned juices that may have formed on the bottom of the pan when you browned the giblets.
Uncover and taste a bit of gizzard. It will be quite hard; remember this texture, so you can recognize when they begin to become tender.
Stir in the garlic, tomatoes, bay leaf, chili, and red wine. Bring to a bare simmer, cover, and cook until the bits of giblet are just tender, another 45 minutes or so. Monitor the pan closely, stirring as needed and adjusting the heat to maintain the weak simmer. {Double and triple batches of this sauce are less likely to come to a boil and will not need such close attention.} Taste for salt; if you used pancetta, it may not need much. Scrape across the bottom of the pan with a flat-edged spatula~the sauce will quickly release a pool of thin but tasty juices.
Stir in the parsley and another splash of olive oil. Simmer quietly, uncovered, to marry and concentrate the flavors and to reduce those brothy juices; allow 15 minutes or so, stirring and scraping the pan regularly, and stopping when the thickened juices only ooze from the mass {but don’t let the sauce dry out and sizzle}. Taste. The sauce should be shiny, rich, thick, and sweet, with just enough acidity from the wine and tomato to keep it from being cloying. If it tastes too tart or lean, try adding a trickle more of olive oil. Sometimes, if the carrots or onions weren’t particularly sweet or the wine was quite acid, I add a pinch of sugar, and once in a while, I add a dab of tomato paste if the sauce wants more body and a little instant character. {If you are not confident in your instincts, you can test any of these adjustments in a spoonful of the sauce before you decide to alter the whole batch.}
Leave to cool completely. {The sauce can be refrigerated for up to a week}. The juice will turn a little syrupy, the vegetables almost suave, and the giblets velvety. The flavors will blend and become richer and sweeter.
Cooking and saucing the pasta:
Drop the pasta into 6 quarts rapidly boiling water seasoned with a scant 2 tablespoons salt {a little more if using kosher salt}. Stir, and cook until al dente.
Reheat about 2 cups of the sauce in a 3-quart sauté pan or 12-inch skillet over low heat, stirring as needed. If it seems dry, add a spoonful of the boiling pasta water.
Drain the pasta well, and toss and fold with the hot sauce. The sauce should glisten on the pasta; if not, it is too lean~add a splash of extra-virgin olive oil. Serve in warm bowls and offer the cheese to grate on top.
ZUNI FIDEUS with WILD MUSHROOMS & PEAS
FIDEUS IS A BRAISED NOODLE DISH FROM CATALONIA, WHERE THE NOODLES ARE short threads. We use cappellini pasta broken into 1/2-inch lengths. You can also use slightly fatter fedelini or vermicelli, broken into the same lengths. Pastina shapes such as riso, orzo, and acini di pepe are also tasty cooked this way, although any of these alternatives may require more liquid and more time to cook through.
If you are comfortable with risotto making, fideus making will feel familiar. How much stock you use will vary according to the pasta in question, the heat, and the pan you use. You can make this dish entirely on the stovetop, or, for more textural contrast, finish it in a hot oven. Either way, as with risotto, a plate of fideus is only as good as the stock it is made with. In Catalonia, fideus is often served with a dollop of allioli~a yolk-less, mayonnaise-like garlic-oil emulsion, which is a trick to produce. Yolky Aïoli {here} is a very rich substitute. Another excellent option is to crack an egg per person into the bed of simmering fideus, gingerly prick the yolks so they won’t form a skin, then slide the pan in the oven to finish cooking.
Don’t be daunted by the fact that this recipe has a few subcomponents; preparing the onion base and toasting the noodles can be done well in advance, and both are easy to do. Likewise, you can make the chicken stock a few days in advance if you like. Once you have these three things ready, the assembly of the dish is no more ambitious than for risotto.
If you have leftover cooked fideus, they make a great Frittata {here}. And the raw toasted noodles are a good alternative to plain pastina for the friendliest of soups, pastina in brodo, especially if you use beef broth or the broth from a Pot-au-Feu {here}.
Wine: Penedès Torres Gran Viña Sol, 1999
FOR 4 SERVINGS:
For the aromatic onion base:
3 cups finely diced yellow onions {12 ounces}
6 tablespoons extra-virgin olive oil
Salt
1/4 cup chopped drained canned tomato or 1/2 cup chopped, peeled, ripe tomato
A few garlic cloves, coarsely chopped
2 small dried chiles, broken in half
A pinch of saffron threads
For the toasted noodles:
10 ounces cappellini, broken into 1/2-inch pieces
2 teaspoons mild-tasting olive oil
For finishing the dish:
1/4 cup extra-virgin olive oil
4 to 6 ounces chanterelle, porcini, or morel mushrooms, cleaned {see here} and sliced about 1/4 inch thick
Salt
4 garlic cloves, finely chopped
6 cups Chicken Stock {here}
1 cup shucked sweet English peas or shucked sugar snap peas {8 to 12 ounces whole pods}
A handful of fresh flat-leaf parsley, coarsely chopped
Preparing the aromatic onion base:
Place the onions and olive oil in a 2-quart saucepan, set over medium-high heat, and stir to combine. Let the onions on the bottom color, then stir again and reduce the heat to medium-low. Continue to cook, stirring regularly, until the onions have fallen to about half their original mass and are generally golden, about 15 minutes. Salt to taste.
Reduce the heat to low, stir in the tomato, garlic, chili, and saffron, and cook, stirring occasionally, for another hour or so on the lowest heat: When the mixture is ready, it will be suave and jam-like, with no trace of acidity. If it starts to dry out, or look oily around the edges, add a few drops of water or stock to reemulsify the mixture. You should get about 1 cup. {The onion jam will keep well for a week or so, covered and refrigerated.}
Toasting the noodles:
Preheat the oven to 325°.
Toss the noodles in the olive oil just to coat, then spread evenly in a single layer on a baking sheet. {I use a 14-inch square baking sheet and brown the noodles in two batches.} Toast until the color of cornflakes, about 10 minutes; stir the noodles or rotate the pan if they are not browning evenly. Set aside.
If you plan to finish the fideus in the oven, raise the heat to 475°.
Finishing the dish:
Warm about half of the olive oil in a 3-quart sauté pan over medium heat. Add the mushrooms, salt them, and cook, stirring occasionally, until they are tender but only slightly golden on the edges, 3 to 8 minutes, depending on variety and moisture content. Stir in the garlic. Taste a mushroom. It should be delicious already; if at all bland add a little more salt or garlic, or cook little longer to concentrate the flavor.
Add the onion base, toasted noodles, and about 1-1/2 cups of the stock. Bring to a simmer, and stir as the noodles absorb this first dose of stock, about 2 minutes. Add the peas and another 1-1/2 cups stock and bring to a simmer. Stir until the stock is absorbed, another 3 minutes or so, then add another 1-1/2 cups stock. Continue to cook, just simmering, until this dose is absorbed, another few minutes. Check a noodle for doneness; it should be chewy. Add the parsley, the final 1-1/2 cups stock, and the remaining olive oil. Taste for salt.
Stir and cook the fideus over slightly higher heat until the stock is fully absorbed and the noodles are tender through or, to finish the dish in the oven, slide the juicy noodles into a shallow flameproof 3-quart baking dish, bring to a simmer, and place the pan in the top half of the oven. Bake uncovered until the stock is completely absorbed, about 10 minutes. Though purists may scoff, I like the variety and contrast of the al dente surface noodles, which are especially caramelized and crisp at the edges of the pan, with the remainder underneath, cooked to tender, slippery succulence.
MARTHA’S SPÄTZLE
SPATZLE ARE TINY, WIGGLY, CHEWY DUMPLINGS, USUALLY OVERSHADOWED IN THE starch department by pasta, potatoes, polenta, and rice. {And, in my kitchen, by day-old bread} But each time we make this recipe I learned from my longstanding sous-chef Martha Buser, I eat a plateful, and then take home more for a late dinner. Squished through little holes, the sticky batter turns into a crowd of beaky “little sparrows” {which is what spätzle means in Swabian dialect} that bob to the surface of a pot of simmering water. They are nice freshly boiled and tossed with melted butter, or with the rich juices from a pot roast or other braise. Spätzle brown well, especially in a nonstick pan. Leftover spätzle sometimes replace pastina in our brodo. Spätzle are not fragile or sticky, and they can be cooked well in advance, as long as you spread them out to cool. Don’t worry if some clump together; you can easily break them up by hand once they have cooled.
The technique is easy to get the knack of, but if you have never made spätzle before, or seen anyone make them, I recommend you make a practice batch. The ingredients are staples and inexpensive. Really fresh eggs will make the tastiest, fluffiest spätzle. There are several types of spätzle-makers available; I use an inexpensive model that looks like a grater with a sliding box attached. Although it’s more awkward, you can also press spätzle through a colander with large holes.
FOR ABOUT 2-1/2 CUPS:
5 ounces cake flour {not self-rising} {scant 1-1/2 cups~spoon-and-level; don’t pack, don’t tap}
2 large eggs
5 tablespoons lukewarm water
Salt
1 tablespoon unsalted butter or mild-tasting olive oil
Shake the flour through a strainer into a bowl to break up any clumps. Crack the eggs into a separate bowl; beat lightly with a fork. Pour the eggs over the flour and stir with the fork just until the eggs are absorbed, about 10 strokes. Don’t worry that most of the flour is still dry and loose. Stir in 4 tablespoons of the water, to make a heavy, lumpy batter. Trickle in the remaining tablespoon of water, stopping once the batter is soft and no longer holds a peak as you mix it. Lift the fork clad with some of the batter; it should hang for a second before dropping. As it rests, the batter will smooth out and begin to look like warm taffy.
Fill a wide sauté pan with water and bring to a boil. Salt liberally {I use about 1 teaspoon sea salt per quart of water}. Add the butter or oil.
Spoon about half of the batter into the spätzle-maker {or a colander with 1/4-inch-wide holes}, and set it over the boiling water, resting it on the edge of the pan. Press on the spätzle {or use a stiff rubber spatula or bowl scraper to smear the batter against the bottom and sides of the colander}, forcing it through the holes. The little sparrows will initially sink, but they will swell and float within 30 seconds as they fill with steam. Stop adding batter once the surface of the water becomes crowded.
Let the spätzle cook for about 1 minute after they float. Lift them out with a skimmer or strainer, shake gently to drain, and tip them onto a sheet pan to cool. {Or slide into a pan of warm braising juices.} Repeat with the rest of the batter. You may be able to manage more batter at a time once you get the knack of it, but only attack as much as you can press through in 15 seconds or less, and never add more batter than the surface of the water can safely harbor. Obviously, some of the spätzle cook a little longer than others, but the resilient little things don’t go soft or soggy that quickly.
ZUNI RICOTTA GNOCCHI
THIS RECIPE, BASED ON ELIZABETH DAVID’S GNOCCHI DI RICOTTA IN HER BOOK Italian Food, has become one of our most-often-requested house formulas. Requiring fresh, curdy ricotta, it yields succulent, tender dumplings that always beguile. But since fresh ricotta varies in texture, flavor, and moisture content, depending on the season, what the animals are eating, who is making it, and how long they drain it, we often need to tinker with recipe, adding more Parmigiano-Reggiano for flavor, or butter for richness. If the cheese is particularly wet, we add a little more egg, or we hang it overnight in cheesecloth, refrigerated {or we do both}. Very wet ricotta can weep 1/2 cup liquid per pound. Don’t substitute machine-packed supermarket ricotta here; flavor issues notwithstanding, mechanical packing churns and homogenizes the curds and water~you’ll have trouble getting enough water back out. Tender fresh sheep’s milk ricotta, if you can get it, makes delicious gnocchi and is worth the extra expense.
Having offered ricotta gnocchi four or five evenings per week for more than a decade, we have a large repertory of accompaniments for, and variations on, this dish. We sometimes add freshly grated nutmeg, chopped lemon zest, or chopped sage stewed in butter to the batter before forming the gnocchi. Or we form thumbnail-sized gnocchi and poach them in chicken broth for a delicate soup course. One of the nicest variations is to fold flecks of barely cooked spinach into the batter. These Spinach and Ricotta Gnocchi recall the Florentine mainstay, variously called ravioli verdi {“green ravioli”}, ignudi {“naked” ravioli}, or malfatti {“poorly fashioned,” which they needn’t be}, and are sublime.
Although these gnocchi are delicious and delicate enough to serve with just a cloak of melted butter, I list my favorite seasonal accompaniments at the end of the recipe to provoke you to think of serving ricotta gnocchi often, and year-round.
Wine: Chehalem Willamette Valley Pinot Gris, 2000
FOR 40 TO 48 GNOCCHI, TO SERVE 4 TO 6:
To prepare the gnocchi:
1 pound fresh ricotta {2 cups}
2 large cold eggs, lightly beaten
1 tablespoon unsalted butter
2 or 3 fresh sage leaves, chopped, or a few pinches of freshly grated nutmeg, or a few pinches of chopped lemon zest {all optional}
1/2 ounce Parmigiano-Reggiano, grated {about 1/4 cup very lightly packed}
About 1/4 teaspoon salt {a little more if using kosher salt}
All-purpose flour, for forming the gnocchi
To sauce the gnocchi:
8 tablespoons butter, sliced
2 teaspoons water
Testing the cheese {the day before you make the gnocchi}:
Check the cheese for wetness. If you are lucky enough to have an individual basket-drained ricotta~you’ll see the basket imprint or dimples on the cheese~it may be sitting in a little whey; in this case, slide it out of the container and wick away the surface moisture with a dry towel. With any ricotta, place about 2 teaspoons of the cheese on a dry paper towel and wait for about 1 minute. There will always be a little wet spot under and around the cheese, but if the cheese has thrown a wide ring of moisture, it is too wet to use as is. Place it in a strainer, or double-wrap in cheesecloth, and suspend over a deeper receptacle to drain for 8 to 24 hours, refrigerated. Cheesecloth is more efficient, as it also wicks moisture from the cheese while gravity does its job of draining. You can also speed up the draining operation by cinching the cheesecloth tight and squeezing some of the moisture from the ball of cheese.
Making the batter:
Beat the ricotta vigorously, then smash a little cheese against the side of the bowl with a soft rubber spatula. If you can still make out firm curds, press the cheese through a strainer to break them up. Stir in the eggs. Melt the 1 tablespoon of butter~with the chopped sage, if using~and add to the batter. Add the nutmeg or lemon zest, if using. Add the Parmigiano and salt and beat the whole mixture very well. This is what will make the gnocchi light. You should have a soft, fluffy batter.
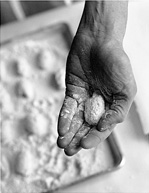
Forming and testing a sample gnocchi:
Make a bed of flour about 1/2 inch deep in a shallow baking dish or on a sheet pan.
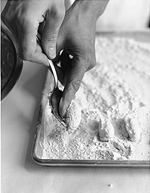
Scrape the sides of the bowl, mass the batter, and smooth its surface. Use a spoon held at an angle to shallow-scoop out 2 to 3 teaspoons of batter {1, 2}. Use your fingertip to push the almond-shaped scoop of batter cleanly from the bowl of the spoon onto the bed of flour {3}. Shimmy the pan gently to coat its sides, then flip the gnocchi with your fingertip to coat the top. Lift from the flour and cradle and rock it in your palm {4}. Don’t squeeze it. You should have a dusty oval pod. As long as the general shape is uniform and rotund, don’t worry that the gnocchi has a few wrinkles, dimples, or bumps.
 |
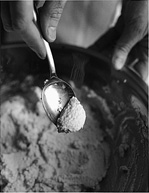 |
| 1 | 2 |
 |
 |
| 3 | 4 |
To check the batter, poach this first gnocchi in a small pot of simmering well-salted water. It will initially sink but will then swell, roll, and bob to the surface. Maintaining the quiet simmer, cook until the gnocchi is just firm, usually 3 to 5 minutes from the time it floats, depending on the cheese and the size of the gnocchi. Don’t boil hard, or the gnocchi may explode. If, even at a gentle simmer, the gnocchi spreads or starts to decompose, the cheese was probably too wet. This can usually be corrected by beating a teaspoon or so of egg white into the remaining batter. If the batter was very fluffy, but the sample seems heavy, beat in about 1 teaspoon beaten egg. In either case, poach another sample to make sure the fix is successful.
Taste the sample for salt, and adjust the batter if needed.
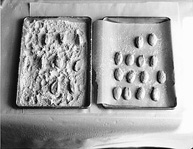
Forming the remaining gnocchi:
Use the same spoon-and-finger technique to form the rest of the gnocchi. I usually form them in groups of 4 to 6, placing them all at the same angle, and a few inches apart, in the bed of flour, then shimmy the pan to coat all of them at once; don’t leave them sitting too long in the flour, or they will absorb too much. Keep scraping the bowl and smoothing the surface of the batter to permit smooth scoops. As with the sample, roll each gnocchi in your hand. Arrange them on a sheet pan lined with a flour-dusted sheet of parchment paper or wax paper. Be sure that the individual gnocchi are not touching one another.
 |
You can poach the gnocchi right away, but if you refrigerate them uncovered for about an hour, they will firm up, making them easier to cook and handle. {They will keep for up to 8 hours that way}.
Cooking the gnocchi:
Place the 8 tablespoons of butter and the 2 teaspoons of water in a 12-inch skillet; set aside.
Bring 2 to 3 quarts water to a simmer in a wide pan~10 or more inches in diameter, so the gnocchi won’t crush each other too much as they push to the surface. A sauté pan, flared brasier, or saucier pan will work, as long as it is at least 2 inches deep. Salt the water liberally~about 1 teaspoon per quart. Add the gnocchi one by one, adjusting the heat to maintain the simmer. Dip your fingertips in water if you find they are sticking to the gnocchi, but don’t fret if the gnocchi stick a little to the paper. Do avoid holding the tray of gnocchi in the steam. Cook the gnocchi as you did the sample, until just firm, 3 to 5 minutes from the time they float.
Meanwhile, as soon as the gnocchi float to the surface, place the pan of butter and water over medium heat. Swirl the pan as the butter melts and begins to seethe. As soon as the butter is completely melted and has turned into an opaque pale yellow sauce, turn off the heat. Swirl the pan a few more times.
Lift the gnocchi out with a slotted spoon or skimmer, slide into the ready skillet, and roll in the warm butter sauce. Serve instantly in warm bowls.
Note: Freezing ricotta gnocchi: Since you may not want to cook all your gnocchi at once, and they don’t keep long raw, it is useful to know how you can freeze and cook them later. The results may not be quite as delicate and flavorful as fresh dumplings, and will be more wrinkly, but they are still delicious. Be aware that uncareful that freezing and cooking, however, will fail utterly.
Place the raw gnocchi, still widely spaced on their floured tray {or transfer to a smaller floured tray if appropriate}, in the freezer. Don’t cover, or they may sweat before they solidify. Once they are frozen hard, slide the gnocchi, tray and all, into a plastic bag, tie the end and keep frozen until needed.
Cooking frozen ricotta gnocchi: Remove gnocchi from the freezer, slide off the plastic bag, and separate any gnocchi that have rolled together during storage. Thaw completely in a cool spot or in the refrigerator. Frozen, or partially frozen, they will not cook properly. Cook as directed for fresh gnocchi.
Serving Suggestions:
The mild flavor of the ricotta marries well with many other flavors and ingredients, especially sweet, subtle, or nutty ones. Whatever the companion, it should be tender and delicate~like the gnocchi themselves.
Try serving the dumplings with a few leaves of sage, arugula, or spinach wilted in butter, or roll in melted butter with just-cooked baby carrots and fresh chervil. Or pair with tender flageolets finished with extra-virgin olive oil and black pepper. Or fold in matchsticks of just-cooked zucchini; it’s subtle flavor becomes clearer next to these gnocchi. In the spring, we offer them with barely cooked peas, tiny favas, or finely slivered asparagus, or all three. During summer, we match them with fresh white corn kernels cooked in butter with basil, or scatter them with chopped nasturtium blossoms. When tender-skinned Sungold Sweet 100 tomatoes are at their sweetest, we halve them, warm them in extra-virgin olive oil with basil, and toss them over the gnocchi. In the fall, fresh wild mushrooms slivered, stewed, and finished with white truffle oil are delicious with the gnocchi, and in the winter, whenever we have black truffles in house, we shave some generously over the dish.
Variation SPINACH & RICOTTA GNOCCHI
Prepare the batter as above. Warm an additional tablespoon of butter in a 10-inch skillet over low heat. Add a few handfuls of spinach leaves~about 2 ounces. Salt lightly and, stirring and folding constantly, cook until the spinach is completely wilted but still vibrant green, 1 to 2 minutes. Slide onto a clean towel, cover with another towel, and press to extract the moisture. {The spinach will bleed green into the towel.} Peel off the spinach and chop into bits the size of fresh thyme leaves. Don’t chop fine, and don’t purée, or you will sacrifice the nice texture and burst of flavor it promises. Beat the spinach flecks into the prepared batter, then form and cook the gnocchi as described above.
THREE ONION PANADES: CHARD, SORREL, & TOMATO
A PANADE, LITERALLY, A “BIG BREAD THING,” IS A FLUFFY, GRATINÉED CASSEROLE of stale bread and stewed onions, moistened with broth or water {made with water, it might be tagged acquacotta, an Italian relation}. Enriched with cheese and layered with greens or tomatoes, this primitive peasant gratin becomes an affordable luxury dish. We serve a generous scoop of panade by itself in lieu of soup, pasta, or risotto, or a smaller spoonful next to grilled or roasted birds or meat. In either case, scoop strategically when you serve, so everyone gets some of the craggy top. Whichever panade strategy you choose, don’t worry if it looks as if you will have too much. What isn’t consumed in second helpings has a future still: it is delicious panfried {see here}.
You can assemble and start baking the panade itself hours in advance, and you can certainly prepare the chicken stock, onions, and bread even earlier. {If you do, make sure to refrigerate the bread after you moisten it.} When possible, use sweet onions~Granex, Vidalia, Maui, or Walla Walla~whichever is available in your region. As suggested above, you can make the panade with part or all lightly salted water; the result will be lighter. In that case, brown the onions a little longer and consider adding extra garlic to boost the flavor.
Wine: Côtes du Ventoux, Val Muzols, Delas Frères, 2000
CHARD & ONION PANADE with FONTINA
Use Fontina Val d’Aosta for this recipe, not an imitation. Swiss Gruyère is also a good choice.
FOR ABOUT 5 SERVINGS AS A MAIN COURSE, 6 TO 8 AS A SIDE DISH:
1-1/2 pounds thinly sliced yellow onions, a sweet variety if possible {about 6 cups}
1/2 cup mild-tasting olive oil
6 garlic cloves, slivered
Salt
1 pound green Swiss chard, thick ribs removed {which you can reserve to deep-fry~see Chard with Lemon Oil, here} and cut into 1-inch-wide ribbons
A little water, as needed
10 ounces day-old chewy peasant-style bread, cut into rough 1-inch cubes {8 to 10 cups}
Up to 4 cups Chicken Stock {here}
About 6 ounces Fontina or Swiss Gruyère, coarsely grated {about 2 cups very loosely packed}
Preparing the onions, chard, and bread:
Place the onions in a deep 4-quart saucepan and drizzle and toss with olive oil to coat, about 1/4 cup. Set over medium-high heat and, shimmying the pan occasionally, cook until the bottom layer of onions is slightly golden on the edges, about 3 minutes. Stir and repeat. Once the second layer of onions has colored, reduce the heat to low and stir in the garlic and a few pinches of salt. Stew, stirring occasionally, until the onions are pale amber colored and tender but not mushy, another 20 minutes or so. If at any point the onions look as if they may dry out, cover them to trap some of the moisture in the pan. Taste for salt. You should get about 2-1/4 cups cooked onions.
Preheat the oven to 325° {or as low as 250°, if it suits your schedule to stretch the cooking time from about 1 hour 45 minutes to 2 hours 45 minutes; in general, the longer and slower the bake, the more unctuous and mellow the results}.
Wilt the prepared chard in batches: Place a few handfuls of leaves in a 3-quart sauté pan or 10- to 12-inch skillet with a drizzle of oil, a sprinkling of water {if you’ve just washed the chard, it may have enough water still clinging to the leaves}, and a few pinches of salt. Set the pan over medium heat until the water begins to steam, then reduce the heat and stir and fold the leaves until they are just wilted, 3 to 4 minutes. The leaves should be uniformly bright green, the white veins quite pliable {the veins will blacken later if they are not heated through}. Taste. The chard may be slightly metallic tasting at this point, but make sure it’s salted to your taste. Set aside.
Toss and massage the cubed bread with a few tablespoons of olive oil, a generous 1/4 cup of the stock, and a few pinches of salt, to taste.
Building the panade:
Choose a flameproof 2-quart soufflé dish or enameled cast-iron Dutch oven. Assemble the panade in layers, starting with a generous smear of onions, followed by a loose mosaic of bread cubes, a second layer of onions, a wrinkled blanket of chard, and a handful of the cheese. Repeat, starting with bread, then onions, and so on, continuing until the dish is brimming. Aim for 2 to 3 layers of each component, then make sure the top layer displays a little of everything. Don’t try to make the layers flat or even; irregularity makes the final product more interesting and lovely. And don’t worry if you need to pack the layers a bit. Drizzle with any remaining olive oil.
Bring the remaining 3-3/4 cups chicken stock to a simmer and taste for salt. Add it slowly, in doses, around the edge of the dish. For a very juicy, soft panade, best served on its own, like a soup or risotto, add stock nearly to the rim; for a firm but still succulent panade, nice as a side dish, fill to about 1 inch below the rim. Once you’ve added the stock, wait a minute for it to be absorbed, then add more if necessary to return to the desired depth. The panade may rise a little as the bread swells.
Baking the panade:
Set the panade over low heat and bring to a simmer; look for bubbles around the edges. {Heating it here saves at least 30 minutes of oven time; it also means every panade you bake starts at the same temperature, so you can better predict total cooking times.}
Cover the top of the panade with parchment paper, then very loosely wrap the top and sides with foil, dull side out. Place a separate sheet of foil directly under the panade or on the rack below it, to catch the inevitable drips. Bake until the panade is piping hot and bubbly. It will rise a little, lifting the foil with it. The top should be pale golden in the center and slightly darker on the edges. This usually takes about 1-1/2 hours, but varies according to the shape and material of your baking dish, and your oven. {You can hold the baked panade for another hour or so; just reduce the temperature to 275° until 20 minutes before serving.}
Browning and serving the panade:
Uncover the panade, raise the temperature to 375°, and leave until golden brown on top, 10 to 20 minutes. {If you aren’t quite ready when your panade is, re-tent the surface with parchment and foil and reduce the heat to 275°. You can hold it another half hour this way without it overbrowning or drying out.} Slide a knife down the side of the dish and check the consistency of the panade. Beneath the crust, it should be very satiny and it should ooze liquid as you press against it with the blade of the knife. If it seems dry, add a few tablespoons simmering chicken stock and bake for 10 minutes longer.
Present the panade full-blown, then allow it to settle for a minute before serving directly from the baking dish.
SORREL & ONION PANADE
Prepare as above, but layer with raw sorrel {2 big handfuls, about 3 ounces} instead of cooked chard. Don’t bother de-ribbing the sorrel; just trim the stem tips and any damaged areas. The tissuey leaves will melt into silky-tart veins.
SUMMER ONION PANADE with TOMATOES
This version calls for 1/2 pound tomatoes in lieu of the chard, extra-virgin olive oil, basil, and a little Parmigiano-Reggiano instead of the Fontina. You may use a little less stock, since the tomatoes provide more moisture than chard. I suggest slicing the bread so you can layer the tomato slices more neatly, which is especially pretty if you use more than one color of tomato.
TURNING LEFTOVER PANADE into PANFRIED PANADE:
If you are blessed with too much panade, the refrigerated leftovers can be turned into an excellent, comforting supper:
Warm about 1 tablespoon extra-virgin olive oil in an 8-inch nonstick skillet over medium heat. Slide in a scoop or wedge of cold panade and press gently to make an amorphous 1/2-inch-thick patty. Fry gently to make a golden crust, about 3 minutes, then use a wide spatula to turn over and fry the other side, also until golden. Don’t worry if it wrinkles, crumbles, or cracks as you turn it; just smash it back together. Serve piping hot with a salad of bitter greens, a poached egg, and sausage or bacon~or with nothing but freshly cracked black pepper and a glass of red wine.