


THE APPETIZERS IN THIS BOOK FALL INTO SEVERAL CATEGORIES, BUT ALL AIM TO pique the appetite, rather than stun it with complexity or quantity. Small portioning is an obvious strategy for first courses, but I like the little nibble to be big enough to allow you to appreciate the ingredients. The tiniest of amuse-gueles {“gullet entertainments”~the most unfortunate of French culinary metaphors, I think} sometimes fail me in this respect. If only out of reverence for the ingredients, I’d rather have a second, or even a third, bite, and less variety.
The traditional distinction between hors d’œuvres, or antipasti~both of which are meant to be deployed “outside” the meal~and “first courses,” which then begin the real thing, is hard to sustain. All of the dishes that follow can be served outside or within the “main menu” and in smaller or larger portions than specified, to suit how you use them in a meal, and how many of them you serve. Some might become the main course of a simple meal.
A few of these dishes consist of little more than an excellent product, such as raw oysters or cured meat, with little or no cooking. Others, the crostini in particular, may initially appear more complicated, but will be logical choices for your menu when you have one of the base ingredients in the “larder,” or left over from a prior meal~a few spoonfuls of meaty pasta sauce, or onion marmalade, or preserved tuna. Indeed, that is how many of these dishes were born. I do, of course, suggest you set the stage for this sort of pseudo-improvisation by making extra of these condiments when they make their principal appearance elsewhere in the book.
The beginning of a meal is a good place to be adventurous when menu planning, and when learning to cook. While you may not be brave enough to invest all your hope in raw beef carpaccio or season with salted tuna roe when it concerns the main event, you might consider taking risks with appetizers, where you generally encounter hearty appetites and, if the nibbles are entertaining and delicious, open minds.
ZUNI SALT-CURED ANCHOVIES
THIS METHOD FOR CURING ANCHOVIES IS ANCIENT. I learned it in the southwest of France from Pepette Arbulo when her fisherman husband released an incidental catch of five pounds of live anchovies onto the work table in her small kitchen. Pepette was very enthusiastic about the delivery~this was an hors d’œuvre that would supplant her perfect foie gras for special friends all summer long. She calmly pushed aside that day’s fortune in raw duck liver to pack the fish in salt.
Choose only bright, shiny, fresh anchovies up to 4 inches long. Expect about 20 fish per pound and allow about 2 pounds rock salt per pound of fish. Gut them by hand, pinching and twisting off the heads, which should tug the viscera from the belly at the same time. Then use your index finger to pry open the tender belly, sliding it along the vertebrae to wipe the cavity clean. Rinse each fish briefly under a gentle stream of cold water. Don’t attempt to clean them perfectly; you don’t want to waterlog them or wash away all their oil. Loosely layer the fish in a colander, scattering with about one-quarter of the rock salt as you go. Place the colander over a bowl and leave the anchovies to drain overnight in the refrigerator. The next day, carefully repack the fish, layering with the remaining rock salt in wide jars or earthenware crocks. Cover tightly and refrigerate. Thus preserved, the anchovies will keep well for nine months, which allows a year-round supply if you are diligent and prepare enough during fresh anchovy season {late April to mid-September in California}. They are especially delicious, however, after only a few days of curing. We serve them as soon as 18 hours after the second packing.
To serve, first rinse the fish, then soak in cool water until pliable, about 5 minutes. Next, starting at the natural seam at the base of the dorsal fin, use your fingers to ease the fillets free of the central bone. Rinse each fillet, rubbing gently to remove the scales, collarbone, and remaining fins. Taste and keep rinsing, or resoak in cool water until the fish is only mildly salty and quite tender. Arrange the fillets in a single layer on an absorbent towel. Cover with another towel and press to draw out the water~the fillets should now have a nutty, tender texture. Place them in extra-virgin olive oil to just cover. Serve immediately, or cover and refrigerate for up to a few weeks.
Our signature hors d’œuvre at the restaurant consists of 6 or 7 neatly displayed fillets of these glistening anchovies, flanked by slivers and shards of Parmigiano-Reggiano and cold, crisp, sliced celery, topped with a grind of black pepper, a few Niçoise olives, and a squeeze of lemon.
If you are lucky enough to find very small fresh sardines, try the same method. They are stronger and meatier and are nice with Picholine olives and fleshy roasted red and yellow bell peppers.
Wine: Muscadet de Sèvre-et-Maine, Cuvée 1, Louis Métereau, 2000
CHOOSING, STORING, & SERVING OYSTERS
MY FIRST OYSTER WAS UNFORGETTABLE. It was not quite cold, and looked to me like a large, milky gray raw egg spilled into the pearly shell. I dangled the whole thing from the little fork and glanced around before committing. It did not taste good, but given the august setting I found myself in, a tufted Parisian three-star, I didn’t consider I had an option. Tears welled in my eyes as I swallowed it whole. I looked away just as the garçon returned with the platter and a gracious “Encore une?”
I ate my second oyster thirteen years later, and twenty-three more that same evening at Zuni. Perched like diamonds in the rough on plenty of ice, casually entangled in seaweed fronds, the tiny, ruffled Pacific oysters were so beautiful I suddenly had an appetite for them. I did work my way as well through the ritual fan of thinly sliced dense rye, flanked by a generous slab of unsalted butter and a ramekin of shallot vinegar, adjusting to this new taste, but it was hardly torture. A flute of Champagne helped, as it usually does.
One of the finest hors d’œuvres we are lucky to be able to offer is oysters, and I never forget that romance makes oysters better. Knowing you can have more is delightful; that they are pristine, bracingly cold, and presented grandly makes this primitive food seem a great indulgence. We sell at least four thousand per week, all on the half-shell. Allowing for more modest sales in the early years, this adds up to over four million oysters.
On a given day we may offer as many as fifteen different oysters. Beyond the local Tomales Bay product, our broker receives thrice-weekly deliveries of a lavish selection from the Pacific Northwest, North Atlantic Coast, and, during our summer, the Southern Hemisphere. We purchase only the ones we think are at their best. Stored in a moist environment, at 36° to 45°~the lower end of that range is preferable to the higher end~oysters will live for as long as two weeks, although we sell through our stock in two days or less. Flavorwise, more recently harvested oysters have an advantage in that the seawater in their shells is fresher. Once harvested, oysters live in, and on, the water in their shells, which necessarily changes flavor. For that reason, some people choose to pour this “liquor” off when an oyster is not straight from the sea. But healthwise, it is perhaps less important how long oysters have been stored than how well. Even a brief period of higher temperatures favors the reproduction of bacteria, which is unhealthy for diners, and can kill the oyster.
We list oysters first by species, and then by market name, which is usually the location of harvest, or of the oyster farm that cultivates them. I compare this to a wine list that is divided into varietals, and then wineries. Furthering the analogy, I like to explain that two oysters of the same species, say virginica, which is the native East Coast oyster, will taste very different if grown in different locations. Hence a Blue Point* from off Long Island is distinct from a virginica harvested off the coast of Wellfleet, Massachusetts, or one from Cape Breton, Malpeque, or our own Tomales Bay {where Hog Island Oyster Company harvests a precious, delicious few every year}. Like four different crops of Cabernet Sauvignon, virginica may grow successfully in many places, but they will always taste distinctly of their aquatic “terroir.” Indeed, being filter feeders, oysters usually taste exactly of their terroir.
To simplify the matter of species identification, I list the species we offer as follows:
In the genus Crassostrea:
Virginica~the Atlantic oyster, by which I mean that one native to, and hence most familiar on, the East Coast and around the Gulf of Mexico. The oysters can be had quite large, the shells are thick and heavy, and the meats tend to fill the shallow shells. On the whole, oysters of this species are milder than other species. Some taste like raw egg white to me.
Gigas~a Japanese native, the most widely cultivated species in the Pacific Northwest, Europe, and elsewhere; what the French sometimes call portugaise.† It is the fastest-growing of the species, attaining 2 inches in twelve to eighteen months, and sometimes reaching three times that size. The deeply ruffled shells are often striated with showy bands of gray, white, gold, black, green, or purple~or all those colors~and hold the meat in deep cups. Flavor, firmness, creaminess, and size of meat vary tremendously from farm to farm, and from harvest to harvest at the same farm, but most have fresh, cucumbery or melony notes I adore.
Sikamea~another Japanese native, which was revived in the Pacific Northwest in the 1940s as a summer oyster. This commercial motive was thought to have preserved the species, though, happily, native stock has recently been identified in Japan. Known as the Kumamoto, the Japanese prefecture it came from, it is very successful gastronomically. It outsells every other oyster at Zuni 5 to 1. “Kumis” are small, with very deeply cupped, ruffled shells; the meats usually fill the shell and are often creamy. Flavor varies from sweet to mild to alkaline and depends, as with all oysters, on food supply, water temperature, and time of year.
In the genus Ostrea:
Conchaphila {formerly known as lurida}~the tiny flat oyster native to and once gloriously abundant all along our Pacific Coast. San Francisco Bay once had a fabulous population, well before the arrival of Europeans. It was already declining rapidly when Gold Rush pollution fouled the Bay and all but finished the job. These have rebounded somewhat as the Bay has gotten cleaner, although for now they are commercially limited to the Olympic Peninsula, in Washington, where the oyster was christened the Olympia. They are very slow to grow; I do not know of “Olys” having been farmed with commercial success anywhere else. They have flat, slightly ruffled shells with ample meat for their size. They usually have a creamy texture and a pleasant, metallic flavor note, sometimes with a lovely, subtle mushroomy taste.
Edulis~the flat oyster native to the coastal waters of most of Europe. The increasingly rare French Belon and Marennes oysters are edulis. Shells are always rather round and flat with a modestly ruffled edge. When they are cultivated in New World waters, the meats tend to be small and very briny, with otherwise mild flavor notes. More often lean than creamy, they are often dry~their shallow design doesn’t hold much brine, and they require care in handling so what there is doesn’t drain out. Apparently they can be “trained” to stay closed, and the French shuttle them into intertidal zones to do that. Some growers ship “flats” with rubber bands around them.
I offer few specifics here on flavor, because it is perilous to generalize about a species or even a farm. In my notes, I find “watermelon” next to certain gigas oysters, “algal,” “metallic,” “briny,” “iodine,” “Milk of Magnesia” {!} next to others, but the more I taste, the less I generalize. I know I like “leaner” oysters~literally, not full of food, stored as creamy glycogen, which is chemically equivalent to cornstarch. Leaner oysters have clearer, smaller meat and bright flavor notes, and they don’t coat your mouth. In the extreme, however, say, after heavy storms, when oysters find their supply of microorganisms totally disrupted, they go from pleasantly lean to starving; the meats are miniature and tasteless. These we avoid. Likewise oysters that have just finished spawning. This cycle varies with genus and species; for example, gigas are excited by warming waters, but virginicas may spawn, or not, at any time of year. During spawning, oysters change radically in flavor and texture. If you look closely, you can see translucent “channels” in the swollen white meat. Spawning oysters tend to be runny, and I find their flavor to run from insipid to rank tasting. But they are not harmful to eat.
I have been taught that the colder the water, the saltier the oyster, but only because the water itself may be saltier. This could be useful if you know how cold the water in a given inlet, or oyster bed, is; latitude and season are not entirely reliable guidelines. More significant is the amount of freshwater intrusion, whether from local rivers or recent rain, which will dilute the salinity of any temperature of water. This factor renders the temperature-saltiness guideline largely academic. A more critical concern with warming, or always-warm, waters is the proliferation of naturally occurring bacteria, which collect in the filter feeder and can be passed on to the diner in these higher concentrations. This is the reason we are advised to avoid raw oysters outside the “r” months, although the calendar is not a perfect predictor of water temperature. Some locales harvest safely nearly year-round. But all raw oysters contain bacteria; individuals with compromised immune systems should not eat them.
To serve oysters on the half-shell requires little culinary skill. Purchase oysters from a vendor you trust and who knows exactly what he is selling and when the oysters came in. He ought to know or be able to find out when they were harvested. The oysters ought to be stored in a cold, moist spot {but never submerged in water}, between 36° and 45°. They should be bedded in ice if they are not in a refrigerator. Choose oysters that are tightly closed and with shells intact, not cracked or crushed. They should be neither too heavy for their size {or they may be filled with silt!}, nor feel hollow. But don’t worry if they are a little muddy on the outside~it is better that they be washed just before opening anyway. If you don’t serve the oysters the day you buy them, store them cup side down in the coldest part of your refrigerator, draped with a damp towel, with an ice cube or two on top to keep the towel damp.
To open oysters, simply rinse them in cold water to rid them of the surface mud you don’t want to transfer inside. Set the oyster cup side down {this is usually obvious in all but the flattest of flat oysters}, and look for the spot where the shells are joined. This is also usually obvious, but if not, look closely at the whorl pattern of growth rings on the shell: the lines in the whorl are most compressed near the joint. Hold the oyster securely in place with a gloved hand or a towel and probe at the joint with an oyster knife, or, yes, a sterilized sharp screwdriver, and gently work the flat blade into this tiny slit. Usually you can ease the shells apart with a patient rocking, probing motion. Sometimes they pop easily. If you run into a recalcitrant one, work at it, then set it aside. Often it will be easier in five minutes. Once you have popped the top shell free, slide in your knife {if you are using a screwdriver, switch to a paring knife for this step}, flat against the top shell. Feel for and cut through the connective muscle, which resembles a small, tough scallop, then lift off the top shell. Smell the oyster. Discard it if it smells off. Now slide your knife under the oyster meat, close against the cupped side of the shell, and free that side of the muscle. Contrary to custom, we don’t turn the oysters over in their shells; I think the topside of the meat is gorgeous with its ruffles, folds, and shades of gray, silver, black, cream, and beige. The underside is plain by comparison. Inspect the oyster for bits of shell, mud, or, yes, the rare tiny pearl. Arrange the opened oysters as you go on a bed of ice, first dusted with salt to stabilize it and make it shed cold, on a wide, shallow platter. Take care to place the oysters level, so they don’t spill their juice. Open oysters at the last possible moment; if this is not possible, keep shucked oysters level and well chilled until serving. Properly stored, oysters on the half-shell do not spoil immediately, but they can take up lots of space and are vulnerable to mishap and contamination. “Managing” opened oysters and transferring them from one tray to another is no less labor than shucking at the last minute. Holding them on ice can be fine as long as your tray has a drain; otherwise, the oysters will shortly be inundated in their melting bed. We insist on opening every oyster to order, which can result in backlogs at our beleaguered oyster bar, but the alternative can pose health risks and is always a challenge to quality.
We serve oysters on the half-shell with the simplest garnishes and condiments, hoping to let the complex flavors of each oyster bloom in the diner’s mouth. The strongest condiment we offer is lemon. For preserving and flattering an oyster’s flavor, I favor a traditional sauce mignonette. Make it about half an hour before needed, and keep it cold; heat will dull the flavor.
Wine: Chablis Premier Cru Vaillons, Christian Moreau et Fils, 1999
SAUCE MIGNONETTE
ENOUGH FOR A FEW DOZEN OYSTERS:
1/4 cup dry white sparkling wine or Champagne
2 tablespoons Champagne vinegar or white wine vinegar
1 medium shallot {about 1/2 ounce}
Freshly cracked black pepper
Combine the wine and vinegar. Finely mince the shallot using a razor-sharp knife; a dull knife will smash the shallot and release acrid flavors. You should get about 2 teaspoons. Add the shallot to the wine-vinegar, along with plenty of pepper, and stir. Serve in ramekins for dipping the oysters, or in a bottle, with a split cork for a spout, to sprinkle on the half-shells.
I use leftover mignonette plus unsalted butter, bay leaf, lots of lemon zest, and a sprig of thyme for steaming mussels or clams.
CURED MEAT
CURED MEAT, PAIRED WITH A CONDIMENT OR TWO OR THREE, MAKES SIMPLE WORK of the appetizer course in a meal. Buy cured meat where they sell a lot of it, and where they slice it perfectly and are careful to lay down each slice neatly overlapping the preceding one. Cured meat will taste and look best if you buy it within a few hours of serving it, but if you need to purchase it further in advance, then refrigerate it promptly and keep the package flat. For the best flavors and easiest handling, bring it out about half an hour before serving.
The dishes that follow are particularly good before a meatless main course of eggs, pasta, or gnocchi, or before grilled fish or poultry. Well-presented, cured meat can add luxury and finesse to a meal, with minimal scrambling in the kitchen.
SOME THOUGHTS on THE CURED MEATS SUGGESTED in THESE RECIPES
AVAILABILITY OF THESE CURED MEATS VARIES REGIONALLY BUT OUGHT TO IMPROVE as they are better appreciated. You may not find smoked prosciutto as easily as prosciutto, but a store that cares enough to stock excellent-quality Parma prosciutto may be interested in carrying it, along with fine air-dried beef or coppa, if they learn their clients will buy it.
We use Parma prosciutto at Zuni, choosing brands that are deep, fleshy pink, and firm but not hard. I avoid prosciutto that has an unnatural, “glowing” pink hue, evidence of excessive curing salt. While not as readily available, prosciutto di San Daniele can be an excellent choice as well. I have not tasted a domestic prosciutto that approaches the highest Italian standard. Fine, sweet-salty, satiny prosciutto tolerates nothing but elegance on its plate~in particular, succulent, low-acid fruit. The combinations I describe toy with the softness, the subtle nutty-sweet animal flavor, and the sensuality of the best prosciutto.
Firmer and saltier than plain prosciutto, smoked prosciutto stands up to bigger flavors and coarser textures. Pressed and aged for about six months, it yields gorgeous petals of burnished maroon meat edged with ivory fat. Do not confuse cold-smoked prosciutto with hot-smoked cooked hams, such as Westphalian. Some smoked prosciutto is called speck. Speck is a product of the Alto Adige/Südtirol in Northern Italy, where it has been made for nearly five hundred years and is justifiably treasured. {But since speck can be made with loin, belly, shoulder, neck, or leg, not all speck is actually smoked prosciutto.} We use both imported smoked prosciutto and speck.
Spanish serrano ham, lately available in the United States, is a delicious alternative to smoked prosciutto in these recipes. It is not a smoked ham, but is similarly firm, dense, intensely flavored, and full of character. Salty-sweet raw Smithfield ham, which can be delectable served thinly sliced, is another good choice.
All three of these hams can be excellent with cheese, olives, or pickled fruit and anchor an antipasto that has more than one big flavor.
I favor very coarsely ground all-pork salami. We use a four-inch wide “flattened-log” type, marketed as soppressata. Currently no Italian salami is permitted for import in the United States; the one we use is made in California and sold under the label Ticino. Traditionally, fat logs of soppressata were pressed, to force out air and improve the chances of successful drying, which accounts for its name, but I have seen proud round ones in American markets; modern methods often render old words more charming than meaningful. Their shape and size notwithstanding, I choose firm salami, and only those that are distinctly freckled ruddy red and pearly white. Rustic in all ways, salami shows best in informal arrangements with simple, accessible flavors.
The coppa we use is a log of cured rolled pork shoulder. It presents a bold swath of pearly fat in each slice. {In Italy, the name coppa can apply to both shoulder and loin products, and, confusingly, in Southern Italy similar confections are sometimes called capocollo.} Coppa tends to be salty, and spicy coppa is rubbed with cayenne pepper before it is rolled, cased, and dry-aged for up to 3 months. There is nothing subtle about coppa; it will overwhelm delicate, fruity, or faint-heated condiments. We pair it with big, earthy flavors.
Currently, Italian coppa and capocollo cannot be imported into the United States; however, there are tasty domestic coppas to choose from. We use coppa and spicy coppa made by Molinari in San Francisco, which is widely distributed. {Do not confuse this type of traditional dry-cured coppa with cooked coppa or other cooked domestic products called capocollo.}
“Bresaola,” an awkward but lovely word, refers to a flavorful air-dried beef from the Valtellina in Northern Italy. Originally known as salaa come brisa, it is made from one of five lean hind leg muscles {from the top, bottom, or eye of the round}. It is first soaked in a proprietary saltwater brine containing perhaps pepper, juniper, and coriander seeds, then cased, dried, and aged for at least 2 months. It is log shaped. Bündnerfleisch, made in the Grisons region of Switzerland, is another fine air-dried beef that I recommend. It is not cased and tends to be firmer than bresaola. It is brick shaped, producing pretty rectangular slices. The edges may be flecked or well frosted with harmless~indeed it is protective~white mold. This is easy to scrape or trim off. Beefy, salty, and lean, and with a wonderful leathery texture, both types of air-dried beef are up to many flavor challenges, so long as one of them is a generous splash of oil to compensate for its lack of fat.

WINE & CURED MEATS
THOUGH MOST OF THE WINE SELECTIONS HERE ARE INTERCHANGEABLE, each has been chosen for a particular affinity with the garnish and for any regional association it might have. If the dish is served as a first course {rather than as a main course for a light lunch or supper}, the wine chosen should lead gracefully to whatever wine or food is planned to follow.
PROSCIUTTO & MELON in SAMBUCA
AN INTOXICATING VARIATION ON A FAMILIAR PAIRING. Use ripe cantaloupe or other firm orange-fleshed melon. This combination is also nice with thinly sliced soppressata.
A note on choosing melon: Melon should be heavy for its size, and if it has netting, the rind under the netting no longer raw green. Sometimes a tender stem end is a good sign. Scent can be a good guideline, but I have had some great melons that didn’t share their scent until I cut into them. I have been assured that if you know that a bin of melons all came from the same field, or, better yet, if you can choose among a few melons on the same plant, you can expect the larger ones to be better~they are the ones the plant has favored. If you aren’t confident but want to learn, it can be instructive to buy two melons at a time~choosing ones that look and feel quite, or slightly, different, and then cut and taste them side by side. If one tastes better to you, make a point of noting what it looks, feels, and smells like, and whether one end or one side is sweeter than the other. The extra melon purchase will not seem extravagant if you are learning how to choose well.
Wine: Collio Pinot Grigio, Vittorio Puiatti, 2000
FOR ABOUT 4 SERVINGS:
1-1/2 to 2 pounds ripe melon
A few pinches of anise seeds
1 teaspoon Sambuca
4 to 6 ounces thinly sliced prosciutto
Halve and seed the melon. Cut into inch-thick wedges, then carve away the rind, deeply enough to remove any rindy-tasting, hard flesh, in a continuous, smooth stroke to produce elegant crescents. Expect 3/4 to 1 pound of flesh. Place in a wide bowl.
Slightly crush the anise seeds and sprinkle over the melon. Dribble a little Sambuca over all and fold gently to distribute without bruising the melon. Leave to macerate for about 10 minutes in a cool place, or refrigerate.
Turn the melon slices over on themselves, then slide onto plates or a platter. Cut the prosciutto into wide ribbons and drape them over the melon.
PROSCIUTTO with WARM ROASTED FIGS & HAZELNUT PICADA
I CAN’T EAT A WARM ROASTED FIG ANOINTED WITH NUTTY CRUMBS AND WRAPPED in a melting slice of prosciutto without remembering the sweet-salty, crispy, creamy, hot grilled peanut butter and jelly sandwiches I loved as a child. I never liked sweets much unless there was a little salt and crunch. This zesty, garlicky crumb topping, based on a Catalan culinary staple, adds both. Notwithstanding, if you don’t have time to make the picada, roasted figs and prosciutto are delicious by themselves. {And remember roasted figs: they are good with grilled or roasted lamb or game birds. Or, if you skip the oil and roll them in sugar before roasting, they make a nice dessert.}
Wine: Steele, Santa Barbara County Pinot Blanc, 2000
FOR 4 SERVINGS:
About 8 small, ripe Black Mission figs {6 to 8 ounces total}
About 2 teaspoons extra-virgin olive oil
About 3 tablespoons Crumbly Hazelnut Picada {here}
4 to 6 ounces thinly sliced prosciutto
Preheat the broiler.
Cut the figs in half, roll in the olive oil to coat, and place cut side up on a small baking sheet. Broil until hot through and just beginning to caramelize on the edges, about 3 to 5 minutes. Sprinkle a few pinches of picada on each as you pull them from the broiler. The warmth will tame the raw garlic and heighten the other flavors in the picada. Lay the prosciutto on plates and carefully garnish with the hot fig halves. Serve immediately.
PROSCIUTTO & WHITE ROSE NECTARINES with BLANCHED ALMONDS
THE ROSE SCENT, FAINT BITTERNESS, AND LONG FLAVOR OF A RIPE WHITE NECTARINE reveal flavors in prosciutto that you can miss when you taste the ham with sweeter fruit. Choose a nectarine that yields to the touch, like a barely flexed muscle. A thin-skinned white Babcock peach, because it has a similar austere bitter-sweetness, can make a nice counterpoint to the ham as well. Smooth, lightly toasted peeled almonds are delicate enough for the subtle balance; no other preparation, or nut, will do. {During the few weeks a year we can get them, I do like to serve this dish with green almonds. Pried from their fuzzy pods and painstakingly peeled, tender unripe almonds have as delicate a flavor as I know, one that reads best against something savory, rather than sweet. See Note below.}
In any case, taste this combination slowly.
Wine: Alban Vineyards Edna Valley Viognier, 2000
FOR ABOUT 4 SERVINGS:
18 to 24 raw almonds {about 1/4 cup or 1 ounce}
1 large or 2 small White Rose nectarines {7 to 8 ounces total}
4 to 6 ounces thinly sliced prosciutto
Preheat the oven to 300°.
Bring a few cups of water to a simmer in a small saucepan. Drop in the almonds and count to ten. Fish out one nut and pinch it~the swollen skin ought to slide right off. {If not, blanch for a few seconds longer.} Promptly drain the remaining almonds, so they don’t get waterlogged. Spread on a towel and rub dry. Pinch off all the skins, then rub dry again.
Spread the almonds on a baking sheet and place in the oven until they begin to change color~this may take 15 minutes or longer. They will be soft as they emerge from the oven but will crisp as they cool.
Cut the nectarines into 1/2-inch-thick wedges {if the nectarines are sliced too thick, they will dominate, and the combination will be awkward}. Arrange the slices of prosciutto and the nectarine wedges on plates. Scatter the almonds over all.
Note: If you are in an almond-growing region, or know someone with an almond tree, you may be able to get the soft green fruits. If you do, here is how to liberate the prize: Use a paring knife to gently split each fuzzy almond pod along its natural seam. Pop out the almond and peel it carefully. Occasionally some nascent almonds will be cloudy and jellylike. I eat those on the spot. The more mature ones will be ivory and pliable.
PROSCIUTTO with CHESTNUTS in SAGE OIL
FRESH CHESTNUTS ARE A BIT OF A BOTHER TO PREPARE, BUT WORTH IT FOR THIS winter antipasto. Salty-sweet prosciutto is a lovely foil for the warm chestnuts. You might also try this with smoked prosciutto, serrano ham, or raw Smithfield ham. Choose firm, shiny, heavy chestnuts. Make sure the shells are not split. If you prepare extra, they will keep for weeks refrigerated, as long as they are submerged in the scented oil. Serve them warm with roast pork or game.
Wine: Bardolino Cavalchina, 2000
FOR ABOUT 4 SERVINGS:
About 4 fresh sage leaves
About 6 tablespoons extra-virgin olive oil
12 to 16 whole fresh chestnuts {about 8 ounces}
4 to 6 ounces thinly sliced prosciutto
If the sage leaves are large, cut or tear into a few pieces. Bruise and crush the leaves with the back or flat face of your knife. This will expedite the release of their fragrant oil. Place in a 2-quart saucepan with the olive oil, and set over very low heat to steep for about 10 minutes. The oil should never get too hot to touch. Set aside.
To prepare the chestnuts: Most chestnuts have one rounder and one flatter face. Using a small knife, and holding the tip of the blade against the flatter face, slash the leathery shell as you would slide a letter opener into an envelope~that way you won’t gouge the meat. For the occasional rotund specimen, make as shallow a slash as you can.
Place the chestnuts in a pot of just-simmering water to cover by a few inches. Large chestnuts usually take 12 to 15 minutes to cook. When ready, the flesh will be steamy but still firm. Scoop a chestnut at a time from the simmering water and hold it in a towel while you peel it: Slide the knife back into the slash and peel away the outer shell; if you are lucky, the velvety inner skin will come off as well. Working quickly, while the nut is still quite a lot hotter and more humid than the surrounding air, will improve your odds of getting both shell and skin at once. If a given chestnut cools too much to peel easily, slide it back into the simmering water. It may crumble when you return to peel it, but that will hardly destroy the dish. As you peel each chestnut, inspect carefully for hidden bits of copper-colored skin. You may need to pry the flesh apart to remove inner folds of skin. Trim any discoloration as you go. If any chestnut is over an inch in any dimension, break it in half~this will speed up the absorption of scented oil. As you peel them, drop the warm chestnuts {or the pieces of chestnut} into the warm sage olive oil. Stir as needed to bathe all the chestnuts.
Once you have peeled all of the chestnuts, set the pan back over the lowest heat and heat until warm to the touch. Remove from the heat and leave the chestnuts to absorb some of the oil and its perfume, about 30 minutes. Stir again.
Serve each person a spoonful of the warm chestnuts and the oil that clings to them, with a few slices of prosciutto. Save any leftover oil to stir into bean or winter squash soup, or to add to Farrotto {here} or Farro Soup {here}.
SMOKED PROSCIUTTO with SPICED ZANTE GRAPES & FENNEL
THIS IS A FESTIVE DISH TO SHOW OFF THE SIMPLE SPICED ZANTE GRAPES. Don’t substitute regular prosciutto; the pickled fruit is too aggressive for the soft, sweet meat. In that case, use fresh Zante grapes. They are usually most abundant in August, although they may appear as early as July and last into September.
Wine: Boeger Vineyards El Dorado Refosco, 1999
FOR 4 SERVINGS:
6 ounces Spiced Zante Grapes {here}, drained {about 3/4 cup}
4 to 6 ounces thinly sliced smoked prosciutto
1 medium fennel bulb {about 8 ounces}, trimmed
2 to 3 ounces walnuts {about 1 cup}, preferably freshly shelled {optional}
Use scissors to snip the grapes into bite-sized clusters. Wrap a slice of smoked prosciutto around each cluster, fixing with a toothpick if you like, and arrange on a platter. Slice the fennel crosswise into 1/8-inch-thick sickles and offer these and the walnuts, if using, in little piles on the side.
SALAMI with RAW FAVAS, MINT, & MANCHEGO CHEESE
RAW FAVAS ARE A SPRING DELIGHT, OFTEN OVERLOOKED IN CELEBRATIONS OF THE first peas, asparagus, and artichokes. A friendly collision of a Tuscan idea {favas and sheep’s milk cheese} and a Catalan one {favas and mint} resulted in this little dish. Basque Brebis, and aged Tuscan pecorino are good alternatives to Manchego. This antipasto is also nice made with thinly sliced, leftover rosy-pink Roasted Leg of Lamb {here}. In that case, strew the dressed favas and Manchego over the slices of lamb, which should be at room temperature and trimmed of all fat.
Wine: Vermentino “Vigna U Munte,” Colle dei Bardellini, 2000
FOR ABOUT 4 SERVINGS:
2 pounds whole young favas
2 to 3 ounces thinly sliced pork salami
About 3 tablespoons extra-virgin olive oil
A few leaves of fresh mint
Salt and freshly cracked black pepper
About 2 ounces Manchego, Basque Brebis, or aged Tuscan pecorino
A lemon {optional}
Shell the favas, removing the fat, fleshy beans from their padded pods. Next, peel away the outer skin, which resembles nothing more than a bit of rubber glove. This is tedious, but if you trim away a sliver of this casing from the tip of the bean with your fingernail, you can usually peel away the rest in a few seconds. {Resist the temptation to blanch the favas and then pop them out of their skins~a quicker technique, good for some recipes, but one that changes their texture.} The peeled favas should be pliable and bright green~don’t use any that are hard or yellowing. Split the favas into halves, as you would a shelled peanut. You should get about 1-1/2 cups “double-peeled” favas.
Cut the salami into 1/2-inch-wide ribbons.
Toss the favas with olive oil to coat. Coarsely chop the mint leaves, then add to the favas, with a little salt and lots of black pepper. Use a vegetable peeler to shave in a few curls of cheese, avoiding any rind, then fold in the salami ribbons. Taste. Fold in a trickle of lemon juice, if you like, and taste again. Transfer to plates or a platter, garnish with additional curls of cheese, and serve immediately.
ANTIPASTO of SALAMI, IDIAZABAL, & CELERY-WALNUT–DRIED FIG RELISH with GRAPPA
A GOOD COMBINATION BUILT FROM THINGS YOU CAN KEEP IN THE LARDER. Idiazabal is the Basque town where they produce this hard sheep’s milk cheese. It is very lightly smoked and retains a fruity note that marries well with figs and grappa. Manchego is a good substitute. Both cheeses keep well for weeks.
Tossed with a handful of frisée and sherry vinaigrette, the combination makes a good first-course salad. In that case, you can skip the salami or cut it into wide ribbons to fold into the salad.
Wine: Arneis, Vietti, 2000
FOR 4 SERVINGS:
12 walnut halves {about 1 ounce}, preferably freshly shelled
1 stalk celery, leaves trimmed off
4 dried white figs~Kadota or Smyrna {Calimyrna}
1 tablespoon pomegranate seeds {optional}
1 tablespoon extra-virgin olive oil
A splash or two of grappa
Salt and freshly cracked black pepper
4 to 6 ounces Idiazabal or Manchego
4 to 6 ounces thinly sliced pork salami
A bunch of small radishes {optional}
Preheat the oven to 300°
Go through the walnuts and discard any shriveled or very dark bits of nutmeat. If you aren’t sure what the standard for too dark ought to be, taste a suspect piece and decide if you like it, then base your standard on that. Spread the walnuts on a baking sheet and warm for about 5 minutes, then rub between rough towels to remove some of the tannic, papery skin. {The fresher the walnuts, the more effective this technique will be.} Pick out the nutmeats, break into little bits, and then shake in a strainer to further cull flecks of skin.
Slice the celery crosswise into thin sickles. Trim their stems, then cut the figs into small chunks the size of the walnut bits, or halve and thinly slice. Combine roughly equal parts of celery, walnuts and figs, plus the pomegranate seeds, if using. Moisten with the olive oil just to coat, then add a few splashes of grappa, a pinch of salt, and a few grinds of black pepper. Mix well, then set aside for 5 minutes so the flavors marry.
Cut the cheese into 1/4-inch-thick wedges. Loosely fan the salami and cheese on plates or a platter. Pile the relish in a little mound alongside. Offer crisp whole radishes, if you like, on the side.
COPPA & WARM PARSLIED POTATO SALAD with ROASTED PEPPERS
THIS COMBINATION IS SO FRIENDLY AND EASY YOU MAY MAKE IT MORE OFTEN than any other of our cured meat antipasti. No one can resist parslied potatoes. The key to this simple potato salad is to fully season the cooking water so it seasons the potatoes, inside and out, as they cook, and then dress them while still warm. We use Yellow Finnish, Butterball, or Bintje potatoes; they have a much richer flavor and a creamier texture than the shrewdly named Yukon Gold potatoes grown in our region. But you should experiment with potatoes you find in your area and choose the variety that tastes best to you. Regarding the parsley: Chop it just before you need it, and not too finely. Salami would be good in place of coppa here.
Wine: Dolcetto d’Alba, Aldo Conterno, 1999
FOR ABOUT 4 SERVINGS:
Generous 1 pound peeled yellow-fleshed potatoes cut into irregular 1-inch chunks or a little smaller
Salt
About 1 tablespoon tightly packed, coarsely chopped, fresh flat-leaf parsley
About 4 to 5 tablespoons extra-virgin olive oil
About 2 tablespoons Champagne vinegar or white wine vinegar
Freshly cracked black pepper
About 4 ounces coppa, sliced 1/16 inch thick
1 large or 2 small red or green bell peppers {about 12 ounces total}, roasted or charred, peeled, and cut or torn into wide strips {see here}
12 oil-cured meaty black olives, such as Nyons
Place the potatoes in a 2- to 4-quart saucepan and add cold water to cover. Salt the water very liberally, stir to dissolve, and taste~the water should taste a little too salty. {I use a generous 1-1/2 teaspoons sea salt per quart of water.} Bring to a simmer, uncovered. Cook at a bare simmer, stirring once or twice, until the potatoes are tender and the edges are starting to soften, usually about 6 minutes. Drain well.
As soon as they have stopped steaming, transfer the potatoes to a wide bowl. Using a rubber spatula, fold in the parsley and enough olive oil to coat well. The edges will break down a little, shedding potato into the oil. Cover with plastic wrap and leave for a few minutes so the parsley perfumes the oil and softens.
Fold in the vinegar and black pepper, both to taste.
Arrange the slices of coppa and the strips of roasted pepper on plates or a platter, and mound the juicy potatoes and the olives to one side.
COPPA with CATHERINE’S CELERY ROOT
CATHERINE BRANDEL WAS A DEAR FRIEND AND AN UNCOMMONLY GIFTED COOK who could charm a cockscomb into elegance. On her return from a cooking job in Turkey in 1998, she served me a dish of delicately preserved celery root that she had learned to make there. I could not figure out how she’d achieved the texture, color, and flavor and I asked about it. Of course, she had measured nothing, but this formula owes to her keen observations and precise explanation.
Make this whenever you have to buy a whole celery root in order to get only a chunk for a salad or a braised dish. The mild pickle keeps for about a week refrigerated and is nice as an hors d’œuvre or with grilled fish. The formula works for carrots as well, although you will want to cut back on the sugar.
Wine: Vernaccia di San Gimignano, Strozzi, 2000
FOR 4 SERVINGS:
1/4 cup mild-tasting olive oil
3 tablespoons water
Scant 2 tablespoons sugar
1/2 teaspoon salt
1/4 teaspoon coriander seeds
1 bay leaf
1 pound peeled celery root {about 2 medium celery roots}, cut into roughly 1-inch chunks
1 to 2 tablespoons freshly squeezed lemon juice
4 to 6 ounces thinly sliced coppa
About 3/4 cup olives {4-1/2 ounces}, such as Lucques, Picholine, Ascolane, Gaeta, Niçoise, or Nyons, or a combination
Place the olive oil, water, sugar, salt, coriander seeds, and bay leaf in a 2- to 4-quart saucepan. Stir to dissolve the sugar, then stir in the celery root to coat. Set over low heat, cover, and bring to a quiet simmer. Cook, stirring once, for 5 to 6 minutes, then uncover. Cook uncovered at the same discreet simmer, stirring regularly, until the celery root is tender and the water has practically evaporated, about 10 more minutes. The celery root should not color. Remove from the heat and stir in lemon juice to taste.
You can serve the celery root warm, at room temperature, or cool. If you do wait to serve it, taste again for lemon; it will taste less assertive than when it was warm, and you may want to add more.
Arrange the coppa on plates or a platter. Spoon a juicy mound of celery root next to the meat. Offer a bowl of the olives on the side.
AIR-DRIED BEEF with BUTTER LETTUCE & CORIANDER VINAIGRETTE
BRESAOLA, ITALIAN AIR-DRIED BEEF, IS TRADITIONALLY CURED WITH A SPRINKLE OF crushed coriander seeds, a preserving habit that dates from Roman times at least. This easy antipasto is for purists, who will find the combination of heady, salty meat and the fragrant vinaigrette refreshing and logical. In this context, the satiny, soft leaves of butter lettuce taste and feel luxurious.
Wine: St. Innocent, Temperance Hill Vineyard, Willamette Valley Pinot Noir, 1999
FOR 4 SERVINGS:
About 6 tablespoons extra-virgin olive oil
About 1 tablespoon Champagne vinegar or white wine vinegar
Salt
Scant 1/4 teaspoon coriander seeds
A small head of butter lettuce in excellent condition, carefully washed and dried
About 5 ounces thinly sliced air-dried beef
Combine the oil, vinegar, and salt to make a mild vinaigrette. Warm the coriander seeds in a small pan over medium heat for a few seconds, then lightly crush and add them to the vinaigrette. Taste.
Pick out a combination of about a dozen large, medium, and small lettuce leaves, choosing perfect specimens {or pick nearly perfect ones and trim their minor flaws}. Toss with enough vinaigrette to liberally coat.
On cold plates or a platter, alternate slices of meat and lettuce leaves in a shingle pattern. Drizzle with a little additional dressing, stirring together more if necessary.
AIR-DRIED BEEF & FUYU PERSIMMONS with EXTRA-VIRGIN OLIVE OIL & BALSAMIC VINEGAR
THIS IS A PRETTY WINTER ANTIPASTO REQUIRING ALMOST NO WORK. The subtle, candylike sweetness of the persimmons in combination with the rich, smoky-salty lean meat is beguiling. Choose Fuyus that are a deep, saturated orange and just beginning to give to the touch, like a slightly underripe peach. The best varieties have a squat profile and are clefted, presenting a quatrefoil-shaped slice. Don’t use torpedo-shaped Hachiya persimmons, which must be jelly-soft to be edible. If you see the unusual Chocolate Fuyu persimmons, snatch up a few. The gorgeous, marbleized flesh has faint cinnamon overtones and is worth the extra dimes. I don’t usually peel Fuyu persimmons, but you should taste a small sliver of the fruit and decide if you like the skin or not.
This antipasto is a proper place to lavish the best artisan-made, aged balsamic, but, lacking that, combine good-quality commercial balsamic with the oil to make a rich vinaigrette instead. We sometimes add a few sickle-shaped slices of raw fennel to this dish. A nice variation, simpler still, constists of prosciutto or smoked prosciutto with Fuyus and almonds. Ham doesn’t need the balsamic for sweetness, and is rich enough without the oil.
Wine: Buttonwood Santa Ynez Valley Sauvignon Blanc, 1999
FOR ABOUT 4 SERVINGS:
1 medium or 2 small Fuyu persimmons {about 6 to 8 ounces total}
5 to 6 ounces thinly sliced air-dried beef {bresaola}
3 to 4 tablespoons extra-virgin olive oil
2 to 3 tablespoons artisan-made balsamic vinegar
1 fennel bulb, trimmed {about 6 ounces} {optional}
Use the tip of a paring knife to carve out the stem end of the persimmons. Carve out a sliver of meat and skin and taste. If you like the texture of the skin, leave as is; if not, peel the fruit. Cut the persimmon into very thin wedges, prying out seeds if there are any, or thinly slice with a mandoline.
Spread the meat and persimmons, somewhat overlapping, on plates or a platter. Drizzle with oil, then finish with balsamic. If using the fennel, sliver crosswise into thin sickles and scatter them over. Don’t feel you need to use the whole fennel bulb.
AIR-DRIED BEEF with FROMAGE BLANC & GREENS
MY FIRST TASTE OF BRESAOLA WAS WRAPPED AROUND SOFT, DELICATE CAPRINO goat cheese on the wrong shore of Lake Como {even that, I could not really afford} in 1981. It is a well-known combination, traditional there, and it is a pleasure to transplant the idiom, using a fresh “white cheese,” only lately available in America. Friends at Cowgirl Creamery north of San Francisco make soft, delicate mixed Holstein and Jersey milk fromage blanc, which blooms next to the salty meat. You can substitute a soft, mild goat cheese or fresh ricotta.
Pair the stuffed air-dried beef with a small-leaved salad green, such as lamb’s lettuce, tiny baby lettuces, or lettuce hearts, a handful of dressed chervil sprigs, or minutina {see About Salads, here}.
Wine: Apremont, Vin de Savoie, Pierre Boniface, 2000
FOR 4 SERVINGS:
About 6 tablespoons fromage blanc
12 to 16 thin slices air-dried beef {bresaola} {about 2 ounces}
3 to 4 ounces tiny salad greens, carefully washed and dried
About 2 tablespoons lemon oil {see Sources and Resources, here, or, to infuse your own, Lemon Oil, here}
Salt
Smear 1 to 2 teaspoons of cheese onto each slice of meat, fold over, and pinch closed. Toss the greens with the lemon oil to coat and a pinch of salt. Arrange the pinched meat “turnovers” around a nest of salad.
PORTOBELLO MUSHROOMS with EXTRA-VIRGIN OLIVE OIL, MINT, LEMON, & MOCK CRÈME FRAÎCHE
A VERY EASY AND LOVELY FIRST COURSE. Portobellos {or portabellas or portobellas, since different producers have adopted different versions of the marketing name} are a cultivated, large-capped form of Agaricus bisporus, the brown field mushroom that has been a supermarket staple for years. Make sure the mushrooms are firm, plump, and cold; this will make the slicing easier. Refrigerate the serving plates or platter as well. This preparation is also delicious with raw porcini mushrooms or with shavings of Parmigiano-Reggiano in lieu of the cream.
Wine: Soave Classico Superiore, Pieropan, 2000
FOR ABOUT 4 SERVINGS:
6 ounces firm portobello mushroom caps {about two 5-inch caps} {save the stems for Giblet-Mushroom Sauce, here}
About 12 fresh mint leaves
Salt and freshly cracked black pepper
Generous 1/2 cup extra-virgin olive oil
1 lemon, halved
3 to 4 tablespoons Mock Crème Fraîche {here}, thinned with whipping cream if necessary to the consistency of thick paint
Using a dry pastry brush or towel, brush or wipe the mushroom caps clean. Check the gills for hidden dirt, which you can flick out with the tip of a paring knife. Don’t rinse the mushrooms; this tends to damage their texture and flavor.
Using a Japanese mandoline, slice the mushrooms as thin as possible, letting them fall into a loose, layered scatter on cold serving plates or a platter. Sliver the mint and distribute over the mushrooms. Season evenly with salt and pepper, a generous drizzle of olive oil, and then a trickle of freshly squeezed lemon juice. Finish with a “scribble” of crème fraîche dripped from the tines of a fork.
RAW WHITE ASPARAGUS & PORCINI MUSHROOMS with HAZELNUTS, PARMIGIANO-REGGIANO & WHITE TRUFFLE OIL
A SIMPLE ASSEMBLY OF SUBLIME THINGS. White asparagus is in season for a few months in the spring~overlapping with the short spring porcini season. Ours comes from Fairview Gardens, an organic farm near Santa Barbara. Nourished with plenty of compost, it is tender and sweet, with a pleasant trace of bitterness. To store asparagus, white or green, trim the ends, place in an inch of water, like flowers, and refrigerate. {Use spring water if your tap water isn’t great.} Choose porcini that are firm, like fresh button mushrooms, and tennis-ball–sized or smaller. Check under the caps; they should be beige and firm, not yellow-green and spongy. Buy them no more than a day before you make the dish, and store in a paper bag, refrigerated, until just before serving. If you can’t get suitable porcini, you are better off substituting slices of fleshy Belgian endive. For a very luxurious version of this dish, look for Occelli’s crutin, a delectable, aged cow-and-sheep’s-milk cheese that is studded with black truffles, from the Piedmont region of Northern Italy {see Sources and Resources, here}. Shave it over the antipasto in lieu of the Parmigiano and truffle oil.
Wine: Aligoté de Bouzeron, A. & P. de Villaine, 2000
FOR 4 SERVINGS:
8 to 9 ounces fresh, fat white asparagus {about 8 spears}, to yield 6 to 7 ounces trimmed
About 4 ounces fresh, firm porcini mushrooms or about 8 Belgian endive leaves
About 24 hazelnuts {3/4 ounce, or scant 1/4 cup}
About 1/4 cup extra-virgin olive oil
1 scant teaspoon white truffle oil
Salt
A small chunk of Parmigiano-Reggiano {about 2 ounces}, to shave on top
Peel each asparagus spear to within a few inches of the tip, then break off the woody end. To clean the porcini, remove any loose dirt or debris with a clean towel or pastry brush. Use a sharp paring knife to scrape off or peel away any crusty dirt. Trim soft or discolored spots. Check under the cap as well. Don’t worry if the stems fall off as you clean the mushrooms~you can slice the stems and caps separately. Place in a paper bag and refrigerate until needed. This preserves them and makes them much easier to slice.
Preheat the oven to 325°.
Roast the hazelnuts on a small baking sheet until their skins darken, start to split, and become papery, about 10 to 15 minutes. While they are still hot, bundle them in a towel beanbag-style and scrunch and massage them to rub off some of their skins. Don’t worry if some of the skin remains. Pick out the nuts and chop them coarsely.
Combine the oils and taste~the truffle flavor should be subtle.
Slice the asparagus lengthwise on a mandoline, barely 1/16 inch thick {if you don’t have a mandoline, slice with a sharp knife on as steep an angle as possible into elongated ovals}. Scatter most of the slices onto serving plates or a platter. Salt very lightly all over.
Use the mandoline or a razor-sharp knife to slice the porcini as thinly as possible. You will get a pretty combination of sickles, ovals, and “parasols.” Or, if using endive, cut the leaves crosswise into 1/2-inch-thick sickles. Scatter over the plates, then add the rest of the sliced asparagus. Salt again, very lightly.
Use a vegetable peeler or the mandoline to shave curls of cheese over the asparagus, then scatter the hazelnuts over. Drizzle evenly with the truffle-scented oil.
GRILLED ASPARAGUS with PISTACHIO AÏLLADE
AN AILLADE IS AN EMPHATICALLY GARLICKY THING, USUALLY A GARLIC-{AIL IN French} driven sauce. This one is based on a delicious pounded walnut-garlic condiment, L’Aïllade Toulousaine, in Elizabeth David’s French Country Cooking. This pairing is pretty and the preparation easy.
Choose firm asparagus with elegant, smooth tips; as the tips begin to bud, the stalks become less tender and sweet. Trim a quarter inch from the ends and store upright in water, refrigerated, until using.
Don’t hesitate to make extra aïllade; covered and refrigerated, it will keep for at least a week. It is delicious with grilled vegetables, like zucchini, leeks, or fennel, or with grilled quail or chicken. For a nice variation, try substituting hazelnuts for the pistachios. We serve hazelnut aïllade with Rabbit Mixed Grill {here}. Grilled asparagus is a versatile side dish and is also good with a drizzle of lemon-, orange-, or tangerine-scented agrumato oil {here} and mild meaty Nyons olives.
Wine: Weingut Bründlmayer, Langenloiser Steinmassel, Austrian Riesling, 2000
FOR 4 SERVINGS:
For the aïllade {makes about 1/2 cup}:
2 ounces raw shelled pistachios {about 1/3 cup}
1 small garlic clove
About 1/4 cup extra-virgin olive oil
1 small orange, mandarin, or tangerine, for zesting
A splash of grappa or brandy
Salt
For the asparagus:
1 to 1-1/4 pounds trimmed asparagus {allow 1-1/2 to 2 pounds untrimmed}
1 to 2 tablespoons mild-tasting olive oil
Salt
Preparing the aïllade:
Turn the oven to 350°.
Go through the pistachios and discard any that are shrunken or brown. {Taste a “perfect” pistachio, then taste one of the rejects. You will understand why you are taking the trouble.} Spread on a baking sheet and heat the pistachios until warm to the touch, about 2 to 3 minutes, long enough to heighten their flavor without burning their fragile oil. Coarsely chop, again watching for and culling discolored nuts.
Coarsely chop the garlic, then pound in a mortar. Scoop out with a rubber spatula and set aside.
Transfer the chopped pistachios to the mortar and pound to a dry paste, or grind finely in a processor. Blend in the pounded garlic to taste. Pound or grind in about half of the oil to bind with the nuts, then stir in the remainder.
With a few strokes of a zester, carve a teaspoonful of fragrant orange filaments. Chop, then stir them into the paste. Add the grappa or brandy and salt to taste.
The finished aïllade will be a dense, heavy paste. Set aside to mellow for an hour or so. As it sits, the crushed nuts will settle out of the oil, but a few stirs will reamalgamate the paste.
Finishing the dish:
Prepare a grill fire and let it burn to glowing coals. Spread the coals, position the grill about 4 inches above them, and preheat it.
For standard or jumbo asparagus, 1/2 inch thick or thicker: Break off the woody ends, then peel away the toughest skin. Bring about 6 quarts water to a rapid boil. Salt lightly {about 2 teaspoons per gallon}. Blanch the asparagus for about 1 minute. They should remain crunchy and bright green. Drain. Cool in lightly salted ice water {so you don’t unseason the asparagus you just seasoned}, drain, and pat dry. Oil and arrange in a single layer on the grill. Grill until hot through and emblazoned with pretty char marks, 1 to 2 minutes per side, depending on the thickness of the asparagus.
For pencil-thin or thinner asparagus: Break off the woody ends. Wash, drain, and then toss with olive oil and salt. Line up the asparagus on the hot grill, not too crowded, or the asparagus will steam instead of sizzle and char. The tips of the asparagus may frazzle and blacken slightly, but taste before you reject this on principle. I find the charred tips delicious. After about 2 minutes, use a spatula and/or tongs to turn the asparagus, several spears at a time. Cook for about 1 minute longer.
I serve a smear of the aïllade in the center of each warm plate and let the grilled asparagus fall like “pick-up-sticks” on top of it.
BLANCHING
A SHAMELESSLY VERSATILE TERM, WHICH ONCE MEANT “TO whiten,” but which is now cheerfully applied to a cluster of different culinary operations that have different goals:
1. Plunging food, very briefly, into boiling liquid, usually water, to achieve the most superficial cooking possible. The specific goal is to soften or distress the skin so it can be removed, as in the case of peaches, tomatoes, or almonds. It may be no coincidence that in English this sense of blanching as a preparation for peeling was first applied to almonds, which, once peeled, are white.
2. A more lengthy but still abortive cooking operation, where food is plunged into boiling or nearly boiling liquid, usually water, for only long enough to partially cook. The hope is for minimal flavor loss, along with tenderizing, and/or brightening the color and/or strategic hydrating. This is all in anticipation of a secondary cooking. Hence, we might blanch leeks or fennel before adding them to a fish stew, or fat asparagus before grilling it. This type of operation is sometimes referred to as parboiling, which has come to mean “partially” boiling, a curious transformation in itself, since “par” means “thoroughly.” {“Parboil,” and its French and Italian equivalents, originally meant “boil thoroughly,” until “par” was misunderstood to mean “part.” For a while the two meanings of parboil coexisted, which must have been as confusing as “blanching” is today.} This sense of blanching also applies, sort of, to the peculiar case of french-fry cookery, where one first “blanches” {or “par-fries”} the raw potato batons in not-too-hot oil until just tender, in preparation for a second cooking in sizzling oil.
3. In the case of certain tender vegetables, such as little green beans or very skinny asparagus, rapidly boiling in lots of water until al dente, where al dente is considered quite cooked enough. No secondary cooking occurs.
4. Placing food in cold liquid {usually water, generally unsalted} and gradually bringing it to a simmer, with the goal of extracting unwanted flavor from the food so it can be discarded with the water {as in the case of blanching olives to desalt them, cardoons to draw out bitterness, or tripe to subdue its aggressive flavor.} Partial cooking is the inevitable result, and it can be arrested or prolonged, depending on the situation. {For example, in the case of blanching pig’s feet, I prolong it. The first goal is to cleanse them of surface impurities, the second step is to soften the tough cartilage and meat.}
Also, certain vegetables are called “blanched” when they are cultivated in such a way that some or all parts of the plant are shielded from sunlight so they never turn green~leaving the leaves or stems pale yellow-white. This produces, for example, white asparagus, Belgian endive, and pale-hearted escarole and chicories. Hence a head of frisée is “blanched,” but completely raw. It is merely “whitened.”
Understanding what “blanched” means hinges on knowing what you are blanching.
CHARRED EGGPLANT with BOTTARGA
THIS IS A SUAVE, SLIGHTLY SMOKY EGGPLANT DIP. Born of the most primitive of techniques, it is surprisingly delicate. I like to serve this with cracker bread, but thin, crispy crostini {here} are good as well. Comforting and delicious plain, it is unusually good garnished with grated bottarga, whether tuna or mullet {See Note, here}, or with thin ribbons of smoked prosciutto. Both have a pungent, feral saltiness that is perfect with the fleshly-earthy mash. This will keep for a few days covered and refrigerated.
Wine: Kavaklidere Çankaya {Turkish white wine}, 1999
FOR 4 TO 8 SERVINGS:
1 to 1-1/4 pounds globe or Japanese eggplant
1 garlic clove, peeled
2 to 3 tablespoons extra-virgin olive oil
About 2 teaspoons red wine vinegar or sherry vinegar
Salt and freshly cracked black pepper
A small chunk of bottarga {enough to grate about 1 teaspoon} or 1 ounce thinly sliced smoked prosciutto {both optional}
About 6 ounces cracker bread or 20 to 25 bite-sized crostini
Char and cook the eggplant by nesting it in barely glowing coals or placing it directly over the flame of a gas burner. Turn a few times to ensure even cooking. It should take about 15 minutes for large globe eggplant, about 8 minutes for skinnier Japanese eggplant. The once-proud specimen will have collapsed on itself, the surface coal black, the skin a thick, cakey mantle. Place in a paper bag to steam for about 5 minutes, then, when it is cool enough to handle, rub off the skin, rinsing your hands a few times as you go. Give the eggplant a very quick rinse under cold water just to rid it of some of the lingering burned specks. Don’t be thorough.
Slice off the stem, then cut the eggplant in half and pry out and discard any lobes of dark, hard, mature seeds. Chop coarsely. You ought to get a generous 1-1/4 cups pulp.
Cut the garlic clove in half and rub it all over the inside of a small mixing bowl. Add the chopped eggplant, then fold in olive oil, vinegar, salt, and black pepper to taste. Don’t overwork.
Mound on a serving dish and garnish with the optional grated bottarga or with smoked prosciutto cut into thin ribbons. Offer broken sheets of crispy cracker bread or crostini.
ARTICHOKE CAPONATA
THIS IS A STURDY VARIATION ON EGGPLANT CAPONATA. It is best when 2 to 5 days old and at room temperature. Serve it as part of an antipasto, with cured meat, hard-cooked egg, roasted peppers, or all three. I especially recommend it tossed with chunks of preserved tuna {for the method, see Pasta with Preserved Tuna and Pine Nuts, here}.
Choose artichokes as you would flowers. Look for perfect “blooms” with firm, unblemished “petals.” The freshest artichokes, that have been handled well, feel heavy for their size and make a scrunchy sound when you squeeze them. For this recipe, you need small, tightly closed buds~if the blossom is beginning to open, you know the thistle will have begun to develop, at which point the leaves will have toughened and changed in flavor.
I don’t bother rubbing the artichokes with lemon or holding them in acidulated water as I trim them~they do brown initially, but that discoloration disappears with cooking. Moreover, the lemon flavor is unwanted in this recipe, and the water just “spits” when you add the artichokes to the hot oil.
Wine: Ribolla Gialla del Friuli, Abbazzia di Rosazzo, 2000
FOR ABOUT 3-1/2 CUPS:
Scant 1/4 cup tomato paste
2-1/2 tablespoons sugar
1/2 cup Champagne vinegar or white wine vinegar
1/2 cup mild-tasting olive oil
Salt
1-1/2 cups sliced celery {6 ounces}
1-1/2 cups sliced yellow onions {6 ounces}
About 16 small artichokes {1-1/2 to 2 ounces each}
1/2 cup rinsed, pitted green olives, such as Picholine, Lucques, or Ascolane, or whole Niçoise olives {3 ounces}
3 tablespoons capers, rinsed and pressed dry between towels
A handful of fresh mint leaves, coarsely chopped
3 tablespoons pine nuts {optional}
Stir together the tomato paste, sugar, and vinegar in a 3-quart sauté pan.
Warm about a tablespoon of the olive oil in a 12-inch skillet over medium heat. Add the celery and cook, tossing or stirring a few times, until it begins to soften and color slightly, about 4 minutes. Tip the celery into the tomato-vinegar mixture. Add another tablespoon or two of oil to the skillet and cook the onions, tossing or stirring a few times, for about 3 or 4 minutes until translucent but still firm. Some of the onions may be gold on the edges. Add to the celery, salt lightly, and stir to combine. Cover and set aside. Set the skillet aside.
Remove the dark green outer leaves of each artichoke until you reveal the softer, pale leaves at the heart. Trim the tip and stem, then, rotating the artichoke as you go, trim around the base of the leaves. You should have about 1 pound of “turned” artichokes. Halve or quarter the artichokes, depending on size.
Warm the remaining 5 or 6 tablespoons of olive oil in the skillet over medium heat. Add the artichokes and stir to coat. Cook until golden on the bottom, then stir and leave to color again, a few minutes each time. Reduce the heat, cover, and cook until the artichokes are nutty-tender, about 3 to 5 minutes. Don’t worry that they are not uniform in color. Taste for salt. Fold into the celery-onion-sauce mixture. The caponata will look like a chunky, dryish vegetable chutney.
Set the sauté pan over medium heat and stir until the scant sauce bubbles hesitantly. Reduce to the lowest setting. Stir in the capers and olives, cover, and leave for about 30 minutes to finish cooking the vegetables, checking after 15 minutes to make sure the sauce isn’t close to drying out. {Sprinkle with a teaspoon of water at a time if this threatens.} The vinegar will keep the vegetables from falling into a purée, but check the artichokes especially for doneness~they should be soft enough to crush with a wooden spoon. If they are undercooked, they will eventually blacken in the center. The caponata will now look like a soft, chunky, dryish vegetable chutney.
Taste the caponata, expecting it to taste out of balance~it should seem too acidic. If not, add a few drops more vinegar. Bear in mind that cooling, and time, always mute acidity. Cool to room temperature, then stir in the mint leaves, transfer to a clean storage vessel, cover, and refrigerate for at least 48 hours before serving.
Just before serving, place the pine nuts in a small pan and warm, stirring, over low heat, or heat until just warm in the oven {oven temperature matters little, so long as you watch that they don’t burn}. Fold into the caponata. Taste again and notice how the flavors have mellowed, then serve.
FARRO & TOMATO SALAD with BASIL & ANCHOVIES
AMONG THE FIRST GRAINS DOMESTICATED IN THE ANCIENT NEAR EAST, AND ONE that has remained traditional in parts of Central and Southern Italy since Roman times at least, farro is lately chic. In this preparation, the farro looks like brown rice and has a delicate, nutty flavor. Mindful of this, be judicious with the vinegar. Use whole-grain farro, which is sometimes labeled as “decorticato,” “perlato,” or “semiperlato” {like “pearlized” rice}, having some of the outer brown hull removed. It cooks fairly rapidly and becomes chewy-tender. {Farro integrale, which has the whole outer brown hull intact, requires a few hours of soaking, takes longer to cook, and stays nutty-firm, like wild rice. You may also encounter cracked farro, which looks like steel-cut oats; it doesn’t need soaking, and cooks in about 10 minutes.}
For the best flavor and texture, cook the farro specifically for this salad and then serve at room temperature. {However, leftover plain boiled farro will keep for a few days refrigerated and can be useful in other dishes. Stir it into risotto, use it for Farro Soup {here}, or add it to your favorite bean or vegetable soup.} This is a good summer dish, offered as part of an antipasto, with deviled eggs, radishes, and olives.
Wine: Fiano d’Avellino Radici, Mastroberardino, 1999
FOR 3 TO 3-1/2 CUPS:
1 cup whole-grain farro
About 3 cups water
Salt
6 tablespoons extra-virgin olive oil
1 teaspoon red wine vinegar or sherry vinegar
Freshly cracked black pepper
1 cup halved ripe Sweet 100 cherry tomatoes {about 24 tomatoes} or diced ripe tomatoes
4 salt-packed anchovy fillets, rinsed and cut lengthwise into 3 or 4 strips each
1/2 small cucumber {about 3 ounces}, peeled, if you like, and sliced or diced
A handful of basil fresh leaves
Combine the farro with the water and salt to taste in a 2-quart saucepan and cook uncovered at a bare simmer until just tender, 10 to 15 minutes. You should get about 2 cups. Drain and spread on a sheet pan so it will cool evenly.
Whisk together the oil, vinegar, and salt and black pepper. Taste. The vinegar flavor should be barely strong enough to detect.
Combine the farro, tomatoes, anchovies, and cucumbers, if using, and toss with enough vinaigrette to coat. Tear the basil leaves, then fold into the farro. Taste again. Serve promptly, while the flavors are bright and clear and before the farro soaks up the vinegar.
 Variation CARLO’S FARRO SALAD with AGED TUSCAN PECORINO
An excellent variation on this dish consists of no more than the farro, tomatoes, basil, and olive oil, joined with about 1/2 cup tiny cubes of aged Tuscan pecorino in lieu of the anchovies. No vinegar at all. Carlo Cioni, during his benevolent one-week reign over the kitchen at Zuni in 1999, made that salad, for which Zuni, unjustly, still receives the compliments. Carlo is chef and owner of Da Delfina, an idyllic restaurant just outside Florence, where he furthers the cause of Tuscan food and Tuscan cooking with uncommon vigor and irresistible charm.
BOSC PEARS with FENNEL, FRESH WALNUTS, PARMIGIANO-REGGIANO, & BALSAMIC VINEGAR
SWEET, FRUITY FRESH WALNUTS ARE A LUXURY OF THE FALL. At their prime, they appear constantly on our menu, especially in this, one of my favorite dishes. But even at peak season, shelled walnuts change flavor rapidly~look for them in their shells, or taste shelled walnuts before you buy. {And if you don’t see whole walnuts in your market year-round, do not despair; consider this a reminder that they are a seasonal crop, not a pantry staple.}
Choose firm, plump, mature heads of fennel that are heavy for their size. Avoid slender, stalky “baby fennel”~it can be fibrous and green tasting. Choose Bosc pears with amber skins.
This is a good dish to lavish with syrupy artisanal balsamic vinegar. Otherwise, use a good-quality commercial product, but dose it more sparingly.
Serves as an antipasto, salad course, or, if you have a precious balsamic, dessert. This salad has a primitive sweetness that is as elegant as any refined sugar dessert I know. I enjoy its unmanipulated finesse at the end of a rich meal.
Wine: Wild Horse Monterey Malvasia Bianca, 2000
FOR ABOUT 4 SERVINGS:
1 medium fennel bulb, trimmed {about 8 ounces}
1 large, ripe Bosc pear {about 8 ounces}
A small chunk of Parmigiano-Reggiano {about 2 ounces}
2 ounces walnuts {about 3/4 cup}, preferably freshly shelled
About 1/2 cup extra-virgin olive oil
About 1/4 cup aged balsamic vinegar, preferably artisan-made
Just before serving, slice the fennel crosswise into thin sickles. Cut the pear in half, then carve into elegant 1/4-inch-thick wedges, avoiding the core and seeds.
Layer the fennel and pear very loosely on a platter, interspersing with slivers and curls of the cheese, cutting them with a vegetable peeler as you go. Scatter the walnuts over all. Drizzle with the olive oil and finish with the balsamic, enough that the whole thing glistens gold and chestnut.
PICCOLO FRITTO
OUR “SMALL FRY” IS A SMALL ASSEMBLY OF FRIED THINGS WHOSE COMPOSITION varies. I have dropped just about every available vegetable and not a few fruits into the fryer over the years, looking to “bronze” as many different textures and flavors as possible. What doesn’t vary much here is the simple technique. It produces a light, lacy, golden fry. I offer here descriptions and frying hints for our most popular fritto combinations, but you can also compose your own. As you select from what is in season and delicious, look for complementary flavors, and pursue textural contrast as well. The best little mixed fries boast a variety of leafy and solid; sweet, tart, and slightly bitter; meaty, fibrous, and crunchy. Garnishes can provide interesting contrast as well.
Deep-frying food at home can be an invasive operation; while this breading technique is very easy, it does take up a lot of counter space, and then the actual frying needs to happen in batches. But don’t let these concerns daunt you; once you’ve figured out an arrangement that works in your kitchen, the process will seem easy.
At Zuni, we fry in peanut oil. It is nearly neutral in taste and fairly stable. I also like food fried in pure olive oil, though it has a persuasive flavor and is considerably more expensive. The key to our breading is buttermilk; slightly viscous, it grabs and binds the perfect amount of flour for a light, tender, crispy fritto.
Here is a list of favorite fritto ingredients and how to prepare them, followed by general frying instructions. Having chosen to cook distinctly different things at the same temperature, one needs to tailor the thing to the temperature, so each of the items is cut with a mind to surface area, texture, and doneness. Keep this in mind if you choose to fry things not listed here. For most combinations, plan on about 1 pound of prepared vegetables for 4 servings as a first course. If you are including seafood or poultry, allow slightly more.
 Onions: Peel, slice 1/16 to 3/8 inch thick, and separate into rings.
Lemon or orange slices: This is our signature fritto item. The crispy, fragrant, savory-tart chips are irresistible and beautiful. Use unwaxed fruit, or scrub in hot water to remove wax. Trim the blossom end flat, deep enough to reveal the juicy fruit. Slice, skin on, into pinwheels the thickness of shirt cardboard {about 1/32 inch}. Where it’s easy to do, pick out the seeds as you go. Stop when you reach the pith at the stem end.
Portobello mushroom caps or fresh porcini mushrooms: Slice 1/4 to 3/8 inch thick.
Broccoli rabe: Leave small clusters whole; cut lengthwise in half if the stem is more than 3/8 inch thick, or if a floweret is more than 1 inch across. I prize the frazzled look and extra-crisp texture of the fried leaves and flowers.
Radicchio: Trim the root end clean, then cut through the core into 3/4-inch wedges.
Fennel: Trim, and cut across the bulb into 1/4-inch-thick slices. Separate into sickles.
Pencil-thin asparagus: Break off the woody ends.
Celery hearts: Use only the pale innermost section. Trim the root end and separate into individual, pliable stalks, up to 1/2 inch wide and 4 inches long.
Summer squash: Slice, in any direction, about 1/4 inch thick. Crookneck squash sliced lengthwise makes pretty arabesques.
Squash blossoms or nasturtiums: Check inside for bugs or flecks of dirt. Leave whole.
Fresh sage: Use individual perfect leaves or, where the stem is tender, small sprigs of perfect leaves.
Capers: Rinse or soak until not very salty, drain, and press dry between towels. {You won’t be breading these.}
Cauliflower: Remove the leaves and trim the root end flush. Cut the head into quarters. Starting along one of the flat faces, slice 1/4 inch thick. You’ll get a selection of scalloped-edged, lacy, branchy slices, a few full-width and held together by the central trunk, most broken at least in half, and lots of pea-sized, and smaller, “crumbs.” Fry them all; the variety is fun.
Prunes, with or without pits: Plump for an hour or so in warm water to cover, drain and gently squeeze in a dry towel. Spiced Prunes or Prunes in Black Tea {here} are delicious deep-fried, but they should be well drained before breading. Fried prunes are great with duck confit or quail.
Fresh figs: Trim the stem ends, then halve or quarter depending on size.
Fresh Zante grapes: Cut into clusters, walnut-sized and smaller. Save the loose grapes; you can bread and fry them too, or, for contrast, scatter them raw over the crisp, hot fritto.
Squid: Clean {see here}, then cut the bodies into 1/4- to 3/8-inch rings and leave the tentacles whole. Rinse and drain. {1 pound whole squid will yield 10 to 11 ounces cleaned.}
Scallops: Leave small scallops whole; cut fat ones 1/2 to 3/4 inch thick in either direction.
Skate: Buy “on the wing,” by which I mean a whole or partial skate wing that is still attached to the cartilage. Rinse briefly and press dry between towels. Cut between the ridges into 1-inch-wide pieces. Salt lightly all over.
House-Cured Salt Cod {here}: Soak, drain, cut into 1-ounce chunks, and press dry between towels.
Fresh anchovies, smelt, or small sardines: Scale, gut, and clean {see here}. Remove the heads if you like. Press dry between towels. Salt lightly.
Whole sand dabs or sole: Buy pan-ready “dressed” fish {cleaned, fins trimmed, head removed}. Rinse and press dry between towels. Leave small fish~up to 6 ounces~whole; cut larger fish, perpendicular to the vertebrae, into 1-inch-wide segments. Salt lightly all over.
Eggs: Crack each egg into its own small, shallow bowl.
Chickpeas: Cook until quite tender, then cool in their liquid {see Dried Beans, here}. Drain well. {You won’t be breading these.}
For breading and frying about 4 servings:
About 4 quarts peanut oil
About 2 cups buttermilk
About 4 cups all-purpose flour
About 1 cup semolina {optional, but it gives the crust a nutty crunch and makes the breading process a little less sticky}
Salt
Prepare the items you plan to fry.
Place the oil in stable pot, stockpot, or Dutch oven with a capacity of approximately 6 quarts. The oil should be a few inches below the rim of the pan. Clip on an accurate thermometer. Set the pan over medium-low heat to begin preheating. We fry most often at 365° to 370°; this cooks the small pieces of vegetables in the time it takes to brown the breading. We reduce the heat if we are frying fish or quail. While you bread the food, keep an eye on the thermometer and the oil, adjusting as needed to reach the proper temperature.
Place the buttermilk in a wide, shallow bowl. Mix the flour and semolina, if using, in a cake pan or deep platter. Place this right next to the bowl of milk. Set a sheet pan, tray, or platter next to the flour, to receive the breaded food. For easy handling, line this with parchment paper.
Place a few pieces of the prepared food in the buttermilk, then transfer them, dripping, to the bed of flour. “Shimmy” the breading pan so the pieces settle, coating their sides, then flip each piece with a fingertip to coat the other side. {Before you have finished, your fingers will be breaded as well.} Lift out the breaded food, tap or shake to remove excess flour, and set on the sheet pan. Be aware that this simple coating is never uniform and does not need to be. Ideally, the breading will have wrinkles and some barely coated spots; both fry nicely and, in combination, they make a fritto lovely and fun to eat.
Bread the remaining ingredients in the same fashion. It’s fine if the pieces of breaded food touch and overlap on the sheet pan, but don’t stack them outright~use more than one sheet pan if you need to. It is convenient, although not required, to get all the breading done before you begin frying it. Most breaded items will hold well at room temperature, or slightly cooler, for half an hour or so. {They become a little sticky, but will still fry beautifully.} If you hold the breaded food too much longer, the breading may fry to hard rather than crisp. In general, don’t refrigerate the breaded food; it won’t prevent stickiness, and cold food will hamper the frying process.
Line another wide bowl, or a shallow roasting pan, with a few layers of paper towels. Set on the stove, ready to receive the fried food.
Once the oil is heated to the desired temperature, add a small piece of breaded food. It should sizzle quietly, almost instantly. Now add a few more pieces of food~about one-third of the total. The pot shouldn’t be crowded, as that would produce a soggy fry, {or worse, the oil could boil over}, but it is inevitable that some pieces of food will touch and fuse into odd couplings, which everyone will reach for first. The oil will bubble noisily as moisture vaporizes, and the temperature will fall, but the overwhelming volume of oil should recover quickly. But you are the thermostat, so monitor closely. If the oil doesn’t rebound, you may need to increase the heat. If so, be very conservative; since any adjustment will only take effect gradually, it is easy to overcompensate.
Leave the frying food undisturbed until a pale golden crust sets. With this volume, it generally takes about a minute or two. {Larger vats of oil~and commercial fryers~recover more quickly, and may color and cook the food in half that time.} Use tongs or a long-handled fork to very gently turn anything that won’t otherwise brown on the top. Don’t, however, fuss with the frying food; the fragile breading must stay integral, or the fritto will go limp and become greasy. Stirring and aggressive poking can easily fracture the crust. Once the food is generally golden, lift out the pieces with tongs or a mesh skimmer {you may choose to corral little things like capers, chickpeas, or cauliflower “crumbs” in a mesh strainer}, dangle them briefly over the oil to drip, and then set gently in the paper-lined bowl; try not to crack the crust. Fry and drain the remainder of the food in the same manner. Don’t pile the new batches of hot fritto on the prior ones, lest they steam or crush one another. You ought to be able to cook the suggested pound of vegetables in about three batches.
Just before serving, season lightly all over with salt and transfer, still gingerly, to warm plates or a platter.
Note: You can usually save the oil for reuse, as long as it has not gotten too hot, you haven’t cooked too much in it, and none of what you cooked was seafood. To save the oil, cool it to room temperature, letting the solids settle, then pour it off through a fine mesh strainer. Don’t bother trying to salvage the sludgy oil on the bottom of the pan. Store, sealed, in a cool, dark place. It is hard to say exactly how long it will keep; smell and taste a drop before you decide to reuse it.
These are some of the Piccolo Fritto combinations we serve regularly:
RADICCHIO, ONIONS, & LEMON OR ORANGE SLICES
Radicchio balances the sweetness of the onions, which, in turn, play off the tart, fragrant lemon. Fry just a few wedges of radicchio, or it will dominate, volume- and flavor-wise. The outer leaves tend to pull away during the breading process, or in the fryer, and emerge looking like brittle parchment. They are delicious. Fry the citrus slices last; they cook quickly, and need to be removed from the oil slightly paler than everything else~their sugars continue to brown outside of the oil. You will have tart, crisp, lacy golden wafers, sometimes etched with inky caramel. Fry a few slices per person, at least. They are addictive. This fritto is delicious drizzled with artisan-made balsamic.
RADICCHIO, ONIONS, & PORTOBELLO MUSHROOMS with A DEEP-FRIED EGG
A variation on the preceding fritto, with the earthy, meaty mushrooms striking a different flavor-texture balance. The virtuoso garnish is optional, but here is how we deep-fry an egg: Lower a fryer basket or strainer at least 2 inches into the oil. {If using a strainer, the far edge probably needs to be resting on the bottom, rather than hooked on the side of the pot.} Let it preheat for at least 30 seconds, then slowly slide the egg from its bowl into the oil, positioning it so it lands in the basket or strainer. The white will begin to set as it falls through the oil; you can gently pull the egg from the mesh after it has fried for about 20 seconds. Count 1 egg per person, but plan on frying a practice egg so you can decide how done you like it, and learn how long that takes. Also good drizzled with balsamic or topped with shavings of Parmigiano-Reggiano.
PENCIL ASPARAGUS, ONIONS, & NASTURTIUMS
This spring fritto is about delicacy in taste, texture, and display. Slice the onions very thinly. Bread the asparagus and onions first. Thin the buttermilk with a little milk before you dip the nasturtiums, then twirl by the stem as you sprinkle them with the breading flour, rather than dredge them in it.
It is surely lily-gilding, but I sometimes offer fresh Lemon Mayonnaise {here} with this fritto.
MOZZARELLA & CORN-STUFFED SQUASH BLOSSOMS & SWEET 100 TOMATOES
Choose very fresh blossoms whose petals you can easily spread open. Tuck a few small dice of mozzarella inside, along with a spoonful of freshly scraped corn kernels {see here}. Gather and twist the tips of the petals together gently, then bread as usual. Fold the twisted part back and under and leave to set for at least 10 minutes. {Otherwise, the flowers may open during frying and the cheese escape.} The tiny tomatoes must be very sweet and with tender skins; underripe or tough, they will make you squint. They are the one vegetable you need to double-bread~otherwise, the flour will tend to slide off the shiny skins. Alternatively, you can simply halve the tomatoes and scatter them raw over the star of the plate, the fried blossoms. And if you don’t have time or inclination to stuff the blossoms, fry them plain; although mild in flavor, they have an intriguing crispy, leathery texture.
SQUID, CHICK PEAS, & SWEET 100 TOMATOES
The squid may not need to be dipped in buttermilk before dredging~whenever we fry squid, we test it both ways to see which sets the nicest crust. And don’t bread the chick peas at all; they fry to smooth crunchiness without. Choose sweet, thin-skinned tiny tomatoes and double-bread them. They will deliver little explosions of sauce for the squid. Garnish, if you like, with a handful of arugula or a few torn leaves of basil for counterpoint and freshness. Everyone asks for Aïoli {here} with this fritto.
SAND DAB with ONIONS, LEMON SLICES, & FRESH SAGE
The onion-lemon-sage combination is good with many kinds of fried fish, such as whole sardines, smelt or fresh anchovies, pieces of skate wing, or chunks of our house-cured salt cod. To fry the sage, holding it by the stem, dip each sprig or large leaf in the buttermilk, then drag through the flour. If breading a sprig, jostle it in the flour to coat each leaf. Fry to golden, about 15 seconds on each side. Fried capers are an easy alternative to the sage~don’t bread them, and fry just until the little buds begin to crisp on the surface; if you are lucky they will begin to “bloom” before they set. Capers take about 30 seconds. Cook this fritto at 360°.
ONIONS, FENNEL, & ZANTE GRAPES
Three kinds of sweet, with distinctly different perfumes and textures. Cut the onions very thin for a lacy effect. We sometimes drizzle this fritto with a rich condiment called saba {see Sources and Resources, here} or with syrupy balsamic. You can substitute halved or quartered fresh figs for some or all of the grapes {and Deep-Fried Figs make a stunning dessert; see here}.
We sometimes strew these skinny fried onions and grapes over a wad of warm frisée salad studded with pecans. Serve this as a first or middle course, or add a piece of plainly prepared duck, squab, or quail and serve as main course.
WINE & PICCOLO FRITTO
FOR RADICCHIO, LEMON, FISH, ASPARAGUS, ETC., CHOOSE A CRISP, GRASSY Sauvignon Blanc from New Zealand’s cool Marlborough region Goldwater Dog Point Vineyard or Cooper’s Creek, for example. For dishes based on prunes, fennel, grapes, and mushrooms, use the softer and more melony Sauvignon Blancs from Hawkes Bay~they include Matariki and Matua Valley~and be sure they are always of the most recent vintage available.
SAGE GRILLED CHEESE
DON’T CONSIGN GRILLED CHEESE TO LUNCH ALONE. Individual little sandwiches or diminutive wedges of sizzling grilled cheese make an irresistible, accessible hors d’œuvre. Using chewy bread, excellent cheese, and lots of fresh sage and black pepper makes the familiar icon addictive. For Zuni’s twentieth anniversary, we layered the cheese with slivers of fresh black truffle, which was exquisite.
Serve with Spiced Zante Grapes {here}.
Wine: Hamilton’s Ewell Vineyard Barossa Valley Grenache/Shiraz, 2000
FOR 4 LITTLE SANDWICHES, OR ABOUT 20 BITES:
About a dozen fresh sage leaves
2 tablespoons mild-tasting olive oil
1/2 teaspoon freshly cracked black pepper
6 ounces chewy, peasant-style bread, sliced 1/4 inch thick {8 slices from a fat French bâtard~a fat baguette~will do perfectly}
4 ounces Fontina or Swiss Gruyère, all rind removed and sliced 1/16 inch thick or coarsely grated
Chop the sage. You should get about 1 tablespoon. Place in your smallest saucepan, add the olive oil and cracked pepper, set over low heat, and warm to the touch. Turn off the heat and leave to infuse while you assemble the sandwiches.
Blanket half of the slices of bread evenly with the cheese, taking care to bring the cheese all the way to the crust. Top each with a second slice of bread and press flat. Lay a heavy or weighted cutting board on top of the sandwiches for 10 to 20 minutes.
Use a pastry brush to spread the sage oil lightly on both faces of the sandwiches. Make sure you go all the way to the edges, and try to distribute the sage and pepper evenly over the bread.
Preheat a griddle or warm a seasoned cast-iron pan over low heat. Sprinkle with a few drops of olive oil, then rub it over the whole cooking surface with a paper towel. Add the sandwiches and cook until golden, 2 to 3 minutes per side. Keep the heat low so you don’t burn the sage or pepper.
Eat quickly, while the cheese is still soft.
NEW YEAR’S EVE GOUGÈRES with ARUGULA, BACON, & CAROL’S PICKLED ONIONS
THIS WAS THE MOST SUCCESSFUL NEW YEAR’S EVE HORS D’ŒUVRE OF THE LAST decade, outselling foie gras, oysters, caviar, crab salad, and little truffle-laden pizzas. Many tables ordered several more after they had had one. A gougère is a savory, cheese-studded cream puff pastry; for this dish, you split and stuff the puffs like sandwiches.
Wine: Louis Roederer Brut Premier
FOR 20 TO 24 THREE-BITE–SIZED GOUGERES:
For the batter:
1 cup water
3 tablespoons unsalted butter
1 teaspoon salt {a little more if using kosher salt}
4 ounces all-purpose flour {1 cup}
4 large eggs, cold
1/2 to 3/4 teaspoon freshly cracked black pepper
2 ounces Gruyère, cut into 1/4-inch cubes {about 1/2 cup}
To stuff the gougères:
10 to 12 slices bacon
About 1-1/2 ounces arugula, carefully washed and dried
1 cup Carol’s Pickled Onions {here}, drained
Preheat the oven to 400°.
In a 2- to 4-quart saucepan, bring the water, butter, and salt to a simmer over medium heat. Add the flour all at once and stir vigorously until the mixture masses and detaches itself from the sides of the pan. Reduce the heat to low and cook, beating constantly, until the batter is very stiff and almost shiny, usually a few minutes. Off the heat, add the eggs one by one, beating thoroughly with a wooden spoon to completely incorporate each egg before adding the next. The mixture will initially resist each addition; you’ll find yourself cutting through and slapping together slabs of slippery, warm paste until it gradually absorbs the egg and becomes sticky again. The final mixture should be no hotter than tepid. Add the pepper to taste and stir in the Gruyère.
If you are proficient with one, transfer the batter to a pastry bag, and pipe 2- to 3-inch-long bands onto a parchment paper–lined {or nonstick} baking sheet about 2 inches apart. Otherwise, use a spoon to scoop out a heaping tablespoon of batter per gougère and a second spoon to scrape it into a peaky mound on the prepared baking sheet.
Bake until firm and a rich golden brown, about 25 minutes. Inevitably, some bits of cheese will ooze and form a delicious, crispy bib on the edges of the gougères. To check doneness, remove 1 gougère and pry open. The interior strands of dough should be tender and moist, but not mushy; if they are, close the gougère and return it to the oven to bake with the rest for another few minutes. If you are concerned they may overbrown, simply turn off the oven and leave to finish cooking in the ambient heat.
Meanwhile, cut the bacon into 1-1/2- to 2-inch segments and panfry or roast to your taste. Drain on towels.
Serve the gougères warm from the oven {or reheated}, split through the middle and overstuffed with a few pieces of bacon, several leaves of peppery arugula, and a few ringlets of the pickled onions.
SAVORY ONION TART, with TWO ELABORATIONS
“ROUGH PUFF” PASTRY SMEARED WITH SWEET, HONEY-COLORED STEWED ONIONS and baked hot and fast. Serve with a fistful of arugula, frisée, or watercress dressed with vinaigrette.
Wine: Claiborne & Churchill Central Coast Riesling, 2000
FOR 4 SERVINGS:
1 recipe “Rough Puff” {here}
For the basic onion mixture:
About 3 tablespoons mild-tasting olive oil
12 ounces thinly sliced yellow onions {about 3 cups}
Salt
A few garlic cloves {optional}
1 bay leaf
A sprig of fresh thyme
If the dough is frozen, thaw it in the refrigerator, then leave at room temperature long enough to roll out without cracking {see Tempering, here}. Roll the dough into a square about 1/2 inch thick. Cut into 4 roughly equal squares and then roll them out until barely 1/8 inch thick. The warped-squareish pieces of dough should be 7 to 8 inches across. The thickness need not be perfectly uniform~indeed, an unnoticed thick edge will bake into pillowy tenderness, and it never fails that that little tart is the first one chosen. Place each piece of dough on an 8- to 9-inch square of parchment, stack, cover, and refrigerate.
Preheat the oven to 400°.
Warm the olive oil in a 12-inch skillet. Add the onions and a few pinches of salt. Cook over medium-high heat for a few minutes, until some of the onions begin to color. Stir or toss, then cook undisturbed for another few minutes to color another layer of onions. Reduce the heat to medium-low and stir in the garlic, if using, the bay leaf, and the thyme. Continue cooking until the onions are generally golden and tender but not mushy, about 15 minutes total. If they threaten to dry out at any point, reduce the heat a little further and cover the pan to trap the remaining moisture. Taste and correct the salt. You should get about 1-1/4 cups. Cool completely. Remove the thyme and strip the leaves into the onions. Remove and discard the bay leaf.
Pull the prepared dough from the refrigerator and allow to warm just enough to fold the edges over without cracking; this will take only a few minutes in a warm kitchen.
Place the squares of dough, on their parchment, on a baking sheet. Don’t worry if the papers overlap. Spread each piece of dough with 4 to 5 tablespoons of the cooled onion mixture, stopping about an inch from the edges. Fold in the sides, mitering or lapping the corners. Press lightly to secure the sides and corners.
Bake until a rich golden brown, about 20 minutes. The edges of the onions may begin to caramelize.
ONION TART with SAFFRON, TOMATO, ANCHOVIES, & OLIVES
Prepare the dough squares and gather the ingredients for the basic onion mixture, plus:
A few saffron threads
1 small, very ripe tomato or 15 to 20 tiny, ripe Sweet 100 tomatoes {about 3 ounces}
Salt
4 salt-packed anchovy fillets, cut lengthwise into 3 or 4 strips each
A trickle of extra-virgin olive oil
4 mild black olives, such as Nyons, Niçoise, or Ligurian
Cook the onions as described in the basic recipe, adding the saffron with the bay leaf and thyme.
Slice the tomato about 1/4 inch thick, or halve the Sweet 100s, and salt very lightly. {If using a large tomato, set aside the shoulder and heel for tomato soup or sauce.} Leave to purge for a few minutes, then pat with a towel to wick a little water from the fruit. This way, the tomatoes will color a little and have more intense flavor.
Drizzle the anchovies with extra-virgin olive oil.
Smear the onions on the prepared pastry dough, crown each tart with 1 or 2 tomato slices, or dot with the tomato halves, and finish with strips of anchovy and the olives.
Bake as in the basic recipe.
ONION TART with APPLES & BACON
Prepare the dough squares and cook the basic onion mixture. Gather:
1 small Pippin or other crisp apple
3 or 4 thin slices lean bacon {scant 3 ounces}
Cut about 12 slivers of apple, 1/16 inch thick, leaving the skin on if it tastes good to you. Cut the bacon into 1/2-inch strips, set in a small skillet, and place over low heat for a minute or so, until it has rendered a film of fat. Drain the fat and, off the heat, toss the apple slices with the bacon.
Spread the cooled onions on the prepared pastry dough and press in the warm apple and bacon. The tart will be most interesting if some of the apples poke above the surface a little and some are tucked into the onions. The bacon, on the other hand, should lay flat, or it may burn on the edges.
Bake as directed in the basic recipe.
TEMPERING
THE TERM “TEMPERING” IS AN EFFICIENT WAY TO EXPRESS AN important culinary concept: moderating the temperature of whatever you are handling. It can involve cooling or warming, either liquids or solids, and serves many purposes. In some situations, we temper to manage texture; for example, frozen desserts usually have a nicer texture when not too cold. Similarly, butter and pastry dough tend to crack if too cold, so we usually temper them before handling. And we temper tubs of cold confit in order to soften the fat just enough to remove the meat. Tempering can also improve flavor, and again, this is particularly significant for ice creams, sorbets and granitas. As really cold things warm up, you can perceive more flavors. We occasionally temper very hot things before adding them to a dish to avoid cooking the remainder, as when we cool a hot brine before pouring it over fresh meat, fruits, or vegetables, or cool hot liquids before combining them with eggs {or warm the cold eggs, tempering them by adding a little of the hot mixture.} I sometimes temper large chunks of meat before roasting them, so they cook more rapidly and evenly. But more important than memorizing specific applications, embracing the general concept~that moderating temperature extremes will frequently increase success in the kitchen and at the table~will make you a better cook. You will find yourself deciding on your own when you want to temper an ingredient or finished dish.
I should note that where chocolate is concerned, “tempering” has a different and precise meaning. It is a more complex process, involving both warming and cooling, within strict temperature ranges, that has the goal of stabilizing the chocolate, and of preventing the cocoa butter from migrating to the surface as a bloom of fine white crystals.
CROSTINI
OR CROUTONS, OR CRISP CANAPES: THESE ARE THE LITTLE PIECES OF TOASTED, roasted, grilled, or fried bread, crowned or smeared with compatible toppings, that haunt our menu. A bite-sized hors d’œuvre is often the best way to fit a very rich, unusual, or expensive dish, like foie gras, or brandade, or eggs and bottarga, onto a menu~people can’t resist little things on toast. Several of the other crostini toppings and combinations here are proudly based on leftovers, or larder items. When yesterday’s giblet-mushroom sauce or squid stew is still delicious~often more delicious than it was yesterday~but is in short supply, it may manage to return by the spoonful, on toast, as an appetizer. It is most practical to serve those crostini when you already have a little of such a topping on hand. You will find I advise making a little extra of such things on a regular basis in these pages. Nearly all of these crostini appetizers are also comfortable next to a tangle of carefully dressed salad, to make a different sort of first course.
While the toppings may be the attention-grabbers of any crostini course, they will be squandered if the bread part is not properly prepared. For delicate crostini, the bread should be fresh, or at least fresh enough to eat “as is.” Really stale bread is prone to make hard, tough, dry croûtons. Well-wrapped, carefully frozen {and carefully thawed} bread is a fine alternative to today’s bake. Keep a loaf in the freezer for emergency crostini. Aside from baguettes, we use chewy, peasant-style white bread and mixed unbleached wheat and barley flour sourdough levain bread for crostini. Small-crumbed sandwich breads are generally too tender and often too sweet or rich for the rustic toppings I describe.
To prepare the crostini: Slice the bread about 1/4 inch thick {if the bread is particularly soft, wrapping and partially freezing it will make this easier} and, where indicated, brush with olive oil, making sure to go all the way to the edges.
Don’t cook the crostini until you have to~it is tempting to get this done well in advance, and oven or grill logistics may force you to do so, but freshly cooked crostini are fragrant and crispy. Cooled, hours-old ones usually taste dull.
When you do cook the crostini, make sure your oven or grill is fully preheated~the goal is to achieve surface color and crispness without transforming the bread into melba toast. Bake the crostini on a baking sheet that conducts heat well. I like them to be slightly brown on the edges, with golden touches on the face. This generally takes about 5 to 7 minutes at about 425°, but timing will vary according to rack height, oven size, baking sheet, and, most of all, the bread. Check this by baking a single crostini; if it takes much longer to color, the bread risks drying out completely. Raise the heat for quicker results.
I pull the crostini from the oven with a trace of chewiness left in the bread~they crisp as they cool. That way, they are more flavorful and don’t wick too much moisture from the topping. {They also tolerate 30 seconds of reheating if you do need to make them in advance.} If your crostini do get fully crisp in the oven, slide them off the baking sheet right away; this will keep them from getting too hard and dry. Otherwise, leave them on the baking sheet until needed.
Grilled crostini tend to be chewy-crisp and are delicious but not particularly convenient unless you are grilling something else in the meal {in which case, you should grill some bread no matter what, to enjoy with the meal, even if you don’t have a crostini course}. On a hot grill, allow 30 seconds or less per side to crisp and etch lovely char marks on thinly sliced dry bread.
I have made dry crostini in a toaster by fussing with the darkness adjustment, toasting the bread once on “light” to dry it slightly, and then retoasting it on a darker setting. Making baguette croûtons in a toaster is possible if you slice the baguette lengthwise or on a very steep angle, into large slices you can safely retrieve from the appliance. Cut these down to bite-size after the fact. A toaster oven is fine for dry or oiled crostini toasting, though the cramped quarters means they tend to color quickly and stay steamy in the middle. Experiment and adjust for this as necessary.
CROSTINI IDEAS
THESE ARE SOME OF MY FAVORITE CROSTINI COMBINATIONS. Most are based on spoonfuls and slivers of other dishes in this book, with only a few, easy “from scratch” requirements. Make sure all of the toppings have concentrated flavor and are succulent and moist, but not wet or watery. If they are too dry, the bread will dominate the flavor and texture of the toppings, and the toppings will tend to fall off the bread. Very wet toppings will make the toast soggy too quickly; you can easily “tighten” these small amounts of topping, evaporating excess water as you reheat them, stirring with a spatula, in a small skillet or saucepan, preferably nonstick, over low heat.
Count on a tablespoon or two of topping per crostini, depending on the size of the toast. Where you are serving a couple of different types, don’t worry if you don’t have equal amounts of the toppings.
CROSTINI with CHARRED SWEET 100 TOMATOES & BALSAMIC VINEGAR
Prepare crostini with extra-virgin olive oil {see here}. Rub with raw garlic if you like.
Select nearly overripe red or gold Sweet 100 tomatoes, 4 or 5 per crostini, more than you think you’ll need to cover the toasts. Stem, rinse, and dry well. Toss with extra-virgin olive oil to coat and salt to taste. Crowd in a shallow gratin dish and place under a preheated broiler. Cook until the skins burst, usually a few minutes, then raise the rack and leave until the surfaces begin to char. Adjust the rack or rotate the dish as needed to achieve dramatic results. Cool briefly, then drizzle with balsamic vinegar and tilt and shimmy the dish to distribute. You can prepare these tomatoes just before you need them, or up to a few hours in advance, then leave at room temperature to mellow.
Top each toast with a layer of tomatoes, pressing on them gently so they bleed juice into the bread. Drizzle any extra balsamic-oil-tomato-juice mixture from the baking dish over the crostini.
Wine: Sangiovese di Toscana, Conti Contini, 1998
CROSTINI with SMASHED SHELLING BEANS, GIBLET-MUSHROOM SAUCE, & GREENS
Prepare crostini with extra-virgin olive oil {see here}.
Warm a heaping spoonful of cooked Fresh Shelling Beans or Dried Beans {here and here} per crostini. Lift the beans from the pan with a slotted spoon and mash in a mortar, adding a little of the cooking liquor, and extra-virgin olive oil to taste. Keep warm. Drain, then warm Boiled Kale {here}. Warm the Giblet-Mushroom Sauce {here} separately, then top each crostini with one of the three toppings. Finish the crostini with freshly cracked black pepper. A juicy, charred Sweet 100 tomato {see above} would also be good on each of these crostini.
Wine: Lolonis Mendocino Estate Zinfandel, 1999
CROSTINI with BEAN PURÉE & SARDINES in CHIMICHURRI
Prepare crostini with extra-virgin olive oil {see here}.
Warm, then smash well-cooked white beans or chickpeas as described immediately above, but don’t add the extra-virgin olive oil. Warm sardine fillets {see here} in Chimichurri {here} for about 5 minutes in a 275° oven. Slather each crostini with the bean purée, then set a sardine fillet, or a piece of one, on top. Stir the chimichurri to recombine, then spill a little on each crostini.
Wine: Far Niente Napa Valley Chardonnay, 1999
CROSTINI with SALT COD BRANDADE & CHARD with LEMON OIL
Prepare crostini with extra-virgin olive oil {see here}.
Chop, then warm a handful of Chard with Lemon Oil {here}; keep warm. Mashing and stirring constantly, warm a spoonful of Brandade {here} per crostini in a small nonstick pan, then mound on some of the crisp bread. Spread strategically all the way to the edges. Place under a preheated broiler to brown and frazzle the tips of the fish paste, a minute or two.
Pile the warm chard on the remaining crostini.
Wine: Orvieto Classico Secco, Le Velette, 2000
CROSTINI with FAVA-EGG SALAD & SMOKED TROUT
Prepare crostini with extra-virgin olive oil {see here}.
Choose very young favas. Shuck, then double-peel them {see here}, counting a few tender, small, bright green favas per toast. Prepare 1 hard-cooked egg {see here} for each 3 crostini. Peel the warm eggs and mash with the favas and 1 tablespoon extra-virgin olive oil or Lemon Oil {here} per egg. Salt lightly. Spread on the crostini and top each with a bite-sized piece of smoked trout fillet and freshly cracked black pepper. This simple egg salad is also good with slivered raw asparagus in place of favas. Sliver just the center section of the spears~especially when raw, it is the sweetest part and has the best texture; save the tips to use elsewhere.
Wine: Bonny Doon Pacific Rim Riesling, 2000
CROSTINI with EGG SALAD, ROSEMARY-PICKLED PEPPERS, & SMOKED PROSCIUTTO
Prepare crostini with extra-virgin olive oil {see here}.
Prepare 1 hard-cooked egg {see here} for each 3 crostini. Peel the warm eggs and mash with 1 tablespoon extra-virgin olive oil per egg. Salt lightly. Spread on the crostini and top each with a few strips of smoked prosciutto and a few thin strips of Rosemary-Pickled Peppers {here}. Garnish with a few leaves of rosemary fished from the pickle brine. You can substitute regular prosciutto or serrano ham for the smoked prosciutto.
Wine: Rioja Crianza, cune, 1999
CROSTINI with GRILLED FOIE GRAS, & A FEW FAVORITE GARNISHES
Allow about 1-1/2 ounces foie gras for each 2 crostini. {For notes on choosing foie gras, see here.}
Prepare dry crostini~the foie gras is so rich in fat that you don’t need to oil the bread. Build a small grill fire and let it burn to glowing coals. Spread the coals, position the grill about 4 inches above them, and preheat it. Set the bread over the hottest part of the fire so it quickly colors on the outside but remains tender in the middle. Then set the toast on the side of the grill, away from direct heat. Slice the foie gras very evenly, 3/8 inch thick, at an angle that will produce slices that will span a few bars of your grill~if the slices are too short, they may tip and fall between. Salt evenly on both sides. Set on the grill, but not directly over the hottest coals, or the inevitable dripping fat may flare up and scorch the liver. Cook until just soft and branded with chestnut-colored grill marks, about 30 seconds. Using tongs aided by an offset spatula, turn over and grill for about 25 seconds on the other side. If the grill is charring any of the liver too fast, pivot the piece of foie gras a quarter turn, but otherwise don’t bother trying to get crisscross grill marks~this might result in overcooking the foie gras. Slide onto the waiting toasts.
If grilling is not an option: Prepare the crostini in the oven. Cook the foie gras on a hot griddle or in your smallest skillet, preheated for about 30 seconds over medium-high heat. Don’t add fat to the griddle or pan; the foie gras will produce plenty in the first sizzling seconds. Cook until golden brown and just soft, about 30 seconds per side.
Wine: Meursault Premier Cru Les Charmes, Joseph Matrot, 1999
with Arugula and Hazelnuts: Dress a few small leaves of arugula {or torn large leaves} per crostini with mild red wine vinaigrette and add a few roasted, skinned, and finely chopped hazelnuts. Arrange a few leaves flat on each warm crostini and press a slice of hot foie gras on top.
with Brandied Red Currants {here}: Dress a few leaves of baby lettuce with mild red wine vinaigrette spiked with syrup from the brandied currants. Lay the leaves flat on each toast and set the hot foie gras on top. Garnish each crostini with a tiny sprig of brandied currants. You can eat the tender stems.
ROSEMARY-GRILLED CHICKEN LIVERS & BACON with BALSAMIC–ONION MARMALADE TOASTS
THIS IS A PERENNIAL FAVORITE APPETIZER, WHICH WE OFFER REGULARLY DURING the cold winter months, and sometimes during chilly San Francisco summers as well. We occasionally substitute wedges of grilled polenta {see here} for the toast.
This recipe produces more onion marmalade than you need for 4 servings. I find it’s difficult to cook it slowly enough to get the right texture in smaller batches, but given that it takes about an hour and a half to cook properly and keeps well, making “too much” is a fine idea. You can serve it on crostini, next to a main course of pork, squab, or quail, or with a warm frisée or dandelion salad. If you don’t have time to make the marmalade, serve the warm livers drizzled with strong balsamic vinaigrette instead.
Wine: Mas de la Garrigue, Côtes du Roussillon Villages, 2000
FOR 4 SERVINGS:
4 branches of fresh rosemary, 6 to 8 inches long, to use as skewers
9 to 10 ounces chicken livers {1 generous cup, 7 to 8 livers}
Salt and freshly cracked pepper
A few tablespoons mild-tasting olive oil
4 thin slices meaty bacon {about 2 ounces}
4 large slices chewy, peasant-style bread, about 1/4 inch thick
6 to 8 tablespoons Onion Marmalade {recipe follows} or a few spoonfuls strong balsamic vinaigrette made with equal parts balsamic vinegar and extra-virgin olive oil, with salt to taste
Prepare a small grill fire and leave it to burn down to glowing coals.
Strip most of the leaves off the rosemary branches, leaving only a tassel at the tip of each; set the leaves aside. Cut the stem ends cleanly on a steep angle.
Separate the lobes of the chicken livers and trim the veins and discoloration. Season very lightly with salt, cracked pepper and a trickle of olive oil. Bruise a few of the rosemary leaves with the back of your knife to encourage them to express their flavor, then toss them with the livers.
Cut each slice of bacon into segments about 3 inches long. Assemble the brochettes, wrapping the bacon segments partially around the pieces of liver, then threading the livers on the skewers, making sure to poke through both ends of the bacon to hold it in place. The livers should be touching one another, but not pressed tightly together or the bacon will not cook properly. If you have more pieces of liver than bacon, slide the unwrapped livers on last.
Spread the coals and position the grill about 3 inches above the coals to heat.
Lightly oil the bread and grill briefly on both sides, just long enough to crisp the surface and leave faint char marks. Spread each slice with a very thin layer of the marmalade, then return to the grill to heat through. Arrange the toasts on 4 warm plates.
Meanwhile, grill the liver skewers for about 3 minutes per side. Watch closely and move the little brochettes aside if the melting bacon fat causes flare-ups.
Serve the skewers perched atop the warm toasts. {Drizzle with vinaigrette if using that in place of the marmalade.}
For the onion marmalade:
FOR ABOUT 1-1/4 CUPS:
1 pound sliced red onions {about 2 medium onions}
1 to 2 tablespoons mild-tasting olive oil
About 1/4 teaspoon salt
1 tablespoon plus 2 teaspoons honey
1 bay leaf
1 cup medium-bodied red wine, or a little less of a full-bodied variety
3 tablespoons balsamic vinegar {an inexpensive commercial type is fine here}
Place the onions in a 2-quart saucepan and toss with the olive oil and salt. Set over very low heat, cover, and cook quietly, stirring occasionally, for about 20 minutes. The onions will first “sweat” their moisture, then fall into a mauve mass about an inch deep. Uncover and continue cooking over low heat until that moisture has evaporated and they have softened.
Taste an onion~it should have no trace of rawness. Stir in the honey and cook for another few minutes. Add the bay leaf and red wine, bring to a low simmer, and cook until the wine is syrupy and barely puddles in the pan, about 1 hour. {The acidity in the wine will toughen the cellulose enough to keep the onions from becoming a purée.}
Add the balsamic and cook, maintaining low heat until the liquid is syrupy again. Taste and adjust for salt, sweetness, and acidity, being aware that further cooking is going to mute the acidity of the balsamic.
Raise the heat slightly to evaporate the last of the syrupy liquid. The wine-honey concentrate can scorch rapidly, so you’ll need to stir every 15 seconds or so~but don’t be tempted to curtail this step. The onions will gradually become glossy and the color will become markedly richer as evaporation concentrates the pigments. The marmalade is ready when the mass of onions oozes no liquid and has a suave, marmalade-like consistency. This step can take from a few to 10 minutes, depending on the type of pan and the intensity of heat.
Store any extra marmalade, covered and refrigerated, for up to a few weeks.
BEEF CARPACCIO, & FOUR WAYS TO SERVE IT
CARPACCIO, A POPULAR CULINARY IDIOM THAT PROMISES A PLATE LINED WITH thinly sliced meat, fish, or whatever the cook intends to glamorize, has suffered from overexposure, but this does not dim the luster of the brilliant original dish. Born at Harry’s Bar in Venice, and named for the Renaissance painter, thin sheets of pounded raw beef carpaccio make a sensual, elegant first course or light main course. The meat is just resistant to the tooth and subtly flavored. Easy to overwhelm, carpaccio shows best in restrained counterpoint, with careful contrasts of flavor, texture, and temperature.
Quang Nguyen, perhaps the cleverest cook among the many I have learned from at Zuni, fine-tuned this technique for preparing the classic dish. The meat should be chilled until very cold~but not frozen, since that damages the flavor and the texture~and then sliced and pounded by hand.
Use very fresh, bright red top round for carpaccio, and ask for a chunk that is all from a single muscle. At its best, it has a slight, clean tang and a firm, but not chewy, texture. All of our trials with beef fillet instead have been disappointing in comparison. Although it is easier to trim, and is conveniently shaped, tender fillet reads “mushy” in this context. What’s more, served cold and raw, it can taste dull and “organy.”
Count on about 3 ounces finished carpaccio per serving, but buy extra to allow for trim. Just under 1 pound should be plenty for 4 servings, and you will likely have some nice scraps left over. You can use them to make a Beef-Mushroom Sauce for pasta {based on the Giblet-Mushroom Sauce, here} or add them, in a small proportion, to chuck before you presalt it for the Zuni Hamburger {here}.
CARPACCIO with LEMON & OLIVE OIL
FOR 4 SERVINGS:
1 pound top round
Salt
Extra-virgin olive oil {a little to brush the paper, plus about 1/4 cup to garnish}
1 lemon, halved
A small chunk of tuna bottarga, to grate on top {optional}
Preparing the sheets of carpaccio:
Trim the meat of every bit of surface discoloration, fat, and sinew. Chill thoroughly to firm the muscle and make it easier to slice.
Cut 8 sheets of parchment paper 12 to 14 inches square.
Position the knife at a right angle to the grain of the muscle and slice the meat 1/4 inch thick. Cutting across the grain allows you to pound the meat evenly and produces the best texture. Excise any sinew or fat you encounter along the way.
Brush one sheet of parchment with olive oil. Lay about 3 ounces of sliced meat in the center. A serving need not be a single slice~you may need to compose it of a few smaller slices. If so, make sure the slices are not overlapping {1}. Place a second sheet of paper over the meat and press to smooth. Repeat with the remaining slices of meat to make 4 “packages.”
Working outward from the center, pound the meat evenly with a meat pounder or a flat-faced rubber mallet {2}. Pound just hard enough to stretch the muscle without tearing the fibers. If you are too aggressive, the meat will disintegrate into uninteresting bits. Aim for a thickness of 1/16 inch. Hold the paper up to the light to check for evenness {3}. Smooth the pounded carpaccio with one light pass of a rolling pin {4}. The finished sheets of carpaccio will be two to three times bigger around than the unpounded meat.
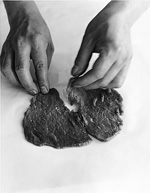 |
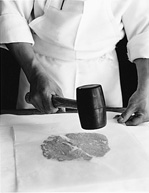 |
| 1 | 2 |
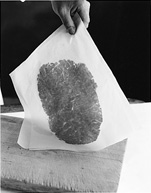 |
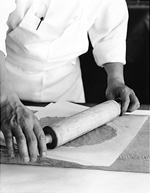 |
| 3 | 4 |
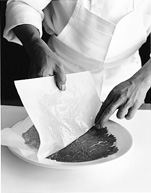 |
|
| 5 | |
Refrigerate promptly. If it suits your schedule, you can complete this phase up to 12 hours in advance, although for optimum flavor, try to serve within 6 hours.
Serving the carpaccio:
Carefully peel off one sheet of parchment from each “package,” then lay its exposed meat side on a cold plate. Press to smooth, then carefully peel away the other sheet {5}.
Season lightly and evenly with salt, then finish with a long drizzle of extra-virgin olive oil and a squeeze of lemon juice. I sometimes add a dusting of finely grated bottarga as well. Bottarga is salted, dried fish roe~bottarga di tonno is made from tuna roe; bottarga di mugine is milder, firmer gray mullet roe {see Note, here}. Or try one of the following elaborations. In each case, be stingy with the garnishes, they are meant to flatter the carpaccio, not obscure it.
Wine: Domaine Drouhin Oregon Pinot Noir, 1999
CARPACCIO with CRISPY ARTICHOKE HEARTS & PARMIGIANO-REGGIANO
4 pounded sheets carpaccio {see here–here}
8 small artichokes {firm and heavy for their size}
About 1/2 cup mild-tasting olive oil
Salt
A small chunk of Parmigiano-Reggiano {about 2 ounces}
2 tablespoons capers, rinsed, pressed between dry towels, and barely chopped
2 tablespoons extra-virgin olive oil
1 lemon, halved
Freshly cracked black pepper
Just before serving, “turn” the artichokes. First remove a few outer layers of leaves from each artichoke to reveal the pale, kidskin-soft inner petals. Trim off the tip and stem, then use the tip of a paring knife to trim around the circumference of the base. Thinly slice.
Warm the mild olive oil in a 12-inch skillet over medium heat. Drop an artichoke sliver in the oil, and when it begins to sizzle, add the rest. Stir to coat, then swirl the pan to spread the artichokes into an even lacy layer. They should not quite float in the oil. Stirring every 15 seconds or so, fry until just firm and pale golden on many edges, about 2 to 3 minutes. Scrape the sides of the pan whenever bits of artichoke cling to them, and adjust the heat as needed to maintain a discreet sizzle. The oil should never smoke. Drain in a strainer, then tip the artichokes onto a dry paper towel. Discard the frying oil.
Turn the carpaccio onto plates {here} and salt very lightly and evenly. Scatter the gilded slivers, still hot, over the meat. Use a vegetable peeler to shave thin curls of cheese over all. Scatter with the capers, then drizzle with the extra-virgin olive oil and a squeeze of lemon juice. Finish with black pepper.
Wine: Pomino Rosso, Frescobaldi, 1998
CARPACCIO with CELERY LEAF SALSA VERDE
4 pounded sheets carpaccio {see here–here}
1/2 cup Celery Leaf Salsa Verde {here}
A small chunk of pecorino romano {about 1 ounce}
Turn the carpaccio onto plates {see here}. Salt lightly and evenly. Splatter with the salsa verde. Use a vegetable peeler to shave tiny nicks of pecorino romano over all.
For a more ambitious version, garnish each plate with a few little stalks {up to 4 inches long} of fried celery hearts, a modest handful that you can fry properly in just a few cups of peanut oil. {For guidelines, see Piccolo Fritto, here.}
Wine: Château Routas, “Rouvière,” Coteaux Varois Rosé, 2000
CARPACCIO with FRIED POTATOES & TRUFFLES
The Troisgros brothers served this carpaccio; both loved to wrap the cold meat around the warm, crispy potatoes. The truffles are an optional garnish; lacking them, add a very little truffle oil to the vinaigrette.
1 pound peeled {just over 1 pound whole} yellow-fleshed potatoes, preferably Yellow Finnish or Bintjes, cut into irregular 1-1/2-inch chunks
About 1/2 cup mild-tasting olive oil, for shallow-frying, or 4 cups peanut oil, for deep-frying
1/4 cup extra-virgin olive oil
2 teaspoons Champagne vinegar or white wine vinegar
Salt
A few drops of truffle oil if not using fresh truffles
4 pounded sheets carpaccio {see here–here}
2 handfuls of arugula {about 1-1/2 ounces}, carefully washed and dried, at room temperature
1/2 to 1 ounce fresh black or white truffle {optional}
Cooking the potatoes:
Place the potatoes in a saucepan and add cold water to cover. Season moderately with salt {I use a generous teaspoon sea salt per quart}, stir, and taste. The water should taste perfectly seasoned. Bring to a simmer and cook gently until the potatoes are tender through but not soft on the outside, usually about 5 minutes. Drain and immediately spread out on towels to cool and dry.
To shallow-fry: This operation sounds more tricky than it is. Potatoes fried this way are addictive. Warm the mild olive oil in a 12-inch skillet over medium heat. Choose a small, firm piece of potato and set it in the pool of oil. When it begins to sizzle, carefully distribute the rest of the potatoes evenly around the pan. They should just fit, making a starchy mosaic. Some of the potatoes may stick initially, but don’t fuss with them now~once freed, they are doomed to stick again, leaving a rough crust on the bottom of the pan, which will inevitably burn, instead of browning the potatoes. Adjust the heat to maintain a steady sizzle. The oil should never smoke. After about 5 minutes, the potatoes should be browning around the edges and a nice crust should have set. Swirl the pan cautiously and use tongs or a metal spatula to gently turn the potatoes. It’s now okay to pry any slightly reluctant chunks cleanly from the pan. Continue to fry, turning the potatoes occasionally, for about 20 minutes, until they are mottled golden all over and crunchy. {They will shrink a lot as water evaporates from the flesh.} Drain on towels.
To deep-fry: Heat the peanut oil to about 365° in a 3-quart sauté pan. Lower the potatoes into the oil and fry until golden and crispy, usually 5 to 7 minutes. Drain on a towel.
Whichever frying method you use, keep the potatoes warm while you plate the carpaccio. {But don’t pile them atop one another, or they will steam and the crust will soften.}
Finishing the carpaccio:
Combine the extra-virgin olive oil, vinegar, and salt to taste. The vinaigrette should be mild, to avoid overwhelming the truffle. If using truffle oil in lieu of truffles, add a few drops to the vinaigrette.
Turn the carpaccio onto plates {see here}, then brush or drizzle all over with vinaigrette. Toss the arugula with vinaigrette to coat, and add as much thinly sliced black or white truffle as you could afford. This is the one garnish you need not fear abusing in a carpaccio dish.
Scatter the salad over the meat and finish with the hot, crispy potatoes.
Wine: Baga, Beira, Luis Pato 1999
* Blue Point, on Long Island’s south shore, no longer supplies oysters commercially. The Blue Point Oyster Company, in business since the 1800s, was sold to a developer in 1997. There are, however, still oysters out there.
† This because a load of the strain of gigas, called angulata, migrated to Portuguese waters from its native Taiwan, courtesy of the great explorers. In the late 1800s, a load of these tasty transplants~en route to English markets~was dumped for dead into the waters off Bordeaux. Some lived, to be harvested and enjoyed by the French, who christened this new type of oyster portugaise. By the mid-1970s, an oil spill and an Atlantic Ocean virus had destroyed this Asian native. The oyster beds were replanted with seed from a similar but virus-resistant Japanese cousin, also a gigas. It assumed the familiar moniker.