

I WILL NOT FORGET THE DAY IN 1983 WHEN BILLY WEST, THE FOUNDER OF ZUNI Café, came to my apartment in Berkeley to introduce himself, and {he confessed years later} figure out what to do with the then-tiny restaurant. He thought I might want to work there, but he was also thinking about selling the place.
There were strings of freshly cased salami spanning my front hallway, and the floor was covered with newspapers strategically taped in place beneath the occasionally dripping garlands. The whole apartment smelled like potpourri, thanks to an open bin of lavender where, once it had dried out, I had buried an earlier batch of sausage, thinking it would give a nice perfume to the tangy meat. I was busily unemployed, doing “research” for a restaurant I hoped to open. That restaurant never happened, but Billy liked the salami quite a lot and said the whole scene convinced him we would get along. We only made lavender salami a few times at Zuni, but sausage and charcuterie are an important part of our repertory, and the episode suggests one can certainly attack such exotics at home. I include here a basic sausage-making method and two treasured sausage recipes, culled from years of dabbling. They are resolutely oldfangled, but I’ve never grown tired of them. {Given the need to control humidity and temperature, tricky for both home and restaurant cooks, I’ve left out the lavender salami recipe, but I do recommend you try burying a good quality store-bought salami in dried lavender. Leave for a few days, then brush off the lavender, slice thin, and enjoy with a glass of Beaujolais and some olives.} Beyond sausage, you will find a lesson in confit-making; a classic foie gras terrine; an unusual rillettes formula, and a recipe for Graisserons, an obscure relation of confit that looks like pâté.
A LESSON in SAUSAGE MAKING
SAUSAGE MAKING OUGHT NOT TO INTIMIDATE THE HOME COOK: GRINDING AND seasoning is easy~only the stuffing part requires a special technique, but even that is not hard to master. And you can certainly serve many sausages in patties. As for specialized equipment, a meat-grinding and sausage-stuffing package for an electric mixer can be had for about $50. The grinder attachment should come with a feeding pan to hold the meat, a stomper to push the meat into the tube, two perforated plates~for medium and coarse grinding {by “medium” I mean a grind the texture of hamburger}~and an X-shaped four-bladed knife. I recommend ordering a second knife~which I explain here. To care for the blades, keep them scrupulously clean, dry, and lightly oiled when not in use, stored where they will not get nicked. That way they will continue to produce the clean, crumbly grind you need for top-notch sausage. The sausage-stuffing attachment will usually consist of no more than the funnel-like “horn” you mount on the front of the grinder. {You can invest in a separate sausage stuffer~a cylinder with built-in plunger~but this is not essential; I’ve made sausage at restaurants for more than twenty years without ever using one.}
Once you have the equipment, getting the meat into the casings requires no great dexterity, only a little patience. The casings themselves may not be a supermarket item, but they have lately become available by mail-order, and in home cook–appropriate quantities {see Sources and Resources, here}. I’ve also found that many specialty food stores that prepare fresh sausages on site are happy to sell small quantities of casings over the counter. Even so, consider buying more casings than you need right away; stored in brine and refrigerated, they keep indefinitely.
BASIC SAUSAGE-MAKING TECHNIQUE
Seasoning the meat:
Cut the meat into cubes that will easily fit into the opening of the grinder. Trim off thick sinews or silverskin. Season with 1 scant teaspoon sea salt per pound of meat {allow a little more if using kosher salt}. We generally incorporate most of the other seasonings and ingredients at this point so they permeate the meat with the salt, as well as to ensure they are well distributed. {Working seasonings evenly into ground meat is problematic, and that kneading process changes the texture.} Refrigerate the meat for 8 to 24 hours. This slight cure improves the texture, and helps keep it juicy even when cooked well-done.
Preparing the grinder:
You will get the cleanest grind and brightest tasting sausage if the grinder, plate, and knife and the meat are well chilled when you begin. As meat warms up, it softens and the fat starts to melt, both of which cause it to slip and slide in the mechanism~the meat gets kneaded and mashed rather than passing through neatly. This taints the texture of the sausage. It will also spoil more rapidly than meat that has been kept very cold.
Whenever you assemble the grinder, always place the same face of the perforated plate against the four-edged knife. {Incise a mark into the nongrinding face of the plate to keep track.} On its initial uses, the cutting edge of the knife shapes itself to the plate; alternating the face unnecessarily wears and dulls this edge. For this reason, we buy and store plates and knives in sets, and never trade parts.
Grinding and tasting the sausage:
As you grind the meat, watch that it is emerging evenly and that the grind is speckled red {or pink} and white. Occasionally a piece of sinew will catch on the plate or knife and clog the grinder. If the grind is uneven, or “smeared pink,” this is the likely cause. Turn off the machine immediately, unscrew the face of the grinder, slide out the plate and knife, and remove any trapped meat and sinew. Reassemble the grinder and resume grinding.
Once all of the meat is ground, form a small patty and cook it in a small skillet over medium-low heat to check the salt and other seasonings. If it needs more seasoning, spread the meat out in a wide baking dish or on a platter and reseason it evenly, so most of the distributing is done without handling the meat. Use your hands or a spatula to cut and fold in the seasonings to finish the job. Cook another sample. Once you are happy with the flavor, return the ground meat to the refrigerator. Clean and refrigerate the grinder in preparation for stuffing. Or you can form sausage patties by hand right away.
Preparing the casings and stuffing the sausage:
While the meat is chilling, prepare the casings, whether skinny, tender lamb casings or fatter, stronger hog casings. All should be sold in saltwater brine that will allow you to preserve your supply for months. Each type of casing can vary in width, and holes and tears can happen, so it is impossible to know exactly how long a piece you will need, but a generous 1/2 ounce of casing per pound of sausage meat should be adequate. This will amount to about 6 feet of lamb casing or 2 feet of hog casing. As you become adept at stuffing, you may use less. Rinse the casing in cold water, then thread the end over the spout of the faucet and run a gentle stream of cold water through it {1}. The casing should feel and smell clean. It is inconvenient to run out of prepared casing in the middle of a stuffing operation, so I encourage you to err on the side of cleaning too much~you can re-brine any casings you don’t use.

 |
 |
| 1 | 2 |
 |
|
| 3 | |
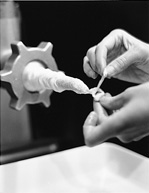
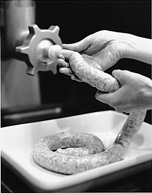
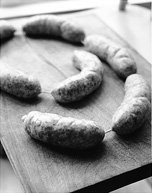
Reinstall the cold grinder, substituting the stuffing horn for the knife and plate. Slide the casing over the tip of the horn. Feed the meat into the mouth of the grinder and turn it on to the lowest speed. When the first bit of meat appears at the tip of the horn, turn off the grinder, pull the casing forward, and knot it {2,3}; that way, you will avoid trapping air in the casing. Now, holding the casing in place at the tip of the stuffing horn, turn the machine on to the lowest speed, and gradually release the casing as the meat fills and tugs at it {4}; turn the machine off any time the extruding end gets ahead of you. Always stop the grinder a few seconds before you reach the end of a casing. Once you have cased all of the meat, slide the remaining casing off the horn, and pinch and twist off the links. For 4-ounce sausages in hog casings, or 2 ounce sausages in lamb casings, pinch off about 6-inch links and squeeze the meat from both ends of each one to produce a plumper 5-inch link. Give each sausage about four complete twists, and alternate directions from one sausage to the next. This will produce a twisted thread of casing about 1/2-inch-long between each link {5}. One can also, with a patient helper to feed the meat into the grinder, and a little practice, use both hands to release the casing and cradle and twist off the sausages as you stuff them. This is fun once you get the hang of it. Lay the sausages in a wide dish, cover loosely, and refrigerate.
 |
 |
| 4 | 5 |
Storing and cooking the sausage:
It is best to age most sausages 4 to 8 hours in the refrigerator before cooking them. That way, the meat will adhere to the inside of the casing and be less likely to burst out the ends. Before cooking, snip the sausages apart at the center of the “twisted thread” that links them. The 1/4 inch of twisted casing should keep the ends from popping open when you cook the links.
Leave the sausages at room temperature for about 15 minutes before cooking them, to reduce pressure on fragile casings; to further reduce the risk of explosion, start the sausages over medium heat, and only raise the temperature to brown them after some of the moisture has evaporated or seeped out of the sausage. Initial high heat may blister and tear the casings. I don’t advocate pricking the raw sausages; too much moisture escapes with this method. Don’t blanch or poach the links before grilling or panfrying them. Precooking may ensure that no bursting occurs, but it also leaches out flavor and succulence from the sausage.
Allow about 12 minutes to cook a fat sausage stuffed in hog casing. Brown each side for 3 or 4 minutes over medium heat or glowing coals, then finish cooking over lower heat. Skinny sausages stuffed in lamb’s casing should take 4 to 6 minutes.
PORK SAUSAGE
THIS IS THE FORMULA I HAVE RELIED ON FOR DECADES TO PRODUCE ROBUST, succulent sausage. The balance of fat to lean {1 to 2}, the ratio of salt to meat {1 teaspoon to 1 pound, and strategic preseasoning are the key elements here~even without the fennel seed or sage, this recipe makes a tasty sausage. Choose pork that is firm and rosy pink, streaked with creamy white fat. Pork shoulder is usually well trimmed for the consumer, but if you can get a chunk with fat intact, you can cut back on the amount of pork belly and use proportionately more shoulder.
Serve this sausage, cased or in plump patties, with grilled or braised vegetables, with Fagioli all’Uccelletto {here}, or with eggs. We use it in pasta dishes with braised bitter greens or with English peas. You can also use it to make a hearty pasta sauce that keeps well for several days; follow the method for Giblet-Mushroom Sauce {here}. It is also good crumbled, browned, and cooked into risotto with favas or mustard greens. The fennel seed–dried currant version is perfect for Quail and Sausage Braised with Grapes {here}.
Wine: Pinot Blanc d’Alsace, Zind-Humbrecht, 1999
FOR ABOUT 2 POUNDS {ABOUT EIGHT 4-OUNCE LINKS IN HOG CASINGS, OR SIXTEEN 2-OUNCE LINKS IN LAMB CASINGS}:
1 pound boneless pork shoulder butt, cut into 1-inch cubes
8 ounces pork belly, cut into 1-inch cubes
1-1/2 ounces pancetta or a mixture of pancetta and fatty prosciutto scraps, coarsely chopped
Scant 1-1/2 teaspoons salt {a little more if using kosher salt}
Scant 1 teaspoon dried chili flakes
1 tablespoon fennel seeds, lightly crushed, or a few fresh sage leaves, lightly pounded, then chopped
5 to 10 garlic cloves, peeled {1 to 2 ounces}
3/4 cup diced yellow onions {3 ounces}
2 tablespoons dried currants {about 1/2 ounce}, soaked in a spoonful of brandy {optional}
Generous 4 feet hog casing or 12 feet lamb casing, cleaned {to buy, see Sources and Resources, here; to clean, see here}
Seasoning the meat {8 to 24 hours in advance}:
Combine the pork shoulder and belly with the pancetta or pancetta and prosciutto. Sprinkle evenly all over with the salt, chili, and fennel or sage, then toss well to distribute. Cover loosely and refrigerate.
Assemble your grinder attachment, with a knife and the medium plate {3/16- to 1/4-inch holes}, and chill.
Just before grinding, coarsely chop the garlic and scatter it and the diced onion over the meat. Fold to distribute. Attach the grinder attachment to your mixer or grinding machine, and grind the meat. {For guidelines, see here–here.}
Scatter the currants, if using, over the meat, then fold in. Form a small patty and cook gently in a small pan with a few drops of olive oil over medium-low heat. Taste for salt and other seasonings, adjust as needed, and cook another small sample. The raw onion may taste strong at this point, but it will mellow as the sausage ages.
Form the meat into patties, or chill well and then stuff into hog or lamb casing. {For stuffing guidelines, see here}. Cover loosely and refrigerate for at least 8 hours. Remove cased sausages from the refrigerator about 15 minutes before cooking.
As long as you have kept the ingredients cold, uncooked loose sausage should keep for a few days in the refrigerator; cased sausage for a few days longer.
RABBIT SAUSAGE
THIS ELEGANT SAUSAGE IS MY FAVORITE; TENDER AND DELICATE, IT SHOWS OFF the subtle flavor of rabbit better than any other dish we make. I first made it for a special Easter menu at the Union Hotel in Benicia. In that intimate kitchen, I always made it myself, measuring nothing, concocting entirely by “feel” and feeling vaguely proprietary about it. The reality of the bigger and busier Zuni Café made it difficult to always do anything myself, so I reluctantly allowed “feel” to be transformed into ounces. But not entirely.
The variable quantities and options here reflect the range of delicious textures and flavors that is possible. Cream makes the sausage rich, bread crumbs add tenderness, and egg will make it fluffy and rich, but all three compete with the flavor of the rabbit. Taste and decide what you like as you make the sausage. A good rule of thumb is that if the mixture tastes good and has a good texture, stop messing with it. Simple, clear tastes that emerge with no teasing are a lucky treat; don’t risk stifling them beneath virtuoso layers of complexity. Availability will affect your decisions as well, as should the rest of the menu. For example, if you have cream or egg elsewhere in the meal, you may want to leave it out here.
We usually serve rabbit sausages with a salad as a first course, or as part of a Rabbit Mixed Grill {here}. They are delicious with mashed potatoes or favas, roasted butternut squash purée, or warm green beans and white truffle oil. Try them on top of a risotto flecked with wild rice and fresh sage. This sausage shows best next to things tender, suave, and elegant. It will falter next to rustic dishes with strong flavors and coarse textures. And don’t pair it with tomato.
Yield varies with the quantity of the optional ingredients you use.
Wine: Mitchelton Victoria, Australia, Marsanne, 1999
FOR 1-1/4 TO 2 POUNDS {TEN TO SIXTEEN 2-OUNCE LINKS}:
1 tablespoon unsalted butter
1/2 cup finely diced yellow onions or shallots {2 ounces}
1 teaspoon salt {allow a little more if using kosher salt} plus a few pinches
A few fresh sage leaves, chopped {optional}
14 ounces rabbit~loin, belly flap, or hind leg {see Cutting Up a Rabbit, and What to Do with the Parts, here}; a 2-1/2-pound rabbit will yield about 18 ounces of these cuts~use any excess, plus the forelegs, for Rabbit Rillettes, {here}
2 ounces pancetta, minced {about 1/3 cup}
Freshly grated nutmeg
Freshly ground black or white pepper {optional}
Up to 1 cup cold heavy cream
Up to 1 ounce soft, fresh bread crumbs {about 1/2 cup} made from slightly stale, crustless, chewy, white peasant-style bread {see here}
1 or 2 small eggs, chilled {optional}
Up to 1/2 ounce fresh black truffle {optional}
About 9 feet lamb casings, rinsed {to buy, see Sources and Resources, here; to clean, see here}
A few teaspoons mild-tasting olive oil or unsalted butter
Preparing and seasoning the meat {8 to 24 hours in advance}:
Warm the butter in a small skillet over low heat. Add the onions or shallots, a few pinches of salt, and the sage, if using. Cook, stirring a few times, until the onions or shallots are translucent and very soft, 6 to 7 minutes. Scrape onto a plate and chill thoroughly.
Cut the rabbit into bite-sized pieces. {If using hind legs, they are quite easy to bone by simply carving the plump meat away with a paring knife. Trim the thickest sinews and cut through the smaller ones that might otherwise catch in the grinder blade. Cut any belly flaps across the grain into strips. Toss together the rabbit meat and pancetta, and sprinkle evenly with 1 teaspoon salt, the nutmeg, and pepper, if using. Fold in the chilled onions. Cover loosely and refrigerate.
Assemble your grinder attachment, with a knife and the medium plate {3/16- to 1/4-inch holes} and chill.
Attach the grinder attachment to your mixer or grinding machine and grind the cold meat mixture. {For guidelines, see here–here.} Form a tiny patty and cook in a small skillet in just a film of olive oil over low heat. Taste. One in a dozen times the meat will already taste delicious and have a great sausagey texture; you can stuff such a mixture right away if you like. More often, the rabbit is a bit hard at this point, and needs help.
Mix half the cream with half of the bread crumbs, and leave for a few minutes to allow the crumbs to swell and soften.
Add the bread crumb mixture to the ground rabbit and beat with a wooden spoon. Cook another small sample and taste. The sausage will be softer, richer tasting, and less crumbly. You can stuff the sausage now, or add a little more cream, or make and add more cream-crumb mixture if you want to enhance those qualities.
To make the sausage slightly bouncy-tender, incorporate 1 egg, beaten first with a pinch of salt. Cook and taste another sample, and add a second beaten egg, or part of one, if you want to emphasize that quality.
Mince the black truffle, if using, and fold into the sausage mixture. Cover and chill well.
Stuff the mixture into the prepared lamb’s casings; for 2-ounce sausages, twist every 6 inches or so. {For stuffing guidelines, see here.} Refrigerate for at least 3 hours before cooking.
If you have kept all of the ingredients cold, the uncooked cased sausage will keep in the refrigerator for about 4 days.
Remove the sausage from the refrigerator about 15 minutes before cooking. Rabbit sausage is fragile, owing to the high moisture content and the tender lamb casings. As the moisture vaporizes, the pressure can easily burst the skins, so take care to start the sausages over gentle heat, whether in a pan or on the grill, then increase the heat gradually. If grilling, first rub the sausages with a little mild-tasting olive oil; if cooking in a pan, start in a little olive oil or melted unsalted butter. Cook until just firm, turning to brown both sides, about 5 minutes.
DUCK CONFIT
CONFIT IS A TYPE OF PRESERVED MEAT, USUALLY DUCK, GOOSE, OR PORK. It is native to Southwestern France, where the farmhouse tradition lives on in homes and restaurants alike. To prepare confit, the fresh meat is first salted, then rinsed, dried, and simmered in duck, goose, or pork fat until tender. Well-made, it is neither salty nor fatty. Carefully stored, well-made confit will keep for months. Compared to simple drying, salt and sugar brining, or smoking, this method of preservation conserves the basic character of the meat very well. It also preserves succulence. Confit is served panfried until crispy, or simmered or baked in well-known concoctions like cassoulet, or less well-known ones, such as Garbure {here} Cold confit is good sliced as an hors d’œuvre or shredded into winter salads, garnished with brandied or pickled fruit.
The best duck for confit is the moulard {mulard in French, literally, a “mule” duck}, the sterile offspring of a Muscovy and Pekin cross. It is the duck of choice in southwestern France, since, not incidentally, it is efficient for producing excellent foie gras. Muscovy duck does well confited, although it can be tougher and stronger in flavor than the moulard. You can also confit white Pekin duck {the Long Island Duckling variety}, although it is so tender and mild that you’ll need to abbreviate the curing and cooking times. The result won’t have the hearty character of moulard or Muscovy confit, but can be delicious.
I have produced large amounts of duck confit over time, and a number of unusable failures have forced me to figure out how to get the salt right. I spent years~the better part of one in the Southwest of France~earnestly, hopefully, warily rolling duck legs in salt, trying to gauge how much needed to cling to the flesh, contemplating how hard to tap the frosted limb to remove excess. Everybody there seemed to produce perfect confit by feel and I was anxious to acquire that touch.
En route to that knowledge, I made some very good but also many very salty, confits. For this, I overcompensated, tending to overrinse or undersalt the duck legs. Ergo, I produced some very bland confit. I tried different types of salt~kosher, coarse sea salt, rock salt, fleur du sel. I then asked my mentor in Les Landes, in Southwest France, Pepette Arbulo, to send her preferred flocons de sel {salt flakes}. To complicate things further, I overcooked some batches and undercooked others. Bedeviled by my duck confit problems, I explored confiting quail and rabbit and chicken, and, of course, encountered the same inconsistency. I couldn’t get a feel for what was right, because, like most non-Landaise cooks, I wasn’t making confit often enough to remember exactly what I had done the last time and exactly what it felt like. So, I started taking notes. And then experience started to become a reliable teacher after all. The unromantic truth is that a ratio of 2 teaspoons {1/3 ounce} of sea salt per pound of meat, for 18 to 24 hours, will largely preserve you from the disaster of oversalt and the dullness of undersalt. {If using kosher salt, measure a little more than 2 teaspoons~still 1/3 ounce per pound}. Then pay attention to how evenly you distribute the salt, how well you rinse it off, and how long you cook the duck, which should be over a gentle, always-steady flame. It is easy to keep track of all this and get a feel for confit if you prepare the same amount of meat, and use the same pot, a few times in a row.
The method that follows is tailored to duck legs, which make a handsome main course, but you can also use these guidelines to confit other parts of the duck. Boneless breast makes a lean but excellent confit, which is especially good cold, thickly sliced, as an hors d’œuvre. I often confit necks or the first joint of the wing {or the aileron, which I call the “winglet”}. Both are inexpensive flavorful ways to flavor soup or cassoulet. I offer a few separate guidelines for Gésiers Confits {preserved gizzards}. You can also use this formula to confit comparable cuts of goose or chunks of pork. Where pork is concerned, the shoulder butt makes the best confit.
Wine: Côtes du Frontonnais, Château Bellevue La Forêt, 1998
Salting and rinsing the duck legs:
Rinse the legs and pat them dry. The flesh will feel fairly soft. Trim ragged edges {set aside the trim to render for fat or to make Graisserons, here}. Weigh the meat, then measure 2 teaspoons {1/3 ounce} sea salt per pound of meat. Working on a sheet pan or a sheet of parchment paper, salt the legs all over, targeting the thickest sections with a heavier dose than the skinny edges and ankles. Then roll the legs on the salty pan or paper to grab the salt that fell from or missed the target. Arrange the legs in a wide glass, glazed earthenware, stainless steel, or hard plastic bowl or storage vessel, placing the first layer skin side down. Don’t stack the legs more than three deep, or the bottom layer will be submerged in pink brine by the next morning, and those pieces will be too salty. Refrigerate for 18 to 24 hours.
Rinse the legs one at a time under a stream of cold running water. Don’t soak. Pay attention to the texture of the meat as you rinse it. The flesh will be a little darker, and feel a little firmer than before. But if any spots feel particularly hard~sometimes the edges will be almost clay-like~knead those areas lightly as you target them with rinse water, to urge excess salt out. Spread the rinsed legs on a clean, dry towel. If you are anxious about the saltiness, do a simple test. Trim off a nugget of meat, place in a small saucepan with just enough warm duck fat to submerge it, and cook at a near simmer for about 5 minutes. Taste. Ignore the texture~it will be very tough~and consider the salt. The meat should taste well seasoned, like fresh sausage. If it is too salty for your taste, briefly rinse each leg again. You will notice this softens the meat further. Once you are content with the saltiness, pat each leg dry.
Place the legs in a wide, sterilized bowl or tub, cover, and leave for an hour or so at room temperature. The shock of being aggressively salted and briefly rinsed means the salinity will be uneven within each piece of meat. As it rests, the salt will diffuse more evenly. You can leave the legs overnight refrigerated if it better suits your schedule.
The fat:
A ratio of 2 cups fat to 1 pound meat should be generous enough to submerge most cuts of duck in most pots. It is most practical to purchase rendered duck fat, in which case you need merely warm it up {see Sources and Resources, here}. You can render your own, but be aware that the duck you are confiting will not yield enough fat to submerge it. The phrase “duck cooked in its fat” always makes me smile, because that duck almost certainly cooked in another duck’s fat as well. To get sufficient fat, you will need to either purchase extra duck {which you won’t be confiting} or ask your poultry butcher to save lumps of fat and big slabs of fatty skin for you to render. Neck skin is a very good candidate for rendering. These odd bits can be frozen, which may make your request seem more reasonable. A pound of scraps and skin will yield about 3/4 pound or 1-1/2 cups of fat.
To render duck fat: Thaw the clods of fat and skin if necessary, then rinse. Place in a heavy saucepan, add about 1/2 inch of cold water, and set over low heat. Stir once or twice in the first 10 minutes, then leave to melt. Once the solids are no more than a handful of shrunken, misshapen bits and the fat is clear and golden, strain. It will take at least 30 minutes to reach this point, but exact timing depends on the pan, amount and type of scraps, and heat. If any of the shrunken bits are meaty, save them for Graisserons {here}. The remaining bits of rendered skin can be coarsely chopped, lightly salted, and browned in a pan to make cracklings, which I like to add to frisée salad.
Cooking the confit:
Choose a heavy pot that will crowd the duck legs, without stacking them more than two or three pieces deep. A crowded fit reduces the amount of fat needed to submerge the meat, but if it is piled too high, the meat can cook unevenly. Stirring and rearranging prevents this but is difficult to do without tearing the skins and losing track of which leg was where. I can confit up to 3-1/2 pounds of meat {4 large duck legs} in a 4-quart saucepan with just over 5 cups of fat. When making a large batch of confit, I use a saucier-type pan and never stack more than two-deep.
When you are ready to start cooking the confit, heat what should be just enough fat until it is warm to the touch. Add the duck legs, and then add more fat if they are not submerged. Bring the fat to a near simmer and skim any foam. Adjust the heat to maintain the fat at a steady near simmer. In my experience, uneven heat means the meat releases lots of its tasty juice, producing a less succulent confit. I try to hold the fat at 200° to 205°.
Judging doneness:
The duck will initially firm up and then gradually soften as it cooks in the fat. How long this takes is a function of the type of duck, size of the cut, and the quantity. Meats vary widely; even two batches of the same type of meat from the same source at different times of year can behave differently. In general, allow between 1-1/2 and 2 hours for 12-ounce duck legs, or comparable chunks of goose or pork, checking every 10 minutes after the first hour. Allow an hour for small, bony, sinewy winglets. Prod the meat in the pot; if it yields at all, remove a piece, carve off a sliver, cool it to the touch, and taste. {Very hot meat will always feel tough; it needs to cools slightly before you can accurately judge tenderness.} Perfectly cooked confit should be tender but still resilient. If it is allowed to cook to “fork-tender” it will be dry. Once the meat is tender, turn off the heat and leave for about 10 minutes for any juices to settle at the bottom.
Storing confit:
Skim the surface of the fat. Carefully remove the pieces of meat, without tearing the skins or stirring the fat, and place in sterilized glass, porcelain, glazed earthenware, hard plastic, or stainless steel vessels. Skim the fat again and then ladle it through a fine strainer over the cooked meat. Take care as you reach the bottom of the pot not to collect any of the delicious, salty, gelatinous broth that resides there. {Strain and save it for other recipes, such as Graisserons, here; Onion Soup with Tomato and a Poached Egg, here; or La Garbure Landaise, here.} Make sure the pieces of meat are completely submerged in fat, then cool completely, cover with a lid or plastic, and store refrigerated until needed. {Actually, properly salted, cooked, and sealed confit doesn’t really need to be refrigerated, although it should be kept cool. In Les Landes, I saw lots of confit in un–air conditioned barns or cellars, and even out all day in working kitchens. It seems prudent, though, and it is convenient, to store it in the refrigerator.} It will improve during the first month and then can keep well for months longer. Label the vessel with exactly what is in it and the date. The clear yellow fat turns opaque white when it solidifies, and you could never guess what it hides.
“Tempering” the confit {see Tempering, here}:
Always pull the dish of confit from the refrigerator an hour or so before you need it, to begin to warm and soften the fat. You can speed the process by setting the pan in a warm spot near the oven, but don’t set the whole thing in a hot oven, you’ll just melt the edges. Once the fat is malleable, reach in and ease out the pieces you need. Slide them through your fingers to remove the squishy mantle of excess fat. As long as your hands were clean and you see no beige or brown liquid at the bottom, you can usually return the vessel with unused confit to the refrigerator. Just make sure no meat is exposed, and do use the remaining confit within a week or so. Otherwise, you should rewarm the remaining confit and fat, place the meat in a clean smaller vessel, and strain the fat back over it to reseal. In either case, note on the label what you did.
To pan-brown confit:
I recommend the pieces of confit be at room temperature or close to it when you brown them. Place a cast-iron or other heavy skillet over medium heat. When it is hot enough to sizzle the confit quietly on contact, arrange the pieces in a single crowded layer skin side down in the pan. The duck will shed some fat. Adjust the heat as needed to maintain that quiet sizzle. It should take about 9 minutes to set a pretty golden crust. You can check progress once or twice, but don’t fuss with the confit, or you may compromise that crust. {If your confit was much colder than room temperature, trap some heat in the pan by partially covering it with a lid~don’t cover it completely, or the confit may steam. I also suggest you work over lower heat and take a little longer to color the skin.} Once the skin is crispy and golden, turn the duck over and cook for only 4 or 5 minutes on the other side. Don’t overcook this side, or the skinless flesh will develop a tough, jerky-like crust.
If you need to brown more than one batch of confit, spread the browned pieces in a roasting pan and hold in a 275° oven while you brown the rest.
Prepared this way, duck confit welcomes many different vegetables and garnishes. Beans, mashed root vegetables, roasted winter squash, hashed sweet potatoes, deep-fried or spiced prunes, roasted applesauce, polenta, lentils in red wine, grilled radicchio, roasted cherries or figs, and frisée, watercress, and arugula salad are all on my short list. I don’t pair confit with creamy or cheesy dishes.
 GÉSIERS CONFITS
«Gésiers confits» sounds pretty in French and they are one of my favorite confits. “Preserved gizzards” are a hard sell in English, but absolutely worth trying. The toughest muscle I can think of, the hard-working gizzard is also the most flavorful. In southwestern France, I first enjoyed preserved gizzards as a cold hors d’œuvre, sliced the thickness of poker chips and speared with toothpicks. They are delicious in warm chicory salads with walnuts and apples. Warm confited gizzards and Warm Truffled Beets {here} are extraordinary together. Count an ounce or two of gizzards per person for salads or as part of an hors d’œuvre.
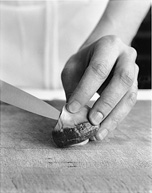
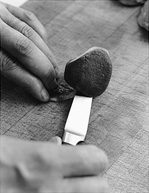
To confit duck, goose, or little chicken gizzards, trim off the silverskin {1,2}, rinse, and dry, then toss with 3/4 teaspoon {1/8 ounce} sea salt for every pound of innards {count about 2 dozen duck gizzards per pound}. Gizzards often come with an errant heart or two in the mix; they make a tender and delicious confit, so salt them as well. They require no trimming; just rinse and press dry.
 |
 |
| 1 | 2 |
1. Use the tip of a paring knife to free the edge of the silverskin.
2. Flip the gizzard over, and, holding the freed edge of the silverskin, slide the knife flat against the work surface to remove the rest of the silverskin. Repeat to remove the silverskin on the other side.
Cover loosely and refrigerate. Allow 6 to 8 hours for the salt to penetrate duck or goose gizzards, a few hours less for smaller gizzards or the tender hearts.
Rinse the gizzards {and hearts} thoroughly, dry, and cook very slowly in enough fat to cover by a few inches~figure on about 2 cups fat for 1 pound gizzards. Don’t skimp on fat, or you’ll have trouble keeping it from boiling. Skim foam as it accumulates. Goose and duck gizzards will take 45 minutes to 1-1/2 hours. With hearts and smaller chicken gizzards, start checking for doneness at 30 minutes. To test for doneness, spear a gizzard with the tip of a paring knife; it should enter easily. Carve off a sliver and taste. The meat should be dense and firm, but not crunchy. I compare the texture of a perfectly cooked gizzard to cold, hard Gruyère cheese. Once the gizzards are tender, turn off the heat, leave to cool for about 5 minutes, skim, and then lift the confited gizzards from the fat to a small container. Ladle the fat through a fine strainer onto the confit. They should be completely submerged. Refrigerate. Any juice at the bottom of the pot will be strong and is difficult to use, but save it if you will be making Giblet-Mushroom Sauce {here} or Graisserons {here} anytime soon. Discard any leftover fat.
In a pinch, when I have no duck fat on hand, I confit gizzards in mild-tasting olive oil. This is heretical, but gizzards have enough flavor and character to withstand the challenge of mild olive oil. It is a convenient alternative, of particular interest if you plan to serve the gizzards thinly sliced in a salad or in an hors d’œuvre that is prepared with olive oil.
FOIE GRAS en TERRINE
THIS IS THE SIMPLEST OF THE CLASSIC FOIE GRAS PREPARATIONS, WHOLE LOBES, gently baked in their own fat, to be served cool or cold in satiny slices. This particular method produces a rosy foie gras, which tastes exactly and only of that. My purist roots preclude adding truffles, pepper, sweet wine, or any seasoning other than salt, but you can use this technique for recipes that include those things.
Regarding your choice of foie gras: There is much discussion over whether duck or goose produces the superior foie gras; however, the issue is largely moot in America, since, as of this writing, there is no domestic goose foie gras available. Both birds have their partisans in France, but the people I worked with in Les Landes in Southwest France preferred duck for its finesse. {Notwithstanding, a combination of economics and biology determines availability. Geese need more days of forced feeding, and more food per day, to develop a fat liver than ducks do, so goose foie gras is more expensive to produce. And, since, unlike ducks, geese can’t be cajoled into laying eggs year-round, you can only produce goose foie gras during part of the year~the late fall, just in time for the holidays~which helps explain how foie gras became a holiday specialty in France. I have also heard that fattened geese don’t support hot summers as well as fattened ducks, which makes geese a risky undertaking in the hot Southwest of France.} Our local foie gras producer did raise geese for foie gras when they started out, and the results were good, but lacking a steady market for the meat, it wasn’t a viable endeavor.
What fresh foie gras is produced in America is from either the moulard or the Muscovy duck. The moulard, or mulard {a sterile “mule-duck” cross between the Muscovy and the Pekin duck}, is the foie gras duck in France, and even though its father may be Muscovy, it is not customary there to raise that bird for its liver. Again, economics play a role; Muscovy chicks are more expensive than moulards, and require more days of forced feeding. My mentor, Pepette Arbulo, was perplexed when I first told her she’d be cooking Muscovy foie gras when she flew from France to be guest chef at Zuni, but she approved once she tasted the product. {For both kinds of duck foie gras, see Sources and Resources, here.}
Whatever its pedigree, the best foie gras is fleshy pink and uniformly firm. Commercial foie gras is vacuum-packed, and it begins to sweat a little blood mixed with water within three days. Although this is not an intrinsic defect, I avoid livers that have exuded a lot of brownish liquid. A small bruise or two seems to be inevitable, but check to see that there are not too many. A foie gras whose plastic pack has lost its vacuum may be fine as long as it still has good, bright color and you are planning on cooking it within a day or two. Alas, foie gras is not labeled with packing dates, but if it is kept consistently quite cold, the vacuum-pack keeps well for 3 weeks.
Preparing the foie gras for baking:
Rinse the liver in cold water and pat it dry. Gently pry the two lobes apart. If the liver starts to crack, let it warm up a few degrees, until you can ease the lobes apart. Using the tip of a boning or paring knife, gingerly trace and liberate the blood vessels that connect the lobes. Carve out the vessels as deeply into the liver as they are blood-filled. Occasionally you will discover a green vessel or green specks on the liver: this is bile and should be completely removed.
Preheat the oven to 275°.
Weigh the foie gras and season all over with 1 scant teaspoon sea salt per pound {allow a little more if using kosher salt}, concentrating the distribution on the thickest parts, where it must penetrate most deeply. Reassemble the lobes in their natural configuration. Press any loose chunks of foie gras into the natural hollows of the lobes.
Baking and cooling the foie gras:
Choose a terrine or small, deep baking dish that at least vaguely echoes the shape of the foie gras and is barely large enough to contain it. Pepette baked her foie gras en bocaux, upright, in straight-sided canning jars, which, if not glamorous, work perfectly and have the advantage of an airtight lid for storage. Press the foie gras into the chosen baking dish. Remember how high the foie gras sits in the dish. Take the temperature at the center of the liver. This will help you predict how long it will take to cook. I usually start with the liver between 55° and 60°. If it is colder than that, it tends to cook less evenly. Cut a piece of parchment paper to rest on the surface of the liver, then cover with a lid or foil, shiny side out. If using foil, don’t wrap it around the bottom of the dish; you need to be able to lift it easily during cooking.
Place the dish in the center of a larger pan, ideally about an inch taller than the level of the foie gras and wider and longer than the baking dish by at least 4 inches. Set in the center of the oven and add very hot tap water, up to 135°, to come to the depth of the foie gras, or nearly so. {This water bath will regulate the cooking temperature.}
After about 15 minutes, the liver will begin to slump in its fat. Begin checking the temperature at the thickest spot in the mass of liver. When it registers 98°, remove the terrine from the water bath, remove the foil and droopy parchment, and leave to cool. If any part of the liver projects dramatically above the rest, push on the warm, soft lobe to lower its profile. The melted fat will be much hotter than the liver, and it will, coupled with the retained heat in the vessel itself, finish cooking the liver. Continue to monitor the temperature, however, and if it rises to 105° in the thickest spot, place the dish in an ice water bath until it is cool to the touch. The rate of cooking and cooling will depend almost entirely on the material your “terrine” is made of~earthenware, porcelain, enameled cast-iron, and ovenproof glass absorb and bleed heat at different rates. {Try to use the same baking dish each time you bake a foie gras so you become familiar with how it affects cooking time~although by the time you are, you may discover the liver cooks more quickly because you won’t be opening the oven so often to check it.}
By the time the liver has cooled, it will have rendered 15 to 25 percent of its mass as bright yellow fat and settled into it. This sounds dramatic in view of the cost of foie gras, but that fat is a culinary treasure as well {see here}.
Storing and serving:
Place a clean piece of parchment on the surface, then wrap the dish with foil. Don’t use plastic, or the terrine may sweat. Refrigerate. The foie gras will have better flavor after a few days. An uncut terrine will keep for up to 2 weeks, although in that case, you should wrap plastic around the foil once the terrine is quite cold.
To most easily slice the foie gras, use a slender knife, and warm the blade in a tall glass of hot water and wipe dry before each slice. Count on an ounce or two of foie gras en terrine per person as an hors d’œuvre.
This fine terrine tolerates all the classic embellishments, but at Zuni we most often present it with freshly grilled, thinly sliced, peasant-style bread, lightly toasted hazelnuts, and Brandied Cherries or Red Currants {here}, or Spiced Zante Grapes {here}. We always add a few leaves of arugula, Belgian endive, or young lettuces dressed with mild vinaigrette.
Capitalizing on the Scraps:
Conserve every crumble of foie gras and every dab of the bright yellow fat. You can use both to flavor a Pearà Sauce {here} to serve with quail, squab, or duck, or to offer with grilled asparagus. Even a little bit of foie gras fat will make a simple pan of fried potatoes excellent. Pepette’s mother, who was a venerable figure in the culinary community and nearly belligerent in her traditionalism, enjoyed the golden fat spread on warm toast more than the liver itself. In Roanne, a decade before, I watched great-aunt Tata {Jean-Baptiste Troisgros’s sister} fashion the same warm tartine of slightly charred country bread and foie gras fat. Both Tata and Georgette lived well into their nineties.
GRAISSERONS
DESPITE THEIR INAUSPICIOUS BAPTISM AS “LARGE FAT THINGS,” GRAISSERONS ARE in fact not terribly fatty. They are a fortuitous, and widely unknown, by-product of making a lot of confit. Traditionally, the scrappy bits of meat that fall to the bottom of the cauldron of fat are greedily gathered by the cook, drained, and then pressed into a jar or small terrine. Then the flavorful gelée, which also accumulates at the bottom of the pot, is skimmed of fat and poured warm over the precious scraps. Once cold, these scarce graisserons become a cherished stash, saved for a lucky few to enjoy as an hors d’œuvre, sliced like pâté, with pickles and toasts.
Not content to have a scant supply for a lucky few, we use a method contrived by my friend and teacher Pepette, who generated graisserons by the potful in her restaurant in rural Southwest France. It involves salting a selection of meats, mincing some and grinding others, and then confiting them. We add a pig’s foot for gelatin. The recipe itself is flexible; as long as you follow the basic ratios for salting, and procedures for rinsing and cooking, you can alter the mix of meats. You can use goose instead of duck, or replace some of the dark Muscovy or moulard meat with pale Pekin duck, or incorporate some squab or even a little chicken. You can also alter the quantity of pork or giblets, or mince the pork instead of grinding it, or grind the duck instead of mincing it. {Or mince them both if you don’t have a grinder.} If you have a little bit of tasty but ragged-looking leftover confit, shred it and add to the pot of simmering “fat things.” I am certain that before this writing I had never assembled exactly the same combination twice, but I do know that the best graisserons are mostly dark meat, contain a combination of poultry and pork, and boast some textural variation.
Graisserons keep for months refrigerated. It is practical to pack them in 1-cup batches, to pull out as an hors d’œuvre for 4, or to give as gifts. Serve cold with warm toasts and pickled fruit, such as Spiced Zante Grapes {here}, Pickled Onions {here} or Glasswort {here}, or Marinated Roasted Beets {here}.
Wine: Morgon Javernières, Domaine Louis-Claude Desvignes, 2000
FOR ABOUT 6 CUPS:
1 pound lean boneless pork shoulder butt, cut into 2-inch chunks
1 pound Muscovy or moulard duck breasts, skin on, cut into 3-inch chunks
About 10 ounces Muscovy or moulard duck leg {about 1 small leg}
4 ounces poultry hearts or trimmed gizzards {see Gésiers Confits, here}
Salt
8 ounces pig’s foot
2 bay leaves
About 1/2 cup Chicken Stock {here}
About 1-1/2 cups duck fat {12 ounces} {to buy, see Sources and Resources, here; to render your own, see here}
Salting the meats {for best flavor, salt 12 to 24 hours in advance}:
Toss each type of meat separately and evenly with 2 teaspoons sea salt per pound {if using kosher salt, allow a little more}. Cover loosely and refrigerate overnight.
Rinse all of the meats well and pat dry. Grind the pork through a grinder fitted with a knife and the medium plate {3/16- to 1/4-inch holes}. Mince the duck breast, skin and all. Split the duck leg at the knee joint.
Place the pig’s foot and duck leg and thigh in a 4-quart saucepan. Add the duck breast, pork, bay leaves, and chicken stock. Add about 1 cup of the duck fat and set over low heat to warm through, then add enough duck fat to not quite cover the meat. Once the duck skin renders, the meats should be fully submerged.
Cover and cook at a bare simmer, stirring occasionally, until the meats are very tender, about 2 hours. Remove and bone the duck leg {or, if it has already boned itself, fish out and discard the bones}. Lift the pig’s foot from the pot and cool slightly, then remove and discard the bones and cartilage. Mince the meat, and skin if you like, and stir this, and the chunks of boned duck, back into the pan of graisserons.
Leave the graisserons to settle for about 10 minutes, then skim the surface and strain them from the fat. Pile them in a deep bowl. Let the fat and juices settle and separate in the pan, or transfer to a fat separator, then slowly pour off the fat and set aside. There should be about 2 cups of juices remaining~they will be strong, salty, and very gelatinous. If they are too salty, dilute very gingerly with water, up to a few teaspoons. {And plan to rinse the meat a little more thoroughly next time.}
Use a pestle or wooden spoon to lightly knead and amalgamate the drained graisserons. Add the strained juices.
Pack the graisserons in small straight-sided canning jars, small terrines, or custard cups. Press down so that the bits of meat are submerged in the liquid. Cool completely, then spoon a little of the duck fat over the surface to seal. Store in the refrigerator.
To serve, scrape the fat from the surface, and slice as you would pâté. If you pack the graisserons in jars, you can easily unmold a “loaf” by holding the sealed jar under warm water, then running a knife around the edge and sliding out the graisserons.
RABBIT RILLETTES
MOST OFTEN MADE WITH PORK OR DUCK, RILLETTES ARE AN EARTHY CONCOCTION of gently cooked meat teased into a meltingly tender, succulent, well-seasoned spread whose texture resembles a smashed forkful of perfectly yielding pot roast. Where traditional rillettes are concerned, the succulence owes to a fair bit of pork fat.
For years I made my rabbit rillettes in that time-honored way, marrying the lean, mild rabbit with plenty of fatty pork belly, before defecting to this unorthodox, hybrid method. Inspired by an underappreciated dish of preserved pork chunks curiously named grillons, this version calls for cooking the rabbit with wine and aromatics. In a further departure from canon, these rillettes derive their succulence not from the sacrosanct pork fat, but from pig’s feet and extra-virgin olive oil. The result is lighter and more flavorful. You can use any cut of the rabbit for this recipe, but this is an excellent way to make the most of the bony forelegs.
These rillettes have the best flavor at room temperature or warmed. Serve with warm toasts as an hors d’œuvre, or spread on the toasts and tuck them into a salad garnished with nuts and Brandied Fruit {here}. These same toasts make a nice garnish for braised rabbit, and they appear in our Rabbit Mixed Grill {here}. Or try one of my favorite canapés, which consists of a warm baguette croûton smeared with a coarse paste made from Spiced Prunes {here} and topped with warm rillettes. Rillettes are also good stuffed into the yolk-less hollow of a hard-cooked egg and served with a slaw of finely slivered celery root, carrots, fennel, and radicchio, tossed in mustard vinaigrette.
Wine: Taltarni, Victoria, Australia, Sauvignon Blanc, 2000
FOR ABOUT 1-1/2 CUPS:
1 pound rabbit parts, preferably 4 forelegs and 4 belly flaps {see Cutting Up a Rabbit, and What to Do with the Parts, here}
1 teaspoon salt {a little more if using kosher salt}
1 bay leaf, crumbled
About 6 black peppercorns, crushed
A small piece of pig’s foot {about 4 ounces}
1 small carrot, peeled and cut into large chunks
1 small stalk celery, cut into 1-inch chunks
1/2 medium yellow onion, cut into wedges
4 garlic cloves, crushed
Up to 6 tablespoons extra-virgin olive oil
1/4 cup dry vermouth
Up to 3/4 cup Chicken Stock {here}
A nutmeg, or a piece, for grating
Freshly cracked black pepper {optional}
Seasoning the rabbit {for the best flavor, do this step 8 to 24 hours in advance}:
Season the rabbit evenly all over with the salt, bay leaf, and black pepper. Cover loosely and refrigerate.
Preheat the oven to 300°.
Place the pig’s foot in a saucepan of plenty of lightly salted water and bring to a boil. Skim, reduce the heat, and simmer for about 30 minutes. Drain. {This precooking tames the porky flavor and assures that the tough sinew will already be at the point of yielding succulence when you start cooking the rabbit.}
Crowd the rabbit parts and aromatics, pig’s foot, carrot, celery, onion, and garlic in a shallow flameproof 1-quart baking dish that accepts everything in a single, crowded layer. Chop the pig’s foot into a few pieces if it pokes above the pieces of rabbit. Add the vermouth, 1/4 cup of the olive oil, and enough stock to not quite half-bathe the rabbit.
Place the dish over low heat and bring to a simmer. Cover tightly and bake until the meat is just falling off the bones, 1-1/2 to 2 hours. Check at 1 hour and turn the rabbit pieces over if they are browning.
Let cool only slightly, then remove the rabbit from the dish; set the dish aside. As soon as it is cool enough to handle, bone the rabbit. You should get about 1/2 pound of meat. Work quickly to tear and shred the meat with intrepid fingers or, if you are skittish or tradition-minded, two forks. Grate a little nutmeg over it. Pound the boned meat lightly in a mortar, in about 1/2-cup batches. As long as the meat is still quite warm, it will quickly and easily fall into a tender, fluffy mass; once the meat cools completely, it will resist separating into the fine filaments that give rillettes their charm. {I do like to leave a few thicker strands of meat in the rillettes for contrast. I also bone the pig’s foot, chop the meat and skin finely, salt to taste, and smash it into the rillettes with a pestle. This is optional, but gives the rillettes added succulence.}
Strain the cooking liquid; skim and add the oil to the rillettes. Taste the remaining liquid. If it looks or tastes thin, simmer it until it has some body and tastes concentrated. A few drops at a time, add just enough of this potion, usually no more than a teaspoon or two total {see Note below}, to the meat mixture until it begins to mass. Taste. Add more salt, pepper, and/or nutmeg if you like. If you want more richness, work in a little more extra-virgin olive oil.
Serve immediately, or refrigerate until ready to use. If you make more than you will consume in one sitting, divide it among small jars or ramekins, packing it lightly, and coat the surface with a film of extra-virgin olive oil. The rillettes will keep a week or so this way. For longer keeping, pour a 1/8-inch-thick layer of clarified butter or melted pork or duck fat over the surface. Scrape or lift off and discard that fat before serving.
Note: Save any extra cooking liquid; you can add it to braised rabbit dishes, or spoon it over Rabbit Sausages {here}. It is also good tossed with egg noodles, enriched with a nugget of unsalted butter, or stirred into risotto~whether plain or studded with mushrooms, asparagus, peas or favas. I sometimes add it to a pot of white beans just before I reheat them.