


THE ZUNI HAMBURGER
THREE-STAR CHEF JEAN TROISGROS COULD NOT HAVE KNOWN WHAT HE WAS seeding when, in 1973, in the most revered kitchen in France, he grandly announced he was planning a special dish for the Sunday family meal in the bar of Les Frères Troisgros. He prepared fourteen generous «ahm-bour-gaires poêlés» and explained his selection with an incredulous, «Et pourquoi pas?» Cuisiné with care, his hamburger was worthy of his signature filet au poivre or benchmark entrecôte à la moelle. The Troisgros brothers’ rogue attitudes about what is okay to cook in a “serious restaurant” still color my every culinary decision.
The Zuni hamburger is made with fresh chuck and sea salt. Look for firm, bright red meat with hard, bright white fat. Pale, flaccid, wet meat produces a listless result. It cooks up dryer than its fresh counterpart, and tastes old within hours of grinding. For this reason, we avoid meat that has been vacuum-packed {“Cryovac’d”}. Although the process does prolong shelf life, it doesn’t enhance flavor or texture. The vacuum process weakens the cell walls, which is why the meat weeps progressively more and more water and blood into its package. The meat smells unpleasant when you unwrap it, and although rinsing helps, the odd scent doesn’t always go entirely away. For largely the same reasons, we avoid meat that has been frozen.
Where fat is concerned, don’t trim it all off. We aim for 18 percent fat overall~which sounds hard to judge, but if you think of it as barely one-fifth of your prepared product, it’s possible to get close enough by eye. You can moderate this, at the cost of some flavor and juiciness. {Bear in mind that commercial ground chuck is 20 to 25 percent fat; 18 percent is within the margins for ground sirloin.}
But what finally makes the Zuni hamburger particularly succulent and delicious is seasoning the meat with salt a day before grinding it. Aside from guaranteeing that it is evenly and properly seasoned, this brief curing makes the meat retain moisture better and enhances the texture. We use 1 tablespoon sea salt per 5 pounds of meat. You can use more or less salt, to your taste. It is important to keep the meat cold during all phases of handling.
The Zuni hamburger arrives on a rosemary-flecked focaccia bun with a few leaves of oak-leaf lettuce, a smear of Aïoli {here}, and our Zucchini and Red Onion Pickles {here and here}.
Wine: Joseph Phelps California Le Mistral, 1998
FOR 4 SERVINGS:
1-1/2 pounds boneless beef chuck, trimmed of discoloration but with some fat intact
1 scant teaspoon salt {a little more if using kosher salt}
Seasoning the meat {18 to 24 hours in advance}:
Cut the meat into 1-inch strips or chunks and toss with the salt. Cover loosely and refrigerate.
Assemble your meat grinder with a 3/16-inch blade and sharp knife. Refrigerate to chill thoroughly. A warm grinder can warm the meat, melt the fat, and produce more of a “smash” than a clean, crumbly grind. The result will have inferior flavor and texture and then degenerate rapidly. {For more on grinding meat, see A Lesson in Sausage Making, here.}
Grind the meat two times, paying special attention on the first pass to make sure that the meat is emerging cleanly and evenly. If it is not, turn off the grinder immediately. Remove and clean the blade and knife: an errant sinew wrapped around a cutting edge is usually responsible for a mushy grind. Reinstall and finish grinding the meat.
As an alternative to grinding the meat, you can finely chop it, by hand or by the fistful in a food processor with a very sharp blade. The patties will be a little more fragile and the texture of the cooked meat more crumbly, but neither of these is necessarily a defect. The flavor and succulence will not suffer.
Form 6-ounce patties by hand, first forming balls, then flattening them to 3/4-inch thickness. Press the patties a bit thinner in the middle; the meat shrinks as it cooks and the patties will emerge an even thickness only if they start out skinny in the middle. If the edges crack, smash them back together. In all events, work quickly and don’t overhandle or warm the meat.
Cook the hamburgers immediately, or refrigerate loosely covered until needed. The hamburgers will taste best if cooked within 12 hours.
To grill the hamburgers: At Zuni, we grill hamburgers over mesquite charcoal. The grill sits about 3 inches from the just-graying coals. We flip the patties three times to ensure even cooking and to make sure they don’t char. A cold 6-ounce patty will take about 9 minutes to cook to a rosy medium-rare, but allow another 2 to 3 minutes away from the direct heat for this thick hamburger to rest, as you would a roast. Short of that, it will be a bit overdone on the edges and perhaps too rare in the center.
To cook the hamburgers on the stovetop: Choose a pan not much larger than will accommodate the patties, and make it cast-iron if you have one the right size. This will encourage a nice crust. Preheat the pan until the meat sizzles on contact. Start over medium heat, and flip the patties after about 3 minutes. They should have set a tender golden-brown crust. Cook another 3 minutes to make a crust on the other side. Reduce the heat to cook through without toughening the crust, flipping each patty twice more to guarantee even doneness. For rosy medium-rare, allow about 10 minutes total cooking time, plus 2 to 3 minutes’ resting time away from direct heat.
To broil the hamburgers: Make sure to fully preheat the broiler and broiler pan. Also, make sure the patties are widely spaced, so they don’t steam one another. Failing either of these, the patties will not look very appetizing and the surface will taste insipid. Start by browning both sides of the patties close to the heat, about 3 minutes per side. Then lower the broiler rack a few inches and finish cooking, flipping each patty twice more. For a rosy medium-rare, allow about 9 minutes’ total cooking time, then turn off the broiler, leave the door slightly ajar, and let the hamburgers rest for a few minutes before serving.
SKIRT STEAK & HANGER STEAK
BOTH THESE CUTS ARE HARDWORKING ABDOMINAL MUSCLES AND ARE VERY flavorful. Ask for the “outside” skirt~it will be plumper than the “inside” cut. The “hanging tender” steak is a single convoluted muscle, among the select cuts that butchers everywhere used to try to keep for themselves. It has a rich flavor that more than makes up for its awkward shape. The French call it onglet and accord it an honored role in the traditional repertory; specifically, sizzled in butter and finished with lots of minced shallot, coarsely chopped parsley, a stingy splash of white wine, and then more unsalted butter.
Both cuts are flavorful unadorned but also stand up to sauces like Porcini Pearà {here}, Chimichurri {here}, Salmorigano {here}, Salsa Verde {here}, or Toasted Bread Crumb Salsa {here}, in which case we serve them with grilled vegetables. Or serve with a rich Onion Panade {here}, Buttermilk Mashed Potatoes {here}, Hashed Sweet Potatoes {here}, Braised Fennel {here}, Long-Cooked Romano Beans {here}, Lentils in Red Wine {here}, or Fagioli all’Ucelletto {here}.
Hanger steak and skirt steak both make great sandwiches. My favorite marries them with salsa and white bean purée. Either cut makes delicious pasta sauce {see Pasta with Giblet-Mushroom Sauce, here}.
Wine: Chimney Rock Stags Leap District Reserve Cabernet Sauvignon, 1998
PER SERVING:
5 to 6 ounces skirt steak or hanger steak
Salt
Mild-tasting olive oil, to coat, or as needed
Trimming and seasoning the meat {for the best flavor, do this step in advance, about 4 hours for skinny skirt steak, up to a day ahead for stumpy hanger steak}:
Trim any fat or discoloration from the meat, then press lightly between dry towels to wick away surface moisture. Season evenly all over with salt {we use a scant 3/4 teaspoon sea salt per pound}. Cover loosely and refrigerate.
Just before cooking, press the meat dry between towels and rub with olive oil. Sear over high heat~on a preheated grill, or in a hot skillet with a few additional drops of oil. Sear each side of the meat until splotched with a little color, a minute or so per side, then move to slightly lower heat, or reduce the burner heat, to cook to the desired doneness. Skinny skirt steak will take only minutes more at most; a thick hanger steak may take 8 more minutes to cook to medium-rare. But these times are hugely affected by the cooking medium, size of cut, how cold it is when you begin cooking it, how thoroughly you sear it, and so on. Hanger steak benefits from resting for a few minutes before slicing.
Slice straight across the grain, rather than on a uniform indiscriminate steep angle~this popular habit produces wide, elegant-looking slices, but they can be pretty chewy, regardless of how well the meat is cooked. Cutting strategically across the grain minimizes the chewiness problem. Also in view of chewiness, I like to slice both skirt and hanger steak no more than 3/8 inch thick. Cutting skirt steak across the grain is easy, since the fibers run in regular, parallel formation across the full width of the muscle. Try to forgive the skinny slices and enjoy the improved texture. The grain of a hanger steak is not so ruly; and most cooks puzzle over the cooked thing, flipping it a few times, before making a calculated, counterintuitive stab. It may help to study the direction of the fibers before you cook the meat, when they are much easier to make out. The grain does alter course within the cut; be prepared to change the angle of your knife accordingly. Cutting the hanger steak this way, you will get a collection of oval and oblong slices.
 Variation SKIRT STEAK OR HANGER STEAK & WHITE BEAN SANDWICH
Toss thin slices of warm meat with Chimichurri, {here}, Salsa Verde {here}, or Salmorigano {here}. Warm a spoonful of white beans {here} with a splash of their cooking liquid and taste for salt. Smash and spread on a slice of warm grilled or toasted chewy country bread or focaccia. Pile the meat on the beans, add a few leaves of arugula or sprigs of watercress, and top with a second piece of bread.
MASTERING THE BRAISE
FEW OF US THINK OF GLOWING COALS WHEN WE SET OUT TO MAKE A BRAISED DISH, though the name traces to la braise, the steady coal fire that was heaped on and under a closed cooking vessel~the braisière~filled with meat and aromatics. A modern braise, largely defined by content and technique, not by the cooking vessel, is composed of gently browned meat, typically crowded by vegetables and moistened with stock and wine, then covered tightly and cooked slowly in the oven. It lacks the romance and risk of the original technique but relies on the same principal of trapping the meat and its juices in a moist, fragrant chamber surrounded by steady, low heat. Stovetop braising can approximate this condition if the vessel is heavy enough to really surround the food with uniform and steady heat.
In contemporary kitchens, or at least in ours, braising has succeeded sauce making as the most appealing of culinary endeavors. And with good reason. Braising integrates protein cooking and sauce making in one dish, and the result is usually the heart of any meal. “Building” a tasty braise requires good judgement in the choice of ingredients and how they are prepared, portioned, and assembled. Producing a successful braise depends on appreciating a clutch of variables and how they will interact through long cooking. The succulence of a braised meat depends on slow, steady cooking with internal temperatures high enough to gradually melt sinews {which begins at about 150°} and weaken tough muscle fibers without drying them out. If the meat gets too hot for too long, too much moisture evaporates and the proteins become so denatured that they can’t hold on to the melted sinew {collagen} that gives the meat succulence. That melted collagen will give body to the braising liquid, but the muscle itself will collapse and become stringy.
Hence, successful braising requires low to moderate heat and time. And still, as fragile as all that may sound, and as elaborate as any of these braising recipes may appear, the technique is, in fact, easy. The particulars don’t require absolute precision and, happily, no great dexterity is needed to produce a fine braise. And the slow, gentle cooking process permits great latitude with regard to timing.
Some guidelines and “braising habits” you’ll encounter in most of our braised meat recipes:
 The meats are salted in advance, usually 1 to 3 days before braising. We usually use 1 scant tablespoon of sea salt for 4 pounds of meat. I find this improves flavor and enhances succulence and is worth the little planning it requires. If your schedule is tight, reducing the lead time will diminish the effect, but is better than skipping this preliminary step.
Good, rich flavor depends on carefully browning the meat. Brown meat gently over medium heat, or a good 5 inches from a broiler element. This will preserve the flavor of the fat and allow the whole surface of the meat to brown before any fraction of it gets a chance to burn. The tiniest spot of overbrown or scorch will affect the flavor of the braising liquid. Trim any such defect. When pan-browning, use only a film of fat. If there is too much fat in the pan, the meat will shallow-fry, and the gorgeous, crunchy surfaces that might taste delicious now will seem like so much boiled cardboard after braising. {To appreciate this point, imagine taking a bite of freshly cooked, crispy brown bacon, and then consider how that same slice would feel in your mouth after simmering for two hours in stock.}
And bear in mind that browning is for flavor, not sealing in juices. The persistent saw that “searing seals in the juices” is only a blessing if it causes cooks to continue to brown carefully~it has long been understood that no amount of well-meaning browning will hold in moisture. Close attention to a lovingly seared steak reveals that plenty of moisture escapes no matter what, but if you resist trusting your eyes when it comes to abandoning such a successful myth, an explanation of the dynamic is in Harold McGee’s On Food and Cooking {Scribner, 1984}. It is worth noting that searing does, however, keep slowly cooking meat from oozing unappetizing globs of protein, as, for example, happens when you place hamburgers under a not-very-hot broiler. {For more on browning, see here.}
Concerning the “surrounding” vegetables: We very rarely brown them, not only because the braising process is long enough to thoroughly cook the brawniest of roots, but also because aggressively browning generally dims their individual flavors in favor of subtly cloying caramel. And I prefer to avoid introducing more cooked fat into the long-cooked braise. I think the resulting sauces are clearer in flavor and more digestible. All of this is relevant even if you don’t plan to serve the braising vegetables.
The braising liquid consists of stock, wine, or beer, and sometimes tomato. The depth of the liquid ranges from one-quarter to one-third of the height of the meat, depending on how much liquid we expect the meat and vegetables to release as they cook. It is critical that the liquid be seasoned and rich in flavor and body, to avoid leaching too much flavor, succulence, and salt from the meat. {Where the stock is not terribly gelatinous, a pig’s foot is a good, inexpensive off-the-shelf fortifier. It is mild in flavor, but rich in the collagen that gives the sauce body. After a brief parboiling, the pig’s foot will be primed to shed that protein into the braising liquid.} This formula produces satiny, syrupy, clear tasting sauces that hold and reheat well. I prefer them to the slightly starchy texture and duller taste of sauces whose body owes to flour.
Reheating a Braised Dish:
These meaty braises generally taste best and have a silkier texture if they are allowed to cool, at least partially, and are then reheated. Cool them with the pot at a slight tilt, which makes it easier to remove the fat.
We always strain off, taste and “rectify” the braising liquid before we reheat the braise, whether by reducing it or adding salt, sugar, wine, stock, water, tomato, and/or vinegar. If you aren’t confident making such an adjustment, I recommend you tinker with only a spoonful of the braising liquid and then taste the effect before you gamble on the whole affair. Once you are happy with the sauce, recombine it with the meat.
We reheat the meat and any vegetables we’ve salvaged, together with the braising liquid, slowly and still crowded, either in the original braising vessel or in one suited to the amount we are reheating. To evenly reheat a fully cooled braise, set the pan over low heat and bring to a simmer, then cover and place in a 300° oven until the meat is piping hot. If you are reheating a small amount, you can do so successfully on the stovetop, as long as you gently swirl the pan and turn the pieces of meat over occasionally. The braise shouldn’t boil hard when you reheat it.
BRASATO
THE NOTION OF COOKING IN A COVERED PAN HEAPED WITH COALS {LA BRAISE} gave us the name of this dish and cooking method, although in English we focused on the vessel, not the fire, and came up with “Pot Roast.” This brasato was inspired by the Piedmontese version, which is a pot-roasted chunk of beef loyally bathed with the red wine of that Northern Italian region. {When they do the same thing around Florence, they call it stracotto, meaning “overcooked,” but “extra-cooked” sounds more encouraging} When we make brasato, we reduce the wine first and then add rich beef or chicken stock to the braising liquid. If using chicken stock, we fortify the liquid with a piece of pig’s foot, which many supermarkets carry fresh or frozen {or can order for you}, as do many Latin or Asian markets. I always buy more than I need, cut it into chunks, and wrap and freeze them individually. They keep well for months and are a boon to have on hand for enriching this and other dishes.
Shoulder chuck is excellent for pot roasting~choose firm, bright red meat with bright white fat, and ask for a piece where different muscles meet: this means there will be plenty of gelatinous connective tissue to render the pot roast succulent. Lean, uniform single-muscle cuts, like eye-of-the-round and bottom round roasts, advertise “pretty,” but do not have better flavor and will readily dry out; I don’t recommend them. The ritual of artificially enriching lean cuts by larding them with alien fat is a curious one~it doesn’t contribute what you need, collagen, and the channels of introduced fat always taste and feel like, well, channels of fat {unless you roll the strips of fat in salt and other seasonings first, which can make them worthwhile}. But fat does improve flavor; so I simply choose a cut that has some of its own fat and I don’t trim it too scrupulously. We try to tie the roast in such a way that a little of that compatible fat is inside the roast. Fat and gelatin notwithstanding, salting the chunk of meat a few days in advance will make any pot roast more flavorful and succulent.
Red-wine pot roast calls for hearty vegetable and starch dishes. Polenta is its constant companion in the Piedmont, but root vegetables~roasted, braised, or mashed~are welcome too. And Long-Cooked Romano Beans {here}, Braised Fennel {here}, Martha’s Spätzle {here}, watercress salad, roasted winter squash, and Lentils Braised in Red Wine {here} have all accompanied pot roast at Zuni. By adding an egg or two, you can turn leftover bits of meat and braising liquid into a hearty meal for one, or a few. {See Eggs Baked in Restes, here.}
Wine: Barolo “Bussia Soprano,” Aldo Conterno, 1996
FOR 6 GENEROUS SERVINGS:
One 4-pound beef shoulder chuck roast, trimmed of any discoloration, but with some fat intact
Salt
One 750-milliliter bottle hearty red wine, such as Nebbiolo, Cabernet Sauvignon, Zinfandel, or Syrah
About 4 cups Beef Stock {here}, or 2 cups Chicken Stock {here} plus 12 ounces pig’s foot, cut into pieces
About 1 tablespoon mild-tasting olive oil
1 large carrot {about 4 ounces}, peeled and cut into 2-inch chunks
1 small celery root, top trimmed {about 8 ounces}, peeled, and cut into 2-inch chunks
1 medium yellow onion {about 8 ounces}, cut into 2-inch wedges
A handful of garlic cloves, unpeeled
1 or 2 bay leaves
12 black peppercorns, barely cracked
A pinch of sugar, if needed
About 1 teaspoon balsamic vinegar {optional}
Seasoning the meat {for the best flavor and succulence, do this step about 3 days in advance, or as close to 3 days ahead as you can}:
Salt the meat evenly all over, making a point of sprinkling it into any of the natural seams between the muscles {we use 1 scant tablespoon sea salt for 4 pounds meat}.
Tying up the meat:
Tie the meat tightly into a stout log about 6 to 7 inches in diameter, knotting about four individual loops around the circumference and one loop around the length of the meat {see Hints for Tying Up Meat, here}. Given the sought-after irregularity of the cut, you may need to push the muscles into slightly unnatural alignment to produce a regular shape.
Preparing the braising liquid {about 20 minutes, and you can do this well in advance}:
Simmer the red wine to reduce to just over 1/2 cup. It will be very dark.
If using beef stock: Place in a small saucepan and simmer, skimming as needed, to reduce the stock to about 2 cups. It should have a little body.
If using chicken stock plus the pig’s foot: Place the pig’s foot in a small saucepan and add cold water to cover. Bring to a boil, reduce the heat, skim, and then simmer until the foot begins to feel slippery, about 20 minutes. Drain, and set aside.
Browning the meat {allow 15 minutes}:
Lightly brown the meat, either under a preheated broiler or on the stovetop; you are browning for flavor~if the fat or meat scorches you defeat that purpose.
To broil: Preheat the broiler. Rub the roast with the olive oil, set in a small roasting pan and place about 5 inches below the element. Roll a quarter-turn as each side takes on a little color. Trim any bits that overbrown.
To pan-brown: Choose a skillet not much larger around than the largest side of the roast. Add the olive oil and warm over medium heat. Set the roast in the pan and leave it to color, then roll and pivot it as necessary to brown the sides and ends.
Assembling the braise {about 5 minutes}:
Preheat the oven to 325°.
Choose a heavy flameproof braising vessel that can accommodate the roast surrounded by a 2- to 3-inch wide moat of vegetables. A deep Dutch oven, flared brasier, or wide saucier-type pan is ideal, although I generally use my 3-quart suaté pan. Set the browned meat in the center of the pan, flanked by the pig’s foot, if using, then scatter the bay leaves and cracked pepper in the “moat.” Surround with the vegetables. The vegetables should be crowded; your pan size will determine whether you can fit them all. Add the reduced red wine, then add enough stock to come to about 1 inch. You may not use all the stock~save what you don’t use for extending or correcting the sauce.
Bring the braise to a simmer {this will save about 30 minutes of oven time}. I usually then take the temperature at the center of the piece of meat and make a mental note of it. These two habits help manage and predict cooking time; using the same pan and the same oven every time helps as well. This allows you to focus on the more elusive variables that affect the timing and flavor of the pot roast and its sauce, or of any braised dish: the characteristics of the particular piece of meat, vegetables, and moistening agents.
Braising the meat {3-1/2 to 4 hours}:
Cover the pot tightly and place in the oven. After about 2 hours, uncover and turn the meat over. It will be very firm, like a flexed muscle. Work quickly, so neither the roast nor the oven loses too much heat. Cover and cook for another hour or so, then turn the meat again.
Continue cooking until fork-tender, usually another 30 minutes to 1 hour. {If you like, uncover the roast for the last 30 minutes to glaze the surface slightly.} Properly cooked, the pot roast will yield, but not collapse, with a gentle poke. Remember, a piece of cooked meat never feels harder than when it is piping hot; the roast will soften further as it cools. A tender pot roast will have surrendered about 30 percent of itself to the sauce.
If you need your pot roast to mind itself while you are gone, you can skip the turning over steps; and you can slow the cooking down by an hour, or even a few, by cooking it at 275°. The most succulent pot roast I have ever made spent nearly 6 hours in the oven, the last 4 at 250°. This flexibility makes the dish appealing, as you can tailor it to your schedule; the window of succulent tenderness is not narrow, and an extra 30 minutes at low temperatures will not ruin the result.
Finishing the sauce and serving the pot roast {about 15 minutes}:
Transfer the pot roast to a new pan and set in a warm, protected spot.
If you used the pig’s foot, place it in a strainer, hold it over the braising pan, and rinse with a few splashes of warm water. This will wash the sticky braising juice into the pan below. Another option is to bone and chop the meat and skin and add some or all of it to the sauce.
Fish out the braising vegetables, set in a medium-mesh strainer perched over a bowl, and press with a spatula or wooden spoon until you have about 1 cup of homey mixed-root vegetable purée. I like the garlic in particular, so I make sure it all goes through.
Tilt the braising pan and skim the fat. Skim and add any juice the meat may have oozed as it rested. Taste. The sauce ought to be rich and have a little body. Stir in enough of the vegetable purée to give the sauce a little more bulk and sweetness. Taste again. If you find the flavor too acidic, consider adding a splash more stock or a pinch of sugar. Or trickle in the balsamic, which will add both sweetness and acidity and a waft of perfume to the sauce. {If you are unsure of what to add, and how much, adjust only a spoonful of the liquid to make sure you are on the right track. Then rectify the lot.}
Carve the pot roast into thick slices, removing strings you go: for the best texture, slice across the grain. You may have to change the angle of the knife a few times to do this. Sometimes we pry the whole roast apart into major muscles that want to be carved on different angles. Serve a few spoonfuls of hot sauce with each portion of pot roast.
OXTAILS BRAISED in RED WINE
WE HAVE BRAISED NEARLY 7,500 OXTAILS SINCE THEY BECAME A ONCE-A-WEEK item at Zuni in 1989. But the ugly-duckling cut of over a decade ago is very much in demand now, and since no one can arrange for more than one 2-1/2-pound tail per beast, we can’t always get as many as we need. This became a happy problem when we began supplementing them with beef cheeks, which are even richer in flavor, or short ribs, which are easy to find and, it seems, loved by everyone. Cheeks and short ribs both cook more rapidly than tails, so we remove them from the braise an hour or so early.
As with any braised dish, I am just as interested in the character of the sauce as the meat itself, so we use rich beef stock to ensure that it is flavorful and has body, without wicking all the succulence from the meat. If you don’t have time to make a full-blown beef stock, you can use chicken stock plus a pig’s foot~the foot is an inexpensive package of mostly skin, tendon, and cartilage that slowly melts, giving the braising juice wonderful body. {Many supermarkets carry them, or can get them; Latin and Asian markets are also a good place to find them. Buy split feet, and more than you need. Wrap in small chunks and freeze for future projects}. Whichever approach you take, do know that this dish does take time, although not so much your time as its time. Don’t try to rush it. On the other hand, preparing it in advance and reheating it is an excellent idea; the flavors and textures do nothing but improve.
Serve the oxtails over Polenta {here}, with Buttermilk Mashed Potatoes {here} or Martha’s Spätzle {here}. Or arrange the oxtails in a casserole on a slice of stale bread you have first soaked in a mixture of red wine and olive oil, add the braising liquid, and reheat slowly. Garnish with a wad of watercress.
And I hope you have some leftover braised oxtails to serve in one of the following ways: with eggs, poached or baked in the meat-flecked braising liquid {see Eggs Baked in Restes, here}; tossed with egg noodles or chewy pasta tubes; over risotto; or boned and recombined with their braising liquid, topped with mashed potatoes, and baked into a wealthy shepherd’s pie.
Wine: Jacob’s Creek South Australia Shiraz Reserve, 1998
FOR 4 TO 6 SERVINGS:
4 generous pounds oxtails {or a combination of mostly oxtails and the balance in beef cheeks or short ribs}
Salt
4 cups Beef Stock {here}, or 2 cups Chicken Stock {here} plus 1 pound pig’s foot, cut into a few pieces
1 to 2 tablespoons mild-tasting olive oil
1-3/4 cups hearty red wine, such as Cabernet Sauvignon, Zinfandel, or Syrah, or as needed
A splash of brandy
1 or 2 bay leaves
1 small head garlic {about 2 ounces}, root end trimmed and cut crosswise in half
A branch of fresh flat-leaf parsley, fresh thyme, or both
A few black peppercorns, barely cracked
1 large carrot {about 4 ounces}, peeled and cut into 2-inch chunks
A few stalks celery, leaves trimmed {about 4 ounces} and cut into 2-inch lengths
1 medium yellow onion {about 8 ounces}, cut into thick wedges
About 1 cup coarsely chopped, drained canned tomatoes
Trimming and seasoning the meat {for the best flavor and succulence, do this step 2 to 3 days in advance, or as early as you can manage}:
Trim the oxtails of excess fat, but don’t remove the shiny silverskin. If you have bought a whole oxtail, cut between the vertebrae to make about 9 chunks. The skinny tip of the tail has almost no meat, but include it in the braise anyway, it will add gelatin and flavor. If using beef cheeks, trim any tough-looking silverskin, then cut each cheek into 2 pieces. If using short ribs, trim most of the fat, but leave the silverskin and bones in place. Season all the meat liberally all over with salt {we use 1 scant tablespoon sea salt for 4 pounds of meat}. Cover loosely and refrigerate.
Preparing the braising liquid and browning the meat {about 1/2 hour}:
If using beef stock: Place in a small saucepan and simmer gently to reduce to about 2 cups. Skim as needed. It should be syrupy, not gluey.
If using chicken stock plus a pig’s foot: Place the pig’s foot in a small saucepan, cover with cold water, and bring to a boil. Reduce the heat, skim, and simmer until the foot starts to feel slippery, about 20 minutes. Drain.
Preheat the oven to 300°.
Choose a heavy flameproof braising vessel that will hold the pieces of meat in a single layer with the vegetables piled and crowded in between. I use a 10- by 14-inch roasting pan that is 2-1/2 inches deep.
Wipe the pieces of meat dry. Warm a film of olive oil in a 12-inch skillet over medium heat. Add enough pieces of meat to loosely crowd the pan. Let brown lightly, usually 3 to 4 minutes, then turn to color the other sides. {This can be tedious, since these cuts of meat have multiple awkward faces, but conscientious, gentle coloring overall will repay you with a well-flavored braise.} If the oil smokes at any point, transfer the meat to a dry towel, discard the oil, and clean the skillet; wipe the burned oil from the meat and start again. Transfer the browned meat to the braising pan, and brown the remainder in one or two batches. Once you have browned all of the meat, pour off the fat and wipe the skillet clean.
Set the skillet over medium heat and add the 1-3/4 cups red wine and brandy. Stir and scrape as it sizzles. Then simmer until the wine has reduced by about half. Add the reduced stock and bring to a simmer. Turn off the heat.
Assembling the braise {5 minutes}:
Arrange the meat, including the pieces of pig’s foot, if using, evenly in the braising pan. Distribute the bay leaves, garlic, parsley and/or thyme, and black pepper around it, followed by the carrot, celery, onion, and tomatoes, filling the crannies between the chunks of meat. Add enough of the hot wine-stock mixture to come to about one-third the depth of the meat. You may not need all of the liquid; save it for finishing the sauce {or freeze it for your next red wine–beef braise}. Set the braising pan over low heat and bring to a simmer. Heating the pan and liquid will save about 20 minutes of oven time, and routinely doing so means that every braise you make, oxtail or otherwise, starts at the same temperature; controlling this variable can help you to better predict cooking times.
Tent the surface of the braise with parchment paper, then cover the pan with a tightly fitting lid or with foil, dull side out.
Braising the meat {3-1/2 to 4 hours}:
Place the pan in the oven and cook until the oxtail meat has just begun to pull from the bone, usually 3-1/2 to 4 hours. Check the doneness at 2-1/2 hours. The meat and vegetables will have released lots of moisture~the meat may be nearly submerged. {If you have included other cuts than oxtails, they may be tender already. If so, transfer them to a shallow bowl and set aside, loosely covered.}
After checking the doneness, leave the lid slightly ajar, or the foil loose, when you return the pan to the oven. This will allow the now-abundant braising liquid to begin reducing. Check meat again at 20- to 30-minute intervals until it is tender, but not collapsing. It will continue to soften as it cools.
Cooling and skimming the braise {about 20 minutes}:
Once the oxtails are tender, remove the braise from the oven and prop the pan at a slight angle so the fat will collect at one side. Turn each piece of meat over to remoisten the dryer face. If the braising juice is already quite syrupy, add a trickle of water. Tent with the parchment.
When the braise has cooled slightly, spoon off the fat. Transfer the pieces of meat to a separate pan, with the cheeks or shortribs, if applicable. {Cover and refrigerate if you are not planning on serving the dish within an hour or so.}
Correcting the sauce {about 15 minutes}:
If you used the pig’s foot, remove it and use your fingers to bone it. Discard the bones. Chop the meat and skin. Set aside.
Taste the vegetables. If you like the flavor and texture, you can serve them as is. If their flavor is nice but their texture insipid, press them through a food mill or strainer and stir some or all of that purée into the finished braising liquid. {I usually salvage at least the garlic and press it through a strainer to recuperate the mellow paste~or simply break it up and scatter the paste-filled cloves into the braise.} If the vegetables are utterly spent, collect them in a strainer and place over a bowl to capture whatever liquid they release. Rinse them with a trickle of warm water, stirring the vegetables as you add it, to dilute and retrieve the sticky braising liquid clinging to them, then discard the vegetables.
Skim the braising liquid again. Add the optional chopped pig’s foot and the liquid from the vegetables, bring to simmer over low heat, and skim again. Taste, then spoon a little of the liquid onto a plate. If it tastes weak and looks watery, simmer to reduce further, do the “plate test” again, and taste. If the liquid is less than rich and delicious, consider further reduction, or add wine, stock, or extra wine-stock mixture to a spoonful of the liquid to see if it makes it taste better, then adjust the lot accordingly {which may mean not at all}.
Reheating the braise:
Combine the meat and liquid in the original braising vessel or in a wide sauté pan. Bring to a simmer, then cover and continue to simmer until the meat is piping hot, 10 to 15 minutes. {To reheat oxtails you braised yesterday, or the day before, you should bring to a simmer as described, place in a 350° oven, and heat until the meat is piping hot, usually 30 to 45 minutes.} Serve.

ABOUT BROWNING
WHEN YOU BROWN FOOD, YOU ARE COLORING THE SURFACE BY using heat to rapidly evaporate its moisture. Once the water is gone, the natural sugars can caramelize and/or the carbohydrates, proteins, or fats can turn gold, chestnut, or brown {or, eventually, black}. “To golden” might be a more appropriate instruction, since that is most often what is sought, but that word hasn’t risen to verb status in English. {However, in French, the term dorer, and in Italian, dorare [both meaning “to gild,” or “to make golden in appearance”], are used liberally in the kitchen.} Browning always firms the surface of the food, and successful browning introduces delicious new flavors, which one counts on to give character to braises and stews.
The simplest, least active form of browning is “top-browning,” where a dish is placed under a hot broiler for quick results, or in a somewhat cooler oven for slower coloring. Pan-browning is a more active operation and requires a little finesse from the cook. It is best done in a slope-sided pan so the moisture has a wide avenue of escape. You should preheat the fat, so it issues some sort of sizzle as the food hits it~just how noisy depends on the food in question. If the surface of the food is quite moist, pat it dry before you add it to the fat; this will quiet it down, and help prevent sticking. Don’t crowd the food~if the pieces of food are too close together, they will trap moisture and steam rather than brown. {But don’t space the food too far apart, or you risk burning the fat.} The food will stick to most cooking surfaces until its surface moisture has evaporated and a crust, however minimal, has formed, so be patient. If a chunk of meat, {or poultry, or fish} wants to stick, don’t fuss with it. Stirring or prying tends to create new problems~it makes the food release more moisture, and if you rip it from the pan, you will simply expose a new moist surface of meat, which will in turn want to stick to the pan. Any bits of meat you leave stuck to the pan will readily burn, and you won’t be able to brown anything on top of them. If time doesn’t encourage a piece of meat to release, use a metal spatula to scrape it cleanly from the pan.
Always monitor browning operations closely and adjust the heat as needed to prevent burning or to encourage that brown, or golden, crust to form.
SHORT RIBS BRAISED in CHIMAY ALE
A SIMPLE BRAISE INSPIRED BY THE STALWART BELGIAN DISH CARBONNADE flamande. Chimay is the smooth Belgian ale we use for this dish at Zuni; it has a delicate sweetness, a touch of clove flavor, and only the faintest note of bitterness. Similar Belgian-type ales are made by Ommegang in New York and Unibroue in Canada. A mellow porter is another alternative, as is stout, as long as it is not too bitter.
Choose meaty slabs of short ribs, 3 or 4 ribs each, and have them sawn across the bones into floppy bands. Thickly slice the onions, so they don’t dissolve into the sauce.
These are good with browned spätzle {here} or mashed potatoes. Husband all leftover juice and bits of meat and onion to reheat with eggs {see Eggs Baked in Restes, here}.
You can also make this recipe using large Muscovy duck legs or goose legs.
Wine: Santa Barbara Winery Santa Ynez Valley Syrah, 1998
FOR 4 SERVINGS:
About 2-1/2 pounds short ribs, cut across the bone into 2-inch-wide bands {have the butcher do this}
Salt
1 to 2 tablespoons mild-tasting olive oil
1-1/2 pounds yellow onions {about 3 medium}, sliced 1/4 inch thick
2 bay leaves
A few whole white peppercorns
A few slices dried wild mushrooms, rinsed in warm water and coarsely chopped {optional}
Up to 1 cup Beef Stock {here} or Chicken Stock {here}
Up to 1 cup Chimay ale or similar Belgian-style ale or a mellow porter or stout
About 1/4 cup Dijon mustard
Trimming and seasoning the short ribs {for the best flavor and succulence, do this step 1 to 2 days in advance, or at least a few hours ahead}:
Trim most of the fat from the short ribs, but leave the silverskin and tough sheathing around the bones intact. This will help keep the meat succulent and will give body and character to the braise. Salt evenly all over {we use a scant 3/4 teaspoon sea salt per pound of meat}. Cover loosely and refrigerate.
Cooking the short ribs:
Warm the oil in a 3-quart sauté pan over medium heat. Wipe the pieces of meat dry. Brown the short ribs evenly and gently on the three meaty sides, about 4 minutes per side. Pour off excess fat.
Rearrange the meat bone side down in the pan. Add the onions, bay, peppercorns, the optional mushrooms, and equal parts stock and ale, porter, or stout to come to a depth of about 3/4 inch. Bring to a simmer, cover and cook over low heat, until fork-tender, about 2 to 2-1/4 hours. {You can cook the braise in a preheated 300° oven if you prefer.} Check two or three times to make sure that that the liquid is barely simmering, and turn each piece of meat each time you check. When the meat is done, uncover, prop the pan at a slight angle, and leave to rest for about 5 minutes.
Turn on the broiler.
Skim the fat that has collected at the lower side of the pan. Taste the juice and simmer as needed to concentrate the flavor. Salt as needed. Make sure each piece of meat is bone side down, then brush or smear the tops with the mustard. Set the pan under the broiler, about 5 inches from the element, to brown the mustard and glaze the surface of the onion stew, about 5 minutes.
Serve the short ribs very hot, mustard plaster up, with a spoonful of the syrupy sauce and onions.
POT-AU-FEU
POT-AU-FEU IS AN IMPORTANT MEMBER OF THE LARGE FAMILY OF TRADITIONAL dishes that consist of flavorful but inexpensive cuts of meat or poultry cooked in their own broth with the humblest of vegetables. Such dishes are advertised, unpromisingly, as “boiled dinner” in English, although “simmered dinner” sounds more appetizing, and more accurately describes the primitive but gentle cooking method that coaxes the bony, sinewy cuts of meat and earthy roots to melting tenderness. Pot-au-Feu is a comforting meal~or even two, when you consider the delicious broth and leftovers it usually generates. Both sumptuous and elemental, it makes a fine family dinner or a delectable, unpretentious dish to serve family-style to friends. Unfortunately, lackluster renditions of this type of dish are not uncommon, persuading many to avoid “simmered dinners.” On the other hand, a successful one is a triumph of pure and balanced flavor. It is a restorative dish that I am always happy to turn to as an alternative to the more usual braises, roasts, and grillades.
Making these simmered dinners regularly over the years, I’ve grown fiercely loyal to a few principles and techniques. These simple steps will help ensure your simmered dinner will be limpid and bright tasting.
Start by choosing a deep, narrow pot that will crowd the meat and vegetables. A pot that is too wide obliges you to add too much liquid, which will result in bland broth, and plenty of it. A narrow pot will limit evaporation and oxidation, both of which, for the sake of bright flavor, you want to avoid.
Concerning the meat, I presalt both the beef and chicken for these dishes, which helps keep them juicy and flavorful. I also blanch and rinse the beef before assembling our pot-au-feu. This rids the meat of surface impurities that may add off-flavors to the broth. This technique is foolproof, easy, and more efficient than the alternative of compulsive early skimming. After plenty of experimenting, I always begin this “blanching” in warm water. This seems to precipitate unwanted substances to the water’s surface, without extracting the “good” flavors from the meat.
When it comes to assembling the actual dish, I use a combination of stock and water to moisten it. This indulgence violates the tradition of all water, but it means that a little more flavor can stay in the meat.
Finally, gently simmer, don’t boil, the pot-au-feu, and, farmhouse origins notwithstanding, don’t cook it indefinitely. Boiling will make the broth both murky and murky tasting. Boiling and overcooking make the meats unnecessarily stringy and will turn the vegetables into bland, moisture-logged, formless lumps.
A basic pot-au-feu, which comes from the French farmhouse tradition of a “pot on the fire” {where it lived, simmering indefinitely, to be replenished as often as a meal was drawn from it}, may be no more than one cut of beef plus carrots, onions, and leeks, served with a few kernels of rock salt, mustard, and cornichons {pickled gherkins}. This modest combination can be shockingly good, the taste and texture of each element still bright and clear, and the broth fragrant and saturated with flavor. More ambitious versions include multiple cuts of meat or are embellished with chicken and other root vegetables~such as parsnips, turnips, or celery root. Carol’s Pickled Onions {here}, Pickled Glasswort {here}, and Spiced Zante Grapes {here} are fun alternatives to the ubiquitous French gherkins.
I am married to short ribs~the thick plates de côtes of French butchery~for this dish. They have a bright flavor and a great loose-grained texture. Beef shank is often recommended, but the meat is quite dense and can give a dark, bloody flavor to the broth. Cooking only one cut of meat makes this recipe easy to time. You can adjust the amount, and relative amounts, of vegetables if you like, leaving out what you don’t like or emphasizing what you do. Included in this recipe is a recipe for my favorite garnish, mustard vinaigrette, which you can stir together at the last minute.
In France, the broth from the pot-au-feu is often served as a first course, by itself, or with croûtons and sometimes grated cheese. But even if you honor this tradition, you should still have plenty of broth leftover to serve with an egg poached in it {here} or with pastina cooked in it. It is also good with toasted fideus pastina {here} cooked in it, or with Martha’s Spätzle {here} swimming in it.
Leftover beef is a prize that will allow to you make Miroton {here}.
Wine: Gevrey-Chambertin, Vielles Vignes, Dominique Laurent, 1997
FOR 4 TO 6 SERVINGS, WITH EXTRA BROTH:
4 pounds short ribs, cut across the bone into 3-inch-wide slabs {have the butcher do this}
Salt
Water
About 3 quarts Chicken Stock {here} or Beef Stock {here}, or a combination
2 small yellow onions {about 12 ounces}, root ends trimmed flat, peeled, and halved
1 or 2 bay leaves
2 whole cloves
A few black peppercorns, barely cracked
A small branch of fresh thyme {optional}
2 large carrots {about 8 ounces}, peeled, ends trimmed
2 medium leeks {about 8 ounces}, root ends trimmed flat, green parts trimmed~leaving a few inches of green intact~and quartered lengthwise and thoroughly rinsed
1 medium celery root, top trimmed {12 ounces}, peeled, and quartered
2 medium white turnips {scant 8 ounces}, peeled and quartered
1 medium rutabaga {scant 8 ounces} peeled and quartered
For the mustard vinaigrette:
FOR 1/2 CUP:
Just over 1 tablespoon broth from the pot-au-feu
2 teaspoons Dijon mustard {the seedy kind is particularly good here}
1-1/2 tablespoons red wine vinegar
6 tablespoons mild-tasting olive oil
1 teaspoon walnut oil {optional}
Salt and freshly cracked black pepper
Optional garnishes:
Spiced Zante Grapes {here}, Pickled Glasswort {here}, Carol’s Pickled Onions {here}, or French cornichons
Fleur du sel or coarse sea salt {see Choosing Among Salts, here}
Trimming and seasoning the meat {for the best flavor and succulence, do this step 1 to 2 days in advance}:
Trim most of the fat from the short ribs, but leave the silverskin and tough sheathing around the bones intact. This will help keep the meat succulent and will give character to the broth. Salt evenly all over {we use 1 scant tablespoon sea salt per 4 pounds meat}. Cover loosely and refrigerate.
Blanching the meat {15 to 20 minutes}:
Pour a few quarts of cold water~enough to cover the short ribs~into a deep 6- to 10-quart stockpot. Set over high heat. When the water is warm to the touch, add the short ribs, a teaspoon or so of salt {so you don’t desalt the meat in the water}, and bring to a simmer. Simmer for 2 minutes. The water will be dingy and crowned with unappetizing foam. Drain, rinse the meat in cold water, and wash out the pot.
Assembling and simmering the pot-au-feu {about 2-1/2 hours}:
Replace the short ribs in the clean pot and add enough stock to leave the meat poking about an inch above the surface. Add cold water to cover by a few inches. Bring to a simmer and skim any last bits of foam that pop up. Taste for salt. Add the onions, bay leaves, cloves, peppercorns, and the thyme, if using, and stir under. Cook uncovered at a gentle but very steady simmer, skimming occasionally, for about 1 hour.
Skim, then add the carrots, leeks, celery root, turnips, and rutabagas. Add more stock or water as needed, so everything is just covered. Stir once. Bring to a simmer then taste for salt. Simmer until the meat is yielding but not soft, about another hour. The vegetables should be tender but not mushy. Skim.
Making the vinaigrette and serving the pot-au-feu {10 minutes}:
Chill the tablespoon of broth, then skim any fat. Whisk together the mustard and vinegar in a small bowl, then slowly whisk in the oil, or oils. Whisk in a trickle of the cooled pot-au-feu liquid to stabilize this emulsion. Add salt and pepper to taste. Set aside.
{If serving a first course of broth, ladle off the desired amount, skim and pour through a fine-mesh strainer into another pot. Return to a simmer, taste for salt, and then serve in warm bowls.}
Lift the meat from the pot and slide off the bones. Thickly slice across the grain. Pile on a warm, deep platter or in individual deep plates. Garnish with the vegetables, whole, chunked, or wedged. Skim the rich broth and serve a splash of it with each plate. Offer the vinaigrette, along with something pickled and/or fleur du sel or coarse sea salt, if desired.
BEEF & ONION GRATIN with TOMATOES, OR LE MIROTON
AN ELABORATION OF THE COMFORTING STAND-BY OF CUISINE BOURGEOISE, MIROTON is to the French home cook what roast beef hash or shepherd’s pie is to an American cook: an unpretentious way to transform tasty leftovers into a totally different dish. Made with beef and broth from a pot-au-feu, it is the delicious reason I routinely simmer more meat that I need when I make that dish. {You could also use fork-tender braised beef brisket or chuck, as long as you then moisten the gratin with light beef stock rather than syrupy rich braising liquid.} Since you are likely to make this dish with whatever amount of meat you have, I provide basic moderate-appetite per person measures. The amounts are easy to multiply for larger gratins. A shallow 1-quart gratin dish is about the right size for 4 servings.
This variation begs for others, and my favorites include using sliced black truffles in lieu of the tomatoes or, more modestly, layers of blanched swiss chard. In the latter case, use melted butter spiked with a dab of mustard, instead of olive oil for the bread crumb topping.
This is a two-helping sort of dish, so follow it with, or begin with, a simple green salad.
Wine: Eberle Paso Robles Barbera, 1999
PER SERVING:
About 5 ounces leftover beef from Pot-au-Feu {here}, boned and trimmed of cartilage and fat
About 1 tablespoon mild-tasting olive oil
8 ounces sliced yellow onions {2 cups}
Salt
1 teaspoon all-purpose flour
1/2 cup strained broth from the pot-au-feu, or as needed
Freshly cracked black pepper
1 small ripe tomato {about 4 ounces}
A splash of water as needed
For the topping {per portion}:
1/2 ounce soft, fresh bread crumbs {about 1/4 cup} made from slightly stale, chewy, white peasant-style bread {see here}
About 1 teaspoon extra-virgin olive oil
A splash of dry white wine
Slice the meat, across the grain 1/4 inch thick.
Choose a skillet that will hold the onions in a 1/2- to 1-inch-deep layer. Warm a film of olive oil in the skillet over medium heat, add the onions, and stir or toss once or twice. Leave to color slightly. Salt lightly and stir or toss again, then reduce the heat to low, cover, and cook until the onions have fallen into a soft, silky, wet pile, about 15 minutes. {If preparing the gratin for 6 or more, you may need to brown the onions in batches, then consolidate them in a saucepan to cook through.}
Sprinkle the onions with the flour, stir, and simmer until the juices have thickened. Stir in the broth, to produce a syrupy stew. Cook for a few minutes over low heat. Salt and pepper to taste.
While the onions are cooking, preheat the oven to 425°.
Sliver off the ends of the tomatoes, core, and slice 1/4 inch thick. If they seem quite wet, place between paper towels to purge for a minute or so~this will concentrate their flavor, and ensure they do not dilute the flavor of the gratin.
Combine the bread crumbs, olive oil, and white wine and knead very gently to distribute.
Construct the miroton in a shallow gratin dish. Begin with a smear of the onion stew, then pave with barely overlapping slices of meat. Spread with a second, thicker layer of onions, and then a layer of tomatoes. Repeat the sequence, finishing with a Spartan layer of tomatoes. Tamp lightly and gently shimmy the pan to encourage the layers to settle into one another. The assembled gratin should be quite moist~if not, add a splash of broth, or a few drops of water. The liquid will thicken and reduce during baking; you want enough to guarantee a saucy gratin.
Top with a lacy layer of the bread crumbs. Depending on the shape of your dish, you may not need them all. Using too much topping will result in a pasty gratin, shy of the promised sauce.
Bake the miroton until it bubbles at the edges and the crumbs are golden brown. This may take anywhere from 15 to 30 minutes.
Serve family-style from the dish.
SUCCESSFUL ROASTING
BY A “SUCCESSFUL” ROAST, I MEAN AN EVENLY COOKED PIECE OF MEAT THAT IS the doneness you hoped for and is as juicy as possible. Clever carving will show off that success with the tenderest possible slices of meat. Whatever your doneness preference, an understanding of how roasting works, and a few disciplined habits, can help you roast successfully.
As a technique, roasting is uncomplicated, and this suggests that the cook’s role is passive: a “chunk” of something is cooked by surrounding it with dry heat. The heat first dries the outside and colors it, more or less, depending on the conditions on the surface. As the heat penetrates the muscle, the affected proteins contract and “cook,” and the meat changes color internally and begins to dry out from the edges in. The roast shrinks and becomes firmer. How much heat reaches the center, and how rapidly and evenly it does so, begins to determine how the meat will ultimately be cooked. But the process continues outside the oven.
As you set the roast on the cooler stovetop, or “in a warm, protected spot,” heat begins to escape from the meat, most dramatically from the hottest part, the surface. As the hotter regions cool, the proteins relax somewhat and the meat becomes softer. Unless the roast is quite well done, some of the moisture left in the center of the roast travels back toward the cooling surface, where it is reabsorbed by thirsty proteins. These changes are responsible for making the roast more tender and succulent. While this is going on, however, the internal temperature of the roast continues to rise, sometimes 20 degrees or more. How much it rises is a function of at least four things: first, how hot the oven was, which determines how hot those outer regions are; second, how big the roast is~a large roast has not much surface proportionate to its volume, and so it cools more slowly than a small roast; third, where the roast is resting~how hot or cool the spot is, and whether it is drafty or protected; and fourth, how long you permit it to rest. This resting period is a critical part of roasting~correcting for some of the damage and irregularity wrought by the oven.
Understanding how a roast absorbs and then bleeds heat demystifies roasting. And it suggests a few active measures the cook can take to manage the process. Controlling a few variables and tracking temperature changes will help you to roast successfully, consistently. And with a little experience, you can learn to dispense with most, if not all, of the temperature taking.
Begin by considering the conditions imposed by your oven. First, check its accuracy with a reliable oven thermometer~check it in a few different spots. Knowing your oven can be just as important for a long roast as it is for a quickly baked muffin. Next, realize that if the oven is small, the roast will be close to the walls and it will color fairly quickly. If your oven is shallow, with a wide door, it will lose a lot of heat every time you open it~an electric oven may take as long as 20 minutes to recover. If you are using a convection oven, expect the roast to brown quickly and cook more rapidly than in an oven without that extra force. And remember that any time a roast must share the space with another dish, it may affect results, if only because each dish deflects some heat from the other.
Although recipes routinely provide oven temperatures, consider them as guidelines; adjust for your oven, and for your piece of meat. If the meat is much larger or smaller than specified, you may need to reduce or increase the heat by 25 to 50 degrees. In general, the larger the piece of meat, the lower the temperature. I don’t bother starting at a high heat to brown a large roast~the long cooking time will eventually color the meat, and you can best control the doneness and assure even cooking if you stick with a steady temperature. Basting a roast can make the surface tasty and can help to color it, but only if the basting juices are laden with enough solids to brown well {and if you don’t leave the oven open too long as you do so}. However, moistening the surface this way won’t affect the juiciness of the roast itself.
Just before cooking, I usually take the temperature of the raw roast. Where a large roast is concerned, rather than cook it straight out of the refrigerator, I leave it at room temperature for a few hours before roasting. I aim to set the prepared meat in the oven when it is 50° to 60° in the center. This reduces oven time and, more important, favors even cooking.
Next, I choose a shallow roasting dish that is just large enough to hold the piece of meat. This permits the heat to circulate evenly and freely around the roast. Deep roasting pans mean the lower regions steam, and if the pan is too large the juices will tend to dry out and burn. Shape and size are more important here than material. Other than Pyrex and disposable foil roasting pans, both of which can scorch easily, most metal roasting pans or earthenware dishes conduct heat evenly enough to be suitable for controlled roasting.
If the roast is uniform in shape, it will tend to cook most evenly. Where it is uneven, plan on shielding the skinny parts or narrow ends with foil {shiny side out to reflect the heat} once they have colored, and/or situating the roast so those parts are in the coolest part of the oven or near the door. That way, those parts will cook more slowly than the rest. You can also choose to leave them exposed, and produce a roast with a variety of donenesses to satisfy different tastes. This is another kind of successful roast.
Wipe the roast dry. This will encourage good browning, and it is particularly important for small roast that might otherwise be nearly cooked before the surface dries out enough to color. For the tiniest, leanest roasts~like quail~you may need to rub the surface with fat or brandy after you rub it dry. Set in the pan and notice how firm or soft the meat feels. Place in the preheated oven. Shortly after you reach the halfway point of the expected oven time, take the temperature at the center of the thickest part of the roast. {And make sure you know where on the shaft of your thermometer the sensor is; most sensors are partway up the shaft, but I prefer a model where it is conveniently located in the tip.} Next, check the temperature closer to the surface and note how rapidly, or not, it climbs. If the roast has a narrow end, check the temperature there; it may be ready to be protected. Feel and check the temperature again in short order to see how the process is accelerating. And add 5 to 20 degrees to the temperatures you discover at the center, in function of the variables listed above~size is predominant~to account for the post-oven cooking that will happen as the roast rests. Use the thermometer to “watch” the meat cook. And as you check the temperature, notice also how firm the roast is and how much it has shrunk~both are indications of doneness, but, by themselves, they are less reliable or revealing than temperature. However, once you have roasted a certain cut of meat “by thermometer” a few times, you can begin to associate a degree of doneness with an amount of shrinkage or firmness in a piece of meat. These associations are primary tools for an experienced cook, but, happily, a novice cook can recognize them just as readily. Always take the final temperature reading at the center of the thickest part of the roast.
Once you remove the roast from the oven, let it rest~and finish cooking~in a warm, protected spot. {Tenting it very loosely with foil is an easy way to deflect most drafts. Don’t wrap the roast, though, or it will steam, spoiling any crispy crust} Now, admonish yourself, and everyone else in the room, that the roast is not done. At that point, it will be hot, tough, and dryish on the outside and, in most cases, only slightly less tough and too rare on the inside. Depending on size, it will need up to 30 minutes to finish cooking and relax, and to allow the juices to redistribute. Take the temperature once or twice more {since a little juice will run out each time you poke it, you may want to leave the thermometer in place}. If you should overcook a roast in the oven, the best solution is to select a relatively cool or drafty spot for it to rest in. Don’t try to compensate by cutting into the meat before it has rested. Cutting interrupts the regular redistribution of heat and juices, and, while it will stop the cooking, it will stop it at a moment when the meat is still unevenly cooked and in the least succulent state.
Finally, your approach to carving will, literally, determine whether the tasty, succulent, evenly cooked slices of meat will be chewy or not. Look at the surface of the roast and read the direction and pattern of the muscle fibers. Disregard the overall shape of the cut of meat, and don’t put a premium on impressive wide, regularly shaped slices. Instead, cut at a right angle to the direction of the grain and don’t worry about the size or shape of the slices. Unless the roast is very well done, the muscle fibers will still be quite intact, and if you carve with the grain, you will have to chew through those fibers. The roast will seem tougher than it ought to. Carving across the grain means your knife takes care of as many fibers as possible. You may need to adjust the angle of the knife a few times, whenever the direction of the muscle fibers changes.
By the same logic, do worry about the thickness of the slices. Except for beef fillet or similar pampered muscles, slice fairly thinly.
Beyond these general considerations on how roasting works, I am an advocate of presalting most meats for roasting at least 24 hours in advance. This technique produces a particular succulence and consistency in results. {See The Practice of Salting Early, here.}
ROAST LEG of LAMB
THESE ARE THE ROASTING GUIDELINES I LEARNED FROM KATHI RILEY AND HAVE followed religiously since 1980, when we roasted leg of lamb every night together at the Union Hotel in Benicia, California. Over the course of cooking hundreds of legs of lamb, we tried plenty of alternative methods~higher heat, lower heat, variable heat, initial searing, roasting “bone-in,” and firing the meat cold~but none produced as fine or consistently rosy pink a result as this one. Even now, whenever I see a leg of lamb at the restaurant that is not evenly cooked, or looks dry, it invariably turns out it wasn’t brought to room temperature before cooking, or that someone tried to rush it. Roasting the meat “off the bone” worries some purists, but the moist, flavorful results answer that. And, more important, when carving a boneless leg, it is easy to respect the grain of the meat, making each slice as tender as possible. Mentioning that I fully season the lamb a few days in advance still provokes skepticism, reminiscent of dire assurances I heard twenty years ago that this would draw out all the juices. In our experience, it only improves the flavor and produces a tender and succulent roast. {For more thoughts on roasting, see Successful Roasting, here.}
I give instructions here for boned whole legs of lamb~that is, with the shank and sirloin ends attached. Ask for the leg of lamb to be “corkscrewed”~that way, the bones are first loosened and then twisted out without severing many muscles.
Depending on butchering and marketing practices in your store or your region, you may be offered “short legs” or half-legs, where the loin or shank has been trimmed off. In this case, you may find starting weights are less than I specify, and some trussing and carving concerns become irrelevant, but the temperatures and basic principles of preseasoning, roasting slowly and evenly, and resting thoughtfully are still valid. If you want to make a reduced lamb sauce to serve with the lamb, ask the butcher to cut the bones from your leg of lamb into a few pieces so they will fit into your pot. {You’ll need to buy some extra shank or neck, shoulder, or breast meat to supplement.} Plan to make the stock the same day you season and tie up the lamb.
TO CORKSCREW A LEG of LAMB
IF YOU WANT TO CORKSCREW A WHOLE LEG OF LAMB YOURSELF, you need to first separate the shank meat along a natural seam, then gradually whittle it away from the bone with a boning knife. Leave it attached where it joins with the next muscle group. Then, without making any further incisions from the outside, work the tip of the knife up inside the leg, as close to the bone as possible, making a series of little cuts that gradually free the leg muscles. The freed muscles will be like a loose cuff around the bone. When you reach the knee joint, flip the leg around and begin to free the loin end. Use the tip of the knife to make a series of little cuts around the awkward piece of pelvic bone that may be in place. This is a consummate feel-as-you-go operation, and you will find yourself flipping and turning the leg in order to approach all the angles of the bone you are trying to liberate. Once it is removed, begin to excavate the femur with a series of little cuts close to the bone, just as you did from the other direction. Flip the leg as needed. Once you reach the knee joint again, you’ll need to stretch the opening and begin to gingerly free the kneecap, severing shiny connective tissue. Do the same from the shank side. Once you’ve cut most of the connections, grasp the femur in one hand, hold the meat in the other, and twist like a corkscrew. This motion should tear through the rest of the connections. {If not, return to the probing and severing until you can.} I have seen professional butchers corkscrew a leg of lamb in 45 seconds, with what seemed like only a dozen strategic incisions; my personal best is about 15 minutes, and it never looks nearly as nice as their effort.
Wine: Château Sociando-Mallet, Haut-Médoc, 1995
FOR 8 TO 10 SERVINGS:
One 6- to 7-pound corkscrewed whole leg of lamb {shank and sirloin end attached}; if making the optional stock, have the bones {about 2 pounds} cut into chunks
Salt
For the sauce:
1/2 to 2 cups Lamb Stock {here}, about 1/2 cup Chicken Stock {here}, or a few tablespoons water
1 tablespoon dry vermouth
Preparing the leg of lamb, and making the optional lamb stock {ideally 2 to 3 days, but at least 1 day, in advance. If you can’t get to all of this in advance, do at least try to get the meat seasoned~the trimming and tying can wait}:
Shave away all but a thin layer of fat from the smooth, rounded muscle of the haunch side of the leg of lamb. Flip over and trim any ragged bits of meat that resulted from boning the leg. {Add them to the bone pile if making the stock.} Season all over with salt, including the inside, where the bone was, salting the thick middle section more heavily than the skinny shank and loin ends {we use a scant 3/4 teaspoon sea salt per pound of meat}.
Tie the leg tightly into a log, tying it about every 1-1/2 inches with a separate piece of string {see Hints for Tying Up Meat, here}. Make the first “truss” about an inch from the center, toward the shank end, and then work your way toward the loin end. Return and make one or two more “trusses” on toward the shank end. The result will resemble a crooked log, fattest in the middle, a little skinnier at the loin end, and “floppy” at the shank end. Cover loosely and refrigerate.
Prepare and strain the lamb stock. You can reduce it all immediately to make a glossy sauce with a little body, or simply use some of the stock to deglaze the roasting pan later on and save the remaining stock for another use.
Remove the leg of lamb from the refrigerator about 4 hours before you plan to roast it.
Roasting the lamb and letting it rest:
Preheat the oven to 325°.
For reference, take the temperature of the leg of lamb at the center of the thickest section. It should be about 50°. Place on a shallow roasting pan or heavy rimmed sheet pan that is not much larger than the meat. Place in the center of the oven and roast undisturbed for just under an hour, then take the temperature, again at the center of the thickest part of the leg. Expect about 100°~however, the size of the leg, your oven, and the starting temperature may skew that somewhat. Then, quickly check the temperature at the center of the loin end of the leg~it will be 10 to 15 degrees hotter. Unless you want this portion to be well done, loosely wrap this skinny section with aluminum foil, shiny side out, for the duration of the cooking. Wrap the floppy shank end as well.
Check the temperature at the center of the roast again after another 10 to 15 minutes. I cook whole leg of lamb to 118°~this produces rosy pink meat that is still juicy. Typically, this takes 1 hour and 20 minutes total time. If you like your lamb more red than pink, remove it at 113°; if you don’t want to see any pink, remove it at 124°~it will still be juicy.
When the lamb has reached the desired temperature, remove the roast from the oven, tent loosely with foil, and leave for about 20 minutes in a warm, protected spot. As it “rests,” the center will keep cooking even as it cools on the outside. For rosy lamb, I look for the internal temperature to peak at 140° after resting for 15 to 20 minutes.
Making a sauce with the pan drippings:
Lift the meat from the roasting pan and tilt to pour off the fat. Don’t pour off the tasty juices. Add 1/2 cup or so of stock or water, and a trickle of vermouth. Set over low heat and stir and scrape to dissolve golden drippings. Pour into a small saucepan and skim again. Reduce over high heat for a few minutes to concentrate the flavor if necessary. {If you have prepared reduced lamb stock, you can use this to deglaze the roasting pan as just described, or simply serve it as is, pristine and satiny.}
Carving the lamb:
Remove the first string from the loin end. Thinly slice the lamb at a right angle to the grain of the muscle. This is convenient at the loin end, as you will be slicing at a right angle to the “log” itself. Snip the strings only as you near them. When you have sliced a 1/2 inch or so into the bend at the fattest part of the leg, stop and look at the grain of the muscle on the cut face. In order to continue at a right angle to it, you’ll need to change the angle of your knife by about 45 degrees. This will feel counterintuitive, and the first slices from this angle will be small, but after carving a few slices, it will make sense. Continue carving at this angle until you reach the dense gelatinous meat of the shank, then readjust the carving angle to stay perpendicular to the grain. Slice only as much meat as will be eaten right away.
Note: Refrigerate leftover leg of lamb to serve thinly sliced as a first course with fresh raw favas {see here} and shaved aged Tuscan pecorino or in a sandwich with a slice of Grilled Eggplant {here} and a spoonful of Roasted Pepper Relish {here}; serve with arugula salad. In either case, bring the meat to room temperature first and slice it as thin as you can, trimming off every bit of fat as you go.
ROASTING SPRING LAMB LEGS
If you have a much smaller leg of spring lamb, about 3 to 4 pounds corkscrewed, then make the following adjustments:
The tender meat usually does not need to be seasoned in advance, but it won’t suffer if you want to get the seasoning and tying up done a day early.
Remove the meat from the refrigerator only about 2 hours before roasting.
Roast at 400°.
For a just-pink roast, cook to 124° at the thickest part of the leg. A small leg will cool more efficiently than a large one~hence the higher target temperature in the oven.
Check a few times, but expect the smaller roast to take only about 45 minutes. Allow about 15 minutes for resting.
Here are a few of my favorite ways of flavoring leg of lamb before roasting it.
LEG of LAMB with ROSEMARY & GARLIC
Trim and season the leg of lamb as in the basic recipe. Strip a branch of rosemary of its leaves; pound them lightly. Peel and smash a few small cloves of garlic. Tuck the rosemary and garlic inside the leg, poking the aromatics deep into the natural separations between the muscles~don’t make unnecessary incisions in the muscle, whether from the inside or outside. Tie up and roast as described above.
Roast as indicated and serve with Rosemary-Roasted Potatoes {here} or Fagioli all’Uccelletto {here}.
LEG of LAMB with MUSTARD
Season and tie up the leg of lamb as in the basic recipe. Smear the outside with a thin layer of Dijon mustard just before roasting it; allow about 1/2 cup mustard. Don’t worry if a little mustard gets on the roasting pan, it will give a good flavor to the pan drippings.
Roast as indicated, and serve with Buttermilk Mashed Potatoes {here}.
LEG of LAMB with LAVENDER
This is best with small legs of lamb, whose flavor is mild. Season and tie up the leg of lamb as described in the basic recipe. Rub with a bit of olive oil. Crush a spoonful of lavender buds and rub them all over the leg of lamb. Don’t poke them inside the roast~their flavor will be too strong and their texture unwelcome. Refrigerate overnight, then roast as above.
Serve with a salad of baby lettuces, arugula, and thin ribbons of raw fennel and roasted figs {here}. Offer grilled bread or sprinkle the figs and salad with Hazelnut Picada {here}, or with plain bread crumbs toasted in olive oil.
HOUSE-CURED PORK CHOP & TENDERLOIN with GUIDELINES for OTHER CUTS of PORK, CHICKEN, TURKEY, & DUCK
THIS IS OUR EVERYDAY WET CURE FOR FRESH PORK. It reliably transforms the lean loin chop into a succulent cut of meat. You can experiment with other flavorings, like garlic or herbs, but the ratio of salt to sugar to water is just right for a thick chop, or for a pork tenderloin. For larger cuts of pork like shoulder, leg, or a whole loin, we use a more dilute formula that I include as well. The variations for chicken breasts or duck are less sweet. A diluted version of the chicken brine can be used for a whole turkey, or turkey breast.
To make sure the brine “takes,” it should be at room temperature, or only slightly cooler, when you immerse the meat in it. Cold slows down movement~hence, curing action~substantially.
Don’t reuse this simple, inexpensive brine.
Wine: Côtes du Rhône, Belleruche, M. Chapoutier, 1999
THE BASIC BRINE
FOR 4 PORK CHOPS, 10 TO 11 OUNCES EACH AND 1-1/4 INCHES THICK, OR 2 TRIMMED PORK TENDERLOINS, ABOUT 1 POUND EACH:
A few crumbled bay leaves, dried chiles, and crushed juniper berries {optional}
5 cups room-temperature water
6 tablespoons sugar
3 tablespoons salt {a little more if using kosher salt}
If using the aromatics, place them in a small pot with about 1 cup of the water. Bring to a simmer, stirring and crushing with a wooden spoon, to encourage them to release their flavors. Remove from the heat and leave to infuse for about 10 minutes. Combine the remainder of the water, the aromatic mixture, if using, the sugar, and salt in a deep bowl or 3-quart plastic storage container. Rinse the meat and pat dry. Place in the brine and use a plate to keep the meat submerged. Cover and refrigerate for 2 to 4 days.
Cooking and serving brined pork chops:
A couple of hours before cooking, remove the chops from the brine. They will feel firmer than before you cured them. Rub and massage the meat as you rinse it thoroughly under cold running water. Press dry between towels. Refrigerate until about 15 minutes before cooking.
Brush the chops with olive oil and grill over medium coals, or cook in a heavy skillet with a film of olive oil over medium heat. Move the chops or adjust the heat if the sugar threatens to burn, and turn at least three times as they cook. Cold chops should take about 18 minutes to cook. They will hold well for another 10 minutes in a warm, protected spot.
Serve with Roasted Applesauce {here}, sage or sorrel-mashed potatoes {see Buttermilk Mashed Potatoes, here}, Hashed Sweet Potatoes {here} and Spiced Prunes {here}, or Boiled Kale {here} and Roasted Polenta {here}. Reduced Rich Pork Stock {here} makes a lavish sauce.
Cooking brined pork tenderloins:
Rinse as for pork chops and pat very dry. Rub with olive oil and grill, or sear in a skillet and then roast at 425°, for about 25 minutes. Let rest 5 to 10 minutes before carving into thick slices.
BRINE for LARGER CUTS of PORK:
Increase the water in the Basic Brine to 7-1/4 cups. Follow the basic procedure, making enough brine to cover the meat. Larger cuts need to cure more slowly, about 5 to 7 days, in this milder brine. Remove the meat from the brine and rinse it 1 full day in advance; this allows the cure to diffuse evenly. Failing this, the outer part of the pork may be noticeably saltier than the center.
Note: To make “Shoulder Ham”: If you add a scant 1/2 teaspoon curing salt {see Sources and Resources, here} to this brine, you can use it to make a small “ham” out of a fresh pork shoulder. Stab the meat all over with a wooden or metal skewer, to encourage the brine to penetrate, then leave to cure for about 1 week refrigerated. Twenty-four hours before cooking, rinse and dry the meat thoroughly and refrigerate. Truss tightly {see here} and then simmer in lightly salted water until about 130° in the center, then drain, dry, and roast at 375° until golden brown, about 30 minutes.
BRINE for CHICKEN BREASTS {5 to 8 OUNCES EACH}:
Increase the water in the Basic Brine to 6 cups, and reduce the sugar to 3 tablespoons. Follow the basic procedure, making enough brine to cover the breasts. Brine for 2 to 3 days. An hour or so before cooking, rinse and dry as for pork chops. Brush with olive oil and grill or pan-fry over gentle heat, to avoid burning the sugar.
BRINE for TURKEY:
This recipe marries the two formulas for chicken and pork. The only difficulty here may be finding a vessel big enough to hold the bird, and making space for it in the refrigerator. A roasted brined turkey throws off a lot of sweet-salty juice that doesn’t lend itself to gravy making, but the startling succulence of the meat makes up for it.
Increase the water to 7-1/4 cups, and reduce the sugar to 3 tablespoons. Follow the basic procedure, making enough brine to completely submerge your bird. I usually roast small turkeys~15-pound Toms. Cure for 5 to 6 days, rinse, dry, and refrigerate for 1 more day, so the brine can diffuse evenly. Then, before roasting, rinse again, inside and out, and prop upright to drain for at least 1/2 hour. Dry very well inside and out with paper towels. I roast my turkey at 350°, starting breast side up, turning once to brown the back, until it registers about 150° in the thickest part of the breast meat. Let it rest for at least 20 minutes before carving.
BRINE for DUCK BREASTS {6 to 8 OUNCES}, OR LEGS {8 to 14 OUNCES}:
Increase the water in the Basic Brine to 6 cups, reduce the sugar to 3 tablespoons, and increase the salt to 6 tablespoons. Follow the basic procedure, making enough brine to submerge the breasts or legs. Cure breasts 2 to 3 days, legs 3 to 4. A few hours before cooking, rinse and dry as for pork chops. Grill or panfry breasts as described above for chicken breasts. For legs, sear lightly in olive oil, then roast at 375° for 20 to 35 minutes, depending on size.
STANDING RIB ROAST of PORK
THIS IMPRESSIVE ROAST IS A PERENNIAL HIT AT ZUNI AND A FAMILY FAVORITE FOR Christmas Eve dinner. The loin is succulent and perfumed, and the crispy meat-clad bones are irresistible. We use the same butchering and roasting specifications year-round but vary the aromatics according to the season or weather, and the rest of the menu. This version, sprinkled and rubbed with barely crushed fennel and coriander seeds and garlic, is inspired by an Arista Perugina {a boneless roast pork loin, Perugia-style} in Elizabeth David’s Italian Food. We serve it in the fall with roasted grapes or figs and a salad of bitter greens, or with Braised Fennel {here} and Fresh Shelling Beans {here}. In the winter, we smear the roast with a paste of Dijon mustard, crushed mustard seeds, and cracked black pepper. That version begs for Buttermilk Mashed Potatoes {here} and greens or carrots. The same cut of meat seasoned with rosemary, lemon, garlic, and black pepper becomes a Florentine-style Arista, which wants roasted potatoes. A fourth variation, made with a bright blend of orange zest, chili flakes, and garlic, with or without a few fennel seeds, is good with wilted spinach and Polenta {here}.
Order the rib roast with the featherbone and chine bone in place. Ask the butcher to make a cut through the chine between each rib, as for a crown roast~or make this series of cuts yourself, as described below. Buy and season the rib roast at least 3 days before you plan to cook it. This allows time for the salt and flavor from the aromatics to permeate the whole piece of meat, essential for deep flavor and great succulence. At the restaurant, we carve off and serve one roasted “chop” per person. This makes a handsome presentation, and very generous portions, at 11 to 14 ounces. To get the smallest such chops, ask for the center-cut section of the loin; this will be the leanest section as well. An alternative is to bone the loin after roasting, and slice and serve based on appetite~and hope people don’t fight over the bones. If preparing a larger, or, more accurately, longer rib roast, prepare proportionately more of the seasonings.
You can also use this method to prepare a rib roast of veal. {For a general discussion of roasting, see Successful Roasting, here.}
Wine: Beaune Premier Cru Les Grèves, Tollot-Beaut, 1997
FOR 4 TO 6 SERVINGS:
One 4-pound standing rib roast of pork {about 4 ribs} {if desired, have the butcher crack the chine}
Salt
4 garlic cloves, peeled
2 teaspoons fennel seeds
2 teaspoons coriander seeds
To sauce the roast:
About 1/2 cup Rich Pork Stock {here}, Chicken Stock {here}, or water plus a splash of dry white wine, or about 1/2 cup reduced Pork Stock {see here}
Seasoning and tying up the roast, 3 to 4 days in advance {if you didn’t have the butcher do this}:
Place the roast, bone side up, on a cutting board and locate the rubbery seams between the vertebrae. Crack through each one by first easing the blade of a heavy cleaver or the hefty bolster of a heavy chef’s knife into each joint and then tapping firmly with a rubber mallet {or a hammer wrapped in a towel}. It may take a few taps to go all the way through the seam and joint, but take care not to cut deeply into the meat itself. The blade of your knife ought to sink no more than 1-1/2 inches into the seam {1}.
Flip the roast over and trim away all but a 1/4-inch-thick layer of fat. Begin boning the loin, starting with the thin layer of meat and fat near the cut end of the rib bones {2}. Resting the tip of your knife flat against the curved rack of bones, make a series of smooth cuts between the loin and bones until you reach the “elbow” of each rib bone {3}. Leave the loin attached to other angle of the “elbow,” so you can open and close the roast like a book {4}.
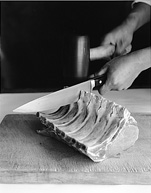 |
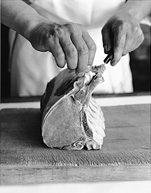 |
| 1 | 2 |
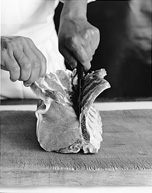 |
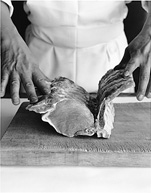 |
| 3 | 4 |
Season the whole roast including the rack of bones liberally inside and out with salt {we use about 1 tablespoon sea salt for 3 pounds of roast}; target the thickest sections most heavily, and the two end faces of the loin most lightly. Roughly chop the garlic, then crush in a mortar. Smear on the inside face of the loin. Slightly crush the fennel and coriander seeds. Scatter about two-thirds of them on the inside of the loin and the facing bones, then close the loin back up and sprinkle the remainder evenly over all of the other surfaces.
Truss the roast, looping and knotting a string between every two ribs {5} {see Hints for Tying Up Meat, here}. Cover loosely and refrigerate.
Remove the pork from the refrigerator about 3 hours before roasting.
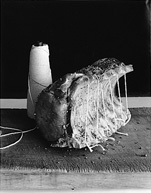 |
|
| 5 |
Roasting the pork and letting it rest:
Preheat the oven to 400°.
I usually take the temperature of the roast just before cooking it, looking for 50° at the center of the thickest section. Stand the roast in a shallow roasting pan or on a heavy rimmed baking sheet not much larger than the meat. Place in the center of the oven. For a juicy roast that is cooked through, but with a faintly rosy cast, roast to 135°. {If the eye of your roast is smaller than 4 inches across, cook it to about 140°; it will stop cooking more abruptly when you remove it from the oven.} Start taking its temperature at about 45 minutes, and allow between 1 and 1-1/2 hours for a 4-pound roast. Turn the roast or adjust rack height if it is browning very unevenly.
Set the roast on a platter, tent loosely with foil, and leave to rest in a warm, protected spot for about 20 minutes, then take the temperature again. Like any roast, it will continue to cook as it rests, but the rack of bones retains heat particularly well, so the temperature should climb to about 160°. The meat will be cooked through but still moist.
Preparing the sauce:
Pour any fat from the roasting pan, then moisten it with the pork stock, the chicken stock, or the water and wine, to capture any fallen aromatics and deglaze the baked-on meat drippings. Pour into a small saucepan and simmer until the sauce has good flavor. Add any juice from the pork platter. Alternatively, for a more lavish sauce, simply heat up reduced pork stock.
Serving the roast:
The rib roast is easy to serve; just carve between the rib bones, then break into chops. Snip the trussing strings as you go. Alternatively, you can remove all of the strings, bone the loin completely, and slice into medallions. Then break the rack into crusty ribs to eat with your fingers.
HINTS for TYING UP MEAT
WHEN I TIE UP MEAT FOR ROASTING OR BRAISING, INSTEAD OF USING one continuous string, I make a series of independent loops and knots so that when I snip one, the remainder stay in place and snug. This makes it much easier to carve properly. It is important that each trussing string is pulled very tight. To do this, first loop the string around the meat in the intended location. Using one “tail” of the string, make a simple knot around the other “tail” of the string {1}. Pull that knot snug, but not so tight that you can’t slide it along the “tail” of the string {2}. Slide the knot down that string until it butts against the meat {3}, and tighten the simple knot a little more {4}, then, holding onto the first “tail” with one hand, use the other hand to pull the second “tail” back away from the knot {5}. This ratcheting action will tighten the loop. Now tie the “tails” together to secure the snug fit {6}. I use 16-ply all-cotton string to tie up meat. Skinnier string can cut through the meat as you tighten the loops.
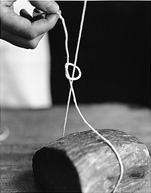 |
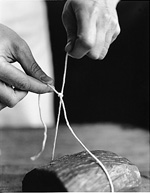 |
| 1 | 2 |
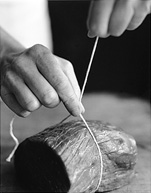 |
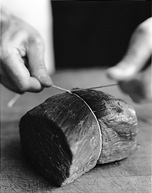 |
| 3 | 4 |
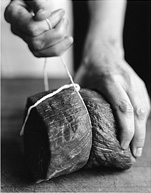 |
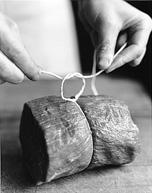 |
| 5 | 6 |
MOCK PORCHETTA
A VERY MODEST, VERY MANAGEABLE INTERPRETATION OF THE TUSCAN “BIG PIG” that few Americans, or Italians, could ever manage at home. {It is a formidable production even at the restaurant.} That gargantuan dish is a whole roast pig, typically stuffed with fistfuls of stemmy herbs, capers, casually chopped garlic, and sometimes fennel or pickled gherkins, all challenged by bold doses of salt and pepper. This diminutive porchetta is made with a small piece of pork shoulder, an inexpensive, underappreciated cut. Its mosaic of muscles provides plenty of places to stuff the seasonings, and it has enough internal fat and connective matter to self-baste and stay juicy as it slow-roasts. Buy, season, stuff, and tie-up your would-be porchetta 2 or 3 days before you plan to roast it, to give the flavors a chance to permeate the meat. Crowd this little roast with whatever root vegetables you like, choosing a larger or smaller roasting pan, depending on how many vegetables you want.
Make sure you have leftover porchetta so you can have a sandwich of the warm meat, spread with a spoonful of fresh ricotta cheese, on a crusty bun moistened with the pan juices. Leftover bits of porchetta are also good torn into bite-sized bits and shreds, moistened with olive oil and drippings, and roasted for a few minutes in a 400° oven. Toss with frisée or bitter greens, add a few pecans, and serve with Balsamic Onion Marmalade {here} on crostini.
If your pork shoulder is a little larger than the 3 pounds specified, you should increase the stuffing amounts accordingly. If it is close to 4 pounds, or larger, I recommend you turn it into two roasts; to maintain the cooking times, and so you get plenty of the caramelized, chewy outside with every slice.
Minus all the Tuscan herbs and seasonings, this is a good basic pork roast method. Try it seasoned with nothing more than salt kneaded with a few crushed juniper berries. That version is excellent with sauerkraut.
Wine: Weingut Robert Weil Rheingau Riesling Kabinett, 1999
FOR 4 TO 6 SERVINGS:
One 2-1/2- to 3-pound boneless pork shoulder butt roast
Salt
1 tablespoon capers, rinsed, pressed dry between towels, and barely chopped
1 teaspoon chopped lemon zest
3 garlic cloves, coarsely chopped
About 12 fresh sage leaves, crushed, then coarsely chopped {about 1-1/2 teaspoons, packed}
A leafy sprig or two of fresh rosemary, leaves stripped and crushed {about 2 teaspoons, packed}
2 teaspoons fennel seeds, barely crushed
1-1/2 teaspoons freshly cracked black pepper
1 to 2 pounds prepared vegetables of your choice: chunks of peeled carrot; onions cut into wedges; quartered fennel bulbs; chunks of peeled celery root, turnips, rutabagas, or parsnips; unpeeled garlic cloves; and/or chunks of potato
A little mild-tasting olive oil
About 2/3 cup Rich Pork Stock {here}, Chicken Stock {here}, or water
A few tablespoons of dry vermouth
Trimming, seasoning, and tying up the pork {1 to 3 days in advance}:
Trim any discoloration and all but a 1/4-inch thick layer of superficial fat from the pork. Study the natural seams between the muscles on each side of the meat. Choose one that runs the length of and close to the center of any face. Use the tip of a knife to gingerly separate the muscles along that seam, gradually exposing more seams, which you should then separate as well. The goal is to create lots of internal surfaces to cake with seasonings. If your initial foray doesn’t expose many internal seams, you can take a second stab at a different face, so long as you don’t cut the pork in two. Salt the splayed piece of pork evenly all over {I use 1/2 teaspoon sea salt per pound of meat}.
Combine the capers, lemon zest, garlic, sage, rosemary, with most of the fennel seeds and black pepper. {You should get about 1/2 cup, loosely packed.} Spread and pack this mixture all over the excavated insides of the pork butt, making sure the seasoning falls deep into the crannies where you’ve separated the muscles. Re-form the pork butt into its natural shape and tie tightly into a uniform shape, tying 4 or 5 strings around the circumference and another around the length of the roast {see Hints for Tying Up Meat, here}. Rub the remaining fennel and pepper on the outside of the roast. Collect and refrigerate any loose herbs and seasonings. Cover the pork loosely and refrigerate.
Roasting the porchetta {2-1/4 to 2-1/2 hours}:
Preheat the oven to 350°.
Toss the vegetables in a minimum of olive oil, barely coating the surfaces. Add a few pinches of salt and toss again.
Heat a 12- or 14-inch ovenproof skillet, depending on how many vegetables you are roasting, over medium heat. Place the pork roast in the pan; it should sizzle. Surround with the vegetables. Place in the oven. The roast should begin to color at 45 minutes; if not, turn the heat up to 375° until it does, then turn the heat back down. At 1 hour, turn the roast over and roll the vegetables in the rendered fat. Work quickly, so you don’t lose too much oven heat and the roast doesn’t cool off. Turn the roast again at 2 hours and add about 1/3 cup of the stock or water. Add any excess herbs and seasonings to the pan juices at this point and swirl the pan so they sink into the liquid. Roast for another 15 to 30 minutes, to about 185°. The pork should be fragrant and glistening golden caramel.
Transfer the meat to a platter, tent loosely with foil, and leave in a warm, protected spot while you make the pan sauce. Place the vegetables on a separate warm plate.
Preparing the pan sauce and serving the roast:
Tilt the skillet and spoon off the fat. Add the vermouth and the remaining 1/3 cup stock or water and set over low heat. Scrape and stir to dissolve the caramelized drippings on the bottom and sides of the pan. Skim the fat as the liquid comes to a simmer. Add any juice that may have trickled from the resting roast.
Slice the pork, removing the strings as you go, and serve garnished with the vegetables and a spoonful of the rich pan sauce.
CUTTING UP A RABBIT, & WHAT TO DO with THE PARTS
I HAVE NEVER UNDERSTOOD THE CLASSIC METHOD FOR CUTTING UP RABBIT, WHICH consists of cutting off the fore- and hind-quarters and then whacking through the central section~ribs, loins, flanks, and all~to produce three or four flappy chunks that look like bats. These pieces are impossible to cook properly, since they are composed of two very different types of muscle, neither of which, by the way, cooks at the same rate as the front- and hindquarters, which are also quite dissimilar. Yet recipes often call for all of these parts to be cooked together in the same dish, by the same method and frequently at the same time.
Here is an unorthodox method for butchering rabbit that produces four different cuts of meat {two pieces of each}, plus the innards, and a carcass for stock. We try to cook each part of the rabbit in a fashion that suits it.
Lay the rabbit on its back. If the arc of the rib cage is still intact, cut down the center, between the tips of the opposing ribs. Spread the rib cage open and remove the kidneys and liver. Set aside.
Turn the rabbit on its side and fold the hind leg away from the body, to reveal where it is connected. Use a boning knife to cut away just the leg, not the whole hindquarter, feeling with the tip of the knife and cutting the muscle where it attaches to the pelvic bone. Then fold the leg farther back, pop the ball joint, and cut through the remaining meat and cartilage. Flip the rabbit over and do the same with the other leg. The end of the vertebrae should now be exposed, poking out like a stub tail.
Pull a front leg forward until you feel it resist. Slide your knife underneath the shoulder blade, flat against the carcass, and cut through the sheath of connective muscle, then fold the leg away from the body to reveal the joint. Cut through the joint. Do the same to remove the other foreleg.
Open the belly flaps and splay the carcass, so the ribs are resting on the work surface. Set the tip of a boning knife about 1/8 inch to one side of the spine, and make a shallow cut the full length of the rabbit. Use your fingertips to pry the loin meat back on that side to reveal the vertebrae, which will look sort of like a zipper. If the loin is still tightly tethered to the vertebrae, make another long cut, this time a little farther from the spine, and pry again. Now, with a series of little cuts and tugs, gradually free the loin from the carcass, finally peeling it from the tough outer layer of silverskin that encases it. Cut across the loin at the base of the shoulder to release it there. You will have a “floppy log” about 6 inches long and tapered at one end. Remove the other loin.
Remove the semicircular flank muscles, cutting along the “dotted line” formed by the tips of the ribs. We call these the “belly flaps.”
You will have: 2 plump hind legs {top of photo}, 2 smooth, tapered loins {center of photo}, 2 belly flaps {center right and left of photo}, 2 bony forelegs {near bottom of photo}, the liver and a pair of kidneys {bottom of photo}, and 1 carcass {not shown}.
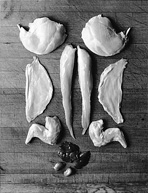 |
We handle each of these pieces of rabbit differently:
Cure the hardworking front and hind legs with rock salt and milk as described on here. We braise, grill, or roast these cuts as a main course. The plump hind legs can be big enough to serve by themselves, which frees you to turn the bony front legs into excellent rillettes {here}.
Season the loins liberally with salt and with crushed fresh thyme, sage, or rosemary leaves, if you like. Refrigerate overnight. Grill or sauté, then slice into little medallions; or cut into chunks, skewer, and grill {see Rabbit Mixed Grill, here}. Or use for Rabbit Sausage {here}.
Season the tough belly flaps liberally with salt and freshly cracked black pepper. Refrigerate overnight. This is the ugly-duckling cut, but this curing method and a very hot grill produce a delicacy we call rabbit “bacon,” which is delicious on salads, or as part of a Rabbit Mixed Grill. You can also use belly flaps in the sausage or rillettes mix.
Trim the liver and separate it into lobes. Coat it and the kidneys with a little olive oil to protect them from the air, and refrigerate. Both are mild in flavor and are good grilled or sautéed. Season just before you cook them.
Make a stock with the carcass {see here}.
ALL-PURPOSE RABBIT CURE
THIS METHOD MAKES RABBIT LEGS RELIABLY TENDER AND SUCCULENT.
Measure 1 ounce {5 teaspoons} rock salt per pound of rabbit pieces and toss well to distribute. Stack the pieces 2-deep in a wide dish, cover loosely, and leave at room temperature for 1 hour.
Rinse each piece of meat quickly under cold water. Make sure you remove all kernels of salt. Drain and place, again two deep, in a clean dish. Add cold milk to cover by about 1/2 inch {about 3/4 cup milk per pound}. Swish the rabbit around in the milk. Cover loosely, and leave at room temperature for 1-1/4 hours to desalt. Stir the rabbit pieces once or twice during that time to encourage them to desalt evenly.
Drain the rabbit and discard the milk. You can rinse off the slightly salty film of milk if you want, depending on the dish the rabbit is destined for and whether a little bit of dairy protein on the surface might taint the sauce. {For Rabbit with Marsala and Prune-Plums [here], do rinse off the milk. For delicious Fried Rabbit, just lift the pieces from the milk, dredge in flour, and refrigerate for a few hours for the crust to set, then pan- or deep-fry. You can cure rabbit up to a few days in advance of cooking it; in that case, do rinse the milk off.
A delicious elaboration on this all-purpose cure adds 1 teaspoon coarsely cracked black peppercorns and a few pounded and bruised branches of fresh thyme for each pound of rabbit. Toss them with the rabbit right before you add the rock salt. Their flavors will migrate into the flesh with the salt, perfuming it assertively. As in the most primitive marinade, salt triggers the transfer of flavor. In the absence of salt, any rub or shower of herbs or spices is destined to have a superficial effect at best. Juxtaposing aromatics and proteins can, via friction, deposit some flavor components on the surface of the food {where they can burn or be rubbed off}, but salt lets them permeate the food.
This thyme-pepper cure also produces astonishingly tasty fried chicken. It is the cure Kathi Riley and I worked out for the Union Hotel Panfried Chicken in the early 1980s. It was nearly too well received~meaning we couldn’t fry it fast enough. The germ of the idea {the rock salt part} came from a gifted 80-plus-year-old Texas chuckwagon chef named Milum, who had told Kathi he’d learned to cook from the wind in the trees. Unable to get a white chef’s toque shipped to his mobile kitchen, he fashioned his own out of a stiff medium-sized brown grocery bag. He insisted that when he got too old to walk, he would have his wheelchair outfitted with a cutting board.
RABBIT with MARSALA & PRUNE-PLUMS
WITH AN AFFECTIONATE NOD TO THE TRADITIONAL FRENCH DISH LAPIN AUX pruneaux {rabbit with prunes}, we make this succulent and fruity variation in the fall with ruddy French prune-plums {sometimes called “sugar prunes”}; purple Italian {Stanley} prune-plums will work just as well. Both are firm oval plums with amber flesh. Their flavor is subtle compared to the rounder tart-sweet varieties native to Asia {such as Santa Rosa, Elephant Heart, Laroda}. Their dense meat holds up to braising, and their skin is not too acidic, which makes them ideal for savory dishes. The result is a mellow, balanced fruitiness. Duck legs are also good with this compôte-sauce. You can brown and braise them in similar fashion; just make sure you skim all the fat before you add the fruit.
Make this dish with rabbit that you have cut up and cured as described on here–here. For slightly smaller portions, leave out the forelegs~use them for Rabbit Rillettes {here}. Serve with soft or roasted polenta {here}.
Wine: Oxford Landing South Australia Grenache, Limited Release, 1998
FOR 4 SERVINGS:
About 2 cups Rabbit Stock {here} or Chicken Stock {here}
4 cured rabbit hind legs {about 6 to 7 ounces each} and 4 cured forelegs {about 3 to 3-1/2 ounces each}
2 to 3 tablespoons mild-tasting olive oil
1 large yellow onion {about 12 ounces}, root end trimmed flat, peeled, and cut into 8 wedges
1 bay leaf, crumbled
3/4 cup sweet Marsala
1 pound prune-plums {about 14 medium}
Reduce the stock over medium heat until it has some body~to test this, spoon a little stock on a plate and set it in the refrigerator to chill. Tilt the plate~it should be slightly viscous.
Wipe the rabbit legs dry. Warm about 2 tablespoons olive oil in a 12-inch skillet or 3-quart sauté pan over medium heat. Add a layer of rabbit pieces and cook until golden brown on both sides, about 4 minutes per side. {You may need to do this in two batches.} Pour off the excess oil.
Crowd the browned meat back into the pan, if necessary, and poke the onion wedges in between. Add the bay leaf.
Add enough of the reduced stock to come to a depth of about 1/2 inch. {If you don’t use it all, you can add it when you finish the dish, or save it to sauce rabbit sausages.} Add 1/4 cup of the Marsala. Bring to a simmer, cover tightly, and cook at a bare simmer for about 20 minutes. Alternatively, you can instead place the covered pan in a preheated 350° oven and cook for about 40 minutes.} About halfway through the cooking, turn the pieces of rabbit over and give the pan a swirl.
While the rabbit is cooking, halve the plums along the natural crease in their skin and remove the pits. I like to add the pits to the simmering rabbit, to add flavor, then retrieve them before serving.
After 20 minutes or so {or about 40 minutes in the oven}, the rabbit should be cooked through and tender, but far from falling off the bone.
The onions should look like translucent fantails, and the pieces of meat will have shrunken somewhat~which is convenient, as it will make room for the plums. If the braising liquid looks or tastes thin, pour or ladle it off very carefully, reduce it in a small saucepan, and then pour it back over the rabbit. {You can set the dish aside for an hour or so at this point.}
Distribute the halved plums around the pan, add the remaining 1/2 cup Marsala, and simmer gently, uncovered, for 10 to 15 minutes, swirling the pan regularly. Try not to crush the pretty onions. The amber plum flesh will brighten to yellow gold and the skins will turn the sauce a deep mauve red, or plummy purple. The skins will curl at the edges, but they generally don’t slide off of this type of plum. Stop simmering when the plums are uniformly soft, like freshly made preserves, and the sauce is just syrupy.
Serve the rabbit pieces {one foreleg and one hind leg per serving}, each carefully garnished with silky onion fans and a few plums, all bathed in the glossy sauce.
RABBIT MIXED GRILL
WHEN WE DEBUTED THIS DIMINUTIVE MIXED GRILL IN THE CALIFORNIA PAVILION at a wine exposition in Bordeaux, the host French chef and his brigade arched eyebrows and whispered. This was no way to handle a rabbit. But the dish was very tasty and it is now entrenched in the Zuni repertory.
This dish was originally contrived to use the pile of odd but delectable “little parts” of the rabbit you generate when you braise a lot of legs. {See Cutting Up a Rabbit, and What to Do with the Parts, here, for how to prepare the cuts listed here.} The “off-cuts” from 2 small rabbits will provide enough pickings for a Mixed Grill for 4. But you can buy extra rabbit to generate additional off-cuts, and to provide meat for sausage or rillettes. At Zuni, the composition of the dish varies constantly, according to what parts, in what quantities, we have, and what compatible greens and fruits are available. We sometimes arrange the mixed grill on a smear of hazelnut aïllade {see here}.
Serve as a first course, either on individual plates, or family-style on a platter, with toothpicks. In more generous portions, this makes a fun main course.
Wine: Château Robin, Côtes de Castillon, 1998
FOR 4 SERVINGS AS AN APPETIZER:
About 1/2 cup hazelnuts, walnuts {preferably freshly shelled}, or pecan halves
About 1 tablespoon red wine vinegar, sherry vinegar, or cider vinegar
About 1/4 cup extra-virgin olive oil
Salt
A few drops of hazelnut or walnut oil {optional}
2 to 3 tablespoons mild-tasting olive oil
About 1-1/4 pounds prepared rabbit parts and confections~choose from:
Rabbit belly flaps {about 2 ounces each}, salted and peppered a few hours in advance if possible
Rabbit loins {about 3 ounces each}, salted a few hours in advance if possible
Kidneys and liver {about 2 ounces per rabbit}
Rabbit Sausages {here} {about 2 ounces each}
Rabbit Rillettes {here}, about 1 ounce per serving, at room temperature, plus bite-sized crostini made from baguette or other chewy, peasant-style bread
Freshly cracked black pepper
About 4 ounces fresh or drained brandied red currants or grapes {here}, fresh Black Mission figs, halved, or fresh red or white cherries, or 2 tablespoons pitted chopped Spiced Prunes {here}~to spread on the rillette crostini
A few handfuls of arugula, frisée, watercress, or mixed young lettuces and greens, carefully washed and dried, at room temperature
Preheat the oven to 350°.
Toast the hazelnuts, if using, on a small baking sheet until the skins darken and begin to split, 10 to 15 minutes. Bundle them, still hot, in a towel, beanbag-style, and scrunch and massage them to rub off most of their skins. Alternatively, warm the walnuts for about 5 minutes, then rub off the skins, or warm the pecans until fragrant. Chop the nuts very coarse.
Prepare a hot fire in a grill.
Spread the coals and place the grill grate a few inches above the coals to preheat. Preheat the broiler. Set a salad bowl in a warm spot.
Combine the vinegar, extra-virgin olive oil, and salt to taste. Add a very few drops hazelnut oil or walnut oil, if you like.
Grill the rabbit parts, simultaneously if possible, according to the following guidelines:
Belly flaps: Lightly oil, then grill over very hot coals until golden in spots and crispy on the edges but not brittle, about 2 minutes per side.
Loins: Lightly oil, then grill over medium heat, turning as needed, until firm, about 5 minutes; the loins should feel like a just-cooked chicken breast.
Sausage: Grill, starting over medium heat and finishing on a hotter spot, until just firm, about 5 minutes.
Kidneys and liver: Oil and season with salt and pepper. Skewer if necessary, to keep them from falling through the bars, and grill over high heat until just cooked through, a minute or two per side.
Rillettes crostini: Lightly oil the bread and grill until just crisp on both sides, then spread thickly with rillettes {if using, spread with a little prune paste first}. Set over gray coals to warm through.
If using grapes, currants, figs, or cherries, coat lightly with oil, salt lightly, and broil briefly, until the skin sizzles and begins to blister.
Place the greens in the salad bowl and toss with vinaigrette to coat. Arrange most of the leaves on plates or a platter, reserving some to garnish.
Slice the loin into thin medallions. Cut the belly across the grain~spanning the arc of the semicircle~into very thin strips. {If you cut the other direction the strips will be tough.}
If you have as many sausages as diners, leave them whole; otherwise, cut into bite-sized chunks. Do likewise with the innards.
Distribute the loin, sausage, and innards randomly over the salad, taking care not to pile them. Add a few more strategic leaves of salad, tuck in the fruits and the rillettes crostini, if using, and garnish with the chopped nuts and slivers of belly.