

DESSERT HAS THE INTERESTING DUTY OF TEASING OUT THE LAST GASPS OF YOUR appetite. For me, the best dessert is simple and bright, and often overtly sensual. A few elements, rigorously in season~in this hemisphere~can charm even a jaded eye and provoke new appetite. Most of the sweets here are familiar and traditional~fruit tarts, shortcake and pots de crème. My enthusiasm for sorbet and granita, the easiest of seasonal desserts, is unbridled. A few dishes, like fried figs, or stuffed dates, are frivolities that are exquisitely fun to eat. In deference to the fruits, nuts, dairy products, or chocolate that define the dish, most of these desserts are not very sweet. I try to keep the sugar from numbing the palate by using a tiny measure of salt in almost every concoction, and often a dribble of fragrant vinegar~cider, sherry, black currant, Champagne, or balsamic~for acidity. These techniques routinely trick me into enjoying dessert at the close of a meal, even if I am no longer hungry.

WINE & DESSERT
A DESSERT WINE THAT IS DELICIOUS ON ITS OWN CAN BE OVERWHELMED by creamy or chocolate desserts. Fresh fruit is kind to a sweet wine, and so are biscotti and tuiles~provided they are not overly sugared. The best accompaniment for a glass of Château d’Yquem, I swear, is a plain English whole-meal biscuit, something like a slightly sweet, crumbly Graham cracker. With a moment’s thought, it’s easy to see why I’ve matched these particular wines with some of Zuni’s most popular desserts.
ORANGES with ROSEMARY HONEY
THIS IS AN EASY, INEXPENSIVE, AND AROMATIC DESSERT THAT CAN SEDUCE EVEN the die-hard non–dessert eater. It is welcome after a rich winter meal. Choose firm, heavy seedless oranges, or a combination of oranges and blood oranges. I use wildflower honey and infuse it with Tuscan blue rosemary.
Wine: Quady Essensia, California Orange Muscat, 2000
FOR ABOUT 4 SERVINGS:
1/4 cup honey
4 teaspoons water
A small sprig of fresh rosemary
4 to 6 oranges
Place the honey and water in your smallest saucepan. Pick off a dozen or so rosemary leaves and pound them lightly with a pestle or the back of your chef’s knife blade, then add them to the pan. Set over low heat. Stir and warm gently, without boiling. Remove from the heat and leave to infuse for about 15 minutes.
Slice both ends off each orange, cutting just deeply enough to expose the juicy flesh. Set the fruit on end and use a paring knife to carve away the skin and pith in a series of smooth arc-like strokes from top to bottom, rotating the orange a little with each stroke. {Most of us misjudge and miss a little pith on the first go-round, but this iseasy to trim once you’ve removed the bulky skin.} Slice the oranges evenly into thin pinwheels~removing any seeds as you go~just under 1/4 inch thick, and lay them slightly overlapping on a platter or plates.
Just before serving, drizzle the tepid honey over the fruit.
MANDARINS & DATES STUFFED with MASCARPONE, POMEGRANATES, & PISTACHIOS
THIS RAVISHING DESSERT IS A STUDY IN CONTRASTS~SWEET AND ACID, JUICY AND dry, sticky and creamy, crunchy and soft, floral and nutty.
Look for tender, sticky-ripe fresh dates. I love their exotic names~Halawi, Khadrawi, Dayri, Barhi, Zahidi, Deglet Noor~and discovering their nuances of honey, butterscotch, molasses, and caramel is fun. All of these varieties can be delicious, although the fat Medjool, “the elusive, wonderful, unattainable thing,” as defined by one guide in southern Morocco, is most available and is very reliable. {I asked him to pronounce and try to translate the names of every date we saw in every market. But nearly all the names changed from oasis to oasis, which made any goal of cataloguing them delightfully hopeless.} My favorite date in California is the Black Precioso, which has a molasses note. Whatever the variety, “natural” dates will have the best flavor and texture; hydrated ones have been showered and steamed for hours, which makes them plump and pretty, at the expense of taste.
Clementines or Satsuma mandarins are a good choice here, but any variety of mandarin {which embraces everything we call a tangerine as well} is fine, as long as it is flavorful and fragrant. As with most citrus, look for saturated skin color. Loose-skinned varieties always worry me~decades of scrutinizing produce makes me think “plump and heavy” is best~but these self-peeling mandarins are often rich and delicious. Flavorful oranges and blood oranges are options as well. Seedless varieties will be the easiest to prepare.
If you come across a blushing yellow-white pomegranate, try it; the pulpy seeds are perfumed and look like little opals. Look for firm pomegranates whose skin has begun to shrink and become leathery, but avoid cracked and dried out fruit. Pomegranates should be heavy for their size.
Wine: Antigua California Muscat de Frontignan, Merryvale Vineyards
FOR 4 SERVINGS:
About 30 shelled raw pistachios {2 tablespoons or 1/2 ounce}
1 pomegranate
About 8 small “natural” dates or 4 large ones {about 4 ounces total}
About 8 teaspoons mascarpone
8 mandarins or 4 medium oranges or blood oranges, or a combination of all three
A few splashes of orange flower water {available at Middle Eastern or Indian markets and some liquor stores}
Turn the oven to 350°.
Discard any pistachios that are shrunken or brown. Warm the pistachios in the oven for a few minutes, just long enough to heighten their flavor, but without letting them brown. Coarsely chop, again watching for and culling discolored nuts.
Cut about halfway through the pomegranate, then pry the halves apart. Harvest a handful of the seeds and remove every bit of tannic pith from them. Save the remainder of the pomegranate for Celery-Walnut-Dried Fig Relish {here} or toss the seeds into simple green salads.
Slash each date and remove the pits. If the dates are large, cut them in half. Use two small spoons to neatly stuff each cavity with about a teaspoon of the mascarpone. Lightly press a few pomegranate seeds and bits of pistachio into the mascarpone.
Slice both ends off the citrus, cutting just deeply enough to expose the juicy flesh. Set on end and use a paring knife to carve away the skin and pith in a series of smooth, arc-like strokes from top to bottom, rotating the fruit a little with each stroke. Go back and trim any pith you missed on the first try. Slice into thin pinwheels.
Arrange the citrus slices randomly on plates or a platter. Sprinkle with a few drops of orange flower water, and tilt the plate to distribute. Add the stuffed dates and scatter with a few more pomegranate seeds and the remaining pistachios. The array will be prettiest if not too crowded. Serve immediately.
FRIED FIGS with WHIPPED CREAM, RASPBERRIES, & HONEY
THIS IS MY FAVORITE DESSERT. Choose tender, ripe figs and sweet, fragrant raspberries.
For detailed instructions on deep-frying, see Piccolo Fritto {here}.
Wine: Isabel Marlborough, New Zealand, Noble Sauvage, 2000
FOR 4 SERVINGS:
About 4 cups peanut oil, for deep-frying
1/2 cup cold heavy cream
8 to 12 ripe Black Mission, Adriatic, or Kadota figs, or a combination of varieties {about 12 ounces}
About 1 cup buttermilk
About 1 cup all-purpose flour, for dredging
1 cup raspberries
2 to 3 tablespoons lavender honey
Place the oil in a heavy 2-quart saucepan over medium-low heat and heat to 365°.
While the oil is heating, whip the cream to soft peaks; refrigerate it. Refrigerate four dessert plates as well.
Trim the stem ends and cut the figs in half. Dip each piece in the buttermilk, then roll in the flour to coat. When the oil is ready, lower about half of the figs into the oil and deep-fry to golden brown, a minute or two. Remove to drain on paper towels. Fry and drain the second batch of figs.
Place a mound of cold whipped cream on each of the cold plates. Set the figs on top. Garnish with the red berries and drizzle with the honey. Serve instantly, while the figs are still hot and crispy and the cream still cold and thick.
FRUIT GRANITA & SORBET
FRUIT GRANITA {CHOPPED ICE} AND SORBET ARE PERHAPS THE SIMPLEST, MOST refreshing, and most versatile of prepared desserts. A few unadorned spoonfuls of either are welcome after a rich meal, or on a very hot day, and both accept trappings of cookies or pastries to become the center of an elaborate final course. And a pair or trio of different granitas or sorbets is both elegant and charming enough to end any sort of meal.
I’ve grouped granita and sorbet into a joint lesson here, taking advantage of the fact that the simple tasting skills and testing techniques involved apply to both. Addressing them together also accommodates the fact that in many cases you ought to taste your fruit before you decide which you are going to make. The recipes and variations are grouped by fruit and are short and easy, with far more words devoted to finding delicious fruit~which is as much of a coup as transforming it into a primitive chopped ice or suave sorbet. Selecting fruit begins with the imperative to seek what is in season, and grown locally if possible; but choosing the right specimens is largely an issue of using your senses. Some types of fruit are more scrutable than others, but most give at least good hints of their quality.
DECIDING WHICH TO MAKE: START with THE FRUIT
Granita is the simpler of the two confections; the process consists of little more than letting a block of big ice crystals happen, and then teasing it back apart. Sorbet is the result of managing the crystal-forming process, doing everything you can to prevent big ones {see About Sorbet, here}. Since sugar helps reduce crystal size, fruit for sorbet should be fragrant and ripe, but with enough acidity to tolerate that necessary sugar. When you have really sweet, ripe fruit, granita can be a better choice than sorbet.
GENERAL SEASONING GUIDELINES
All of the recipes ask you to season, or not season, to taste, and always to adjust “your taste” for the fact that cold dulls our perception of flavor in general, and of sweetness in particular. {Think of the difference in sweetness between a warm Coke and a very cold one} I repeatedly suggest you make the mixture too sweet for your taste, and sorbet needs to be even sweeter than granita. In many cases, I suggest you try a few grains of salt or drops of a selected vinegar to derail sugar’s dulling effect on the palate. {Unless I am making lemon granita or sorbet, I don’t look to lemon juice for acidity~its perfume seems to dominate all others.} Sometimes water will “open up” the flavor and reveal the perfume of a fruit; sometimes it will mellow a puckery tart juice or purée. As always with seasoning, test adjustments on only a spoonful of the mix, so you don’t impose a misjudgment on the whole batch. If you are uncertain as to whether the sample’s seasoning is optimal, then season it further and further, until it is clearly flawed. You will have exposed your palate to the range of flavor change and can then season the whole batch confidently.
It will be easiest to dissolve the sugar when the juice or purée is at room temperature.
BASIC GRANITA METHOD
Seasoning and tasting the fruit juice or purée:
Prepare the juice or purée, and taste. Begin by freezing a small puddle of juice or purée. If the chip of fruit ice is crisp, full flavored, and pleasantly sweet, do nothing to it. Freeze the juice or purée as is. If the sample is not perfect, or you don’t trust yourself to know if it is, begin tinkering with it. Try the suggested seasonings; you may reject some, and you may go back and forth with others~adding, for example, a little more sugar after you add vinegar. You can freeze more chips as you go, to check how the changes read ice-cold. The final mixture should be only slightly sweet to your taste.
Freezing the seasoned juice or purée:
Pour the mixture into a wide glass or stainless steel receptacle {I use my 3-quart stainless sauté pan}; it should form a pool about an inch deep. Cover and place in the freezer.
Choose a plastic, glass, or stainless steel storage container with a tightly fitting lid just large enough to hold the chopped granita {1 cup of the unfrozen mixture will make slightly more than 1 cup frozen.} Make sure it is completely dry, snap on the lid, and place in the freezer.
Chopping the granita:
I know of no mechanical chopping system that will produce a granita with the elegant texture of a hand-chopped one. We chop with a pair of stainless steel pastry scrapers. They are easy to maneuver, and the relatively dull edges tease the crystals apart without slicing them up. {You can make do with one scraper; it will just take longer.} A knife blade produces a finer, denser texture.
Once the juice or purée has set a very thick crust but has not quite frozen through, usually 1 to 2 hours, give it a preliminary round of chopping: Place the pan on a cool surface in a cool room. Use the scraper to cut through and lift the layer of coarse-crystal ice, amalgamating it with the unfrozen core. A few cuts and folds are usually sufficient. Cover the pan and return to the freezer. Check hourly, and when the whole is firm to the touch but still yields easily to a stab with the scraper, it is ready for the final chopping.
Set the pan on a cool surface and methodically chop the crystalline blocks into a regular flaky, granular mass. This can be tedious, but is easy~as long as you have not let the liquid freeze too solid. If it is rock hard, it will take more brawn to cut through the chunks, and you may overwork some bits as you try to split the harder pebbles. At the opposite extreme, in rare instances where the mixture is fairly sweet, or where the purée was thick, the liquid may never fully freeze hard, and it will chop to a rich, grainy-slushy texture. Such “defective” granitas can be exquisite.
Transfer to the chilled container, snap on the lid, and place in the freezer.
Serving the granita:
Place serving dishes in the freezer to chill. {I like to eat granita out of a pretty wineglass.} At the same time, check the granita. When granita is on the sweet side, the fruit syrup sometimes drains from the ice crystals, like a snow cone {or a sharbah; see About Sorbet, below}. To redistribute it, turn the container upside down. In other cases, where the juice or purée was thin, and you didn’t add much sugar, the granita may be dryish; if so, set the container out at room temperature for 5 to 10 minutes before serving. This will improve the texture, and the flavor as well.
Use a fork to fluff the crystals, then slide the granita by the forkful into the chilled dishes or glasses.
ABOUT SORBET
THE SUAVE TEXTURE OF GREAT SORBET OWES TO VERY FINE crystals~the size of which you can manage with several tools. Friction does its part as the motion of the dasher in an ice cream machine keeps the crystals from growing large. Adding sugar also interrupts the formation of crystals and lowers the freezing temperature. Heating that sugar with a little bit of the purée or juice is even more effective. The acid from the fruit breaks up~inverts~the sugar and makes it more efficient at “interrupting.” This syrup acts like a magiric antifreeze whose only flaw is that it introduces a cooked fruit flavor into the mix. {So I try to use as little as possible}. You can also manage the mixture by adding spirits, from “flavorless” vodka to grappa to perfumed brandies. This won’t make a sorbet creamy and chewy, the way sugar does, but it enhances the effect of whatever sugar is there by further lowering the freezing point of the mixture.
For flavor and richness, we occasionally add milk or cream to a sorbet mixture, which, according to federal regulations, we can then call “sherbet,” although a distinction on that basis is historically, or at least linguistically, unfounded. We honor it though, because it has gained currency and the presence of milkfat is worth announcing~which is the point of the regulation.
Sherbet, sorbet, and sorbetto are the almost contemporaneous English, French, and Italian stabs at the Arab word we transcribe as sharbah, which comes from shariba, “to drink.” A sharbah was a drink of sweetened fruit juice or flower-infused syrup poured over ice or snow. Icy confections with these and other abandoned names had long been a fabulous luxury in parts of France and Italy, but then became a commercial rage by the late 1700s. These treats evolved to sometimes include milk or cream, but the presence of dairy products is unrelated to the emergence of the English pronunciation and spelling.
BASIC SORBET METHOD
Seasoning and tasting the fruit juice or purée:
Prepare the juice or purée, and taste. Season the mixture, tasting as you doctor with the suggested sugar, water, fruit syrup, salt, vinegar, and so on. The mixture should be oversweet but still have bright fruit flavor~too sweet to drink as a beverage, but not cloying.
Freeze a puddle of the mixture. It should be pliable and perfectly sweet. If it is brittle and icy, add a little more sugar to the whole batch as necessary, and rebalance with a few drops of vinegar if appropriate, until a frozen sample is pliable. Cover and place the mixture in the refrigerator to chill. {You can also chill it in the freezer; just don’t let it freeze}.
Freezing the sorbet:
Choose a plastic, glass, or stainless steel container with a tightly fitting lid just large enough to hold the churned sorbet {1 cup of unfrozen mixture will yield just over 1 cup sorbet}. Make sure it is dry, snap on the lid, and place in the freezer.
Churn the sorbet according to the instructions for your ice cream machine. Scrape into the chilled storage container. To avoid a blanket of frost on the sorbet, snap on the cover immediately, before moisture precipitates on the surface.
If the sorbet is already fairly firm, you may be able to serve it nearly immediately, or within an hour. In most cases, though, allow a few hours for it to firm up.
Serving the sorbet:
Check the firmness of the sorbet at least half an hour before serving. If too hard to scoop, set out at room temperature or in the refrigerator to soften. This will improve the flavor as well. I usually chill the serving dishes.
RECIPES
HERE ARE RECIPES FOR MAKING GRANITA AND SORBET WITH FIVE DIFFERENT fruits, plus shopping and seasoning guidelines for another three. All of the recipes suggest quantities for sugar and the other seasonings based on ripe fruit. Since yield can vary quite a lot from one batch of fruit to the next, I have based the recipes on 1 cup of prepared juice or purée. This should make it easy to apply the proportions to whatever amount you have. {Most ice cream freezers need at least a few cups of mix to perform well.}
STRAWBERRIES
Choosing the fruit: Great-tasting strawberries generally have rich, saturated color. However, not all deep-red berries will be great; sometimes the color is skin deep and the fruit has little flavor. It may be hard, fibrous, or hollow. Hence, don’t buy on color alone. Fragrance is a better guideline. If the berries are trapped behind plastic wrap, turn the basket over and smell from underneath. If the berries at your market are cold, you’ll have to work a little harder to read the scent, but you should still perceive one. If you detect no perfume at all, consider another fruit.
In strawberry choosing, especially for sorbet or granita, don’t focus on size or regularity. First-harvest spring berries tend to be large {and expensive, given the premium accorded to things jumbo and “first” in the supermarket}, but these trophy berries may not have the concentrated flavor of smaller summer or early fall berries, when water is scarce or withheld. While not all varieties tolerate late-season stress, some older varieties do, and I look forward to that intensely flavored small fruit.
But with any variety of strawberry, growing conditions, harvesting decisions, and shipping conditions can dramatically enhance or undermine its genetic baggage. Strawberries are fast-growing and absorb soil amendments rapidly, whether in the water that literally becomes the strawberry, or through their very permeable skins. To guarantee the highest possible yield, it is common practice to fumigate entire fields. For a few dimes or quarters more, you spare the land and those that work it, or near it, the insult of a chilling dose of sterilizing chemicals. For all of these reasons, I encourage you to look for, and ask for, organically farmed strawberries.
You can often improve the texture and sweetness of strawberries by leaving them at room temperature for up to 12 hours. For granita, use the sweetest berries you can find; for sorbet, choose fruit with a little acidity.
Preparing the purée: Count 1/2 pound berries {a very full pint basket should weigh 1 pound} for about 1 cup strained purée. Rinse the berries in cool water~don’t soak. Drain and roll them around between towels to rid them of excess water. Hull, and trim any bruises and hard tips. If making granita, trim hard or pale shoulders. If you are making sorbet, a little underripe shoulder may serve to balance the necessary sugar. Purée in a blender or process, and press through a fine-mesh strainer, and taste.
 STRAWBERRY GRANITA
This will be a little thick and slushy, but refreshing. Since the purée is initially whipped full of air, let it sit for a few hours at room temperature before freezing. You can speed this up by warming the purée slightly, or pouring it into a warm bowl. Once the air escapes, the liquid will be able to form nicer crystals.
FOR 1 GENEROUS CUP:
1 cup strained strawberry purée
Up to 1 tablespoon sugar
A pinch of salt, if needed
Freeze a spoonful of the purée and taste. If needed, gradually sweeten the remaining purée. Test the effect of a few grains of salt, and adjust accordingly, then freeze and chop as described in the Basic Granita Method {here}.
STRAWBERRY SORBET & STRAWBERRY BALSAMIC SORBET
Both of these are easy and reliably suave. The thick purée virtually guarantees a nice texture. Although the balsamic is optional, it adds a complexity I find irresistible.
FOR 1 GENEROUS CUP:
1 cup strained strawberry purée
1 to 3 tablespoons sugar
A pinch of salt, if needed
About 1/2 to 3/4 teaspoon balsamic vinegar plus about 1/2 teaspoon sugar {optional}
Taste the purée, then gradually add sugar until it is quite sweet. See if salt heightens the flavor, and adjust accordingly. If considering balsamic, add a drop to a spoonful of the mixture and taste. If you like it, cautiously season the whole batch. The flavor change should be subtle. Rather than tasting the balsamic outright, you should just taste the strawberry better. Correct the sugar to taste. Freeze a sample, taste, and adjust if needed. Chill, then freeze according to the instructions for your ice cream machine.
BLACKBERRIES & RASPBERRIES
Choosing the fruit: The bramble genus, Rubus, provides a happy confusion of delicious options: Blackberries, raspberries, and the crossbreeds~boysen, olallie, sylvan, and marion {the black ones} and tay, burgundy, and logan {the red ones}~all make gorgeous, thick sorbet, and the most intensely flavored berries, with strategic thinning, make an unusually rich granita. Although the berries vary wildly in sweetness, their flavors typically stand up to sugar and cold quite well and then explode as the crystals melt in your mouth. Choose very tender, perfumed fruit, although a few slightly less ripe berries won’t harm a sorbet.
Preparing the purée: Count 2 to 3 cups {3/4 pound} berries for 1 scant cup strained purée. Go through the berries one by one, looking for any speck of mold that would taint the flavor of the whole batch. Process briefly and press through a strainer, or pass the whole berries through a food mill whose holes are smaller than the seeds. Taste.
BERRY GRANITA
This regal granita will have smallish crystals and will melt to a potent slush in short order, but that doesn’t bother me. Spoon into frozen glasses to prolong the pleasant meltdown.
FOR ABOUT 1-1/4 CUPS:
1 cup strained berry purée
2 to 4 tablespoons water, sparkling wine, or fruity dry white wine, such as dry Muscat
Up to 3 tablespoons sugar
A pinch of salt, if needed
Add water or wine to thin the purée to the texture of cold half-and-half. Freeze a sample and taste. Sweeten the remainder accordingly~which may mean not at all. Add salt if it improves the flavor. Freeze and chop according to the Basic Granita Method {here}.
BERRY SORBET
Reliably stunning. Consider buying a few different types of berries~to blend, or to make a few different sorbets. Careful seasoning can reveal their nuances: black currant–flavored vinegar can add spark to a blackberry sorbet; a dribble of Cognac or Armagnac may enhance a raspberry one.
FOR 1 GENEROUS CUP:
1 cup strained berry purée
2 to 5 tablespoons sugar
A pinch of salt, if needed
For the blackberry family: a few drops of black-currant vinegar {optional}
For raspberries: about 1/4 teaspoon Cognac or Armagnac {optional}
Taste the purée and gradually add sugar until quite sweet. See if salt heightens the flavor, and season accordingly. Add optional vinegar or brandy to taste, then correct sugar or salt as needed. Freeze a sample, taste, and correct as needed. Chill, then churn according to the instructions for your ice cream maker.
PLUMS
Choosing the fruit: Not many plum varieties are reliably delicious for eating raw; often you have to tolerate tart skin and sour flesh around the pit in order to enjoy the sweet meat in between: Fortunately, puréeing and sweetening usually improves on nature’s arrangement. Among well-known varieties, the Santa Rosa, with its surprising note of banana flavor, is my favorite, for eating and for cooking. Its relatives~Casselman, Duarte, and Fortune~can be good as well. Ruddy Satsumas, Mariposas, and Elephant Hearts, yellow Shiros, and green Kelseys and Greengages can make nice sorbet. Handsome, round “black” plums~Friar and Galaxy~have lots of meat, small pits, and not a lot of flavor for eating raw, but even they can be coaxed into fine sorbet, provided they are ripe. In all cases, choose plump ripe plums that yield slightly when you squeeze them.
Preparing the purée: Count 9 to 10 ounces ripe plums for 1 cup strained purée. Cut the flesh off the pits, working over a bowl so that you capture the juice. Purée or process, strain, and taste. Save some of the bits of skin you trap in the strainer. These flecks can add a potent note of acidity and flavor; so you may want to stir a spoonful back into the purée. This will make a beautifully flecked sorbet.
PLUM SORBET
The one sorbet that is routinely better than the fruit you make it from. The purée accepts generous scoops of sugar, virtually guaranteeing a lovely creamy-chewy texture. With or without freckles of skin, this sorbet is intensely flavorful. If you have the opportunity, serve a few different types of plum sorbet together, showing off a few shades of pink, yellow, green, or burgundy and the complex, unexpected flavors of several varieties.
FOR 1 TO 1-1/4 CUPS:
1 cup strained plum purée, with about 1 tablespoon reserved chopped skins
3 to 8 tablespoons sugar
A pinch of salt, if needed
Up to 1 tablespoon water, if needed
Up to 2 teaspoons grappa {optional}
Taste the purée. Gradually add sugar until quite sweet. See if a few grains of salt improve the flavor, then season the whole batch accordingly. If the purée is puckery or too intense, try adding a splash of water. In the event that it lacks dimension, a teaspoon or two of grappa can be ravishing. Try stirring a bit of the tart skin back into the sweetened purée~then add a bit more sugar to compensate. Freeze a sample, taste, and correct as needed. Chill, then freeze according to the directions for your ice cream machine. If you have added the skins, they may collect on the dasher; scrape off and fold them back into the sorbet.
Variation NECTARINE SORBET
Choose perfumed, “dead ripe” fruit. {It should yield to the touch.} I prefer gold varieties for sorbet; the subtle succession of bitter, sweet, floral notes of a ripe white nectarine can fall out of balance when you purée and freeze it.
Prepare as indicated for Plum Sorbet, above, including the part about the skins, but omit the optional grappa. Expect to use the minimum amount of sugar, and thin with dry white wine or water as needed.
LEMONS
Choosing the fruit: With an unassailable market niche as a universal source of all-purpose “sour” for every cooking operation imaginable, commercial lemons are often picked underripe~high in acid, and shy on varietal fragrance and flavor. I always look for the ripest lemons in the bin, or on the tree; they deliver a lovely complex of flavors, and require less sugar. Both major commercial varieties~Lisbon and Eureka~and the rare backyard Ponderosa are best when saturated yellow overall, plump, and heavy for their size. Meyer lemons, a charismatic hybrid that is almost certainly part orange, are naturally sweeter than most true lemons and can be fragrant and flavorful even before they reach their fully ripe, saturated yellow-orange hue. Pale, banana yellow Meyers can be delicious.
Preparing the juice: Count about 5 medium lemons {about 1-1/4 pounds} for 1 cup juice. Halve and juice the lemons. Pick out seeds and large bits of pith, but don’t strain. To capture the most fragrance, season and freeze promptly. If making sorbet, use a zester to remove about 1/2 teaspoon zests before you juice the lemons.
LEMON GRANITA
Pretend you are making lemonade. At Zuni, we pour a trickle of limoncello liqueur over this granita when we serve it.
FOR 2-1/4 TO 2-1/2 CUPS:
1 cup lemon juice
1 to 1-1/4 cups water
Up to 1/2 cup sugar
A pinch of salt, if needed
Limoncello {1 teaspoon per serving}, to garnish {optional}
Combine the lemon juice, water, and sugar to taste. See if a pinch of salt heightens the flavor. Freeze a sample and taste. Correct the rest as needed, then freeze and chop according to the Basic Granita Method {here}
LEMON SORBET
Chewy and intensely flavorful.
FOR ABOUT 2-1/2 CUPS:
1 cup lemon juice {1 or 2 of the juiced lemon halves reserved for zest}
About 1 cup water
About 6 tablespoons sugar
For the sugar syrup:
3 tablespoons sugar
3 tablespoons water
1/2 teaspoon lemon zest, chopped
Combine the lemon juice, water, and sugar to produce a batch of lemonade that makes you squint slightly.
Making the sugar syrup: In your smallest saucepan, combine the sugar and water. Chop and add the lemon zest. Simmer until the syrup is the texture of warm honey and the zest has candied. Cool completely.
Gradually stir syrup into your tart lemonade, stopping as it becomes quite sweet to your taste. Add a little more water if the mixture still makes you squint. Freeze a spoonful, taste, and adjust the rest as needed. Chill, then churn according to the instructions for your ice cream machine.
Variation ORANGE SORBET
Allow about 3 tablespoons sugar per cup of juice. Dissolve the sugar in a little bit of the juice to make a syrup, simmer for 10 seconds, then proceed as for Lemon Sorbet. See whether salt improves the flavor; correct acidity with sherry vinegar.
HONEYDEW MELON
Choosing the fruit: “No, you don’t want that one, but that one will be good.”
“Oh?”
“I grew ’em. You want the ones that look like that. See all the netting on the skin? That’s good. That’s what you want. That’s sugar. Let’s cut one and try it.”
My anonymous advisor was confident. He had just delivered the pallet of honeydews to Monterey Market in Berkeley. And in one sliver, one July morning, choosing honeydew melon was unexpectedly demystified. I gave up smelling and pressing the stem end, and have followed the friendly command for over a decade, and have never been disappointed.
Preparing the purée: Count 1 to 2 pounds melon for 1-1/3 cups purée {1 cup strained purée}, with larger melons providing better yield than small ones. Halve and seed the fruit, then scoop out only the tender portion of the flesh. Don’t press for yield; the hard pale flesh near the rind is thin and vegetal tasting and will spoil the flavor of the rest. Purée or process, press through a fine-mesh strainer, and discard the pulp. Taste.
HONEYDEW MELON GRANITA
This pale granita blooms with flavor in your mouth. Sweeten cautiously; sugar can shroud the honeyed natural sweetness and mask the perfumes of the fruit. {I find that adding lemon or lime juice obscures, rather than flatters, the perfume and flavor. Likewise, I haven’t found a vinegar that doesn’t try to outbid the melon flavor.} I like to serve this granita studded with other ripe, yellow-, green-, or orange-fleshed melon, diced into coffee bean–sized bits. To do so, incorporate the melon confetti, a few at a time, as you spoon the granita into glasses. Don’t add the bits of melon any sooner; you risk freezing the raw fruit, sacrificing all but its visual charm. Serve in chilled, not frozen, glasses.
FOR ABOUT 1 CUP:
1-1/3 cups strained honeydew melon purée
A pinch or two of salt, as needed
About 1 tablespoon sugar
About 1/4 cup diced ripe melon, several colors and types if possible {optional}
Taste the juice plain, then a little of it with a pinch of salt, then add a pinch of sugar and taste again. Then taste some with sugar only. Decide which you like best, and season accordingly. {It helps to freeze a sample if you are unsure.} Freeze and chop as described in the Basic Granita Method {here}.
Variation WATERMELON GRANITA
Watermelon granita is easy and satisfying; it can be better than the best watermelon. Choose a melon that is heavy for its size. Watermelons usually have a pale patch on their “resting” side: select one where that flush is more yellow than white; this promises maturity, which is when sugar happens. Most sweet watermelons vibrate like a drum when you tap them. You may need to thump, buy, and taste a few watermelons before you get a feel for this, but once you do, the sensation is easily recognized. If not foolproof, this time-honored technique returns better results than chance.
Prepare as for Honeydew Melon Granita, noting that a 1-1/4-pound piece of ripe watermelon should yield 10 to 12 ounces of flesh, or about 1 cup strained purée.
ESPRESSO GRANITA with WHIPPED CREAM
THIS GRANITA IS THE SWEETEST THING WE MAKE AT ZUNI, AND YET IT IS SURPRISINGLY refreshing. This effect requires fiercely rich espresso. Weaker espresso will make an insipid, pale, sugary granita not worth the effort. Our espresso is made with equal parts dark-roasted Costa Rican, Papua New Guinean, and Colombian beans. Our machine doses 1/4 cup water per espresso; we use 1/4 ounce ground espresso beans {1-1/2 tablespoons, very tightly packed} per dose. Don’t use instant espresso, or any sort of brewed coffee.
FOR 5 TO 6 SERVINGS:
1 cup sugar, or to taste
2 cups espresso, room temperature
3 tablespoons water
For the whipped cream:
About 1/2 cup cold heavy cream
About 2 teaspoons sugar
Dissolve all but 2 tablespoons of the sugar in the espresso and taste. It should taste too sweet; if not, gradually add some or all of the remaining sugar, until it does. Add the water. Pour into a stainless steel pan or glass dish in which forms a pool about an inch deep. Freeze until solid. Due to the high concentration of sugar, this may take up to 8 hours.
Choose a glass, plastic, or stainless storage vessel, about 3 cups capacity, with a tightly fitting lid. Make sure it is dry, snap on the lid, and place in the freezer.
Place the pan of frozen espresso on a cool surface and chop according to the method here.
Ten to 15 minutes before serving, turn the container upside down in the freezer. {The espresso syrup sometimes drains from the ice crystals, like syrup in a snow cone; turning it upside down will redistribute the syrup.} Place 5- to 6-ounce serving bowls or glasses in the freezer to chill. I like to use clear, narrow, fluted stemware to show off the layers and crystals.
Combine the cream and sugar and whip very stiffly.
To serve, layer the granita and whipped cream like a parfait in the chilled glasses. There should be nearly as much whipped cream as granita. The surface of the cream will freeze where it is in contact with the granita, and the succession of voluptuous chewy and slushy textures is delightful.
SHORTCAKE with SUMMER FRUIT
THIS SHORTCAKE RECIPE IS NO MORE THAN A GREAT CREAM BISCUIT RECIPE PLUS sugar. It produces an addictive salty-sweet, crispy-tender biscuit, which almost does not need the fruit. We serve strawberry shortcake throughout the spring, then anoint the biscuits with this cocktail of soft summer fruits when they all come into season together. Choose fragrant, tender berries and stone fruits; a single hard or acidic mouthful will spoil the whole effect. The fruit is moistened with heavily sweetened white wine; you can use almost any light-bodied dry white wine, such as Trebbiano, but a floral dry Muscat makes a particularly lovely syrup.
Cut and macerate the fruit an hour or two before you plan to serve it.
Wine: Moelleux, Chappellet Napa Valley Late Harvest Chenin Blanc, 1999
FOR 6 SERVINGS:
For the “fruit cocktail”:
3/4 to 1 cup light dry white wine, chilled
6 tablespoons sugar, or as needed
4 small or 2 large perfectly ripe peaches or nectarines {about 1 pound total}, or a combination of both
About 3 cups mixed ripe berries, such as strawberries, blackberries, olallieberries, loganberries, boysenberries, raspberries, and/or tayberries {1-1/2 pounds total}
for 6 biscuits:
2 cups all-purpose flour {9 ounces}, plus a little more for rolling out
2-1/2 tablespoons sugar
1 tablespoon baking powder
3/4 teaspoon salt {a little more if using kosher salt}
4 tablespoons salted butter, cut into 1/4-inch-thick slabs and chilled
1 cup plus up to 1 tablespoon cold heavy cream
Water {to brush the tops}
For the whipped cream:
1 to 1-1/4 cups cold heavy cream
Sugar to taste
Preparing the fruit:
Stir together 3/4 cup of the wine and the sugar in a wide bowl; it should taste quite sweet {add more sugar if needed}.
Whatever fruits you choose, place them in the sweetened wine as you go, layering in the following sequence.
Peaches: Lower 1 or 2 peaches at a time into a few quarts of simmering water; remove after 10 to 15 seconds, as soon as the skin has loosened from the flesh. Slide into a bowl of ice water and swirl to cool evenly without bruising. Leave just long enough to cool the surface, then lift out and peel off the skins. Trim any bruises and hard shoulders. Working over the bowl of wine, so you capture any drips of peach juice, cut the flesh off the pits in 1/4-inch-thick wedges. Let the slices fall into the wine as you go; swirl to submerge the fruit.
Nectarines: Working over the bowl of wine, cut the flesh neatly off the pits in 1/4-inch-thick slices; trim bruises and carve around hard shoulders as you go. Let the nectarine wedges fall into the wine, and swirl to submerge.
Strawberries: Rinse, drain, and roll on a dry towel to wick excess water. Hull, then trim bruises and hard shoulders or tips. Halve small strawberries; thickly slice large berries. Add to the bowl of wine.
Other berries: Inspect one by one, discarding any that are hard or have even a speck of mold. Leave whole, and add to the bowl of wine.
Swirl and tilt the bowl to moisten everything without bruising the tender fruit. The wine should come just over one-third of the way up the fruit. If not, stir together a little more wine-sugar mixture, counting 1 tablespoon sugar per 2 tablespoons wine. Cover loosely and leave to macerate for an hour or so at room temperature, gently turning the fruit with a rubber spatula after about 30 minutes. The fruits will gradually bleed their juices, noticeably increasing the amount of liquid in the bowl. Taste this wine-fruit syrup and add a sprinkle more sugar or unsweetened wine if you find it either oversweet or not sweet enough. Swirl to distribute.
Cover loosely and leave in a cool spot, but not refrigerated, until serving.
Baking the biscuits {you can do this while the fruit is macerating}:
Preheat the oven to 375°.
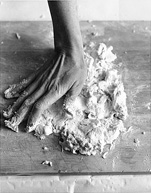
Stir and toss together the flour, sugar, baking powder, and salt in a large bowl or a mixer bowl. By hand, or using the dough hook of the mixer, cut and smash the butter into the flour mixture, stopping when the butter is reduced to dusty flakes about as big as cornflakes. Some irregularity is inevitable and will give the biscuit a pleasant texture. Pour in 1 cup of the cream, distributing it over the whole of the flour. Work it in quickly {about 1 minute on low speed if using a mixer}. The dough will look mottled and may be sticky in spots. Target any really dry spots with as much of the remaining cream as necessary to bind the flour, but don’t worry if the dough is a little ragged in spots. {Although different flours and creams behave differently, how much cream you need depends primarily on the size of the butter flakes}.
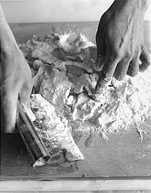
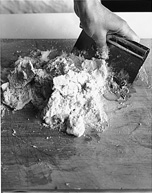
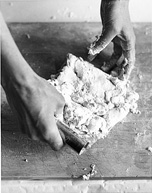
Lightly dust a cool work surface with a little flour. Gently flatten the mass of dough into a roughly rectangular form. Dust the top of the dough with flour and roll 1 inch thick. If it sticks on the bottom, lift the dough, scrape the sticky spot, and dust with flour. Use a sharp knife to cut the dough into 2-1/4- to 2-1/2-inch squares {a dull dough scraper will crimp the edges and restrict the rise}. For the best rise, trim the outside edges of the dough. Or leave it as is if you aren’t afraid of the rustic. {When making large batches of this dough, I miter the scraps together to fashion a couple of amorphous biscuits~I prefer this to pressing, flouring, and rerolling to cut into orderly shapes, since that process makes drier, denser biscuits.} Brush the tops lightly with water.
Place on a baking sheet at least 2 inches apart, so the biscuits don’t steam each other as they rise. Bake until golden brown, 20 to 25 minutes. Don’t underbake, or the centers will become heavy as they cool. Cool on a rack to preserve the crispy bottoms. These are best served within an hour. {If you need to make the dough a few hours in advance of baking it, roll it and cut the biscuits, cover loosely, and refrigerate promptly.}
Serving the shortcake:
Softly whip the cream, sweetening to taste. Split the biscuits and top the bottom half of each with a generous spoonful of the fruit and its wine syrup. Add a dollop of whipped cream. Crown with the craggy top pieces.
CORNMEAL BISCOTTI
THESE BISCOTTI ARE A STAPLE AT ZUNI. Not very sweet, they are generously seasoned with anise and roasted nuts. I enjoy them for breakfast. They are best if aged for a few days before serving.
Wine: Veuve Clicquot Ponsardin Demi-Sec Champagne
FOR ABOUT 24 LARGE OR 36 TWO-BITE–SIZED BISCOTTI:
3/4 cup hazelnuts or almonds {4-1/2 ounces}
4 tablespoons cold salted butter
1/2 cup plus 2 tablespoons sugar
1 large cold egg
1-1/2 teaspoons anisette
1-1/4 cups all-purpose flour {about 5-1/2 ounces}
2 tablespoons fine cornmeal
1 teaspoon baking powder
1/2 teaspoon salt
1-1/2 teaspoons anise seeds
Preheat the oven to 325°. Line a baking sheet with parchment paper.
Roast the nuts on a small baking sheet until they are fragrant and beginning to color on the inside, about 15 minutes. If using hazelnuts, gather them in a towel, beanbag-style, rub to remove some of the papery skin, and then pick out the nuts. Finely chop 1/4 cup of the nuts; coarsely chop the remainder.
In a medium bowl, barely cream the butter with the sugar. Beat in the egg and anisette.
In a separate bowl, combine the nuts, flour, cornmeal, baking powder, salt, and anise seeds. Add to the butter mixture and mix until homogenous.
Divide the dough in half. Roll the dough into logs about 1 inch in diameter. The dough should be cold enough to handle without difficulty, though you may need to dust the counter with a little additional flour if the logs start to stick.
Place the logs on the baking sheet, spacing them at least a few inches apart; they will swell considerably. Bake until slightly brown and firm on the surface, but yielding to light pressure, about 15 to 20 minutes. Rotate the pan if they are browning unevenly. Don’t underbake, or the baking powder will not complete its job, and the cookies will be hard and dense rather than crisp and with a great coarse texture.
Transfer the cookie logs to a cutting board and slice on an angle about 1/2 to 3/4 inch thick. Place cut side down on the warm baking sheet and bake for another 5 minutes or so to brown lightly. Cool completely, then store in an airtight container.
Variation CORNMEAL-PISTACHIO BISCOTTI
Substitute very coarsely chopped raw pistachios for the almonds and grappa for the anisette.
ORANGE-CURRANT SCONES
A CONSTANT ON OUR SUNDAY BRUNCH MENU~AND A CONSTANT REMINDER OF ten years of sleepy weekday morning breakfasts at Zuni. We served breakfast from 1987 through 1997. Everyone loved lingering over a scone, while sipping a third cup of coffee in the warm, bright morning sunlight in an almost empty bar with classical music in the background. Over the years, these scones always outsold sticky buns, fresh fruit turnovers, pain au chocolat, lemon coffee cake, and everything else the pastry department scrambled to bake for the one or two customers who might arrive at 7 in the morning. The Zuni scone is so well loved that we no longer bother making special pastries for Sunday brunch either.
FOR 12 SCONES:
3 cups all-purpose flour {13-1/2 ounces}
Scant 1/2 cup sugar
4 teaspoons baking powder
1/8 teaspoon salt
1/2 pound cold butter {2 sticks}
1/2 cup dried currants
1 tablespoon freshly grated orange zest
1 large egg
1/2 cup whole milk
Preheat the oven to 350°. Line two baking sheets with parchment paper.
Combine the flour, sugar, baking powder, and salt in a large bowl and mix well. Cut in the butter until it is the size of small peas. Add the currants and orange zest and toss well.
Whisk together the egg and milk. Add to the dry ingredients and mix and fold until the dough masses and the flour is absorbed. Don’t worry if the dough is a little streaky.
Divide the dough in half and shape into 2 balls. Pat each one into a 6- to 7-inch circle on a lightly floured surface. Roll about 1 inch thick and cut like a pie into 6 wedges each.
Bake until golden brown and firm to the touch, about 25 to 30 minutes. These are best served warm from the oven.
BASIC RICH TART DOUGH, & TWO VARIATIONS
“A STICK OF BUTTER, A CUP OF FLOUR,” MY FRIEND BETH WOOD-SETRAKIAN happily assured me, made a great tart, and was an easy formula to remember. As undergraduates in the late 1970s, Beth and I bonded over things culinary, and her pastry standard casually became mine. I always base my analysis of a pastry recipe on where it stands with respect to that rich ratio. Armed with little more than Beth’s proportions, I’ve rubbed together and rolled out lots of different types of dough over the years, three of which I detail here. Grouping them together makes it easy to see exactly how differences in water content and handling affect texture, an important lesson in pastry making.
I use salted butter for pastry dough, which may sound inelegant, and has provoked a polite “Really?” from many a purist, but it really does makes delicate, crisp pastry with rich flavor. But do be aware that salted butters vary in flavor and saltiness, and the term “lightly salted” is not entirely reliable. Although it suggests that the product has less salt than simply “salted” butter, in practice, it doesn’t always. {It is the word “light” that is regulated, and it merely promises you are getting half the amount of whatever thing you would get in that producer’s “not light” product.} Check instead the nutritional data on the label that details sodium, typically 45, 75, or 90 milligrams per tablespoon. The 90-milligram salted butter I use for pastry making is one I find way too salty for spreading on toast, or tossing with pasta or gnocchi, but it is justly seasoned for mixing with my cup of flour. I recommend you try different salted butters~and choose the one that gives you the results you like best.
As for these individual recipes, the basic, very short pastry is cookie-like. It reminds me of my favorite French butter cookie, called Traou Mad {from Pont Aven, in Brittany, which is, not suprisingly, the domain of salted butter in France}. But, starting with Beth’s lavish proportions, you can make flakier pastry as well. By working the butter progressively less, and adding progressively more water, you can produce flakier and flakier dough. I’ve made this dough with every increment of water ranging from none to nearly 7 tablespoons over the years. I describe two distinct variations here~a dough “with a little flake” and a friendly “rough puff” pastry. But you could easily, even accidentally, produce a dough that is somewhere in between the two, and it will be delicious. Don’t worry if you’ve taken the butter a little further than you intended, just add a little less water to compensate; or, if you leave more of the butter in larger chunks than described, expect to add extra water. The main concern in variations containing water is to allow time for the muscley gluten strands to relax between dough handlings.
In any version, start with cold {but not hard} butter that you can smash between your fingers like soft clay. It shouldn’t crack, and it shouldn’t be oily. This is especially important when flakiness is sought. And notice that my scoop-with-a- spoon-and-level-with-a-knife cup of flour weighs 4-1/2 ounces. Then, don’t use too much extra flour on the counter and the dough as you form and roll it out. To limit the amount of flour you use, always scrape the counter before you dust it with flour for rolling, and if you aren’t good at throwing a fine layer of flour, try dipping your fingers in a bowl of flour and then flicking them over the troublesome areas. When flouring the dough itself, brush off the excess with a dry pastry brush. Working in a cool room, on a cool board, with a cool pin and cool hands will reduce the need for flour and make any dough easier to handle. Wiping the rolling pin clean with a dry towel at the first sign of sticking will also help.
It’s easy to make a double, triple, or quadruple batch of any of these doughs, then divide it into smaller balls or slabs before the final rolling out. Once you have a feel for how the doughs come together by hand, you can make the basic dough and the “with a little flake” variation successfully in a mixer, although I don’t see much advantage unless you are making at least three times the recipe. I always make the “rough puff” by hand. In any case, tightly wrap and freeze any dough you aren’t planning on using within a day.
I should add that each of these recipes will likely take more time to read and visualize than you will spend pressing the dough together. The flaky doughs need resting time between handlings, but the active work remains minimal.
Use this basic dough to line tart or tartlet pans. This recipe makes enough for one 9-1/2-inch pan; double it if you are making a double-crusted or lattice-topped tart.
FOR 8-1/2 OUNCES DOUGH, ENOUGH FOR ONE 9-1/2-INCH TART SHELL:
1 cup all-purpose flour {4-1/2 ounces}
Up to 2 teaspoons sugar {optional}
8 tablespoons cold salted butter {1 stick}
1. Place the flour, mixed with the sugar, if using, on a cool work surface or in a wide bowl.
2. Cut the stick of butter lengthwise into approximately 1/4-inch-thick slices {illus. 1}. Lay in the flour and flip over to coat each slice with flour. Press each of the dusty butter slices thin, pinching it between your thumbs and fingertips. The slices will break into dimpled, cupped sheets, some poker chip–size, some larger, with the balance in 1/4- to 1/2-inch shards {illus. 2}. You won’t have incorporated much of the flour.
3. Slide your fingers under the pile and lift and toss the sheets and chips of butter. Press them flat again, sandwiching a few chips together with each squeeze. Repeat~the chips will begin to turn into flakes. Continue until you have a combination of about one-third flakes~some as large as cornflakes, some more like rolled oats~and about two-thirds crumbs that look like moist, clumpy sawdust.
 |
 |
| 1 | 2 |
4. Work the dough with your fingertips until the whole mixture turns into crumbs and then quickly forms a mass. Shape the mass into a ball. Knead just long enough to produce a coherent, shiny dough, then reshape into a ball. If you have added sugar, the dough will be a little sticky. Place between sheets of plastic wrap, press into a 1-inch-thick disk, and then use a rolling pin to roll smooth. If the dough cracks on the edges, press back into a ball and knead a bit longer, then place between plastic and roll smooth again. Fold over the edges of the plastic to enclose, and refrigerate until just firm enough to roll out, wrap tightly and freeze if you don’t plan to use within a day or so.
Guidelines for rolling out the basic dough:
 Make sure the dough is just soft enough to roll without cracking. If not, leave at room temperature until it is pliable. {See Tempering, here.}
Thaw frozen dough in the refrigerator, then “temper” as described above.
Roll the dough in all directions to a round just over 1/8 inch thick to fit your tart pan {if you leave the original dough ball between the sheets of plastic wrap, you can gain the first few inches of diameter with no need for flour; then peel off the plastic to finish the process}. Or cut into smaller portions and roll out to fit your tartlet pans. This dough will tear easily as it gets thin, but you can just as easily smash and rub the fractures back together.
Wrap the lined tart pan or tartlet pans in plastic and freeze for at least 1 hour before using.
Variation DOUGH “with A LITTLE FLAKE”
Use this dough for sweet or savory tarts or tartlets. It tolerates juicy fruits and fillings a little better than the Basic Rich Tart Dough does. This recipe makes enough for one 9-1/2-inch tart pan; double it if you are making a double-crusted or lattice-topped tart.
FOR 9 OUNCES DOUGH, ENOUGH FOR ONE 9-1/2-INCH TART SHELL:
Complete steps 1 through 3. Trickle 1 tablespoon of ice water evenly over the flakes and crumbs. Stir and work with your fingertips and watch the “moist sawdust” begin to look like humid Grape-Nuts. Mass the dough and knead a few times. The dough may be a little sticky in spots. Dip your fingers in flour if necessary to keep them from sticking to the wetter spots. On a lightly floured surface, gently knead into a smooth ball. The dough will have a little bounce. Place between sheets of plastic wrap, press into a 1-inch-thick disk, and use a rolling pin to smooth the surface. Fold over the edges of the plastic wrap to enclose the dough, then refrigerate for about 30 minutes before rolling out. This will allow the gluten in the flour, activated by the water, to relax. Freeze if you don’t plan to use within a day or so.
Roll out as described above. Because of the gluten, this dough is less fragile than the basic dough.
Variation “ROUGH PUFF” PASTRY
This method produces a surprisingly puffy, flaky pastry. Once you get the hang of it, you can use it for classic puff paste recipes, if you don’t mind a slightly uneven rise. I use it primarily for Fruit Crostata {here} and for Savory Onion Tarts {here}.
FOR 11 TO 11-1/2 OUNCES DOUGH {ENOUGH FOR 1 CROSTATA TO SERVE 8}:
Omit the sugar, and make this dough on the counter, not in a bowl. Follow Steps 1 and 2. Spread the pile of flour and butter sheets and chips into a lumpy, roughly circular bed. Trickle 5 to 6 tablespoons ice water over it, stirring with your fingers as it puddles in the dry flour. If water starts to flow away from the floury bed, and it nearly always does, shove a little of the loose flour on the leak, then use a scraper to redirect the water to the dry mass {illus. 3,4}.
 |
 |
| 3 | 4 |
Use a scraper to roughly consolidate the mass, scraping in from the edges. Then slide the scraper under the shaggy, sticky, lumpy mass and fold it over itself. Lots of bits of dough and loose flour will have dodged this first folding; scrape them up and tuck them in the crack. Lift the whole mass, scraping it off the counter if necessary, then press the mass flat enough to fold again. Repeat. A couple more of these casual folds ought to produce an unpromising display that looks like chips and shards of yellow wax stuck in chewing gum. Continue pressing, scraping, lifting, and folding this mass one or two more times, until all loose bits are incorporated and there are no major dry spots. The dough should not look homogenous; you should see large sheets of butter, and the surface should be mottled and dimpled {5–9}. If you have used the full 6 tablespoons of water, the dough will be baby-bottom soft.
Wrap loosely and refrigerate for 30 minutes to allow the gluten to relax. {If you chill the dough much longer than that, you may need to leave it briefly at room temperature so you can roll it out without cracking the sheets of butter.} Scrape the work surface clean.
 |
 |
| 5 | 6 |
 |
 |
| 7 | 8 |
 |
|
| 9 | |
Measure out about 2 tablespoons of flour. Try to use no more than this to finish the dough.
Dust the counter with a minimum of flour, then roll the dough, going toward and away from yourself, into a roughly rectangular shape about 1/2 inch thick. Turning the dough over once or twice can make this easier to do. Fold the short ends of the dough in over itself, in approximate thirds {10, 11}. Roll out as before, and repeat. Rewrap loosely and refrigerate another 20 minutes or so. Scrape the work surface clean.
 |
 |
| 10 | 11 |
Roll and fold the dough in thirds two more times. At this point, the dough should be generally smooth, but slightly streaky, with a few discernable bits of butter~most should have been pressed too thin to see. If the dough seems coarser than that, roll and fold it one or two more times, until it is as described. Wrap and refrigerate for at least 1 hour before rolling. Or wrap tightly and freeze if you don’t plan to use within a day or so.
Guidelines for rolling out the pastry:
Make sure the dough is just soft enough to roll without cracking the remaining streaks of butter. {See Tempering, here.}
If the dough is frozen, thaw in the refrigerator, then leave at room temperature until pliable.
This dough can become elastic and slightly sticky when you roll it out; if your kitchen is warm, it may be easiest to do this in two steps: Roll the dough to just over 1/4 inch thick and refrigerate for 15 minutes or so, then roll to finished size on a clean lightly floured surface.
FRUIT TARTS
HERE ARE INSTRUCTIONS FOR 8 FRUIT TARTS, GROUPED ACCORDING TO THE character of the fruits. All are made with either the Basic Rich Tart Dough or the “with a Little Flake” variation. You can use either dough for fruits that cook without bleeding lots of thin juice, like apples, pears, figs, and blueberries; the flakier version is the best choice for wetter fruits like nectarines, peaches, plums, or boysenberries. The tarts are open-faced, lattice-topped, or double-crusted, again in function of the filling. Using the right type of crust and format for a given fruit means the dough will cook through, and you need little or no flour or other thickening agent in the filling, leaving the fruit flavor bright and clear.
Wine: Château Guirand, Premier Grand Cru Classé Sauternes, 1999
Guidelines for making these tarts:
Open-faced tarts allow the fruit to dry out as it bakes. The surface sugars caramelize the edges of the fruit, making them pleasantly chewy and delicious.
A lattice top traps some of the fruit’s moisture as the tart bakes, but lets enough escape to keep the filling from being soupy.
A double crust generally traps the most moisture and perfume~but you can fine-tune that by making more and wider slashes in the top crust.
In each case, roll out the pastry at least an hour before baking it, place it in the pan, and freeze solid. Then prepare the fruit, and place in the dough-lined pan.
Placing filling in a frozen shell and baking it promptly in a hot oven reduces the chance of leaks or syrup-saturated, undercooked dough.
Avoid sweetened dough for wet fruits: sweetened dough tends to absorb moisture from the fruit and to seep or bake up gummy more readily than versions made without sugar.
These recipes are for 9-1/2-inch tarts baked in a 1-inch-deep false-bottom, fluted steel pan. These pans can corrode if not kept clean and dry, but don’t worry that they darken with time~this will improve their performance, as they will absorb heat and brown the pastry more readily and evenly than shiny new pans. Blue-black steel pans dodge the newness problem. For larger pans, increase the amount of filling proportionately; i.e., a 10-1/2-inch pan will take nearly one-third again as much filling as a 9-1/2-inch pan.
If the filling of any of these tarts bubbles over the edges while baking, it may caramelize and the tart stick to the pan at that spot as it cools. To free the tart, you’ll need to rewarm that section of the pan to remelt the sugar. Do that by setting the “stuck” part on the edge of a warm burner, then gently push the bottom of the pan up from underneath. You may need to cut through the caramel with the tip of a paring knife.
The recipes that follow use eight kinds of fruit, but you can apply the principles involved to other fruits. It’s always best to rely on weight rather than volume when measuring awkward things like wedges, slivers, and big berries. What’s more, packing them in measuring cups tends to bruise them.
Regarding sweetening: In general, dryish, low-acid fruits, like pears and many types of apples, whose skins are neither very tart nor tannic, or are removed, require little sweetening, and you can assess the amount necessary by tasting the raw fruit. Wetter fruits, like plums and most berries, need lots of sugar to thicken their juices, and even more if they have tart or tannic skins. In those cases, the necessary sugar may obscure the flavor of the raw fruit and will overwhelm most palates, so it is difficult to judge by taste alone. Flour can’t be gauged by taste. You can, however, learn to adjust within a range of “lots of sugar” and “a little flour” by making at least a mental note of how sweet or juicy a batch of raw fruit was~and how it baked up with a particular amount of sugar and flour. Rely on those recollections to help you sweeten, salt, or thicken future batches of the same type fruit. They are as useful as any recipe.
Preparing the bottom crust for any of the tarts:
Remove the dough from the refrigerator and leave at room temperature just until it will roll out without cracking. Roll into an 11-inch circle just over 1/8 inch thick. Carefully lift the dough and drape it across the tart pan. Lift the edges of the dough and let the slack fall into the corners of the pan. Don’t worry if it tears. Smooth the dough against the bottom, then press it against the sides. Pinch off a bit of excess dough if necessary to patch cracks or fortify thin spots, and press and smooth all repairs. Fold the remaining excess dough over the edge of the pan, then trim with a gentle pinch all the way around to make it adhere to the sides of the pan. This will help prevent the dough from slumping when you bake it. Loosely wrap, then freeze until solid before filling and baking. {You can do this step a day or two in advance. In that case, double-wrap the pan.}
Rolling out the top crust and assembling a double-crusted tart:
Remove the second ball of dough from the refrigerator and leave at room temperature just until it will roll out without cracking. Roll into a 10-inch circle, lay on a sheet pan or plate, and refrigerate. Place the filling in the frozen bottom crust, then lay the cold circle of dough on top. Press around the edges to seal. Trim and save any excess dough {see Note, here}. Slash the top crust with a sharp knife. If desired, brush with a wash made of 1 egg yolk stirred with a splash of water.
Rolling out and preparing a lattice top and assembling the tart:
Remove the second ball of dough from the refrigerator and leave at room temperature just until it will roll out without cracking. Roll into a 9- to 10-inch circle just under 1/4 inch thick. Cut into strips just under 1/2 inch wide. If the dough becomes very soft, chill it until it is firm enough to handle. Place the filling in the frozen bottom crust.
To make the lattice: arrange the strips of dough to form a grid pattern, using the shortest strips on the sides. Press the ends in place and trim the excess.
If you like, you can daub the slats of dough with a bit of egg yolk beaten with a splash of water to glaze it.
Note on using the leftover scraps of dough: If you make a double-crusted tart or a lattice, you will have extra dough. Pile the scraps strategically into a rough circle, smash the edges into line, and roll smooth between plastic wrap {with no added flour}. Freeze to use for individual tartlets. Or, sprinkle with sugar, roll out, and turn into a few tender cookies.
OPEN-FACED APPLE OR PEAR TART
USE RIPE SWEET EATING APPLES WITH TENDER FLESH, SUCH AS SIERRA BEAUTY, Gala, Braeburn, or Arkansas Black for the apple tart. Golden Delicious are good as long as they are really yellow-gold ripe. Rough-skinned Golden Russets have great flavor~watch for them. Really hard, dense apples, like Pippins, will turn leathery cooked this way; use them for Crostata {here} instead.
Choose ripe Anjous, slightly underripe Comice, or very ripe Boscs for the pear version of this tart.
TO SERVE 8:
1 recipe Basic Rich Tart Dough {here} or Dough “with a Little Flake” {here}
1 pound apples or pears
2 or 3 pinches of salt
3 to 4 tablespoons sugar
2 tablespoons honey, to glaze {optional}
Roll out the crust, press it into a 9-1/2 inch pan, wrap, and freeze until solid {see here}.
Preheat the oven to 375°.
Peel, halve, and core the apples or pears. Place cut side down and slice evenly into 1/8-inch slivers: Cut apples across the missing core; cut pears from stem to flower end. Collect the butt ends and incomplete slices, and taste one to check the sweetness.
Lay the ends and irregular slices flat in the center of the frozen shell. Starting at the edge of the pan, arrange the neater slices in any pattern that you like, as long as each sliver overlaps and nearly hides the one beneath. The result should be a layer of cantilevered fruit about three slices thick overall. It may be difficult to get sufficient overlap at the center of the tart, but the scraps will make up for that. Once you have carpeted the dough with apples or pears, sprinkle the fruit very lightly but evenly with salt. This will bring out the fruit flavor and, just as important, it will pull moisture to the surface to mix with the sugar and keep the surface from turning leathery. Sprinkle with sugar evenly all over. If your fruit was quite sweet, use the minimum amount of sugar; if tarter, use the full amount.
Bake until the crust is golden brown and the fruit is tender and brown on the edges, about 40 to 45 minutes. If the surface looks dry, you can brush with a simple glaze made by boiling the honey for a minute or so.
PRUNE-PLUM OR APRICOT TART
I GROUP THESE FRUITS TOGETHER BECAUSE EACH IS “STICKY-WET” AND BECOMES succulent inside and candy-like on the edges when baked in an open tart.
Italian {Stanley} or French prune-plums make excellent tarts. Both are firm and dryish when ripe, don’t need much sugar, and bake to a chewy-meaty consistency.
TO SERVE 8:
1 recipe Basic Rich Tart Dough {here} or Dough “with a Little Flake” {here}
About 1 pound prune-plums
About 1/4 cup sugar
2 to 4 pinches of salt
Roll out the crust, press it into a 9-1/2-inch pan, wrap, and freeze until solid {see here}.
Preheat the oven to 375°.
Cut the fruit in half, remove the pits, and then quarter the fruit. Place in a wide bowl and very gently toss with the sugar and salt to taste. The amount of sugar may look alarming, but the salt will balance the sweetness, as will cooking, since it brings out the acidity and tannins in the skins of the fruit. Quickly place the fruit, cut side up, in neat concentric circles or randomly in the frozen shell. Crowd the fruit, but don’t overlap the pieces. Scrape the sugar remaining in the bowl over the fruit.
Bake the tart until the crust is golden brown and the fruit has sunken into itself, 50 minutes or longer. The prune-plums will self-glaze, and, if you are lucky, they will emerge edged with chewy caramel.
For APRICOT TART
Choose small, slightly firm, fragrant apricots~soft ripe fruit tends to be bland and mushy. Use 1 pound apricots and about 1/3 cup sugar. Prepare as described above.
DOUBLE-CRUSTED BLUEBERRY OR BLACKBERRY TART
YOU CAN USE BASIC RICH TART DOUGH FOR BLUEBERRY TART, SINCE BLUEBERRIES won’t burst until the crust is largely set, but use the flakier variation for the other fruits listed here. Blackberries and their kin~marionberries, sylvanberries, olallieberries, loganberries, boysenberries~need a large dose of sugar, and usually some flour to give the filling body. In that family, boysenberries tend to be wettest, and they call for the full measure of flour.
Choose flavorful, tender, but slightly tart fruit {which is, woefully often, the best you can hope for in many stores} for these fillings.
TO SERVE 8:
Double recipe Basic Rich Tart Dough {here} {if using blueberries; see headnote} or Dough “with a Little Flake” {here}
About 1 pound berries {4 cups}
For blueberries: about 1/2 cup sugar
For the blackberry family: about 2/3 cup sugar, plus up to 2 teaspoons all-purpose flour
2 to 4 pinches of salt
Roll out the bottom crust, press into a 9-1/2-inch pan, wrap, and freeze until solid {see here}. Roll out and chill the top crust {see here}.
Preheat the oven to 375°.
Go through the berries, tasting a few for sweetness, and discarding any that are dried out, very hard, or have the slightest speck of mold. Place in a wide bowl.
Combine the sugar with the salt and the flour, if appropriate. Sprinkle about half of this on the berries. Toss to coat all the surfaces. If using very fragile berries, shimmy the bowl to distribute the seasoning without damaging the berries and releasing the juices. Slide the fruit into the frozen shell, scraping the sugar from the sides of the bowl. Distribute the remaining sugar mixture evenly over the fruit.
Lay the cold top crust over the berries and press in place. {A good seal will keep the filling from bubbling over the edge and caramelizing into a stubborn, tarry glue that will bond the crust to the pan.} Cut vents in the top crust, about 5 short ones for drier berries, more, or wider ones, if the berries seemed wet.
Bake about until the crust is golden brown, usually just under 1 hour. The inky fruit syrup may bubble up through the vents. Cool completely before attempting to cut.
LATTICE-TOPPED OR DOUBLE-CRUSTED SWEET CHERRY TART
USE RED OR WHITE SWEET CHERRIES, OR A COMBINATION OF BOTH. Choose small, tender fruit; fat, firm ones may not cook through in time.
TO SERVE 8:
Double recipe Dough “with a Little Flake” {here}
About 1-1/4 pounds sweet cherries
1/4 to 1/2 cup sugar
2 to 3 pinches salt
A few drops of artisan-made balsamic vinegar or a mellow, rich commercial brand {optional}
Roll out the bottom crust, press it into a 9-1/2-inch pan, wrap, and freeze until solid {see here}. Roll out and refrigerate the second dough ball for the lattice or top crust {see here}.
Preheat the oven to 375°.
Pit the cherries. You should get about 3 cups. Place in a wide bowl and season with sugar and salt to taste. A few drops of balsamic will add dimension if the cherries are really meaty and sweet. Slide into the frozen shell. Cut and form lattice, or add the top crust and slash boldly.
Bake until golden brown, about 1 hour. If the filling looks watery, reduce the heat by 25 degrees and bake until it thickens somewhat. It will continue to thicken as it cools.
FRUIT CROSTATAS
FLAKY, FREE-FORM CROSTATAS, BAKED TO A PUFFY, DARK GOLDEN BROWN IN A hot oven, are my favorite kind of tart to make and to eat. The crust, which defines the tart here~crostata means “big crust”~will be especially crisp and delicate, and the fruit most fragrant, during the first 45 minutes or so after you pull the crostata from the oven, so try to time it to be ready not much sooner than your diners are. Serve the crostata as is, or with ice cream, a dollop of real crème fraîche, or a drizzle of Mock Crème Fraîche {here}.
Wine: St. Supéry California Moscato, 2001
BASIC CROSTATA METHOD
Rolling out the dough:
Leave the “Rough Puff” Pastry out at room temperature until it becomes pliable. As you begin rolling out, anticipate the final shape you want, a rough square or rectangle. If the dough begins to stick~to your pin, your hands, or the work surface~wipe or scrape clean and flick a tiny bit of flour on the problem area. Chilling the dough again will help as well. As the dough gets thinner, it will become elastic and you can usually flip and fold it with some abandon. Roll very thin~just under 1/8 inch thick~into a roughly 15-inch square or comparable rectangle {approximately 14 by 16 inches}. Don’t worry if you accidentally roll “wrinkles” into the dough, whether in the center or at the edges. These accidents will add textural variety, and look lovely when they bake. Bear in mind that the dough will retract when you lift and transfer it to the baking sheet. Don’t worry if the edges of the dough are irregular. Even if they crack in spots, these flaws can make the finished crostata beautiful.
Lay the sheet of dough on a baking sheet, lined with parchment if you like. Where the dough overhangs the edge of the pan, fold it over until you are ready to assemble the crostata. Refrigerate while you prepare the fruit.
Assembling the crostata:
Arrange the fruit in the center of the dough, leaving about 2 inches of border. This border doesn’t need to be consistently wide. {To make smaller crostatas, use a sharp knife to cut the dough into smaller squares or rectangles and reduce the width of the border proportionately.} After arranging the fruit, loosely fold over the edges, enveloping the outer chunks of fruit and creatively lapping or mitering the corners~don’t pinch the folds; just press to secure them, and they will bake into tender, puffy shoulders.
Baking the crostata:
Bake in a preheated 425° oven until the pastry is crisp and the color of cornflakes. This usually takes 40 minutes to 45 minutes, but depending on the baking sheet, oven, and the type, quantity, and temperature of the filling, it could take as long as an hour. Be prepared to reduce the heat to 400° if the pastry threatens to burn; some ovens and pans will color more aggressively than others. {If you always bake in the same oven and on the same pan, you should be able to choose a fixed temperature.} Don’t underbake, or the pastry will have inferior flavor and will stale and toughen rapidly. If you have a convection function on your oven, consider turning it on for the last 10 minutes of the bake to aggressively brown the edges of the fruit.
APPLE CROSTATA with ZANTE GRAPES
USE A MEDIUM-FIRM VARIETY OF SWEET APPLE, AND SELECT NOT-TOO-RIPE specimens. I use the local favorite, Gravensteins, or Sierra Beauties, Galas, or Braeburns. Ripe Golden Delicious apples can make a fine crostata. Firm, flavorful Pippins are also good for crostatas, so long as they are very ripe.
FOR ABOUT 8 SERVINGS:
1 recipe “Rough Puff” Pastry {here}
About 1-3/4 pounds apples {generous 5 cups}
A few pinches of salt
Up to 4 tablespoons sugar
About 1/4 cup stemmed Zante grapes, fresh or brandied {see here} {optional}
Preheat the oven to 425°.
Roll out the dough, place on the baking sheet, and refrigerate {see here}.
Peel and core the apples, and cut into irregular 1/2- to 3/4-inch wedges. You need about 1-1/4 pounds. Taste.
Seasoning the apples:
Place in a bowl and toss with a few pinches of salt. Taste a tiny bit of apple. It should taste seasoned, but not salty. Toss the apples with a few spoonfuls of sugar and taste again. You should no longer directly perceive the salt; add more sugar if you do, then take another nibble. {The raw sugar will quickly dull your palate if you take healthy bites.} If it tastes too sweet, add the tiniest pinch of salt to strike a balance. The salt heightens your perception of the apples’ flavor, so it isn’t obscured by the one-dimensional taste of sugar.
The same salt will also make the apples sweat their moisture in no time, so once you have seasoned them, quickly spread the fruit on the sheet of chilled dough, leaving a roughly 2-inch-wide border around the edges. Don’t bother arranging the fruit in a pattern, but do make sure it its not piled more than two deep in any spot. Leave a few small islands of bare dough and a few apple wedges poking higher than the rest. They will caramelize rapidly and be delicious. Fold over the edges, lapping or mitering as needed.
Bake until the pastry is crisp and well browned, about 40 to 45 minutes. Reduce the heat by 25 degrees if the pastry threatens to burn. If using, scatter the grapes over the craggy apples about 5 minutes before the tart is done. For the best flavor, fragrance, and texture, serve right away, or within 45 minutes.
APRICOT CROSTATA with ALMONDS
CHOOSE BRIGHTLY COLORED, FRAGRANT APRICOTS THAT JUST YIELD WHEN YOU squeeze them.
FOR ABOUT 8 SERVINGS:
1 recipe “Rough Puff” Pastry {here}
About 15 raw almonds
1-1/4 pounds apricots {about 14 small or 8 large}
A few pinches of salt
6 to 7 tablespoons sugar
Preheat the oven to 425°.
Roll out the dough, place on the baking sheet, and refrigerate {here}.
Drop the almonds into a small pot of boiling water and leave for about 10 seconds, then drain. Pinch and slide off the skins and rub dry.
Halve the apricots and discard the pits. Cut each half into 2 wedges, or 3 if the apricots are large. Taste a sliver of apricot for reference. Spread the apricots in a wide bowl and season with salt and then sugar as described above for the Apple Crostata {here}. Don’t overhandle; fold gently so you don’t smash the tender apricots as you season them. Arrange the apricots cut side up on the sheet of dough, spaced a scant 1/4 inch apart and leaving a roughly 2-inch-wide border. Don’t feel you must use all the apricots. Rub the almonds with your sugary fingers, then tuck them into or in between the apricots. They need to be below the surface, or they may burn. Fold over the edges of the dough, lapping or mitering them as needed.
Bake until the pastry is crisp and well browned, about 40 to 45 minutes. Reduce the heat by 25 degrees if the pastry threatens to burn. If your apricots were very wet, you may have to spoon off a little excess syrup. Serve immediately, or within 45 minutes at the latest.
Variation ITALIAN OR FRENCH PRUNE-PLUM CROSTATA
Prepare as for Apricot Crostata, but reduce the sugar to 4 or 5 tablespoons, and then season the sweetened fruit with a trickle of Armagnac, Cognac, or grappa. The almonds are optional.
PEACH CROSTATA
THIS IS THE MOST DELICATELY FLAVORED AND FRAGILE OF THE CROSTATAS~AIM TO serve fresh from the oven. Choose just-ripe, fragrant peaches with thin skins.
FOR ABOUT 8 SERVINGS:
1 recipe “Rough Puff” Pastry {here}
1-1/4 pounds peaches {about 4 small or 3 medium}
A pinch or two of salt
About 3 to 4 tablespoons sugar
Preheat the oven to 425°.
Roll out the dough, place on the baking sheet, and refrigerate {see here}.
Wash and rub the peaches to remove as much fuzz as possible. Cut the flesh off the pits in 1/2- to 3/4-inch wedges. You need just over 1 pound {4 cups}. Place in a wide bowl and season with first salt, then sugar, as described for the Apple Crostata {here}. Don’t overhandle; fold gently so you don’t bruise the peaches as you season them. Arrange randomly on the dough, leaving a roughly 2-inch-wide border; there should be lots of thumbnail-sized bare spots between the wedges. Scrape remaining sugar from the bowl and sprinkle over the fruit. Fold over the edges, lapping or mitering them as needed.
Bake until the pastry is crisp and well browned, about 40 to 45 minutes. Reduce the heat by 25 degrees if the pastry threatens to burn. Serve immediately, or within 45 minutes at the latest.
CHOCOLATE POTS de CRÈME
JULIE COOKENBOO, WHO MADE SWEET THINGS AT ZUNI FOR OVER TEN YEARS, perfected this recipe. It is very easy to put together. Take care not to overcook; this rich custard is nicest when it is still slightly soft.
FOR 4 SERVINGS:
3 ounces bittersweet chocolate, coarsely chopped
3/4 cup heavy cream
3/4 cup whole milk
2 tablespoons sugar
4 egg yolks
A splash of Cointreau or Frangelico {optional}
Preheat the oven to 300°.
Melt the chocolate with 1/2 cup of the cream in a small pan or bowl poised over simmering water, stirring occasionally. Remove from the heat.
Warm the remaining 1/4 cup cream, the milk, and sugar in a small saucepan, stirring just to dissolve the sugar.
In a medium bowl, whisk the yolk, then slowly stir in the warm milk mixture. Pour the mixture through a strainer into the melted chocolate and stir to combine. Stir in the liqueur, if using.
Pour the mixture into four 4- to 5-ounce ramekins or custard cups and place them at least an inch apart in a baking pan. Add hot water to come to barely 1/2 inch beneath the lip of the cups. Bake until the custard is just set at the edges but still quite soft in the center, about 45 minutes. To check, lift a pot and tilt; the center should bulge. The eggs will continue to cook after you pull the custards from the oven and the chocolate will harden as it cools. If the custard is already firm when you first check it, then remove from the oven and set the cups in a shallow bath of salted ice water to stop the cooking. Cool, cover, and refrigerate. They will keep well for several days, although I prefer their texture when only hours from the oven.
TOASTED ALMOND PANNA COTTA with SABA
THIS “COOKED CREAM” IS DELICATELY FLAVORED AND VERY TENDER. Saba is not well known outside the region of Modena, Italy, where it is the staple syrup that spends generations becoming artisanal balsamic vinegar. It is made from Trebbiano grape must, traditionally boiled down in copper cauldrons. The saba we use is chestnut colored and has a honey-raisin flavor that is lovely with the suave almond cream {see Sources and Resources, here}.
FOR 4 SERVINGS:
1/4 cup raw almonds
3/4 cup whole milk
1 cup heavy cream
2 tablespoons plus 1 teaspoon sugar
Salt
2 tablespoons water
1-1/2 teaspoons unflavored gelatin
4 to 6 teaspoons saba
Preheat the oven to 325°.
Spread the almonds on a baking sheet and toast lightly, about 8 minutes. They should be fragrant and just beginning to change color on the inside. Chop immediately, and place, still warm, in a small saucepan with the milk and about half of the cream. Add the sugar and a pinch of salt, and stir as the mixture comes to a simmer. Remove from the heat and leave to infuse for about 10 minutes.
Measure the water into a small mixing bowl and sprinkle with the gelatin. Leave to soften for about 3 minutes.
Rewarm the milk-almond mixture until it is hot to the touch, then pour through a fine strainer into the gelatin and water. Stir until the gelatin is fully dissolved. Add the remaining cream. Taste. It should seem a bit sweet; chilling will correct this imbalance.
Pour into four 4- to 5-ounce ramekins or custard cups. Tent with plastic and chill for at least 6 hours. The panna cotta will have the nicest texture if served within 6 to 12 hours; the gelatin will continue to set for up to 24 hours.
To serve, place each ramekin or custard cup briefly on a warm burner, then slide a knife cleanly around the edge. Invert onto a plate, and, holding the ramekin or custard cup in place on the plate, rap the ensemble gently on the counter, then leave for a minute to give the panna cotta a chance to slide out. Top each with a drizzle of saba at the table.
PEACHES in MUSCAT WINE
SIMPLE, BEAUTIFUL, AND DELICIOUS. Based on the impromptu dessert of peaches in Beaujolais that Jean-Baptiste Troisgros often concocted in his wineglass after turning down prepared desserts. Sweet Muscat wines vary in sweetness; choose one you like and then dose the sugar accordingly. I generally use one from Beaumes-de-Venise, but you could try a sweeter Muscat de Rivesaltes, or Vin de Glacière from Bonny Doon in California.
Choose peaches that are fragrant and just yielding to the touch, with sound, tight skin. Look for fruit that is free of large bruises and soft spots, although some tiny dimples may be a good sign~the best peaches are picked by hand, and even the gentlest of fingers may leave modest marks in the tender surface. Overripe or mishandled fruit discolors and loses perfume and delicate flavor notes rapidly. You can use either yellow or white peaches, or a combination; white ones have a touch of bitterness that plays well off the sweet wine. Freestone varieties will be most cooperative; to coax pretty wedges off cling-type peach pits, use a sharp knife, a gentle grip, and patience.
Serve cold, in pretty wineglasses. Perfect with Tuiles {here}.
Should you have any leftovers, Peach-Muscat Granita is an excellent way to revisit them. {Simply purée the fruit with the wine, strain, freeze, and chop as explained in the Basic Granita Method, here–here.}
FOR 4 TO 5 SERVINGS:
1/2 bottle sweet Muscat wine {about 1-3/4 cups}
Sugar, if needed
4 medium perfectly ripe peaches
4 handfuls red or white wild strawberries, if available
Pour the wine into a bowl and taste. Sweeten, as needed, until it tastes “like dessert” to you~how much sugar you use will depend on your wine, and your taste for sugar. You may use none at all.
Prepare a bowl of ice water large enough to hold the peaches. Slide the peaches one or two at a time into a few quarts of simmering water. Remove as soon as you can slide a spot of skin free of the flesh. {Lift a peach with a slotted spoon and rub gently with your thumb to check}. With truly ripe peaches, this will take no more than 15 seconds~leaving them too long will cook and spoil the outer layer of fruit. Immediately slide the hot fruit into the bowl of ice water and swirl to ensure rapid, even cooling. Repeat with the remaining fruit.
Remove the skins, then carve the flesh off the pit in neat wedges about 1/2 inch thick, letting them fall into the bowl of wine. The fruit should be submerged. Swirl the bowl gently. Lay a sheet of plastic or parchment over the surface so the edges don’t discolor, and place in the refrigerator to macerate for up to an hour.
About 30 minutes before serving, remove the peaches from the refrigerator and taste. Sprinkle with more sugar as needed and swirl the bowl to dissolve.
Spoon into glasses and garnish with the wild strawberries.
TUILES
THIS IS MY FAVORITE RECIPE, AND IT IS THE FIRST ONE IN THE DOG-EARED NOTEPAD I filled with recipes in Roanne in 1973. I owe the original formula to André Délorme, longtime pastry chef at Troisgros, but I have reduced the sugar over the years. These “tiles,” so-called because they are shaped like traditional terra-cotta roof tiles, require a bit of fussing to make, and they are fragile to boot, but they are also so elegant and delicious as to merit the trouble. Although not essential, a nonstick cookie sheet will reduce the fuss-factor {see Note}. If you don’t have the single-purpose pastry item called a moule à tuiles {a tray of curved troughs, in which to cradle the warm cookies as they cool}, you can lay the warm cookies over a rolling pin to shape them as they cool. I caution you, though, to set up your cooling operation in a no-traffic zone~I once spent hours baking more than a hundred tuiles for a charity dinner at a friend’s winery, carefully draping them, like little sheets of pasta, over every broomstick and mop handle on the property. Unfortunately, every whack of a cleaver, every footstep, sent some of the fragile tiles to the floor. We christened the replacement batch “floor tiles,” because we opted to leave them flat. This sensible alternative tastes the same and precludes calamity.
We serve tuiles with ice creams and sorbets, with fruit compôtes, and with sabayon and berries. They are pretty next to glasses of Peaches in Muscat Wine {here}.
Wine: Veuve Clicquot Ponsardin Demi-Sec Champagne
FOR ABOUT 28 COOKIES:
2 tablespoons salted butter
1/3 cup superfine sugar {2 ounces}
Generous 2/3 cup sliced almonds {2-1/2 ounces}
2 tablespoons all-purpose flour {scant 1/2 ounce}
1/4 cup freshly separated egg whites {between 1 and 2}
1/8 teaspoon salt
Preheat the oven to 400°. Set a mixing bowl near or on the oven to warm through.
Melt the butter in a small pan over low heat, and monitor it as it turns a pale hazelnut color and starts to release its nutty fragrance. Promptly pour into the warm mixing bowl. Add the sugar, almonds, flour, and egg whites and stir and fold gently to combine. Don’t beat. Add the salt and taste. It should taste salty-sweet. The batter will be viscous, ropey, and glossy.
Spoon 1 heaping teaspoonful of the batter onto a nonstick cookie sheet and use a fork to spread it into a rough 3-inch circle, barely thicker than a slice of almond. Try to scoop about half almonds, half batter for each tuile, and dip the fork into a glass of water between efforts, to keep it from “grabbing” the batter as you spread it into translucent puddles. The batter will spread a little more as it bakes, so leave an inch between each finished puddle. You can fit about 9 tuiles on a 14-inch square baking sheet. Bake until the cookies are mottled golden in the center and tea colored on the edges, about 3 to 5 minutes. Because many ovens don’t bake evenly, the cookies may not either. Watch and either rotate the cookie sheet to correct for this or remove any tuiles that brown much more quickly than the rest. Pull the pan from the oven and immediately transfer the tuiles one by one to the chosen cooling spot with a thin-bladed metal spatula. If the cookies start to stick before you get them all off the pan, you need only return the pan to the oven for long enough to remelt the caramelized sugar, then peel them off the pan while they are still pliable. Wipe the baking sheet clean between batches. {To speed up production, you may want to use two pans, spreading the batter on the second one while the first set of cookies bakes.}
The caramelized sugar will readily grab humidity out of the air, which could quickly soften the cookies, and collapse their curves, so as soon as they are cool, place the tuiles, cantilevered like roof tiles, in an airtight container.
Note: If you don’t have a nonstick baking sheet, then use a heavy-gauge regular sheet, brushed with clarified unsalted butter. Wipe clean and rebutter between batches.