
Amelia Patterson (climbing), Eric Roed, Micah Dash, and Timmy O’Neill enjoying the social aspect of top-roping at Cannibal Crag, Red Rocks, Nevada

Amelia Patterson (climbing), Eric Roed, Micah Dash, and Timmy O’Neill enjoying the social aspect of top-roping at Cannibal Crag, Red Rocks, Nevada
Devils Lake, Wisconsin, is made up of bullethard quartzite. The cliffs aren’t super tall, and most routes don’t offer much lead protection, so most climbers top-rope. This is a great way to start climbing or to push your limits, because falling is usually safe.
Top-roping can also be a fun way for larger groups to climb together, which is common at Devils Lake. True to friendly Midwestern values, people may even invite you onto their top rope as you hike the cliff line. On most climbs, you’ll top out, see good anchors and rigging, and lower back down. Once in a while, though, you might find anchors frightful enough that you decline to lower and opt to walk back down instead. If that happens to you, or you see climbers anywhere using really poor top-rope anchor practices, politely recommend this book and/or professional instruction to the anchor builder. People don’t like to be told that what they are doing is dangerous, but spreading the word about proper anchor technique is good for the sport and could prevent an accident.
This chapter covers what you need to know for building top-rope anchors using natural anchors or chocks and cams. It covers how to
![]() rig a slingshot top rope with the anchors on top of the cliff and the belayer on the ground below,
rig a slingshot top rope with the anchors on top of the cliff and the belayer on the ground below,
![]() set a top rope with the belayer on top of the cliff,
set a top rope with the belayer on top of the cliff,
![]() protect yourself when setting anchors near the cliff’s edge,
protect yourself when setting anchors near the cliff’s edge,
![]() haul your partner if they can’t get up the climb,
haul your partner if they can’t get up the climb,
![]() evaluate fixed rappel anchors,
evaluate fixed rappel anchors,
![]() clean up messy anchors.
clean up messy anchors.
In a top-rope fall or bouncy rappel, the force on the anchors can be several times body weight, but they are not subjected to the huge forces of a leader fall unless your team makes a big mistake. Still, on every rappel and top rope, you trust your life to the system, so it’s crucial to have good anchors for safety.
Once you complete a top-rope climb, you can walk off, lower down, or rappel, depending on the situation.
SLINGSHOT TOP ROPE
Probably the most common way that climbers top-rope is by using a slingshot setup: the belayer is on the ground and the rope runs up to the top anchors, then back down to the climber. This allows for good visibility and communication between the belayer and the climber, and it puts the belayer in a good position to hold the climber’s weight: the carabiners at the top anchor create enough friction that the belayer feels only about 60 percent of the climber’s weight, and the belayer is getting pulled up rather than down, so she can use her body weight to counterbalance the climber.
A ground anchor is generally not required when slingshot top-roping because of the friction at the top anchor. If the climber greatly outweighs the belayer, however, the belayer should be anchored to the ground. The belayer should also be anchored if she is positioned far from the spot that is directly below the anchors to keep her from getting dragged along the ground when the climber weights the rope.
If the team has constructed solid anchors and is using good belaying techniques, the biggest potential hazard probably involves rockfall. For this reason, the belayer should not be positioned directly below the climber, and especially should not be anchored beneath the climber. Rockfall is of particular concern when the climb angles such that the rope could slide across the wall with enough force to dislodge rocks if the climber falls. On all but the cleanest rock, the climber should wear a helmet, because the rope moving across the rock has a tendency to knock flakes loose from the wall above. I have seen more rockfall caused during top ropes than while following a lead, because when gear is pinning the rope to the crack or bolts, the rope’s movement is limited.
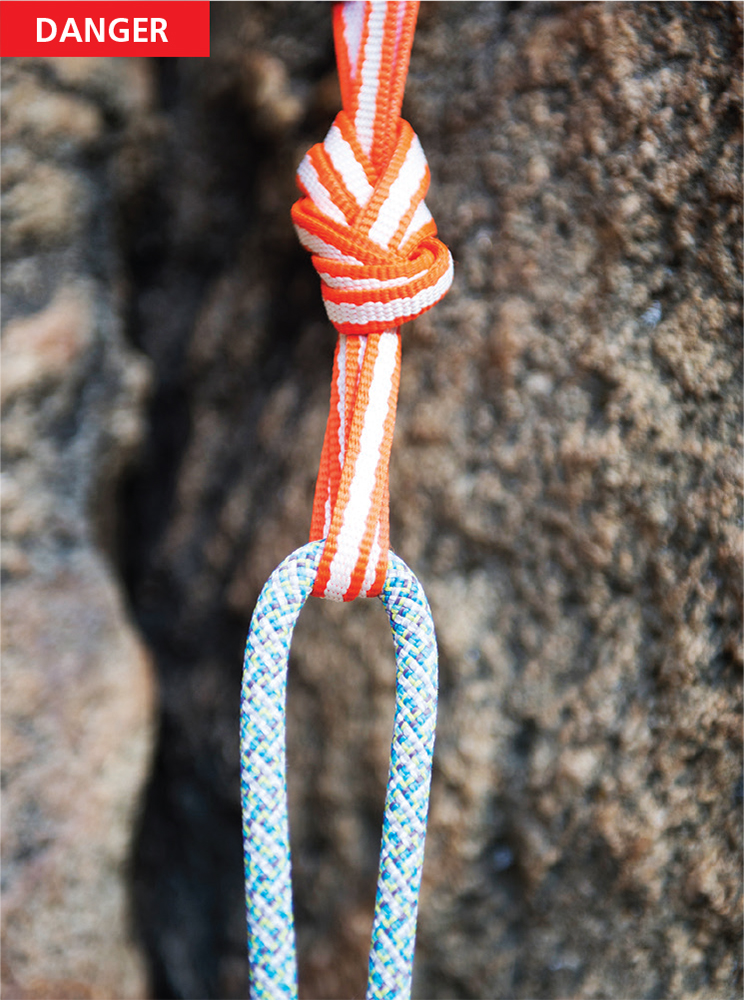
Warning: Do not top-rope through webbing! When lowering or falling with any slack in the system, the moving, weighted rope will cut through webbing like a knife through butter. In fact, if you need to cut webbing and don’t have a knife, sawing a piece of cord back and forth across the webbing with some weight will do the job nicely.
A unique aspect of slingshot top-rope anchors is that the anchor will be used extensively with nobody present to monitor the anchor. For this reason, it is important to check the anchor every so often during a top-roping session. It is possible for slings and cords to wear significantly over a rough edge if repeated swinging falls are taken on a top rope.
ANCHORS AT THE CLIFF EDGE
When rigging a top rope, extend the anchors over the lip of the cliff so that the rope runs straight up, through the master point carabiners, and straight back down. If the anchors are not extended and sit above the edge, the rope must bend over the cliff edge, pass through the carabiners, and bend back over the cliff edge. This creates serious rope drag, and the rope may get damaged during the repeated falls common in top-roping if the cliff edge is even a little sharp.
It’s convenient to set anchors near the edge of the cliff when possible to minimize extending them. Some areas are equipped with bolts for building top-rope anchors, which makes rigging easy. Other times you may find cracks or other anchor possibilities at the edge of the cliff. Either way, two good bolts or three solid anchors, rigged to ERNEST standards, will make a good top-rope anchor. Sometimes a huge tree or giant boulder may be used as the sole anchor; the team needs to make a good judgment call on whether this is adequate.
Two-bolt top-rope anchor:
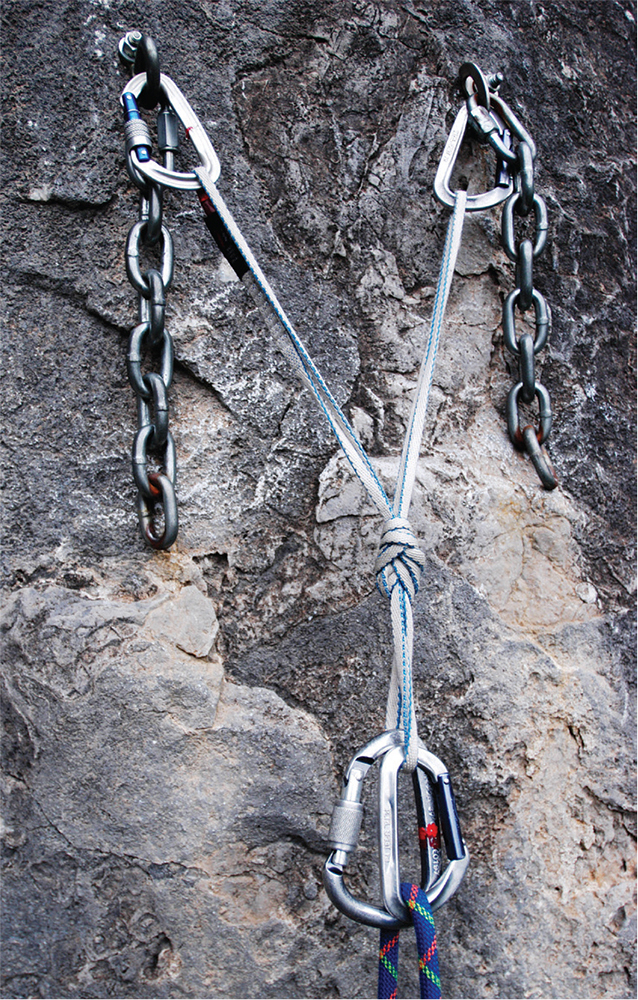
If you have bolts, you can quickly set up a pre-equalized anchor for top-roping.

Two shoulder-length slings rigged with the sliding X makes a redundant anchor with no super tight knots to untie when you’re done.
The standard equalized and pre-equalized riggings shown in chapter 1 will work great if you have two good bolts or three natural anchors close together. For more options, see the belay anchor arrangements rigged with slings or a cordelette in chapter 7; these can easily be adapted to top-roping by omitting the upward-direction anchor (if one exists) and extending the anchor over the cliff edge.
ANCHORS EXTENDED OVER THE EDGE
Often you can’t find good anchors at the cliff edge, or it may be an inconvenient place to rig. In these cases, you can set the anchors back from the edge and extend them to drop the master point over the lip. Always use at least two separate sets of sling, cord, or rope to extend over the lip for redundancy and pad any sharp edges with a small patch of carpet, a pack, or even a T-shirt.

Many options exist for extending the anchors past the cliff edge. This method uses a piece of 10-millimeter-diameter static rope. The rigging rope is tied around a large boulder with a double bowline and extended over the lip, where a master point is created by tying a figure eight on a bight. A second master point is tied right next to the first one for redundancy, then the rope runs back to the second anchor, a large tree, which is fixed with a sling. The rigging rope is tied to the sling with a clove hitch, and the clove hitch is adjusted so both anchors help hold the load. Finally, an old patch of carpet pads the edge and is held in place by a prusik attached to the rigging rope.
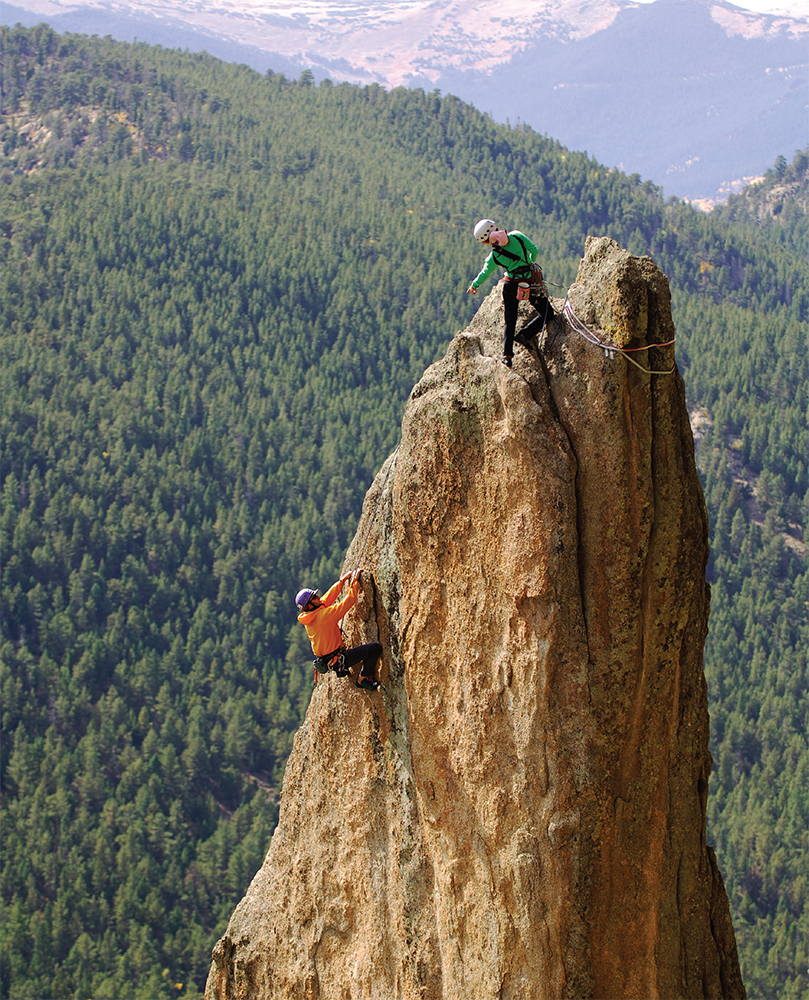
When safe and practical, rig the belay anchor so the belayer can see the climber.
TOP BELAY
Acadia National Park has some beautiful, popular sea cliffs that are climbed mostly on top rope. The belayer anchors on top of the cliff, and the climber rappels or lowers down to a ledge just above the waterline, then gets a top rope as she climbs back out. The ambiance of the ocean and the seabirds makes the climbing seem even better than it is.
In a place like Acadia, where the bottom of the cliff is inaccessible but it’s easy to get to the top, it makes sense to belay from the top. A top belay might also be used if rockfall makes belaying from the ground dangerous, or if the team is only climbing on the last pitch of a tall cliff. It can also come in handy if the cliff is taller than half a rope length and the team has only one rope. (A better option may be to tie two ropes together and use the slingshot system.) The top belay may put all of the climber’s weight on the belayer and make communication difficult, so the slingshot system is usually preferable.
With a top belay, the climber is often lowered down the cliff and then climbs back up. If lowering could possibly damage the rope, or if it might be difficult for the climber to communicate when it’s time to stop being lowered, the climber can also rappel, then be belayed back up on the rappel line if a good ledge or anchors exist for the transition from rappelling to climbing. An even safer option is to rappel on one rope while being belayed on another, then to climb with protection from the belay rope. Logistics must be well planned and communicated between the climbers to avoid problems.
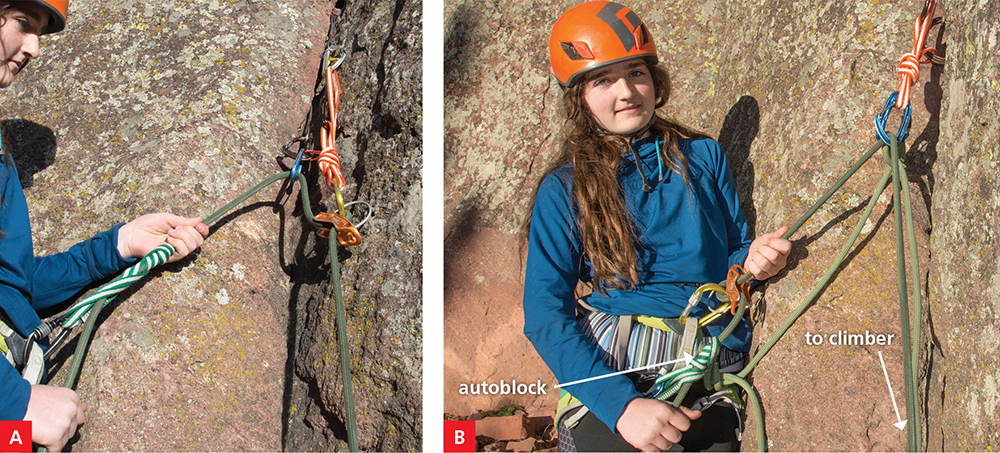

A great system for the direct lower is to use a standard belay device attached to the anchors as shown.
A.Redirect the rope through a high carabiner (attached to the “top shelf” here) to create the necessary bend across the belay device and to add friction; finish the setup with an autoblock hitch attached to the belayer’s harness to provide backup for the belayer. This method does not work well for belaying the climber up, so it is only useful if you do not plan to belay the climber back up after lowering. Note: Belayer tie-in point not shown for clarity.
B.If the climber plans to climb back up after being lowered, it is better to belay with the device on the waist and redirect through the anchor. Again, use an autoblock to back up the lower with the knot on the harness leg loops, as done when rappelling.
C.Belaying directly off the anchors with an assisted-braking belay device makes it easy to hold a fall. You need to understand the manufacturer’s instructions for using these devices and make sure that the locking cam is free to move (not jammed against the wall) so it can arrest the rope.
RAPPEL ANCHORS
So you’ve topped out on Time Wave Zero (5.12b or 5.10 A1) in El Potrero Chico, Mexico. Now it’s time to get down via the twenty-three rappels. Fortunately, the anchors are well bolted, with spare bolts for clipping the team comfortably into each rappel station. Having a good system for efficient rappelling can save hours on such a descent.
On any established rappel descent, rappel anchors are fixed in place. The anchors serve two purposes: the climbing team clips them for protection when they arrive at the station, and then they use them to anchor their rappel rope(s) for the next rappel.
Fortunately, beefy, well-designed rappel stations are becoming prevalent, although you can still find plenty of chossy old rappel anchors. It’s up to the climbing team to decide if the anchors and rigging are adequate and to rebuild or rerig if necessary. All climbers have a stake in the condition of anchors, so we also have a duty to replace or improve poor anchor setups. Some of the tattered rappel stations that still exist (usually in alpine or low-use areas) are pretty low rent and could definitely use a makeover. Sacrificing some time and gear beats risking your life on sketchy rappel anchors, and it helps prevent horrifying “I wonder if the anchors are gonna hold?” rappels. Even leaving a brand-new cam is cheap compared to the consequences of anchor failure.
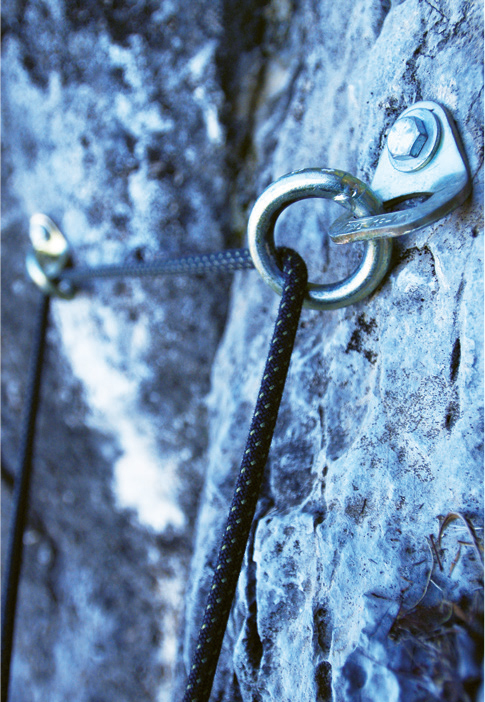
Fixed steel rings are free to turn, so wear is not concentrated in a single point, which increases their useful life. However, be aware that horizontally spaced anchors, as shown here, are prone to twisting the rope as you belay or lower a climber.
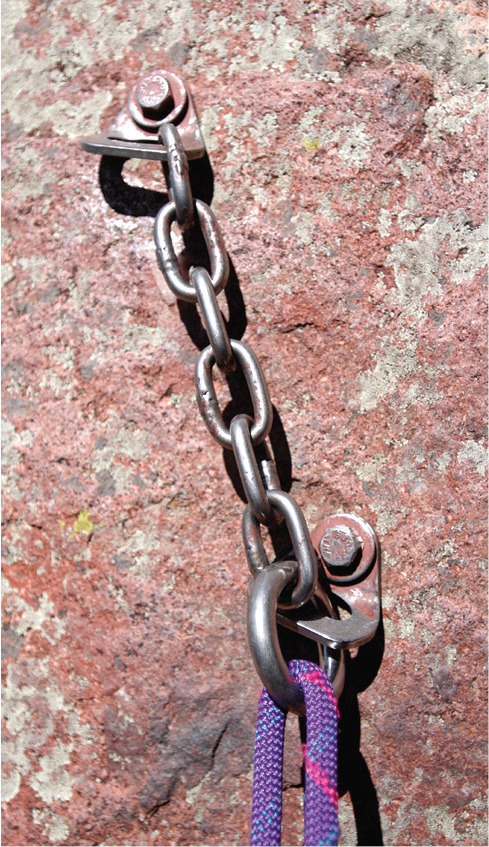
Some climbers might worry that this arrangement has only one ring, but since the welded steel ring is probably stronger than the climbing rope, it’s perfectly acceptable.

Steel chain with a diameter of 8–10 millimeters (5/16–3/8 inch) works nicely for feeding a rope through. Ideally the climbers who installed the hardware would have painted the chain (and bolts) camouflage, and cut the chain sections short so that they would not be an eyesore.
BOLTED RAPPEL ANCHORS
Two or more good bolts in solid rock make a strong, convenient anchor for rappelling. The bolts also need to be fixed with rings or links for passing the rope through. Older stations may have webbing or cord fixing the rappel ring(s) to the anchors. This is okay if the material is relatively new and in good condition, but the webbing or cord looks trashy and weakens as the nylon material breaks down with exposure to the elements and ultraviolet radiation. A much better setup has rings fixed directly to the bolt hangers, with no webbing or cord involved.

A stout, well-rooted living tree can make a strong, convenient rappel anchor. Be sure to assess the quality of the tree—it is not uncommon to see dead, rotting trees with rappel slings left on them (it is possible the tree was alive and strong when the anchor was first used). Simply tie two wraps of webbing around the tree, ideally fixed with two rapid links or rappel rings. If the tree is burly enough, you can fix the slings above a branch for a convenient, high location. Smaller trees should be slung near the ground, where the sling creates less leverage, and beware of trees that are growing behind (and pressing against) flakes or unstable rock. If the tree has no slings on it, rig your own—do not wrap the rope around the tree for a rappel anchor. Although the rope can pull around the tree, the friction of the rope wears through the bark and lifesustaining cambium layer and can kill the tree.
Piton, Chock, and Natural Rappel Anchors

A large, solid rock tunnel fixed with slings and rappel rings, also called a “thread,” makes a good, easy-to-rig rappel anchor. Whenever you encounter threads or slung trees with fixed slings in place, be sure to assess the full length of the slings. Sometimes rodents will chew on fixed webbing, and rockfall can easily damage the webbing on the uphill side of a tree, making the damage invisible from below. If in doubt, back it up.

When rappelling off a rock horn, make sure the horn has a good positive lip for holding the slings, and be careful to load the anchor in a downward direction when beginning the rappel. This rock horn doesn’t look very secure; I’d rather find another way down.

If the anchor is worn or uses only a single aluminum rappel ring, you can quickly add two extra pieces of cord to back up the single sling and the rappel ring. It’s good to carry a small knife and some cord or webbing for such operations.
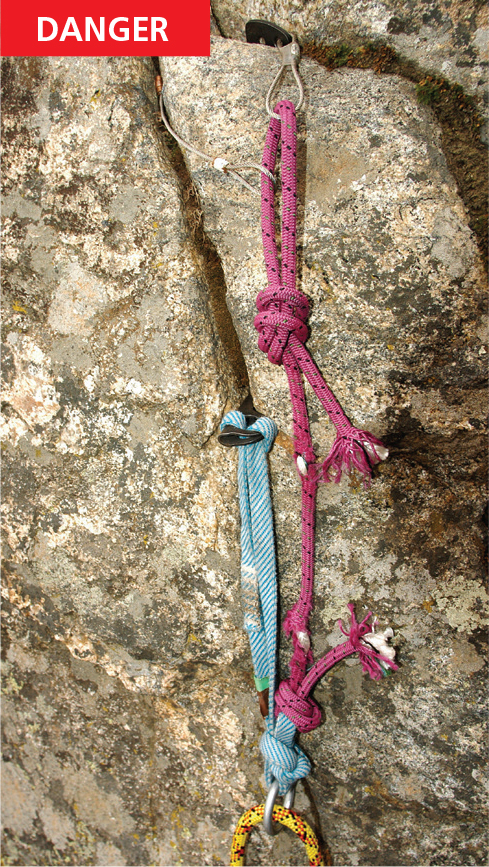
A RURP, a copperhead, and a piton rigged with tattered cord, faded webbing, and a single aluminum rappel ring. Don’t settle for bad rappel anchors like this.

This anchor is bad all around. It depends on a single flake, and it’s rigged in the old-school American Triangle, which amplifies forces on the pieces. The V-angle in the sling is close to 90 degrees, and the sling is tied in a fashion that eliminates redundancy. Additionally, the rope runs directly through the cord, which isn’t as dangerous for rappelling as it is for lowering, but pulling the rope ruins the anchor cord.
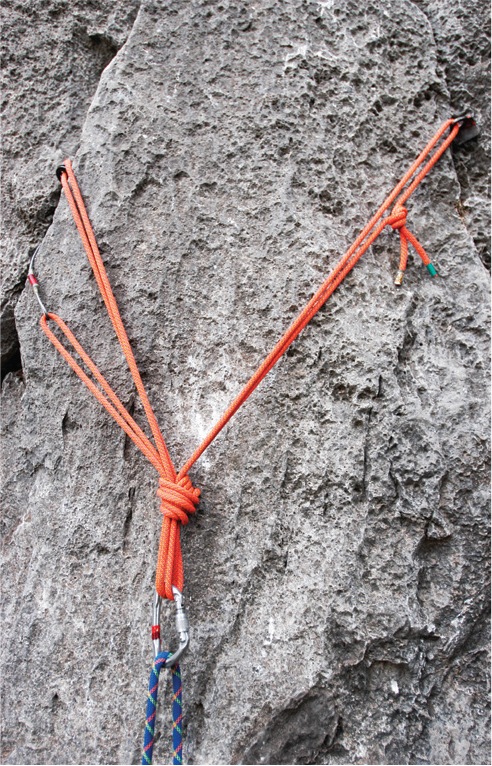
This is the same flake as in the previous photo, with a couple of improvements. If the flake is solid, this is a good rappel anchor because the nut adds a needed backup to the pitons, which are difficult to evaluate, and the carabiner ensures the anchor cord isn’t compromised each time a rope is pulled through it.
You can set extra pieces to back up the rappel anchors to be cleaned by the last person down. Be sure the fixed anchor receives all of the load and bounce test it with a backup in place.

A.In theory, the heaviest climber and gear should go first, and then the lightest climber should clean the backup pieces before descending, because he is least likely to make the anchors fail.

B.If the rappel anchors are sketchy, leave the backup in for the last person, too. The gear will be sacrificed for a good cause; the consequence of rappel-anchor failure is usually death.