
Patience Gribble and Jason Schultz on Energy Crisis (5.11c), The Bugaboos, Canada
Patience Gribble and Jason Schultz on Energy Crisis (5.11c), The Bugaboos, Canada
You awake to the familiar smell of pine, instantly aware that you’re in Yosemite Valley. The route for today is the fifteenpitch Royal Arches. Most of the climbing is easy, but to make good time you need to set belays fast and make quick transitions at those belays. You carry a good rack of wired nuts, hexes, and cams, along with webbing, cordelettes, quickdraws, and extra carabiners for rigging anchors.
The cracks are clean from the feet and hands of thousands of passing climbers, and the rock is solid and the anchors bomber. At each belay ledge, you custom design the anchor, trying to be quick and keep the rigging clean. Trees make a quick anchor at some of the belays, while a combination of nuts, hexes, and cams—placed in old pitonscarred cracks—works at the other stations. Whenever possible, you save the cams for the next leader by using nuts, hexes, and natural anchors at the belay.
Usually, you set at least three bomber pieces for a belay anchor. In some situations, one of the three is oriented to hold an upward pull, especially on pitches where the heavier climber is leading; or you might adjust the anchor for a sideways pull on the traversing pitches. When the three placements are small, you set more. You know how to use far more than three placements in an anchor if the placements are less than ideal, but on a trad route like Royal Arches, you know there is no excuse for using anything other than bomber placements in a belay; at one point you downclimb 30 feet of easy terrain to a good crack rather than belay at a flared crack where the protection options are not inspiring. When the next protection is close to the belay, and two bomber multidirectional placements are available, you build belay anchors out of only two pieces or even use just one stout tree.
Whether you’re playing at your local crag or climbing the long free classics of Yosemite, being able to quickly set a variety of simple, solid belay anchors is critically important. Practice using the different anchor-rigging methods shown in this book on shorter climbs so that when you get onto longer climbs, where time is of the essence and you’re trying to stretch your equipment as far as it can go, you have a range of tools at your disposal.
This chapter covers
![]() choosing where to belay,
choosing where to belay,
![]() rigging belays with a cordelette,
rigging belays with a cordelette,
![]() rigging with slings,
rigging with slings,
![]() rigging with the climbing rope,
rigging with the climbing rope,
![]() rigging with a daisy chain,
rigging with a daisy chain,
![]() rigging with two ropes,
rigging with two ropes,
![]() equalizing the load,
equalizing the load,
![]() building upward-direction anchors,
building upward-direction anchors,
![]() creating multidirectional anchors,
creating multidirectional anchors,
![]() utilizing widely spaced anchors,
utilizing widely spaced anchors,
![]() rigging to a tree growing back from the cliff line,
rigging to a tree growing back from the cliff line,
![]() extending from the anchor so you can see and communicate with your partner.
extending from the anchor so you can see and communicate with your partner.
Chapter 1 showed how to rig two- and three-point anchors with slings or a cordelette and discussed many important considerations of anchoring. Before you read on, it may be worthwhile to review the discussion in chapter 1of pre-equalized and self-equalizing anchor-rigging systems, as well as its coverage of equalization and V-angle.
A variety of methods for rigging three- and four-piece belay anchors are shown in chapter 1. It’s almost silly how many different options you have for creating a belay anchor—there’s no exclusive “best way” that fits all situations. What you want is a belay anchor that’s strong, simple, and fast.
BELAY STATION
Usually the standard belay stances that most teams use are marked on the topo or described in the guidebook. You don’t have to use the described belays: if you’re climbing with a new climber, it might be wise to shorten the pitches to facilitate communication and minimize rope stretch in a fall; if you’re low on gear, you also might stop short; if you’re trying to climb fast, you may blow past the standard belay to link up another pitch (or several pitches).
When the rock is solid and the crack splits a large, clean wall (not cracked or detached on either side), you can set the anchors close together. When the rock is fractured or otherwise suspect, however, spread the anchors out to enlist multiple rock features. Never set all the anchors behind a single detached or fractured block or flake. Set the anchors high if possible so that the master point hangs at chest-to-head level.
CHOOSING YOUR BELAY STATION
A first-rate belay station offers
![]() fixed anchors or good cracks for building anchors,
fixed anchors or good cracks for building anchors,
![]() safe positioning from rockfall,
safe positioning from rockfall,
![]() a nice ledge for comfort and stacking rope,
a nice ledge for comfort and stacking rope,
![]() sight of the climber,
sight of the climber,
![]() a position that minimizes rope drag for the prior pitch and the next.
a position that minimizes rope drag for the prior pitch and the next.
You don’t always get all of these qualities in a belay station. Foremost you want solid anchors and safe positioning. If you can’t find good anchors or a good stance, maybe you can climb higher or even downclimb to find them. It’s good for the belayer to sound the warning “Ten meters!” (or “Thirty feet!”), when that much rope remains, so the leader can start looking for a suitable belay. Once you find a good station, look around before setting the anchors. Avoid tunnel vision that focuses you on one solution only, unless that solution quickly meets all your needs.
BELAY RIGGING METHODS
As discussed in chapter 1, two good bolts or three bomber natural placements make a good belay anchor. Having great individual pieces is the most critical aspect of building a reliable belay anchor.
The time-tested recipe for a natural anchor consists of two pieces that will hold a downward pull and one piece that will hold an upward pull. If the pieces aren’t great and you can’t find better ones, set more and equalize them—a four- or five-point anchor is not unreasonable if the pieces are small or mediocre. If you frequently find yourself belaying on less than perfect placements, hire a guide to help. Ninety-nine percent of belays have excellent protection placements available, so there is little excuse for belaying on poor placements. You can add an upward-pull piece to protect the anchors or belayer from getting pulled up if the leader takes a hard fall, and nearly all belay anchors on multipitch climbs should be able to withstand multidirectional forces. Good lead protection just above the belay can almost be considered part of the belay anchors because it protects the anchors from a severe impact if the leader falls directly onto the belay.
Before building the anchors, analyze which direction the forces will come from, both while the second climber follows the pitch and when the leader climbs above. If the second’s rope runs straight up to the belay, the anchors will get pulled down if he falls. If the leader is leading straight above the belay with no protection, the anchors will get pulled straight down with an extreme force if she falls. If she takes a hard fall after placing good protection, the belayer will get pulled toward the first protection, and the anchors might too. If the route traverses just before or just after the belay, the anchors can get loaded with a sideways pull. Build the anchor to be strong in any conceivable direction of pull, but even stronger in the anticipated direction of pull.

Giulia Luebben clipped to a belay consisting of two Big Bros—her father’s invention—placed in multidirectional placements. When both pieces are bomber and multidirectional, two-piece belay anchors are perfectly acceptable; but if in doubt, place more.
Many options exist for rigging a belay anchor. The best method often depends on the team’s climbing system and the number of climbers; sometimes it’s dictated by what gear is left over at the end of the pitch; at other times it’s a matter of personal preference.
If most of the rack is spent by the end of the pitch, you may have to settle for a belay anchor that’s less bomber than you want. You can add your body into the belay as shown in chapter 1, and once the second arrives with the cleaned gear, you can bolster the anchors before anyone leads above.
A proliferation of bolted belays has made anchoring easier, faster, and on some climbs, safer. Make sure the bolts are at least 10 millimeters (3/8 inch) in diameter and tightly fixed. Back up the bolted belay with other pieces if you have any doubts about the bolts.
Climbers often take shortcuts—some may be justifiable and some, stupid. With experience and education, a climber develops good judgment, and shortcuts should be well thought out. High-angle rock climbing falls can create large impact forces, so you can’t take too many shortcuts in the belay anchor without taking a huge risk.

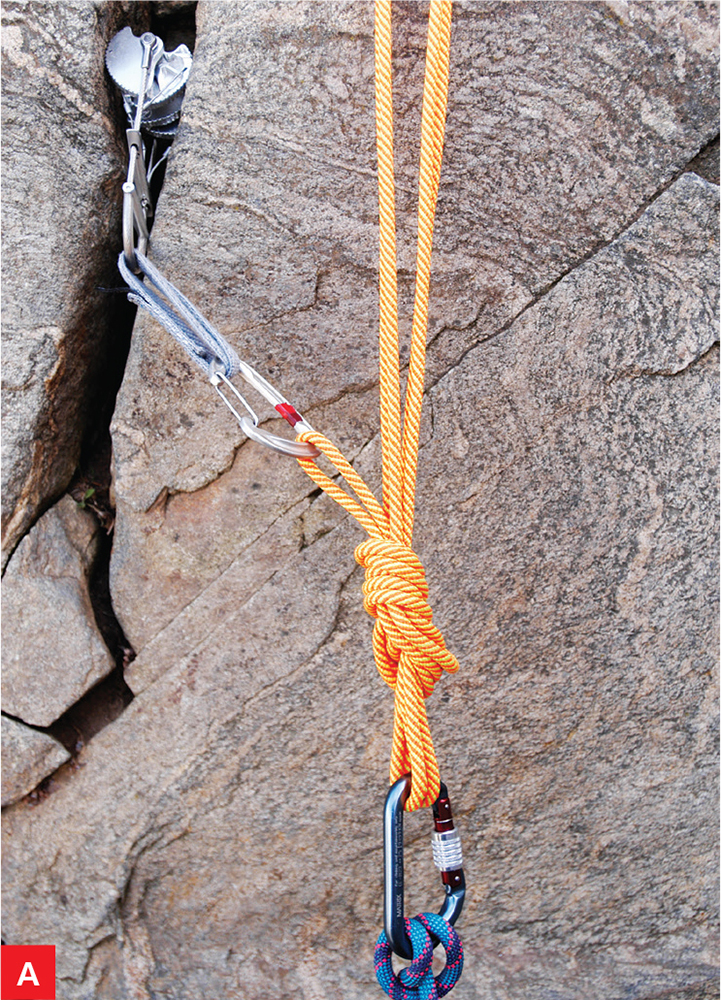
The belayer is tied in to the master point while belaying a leader. The leader placed protection just above the belay to protect the anchors and the belayer from a high-force fall onto the belay. The belayer could be lifted several feet in a hard leader fall. Add an upward anchor to minimize this. Belay gloves make catching hard falls easier.

Here, the cordelette rigs four pieces set in a horizontal crack. This rigging should spread the load fairly evenly among the pieces, because the leg lengths are all similar (unless the loading direction is different than anticipated). A clove hitch tied in to the rightmost piece keeps the double fisherman’s knot out of the way while rigging the cordelette.

Three wired nuts and a cam rigged with the cordelette. The cam is set in a place where it can swivel to hold an upward or sideways load, making the anchor multidirectional. The short leg going to the cam may take most of the force, which may be too weak to hold a high-force leader fall onto the belay anchors. This anchor could be stronger if it were rigged to equalize the load among the pieces better.
CORDELETTE
A cordelette has multiple uses for anchoring and self-rescue. It’s fast and simple for rigging three- and four-point belay anchors. A pre-equalized cordelette creates a convenient work station at the belay, with a top shelf and master point for clipping to the anchors. These clipping points are convenient if you have more than two climbers on the team. The cordelette works whether the pieces are close together or far apart, and it easily rigs multidirectional anchors. See chapter 1 for the steps to rig a cordelette.

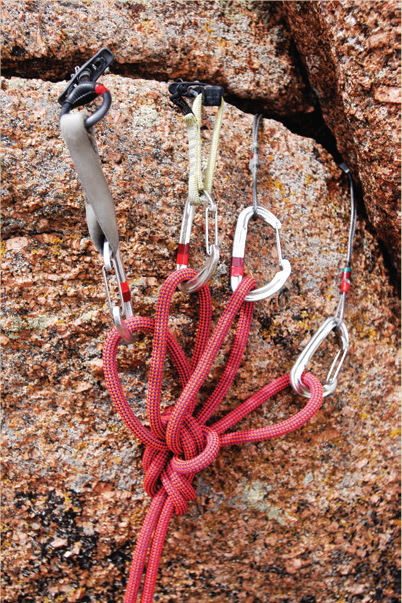
The short leg here is clipped to two pieces equalized with a half-length sling. As long as all the pieces are good, this anchor will handle anything you can throw at it.
The cordelette rigging method is sometimes criticized because it does not spread the load equally among the pieces, especially if the loading direction changes or if one leg is short. If you have bomber anchors, equalization is not so important, because any of them should be able to hold the maximum forces possible in a rock climbing fall. But if the anchors aren’t great (or you’re not sure), or if the leader could take a high-impact fall directly onto the belay anchors, a rigging method that equalizes the load better might be safer.

The equalizer rigging allows you to spread the load better among the pieces, but it’s slow to rig. If any anchor fails, the other anchor on that side will prevent extension. This rigging puts 50 percent of the load on the right anchors and 50 percent on the left anchors, but it’s hard to spread the load evenly among the two right or two left pieces. Clipping in to both strands of the master point with separate carabiners makes the rigging redundant. The carabiners can easily slide to adjust to the pulling direction to maintain equalization.
To rig it, follow these steps:
1.Clove-hitch the two left pieces (the double fisherman’s knot was placed between these two pieces to keep it out of the way).
2.Tie the two extension-limiting knots.
3.Clove-hitch the two right anchors.
4.Adjust the limiting knots and clove hitches so they sit where you want them.
There often isn’t time to create complex anchor systems on long routes, but you’ll pick up skills by practicing with them.

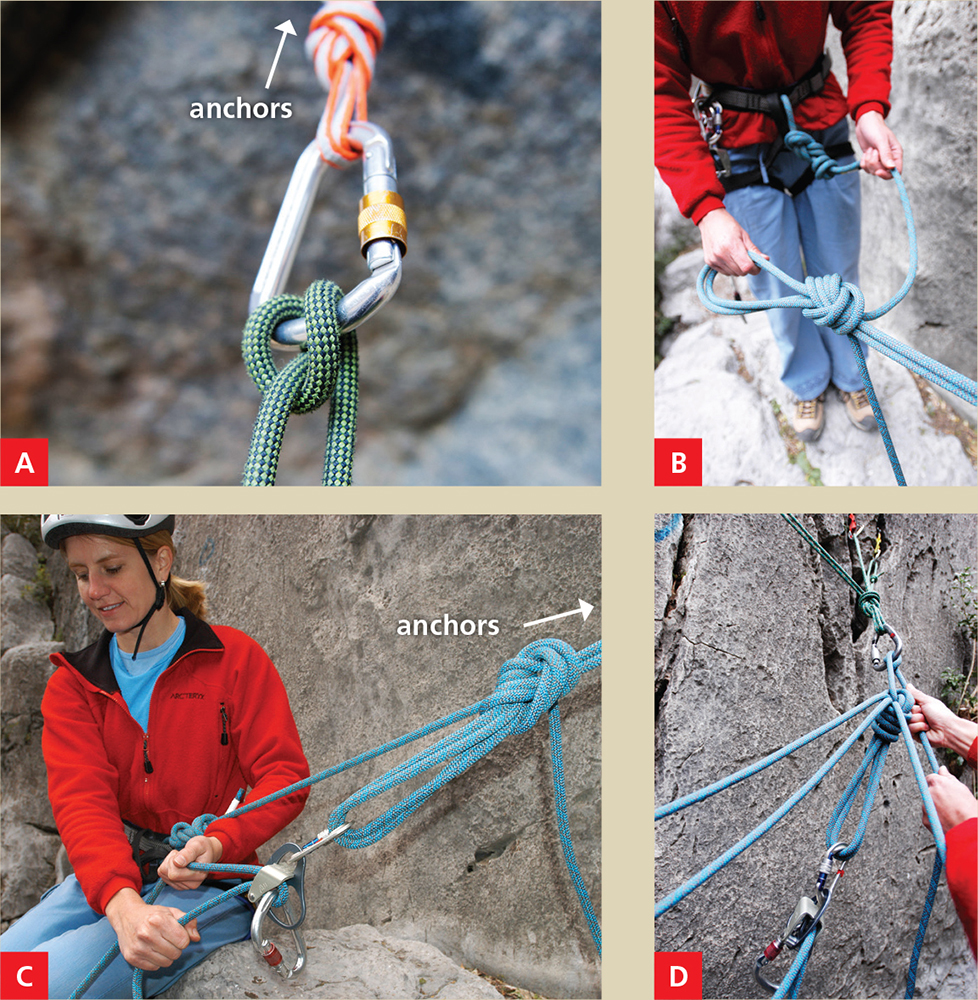
A.This anchor looks like somebody’s science project. It’s slow to build, but it sure does equalize—this rigging will put roughly one-sixth of the load on each of the three left pieces, and a quarter of the load on each of the two right pieces. If one piece blows, the entire load will go onto the other side of the cordelette, though. Such complex systems don’t have much place on long routes, though they can be fun for engineer types who like to tinker (and maybe not so much fun for their partners, who have to wait around).
B.To rig this, tie a figure eight on a bight with a large loop in the cordelette. Clip a carabiner inside the top of the figure-eight knot, and then wrap the loop twice through the carabiner to create three clipping loops.

C.Clip the loops in to the three left anchors to equalize the load on them and tie the two extension-limiting knots.
D.Tie another figure eight on a bight with a large loop on the right side of the cordelette. Clip a carabiner inside the top of the figure eight. Clip the loop into both pieces and then back down to the carabiner in the figure eight. This equalizes the load on these two pieces. Adjust the two extension-limiting knots, then clip in to the two master point strands with separate carabiners, as shown in the first photo, to create a redundant, equalized anchor with minimal extension.

You can rig the previous anchor much more easily with one double- and two shoulder-length slings. Triple equalize the three left pieces with a shoulder-length sling and double equalize the right two pieces. Clip the double-length sling to one of the equalized slings, tie two extension-limiting knots, and then clip the double sling into the other equalized sling. Adjust the limiting knots, put a 180-degree twist into one of the clipping loops to make the sliding X, and clip in. The sliding X makes the master point redundant, so one clipping carabiner per climber works fine. Complex rigging like this is necessary only if you need to spread the load among a bunch of mediocre pieces like these microcams.
When used for rigging belays, the cordelette is first tied into a loop with a flat overhand, double fisherman’s, or a triple fisherman’s knot. If the flat overhand is used, the tails must be at least 30 centimeters (1 foot) long.
You can rig the cordelette many different ways to bring the anchors together to a common master point. Several tricks exist for improving equalization, incorporating an upward anchor, or rigging anchors that are spread far apart. When the individual placements are truly bomber, which they should be the vast majority of the time, the more complex equalization methods shown here are not necessary. But if you find yourself in the terrifying situation of needing to rig a belay on marginal protection, knowing how to craft an equalized belay is a critical skill.
Upward-Pull Anchor Built In to Station
Upward anchors serve two purposes: to hold the belayer down and to protect the other anchors from an upward pull. When it’s important to hold the belayer down, an independent upward anchor, placed below the belayer and attached to the belayer separately from the main anchor as shown in chapter 1, usually works best.
You can incorporate an upward directional placement into the rigging to create a multidirectional belay anchor that can withstand a pull in any direction. This can protect the anchors against an upward pull and limit the distance the belayer can get lifted. The upward directional anchor should be the lowest piece.
Sometimes a cam set for a downward pull in a parallel crack is sufficient to counter the upward pull because the cam will swivel and lock to hold an outward, sideways, or upward pull. However, in “wavy” rock, the cam lobes might open up if the cam swivels; such a placement may not be reliable against an upward pull.
Horizontal cracks can provide excellent opportunities to create multidirectional anchors with only two pieces. Two bomber, equalized placements in a horizontal crack can create an ERNEST anchor with minimal equipment.
Cams in relatively parallel-sided cracks can often provide a multidirectional piece.
A.This anchor can handle an upward pull because the low cam will swivel to the new pulling direction. The leg going to the cam is short, so this piece may feel most of the force if the leader falls directly onto the belay. This belay anchor is good only if the other two pieces are bomber too.

B.When pulled upward, the cam swivels to confront the new pulling direction.

This rigging method cinches two opposing anchors tight against each other to actively hold the pieces in place and create a multidirectional anchor. You can also do this with a sling as shown in chapter 1.
A.Set four anchors in a crack. The lowest two should be opposing. Clip the cordelette loop in to the upward-pull anchor, and clip both cordelette strands through the lowest downward-pull anchor.
B.Pass the opposite end of the cordelette between the two strands and through the upper carabiner again.
C.Pull the cord tight to cinch the pieces against each other.
D.Clip the cordelette loop to the remaining pieces, and pull a loop down between each piece.
E.Pull all the loops in the expected direction of loading.
F.Tie the cordelette off with an overhand or figure eight to create the master point and top shelf.
ADVANCED TIP—KEEPING THE MASTER POINT HIGH
Having the master point at chest-to-head level makes a convenient work station. Here are three tricks for shortening the cordelette to keep your master point high if the anchors are close together.

This cordelette was used to clove-hitch the lowest two pieces to oppose each other, making the anchor multidirectional. The third piece from the bottom is clipped twice, which uses more cord and keeps the master point higher. The double loops may give this piece more than its share of the load because that leg won’t stretch as much as the others.
Tie another knot in the loop, farther from the ends of the cordelette, to shorten the loop and keep the master point high.
A.If you still have too much cord when it’s time to tie off the cordelette, keep passing the cord around itself as you tie the figure eight—to create a figure nine.
B.The figure-nine knot uses up much of the extra length of the cordelette.
Anchors Set Far Apart
If one of the anchors is far above the others, you have a few options for extending it down. Following are solutions for rigging the same set of anchors with a cordelette.

A.The cordelette can work for distant anchors if you untie the loop and tie a figure eight on a bight in each end. Clip one figure eight to the high anchor, the other to the low anchor, and clip the cord in to the remaining anchors. In this case, the lowest two pieces are wired nuts set in opposition to create a multidirectional placement. The nuts are clipped together with two carabiners (gates opposed) due to the three-way pull and possible cross-loading on the carabiner.
B.Pull the cord down in the direction of loading as normal and tie it off to create the master point. The extended cordelette works fine, but it does not provide a full-strength top shelf. With this rigging, the highest piece probably won’t share much of the loads because the leg is so long and it’s only a single strand, which will stretch more easily than the twostrand loops, but it’s still there to serve as a backup.
Here, the lower anchors were rigged with a cordelette, and the climbing rope was extended to the backup anchor. The cordelette was shortened by tying a flat overhand knot to isolate some cord so the master point could be kept high.
Tying Up the Cordelette
It’s important to keep the cordelette organized as you climb.
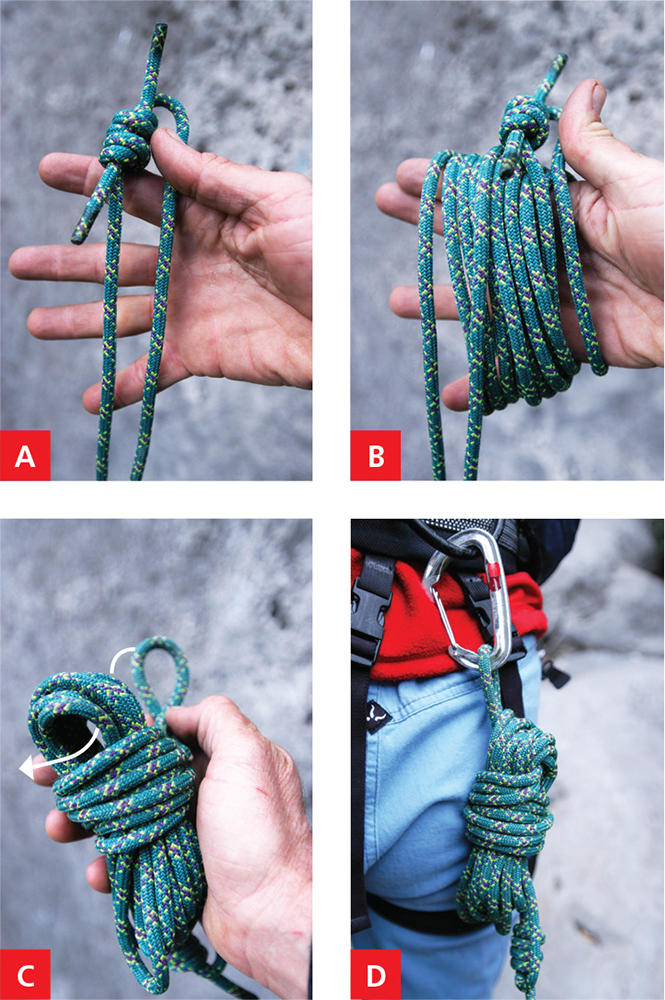
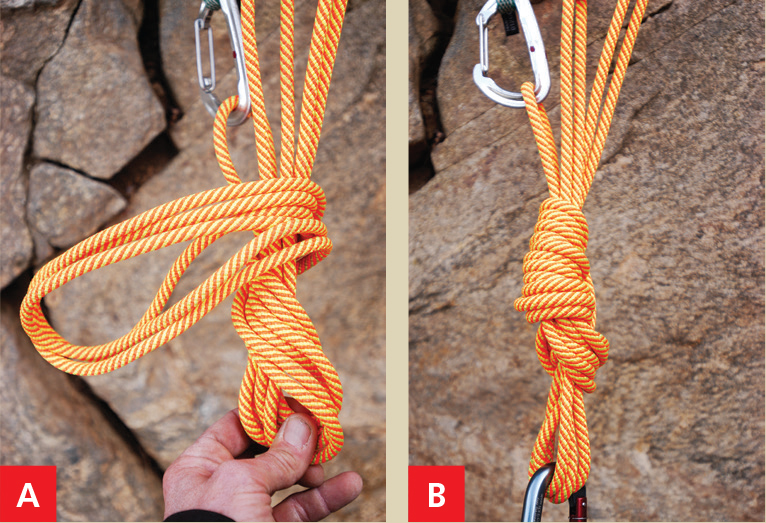
A.Spread your fingers to form a spool. Grab the knotted side of the cordelette.
B.Wrap the cord repeatedly around your hand until you have a loop about 40–60 centimeters (16–24 inches) long remaining.
C.Wrap the remaining loop tightly around the coil. When there’s only a small length of loop left, push it through the top of the coil.
D.Clip this loop to carry the cordelette.
SLINGS
Advancements in webbing material have created slings that are extremely light, compact, and strong. These new materials make it convenient to rig belay anchors with slings, allowing the climbing team to dump the heavier cordelettes. Rigging with slings also makes it easier to equalize the load among the pieces.
Slings are frequently used to rig belay anchors, but often in a messy, time-consuming, gear-wasting fashion. A few nice solutions exist that are clean and efficient. The techniques shown in this chapter require only a sling or two and some carabiners for rigging three- or four-point belay anchors. When the belay will be weighted heavily even without a fall, such as a hanging belay, minimize the number of knots tied in the webbing—these can be difficult and time-consuming to untie.
Many ways exist for rigging anchors with slings. These methods are great to know in case you drop your cordelette, use it for lead protection, or see a quick and bomber alternative to the cordelette. To learn to use these methods efficiently when you need them, it’s important to practice rigging with slings even when you have a cordelette available. Challenge yourself to rig at least one bomber anchor without a cordelette every time you go climbing. Many advanced climbers choose not to carry a cordelette at all in order to conserve weight and time, and any climber who aspires to multipitch efficiency should be comfortable rigging anchors with and without a cordelette.

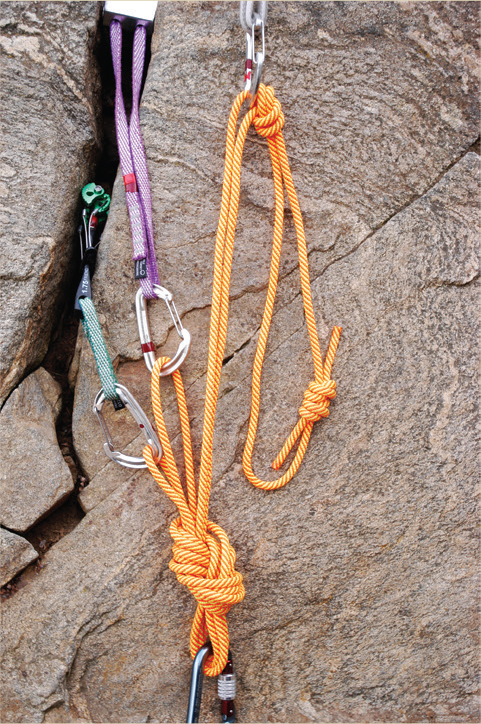
This clean arrangement uses only a double-length sling to equalize the load between the left cam and the two pieces on the right. The two extension-limiting knots make the clipping point of the sliding X redundant, and they allow for some directional shift while limiting extension if the anchor blows. An upward-pull anchor is clipped with another sling to the master point.
To rig it, follow these steps:
1.Clove-hitch the lower-right piece.
2.Clip the upper-right piece.
3.Add the two limiting knots.
4.Clip the left piece.
5.Adjust the knots and clip in between them with a sliding X.

This is a reasonable anchor, but it’s not as clean as the previous rigging. The upper two anchors are equalized with a sliding X, and an overhand knot minimizes extension if the highest piece fails. The upper two anchors are then equalized with the right anchor via a sliding X in a half-length sling (half the length of a shoulder sling to minimize extension if a piece fails). The lower clipping point is not redundant, so the rope is also clipped to the upper locking carabiner to back up the half-length sling. These placements in a horizontal crack will hold an upward pull, so no extra upward anchor is necessary.
A little slack between the clipping knots ensures that the lower carabiner gets loaded so it can equalize the force between all three pieces. As it’s rigged, the two left pieces will each hold 25 percent of the force, while the right piece holds 50 percent. If the load comes onto the upper tie-in, the left two pieces will hold the entire load, and the right anchor will not contribute at all.

These four pieces are rigged with a four-loop sliding X using two double-length slings for redundancy. This rigging is fast and simple, and it equalizes the load among the four pieces, with each anchor holding around 25 percent of the load. If the loading direction changes, the slings will shift in the clipping carabiner to maintain equalization. If one piece fails, the slack disperses among the other three loops so that extension is minimal.
To rig it, follow these steps:
1.Clip both slings to all four pieces.
2.Pull a loop down between each piece.
3.Put 180-degree twist in each loop.
4.Clip all four loops with a large locking carabiner.

The guide’s belay. The autoblocking belay device is clipped in to the top shelf of the cordelette, while the belayer is clipped in to the master point. The two attachments can be switched for convenience and ease of use or to accommodate larger teams of climbers. This method is not safe except with an autoblocking or assisted-braking belay device.

A shoulder sling and double-length sling combine to create three fixed legs, similar to a cordelette rigging. The shoulder sling is tied off with an overhand knot to shorten it. If the rock quality is in doubt, improved equalization would be a better choice.

A double-length sling can rig a three-point anchor if two of the anchors are in line with each other. The lower-left nut clips just below a knot in the sling that eliminates the possibility of extension. The sling is pre-equalized, creating redundancy and a solid master point for the team to clip. While this method is fast and convenient for rigging bomber anchors, the first rigging with slings (shown at the beginning of the chapter) equalizes the load better.
If the belayer gets lifted, she might pull out the low nut. An upward anchor could be clipped to the nut, the master point, or directly to the belayer to prevent this.
An adjustable hitch works well to precisely adjust sling length and is easy to untie after heavy loading. In the example here, the adjustable hitch is used to rig a minimalist anchor with two pieces; the lower piece is a cam that can rotate to hold an upward pull, and both are bomber in a downward pull, meeting two-downward and one-upward minimum for a belay anchor. Ideally, a third piece would be added before the leader sets off on the next pitch. Here’s how to tie an adjustable hitch:

A.Hang a sling from the upper of two pieces.

B.Tie a simple slipknot in one side of the sling with the sliding part of the knot leading toward the upper carabiner.

C.Clip the loop of the slipknot into the upper carabiner.
D.Adjust until the bottom of the sling is close to the same height as the lower piece.

E.Clip in to both the bottom of the sling and the lower piece.

F.Adjust the sliding hitch to match the lower piece as well as the anticipated direction of pull.

A double sling with a sliding X and an extension-limiting knot splits the load between the right anchor and the left two anchors. The upper-left cam is clipped in to the sling of the lower-left cam to save gear, and the pieces are positioned to share the load. A lightweight locking carabiner on the lower-left cam adds security since it connects two of the anchors to the rigging sling.
The sling is not redundant in its master point. Tying another extension-limiting knot in the sling just below the left cams would make it redundant. You could also tie the rope in to the second locking carabiner. An upward anchor can be clipped in to the master point.

The equalized lower pieces comprise the primary anchor, with the highest piece serving as a backup. By tensioning the upper clove hitch more you can get all three anchors sharing the load. This isn’t perfectly equalized, but it’s fast. It would be even faster if you eliminated the extension-limiting knots and used a half-length sling to equalize the left two pieces.

Two shoulder-length slings each equalize two pieces—the slings were just the right length. If one of the slings needed shortening, you could wrap it around a carabiner or tie a knot in the sling. If one anchor blows, or if the loading direction changes, the entire load will go onto just two of the anchors.

The top two cams are pre-equalized with a double-length sling. The knot creating the master point was adjusted so the hexagonal chock could clip in to the master point and contribute to the anchor. You can often slide the cam placements up or down to adjust the position of the sling. The hex looks like it might not handle an upward pull very well, though some crystals do hold it against an outward pull. You might add an upward anchor clipped to the master point or the belayer. This setup doesn’t equalize great, but it’s quick to rig and requires minimal gear.

The Darwin anchor. Climbers who set anchors like this will be removed from the gene pool. All of the pieces are set in a single detached flake, the hexes look like they could pull out easily, the rigging wastes quickdraws and carabiners, and it all relies on a single, nonredundant sling that doesn’t even have a sliding X—if the left hex rips, you get total failure. To top it off, the climber is clipped in using a clove hitch and a single nonlocking carabiner. If the leader falls before setting good protection, this team is toast.
ADVANCED TIP—MULTILOOP KNOTS
You can create multiple clipping loops in the rope by tying a double-loop figure eight, a double bowline, or an equalizing figure eight. These methods use a fair amount of rope, so avoid them on rope-stretcher pitches.

The double bowline (see appendix 2) works well for clipping two anchors, such as this pair of bolts. Appendix 2 shows how to tie this knot, as well as the double-loop figure eight, which also creates two clipping loops. This belayer is clipped in to the bolts with two locking carabiners. Lightweight locking carabiners don’t add much weight to the rack, but they can add some extra security at the belay, though nonlocking carabiners should be fine too.
This bolted belay is nice because it has a third bolt for the leader to clip before setting off on the pitch. The bolt would be better positioned a little higher. The belayer could also tie in to this bolt if she is concerned about the quality of her two belay bolts.

The equalizing figure eight (see appendix 2) can adjust if the loading direction changes, though it may not give perfect equalization due to friction in the knot. As shown here, collapse one of the three loops to clip only two anchors.

You can clip three anchors with the equalizing figure eight. It’s best if the anchors are good, and not too far apart, so the rope can’t burn across itself if an anchor fails. You can tie an extension-limiting knot in the longest loops if you’re concerned about that.
By making a bigger loop in the beginning and passing it through the figure eight one extra time, you can get four or five loops for clipping. Here, four anchors are clipped, and the fifth loop is collapsed.

To create a master point, tie a figure eight on a bight in the rope just below the multiloop knot. You can belay the second directly from this master point if you have an assisted-braking belay device.
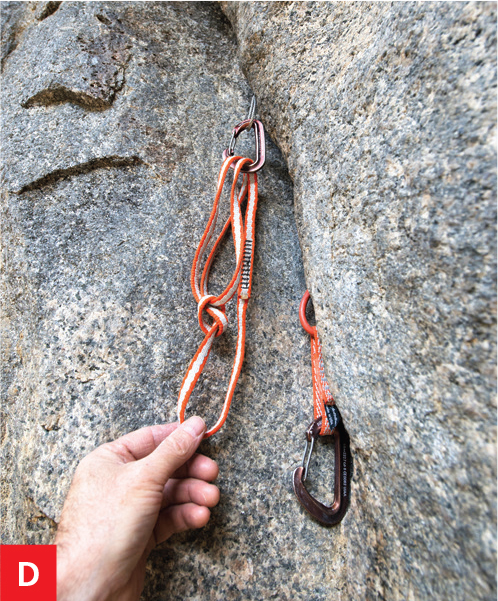
Daisy Chain or PAS
Using a daisy chain or PAS is a popular way to add both efficiency and redundancy to an anchor. The most efficient way to use a daisy in the case of two-bolt anchors is to clip one anchor with the daisy and the other with the rope. Variations on this theme work great for three-piece trad anchors as well: clip one piece with the daisy, equalize the other two, and clip them with a clove hitch in the rope.

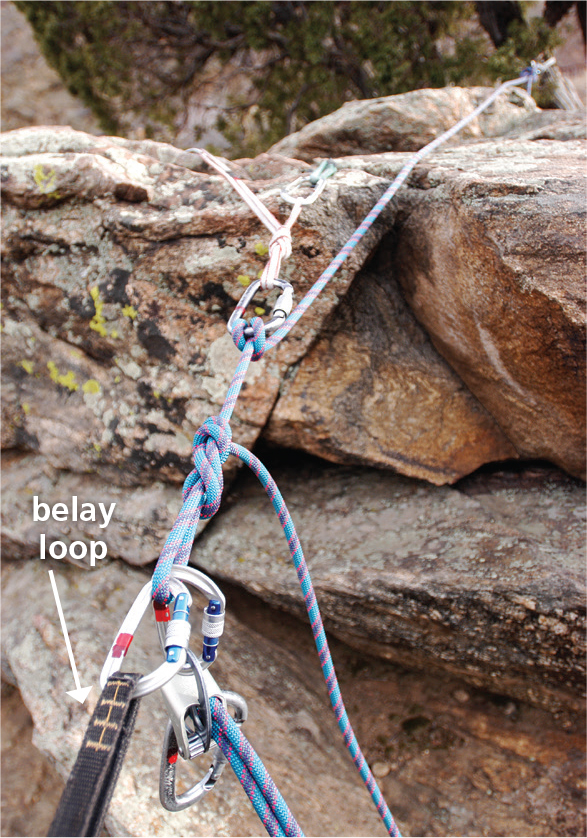
Sometimes the cordelette wouldn’t work anyway because the anchor is too funky and using a cordelette would limit the options. Here, the two pieces close together form the primary anchor, and the tree in the distance, attached with one of the double ropes, is used as a backup. Be willing to be creative.
ROPE
You can tie in to all the anchors with the climbing rope for fast anchoring that requires minimal gear. Anchoring with the rope works well for a party of two who are swinging leads; with bigger teams, or if one person is leading all the pitches, it can be awkward getting climbers clipped in and out of the anchors because no master point exists, but it can be done safely. Tying the belayer’s rope up in the rigging also makes it difficult (but not impossible) to escape the belay in an emergency.
The old-school method. One of the quickest and easiest ways to get in to a series of anchors is to clip each one of them with a clove hitch. Cinch the clove hitches from bottom to top so all the anchors contribute, though it’s impossible to distribute the load equally with clove hitches. This is fast when you’re swinging leads, but it’s hard to clip another climber in to this anchor.
Half Ropes
If you happen to be climbing with two twin, half, or single ropes, you can tie each rope to a different anchor cluster to make a quick belay anchor.
Trees
In some areas, you can frequently tie off a tree as an anchor.

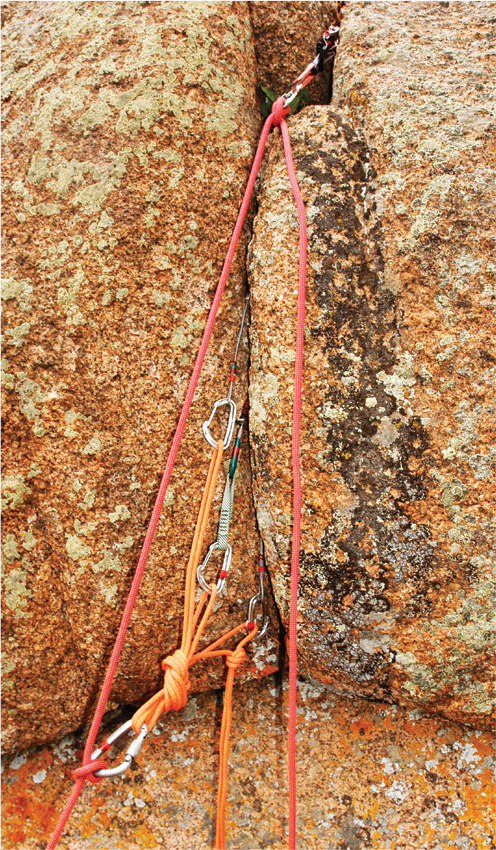
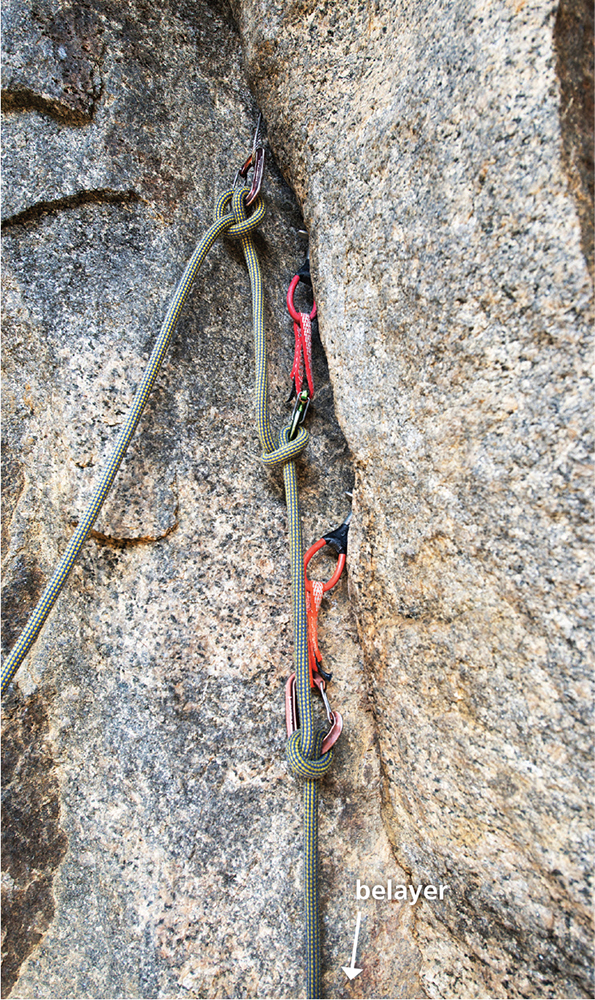
If you use the rope to rig anchors that are spaced horizontally, use the “triangle tie-in” to keep yourself tight to all the anchors. The rope runs from the belayer up to the two left anchors, where it’s tied in to each with a clove hitch. Then it’s tied to the right anchor with another clove hitch, and finally it runs back to the belayer’s harness where it’s tied with a fourth clove hitch. This rigging makes it easy to adjust the rope lengths so that all the anchors hold some of the load. The first protection was placed before the leader left the belay, so the belay essentially included four good anchors. The best clove-hitch anchor is often a combination of two equalized pieces with a third clipped as backup.
You could increase the strength of this belay anchor by equalizing the two left pieces. The lowest piece is a stopper, which probably won’t hold an upward pull. An upward-pull anchor might be a good idea here, to protect the belayer and the lowest anchor from getting lifted in a leader fall.

The lowest piece is a stopper, which could get pulled out with an upward pull—an upward-pull anchor might be in order. This anchor could be strengthened by equalizing the two left anchors at the cost of a sling, carabiner, and a few seconds of time.

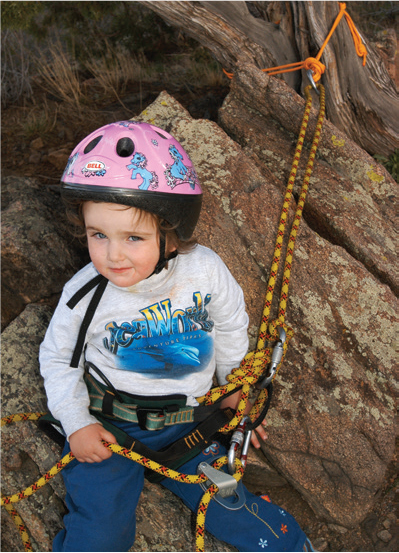
Wrapping the rope around a stout tree and clipping it back to your belay loop makes an anchor with only one carabiner, as a young Giulia Luebben demonstrated here. Make sure the tree isn’t covered in sap. You also might want your belayer to be more than two years old.
Sometimes you want to anchor to a tree set back from the cliff’s edge at the top of a route. One convenient method is to pre-equalize a cordelette around the tree and then clip your rope in with a locking carabiner and lock it. Now go back to the cliff edge and tie a clove hitch in the rope and attach it to a locking carabiner on your belay loop. Lock the carabiner and cinch the rope up tight to fasten yourself to the tree. This rigging doesn’t create a master point, so the climber is belaying directly off her harness belay loop.

You might want anchors at the cliff edge to back up the tree, prevent rope stretch, or give you directional stability (if the belay position is not in line between the tree and the climber). There are many ways that you could rig this. Here, the belayer clipped the tree and went back to the cliff edge. Then she set the extra anchors, pre-equalized them, and clipped her rope in to the pre-equalized sling. Finally, she clipped the rope into her tie-in carabiner to connect the tree to the other anchors.
This climber was nearly out of rope, but she wanted to belay close to the cliff edge to reduce rope drag and to communicate with her partner. The tree is set back from the lip, so she pulled up slack and clipped the rope in to her harness belay loop with a clove hitch on a locking carabiner so she couldn’t drop the rope. Then she rigged a sling around the tree, untied her original tie-in knot, and tied the rope’s free end to the sling.
She belayed herself to the lip by feeding rope through the clove hitch. Then she set two pieces at the lip to back up the tree and to help keep her in position if her partner were to fall. She pre-equalized the two pieces and tied the rope in to them. Finally, she tied a figure eight on a bight to create a master point. She clipped her belay loop directly in to the master point and rigged the belay device. After she was secure, she untied the clove hitch that protected her while she rigged at the lip.
ADVANCED TIP—EXTENDING THE ANCHOR
Guides often extend themselves from their belay anchor so they can see and communicate with their clients. This is a great technique if your partner needs to be coached and the anchors are out of view of the climber.
A.Set the anchors and clip the rope in to the master point with a Munter hitch.
B.Move down to the belay spot, belaying or lowering yourself on the Munter hitch if necessary. Pull rope down to get some slack and tie an overhand in both rope strands. The overhand knot anchors you and creates a master point.
C.You can do a direct belay with an autoblocking belay device off the master point.
D.If the terrain is tricky, you can belay the whole team back to the anchors by pulling the rope through the Munter hitch.