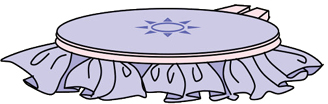
Princess Charlotte Baby Dress & Bonnet
BY WENDY POCHE SCHOEN
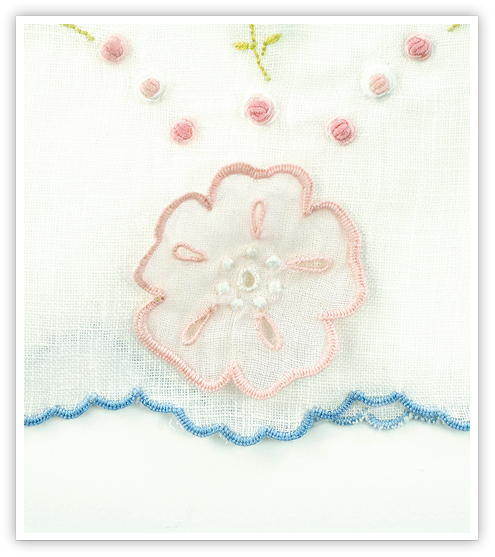
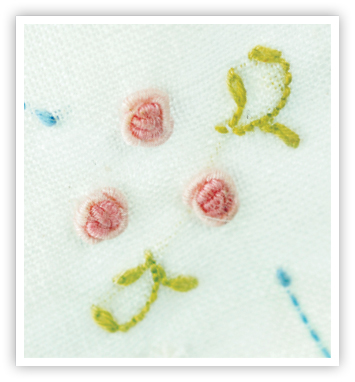
WHAT BETTER WAY TO PREPARE FOR A BABY’S ARRIVAL than by creating this exquisite little dress and matching bonnet. Made of imported linen, Wendy’s designs are beautifully hand-embroidered with bullion roses and swirling stems. Little eyelets and granitos are scattered about, and a pretty detached appliqué dogwood flower is positioned front and center on the skirt and bonnet. Swirling trails of stem stitch accentuate the delicate nature of the design. Edges are finshed in tiny buttonhole scalloping. Worked entirely with Coton á Broder (broder cotton) in pastel hues, the vintage-look dress design features a T-style yoke and three-quarter-length sleeves gathered and edged with scalloped sleeve bands.
What You’ll Need…
PATTERNS
(included in the downloadable pattern files, available here)
“Princess Charlotte Dress and Bonnet” (6 mos. size only)
Dogwood flower template
Hand-embroidery design
FABRIC
(layout guides included in the downloadable pattern files)
2 yd (1.8 m) of fine white linen
1⁄4 yd (23 cm) of white cotton organza
1⁄3 yd (30.5 cm) of pink cotton organza
TRIM
11⁄4 yd (1.2 m) of white Swiss entredeux
5 yd (457.5 cm) of light blue 1" (2.5 cm) wide silk satin ribbon
2 yd (1.8 m) of light blue 5⁄8" (1.5 cm) wide silk satin ribbon
Four 1⁄4" (6 mm) wide mother-of-pearl buttons
THREAD
DMC Coton á Broder #25
Skein Blanc
Skein Green #472
Skein Yellow #745
Skein Pink #776
Skein Pink #819
Two Skeins Blue #3325
Basting thread
SUPPLIES
Fine-point blue wash-away marking pen or #2 lead pencil
6" (15 cm) hands-free hoop or 4" (10 cm) Susan Bates hoop
Magnification and light
Embroidery needles
#8 crewel
#8 sharps
#10 sharps
Embroidery scissors
Shears
Clear plastic ruler
Measuring tape
Thimble and finger shield
Glass-head pins
Clover tapered awl
Pinning board and pins
What to Cut…
Before starting, section off the white linen into individual blocks for each pattern piece. (Refer to the layout guide included in the downloadable pattern files before proceeding.)
FROM LINEN
23" (L) × 28" (W) (58.5 × 71 cm) block for the dress front
20" (L) × 30" (W) (51 × 76 cm) block for the dress back
12" (L) × 71⁄2" (W) (30.5 × 19 cm) block for the yoke
12" (L) × 20" (W) (30.5 × 51 cm) block for the bonnet
8" (20.5 cm) square for sleeve bands
Two sleeves
FROM PINK ORGANZA
Two 12" (30.5 cm) squares for flower appliqué (one for dress, one for bonnet)
FROM WHITE ORGANZA
8" (30.5 cm) square for the sleeve band interlining
12" (L) × 20" (W) (30.5 × 51 cm) block for the bonnet
How to Make It…
Preparation
- Spritz with water and then spray starch and iron the fabric blocks dry. Repeat the process, if necessary.
- Pin the fabric blocks over their respective pattern pieces and transfer the embroidery designs with a blue wash-away marking pen. (See Using the Pinning Board.)
Embroidery
Most of the embroidery is worked without an embroidery hoop, but eyelet and stem stitch look better when worked with a hoop. Work these stitches before proceeding to the other stitches. Refer to the Techniques section for specific embroidery-stitch instructions.
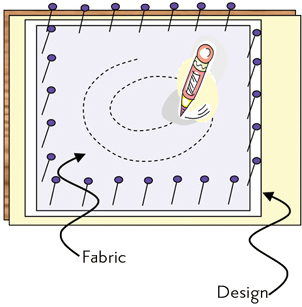
Using a Pinning Board
Refer to FIG. 1 for all steps.
- Place the embroidery template face up and centered on a pinning board. Carefully position and secure the prepared fabric block over the design, right side up. Start pinning by the first pin at the center top edge. Smooth the fabric down tightly and place a pin at the center lower edge.
- Working out about 11⁄2" (3.8 cm), place another pin and repeat the smoothing process to apply the pin at the lower edge. Continue until the entire top and bottom edges of the fabric are pinned in place and then repeat for the sides.
- Transfer the embroidery design onto the fabric block using a #2 lead pencil or a fine-point wash-away marking pen. Make certain the design is centered and on grain.
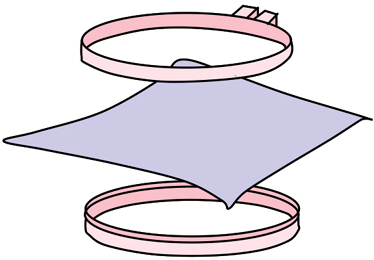
Applying an Embroidery Hoop
Refer to FIGS. 2 AND 3 for all steps.
- Notice that there is an inner hoop with a rim, or lip, on one edge on the Susan Bates hoop. Place the inner hoop down onto the table with the rim side up.
- Place the fabric, right side up with the embroidery design centered within the hoop.
- Loosen the tension of the screw on the outer hoop and place it over the inner hoop, sandwiching the fabric between. Push the outer hoop over the inner hoop until it is flush with the table.
- Pick up the hoop, giving it one more push until the inner hoop pops over the outer hoop. Grabbing all the fabric into your non-stitching hand, smooth the fabric. Tighten the screw slightly. Continue smoothing the fabric as you complete the tightening.
Detached Appliqué
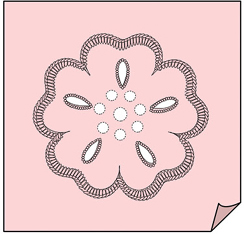
- Transfer the flower template onto the starched square of pink organza (FIG. 4).
- Complete the buttonhole stitching around the edges of the flower and the teardrop eyelets (FIG. 5).
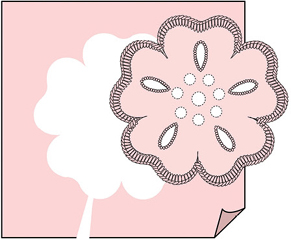
- Cut out the appliqué close to the edges (FIG. 6).
- Complete all the embroidery on the gown, except the circle of dots (granitos) at the center front lower edge of the dress. (This marks the center of the flower to attach the appliqué.)
- Position the detached appliqué over the circle of dots on the gown. Pin or baste in place.
- Complete the circle of dots embroidery (granitos) through the appliqué and dress fabric; cut out all the pattern pieces making sure hems and armholes align.
Buttonhole Edge
- Before proceeding with the buttonhole edging on the neck, turn the back yoke facings back along the folding line (FIG. 7). Turn the raw edge under 1⁄4" (6 mm) and baste in place; press well.
- Complete the buttonhole edge around the neck edge, stitching through all layers of the facing.
Dress Construction
All seams are 3⁄8" (1 cm).
- Machine stay-stitch along the seams of the yoke slashes on the dress front (L=2.0). Cut the slit between the stitches (FIG. 8).
- Stitch three gathering rows along the lower edge of the slit, placing the first row 1⁄8" (3 mm) from the edge and each 1⁄8" (3 mm) thereafter. Attach entredeux to the upper edges with right sides together, stitching to the large dot indicated on the pattern (FIG. 9). Refer to French sewing in the Techniques section if necessary.
- Pull in the gathers on the lower edge to fit the entredeux. Pin in place with the right sides together, distributing gathers evenly (FIG. 10).
- Repeat for the other side.
- Work a 5" (12.5 cm) continuous lap placket at the upper back center of the skirt. Refer to Placket in the Techniques section, if necessary.
- Stitch three gathering rows along the back skirt edges placing the first stitching line 1⁄8" (3 mm) from the edge, and having them 1⁄8" (3 mm) apart (L=2.4) (FIG. 11).
- Attach entredeux to the back yoke bottom edges (FIG. 12). Roll and whip the raw edges together.
- Pull in the gathers so they are even with the yoke’s lower edge. Distribute the gathers evenly, and pin them to the entredeux with the right sides together. Stitch very close to the entredeux, taking in 1⁄4" (6 mm) seams (FIG. 13). Roll and whip the raw edges together.
- French seam the shoulders together using a very narrow seam (FIG. 14). Press the seams to the back; refer to French Seam in the Techniques section if necessary.
- Complete the hem embroidery and cut away the excess fabric from below the scallops on the hem (FIG. 15).
- French seam the gown front to back at the sides using a very narrow seam, making certain the scallops meet at the sides (FIG. 16).
- Stitch the underarm tucks along the stitching line as indicated on the pattern (FIG. 17). Fold the seam even with the stitches, opening the tuck out. Press and baste in place (FIG. 18).
Sleeves
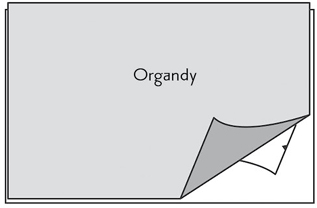
- Trace the sleeve cuff template onto the linen block. To stabilize, baste white organdy to the wrong side of the cuff. These pieces will be treated as one fabric.
- Stitch a running stitch along the outer scallop edge through all fabric layers with one strand of blue broder floss.
- Work a close buttonhole stitch along the scallops (FIG. 19). Cut away the excess fabric from the scallops.
- With right sides together, sew the ends of the cuffs together to form a circle (FIG. 20). Overcast the raw edges. Press the seams open.
- Ease-stitch three rows of gathering stitches along the lower and upper edges of the sleeve beginning 1⁄8" (3 mm) from the edge and placing each row 1⁄8" (3 mm) apart (L=2.5) (FIG. 21).
- French seam the sleeve with right sides together and edges even. Press the seam to the back.
- Pull in the gathers at the lower edge to fit the cuff (FIG. 22). Position the right side of the cuff to the wrong side of the sleeve. Stitch, taking in 1⁄4" (6 mm) seams (FIG. 23). Overcast the raw edges. Press the cuff and seam down (FIG. 24). Turn the sleeve right side out; press. Turn the cuff to the right side, folding along the seamline. Press in place (FIG. 25).
- Attach entredeux to the armhole opening on the yoke. Trim, then roll and whip the raw edges. Ease in the gathers of the sleeve to fit the armhole opening (FIG. 26). Pin the sleeve to the armhole opening, aligning the seams. Baste in place. Stitch the sleeve to the entredeux. Roll and whip the raw edges. Repeat for the other sleeve.
Finishing
- Sew two buttons to the left back yoke (FIG. 27).
- Make buttonholes in the right back yoke to match the buttons.
Bonnet
- Transfer the embroidery template onto the linen bonnet block.
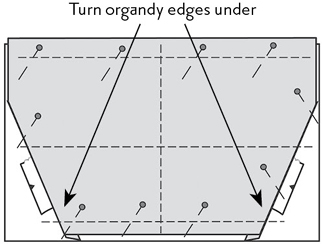
- Pin the organdy block to the wrong side of the linen (FIG. 28). On the back edges, turn the organdy under along the seamlines, then baste the two fabrics together all around (FIG. 29). These pieces will be treated as one fabric.
- From the linen side, work the buttonhole scallop edge along the front edge from the foldline to the foldline. This flap will be turned back.
- From the organdy side, work the buttonhole edge along the sides from the foldline to the foldline. This part of the bonnet will be on the outside, so the scallops are worked on the organdy side.
- Complete the embroidery entirely and cut out the pattern pieces, trimming very close to the scalloped edges. NOTE: The embroidery is worked on the linen side, then the linen is turned back to form the brim. For flower appliqué refer to dress embroidery for instructions.
Bonnet Assembly
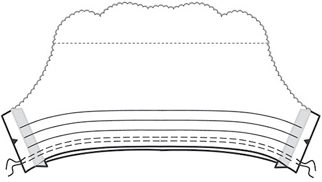
- Stitch three rows of gathering along the back edge of the bonnet on the lines indicated (L=2.5) (FIG. 30).
- Sew cording along the three marked lines, inserting the cord between the lining and fabric. With a twin needle, stitch through both layers holding the cording between the two needles (L=2.0) (FIG. 31).
- French seam the back together aligning the notches and edges, and keeping the cording away from the stitching (FIG. 32). Press the seam to one side.
- Spray starch and iron a 9" (23 cm) length of entredeux. Trim one batiste edge to 1⁄4" (6 mm).
- On the crown, pin the entredeux to the edges, right sides together, clipping as necessary to form a circle. Stitch in place (FIG. 33).
- Pull in the gathers on the bonnet back edge with right sides together and then pin the crown in place, adjusting the gathers evenly (FIG. 34).
- Draw up the cords to form ruching on the back, adjusting the gathers as necessary. Bring the cords to the inside with a large-eyed needle, and then tie into bows.
- Hand-stitch the organdy edges together in back.
- Sew ribbon ties to the bonnet sides on the inside.