Little Lad Sunday Suit
INSPIRED BY AN ANTIQUE CONSTRUCTED BY HELEN LIVELY
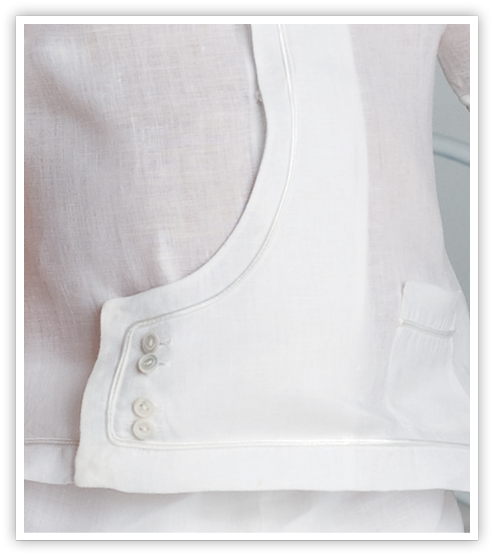
WHAT WE LIKE ABOUT THIS PATTERN, especially for boys, is that it offers a unique design line that is unmistakably heirloom without being too frilly. The suit is a remake of a vintage piece. The linen top is trimmed with white soutache braid for a clean, white-on-white effect; navy braid would give the suit a sailor look. A contrasting Madeira border, a touch of embroidery, or a different colored fabric for the shorts would be equally appealing.
What You’ll Need…
PATTERN
(included in the downloadable pattern files, available here)
“Little Lad Sunday Suit” (sizes 1 to 4)
“William’s Pull-on Shorts” (sizes 1 to 4)
FABRIC
(size chart, layout guides, and yardage requirements included in the downloadable pattern files)
Allow 1⁄2 yd (46 cm) extra shirt fabric for self-piping on collar and cuffs, or purchase ready-made piping to match.
White handkerchief linen
White batiste (lining)
TRIM
11⁄2 yd (1.4 m) of white soutache cord
SUPPLIES
Lace-shaping board
Spool of white DMC 50 wt thread
1⁄2 yd (46 cm) of piping cord
Four 3⁄8" (1 cm) buttons
Elastic for shorts
Interfacing (for waistband)
Four plastic sew-on snaps
Roxanne’s Glue-Baste-It
Size 70 sharps needle
Size 65 or 70 universal machine needle
Blue wash-away marking pen
Grooved sewing machine foot
What to Cut…
FROM MAIN FABRIC
Right shirt front
Left shirt front
Shirt back
Pocket
Right shirt facing
Left shirt facing
Two sleeves
Two collar blocks (larger than collar)
Two shorts fronts
Two shorts backs
Waistband
11⁄2" (3.8 cm) wide bias strips for self-piping (enough to cover piping around collar and sleeves) or use ready-made piping
FROM LINING FABRIC
One collar block
Two shorts fronts
Two shorts backs
FROM INTERFACING
Waistband
Working with Soutache
- Soutache braid will shrink. It is very important to preshrink the braid before use, or your garment fabric will pucker around the trim after washing. To shrink soutache, soak it in warm water and allow it to air dry.
- Shape around the curves by pulling one of the two cords while firmly pushing the rest of the braid away.
- Place the garment on a lace-shaping board or padded surface and position the cord on the garment, smoothing the braid in place; stab the pin as you would if shaping lace.
- Apply the basting glue under the line of braid and let it dry.
- Stitch, using a small stitch (2.0) and fine size 65 or 70 machine needle.
How to Make It…
Preparation
- Prewash the fabric, dry, starch, and press before cutting out. Preshrink the soutache (see Working with Soutache section).
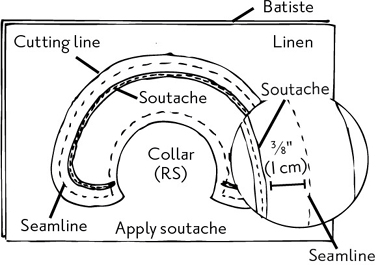
- Mark the dots and notches as indicated on the pattern for all pieces. Trace the collar and seamlines onto the two collar blocks. Mark the braid lines 3⁄8" (1.3 cm) from the seamline.
Instructions
- Prepare the collars: Place a block of batiste under one linen block and pin in place. Glue-baste the soutache braid on 3⁄8" (1 cm) guideline and straight-stitch along the center groove of the braid (FIG. 1). TIP: Use a grooved foot to secure the braid in the center groove and set the needle position in the center.
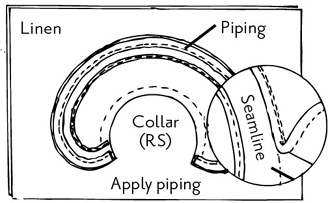
- Cover the piping cord for the collar and cuffs; refer to Piping in the Techniques section. Glue-baste the prepared piping to the outer edge of the collar with the raw edge of the piping aligned to the collar cutting line (not the seamline). Baste the piping to the collar on the seamline (FIG. 2). TIP: Use a grooved foot and set the piping in the center groove; adjust the needle position to stitch beside the cording.
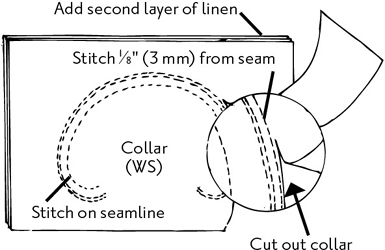
- Place second block of linen on top so that the right sides are together. Stitch with the batiste side up and use the previous stitching line as a guide. Place the piping hump in the center groove of a grooved machine foot and set the needle position to stitch beside the piping just inside the previous stitch line. Shift the piping to the outer groove of the foot and adjust the needle position to stitch a second line a scant 1⁄8" (3 mm) away. Trim close to the second line of stitching (FIG. 3).
- 4Notch the 1⁄8" (3 mm) seam on the curves and turn the collar right side out. The batiste will serve as the interfacing. Set the collars aside.
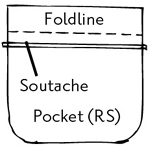
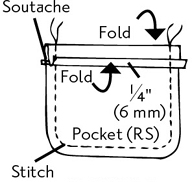
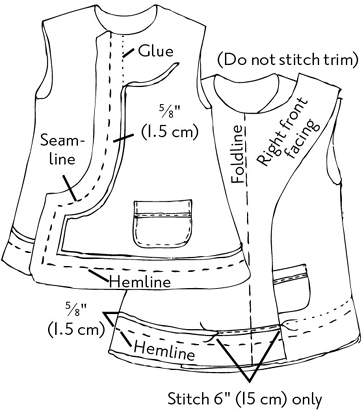
- Prepare the pocket: Fold under and press the top edge of the pockets 1⁄4" (6 mm) then 3⁄4" (2 cm). Glue-baste a piece of soutache braid 5⁄8" (1.5 cm) from the fold on the right side of the pocket from raw edge to raw edge (FIG. 4). Do not stitch.
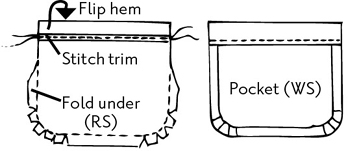
- Fold the top edge of the pocket back on itself to the wrong side so that the braid is sandwiched between. Stitch across the ends of the hem and continue to stay-stitch around the seamline of the pocket curve (FIG. 5). Flip the pocket hem to the inside and press. Notch the curves to the stay-stitching and finger press the edges under. Stitch across the soutache trim from the right side and catch the fold of the hem on the wrong side. Press and starch to set the shape (FIG. 6).
- Glue-baste the pocket in place on the left front piece and topstitch it to secure (FIG. 7).
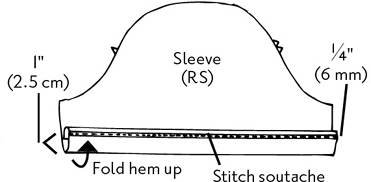
- Prepare the sleeves: Fold and press the bottom edge to the right side of the sleeve along the pattern foldlines. Position and glue the soutache braid 1⁄4" (6 mm) down from the top fold edge (3⁄4" [2 cm] from the bottom). Stitch in place catching the hem on the wrong side (FIG. 8). NOTE: If your fabric has a distinctive wrong side, fold the hem to the wrong side instead.
- Stitch the sleeve seams with a narrow French seam using 1⁄2" (1.3 cm) total allowance. Set the sleeves aside.
- Assemble the top: Stitch the back to the fronts at the shoulder seams and the side seams; use a French seam and press the seams toward the back.
- Mark a line for the soutache braid beginning at the right front facing edge. This line should be 5⁄8" (1.5 cm) above the hemline all around the bottom edge. Continue around the back and work to the right front. Pivot at the bottom right front corner and mark 5⁄8" (1.5 cm) from the seamline edge of the right front up to the neckline. Glue-baste the soutache braid to this line and stitch the braid a section of only 6" (15 cm) from the right front edge (do not stitch the remaining braid) (FIG. 9). See working with soutache braid.
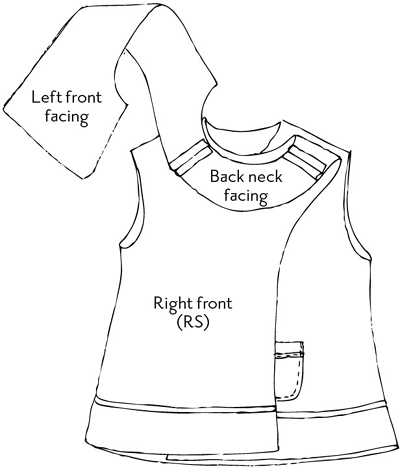
- Stitch the shoulder seams of the back facing (#6) to the front facings (#5 and #2) (the right facing is attached to the right front). Press the seams open (FIG. 10).
- Fold a narrow 1⁄4" (6 mm) hem along the outer raw edge of the facings; press and stitch to finish the raw edge.
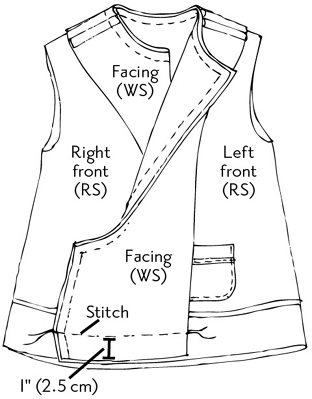
- Apply the collar: Pin the prepared collar to the neckline matching the front edges of the collars to the center front dots indicated on the pattern. Fold the right front facing to the right side on the foldline and pin the entire facing to the neck edge over the collar. The collar will be sandwiched between the facing and linen top. Pin the front edge of the left facing (#5) to the left front (#1). Stitch around the neck, and down the left front edge (FIG. 11).
- Before flipping the facings to the inside, stitch across the bottom 1" (2.5 cm) from the edge, stopping at the hem edge of the facings (SEE FIG. 11).
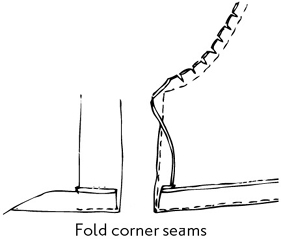
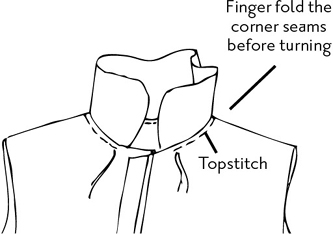
- Trim the seams and clip the curves. Finger fold the corner seam allowances at the stitching line (FIG. 12) and then turn the facings to the inside. “Pop” the corners out and smooth the curves. Press the seamed edges. TIP: Folding the corner seams before turning makes a sharper corner than trimming the seam.
- Topstitch 1⁄8" (3 mm) around the neck seam under the collar to secure the facing (FIG. 13).
- Finishing: Press the hem under 1⁄4" (6 mm) and again 3⁄4" (2 cm) and secure with basting glue. Topstitch along the center of the soutache braid to catch the hem and left front facing.
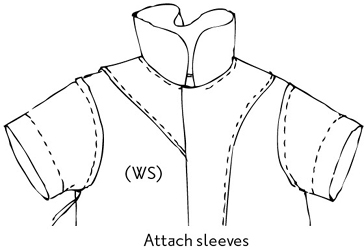
- Run an easing stitch in the cap of the sleeve and attach the sleeve to the armholes with right sides together. Trim the seam to 1⁄4" (6 mm) and cover with bias, or roll and whip the raw edge (FIG. 14).
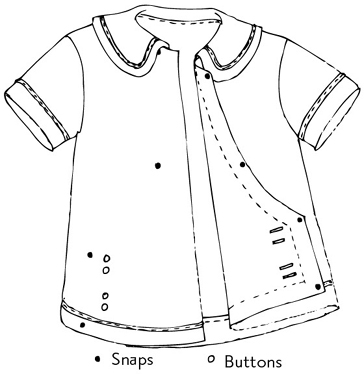
- Mark and stitch the buttonholes on the left front and buttons on the right front. Stitch a snap under each corner of the left front extension to keep the corners from curling. Stitch a clear snap at the neck center front and to the end of the left front extension under the collar (FIG. 15).
- Soak to remove the basting glue and markings. Air dry to slightly damp; press with steam and starch.