Chapter 6: Basic Wirework
You can make all kinds of jewelry and jewelry components by cutting, bending, and hammering metal wire. You do not need to solder or glue any parts because the wire holds its shape with tension. Start out by learning to make some of the key components that you would otherwise purchase pre-made. Then, try making your own beaded links, hook clasps, and chains. For a review of basic wirework tools and supplies, see Chapter 1.
Make Jump Rings, Eye Pins, and Head Pins
Create Wire-and-Bead Drops and Links
Assemble Some Basic Wire Chains
Select Your Wire
Jewelry making wire is available in many different varieties and sizes. The wire you select for a project depends on how well practiced you are with wirework, how you’d like the jewelry to look, and how much money you want to spend on supplies.
Wire Metal
The most popular metals for jewelry wirework are the base metals copper, nickel, and brass and the precious metals silver and gold. (See Chapter 1 for more information about base metals and precious metals.)
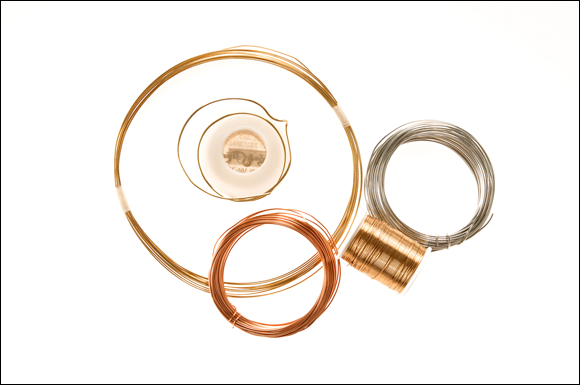
Copper Wire
Copper is one of the best metals to work with because it’s easy to bend into nicely rounded curves. It has a feel similar to sterling silver, but is much less expensive. This makes it a great metal to use for practice. You can also use it to make prototypes, or experimental mock-ups, of new designs.
A potential downside of copper is that it tarnishes, or takes on a dark surface color, very easily. It may also develop a scaly green coating when it’s exposed to excess moisture. In sufficient quantities, this coating, called vertigris, can be toxic. For this reason, some people prefer not to wear copper jewelry. At minimum, some people find that copper temporarily stains their skin if they wear it for long periods of time.
Nickel-Silver Wire
Nickel silver is a base metal that is silver-colored but does not contain any precious silver; it is an alloy, or mixture, of copper, zinc, and nickel. It is much less expensive than silver, but is slightly more expensive than copper.
Nickel silver has a somewhat dull-gray hue. Although it is a soft metal, it does not bend quite as smoothly as copper and sterling silver. Keep in mind that many people are allergic to nickel, which can create redness or even a rash on their skin. For this reason, you may want to avoid it for jewelry that will be worn closely against the skin.
Brass Wire
Brass is an alloy of copper and zinc. It ranges in color from bright yellow to reddish-gold (often referred to as red brass). Brass wire tends to be less expensive than nickel silver, and similar in cost to copper.
Like pure copper, brass is prone to tarnishing. Some people like the look of darkened brass because it gives jewelry a more “antique” look.
Brass wire is more difficult to work with than copper, nickel, silver, or gold. Although it is a soft metal, it is stiffer than the others and resists bending as smoothly.
Sterling-Silver Wire
Sterling silver is an alloy of pure silver and copper. In wire form, it is soft and very easy to manipulate. Because sterling silver is a favorite jewelry metal, it’s naturally one of the most common metals used in jewelry wirework. Unfortunately, it’s also relatively expensive.
As you probably know, sterling silver is also prone to tarnishing. You can reduce tarnish by wearing sterling-silver jewelry often because the oils in your skin help to protect it from the air. To fight tarnish when your sterling-silver wire or jewelry is in storage, store it with anti-tarnish paper or anti-tarnish fabric. These materials are specially treated with chemicals that reduce the formation of tarnish. They are available through many jewelry supply catalogs and at jewelry stores. When silver does begin to tarnish, you can clean it with a silver polishing cloth or foaming silver cream. There are some special varieties of sterling silver that resist tarnishing, but they are generally more expensive than regular sterling silver.
Some designers use chemicals to purposely tarnish their jewelry to give it an antique look. This jewelry is often referred to as oxidized sterling silver. Oxidation is an advanced technique that is beyond the scope of this book, but if you like this style of jewelry, you may want to try it in the future.

Gold and Gold-Filled Wire
You’re probably familiar with gold. In addition to being a gorgeous metal for jewelry, it resists corrosion better than most metals, and it typically does not tarnish. Gold is normally alloyed with other metals to make it stronger. The amount of gold in a given piece of metal is denoted by its karat.
Karat gold is extremely expensive, and as a beginning wireworker, it’s pretty safe to say you won’t be using gold wire. A popular alternative that you may want to try is gold-filled wire, which is made up of an inner core of base metal covered with a relatively thick layer of real gold. Although gold-filled wire is usually more costly than sterling-silver wire, it’s much less expensive than gold.
Silver- and Gold-Plated Wire
Plated wire is usually solid copper wire that has been washed with a very thin coating of silver or gold. Although it is very affordable and has a nice look when it’s brand new, it is not recommended for elaborate wirework. This is because the thin coating can scratch or rub off very easily. Try to use it sparingly or only as practice wire.

Can I use “craft wire” for jewelry making?
Craft and hobby stores often sell inexpensive base-metal wire for crafting that doesn’t fit perfectly into any of the categories in this section. Before purchasing it, check the packaging to see which metal or metals it contains. Steel and aluminum wires are not good for jewelry work, because they are difficult to bend and may be subject to corrosion.
In contrast, some craft wire is made of solid copper with a coating of color on its surface. Because it’s made of copper, this wire is very easy to bend. However, you will need to be extra careful not to scratch the color coating with pliers, and you should avoid hammering it, which can remove entire areas of color.

Wire Size
Wire Gauge
Wire size is denoted by a number called gauge: the larger the number, the thinner the wire; and the smaller the number, the thicker the wire. The following chart provides the approximate diameters of the most popular American wire gauges (also called AWG) for jewelry making and suggested uses for each.
Note: The AWG is the standard for wire sold in the United States. If you purchase wire in another country, be sure to ask your supplier whether they size their wire differently.

Measuring Wire Gauge
As you can tell by the chart on the previous page, there are small size differences between one gauge and the next. When you purchase wire, the gauge should be indicated on the spool or package. However, you will often find stray pieces of wire, of various gauges, strewn across your work area. It may be difficult to tell the exact gauge of a piece of wire by looking at it, and so it’s a good idea to invest in a disc-shaped measuring device called a wire gauge plate.
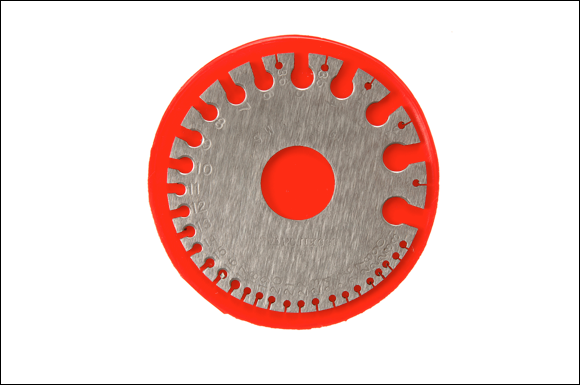
To use a wire gauge plate, insert the wire that you want to measure into a slot along the edge of the gauge. (Do not pass it through the round hole.) Move the wire from slot to slot until you find the one that most snugly fits it. The number stamped near that slot is the gauge, or approximate gauge, of your wire.
Once you’ve determined the gauge of a piece of wire, you should mark it for future reference. Fold a small piece of masking tape around one end, and mark it with the gauge using a permanent marker.

Determine How Much Wire You Need
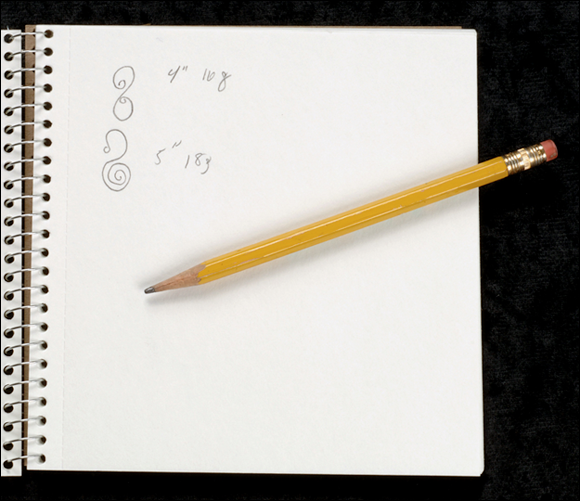
The lengths of wire that you need to create various wire components depend on the size of your pliers, the gauge of wire you use, and your personal taste. The lengths suggested in the tasks in this chapter are estimates. Through experimentation, you’ll learn which precise lengths are right for you, depending on what you’re making and how you would like it to look.
It’s a good idea to keep a journal of your favorite wire components to record the gauge of wire you use, the length of wire required, and any tips or notes you’d like to remember later.
Wirework Safety
Before you get started, take the time to assemble some basic safety equipment and prepare your work area for wirework. You can find basic protective equipment at the local hardware store. Take the following measures in combination with the general safety tips at the end of Chapter 1.
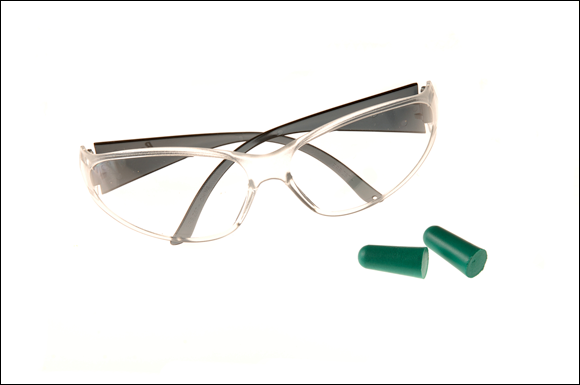
Eye Protection
When you trim wire with wire cutters, little pieces of wire will fly out across your work area or even across the room. Because you won’t want any of these pieces of wire flying into your eyes, be sure to wear safety glasses as often as possible when you work. Also, always be extra careful when other people or pets are in the room.
You should also wear safety glasses when you hammer wire. Although it’s rare for pieces of wire to fly up during hammering, a piece of your hammer or bench block could shatter and become airborne. Again, although this shouldn’t happen very often, if at all, don’t take the risk.
Ear Protection
Basic wirework doesn’t require the use of noisy mechanical tools or equipment. However, you’ll probably find that hammering on a bench block can be uncomfortable for your eardrums. Keep some earplugs or earmuff-style ear protectors near your hammer and bench block, and wear them whenever you need to make more than one or two taps on a wire.
First Aid Kit
Although it’s unlikely that you will seriously hurt yourself when working with wire, you may experience an occasional finger prick or scratch. Keep a small first aid kit with disinfectant and bandages nearby, just in case.
Storage
As you become more involved with wirework, you’ll begin to find pieces of wire—short and long—throughout and near your work area. Try to pick these up and store them, so they don’t prick a foot or become unsafe toys for pets or children. Plastic storage boxes marked with the type of metal wire that they contain are useful for collecting scraps. You can rummage through them for usable pieces when you need to make smaller components like single jump rings or head pins.
Make Jump Rings, Eye Pins, and Head Pins
You can save money and add a more customized look to your jewelry by making your own jump rings, eye pins, and head pins.
Keep in mind that the wire lengths recommended in these tasks are estimates. You need to experiment to discover which precise lengths work best for you.

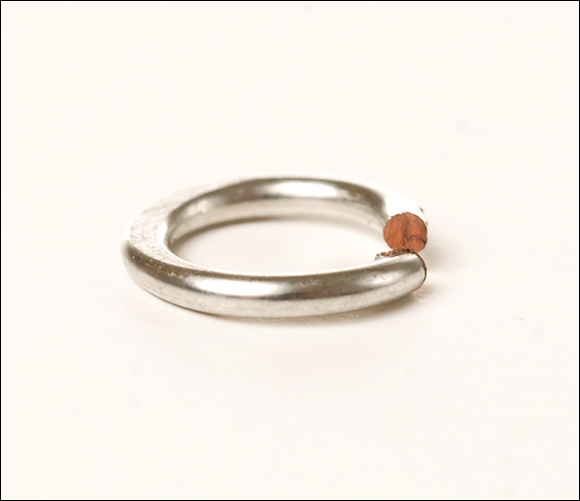
Make a Single Jump Ring
Use this technique when you only need to make a few jump rings at a time. Begin by making a wire coil, and then cut each coil to create a ring.
Make a Short Wire Coil with Pliers
1 Grasp the end of the wire with round nose pliers at the point along the nose that matches what you’d like the inside diameter or your jump rings to be.
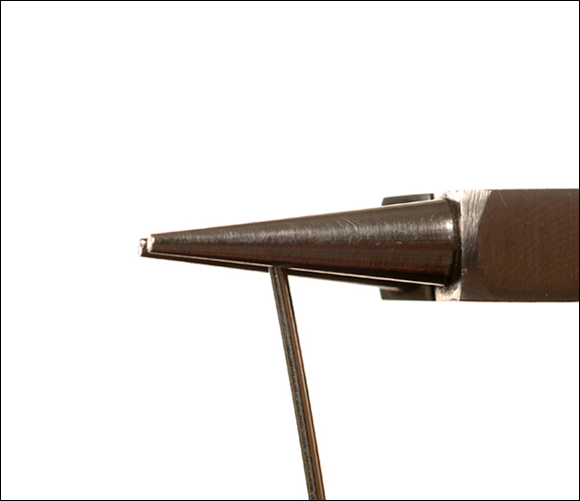
Step 1
2 Holding the base of the wire with your fingers, rotate your wrist away from you to roll the wire into a loop.
Step 2
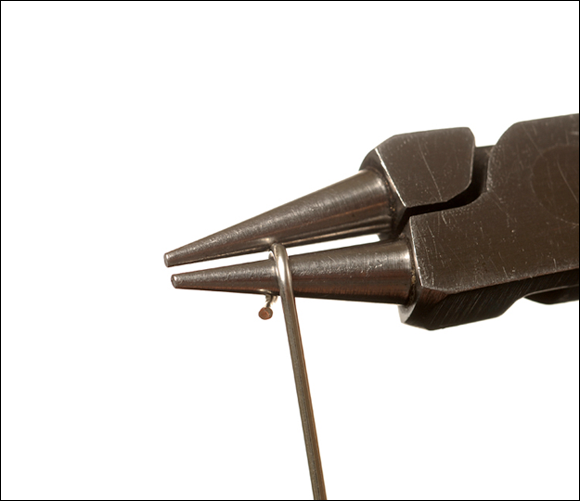
3 Remove the pliers and re-insert them into the new loop in its original position.
4 Begin rolling the wire away from you again while using the thumb and index finger of your other hand to position the new loop below the first loop on the pliers.
5 Position this new loop up against the first loop to make a wire coil.
Step 5
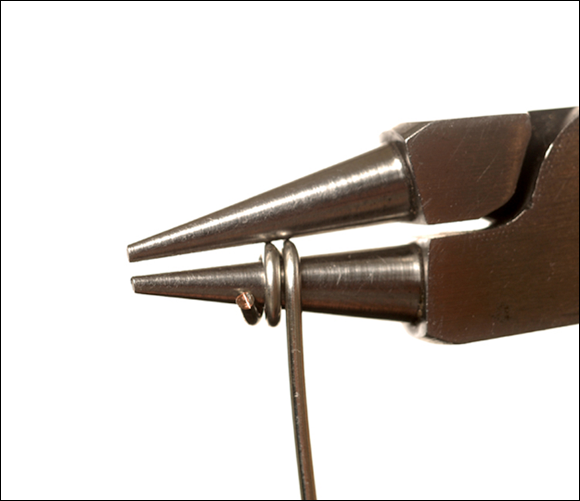
6 Continue using your thumb to guide the wire while using the pliers to make repeated coils at the same place on the nose of the pliers. The coils will move toward the tips of the pliers as you create them.
7 Stop when you have created at least one more coil than the number of jump rings you need.
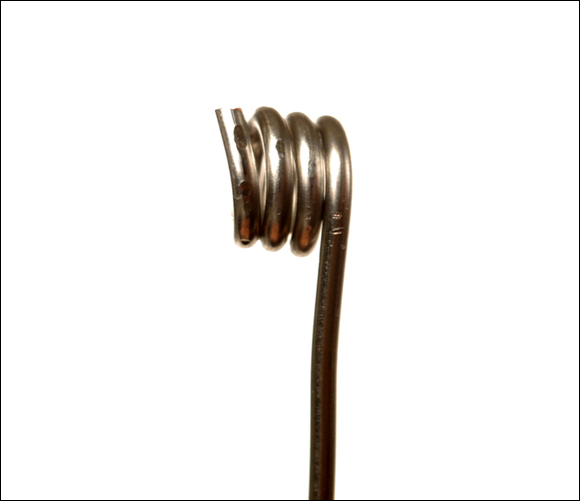
Step 7
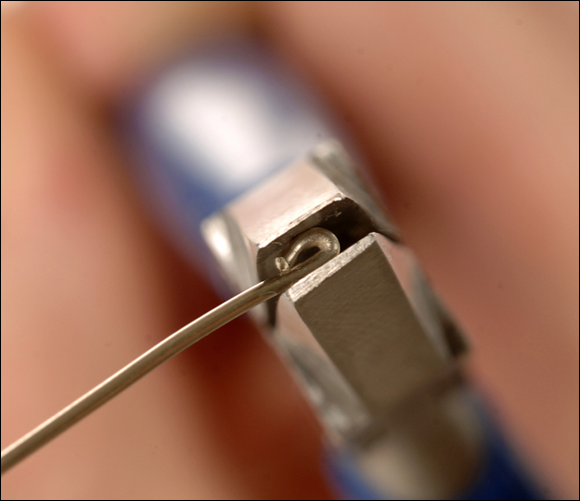
Cut Jump Rings with Side Cutters
1 Use side cutters to trim off the tip of the first coil.
Step 1
Note: To create a flush cut, be sure that the flat side of the cutters is facing away from the end of the wire.
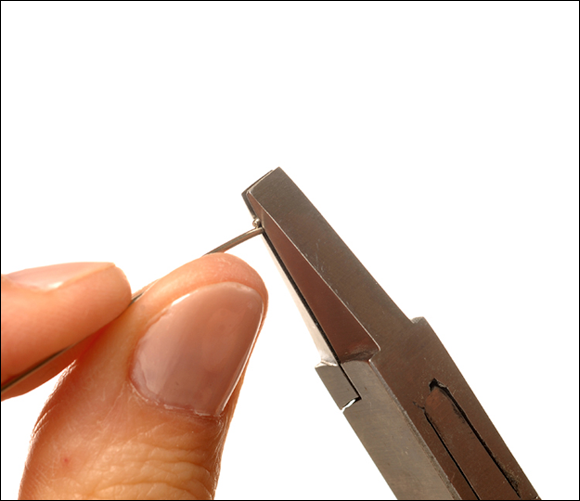
2 Turn the pliers around so that their flat side is facing the opposite direction, and use the cutter tips to cut through the coil just above your first cut. Your first jump ring should fall off the coil.
Step 2
3 Trim off the next tip of wire with the flat side of the cutters facing away from the tip.
4 Continue cutting all of your rings from the coil, turning your pliers each time to ensure a flush cut.
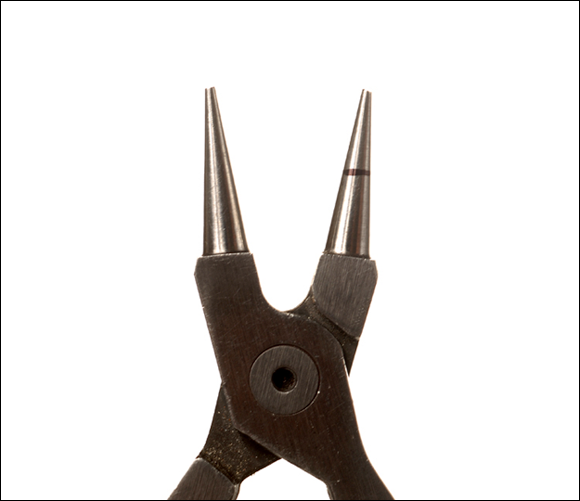
Creating Consistently Sized Rings and Loops
The noses of round nose pliers are graduated in diameter; they’re smallest at the tips and thickest at the base. This allows you to choose how large of a ring or loop you’d like to make. You can grasp the wire closer to the tips for a smaller loop or closer to the base for a larger one.
To help you make consistently sized loops for a given project, try marking the point you’re using on the pliers with a permanent marker. (These markers are not really “permanent” on metal; the mark will wear off.)
As an alternative, affix a small piece of masking tape to the nose of the pliers, with one edge of the tape marking the spot.
Make Multiple Jump Rings
You can make more jump rings in less time by using a mandrel and a jeweler’s saw. (For more information on mandrels and saws, see Chapter 1.)
Make a Wire Coil on a Mandrel
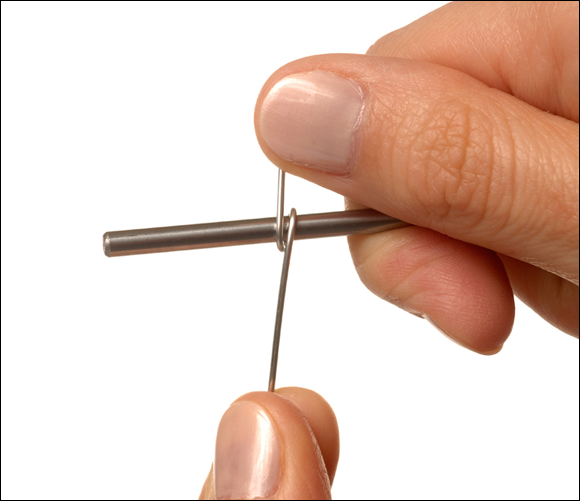
1 Hold a piece of wire perpendicular to the mandrel with about an inch of wire remaining on one side.
2 Use your thumb to hold the wire securely against the mandrel, and hold the other end of the wire with your other hand.
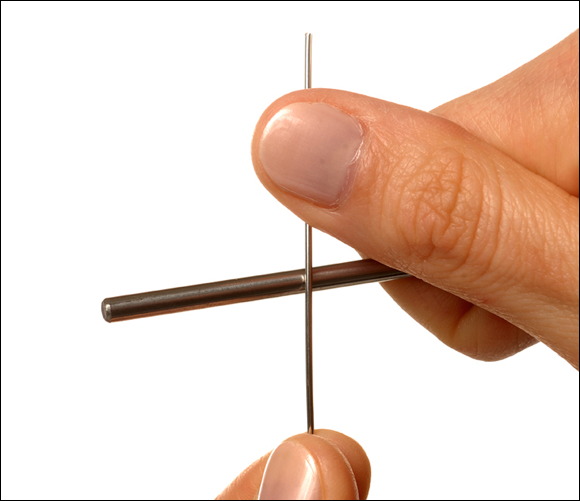
Step 2
3 Rotate your wrist to turn the mandrel slowly and begin making the first coil, positioning your thumb gently against the 1-inch tail of wire for leverage.
Step 3
4 Continue turning the mandrel to make coils, using your other hand to position each new coil up against the previous coil.
5 Complete at least one more coil than the number of jump rings you’d like to make, up to a maximum of about 1 inch of coil.
6 Slowly pull the coil off of the mandrel, being careful not to open any spaces between coils.
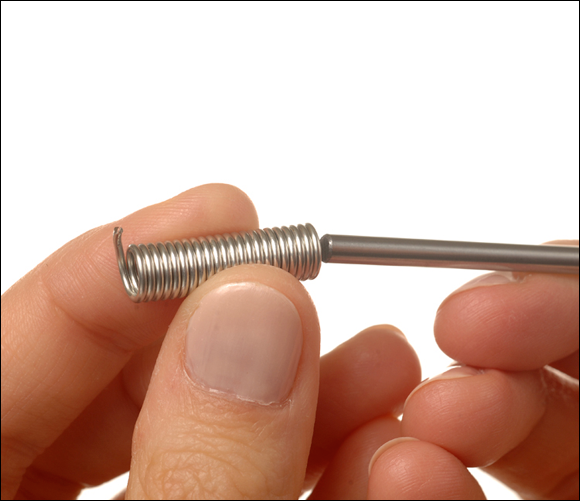
Step 6
Cut Jump Rings with a Saw
Cutting jump rings with a saw takes a little practice. Experiment with holding both the coil and saw at slightly different angles to see which angle works best for you.
1 Hold the coil securely between your fingers and against a bench pin or other secure block of wood. (For more information on bench pins, refer to Chapter 1.)
2 Run the saw backwards along the first coil a few times to create a small groove.

Step 2
3 Keeping the blade in that groove, slowly saw into the first and second coils.
4 Continue sawing slowly, in a straight line, until you have cut through the entire coil.

Step 4
Note: The last few coils may start to fall over when you reach them. If that happens, hold them securely with your fingers to complete your cut. The jump rings will fall off as you cut them.
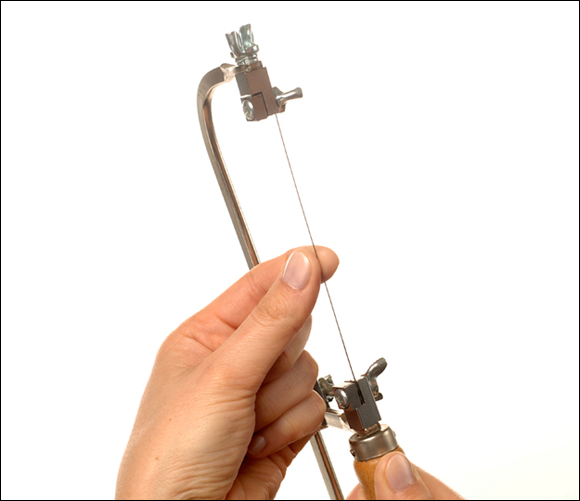
Setting Up a Jeweler’s Saw
A jeweler’s saw is composed of an adjustable metal frame and a handle. To attach a blade, loosen all three bolts in the frame. Support the saw between your chest and bench pin or table, and position the blade in both ends of the frame. (The blade’s teeth should be facing you and pointing downward.) Tighten the bolt at both ends of the blade. Pull the ends of the frame away from each other as far as they will go, and then tighten the last bolt on the back of the frame.
To prepare the blade for cutting, run it across a piece of beeswax or blade lubricant. This will protect the blade and make cutting a little easier.
Saw blades are available in a variety of sizes. Use a size 2 blade for 16- or 18-gauge jump rings, and a size 1 blade for 20-gauge jump rings.
Hammer Jump Rings
You can stiffen jump rings and give them a more finished looked by gently hammering them.
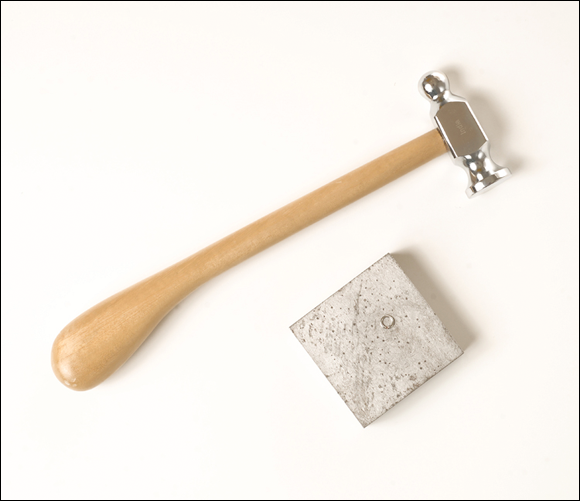
1 Place a jump ring on a clean bench block.

Step 1
2 Use a chasing hammer to tap the jump ring, with the hammer angled slightly down toward the side of the jump ring that is opposite its opening.
Step 2
Note: By hammering at this angle, you create a ring that is slightly more flattened on one side than the other. This is beneficial because it stiffens the jump ring without flattening down the opening, leaving it easy to open and close.
Make Eye Pins
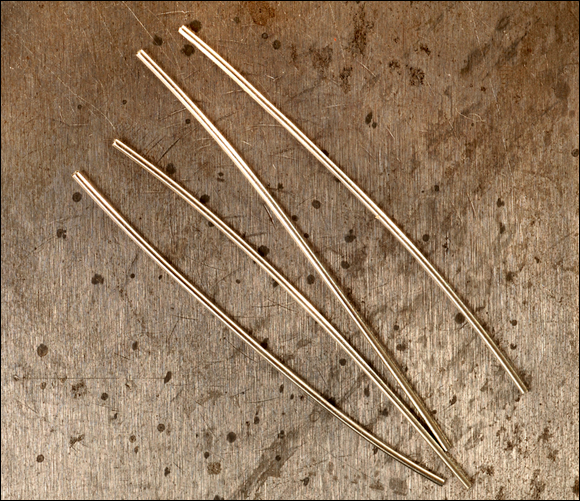
1 Use side cutters to cut a length of wire for each eye pin that you’d like to make. It should be approximately 3⁄8 inch longer than you’d like the straight part of each finished pin to be.
2 Trim the tips with side cutters, as needed, so that both ends of each wire have straight, flush cuts.
Step 2
3 To make the eye of each pin, hold one end of the wire with round nose pliers, and rotate your wrist to roll the wire away from you.
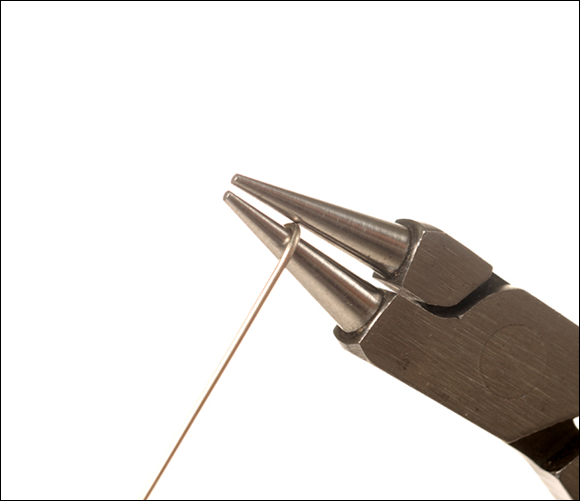
Step 3
4 Return the pliers to their starting position.
5 Roll the wire away from you again to complete the eye.
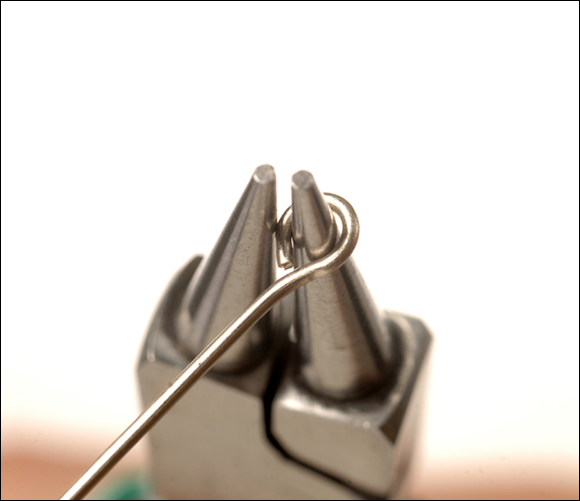
Step 5
6 Return the pliers to their starting position, and use them to hold the wire securely.
7 Place the tip of your thumb just below the base of the eye loop, and rotate your wrist slightly back toward you to center the eye on the pin.

Step 7
The completed eye pin is shown here (a).

Step 7A
Simple Wire Head Pins
Manufacturers use special machinery to create head pins with little nail heads on the ends. You can create simpler head pins that work just as well.
1 Prepare each length of wire as you did for Steps 1–2 of “Make Eye Pins.”
2 Use the very tips of round nose pliers to create a tiny loop at one end of each wire.
Step 2
3 Use chain nose pliers to squeeze down each loop so that the wire is folded back against itself.
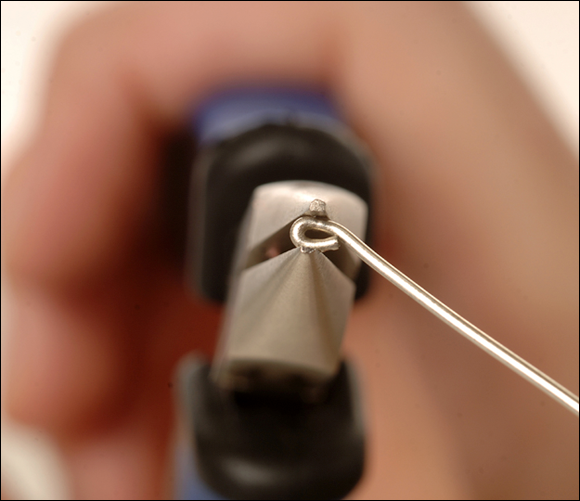
Step 3
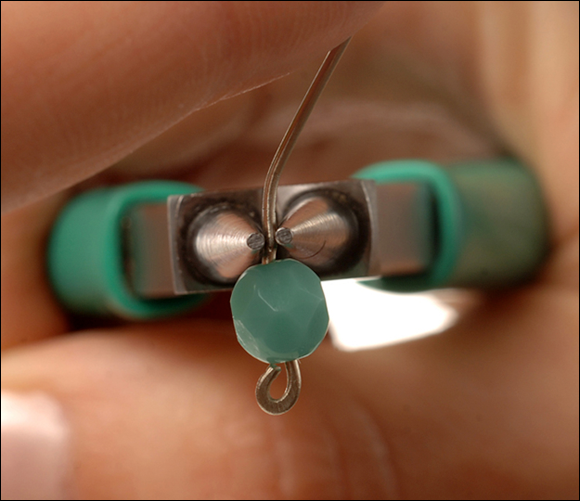
4 Place one pin on your bench block with the folded end facing away from you.
5 Use a chasing hammer to tap the folded end of the pin with a motion that is moving away from you. The face of the hammer should be angled slightly downward. This will flatten the pin’s head more at its tip than at its base.
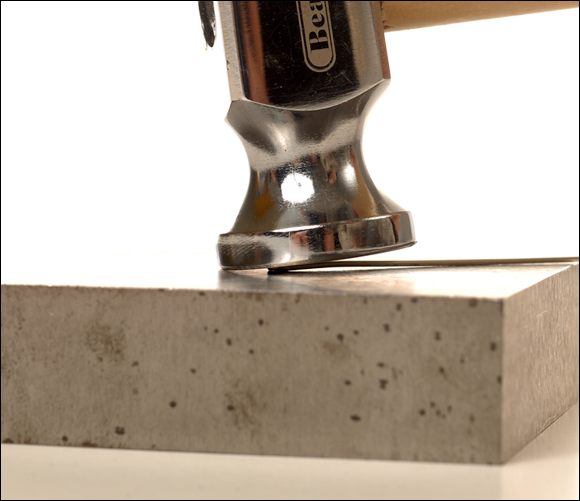
Step 5
6 Repeat Steps 4–5 for each length of wire that you prepared in Step 1.
The completed head pins are shown here.

Paddle Head Pins
Paddle head pins are easy to make and have a more artistic look than simple head pins.
1 Prepare each length of wire for your pins as you did for Steps 1–2 of “Make Eye Pins.”
2 Place one wire on your bench block, with the end that will be the head pointing away from you.

Step 2
3 Holding your chasing hammer at a slight downward angle, hammer the end with a motion that is moving away from you and toward the end of the pin.
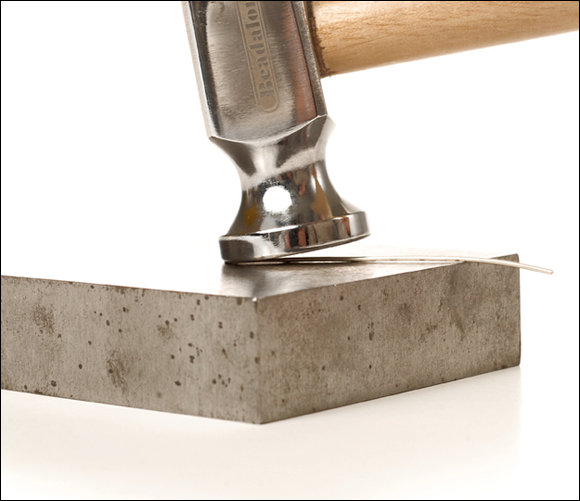
Step 3
4 Continue hammering until you have created a small paddle at the end of the wire.
5 Use a needle file to smooth the paddle edges.
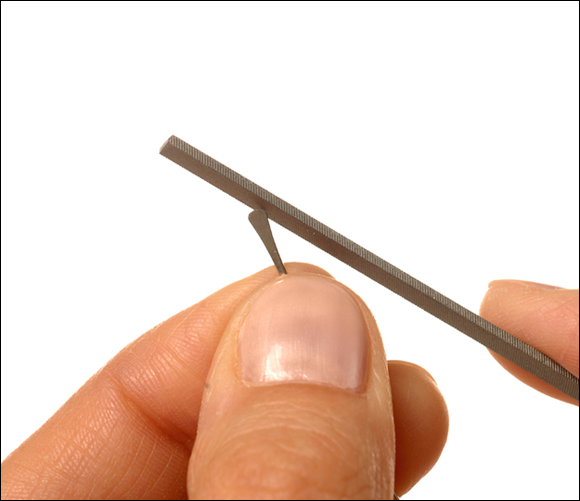
Step 5
6 Repeat Steps 2–5 for each length of wire that you prepared in Step 1.
The completed paddle head pins are shown here (a).

Step 6A
How can I avoid scratching and marring wire with my pliers?
You may not always be able to avoid scratching your wire, but you can take measures to reduce the occurrence and severity of scratches.
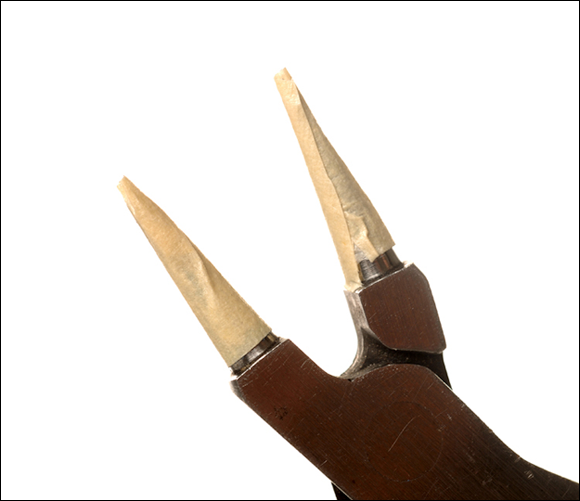
An easy way is to cover the jaws of your pliers with a layer or two of masking tape. It will need to be replaced from time to time, and more often when you’re working with larger-gauge wire.
Another option is to use a special tool-liquid product designed to coat the jaws of your pliers with a layer of soft plastic. You can purchase these products from the larger jewelry supply retailers. Typically, you need to dip your pliers into the liquid, and then hang them up to dry.
If you don’t want to bother with either of these methods, practice using a gentle grip with your pliers. You will probably experience fewer scratches and less marring on your work over time.
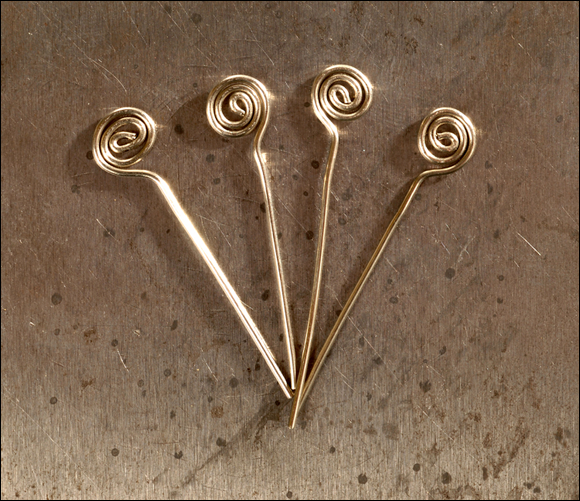
Spiral Head Pins
These head pins have hammered spirals at the ends.
1 Prepare a length of wire for each pin that you’d like to make, as you did in Steps 1–2 of “Make Eye Pins;” however, this time, make each wire about 3⁄4 inch longer than you’d like the straight part of each pin to be.
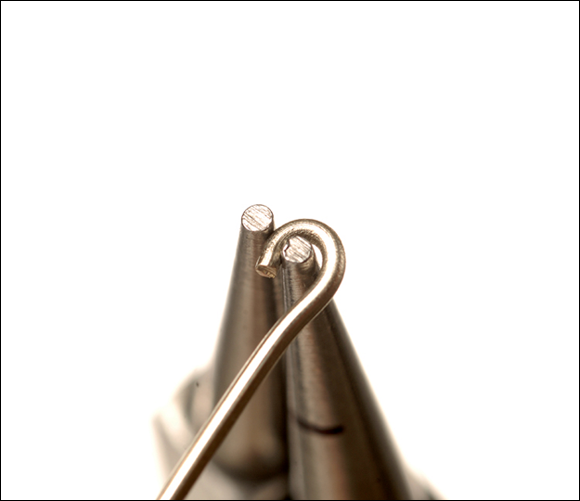
2 To begin the first pin, use the tips of round nose pliers to create a tiny loop at the end.

Step 2
3 Use chain nose pliers or flat nose pliers to flatten down this loop (as you did for Step 3 under “Simple Wire Head Pins” on page 132).
Step 3
4 With the loop or fold facing away from you and your thumb against the wire at the base of the loop, use flat nose pliers to hold the looped or folded tip flat.
Step 4
5 Rotate the handle of your pliers away from you while pressing the wire against your thumb to begin a flat spiral.
6 Return the flat nose pliers to their starting position on the new spiral.

Step 6
7 Repeat Steps 5–6 until you have completed two full coils of spiral.
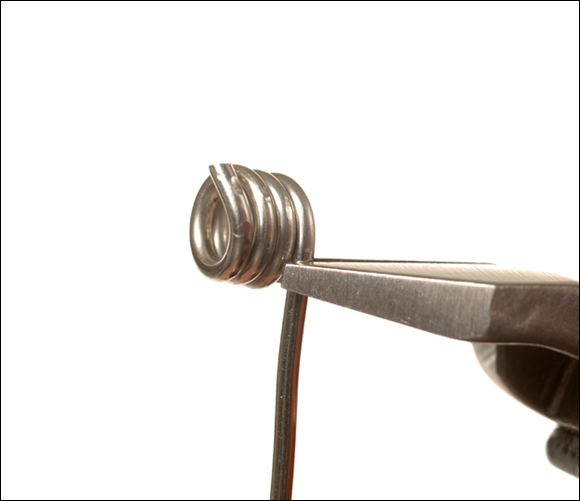
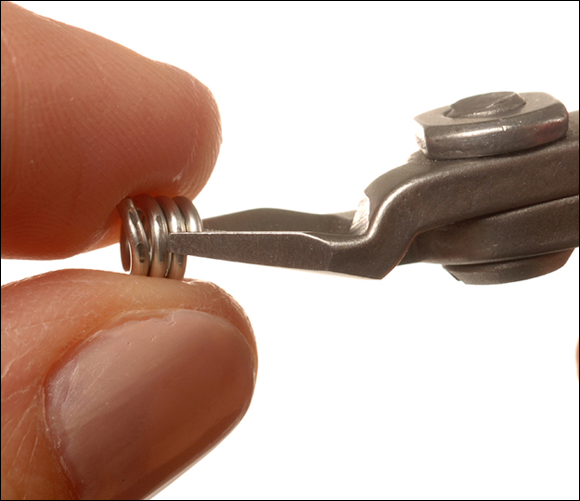
8 Use the flat nose pliers to grasp the wire at the base of the spiral, exactly as shown.

Step 8
9 Use your index finger to bend the spiral slightly toward you to center it on the pin.

Step 9
10 Repeat Steps 2–9 to complete each head pin.
The completed spiral head pins are shown here.
Using Nylon Jaw Pliers to Straighten Wire
As you work, your wire may become bent or kinked. The easiest way to straighten it is by using nylon jaw pliers. Holding the wire securely at one end with your fingers or chain nose pliers, grasp the wire between the jaws of the nylon pliers, and pull them along the entire length of the wire. Repeat this process until the wire is straight enough to work with.

Create Wire-and-Bead Drops and Links
You can use wire and bead drops to embellish almost any type of jewelry. By connecting wire and bead links, you can create entire necklaces, bracelets, and anklets.
As always, keep in mind that the recommended wire lengths in these tasks are estimates. You’ll need to experiment to find which precise lengths work best for you.
Bead Drops
Simple Wire-and-Bead Drops
1 Begin with a head pin in which the straight part is about 1⁄4 inch longer than your bead.
2 Place the bead on the head pin.

Step 2
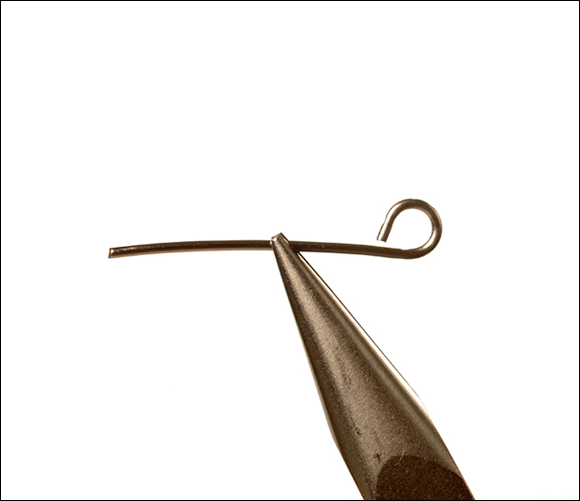
3 Holding the pin in place, bend the wire tail back toward you and against the bead as shown.
Step 3
4 Grasp the end of the wire with round nose pliers, and rotate your wrist away from you to create a loop.

Step 4
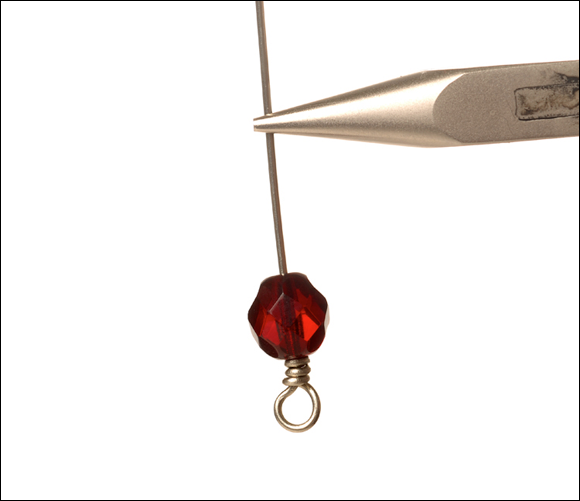
5 If necessary, return the pliers to their starting position, and roll the wire again to complete the entire loop.
Note: If you use an eye pin instead of a head pin for your drop, you can add a charm or another drop to the bottom by attaching it to the eye loop.
The completed drop is shown here (a).
Step 5A
Wrapped Wire-and-Bead Drops
If you wrap the wire at the base of your loop, it cannot be pulled open accidentally.
1 Begin with a head pin whose straight part is at least 2 inches longer than your bead.
2 Place the bead onto the head pin.
3 Use round nose pliers to grasp the wire up against the bead as shown.

Step 3
4 Bend the rest of the wire back toward you as you did in Step 3 of “Simple Wire and Bead Drops” on the previous page.
Step 4
5 Reposition the round nose pliers so that they grasp the wire just above the bend that you made in Step 4.

Step 5
6 Bend the rest of the wire tail away from you, over the nose of the pliers, and all the way around the pliers to form a loop.

Step 6
7 Remove the round nose pliers.
8 Turn the wire over so that the tail is pointing upward.
9 Use chain nose or flat nose pliers to gently hold the loop closed and flat.
10 Using the round nose pliers in your other hand, grasp the wire tail, and wrap it all the way around the base of the wire just below the loop. You should be wrapping in a direction that is moving away from you.

Step 10
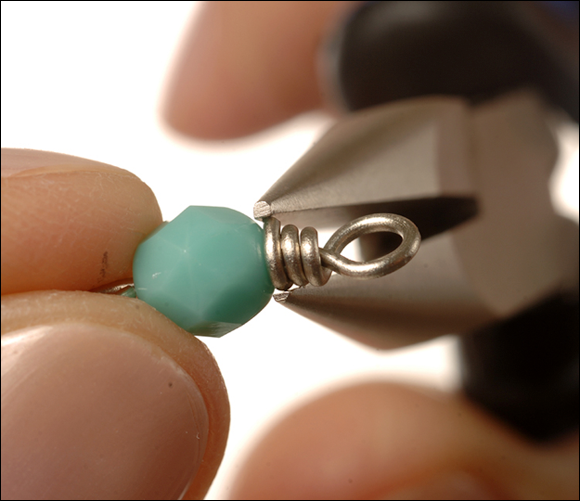
11 Reposition the round nose pliers at their starting position, and continue making wraps down the base of the wire until it is completely covered with wraps.

Step 11
12 Use side cutters to trim the extra wire tail flush against the wraps.
Step 12
13 If necessary, squeeze the end of the wire flat with chain nose pliers.
Step 13
The completed drop is shown below.

Bead Links
Simple Bead Links
To make a simple bead link, combine the techniques that you used to make an eye pin and a wire and bead drop.
1 Begin with a flush-cut length of wire that is about 1⁄2 inch longer than your bead.
2 Use round nose pliers to create a loop at one end as if you were making an eye pin.
Step 2
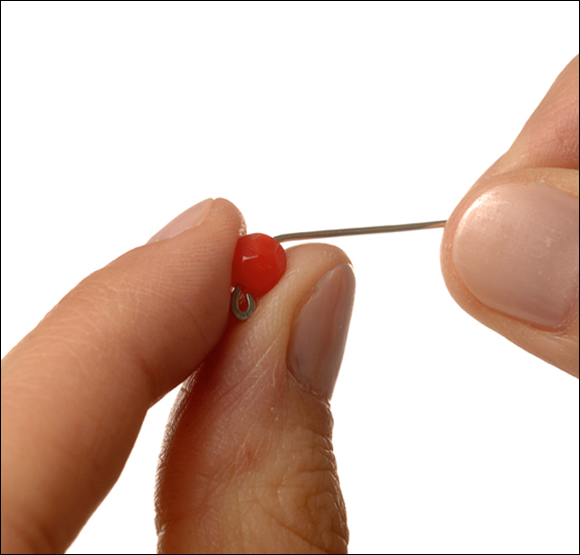
3 Place the bead onto the wire and position it against the new loop.
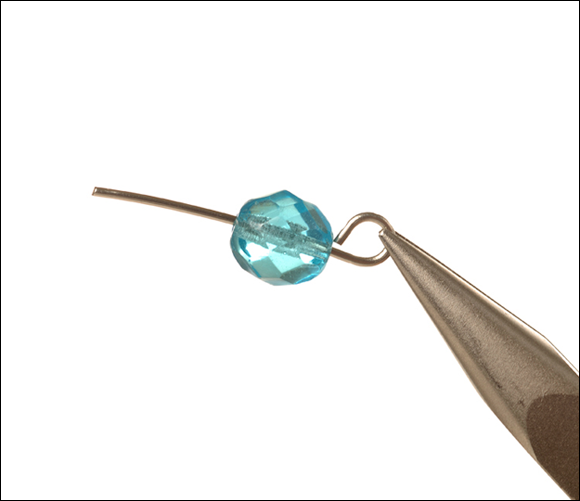
Step 3
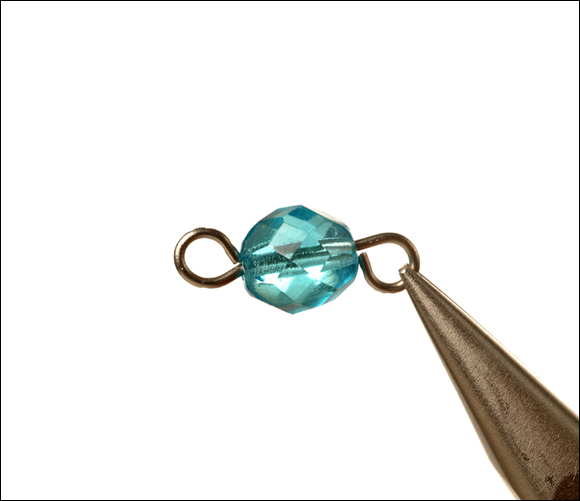
4 Holding the bead in place, perform Steps 3–5 of “Simple Wire and Bead Drops” on page 136 to complete the link.
Note: Links tend to look best if the loops face opposite directions.
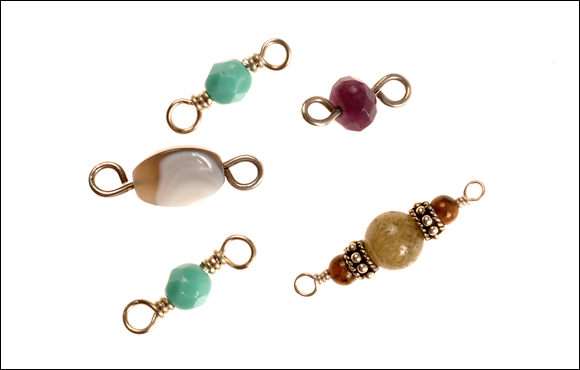
The completed simple bead link is shown here.
Wrapped Bead Links
Like wrapped bead drops, wrapped bead links cannot be pulled open accidentally.
1 Begin with a flush-cut length of wire at least 4 inches longer than your bead.
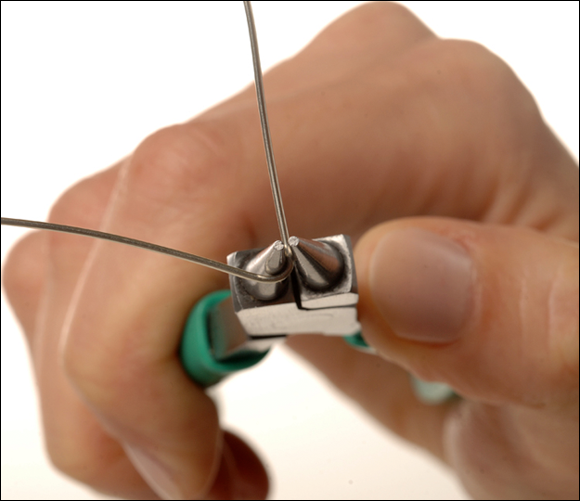
2 Grasp the wire with round nose pliers about 1 inch from one end, with the short end facing upward.
3 Bend the short end of wire toward you.

Step 3
4 Reposition the round nose pliers so that they are grasping the wire just above the bend you made in Step 3.
Step 4
5 Use your fingers to bend the wire over and around the pliers to create a complete loop.

Step 5
6 Remove the round nose pliers, and reposition the wire so that the short tail is pointing upward.
7 Perform Steps 9–10 of “Wrapped Wire-and-Bead Drops” on page 137 to begin making your wrap.

Step 7
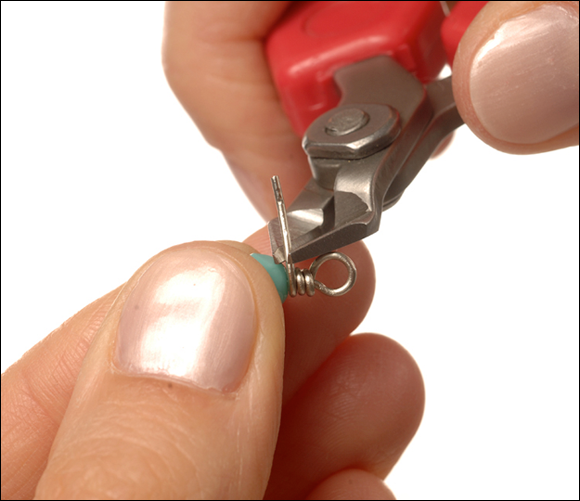
8 Continue wrapping until you have two or three full wraps around the wire.
9 Use side cutters to trim off the extra wire, flush with the wraps.

Step 9
10 If needed, squeeze down the end with chain nose pliers.
11 Place the bead on the wire, and position it up against the first wrapped loop.
Step 11
12 Perform Steps 3–13 of “Wrapped Wire-and-Bead Drops” on page 137 to complete the second wrapped loop.
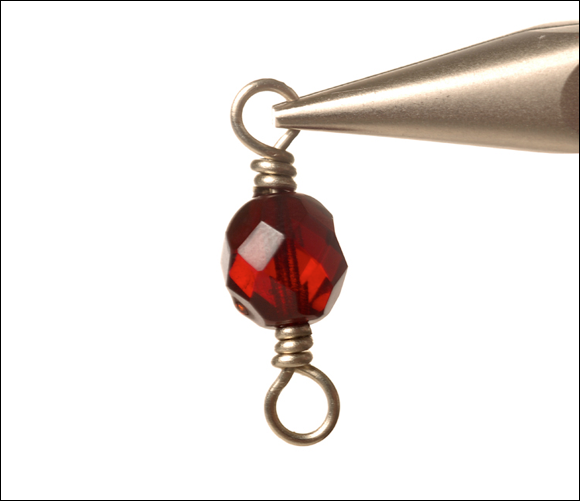
The completed wrapped bead link is shown here.
Make Wire Hook Clasps
You can make your own clasps by forming hooks and eyes with wire. Begin with the basic styles, and then experiment to invent your own signature designs.
As always, keep in mind that the recommended wire lengths in these tasks are estimates. You need to experiment to determine which precise lengths work best for you.

Simple Hook Clasp
1 Begin with a flush-cut piece of wire that is about 2 inches in length.
2 Using the tip of the round nose pliers, roll one end of the wire into a small loop.
3 Grasp the wire about 1⁄8 inch away from the base of the small loop, using the largest part of the round nose pliers.
Step 3
4 Rotate your wrist away from you to roll the wire upward into a large loop shape.
Step 4
5 Turn the piece around and use the tip of the round nose pliers to grasp the other end of the wire.
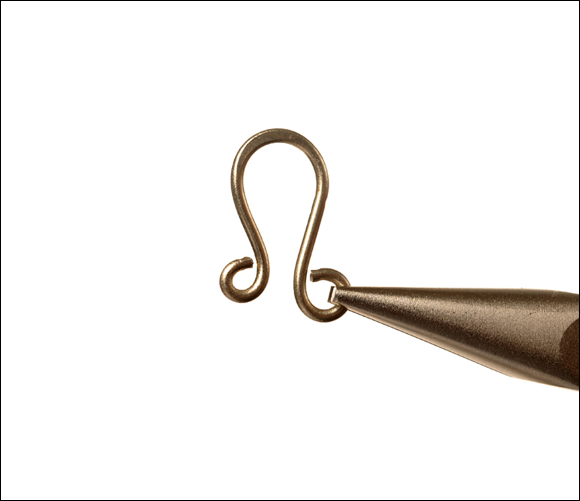
6 Roll that end away from you to create a smaller loop.
Step 6
7 Place the hook on a bench block with the large hook-loop facing away from you.
8 Hammering away from you, slightly flatten the top curved portion of the hook.
Step 8
9 Use your fingers to wiggle the hook so that it is just slightly open, if it’s not already.
10 If needed, use flat nose pliers to wiggle the small loop at the other end closed.
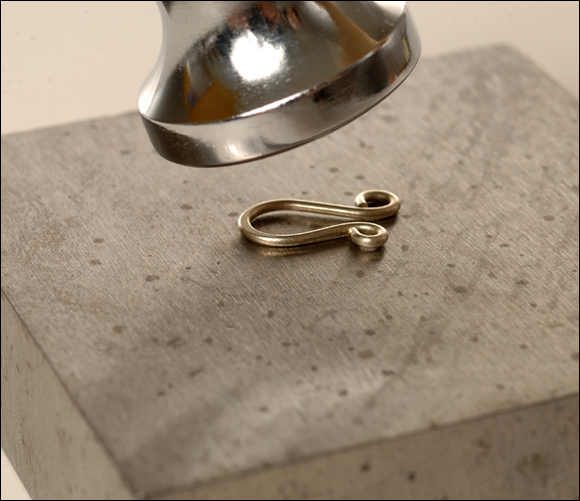
The completed simple hook clasp is shown here.
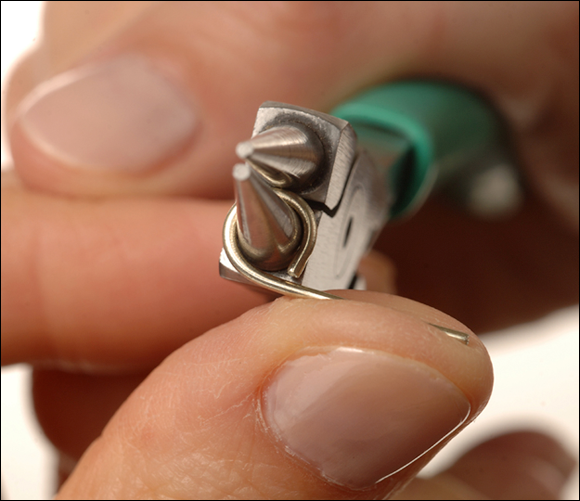
“S” Hook Clasp
As its name implies, an “S” hook is shaped like the letter S.
1 Begin with a flush-cut piece of wire that is about 21⁄2 inches in length.
2 Use round nose pliers to create a small loop at one end.
3 Turn the wire over, and create a small loop at the other end, facing the opposite direction.

Step 3
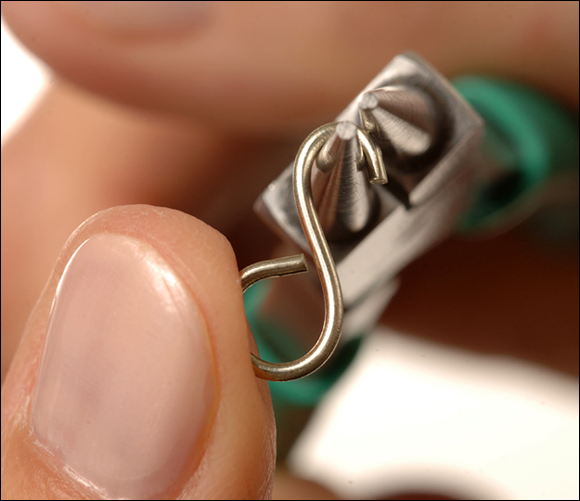
4 Grasp the wire with the largest part of the round nose pliers about 1⁄8 inch from the base of the loop. The loop should be facing toward you.
5 Rotate the pliers away from you to create a complete large loop. The small loop should touch the center of the wire.

Step 5
6 Turn the piece around and repeat Steps 4–5 to create a matching large loop on the other end, facing the opposite direction.
Step 6
7 Place the hook on a bench block.
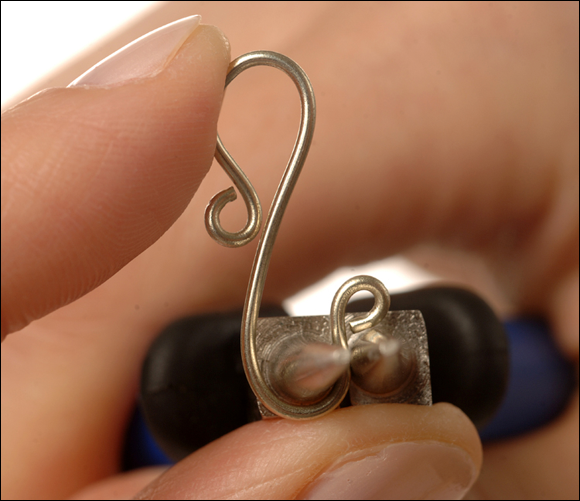
8 Hammering away from you, slightly flatten the top curved portion of one of the large loops.
Step 8
9 Turn the piece around on the bench block, and hammer the other end.
10 Use your fingers or flat nose pliers to wiggle one loop open a little.
11 Wiggle the other loop completed closed, if it isn’t already.
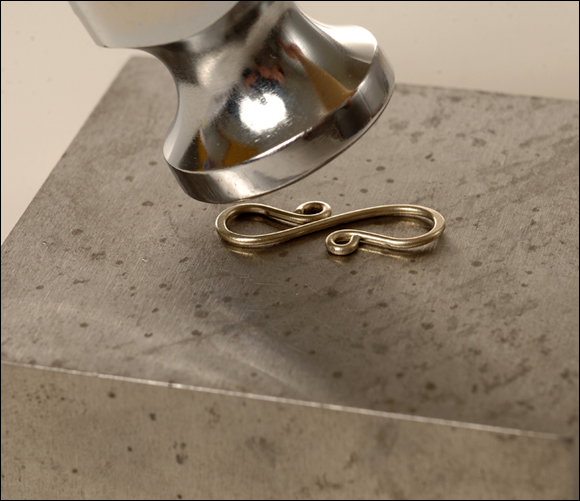
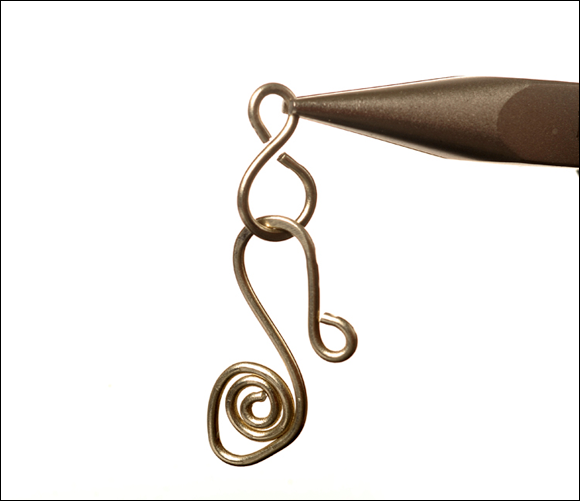
The finished “S” hook clasp is shown here.
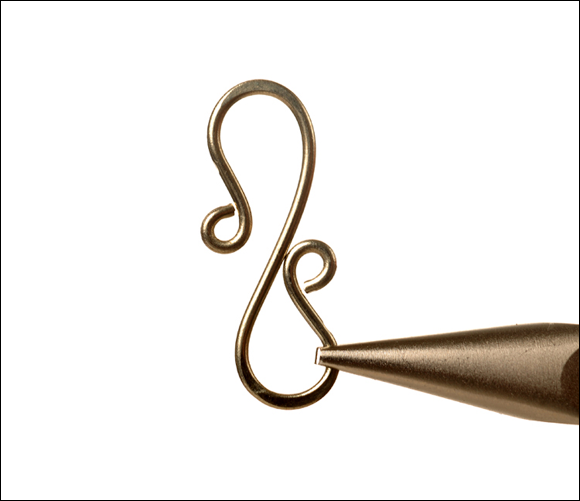
Spiral Hook Clasp
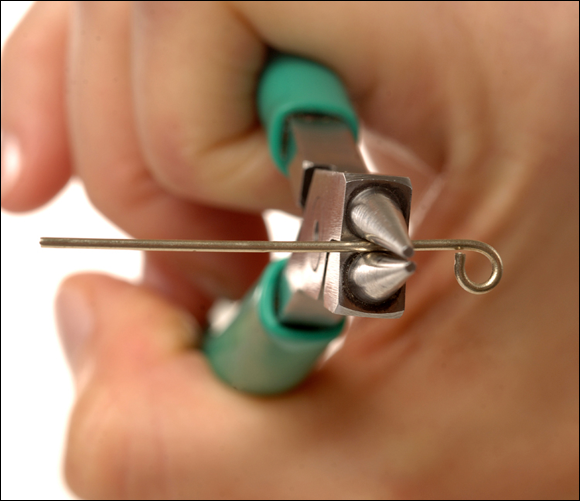
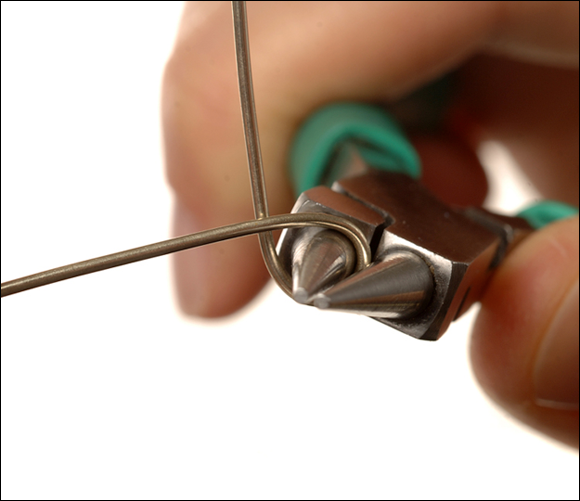
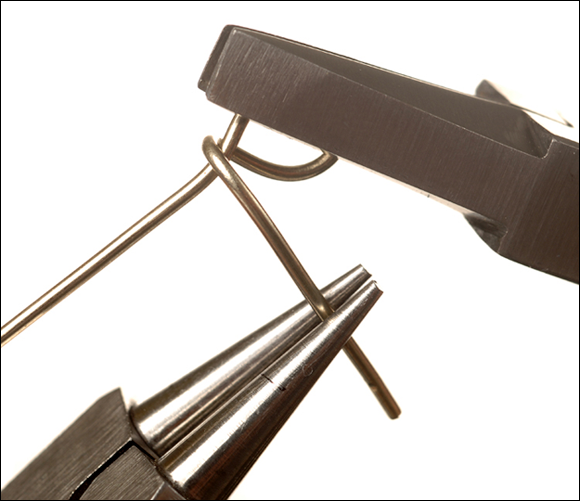
1 Using wire directly from the roll and flush-cut at the end, use round nose pliers to create a small loop.
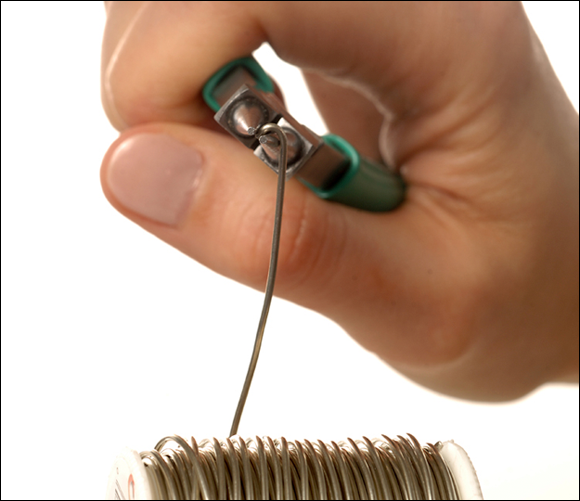
Step 1
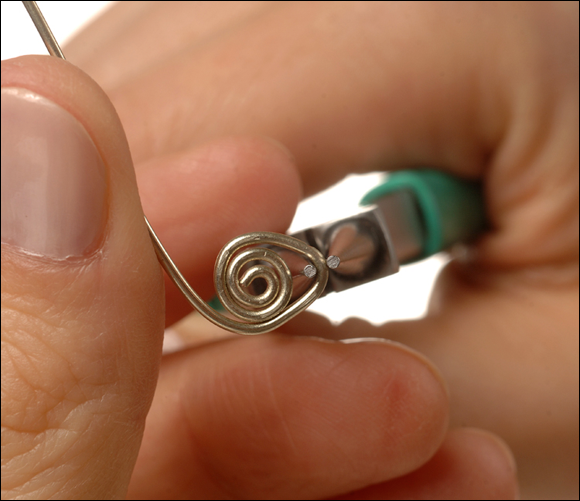
2 Grasp the loop with flat nose pliers, and place your thumb against the wire at the base of the loop.
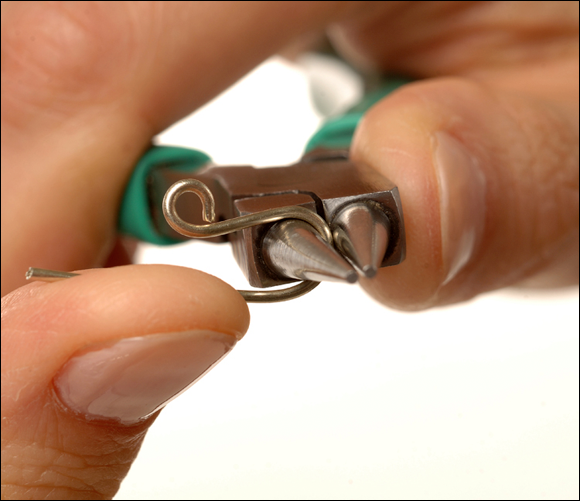
3 To begin a flat spiral, rotate the handle of your pliers away from you while pressing the wire against your thumb.
Step 3
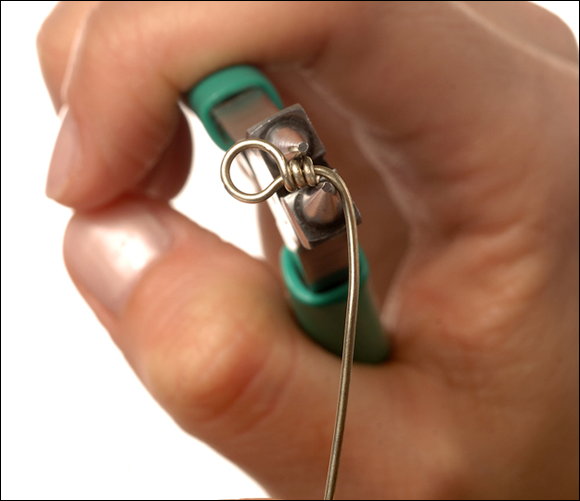
4 Continue this process to create two or three flat spirals.
5 Grasp the wire at the base of the spiral with the tips of the round nose pliers.
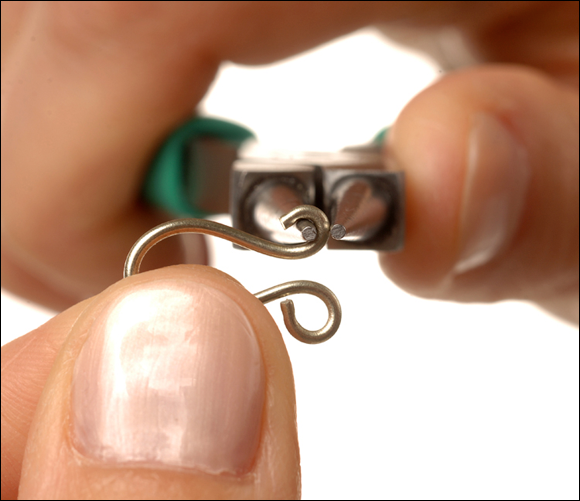
6 Without removing the round nose pliers, use your fingers to complete an additional half-flat spiral.
Step 6
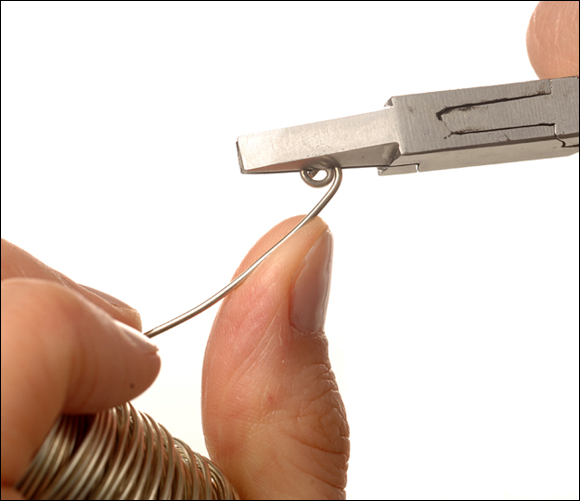
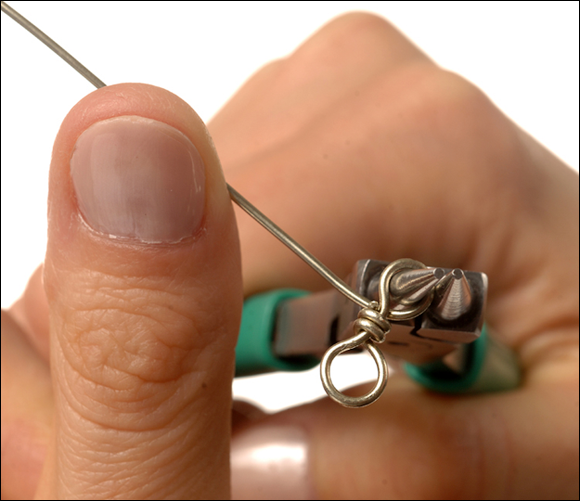
7 Use side cutters to flush-cut the wire about 11⁄4 inches away from the flat spiral.

Step 7
8 With the flat spiral facing toward you, grasp the tip of the wire with the round nose pliers.
9 Roll the pliers away from you to create a small loop.
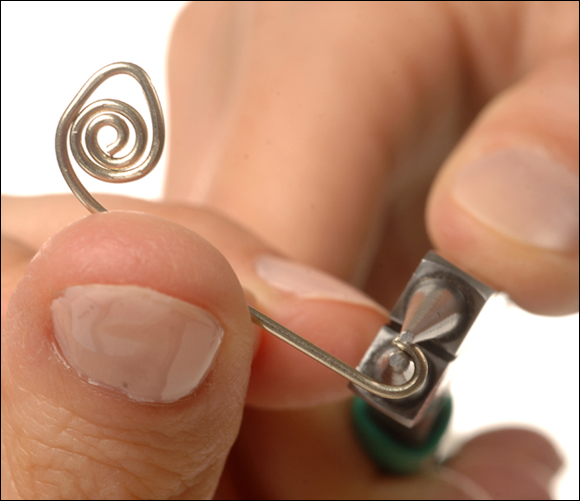
Step 9
10 Turn the piece around so that the flat spiral is facing toward you.
11 Grasp the wire just beneath the loop you made in Step 9, using the largest part of the round nose pliers.
12 Roll the round nose pliers away from you to create the large hook loop.
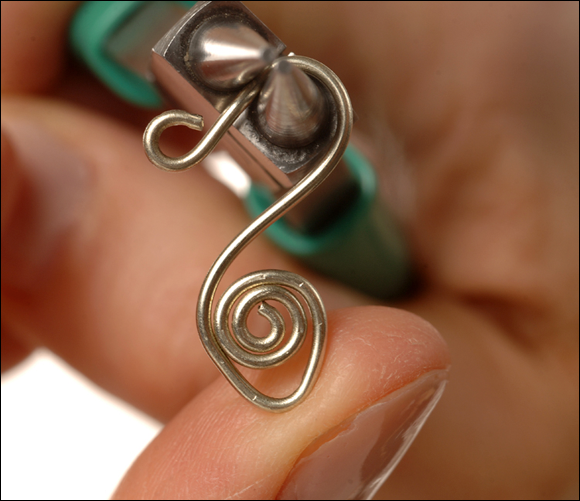
Step 12
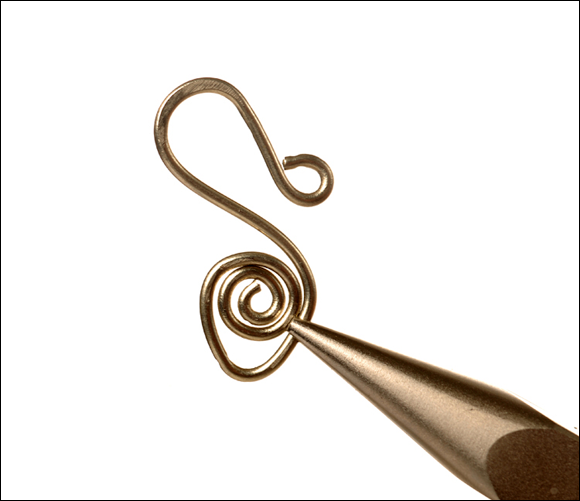
13 Use your fingers to wiggle the hook slightly open and into alignment with the flat-spiraled base of the hook.
14 Place the piece on a bench block with the hook loop pointing away from you.
15 Hammering away from you, slightly flatten the top of the hook.
Step 15
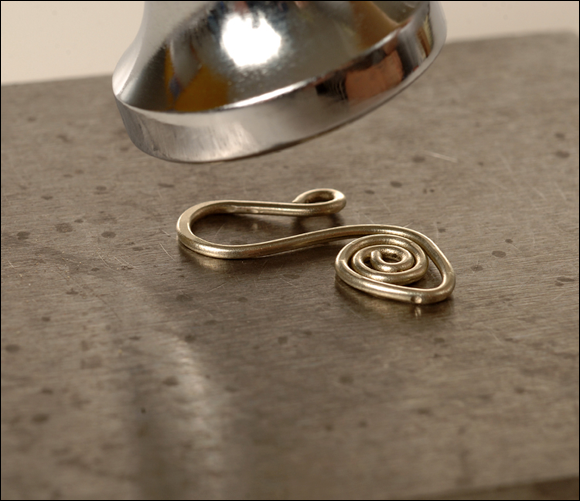
16 Turn the piece around on the bench block, and hammer away from you to slightly flatten the bottom of the flat spiral.
The completed spiral hook clasp is shown below.
Simple Clasp Eyes
The part of a clasp where your hook attaches is called the clasp eye. It can simply be a large jump ring, but a figure-eight style is easier to use and even easier to make.
1 Beginning with a flush-cut length of wire about 11⁄4 inches long, use the largest part of your round nose pliers to create a large loop at one end.
Step 1
2 Turn the piece around, and create a smaller loop at the other end that faces in the opposite direction to the first loop.
Step 2
3 Place the clasp eye on a bench block with the large loop pointing away from you.
4 Hammering away from you, slightly flatten the top of the large loop.

Step 4
5 Turn the piece around on the bench block and repeat Step 4 on the smaller loop.
6 Use flat nose pliers to wiggle both loops closed as needed.
The completed simple clasp eye is shown here, with a hook attached.
Wrapped Clasp Eyes
1 Beginning with a flush-cut length of wire about 5 inches long, grasp the wire with the largest part of your round nose pliers about 11⁄2 inches from one end.
2 Bend the shorter (11⁄2-inch) end of the wire away from you over the pliers to create a full loop.
Step 2
3 Remove the round nose pliers, and grasp the loop with flat nose pliers.
4 Use the round nose pliers to wrap the tail two or three times below the loop.
Step 4
5 Trim off the excess wire.
6 Turn the piece around, and grasp the wrap with the round nose pliers.
7 Bend the unlooped end of the wire toward you, creating a bend next to the wrap.
Step 7
8 Use the round nose pliers to grasp the wire just above the bend.
9 Use your fingers to bend the wire away from you and over the round nose pliers. This will create another loop that is smaller than the first.
Step 9
10 Holding the loop with flat nose pliers, use the round nose pliers to wrap the remaining wire end around the first wrap two or three times.

Step 10
11 Trim off the excess wire tail, and file the end with a needle file, if necessary.
The finished wrapped eye clasp is shown here, with a hook attached (a).

Step 11A
Assemble Some Basic Wire Chains
You can create chains by linking together certain components that you create with wire.
As before, keep in mind that the recommended wire lengths in these tasks are estimates. You’ll need to experiment to find out which precise lengths work best for you.
Bead Link Chains
You can turn your wire and bead links into chains simply by connecting them with jump rings. Alternatively, you can connect them directly to one another with their loops.
Connecting Simple Bead Links
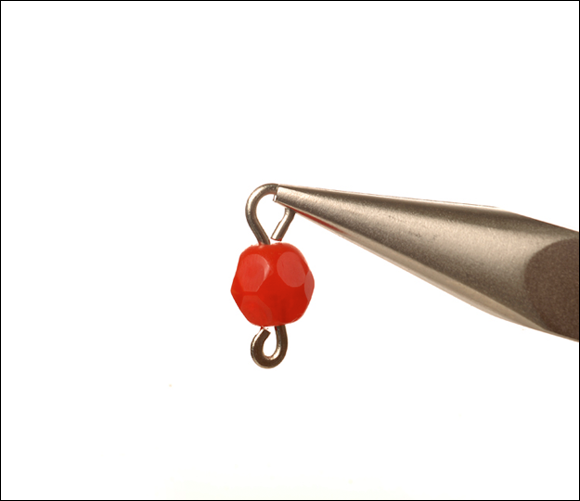
1 Open one loop on a simple bead link by using chain nose pliers to twist the open half to the side.

Step 1
2 Insert the closed loop of another bead link into the open loop on the first.
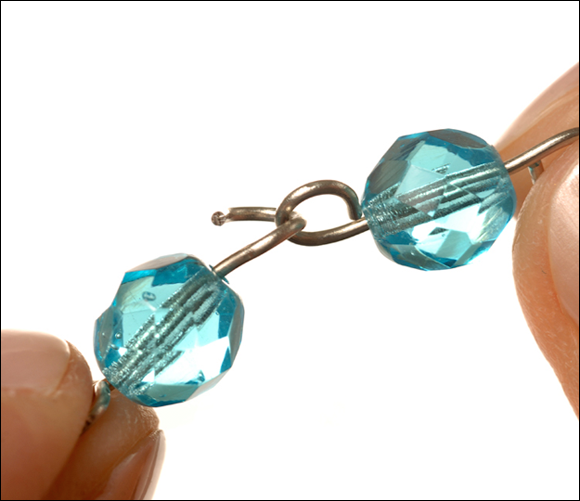
Step 2
3 Use the chain nose pliers to bend the open loop back into its closed position.
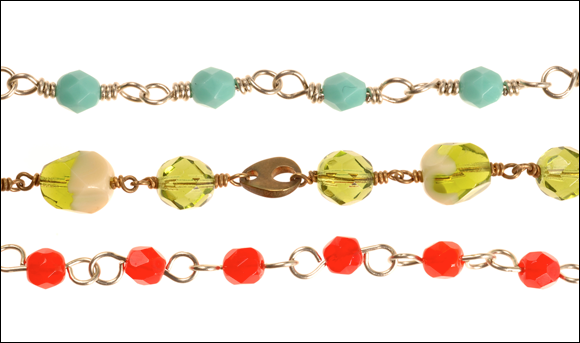
Some connected simple bead links are shown here.

Connecting Wrapped Bead Links
Because wrapped links do not open, you need to connect them as you make them.
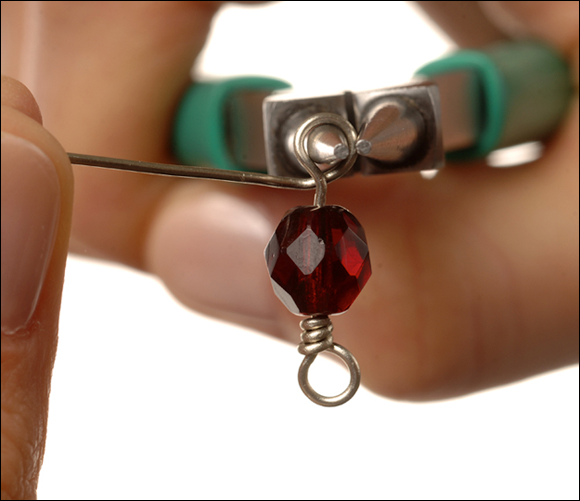
1 Complete Steps 1–11 of “Wrapped Bead Links” on page 139. You now have a link with the first side looped and wrapped, and the bead is in place.
2 Grasp the wire tail at the end of the bead using round nose pliers, with the tail pointing upward.
3 Bend the wire tail back toward you.

Step 3
4 Reposition the round nose pliers to grasp the wire just above the bend that you made in Step 3.
5 Use your fingers to wrap the wire tail away from you and over the pliers to create a full loop.
Step 5
6 Remove the pliers and slip the completed loop of another bead link over the wire tail and into the loop.
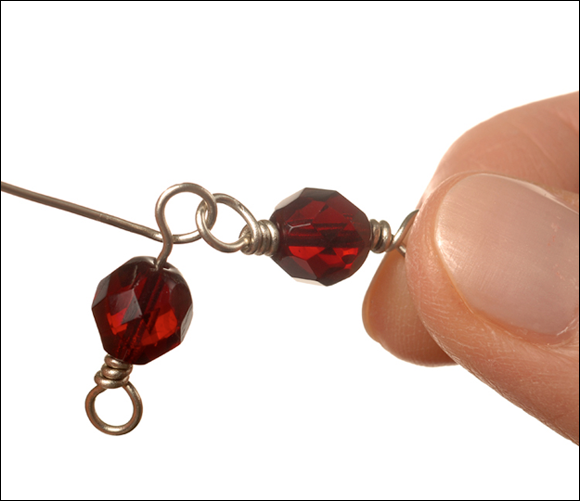
Step 6
7 Grasp the unfinished loop with chain nose pliers, being careful not to mar the other loop that is now inside.
8 Use the round nose pliers to wrap the wire tail around the base of the wire.

Step 8
9 Complete this wrap as usual.
Some connected wrapped-bead links are shown here (a).
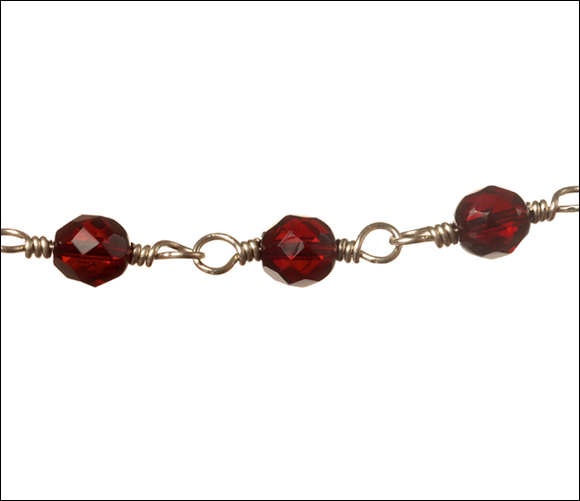
Step 9A
Simple Chain Without Beads
Sometimes you may want a chain that contains no beads, or a chain with beaded links that are separated by unbeaded links. Here are three simple approaches.
“S” Chain
This chain is made up of closed “S” hooks that are linked together with jump rings.
1 Make some “S” hooks, and use your fingers or flat nose pliers to close their loops on both ends.

Step 1
2 Link them together with double sets of jump rings.
Step 2
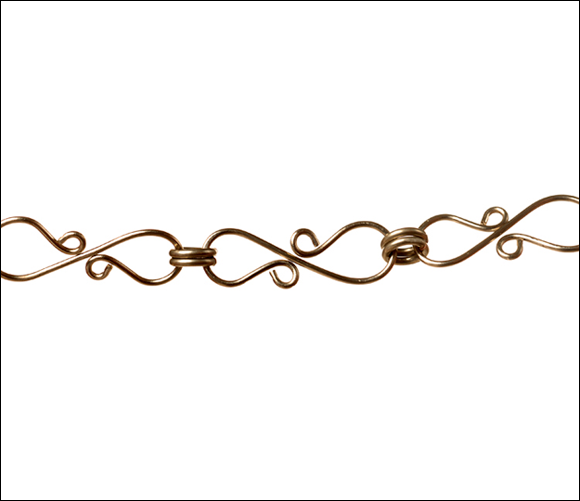
Double Wrapped Loop Chain
To make this chain, you connect a series of two-loop connectors that look a lot like wrapped clasp eyes.
1 Make several wrapped clasp eyes, but make all of the loops the same size.
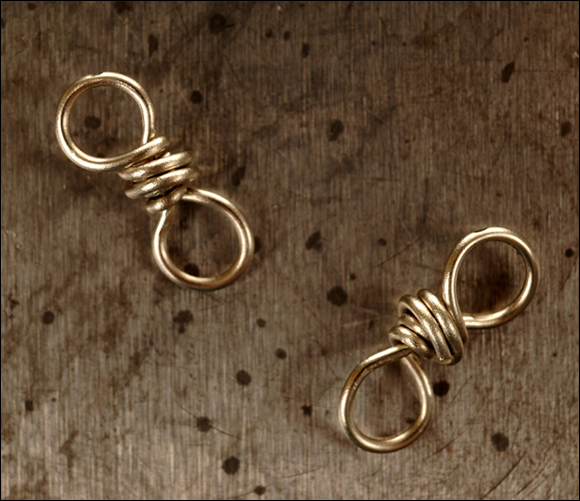
Step 1
2 Link them together with double sets of jump rings.
Step 2
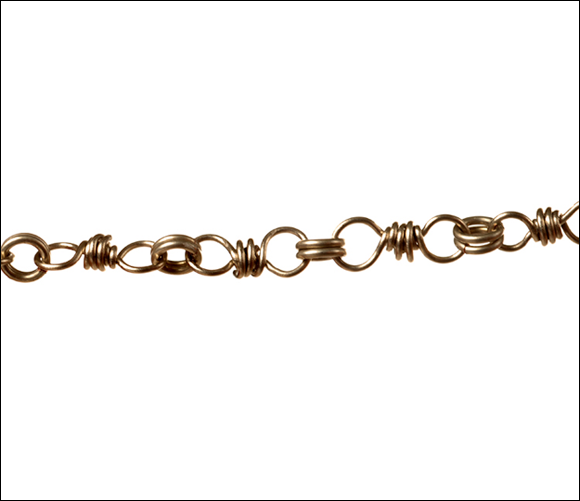
Double Jump Ring Chain
This basic chain is made entirely of jump rings. It serves as an introduction to the more advanced Byzantine chain that you will learn in Chapter 7.
1 Begin with two closed jump rings.
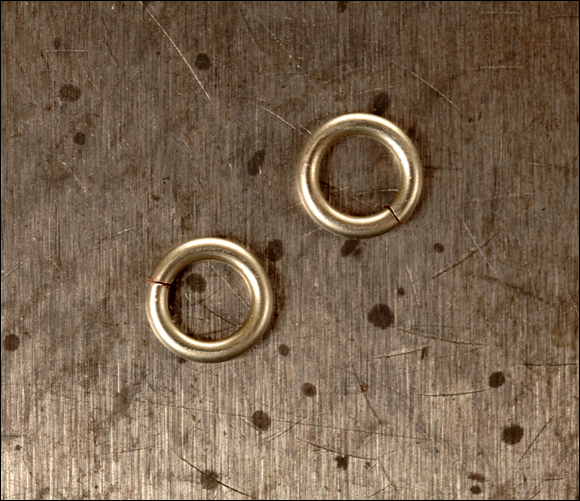
Step 1
2 Use chain nose pliers to pass an open jump ring through both closed jump rings.
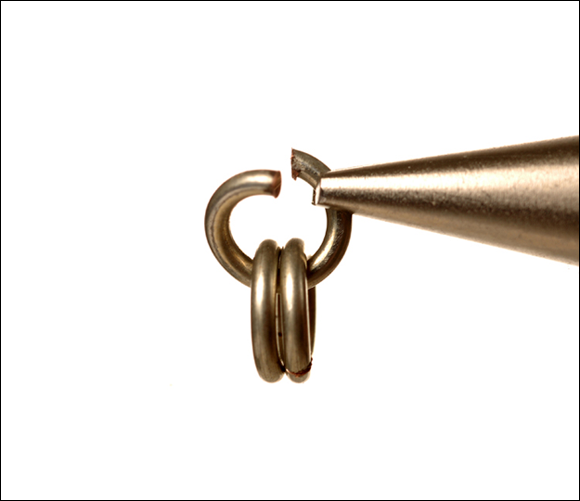
Step 2
3 Close the open jump ring.
4 Pass another jump ring through the first two closed rings, and close it. You now have two links of chain.
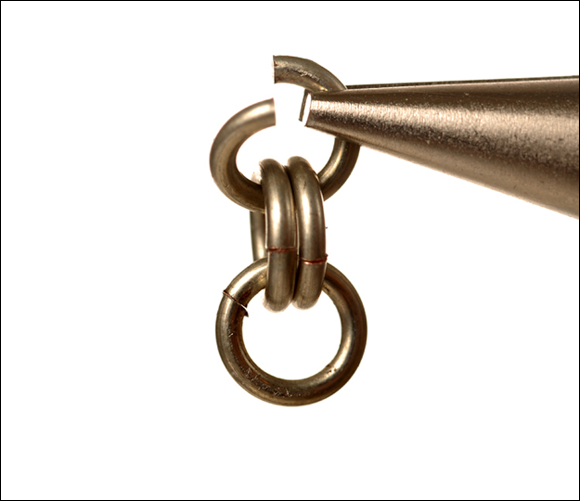
Step 4
5 Continue adding sets of two jump rings to the desired length.
A completed length of double jump ring chain is shown here.
