Chapter 7: More Advanced Wirework Techniques
Once you are comfortable working with wire, you can expand on your basic skills to create more distinctive designs. In this chapter, you’ll learn simple versions of some of the most popular techniques used by wire-jewelry artists and designers. Don’t be afraid to experiment by altering the examples to suit your taste. Over time, you’ll develop your own unique preferences and personal style. Because many of these tasks require practice, be sure to use inexpensive wire when you first attempt them.
Construct Elaborate Wire Chain
Make a Wrapped Briolette Drop
Briolettes are drop-shaped beads that have elegant, triangular facets. They’re commonly used as focal beads and centerpieces and are some of the most popular beads to wrap with wire. Here is the standard technique for creating a wrapped briolette drop.

How to Make a Wrapped Briolette Drop
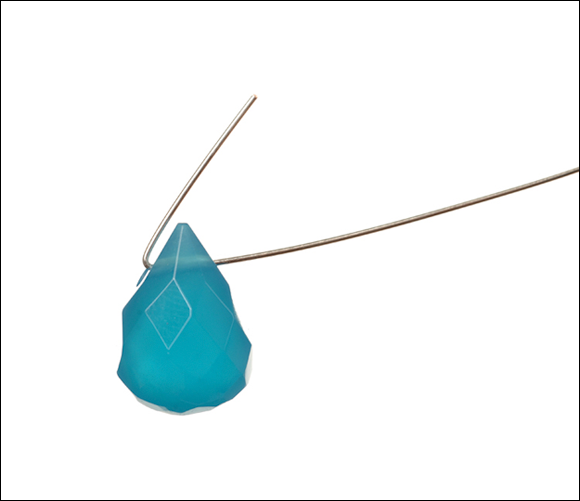
1 Using 24-gauge wire directly from the spool or coil, insert the end of the wire through the hole in the briolette until a tail of at least 1⁄2 inch of wire protrudes from the other side.
2 While holding the briolette in place, bend the wire on the spool-end of the briolette toward the top of the briolette.
Step 2
3 On the other side of the briolette, bend the wire tail in the same manner. The wire is now crossed just above the top of the briolette.

Step 3
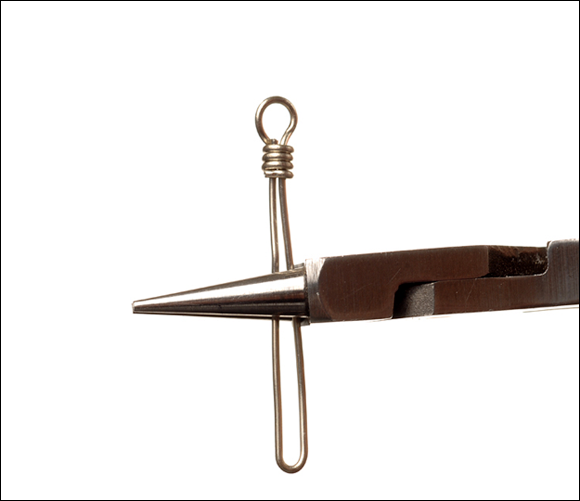
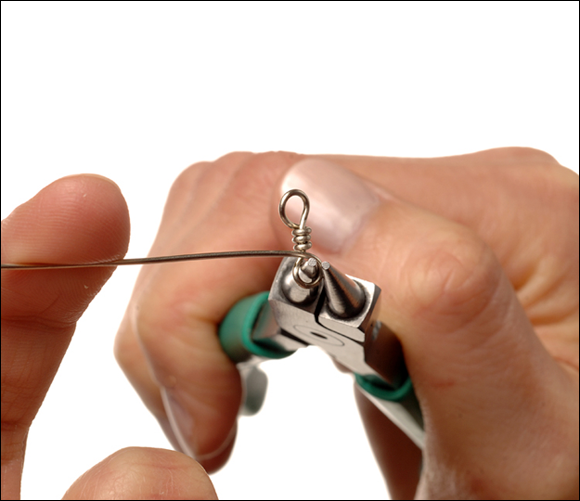
4 Using flat nose pliers, grasp the shorter wire, just above the very top of the briolette.
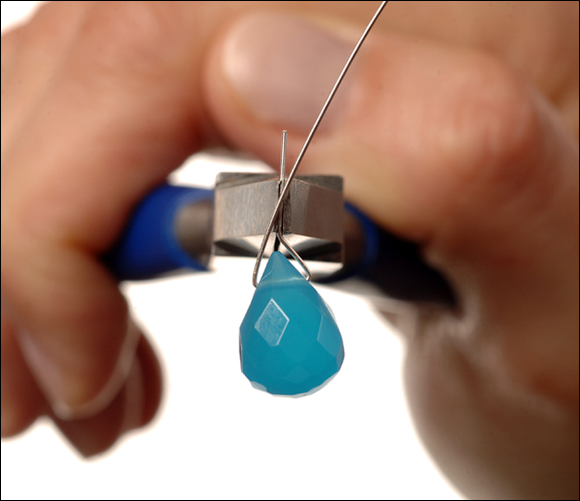
Step 4
5 Bend the wire directly upward.
6 Turn the briolette around and repeat Steps 4–5 with the wire on the other side.
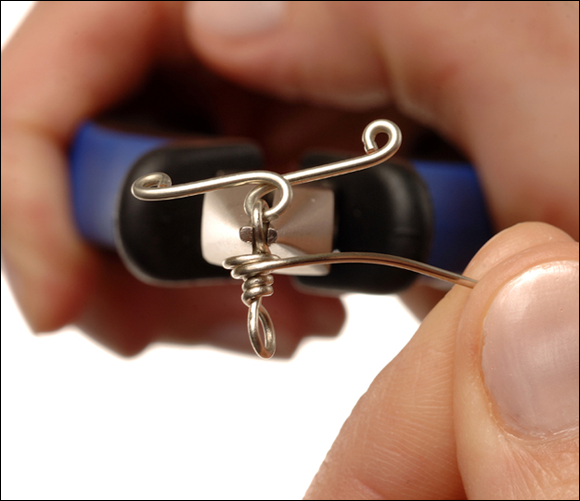
The wire should now look like this (a).
Step 6A
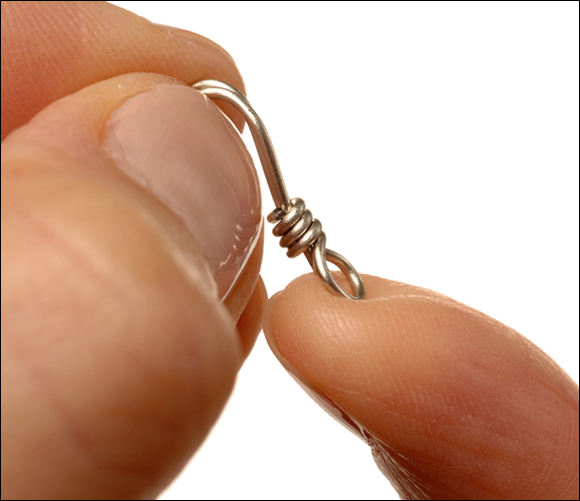
7 Using sharp-tipped side cutters, carefully trim the wire tail about 1⁄8 inch above the bend that you made in the shorter wire.

Step 7
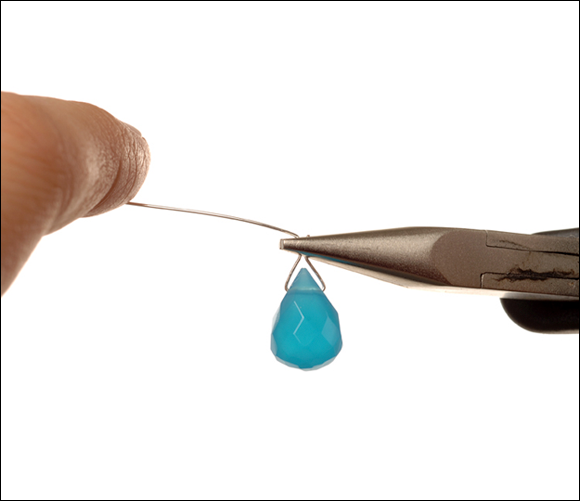
8 With the tips of chain nose pliers, grasp the two wires, side-by-side.
9 Align the upper edge of the pliers with the end of the short wire.
10 Use your other hand to bend the spool end of the wire downward to one side.
Step 10
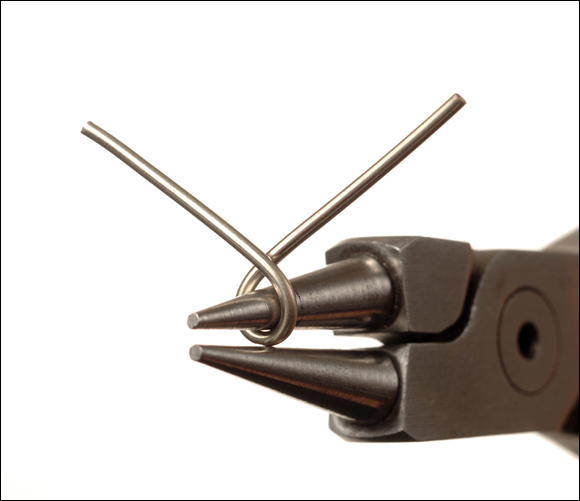
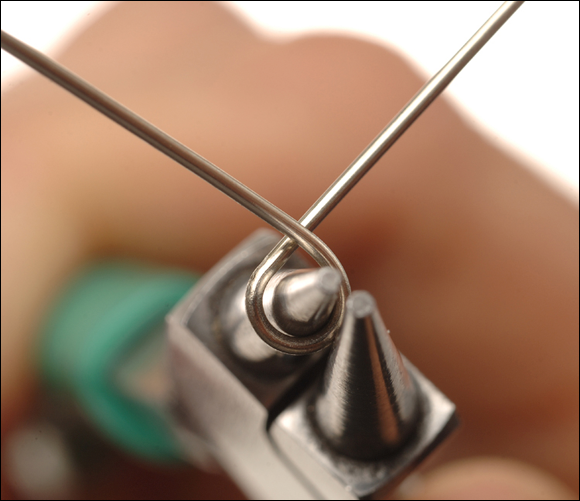
11 Grasp the spool end of the wire with round nose pliers just above the bend that you made in Step 10.
12 Using your other hand, wrap the wire around the nose of the pliers to create a loop.

Step 12
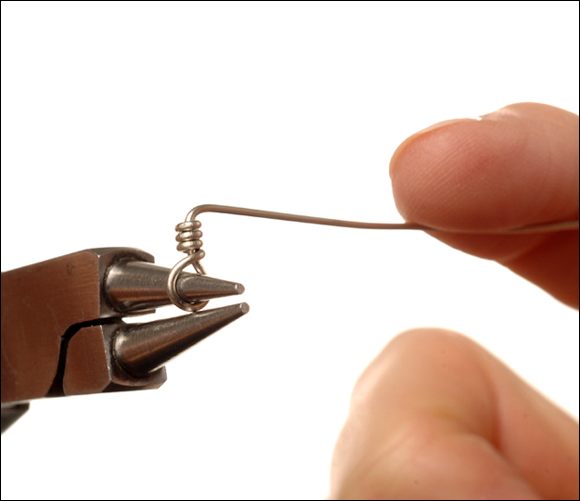
13 While still holding the loop with the round nose pliers, wrap the spool end of the wire around both wires below the loop.

Step 13
14 Continue wrapping until you reach the bends in the wires.
15 Trim the wire with side cutters.
16 If necessary, use chain nose pliers to flatten down the end of the wire.
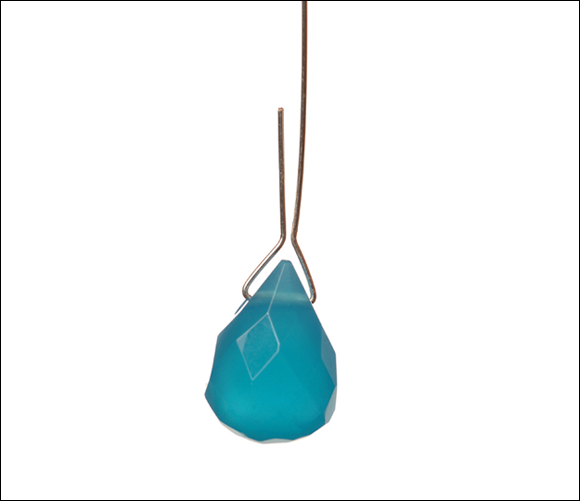
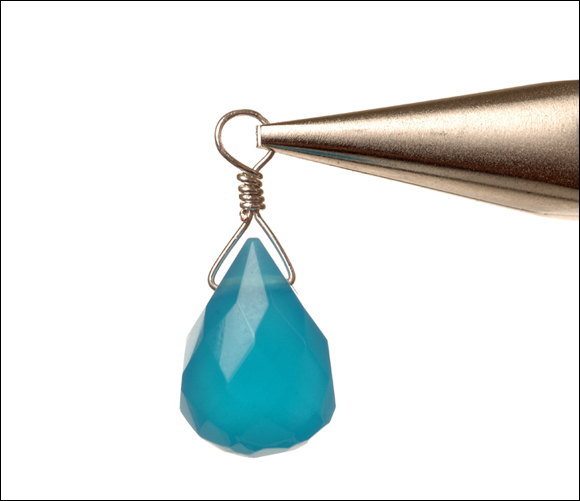
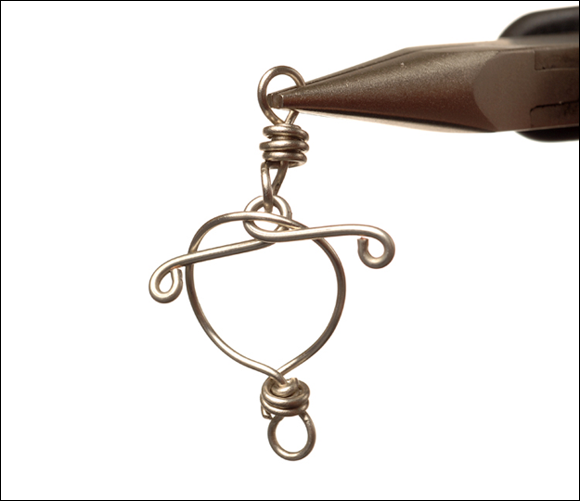
The completed briolette drop is shown here.
Use Double Wire
You can use two pieces, or layers, of wire instead of one to add bulk and interest to jewelry and components. Here are two popular techniques for doubling-up on wire to create detail and greater three-dimensionality.

Double-Twisted Wire
Try making some components (like jump rings and connectors) with two strands of wire twisted together. Use an inexpensive hand drill and some hooks to create this double-twisted wire.
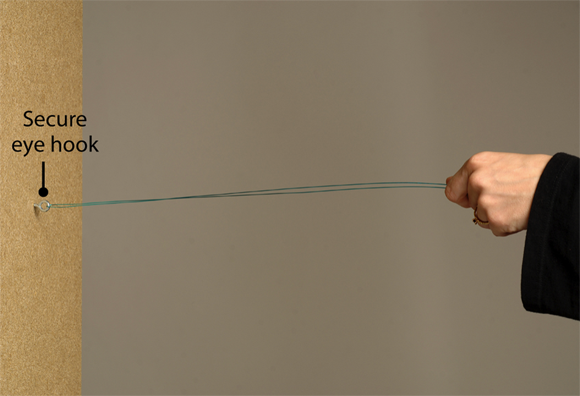
1 Beginning with a length of 20-gauge wire about 3 feet long, insert the wire into an eye hook that is securely attached to your workbench or another heavy, stable object.
2 Center the eye hook along the wire, and pull both ends of the wire together.
Step 2
3 Hold the wire securely with your fingers an inch or two from the ends, and use chain nose pliers to twist the ends together several times.

Step 3
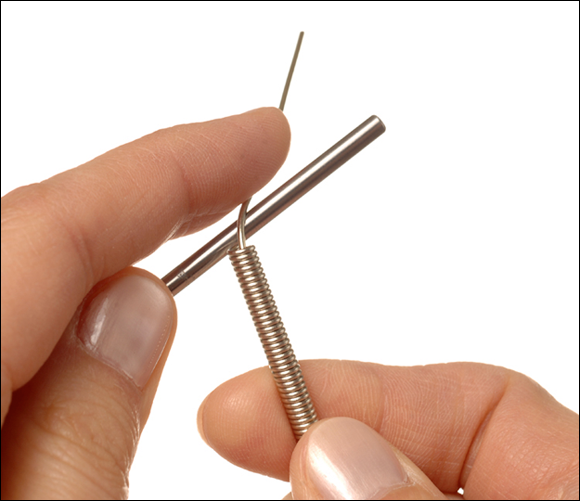
4 Insert a small hook (like a cup hook) into the chuck of a hand drill, and tighten the chuck securely over the screw-end of the hook.
5 Slide the twisted end of the wire over the hook in the drill.
6 Gently pull the wire taut between the eye hook and the drill hook.

Step 6
7 Slowly turn the crank on the hand drill to begin twisting the two strands of wire together.

Step 7
8 As the wire becomes shorter, walk toward the eye hook, keeping the wire taut as you work.
9 Continue twisting until you have the desired density of twists along the wire.

Step 9
10 Trim both ends of the twisted wire with side cutters to prepare it for use.

Are there other ways to twist wire besides using a hand drill?
Absolutely. One of the most basic methods is to use a pencil or pen to hold the wire, instead of a hook and hand drill. Simply insert the pencil or pen behind the twisted-together wire ends, and use both hands to turn it again and again to twist the wire. This technique is much more time-consuming than using a hand drill, but it works.
Some jewelry making suppliers also sell a specialized tool for twisting wire. It looks like a large, strange pair of pliers. You lock the ends of your wire into its jaws, and then pull a lever at the other end of the tool to cause it to spin. This tool may speed up your wire twisting, but it’s a little awkward and uncomfortable to use. Try one before purchasing it to see whether it’s right for you.

Double-Wrapped Wire Beads
You can make these chunky beads by wrapping wire around wire. Learn this basic method, and then experiment with different lengths of wire and different mandrel sizes. (For a review of mandrels, see Chapter 1.)
1 Following the directions for making a wire coil on a mandrel (Chapter 6), use a small mandrel and 20-gauge wire to create a wire coil 2–3 inches long.
2 After removing the coil from the mandrel and trimming the ends, insert a 7- to 8-inch length of 18-gauge wire all the way through the coil.
3 Position the coil at the center of the 18-gauge wire.

Step 3
4 Keeping the coil in this position, press one end of the coil firmly against the mandrel.
Step 4
5 Slowly turn the mandrel while pressing the coil against it to create a new coil moving in the opposite direction. In effect, you are wrapping the 18-gauge wire around the mandrel and taking the 20-gauge coil along with it.

Step 5
6 Continue coiling until you reach the end of the 18-gauge wire.
7 Turn the mandrel around and coil the other end of 18-gauge wire around the mandrel.

Step 7
8 Slide the wire off of the mandrel and trim the ends, making flush cuts.
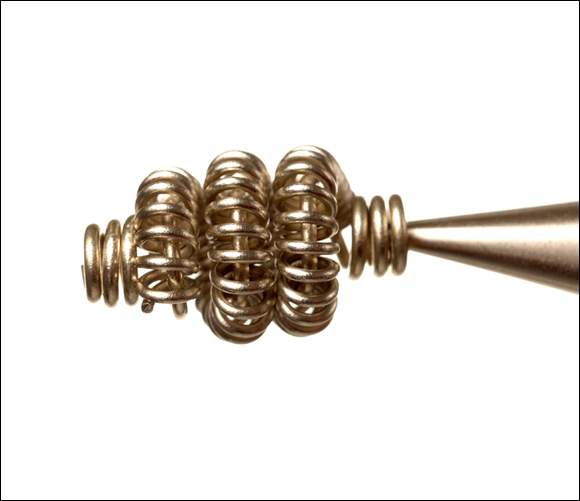
The completed bead is shown here. You now have a bead that can be strung onto cord or wire.

Specialty Wire Coiling Tools
If you have trouble neatly coiling a long length of wire on a regular mandrel, try using a specialty wire-coiling tool instead. There are several styles of coiling tools to choose from. Most include a mandrel attachment with a handle or crank for easy turning, and a notch or other mechanism for securing your wire. Some are even designed to help you make double-wrapped beads faster and easier than you can using the traditional method.

Wrap Beads Within a Framework
You can create elaborate pendants and cuff bracelets by wrapping beaded wire onto wirework frames. Begin by shaping a frame using heavy-gauge wire, and then fill it with wrapped-in beads on small-gauge wire. Experiment with different shapes and sizes of frames and beads for variety.

Round Framework Pendant
Making the Frame
A pendant frame can be just about any shape, but round frames are the easiest to construct. Notice that you wrap the top using the same method that is used to wrap a briolette.
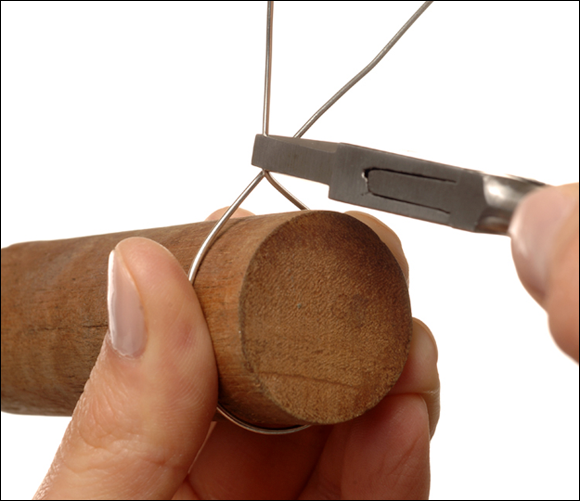
1 Beginning with 16-gauge wire directly from the spool or coil, wrap the first several inches of wire around a round mandrel that is as large as you would like the inside of your pendant frame to be.
2 Double over the ends of the wire, leaving about 1 inch of wire tail.

Step 2
3 Hold the wire on the mandrel with one hand, and use your other hand to grasp the base of the wire tail with flat nose pliers.
4 Use the flat nose pliers to bend the wire tail upward at a 90-degree angle.
Step 4
5 Use the pliers to grasp the base of the wire coming around the other side of the mandrel.
6 Bend this wire upward at a 90-degree angle directly next to the bend that you made in Step 4.
Step 6
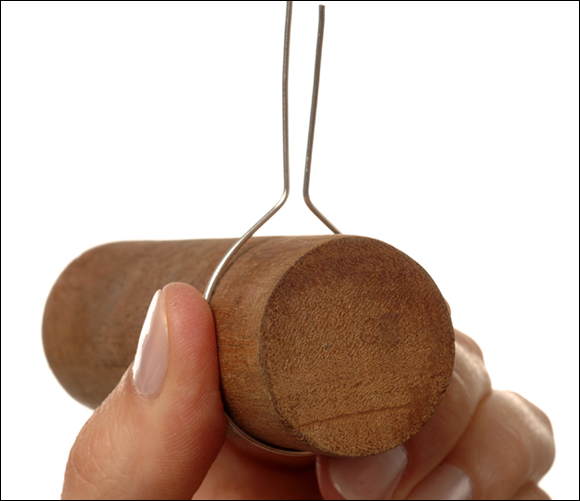
7 Remove the frame from the mandrel.
8 Using heavy, sharp-tipped side cutters, flush-cut the short wire about 1⁄8 inch above the top of the circle.
Step 8
9 Grasp the base of the two wires, just above the wire circle, with chain nose pliers.
10 Align the upper edge of the pliers with the end of the short wire that you cut in Step 8.
11 Use your other hand to bend the spool end of the wire downward to one side.

Step 11
12 Grasp the spool end of the wire with round nose pliers, just above the bend that you made in Step 11.
13 Using your other hand, wrap the wire around the nose of the pliers to create a loop.
14 While still holding the loop with the round nose pliers, slowly wrap the spool end of the wire snugly around both wires below the loop.
15 Continue wrapping until you reach the base of the wires at the top of the circle.

Step 15
16 Make a flush-cut to trim off the wire.
17If needed, use chain nose pliers to neaten the coils and flatten down the wire end.
Note: If your frame has lost its circular shape, slip it back over the mandrel as far as it will go to reshape it.
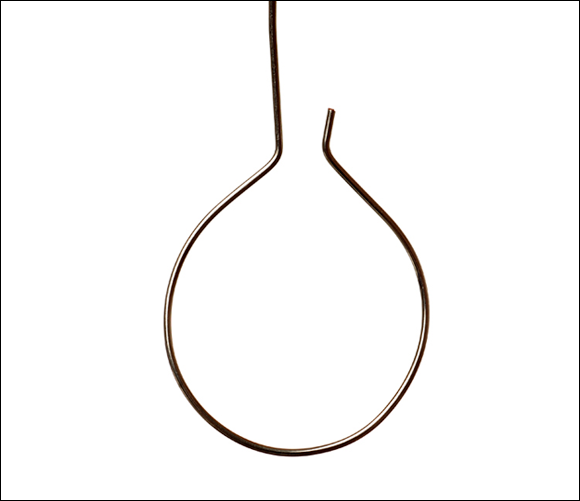
The completed frame is shown here.

Wrapping-In Beads
You can fill your pendant frame with any beads that will fit inside it. Rows of beads can be aligned closely together, or they can zigzag loosely across the frame.
1 Beginning with 3 feet of 24-gauge wire, use chain nose pliers to fold-over about 4 inches of wire at one end.

Step 1
2 Position the wire horizontally over what will be the front of the pendant.
3 Slide one side of the pendant frame all the way into the fold in the 24-gauge wire.
4 Position the wire close to the top of the frame.
5 Using the fingers of one hand, hold the long end of the 24-gauge wire against the opposite side of the frame.

Step 5
6 With your other hand, use chain nose pliers to bring the short end of the wire up through the frame.

Step 6
7 Securely wrap the short end of the wire around the side of the frame.
8 Continue wrapping around the side of the frame until you have made five or six wraps. You will have a tail of extra wire remaining after this step. For now, leave it in place to use for leverage.
Step 8
Note: If the rest of your 24-gauge wire is bent, use nylon jaw pliers now to straighten it. You can stop and straighten the wire after you wrap each row of beads into the frame.
9 String enough beads onto the 24-gauge wire to make up the first row.
10 Slide the beads up against the side of the frame.
11 Position the other end of the wire down through the frame and under its other side.
12 Keeping the wire taut, bring it up and around the frame.
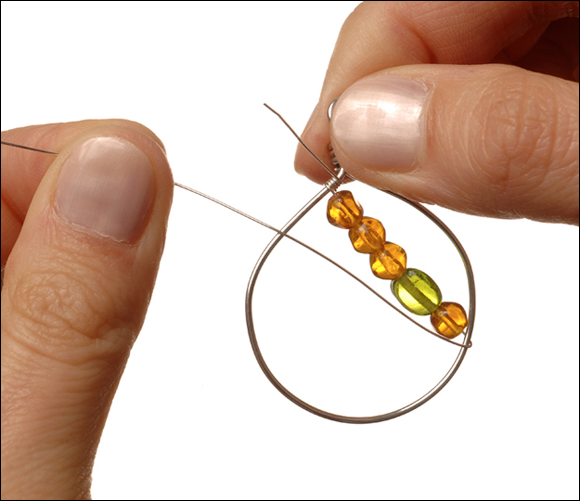
Step 12
13 Wrap the wire around the frame five or six times in a downward direction.
14 String on the next row of beads.
15 Bring the wire over and around the opposite side of the frame and create five or six more wraps.

Step 15
16 Continue adding rows of beads until you reach the bottom of the frame.
17 After securing the last rows of beads with five or six wraps around the frame, use side cutters to trim the wire flush with the frame at both the top and bottom.
18 If needed, flatten down both ends of the wire using chain nose pliers.
The completed pendant is shown here.

Framework Cuff Bracelet
Making the Frame
Try this basic method for making a simple cuff bracelet frame. You can customize the design by changing the frame’s width and shape.
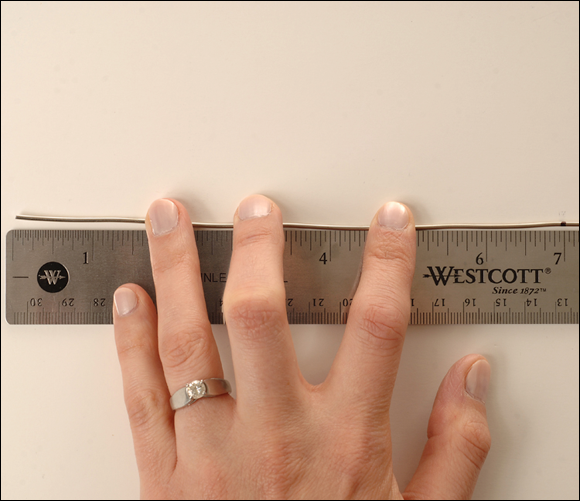
1 Beginning with 14-gauge wire directly from the spool or coil, with the end flush-cut, place the first 8 inches of wire along a ruler.
2 With a permanent marker, mark the wire 7 inches from the end.
Note: You can remove the mark later using nail polish remover or by lightly filing it off with a needle file.
3 Use the marker as a mandrel by holding the wire crosswise against it. The ink mark should be centered above the marker.
Step 3
4 Bend both sides of the wire down over the marker.

Step 4
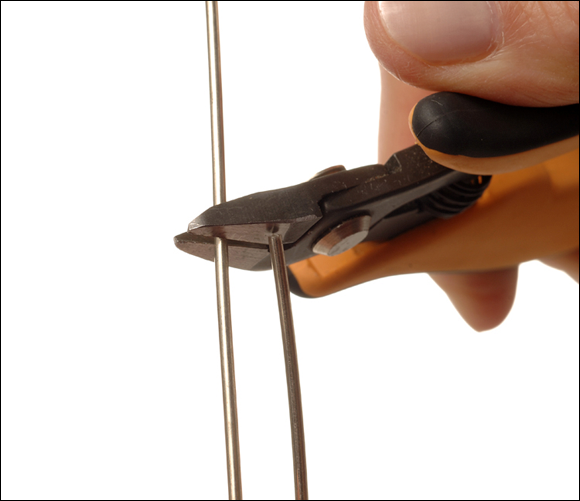
5 Using side cutters, flush-cut the spool end of the wire so that both wire ends are the same length. The wire now has a long “U” shape.
Note: You can straighten the frame at this point by holding the wire at the base of the “U” and pulling both ends of the wire through nylon jaw pliers.
6 Place the frame over a bracelet mandrel or a mandrel substitute, such as a jar or flashlight handle. An eyeglass case is used in the example.
7 Bend down both ends of the frame over the mandrel to form the frame into a curve.

Step 7
8 After removing the wire from the mandrel, hold the frame with the bottom of the “U” closest to you, and grasp the end of the upper wire with round nose pliers.
9 Roll the pliers away from you to create a loose spiral.
10 Turn the frame over and repeat Steps 8–9 to form a loose spiral on the other wire end.

Step 10
11 Manipulate the wire with your fingers as needed to bring it into an oval cuff-bracelet shape.
Note: You can make the cuff a little larger by gently pulling the ends away from each other, or smaller by bending them closer together.
The completed cuff bracelet frame is shown here.
Wrapping-In Beads
Fill your bracelet with beads using essentially the same technique that you use for a pendant frame.
1 Beginning with about 3 feet of 24-gauge wire, use chain nose pliers to fold-over 4 inches of wire at one end.
2 Position the wire vertically over the frame near the “U” end of the frame.
3 Slide the top wire of the frame all the way into the fold in the 24-gauge wire.

Step 3
4 Using the fingers of one hand, hold the long end of the 24-gauge wire against the bottom wire of the frame.
5 With your other hand, use chain nose pliers to bring the shorter wire end up from below the top of the frame and toward the open end of the frame.
6 Use chain nose pliers to wrap the wire around the top of the frame five or six times, moving toward the open end of the frame.
Step 6
7 String on enough beads to reach the bottom of the frame where you would like the first row of beads to connect.
8 Keeping the beads within the frame, bend the long end of wire over the bottom of the frame.
9 Wrap this wire around the bottom of the frame five or six times.

Step 9
10 Continue adding beads and wrapping the ends under, then over, the opposite side of the frame until you reach the open end of the frame.
11 After stringing on the beads for the final row, wrap the end of the wire five or six times around the frame.

Step 11
12 Use side cutters to trim off the excess wire tail at both ends of the frame.
13 If needed, use chain nose pliers to flatten the ends against the frame.
Note: If you use up the length of wire at any time before finishing the bracelet, end the wire by wrapping it five or six times around the frame. Begin a new length of 24-gauge wire by wrapping it around the opposite side of the frame.
The completed bracelet is shown here.

More Framework Ideas
You can make wire frames in just about any shape. Look around your house for interesting items to use as mandrels. If you’re short on time or prefer a more finished appearance, try using pre-made pendant frames. You can often find them at local bead shops or on the Internet. They are usually cast (molded), stamped, or soldered and have a ring or bail at the top for stringing. To get even more creative, look for found objects with general frame-like shapes. See what kind of unusual jewelry designs you can invent by wrapping them with beads.

Create More Wire Clasps
In Chapter 6, you learned how to make basic wire hook clasps. Here are some slightly more complicated clasps that you can use to add variety to your designs. These clasps all work well with simple clasp eyes (see Chapter 6). If you’d like to make them larger than the ones shown here, you may want to increase the wire gauge for strength. If you make them smaller, you can use a slightly smaller wire gauge.
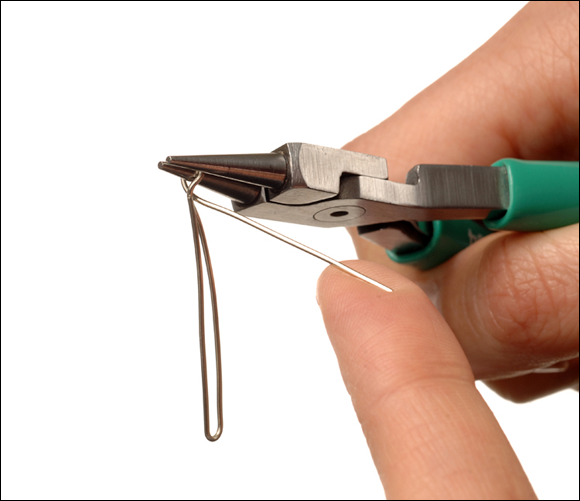
Fold-Over Hook Clasp
This clasp is a wrapped hook made with doubled-over wire.
1 Beginning with a 41⁄4-inch length of 20-gauge wire, use flat nose pliers to fold over the wire 11⁄4 inches from one end.
2 Using round nose pliers, grasp the single wire just past the point where the doubled wire ends.
3 Use the pliers to bend the wire away from you at a 90-degree angle.
4 Without removing the round nose pliers, use the fingers of your other hand to pull the wire all the way around the pliers to create a loop.
Step 4
5 Remove the round nose pliers and turn the piece around so that the loop is pointing in the opposite direction.
6 Grasp the loop with chain nose or flat nose pliers.
7 With your other hand, grasp the end of the wire tail with your fingers or round nose pliers.
8 Wrap the wire tail securely around both wires, below the loop, about four times.

Step 8
9 Trim any excess wire tail and flatten the end against the doubled-wire base, as needed.
10 Grasp the center of the doubled-wire portion of the hook with the largest part of the round nose pliers (the very bottom of the nose).
Step 10
11 Use your fingers to bend the wire over the round nose pliers on both sides.

Step 11
12 Grasp the very end of the doubled wire (the tip of the hook) with the round nose pliers.
13 Gently bend the tip of the hook outward.

Step 13
14 Use your fingers to bend the wrapped-loop portion of the hook slightly toward the back of the hook.
Step 14
The completed fold-over hook clasp is shown here (a).

Step 14A
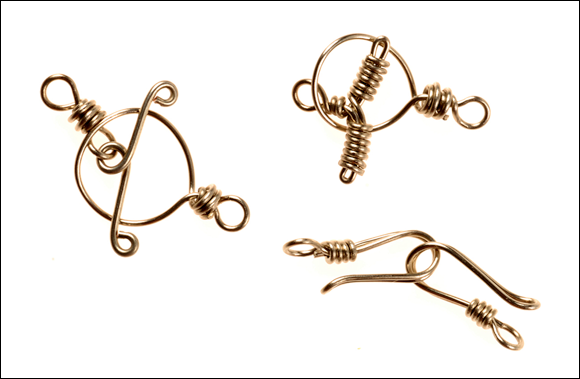
Wire Toggle Clasps
A toggle clasp is composed of a T-bar and a large clasp eye (to review clasp eyes, see Chapter 6). For a secure fit, the inside diameter of the clasp eye should be about half the length of the T-bar.
Simple Toggle Clasp T-Bar
This T-bar is made of two separate pieces linked together.
1 Beginning with a 13⁄4-inch length of 18-gauge wire that is flush-cut on both ends, grasp the very center of the wire with round nose pliers.
2 Use your fingers to bend both sides of the wire upward until they cross over the nose of the pliers.
Step 2
3 Continue bending each wire downward to the side.
4 Check to make sure that the two side wires appear to be the same length.

Step 4
Note: If one side is slightly longer than the other, trim it down now. If your loop is more than a little off-center, it’s best to start over so that your T-bar will not be too short.
5 Grasp the end of one side of wire with the round nose pliers and create a small, upward-facing loop.

Step 5
6 Turn the piece around and use the round nose pliers to create a small, downward-facing loop on the other side. Set this piece aside.
7 Using a 5-inch length of 20-gauge wire, grasp the wire with round nose pliers 11⁄4 inch from one end.
8 Bend the shorter end of wire over the nose of the pliers to create a loop.

Step 8
9 Turn the piece around so that the loop is facing the opposite direction.
10 Grasp the loop with flat nose pliers.
11 Use the round nose pliers to wrap the shorter end of the wire around the base of the loop several times.

Step 11
12 Trim off the excess wire tail and flatten down the end.
13 Holding the wrapped portion of the wire with round nose pliers, bend the long wire end to the side.
After completing Step 13, the wire should look like this (a).
Step 13A
14 With the round nose pliers, grasp the single wire next to the bend that you just made.
15 Bend the wire over the nose of the pliers to create a loop.
Step 15
16 Pick up the T-bar that you completed in Step 6, and slide it into the open loop that you created in Step 15.

Step 16
17 Turn the piece around so that the new loop and bar are facing the opposite direction.
18 Grasp the base of the loop with chain nose pliers, being careful not to crush or scratch the bar.
19 Use the fingers of your other hand, or round nose pliers, to wrap the long end of the wire several times over the first wrap.
Step 19
20 Trim the excess wire tail and flatten the end against the wraps.
The completed simple toggle clasp is shown here (b).
Step 20B
Wrapped Toggle Clasp
This toggle is sturdy, even though it’s made with smaller, 20-gauge wire. It has a different look than the simple toggle clasp, and you make it in one single piece.
1 Beginning with 8 inches of 20-gauge wire, grasp the center of the wire in round nose pliers.
2 Pull one end of the wire around the nose of the pliers to create a loop.
Step 2
3 Remove the round nose pliers, and turn the wire around so that the loop is facing the opposite direction.
4 Grasp the loop with flat nose pliers, with the two wire ends pointing up and to the side, respectively (in an “L” shape).

Step 4
5 Using the fingers of your other hand, bend the upper wire down over the lower wire.
Step 5
6 Bend the other wire out to a 45-degree angle.
7 Go back to the first wire, and wrap it around the second wire two or three times.
Step 7
8 With the loop now pointing downward, hold the loop with the fingers of one hand, and use your other hand to bend both wires down to the sides.
Step 8
9 Using flat nose pliers, fold over one of the side wires 3⁄8 inch from the loop.
10 Turn the piece around and repeat Step 9 with the other side wire.

Step 10
Note: Make sure that the side wires do not cross over one another.
11 Hold one side of the piece firmly between your fingers.
12 Use the fingers of your other hand to bend down the other side wire in front of the bent wire as close to the loop as possible.

Step 12
13 Using your fingers or round nose pliers, wrap this wire around the doubled side wire until you are close to the end of the bar.

Step 13
14 Turn the piece around and repeat Steps 11–13 on the other side.
15 Trim off the excess wire at both ends, and flatten down the wire ends, as needed.
The completed wrapped toggle clasp is shown here (a).

Step 15A
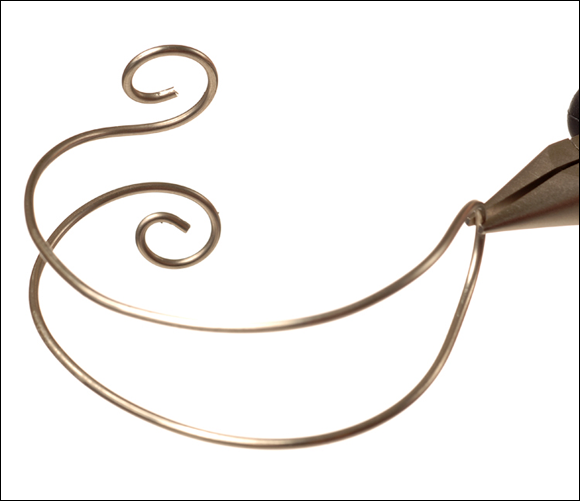
Construct Elaborate Wire Chain
In Chapter 6, you learned how to make some basic wire chains. Now try two slightly more complicated chains made with wire and rings. To make them more ornate, try combining links made from different colored metals or connect chain links with beaded links.
Double Spiral Chain
This showy chain has an ancient Egyptian motif. For efficiency, make the links first and then connect them all together.
Making Spiral Links
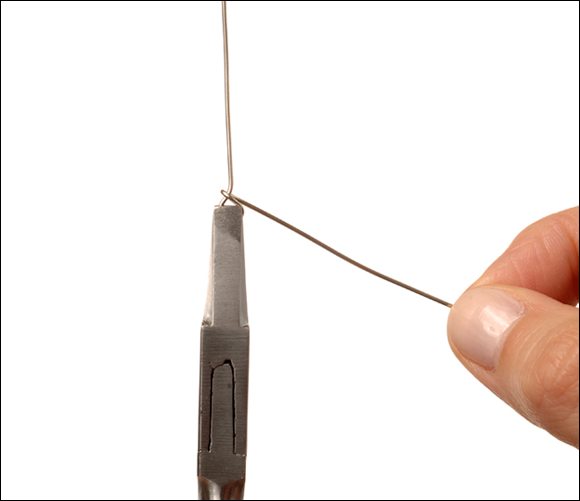
1 Beginning with 4 inches of 19-gauge wire that is flush-cut at both ends, use round nose and flat nose pliers to begin an upward spiral at each end. (For a review of spiraling wire, see Chapter 6.)

Step 1
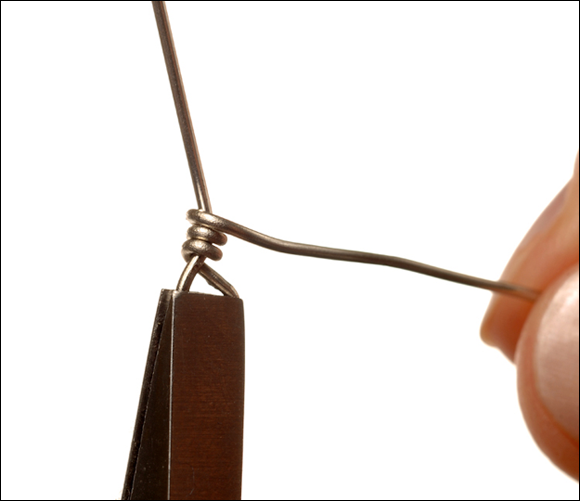
2 Work back and forth between the two sides until there is a 1⁄2-inch space of wire between two equally sized spirals.

Step 2
3 Grasp the center of the wire with round pliers, with both spirals facing upward.
4 Use your fingers to bend both of the spirals down below the nose of the pliers.
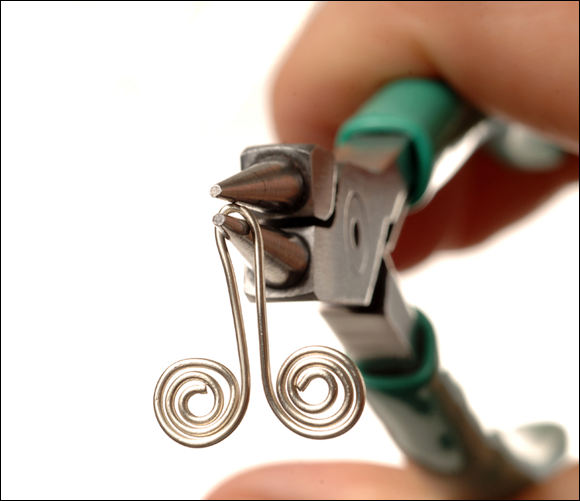
Step 4
5 Repeat Steps 1–4 with separate pieces of wire until you have made the desired number of chain links.
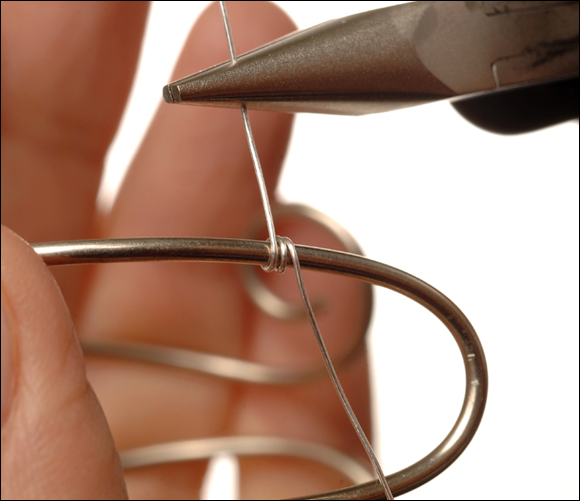
Connecting Spiral Links
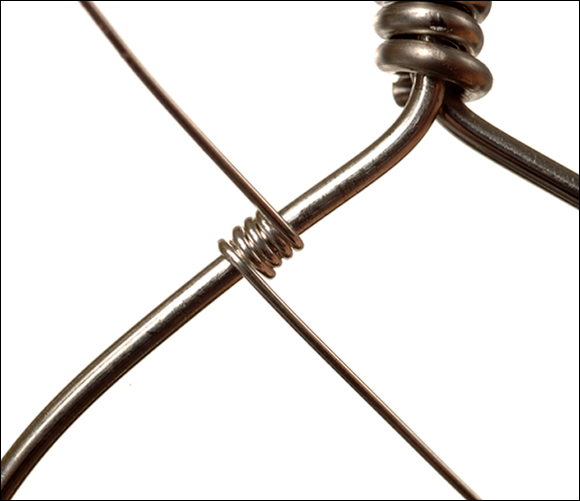
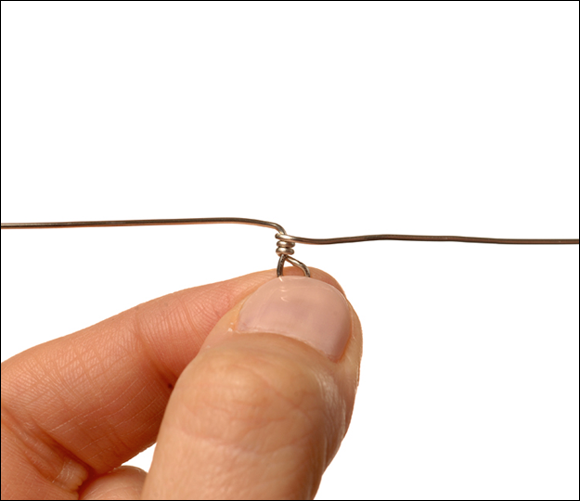
1 Pick up one link and use flat nose pliers to fold over its loop, flush with the bottoms of the two spirals. The top of the loop should protrude a little above the two spirals.

2 Pick up a second link and slip its loop through the end of the loop on the first link.
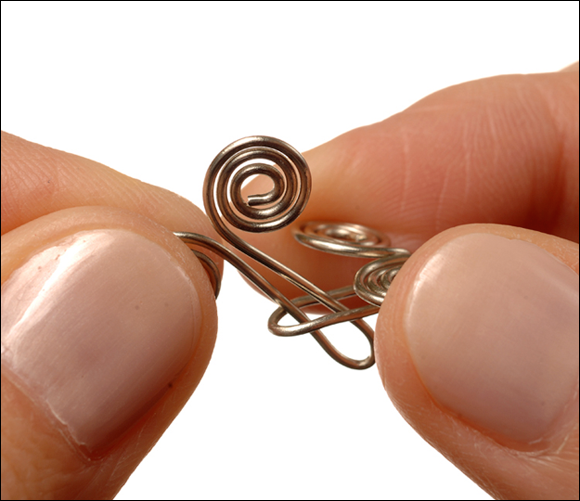
Step 2
3 Use flat nose pliers to fold-over the loop on the second link, and lock the first loop inside. You should now have two links connected by their loops and facing the same direction. They should be connected loosely enough that the finished chain remains flexible.

Step 3
4 Continue attaching links in this manner until you have the desired length of chain.
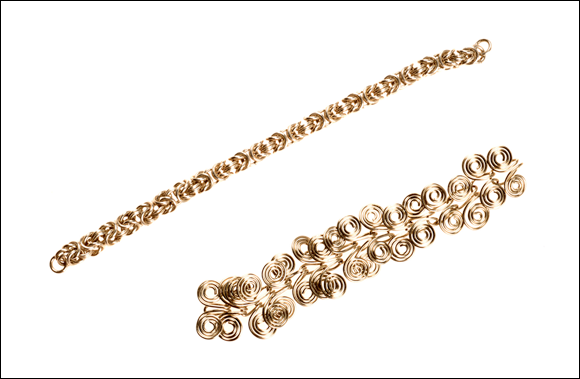
A completed length of chain is shown here.

Byzantine Chain
The Byzantine is a popular, three-dimensional chain that uses a large number of jump rings. You will use up the jump rings quickly, so consider purchasing some pre-made rings in bulk, or investing in equipment for making jump rings, if you enjoy this technique.
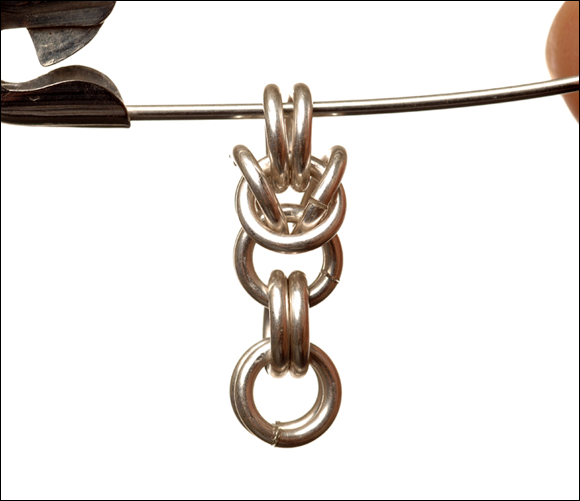
1 Beginning with a supply of 18-gauge, 5.5mm OD (outside diameter) jump rings, place two closed jump rings onto a safety pin.
2 After closing the safety pin, slip an open jump ring through both closed rings, and close it.
3 Repeat Step 2 to add a second closed jump ring to the original two rings.
4 Using the same procedure, add two more jump rings to the two rings that you added in Steps 2–3. You now have a three-link chain of double jump rings.

Step 4
5 Grip the first two links of the chain (four rings total) with the fingers of one hand.
6 Fold back the last two rings in the chain, so that they fall to opposite sides.
7 Add the two folded-back rings to the rings that you’re holding in your fingers.

Step 7
8 Fold back the next two rings at the end of the chain as far as they will go. This will expose the next set of two rings below (shown in blue).

9 While still holding the chain with one hand, use flat nose pliers in your other hand to thread a new open jump ring through the two lower rings that are now exposed (shown in blue in step 8).
10 Add a second closed jump ring to those two lower rings.
The chain should look like this (a).

Step 10A
11 Attach two more links of two jump rings each to the rings that you added in Step 10.
A chain should now look like this (b).
Step 11B
12 Fold back the last two rings so that they fall to the sides, as you did in Step 6.
13 Fold back the next two rings as far as they will go, exposing the next two rings between them.
14 Repeat Steps 9–13 until you have the desired length of chain.
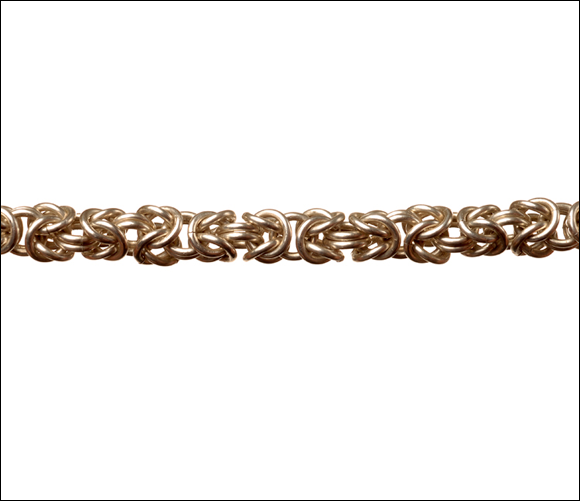
A completed length of Byzantine chain is shown here.
Make a Wire Finger Ring
You can use your wirework skills to create beautiful, stylish rings that don’t require solder or molten metal. Begin with a simple all-wire design and then try wrapping a beaded ring. If you like the results, try experimenting with different wraps and embellishments.
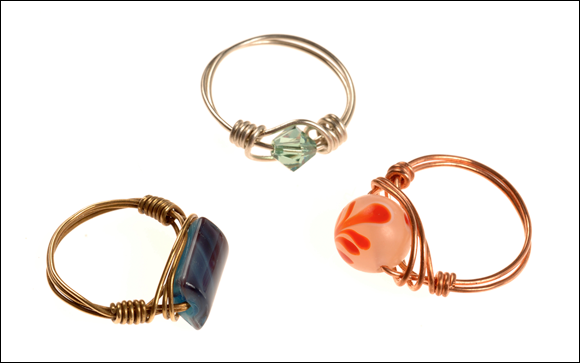
Simple Wrapped Ring
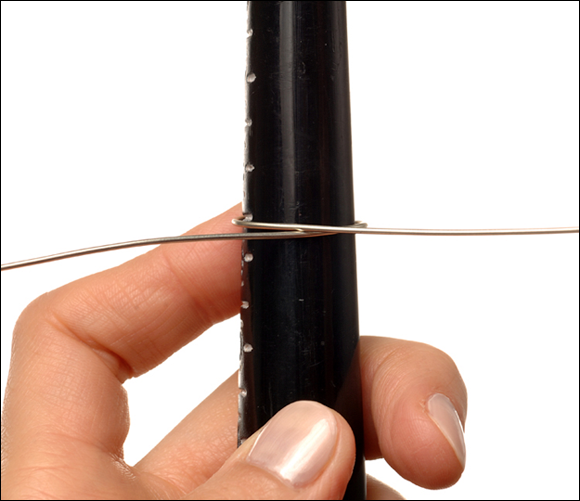
1 Beginning with a length of 16-gauge wire that is about 10 inches long, center the wire across a ring mandrel with size markings, aligned with the mark for one-half size larger than you would like the finished ring to be.
2 Holding the wire against the mandrel with the thumb of one hand, use your other hand to bend back both ends of wire behind the mandrel.

Step 2
3 Pass both wires around the back of the mandrel, but do not allow them to cross over one another. (They should remain parallel.)
Step 3
4 While continuing to hold the wire in place on the mandrel, bend the wire back around to the front of the mandrel and cross them past one another there.

Step 4
5 Bend the upper wire down over the two lower wires.
6 Bend the bottom wire up over the upper two wires.

Step 6
7 Remove the wire from the mandrel.
8 Using your fingers or pliers, wrap each wire end around the ring two or three times, wrapping outward from the center of the ring.
9 Trim off the excess wire and flatten down the ends with chain nose pliers.
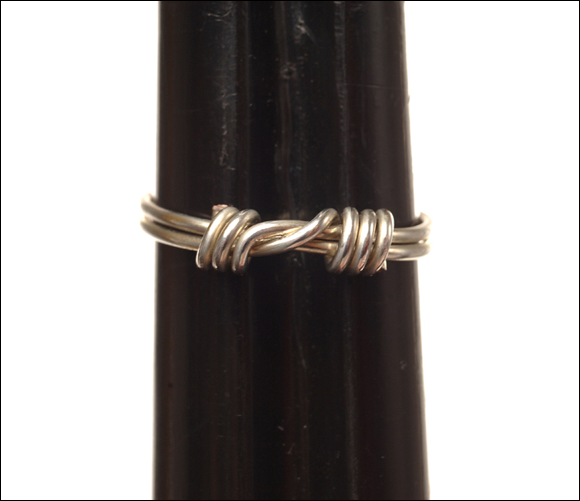
The completed wrapped ring is shown here.
Wrapped Bead Ring
1 Beginning with a length of 20-gauge wire that is about 15 inches long, string on one small- or medium-sized round bead.
2 Center the bead along the wire.
3 Bend up both ends of wire on either side of the bead.

Step 3
4 Place the bead against a ring mandrel (at the same size mark as you would like the finished ring to measure), with the wire ends positioned toward the back of the mandrel.
Note: Some ring mandrels have a channel on one side where the bead can rest to help hold it in place.
5 Cross the wire ends past one another against the back of the mandrel.
6 Bring both wires around to the front of the mandrel.
7 Position the wires so that each wraps slightly under the edge of the bead (between the bead and the mandrel).

Step 7
8 Bend the lower wire up against the side of the bead and over the wire that goes through the bead hole.

Step 8
9 Wrap this wire completely around the bead one time.

Step 9
10 Bend the upper wire down against the other side of the bead.
11 Wrap that wire completely around the bead one time.
The two wires should now point in opposite directions at either side of the bead.

Step 11
12 Remove the ring from the mandrel.
13 Using your fingers or chain nose pliers, wrap the wire on the left side of the ring down behind the ring band.
14 Wrap this wire securely around the band about three times.

Step 14
15 Using the same technique, wrap the wire on the right side of the ring around the band on that side.
16 Trim off the extra wire from both sides, and flatten down the wire ends using chain nose pliers.
The completed wrapped bead ring is shown here.
