Chapter 2. Develop for Azure storage
All applications work with information or data. Applications create, transform, model, or operate with that information. Regardless of the type or volume of the data that your application uses, sooner or later, you need to save it persistently so that it can be used later.
Storing data is not a simple task, and designing storage systems for that purpose is even more complicated. Perhaps your application needs to deal with terabytes of information, or you may work with an application that needs to be accessed from different countries, and you need to minimize the time required to access it. Also, cost efficiency is a requirement in any project. In general, many requirements make designing and maintaining storage systems difficult.
Microsoft Azure offers different storage solutions in the cloud to satisfy your application storage requirements. Azure offers solutions for making your storage cost-effective and minimizing latency.
Skills covered in this chapter:
Skill 2.1: Develop solutions that use Cosmos DB storage
Cosmos DB is a premium storage service that Azure provides for satisfying your need for a globally distributed, low-latency, highly responsive, and always-online database service. Cosmos DB has been designed with scalability and throughput in mind. One of the most significant differences between Cosmos DB and other storage services offered by Azure is how easily you can scale your Cosmos DB solution across the globe by merely clicking a button and adding a new region to your database.
Another essential feature that you should consider when evaluating this type of storage service is how you can access this service from your code and how hard it would be to migrate your existing code to a Cosmos DB–based storage solution. The good news is that Cosmos DB offers different APIs for accessing the service. The best API for you depends on the type of data that you want to store in your Cosmos DB database. You store your data using Key-Value, Column-Family, Documents, or Graph approaches. Each of the different APIs that Cosmos DB offers allows you to store your data with different schemas. Currently, you can access Cosmos DB using SQL, Cassandra, Table, Gremlin, and MongoDB APIs.
Select the appropriate API for your solution
When you are planning how to store the information that your application needs to work, you need to consider the structure that you need to use for storing that information. You may find that some parts of your application need to store information using a Key-Value structure. In contrast, others may need a more flexible, schemaless structure in which you need to save the information into documents. Maybe one fundamental characteristic of your application is that you need to store the relationship between entities, and you need to use a graph structure for storing your data.
Cosmos DB offers a variety of APIs for storing and accessing your data, depending on the requirements that your application has:
SQL This is the core and default API for accessing your data in your Cosmos DB account. This core API allows you to query JSON objects using SQL syntax, which means you don’t need to learn another query language. Under the hood, the SQL API uses the JavaScript programming model for expression evaluation, function invocations, and typing system. You use this API when you need to use a data structure based on documents.
Table You can think of the Table API as the evolution of the Azure Table Storage service. This API benefits from the high-performance, low-latency, and high-scalability features of Cosmos DB. You can migrate from your current Azure Table Storage service with no code modification in your application. Another critical difference between Table API for Cosmos DB and Azure Table Storage is that you can define your own indexes in your tables. In the same way that you can do with the Table Storage service, Table API allows you to store information in your Cosmos DB account using a data structure based on documents.
Cassandra Cosmos DB implements the wire protocol for the Apache Cassandra database into the options for storing and accessing data in the Cosmos DB database. This allows you to forget about operations and performance-management tasks related to managing Cassandra databases. In most situations, you can migrate your application from your current Cassandra database to Cosmos DB using the Cassandra API by merely changing the connection string. Azure Cosmos DB Cassandra API is compatible with the CQLv4 wire protocol. Cassandra is a column-based database that stores information using a key-value approach.
MongoDB You can access your Cosmos DB account by using the MongoDB API. This NoSQL database allows you to store the information for your application in a document-based structure. Cosmos DB implements the wire protocol compatible with MongoDB 3.2. This means that any MongoDB 3.2 client driver that implements and understands this protocol definition can connect seamlessly with your Cosmos DB database using the MongoDB API.
Gremlin Based on the Apache TinkerPop graph transversal language or Gremlin, this API allows you to store information in Cosmos DB using a graph structure. This means that instead of storing only entities, you store
Vertices You can think of a vertex as an entity in other information structures. In a typical graph structure, a vertex could be a person, a device, or an event.
Edges These are the relationships between vertices. A person can know another person, a person might own a type of device, or a person may attend an event.
Properties These are each of the attributes that you can assign to a vertex or an edge.
Beware that you cannot mix these APIs in a single Cosmos DB account. You need to define the API that you want to use for accessing your Cosmos DB account when you are creating the account. Once you have created the account, you won’t be able to change the API for accessing it.
Azure offers SDKs for working with the different APIs that you can use for connecting to Cosmos DB. Supported languages are .NET, Java, Node.js, and Python. Depending on the API that you want to use for working with Cosmos DB, you can also use other languages like Xamarin, Golang, or PHP. In this section, you can review an example of each API and learn how to create, read, update, and delete data using the different APIs.
Before starting with the examples, you need to create a Cosmos DB account for storing your data. The following procedure shows how to create a Cosmos DB free account with the SQL API. You can use this same procedure for creating accounts with the other APIs we have reviewed in this skill:
Sign in to the Azure portal (http://portal.azure.com).
In the top-left corner in the Azure portal, click the menu icon represented by three horizontal bars, and then click Create A Resource.
On the New panel, under the Azure Marketplace column, click Databases. On the Featured column, click Azure Cosmos DB.
On the Create Azure Cosmos DB Account blade, in the Resource Group drop-down menu, click the Create New link below the drop-down menu. In the pop-up dialog box, type a name for the new Resource Group. Alternatively, you can select an existing Resource Group from the drop-down menu.
In the Instance Details section, type an Account Name.
In the API drop-down menu, ensure that you have selected the option Core (SQL), as shown in Figure 2-1.
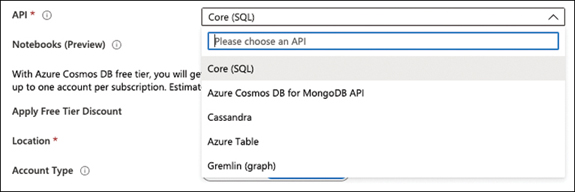
Figure 2-1 Selecting a Cosmos DB API
Ensure that the Notebooks switch is set to Off.
Ensure that the Apply Free Tier Discount switch is set to Apply.
On the Location drop-down menu, select the region most appropriate for you. If you are using App Services or virtual machines, you should select the same region in which you deployed those services.
In the Account Type, set the value Non-Production.
Leave Geo-Redundancy and Multi-Region Write disabled.
In the bottom-left corner of the Create Azure Cosmos DB Account blade, click the Review + Create button.
In the bottom-left corner of the Review + Create tab, click the Create button to start the deployment of your Cosmos DB account.
Implement partitioning schemes
When you save data to your Cosmos DB account—independently of the API that you decide to use for accessing your data—Azure places the data in different servers to accommodate the performance and throughput that you require from a premium storage service like Cosmos DB. The storage services use partitions to distribute the data. Cosmos DB slices your data into smaller pieces called partitions that are placed on the storage server. There are two different types of partitions when working with Cosmos DB:
Logical You can divide a Cosmos DB container into smaller pieces based on your criteria. Each of these smaller pieces is a logical partition. All items stored in a logical partition share the same partition key.
Physical These partitions are a group of replicas of your data that is physically stored on the servers. Azure automatically manages this group of replicas or replica sets. A physical partition can contain one or more logical partitions.
By default, any logical partition has a limit of 20 GB for storing data. When you are configuring a new collection, you need to decide whether you want your collection to be stored in a single logical partition and keep it under the limit of 20 GB or allow it to grow over that limit and span across different logical partitions. If you need your container to split over several partitions, Cosmos DB needs some way to know how to distribute your data across the different logical partitions. This is where the partition key comes into play. Bear in mind that this partition key is immutable, which means you cannot change the property that you want to use as the partition key once you have selected it.
Choosing the correct partition key is critical for achieving the best performance. The reason choosing the proper partition key is so important is because Azure creates a logical partition for each distinct value of your partition key. Listing 2-1 shows an example of a JSON document.
Listing 2-1 Example JSON document
{
    "id": "1",
    "firstName": "Santiago",
    "lastName": "Fernández",
    "city": "Sevilla",
    "country": "Spain"
}
Depending on your data, city or country properties would be the right choice for the partition key. You can find in your data that some documents have the same value for the country property, so they are stored together in the same logical partition. Using the id property as the partition key means that you end with a logical partition with a single document on each partition. This configuration can be beneficial when your application usually performs read workloads and uses parallelization techniques for getting the data.
On the other hand, if you select a partition key with just a few possible values, you can end with “hot” partitions. A “hot” partition is a partition that receives most of the requests when working with your data. The main implication for these “hot” partitions is that they usually reach the throughput limit for the partition, which means you need to provision more throughput. Another potential drawback is that you can reach the limit of 20 GB for a single logical partition. Because a logical partition is the scope for efficient multidocument transactions, selecting a partition key with a few possible values allows you to execute transactions on many documents inside the same partition.
Use the following guidelines when selecting your partition key:
The storage limit for a single logical partition is 20 GB. If you foresee that your data would require more space for each value of the partition, you should select another partition key.
The requests to a single logical partition cannot exceed the throughput limit for that partition. If your requests reach that limit, they are throttled to avoid exceeding the limit. If you reach this limit frequently, you should select another partition key because there is a good chance that you have a “hot” partition. The minimum throughput limit is different from databases to containers. The minimum throughput for databases is 100 request units per second (RU/s). The minimum throughput for containers is 400 RU/s.
Choose partition keys with a wide range of values and access patterns that can evenly distribute requests across logical partitions. This allows you to achieve the right balance between being able to execute cross-document transactions and scalability. Using timestamp-based partition keys is usually a lousy choice for a partition key.
Review your workload requirements. The partition key that you choose should allow your application to perform well on reading and writing workloads.
The parameters that you usually use on your requests and filtering queries are good candidates for a partition key.
There could be situations where none of the properties of your items are appropriate for the partition keys. In those situations, you can create synthetic partition keys. A synthetic partition key is a key compound of two concatenated properties. In our previous document example shown in Listing 2-1, you created a new property named partitionKey containing a string that concatenates the values of city and country. For the example document, the value of the partitionKey should be Sevilla-Spain.
Interact with data using the appropriate SDK
Cosmos DB allows you to access data using different types of APIs. Once you have your Cosmos DB account ready, you can start creating your databases and containers for working with data. Remember that once you choose the API for your Cosmos DB account, you cannot change it.
The following example shows how to create a console application using .NET Core. The first example uses Cosmos DB SQL API for creating, updating, and deleting some elements in the Cosmos DB account:
Open Visual Studio Code and create a directory for storing the example project.
Open the Terminal, switch to the project’s directory, and type the following command:
dotnet new console
Install the NuGet package for interacting with your Cosmos DB account using the SQL API. Type the following command in the Terminal:
dotnet add package Microsoft.Azure.Cosmos
Change the content of the Program.cs file using the content provided in Listing 2-2. You need to change the namespace according to your project’s name.
Sign in to the Azure portal (http://portal.azure.com).
In the Search box at the top of the Azure portal, type the name of your Cosmos DB account and click the name of the account.
On your Cosmos DB Account blade, in the Settings section, click Keys.
On the Keys panel, copy the URI and Primary Keys values from the Read-Write Keys tab. You need to provide these values to the EndpointUri and Key Constants in the code shown in Listing 2-2. (The most important parts of the code are shown with bold format.)
Listing 2-2 Cosmos DB SQL API example
//C# .NET Core. Program.cs
using System.Collections.Immutable;
using System.Xml.Linq;
using System.Diagnostics;
using System.Runtime.CompilerServices;
using System;

using System.Linq;
using Microsoft.Azure.Cosmos;
using System.Threading.Tasks;
using ch2_1_3_SQL.Model;
using System.Net;

namespace ch2_1_3_SQL
{
    class Program
    {
        private const string EndpointUri = "<PUT YOUR ENDPOINT URL HERE>";
        private const string Key = "<PUT YOUR COSMOS DB KEY HERE>";
        private CosmosClient client;
        private Database database;
        private Container container;

        static void Main(string[] args)
        {

            try
            {
                Program demo = new Program();
                demo.StartDemo().Wait();
            }
            catch (CosmosException ce)
            {
                Exception baseException = ce.GetBaseException();
                System.Console.WriteLine($"{ce.StatusCode} error ocurred:
                {ce.Message}, Message: {baseException.Message}");
            }
            catch (Exception ex)
            {
                Exception baseException = ex.GetBaseException();
                System.Console.WriteLine($"Error ocurred: {ex.Message}, Message:
                {baseException.Message}");
            }

        }

        private async Task StartDemo()
        {
            Console.WriteLine("Starting Cosmos DB SQL API Demo!");

            //Create a new demo database

            string databaseName = "demoDB_" + Guid.NewGuid().ToString().
Substring(0, 5);

            this.SendMessageToConsoleAndWait($"Creating database {databaseName}...");

            this.client = new CosmosClient(EndpointUri, Key);
            this.database = await this.client.CreateDatabaseIfNotExistsAsync
(databaseName);

            //Create a new demo collection inside the demo database.
            //This creates a collection with a reserved throughput. You can customize
the options using a ContainerProperties object
            //This operation has pricing implications.
            string containerName = "collection_" + Guid.NewGuid().ToString().
Substring(0, 5);


            this.SendMessageToConsoleAndWait($"Creating collection demo
{containerName}...");

            this.container = await this.database.CreateContainerIfNotExistsAsync
(containerName, "/LastName");

            //Create some documents in the collection
            Person person1 = new Person
            {
                Id = "Person.1",
                FirstName = "Santiago",
                LastName = "Fernandez",
                Devices = new Device[]
                {

                     new Device { OperatingSystem = "iOS", CameraMegaPixels = 7,
                     Ram = 16, Usage = "Personal"},
                     new Device { OperatingSystem = "Android", CameraMegaPixels = 12,
                     Ram = 64, Usage = "Work"}
                },
                Gender = "Male",
                Address = new Address
                {
                    City = "Seville",
                    Country = "Spain",
                    PostalCode = "28973",
                    Street = "Diagonal",
                    State = "Andalucia"
                },
                IsRegistered = true
            };


            await this.CreateDocumentIfNotExistsAsync(databaseName, containerName,
person1);

            Person person2 = new Person
            {
                Id = "Person.2",
                FirstName = "Agatha",
                LastName = "Smith",
                Devices = new Device[]
                {

                     new Device { OperatingSystem = "iOS", CameraMegaPixels = 12,
                     Ram = 32, Usage = "Work"},
                     new Device { OperatingSystem = "Windows", CameraMegaPixels = 12,
                     Ram = 64, Usage = "Personal"}
                },
                Gender = "Female",
                Address = new Address
                {
                    City = "Laguna Beach",
                    Country = "United States",
                    PostalCode = "12345",
                    Street = "Main",
                    State = "CA"
                },
                IsRegistered = true
            };


            await this.CreateDocumentIfNotExistsAsync(databaseName, containerName,
person2);

            //Make some queries to the collection
            this.SendMessageToConsoleAndWait($"Getting documents from the collection
{containerName}...");

            //Find documents using LINQ

            IQueryable<Person> queryablePeople = this.container.GetItemLinqQueryable
<Person>(true)
                .Where(p => p.Gender == "Male");

            System.Console.WriteLine("Running LINQ query for finding men...");
            foreach (Person foundPerson in  queryablePeople)
            {
                System.Console.WriteLine($"\tPerson: {foundPerson}");
            }

            //Find documents using SQL

            var sqlQuery = "SELECT * FROM Person WHERE Person.Gender = 'Female'";

            QueryDefinition queryDefinition = new QueryDefinition(sqlQuery);
            FeedIterator<Person> peopleResultSetIterator = this.container.GetItemQuery
Iterator<Person>(queryDefinition);

            System.Console.WriteLine("Running SQL query for finding women...");
            while (peopleResultSetIterator.HasMoreResults)
            {
                FeedResponse<Person> currentResultSet = await peopleResultSetIterator.
ReadNextAsync();
                foreach (Person foundPerson in currentResultSet)
                {
                    System.Console.WriteLine($"\tPerson: {foundPerson}");
                }
            }

            Console.WriteLine("Press any key to continue...");
            Console.ReadKey();

            //Update documents in a collection
            this.SendMessageToConsoleAndWait($"Updating documents in the collection
{containerName}...");
            person2.FirstName = "Mathew";
            person2.Gender = "Male";

            await this.container.UpsertItemAsync(person2);
            this.SendMessageToConsoleAndWait($"Document modified {person2}");

            //Delete a single document from the collection
            this.SendMessageToConsoleAndWait($"Deleting documents from the collection
{containerName}...");

            PartitionKey partitionKey = new PartitionKey(person1.LastName);
            await this.container.DeleteItemAsync<Person>(person1.Id, partitionKey);
            this.SendMessageToConsoleAndWait($"Document deleted {person1}");

            //Delete created demo database and all its children elements
            this.SendMessageToConsoleAndWait("Cleaning-up your Cosmos DB account...");
            await this.database.DeleteAsync();
        }
        private void SendMessageToConsoleAndWait(string message)
        {
            Console.WriteLine(message);
            Console.WriteLine("Press any key to continue...");
            Console.ReadKey();
        }

        private async Task CreateDocumentIfNotExistsAsync(string database,
string collection, Person person)
        {
            try
            {
                await this?.container.ReadItemAsync<Person>(person.Id,
new PartitionKey(person.LastName));

                this.SendMessageToConsoleAndWait($"Document {person.Id} already exists in collection {collection}");
            }
            catch (CosmosException dce)
            {
                if (dce.StatusCode == HttpStatusCode.NotFound)
                {

                    await this?.container.CreateItemAsync<Person>(person,
new PartitionKey(person.LastName));

                    this.SendMessageToConsoleAndWait($"Created new document
{person.Id} in collection {collection}");
                }
            }
        }
    }
}
When you work with the SQL API, the Azure Cosmos DB SDK provides you with the appropriate classes for working with the different elements of the account. In the example shown in Listing 2-2, you need to create a CosmosClient object before you can access your Azure Cosmos DB account. The Azure Cosmos DB SDK also provides you with the classes Database and Container for working with these elements. When you need to create a Database or a Container, you can use CreateDatabaseIfNotExistsAsync or CreateContainerIfNotExistsAsync, respectively. These IfNotExists methods automatically check to determine whether the Container or Database exists in your Cosmos DB account; if they don’t exist, the method automatically creates the Container or the Database. When you create a new container in your database, notice that in this example, you have provided the PartitionKey using the appropriate constructor overload.
However, when you need to create a new document in the database, you don’t have available this type of IfNotExists method. In this situation, you have two options:
Use the method UpsertItemAsync, which creates a new document if the document doesn’t exist or updates an existing document.
Implement your own version of the IfNotExists method, so you need to check whether the document already exists in the container. If the document doesn’t exist, then you create the actual document, as shown in the following fragment from Listing 2-2. (The code in bold shows the methods that you need to use for creating a document.)
try
{

    await this?.container.ReadItemAsync<Person> (person.Id, new PartitionKey
(person.LastName));

    this.SendMessageToConsoleAndWait($"Document {person.Id} already exists in
collection {collection}");
}
catch (CosmosException dce)
{
    if (dce.StatusCode == HttpStatusCode.NotFound)
    {

        await this?.container.CreateItemAsync<Person>(person,
new PartitionKey(person.LastName));

        this.SendMessageToConsoleAndWait($"Created new document {person.Id} in
collection {collection}");
    }
}
When you create the document using the CreateItemAsync method, notice that you can provide the value for the partition key by using the following code snippet new PartitionKey(person.LastName). If you don’t provide the value for the partition key, the correct value is inferred from the document that you are trying to insert into the database.
You need to do this verification because you get a CosmosException with StatusCode 409 (Conflict) if you try to create a document with the same Id of an already existing document in the collection. Similarly, you get a CosmosException with StatusCode 404 (Not Found) if you try to delete a document that doesn’t exist in the container using the DeleteItemAsync method or if you try to replace a document that doesn’t exist in the container using the ReplaceItemAsync method. Notice that these two methods also accept a partition key parameter.
When you create a document, you need to provide an Id property of type string to your document. This property needs to identify your document inside the collection uniquely. If you don’t provide this property, Cosmos DB automatically adds it to the document for you, using a GUID string.
As you can see in the example code in Listing 2-2, you can query your documents using LINQ or SQL sentences. In this example, I have used a pretty simple SQL query for getting documents that represent a person with the male gender. However, you can construct more complex sentences like a query that returns all people who live in a specific country, using the WHERE Address.Country = ‘Spain’ expression, or people that have an Android device using the WHERE ARRAY_CONTAINS(Person.Devices, { ‘OperatingSystem’: ‘Android’}, true) expression.
Once you have modified the Program.cs file, you need to create some additional classes that you use in the main program for managing documents. You can find these new classes in Listings 2-3 to 2-5.
In the Visual Studio Code window, create a new folder named Model in the project folder.
Create a new C# class file in the Model folder and name it Person.cs.
Replace the content of the Person.cs file with the content of Listing 2-3. Change the namespace as needed for your project.
Create a new C# class file in the Model folder and name it Device.cs.
Replace the content of the Device.cs file with the content of Listing 2-4. Change the namespace as needed for your project.
Create a new C# class file in the Model folder and name it Address.cs.
Replace the content of the Address.cs file with the content of Listing 2-5. Change the namespace as needed for your project.
At this point, you can run the project by pressing F5 in the Visual Studio Code window. Check to see how your code is creating and modifying the different databases, document collections, and documents in your Cosmos DB account. You can review the changes in your Cosmos DB account using the Data Explorer tool in your Cosmos DB account in the Azure portal.
Listing 2-3 Cosmos DB SQL API example: Person.cs
//C# .NET Core.
using Newtonsoft.Json;

namespace ch2_1_3_SQL.Model
{
    public class Person
    {
        [JsonProperty(PropertyName="id")]
        public string Id { get; set; }
        public string FirstName { get; set; }
        public string LastName { get; set; }
        public Device[] Devices { get; set; }
        public Address Address { get; set; }
        public string Gender { get; set; }
        public bool IsRegistered { get; set; }
        public override string ToString()
        {
            return JsonConvert.SerializeObject(this);
        }
    }
}
Listing 2-4 Cosmos DB SQL API example: Device.cs
//C# .NET Core.
namespace ch2_1_3_SQL.Model
{
    public class Device
    {
        public int Ram { get; set; }
        public string OperatingSystem { get; set; }
        public int CameraMegaPixels { get; set; }
        public string Usage { get; set; }
    }
}
Listing 2-5 Cosmos DB SQL API example: Address.cs
//C# .NET Core.
namespace ch2_1_3_SQL.Model
{
    public class Address
    {
        public string City { get; set; }
        public string State { get; set; }
        public string PostalCode { get; set; }
        public string Country { get; set; }
        public string Street { get; set; }
    }
}
At this point, you can press F5 in your Visual Studio Code window to execute the code. The code stops on each step for you to be able to view the result of the operation directly on the Azure portal. Use the following steps for viewing the modifications in your Cosmos DB account:
Sign in to the Azure portal (http://portal.azure.com).
In the Search box at the top of the Azure portal, type the name of your Cosmos DB account and click the name of the account.
On your Cosmos DB Account blade, click Data Explorer.
On the Data Explorer blade, on the left side of the panel, under the label SQL API, you should be able to see the list of databases created in your Cosmos DB account.
Working with the MongoDB API for Cosmos DB is as easy as working with any other Mongo DB library. You only need to use the connection string that you can find in the Connection String panel under the Settings section in your Azure Cosmos DB account.
The following example shows how to use Cosmos DB in your MongoDB project. For this example, you are going to use MERN (MongoDB, Express, React, and Node), which is a full-stack framework for working with MongoDB and NodeJS. Also, you need to meet the following requirements:
You must have the latest version of NodeJS installed on your computer.
You must have an Azure Cosmos DB account configured for using MongoDB API. Remember that you can use the same procedure used earlier for creating a Cosmos DB with the SQL API to create an Azure Cosmos DB account with the MongoDB API. You only need to select the correct API when you are creating your Cosmos DB account.
You need one of the connection strings that you can find in the Connection String panel in your Azure Cosmos DB account in the Azure portal. You need to copy one of these connection strings because you need to use it later in the code.
Use the following steps to connect a MERN project with Cosmos DB using the MongoDB API:
Create a new folder for your project.
Open the terminal and run the following commands:
git clone https://github.com/Hashnode/mern-starter.git
cd mern-starter
npm install
Open your preferred editor and open the mern-starter folder. Don’t close the terminal window that you opened before.
In the mern-starter folder, in the server subfolder, open the config.js file and replace the content of the file with the following code:
const config = {
  mongoURL: process.env.MONGO_URL || '<YOUR_COSMOSDB_CONNECTION_STRING>',
  port: process.env.PORT || 8000,
};
export default config;
On the terminal window, run the command npm start. This command starts the NodeJS project and creates a Node server listening on port 8000.
Open a web browser and navigate to http://localhost:8000. This opens the MERN web project.
Open a new browser window, navigate to the Azure portal, and open the Data Explorer browser in your Azure Cosmos DB account.
In the MERN project, create, modify, or delete some posts. Review how the document is created, modified, and deleted from your Cosmos DB account.
Set the appropriate consistency level for operations
One of the main benefits offered by Cosmos DB is the ability to have your data distributed across the globe with low latency when accessing the data. This means that you can configure Cosmos DB for replicating your data between any of the available Azure regions while achieving minimal latency when your application accesses the data from the nearest region. If you need to replicate your data to an additional region, you only need to add to the list of regions in which your data should be available.
This replication across the different regions has a drawback—the consistency of your data. To avoid corruption, your data needs to be consistent between all copies of your database. Fortunately, the Cosmos DB protocol offers five levels of consistency replication. Going from consistency to performance, you can select how the replication protocol behaves when copying your data between all the replicas that are configured across the globe. These consistency levels are region agnostic, which means the region that started the read or write operation or the number of regions associated with your Cosmos DB account doesn’t matter, even if you configured a single region for your account. You configure this consistency level at the Cosmos DB level, and it applies to all 92databases, collections, and documents stored inside the same account. You can choose among the consistency levels shown in Figure 2-2. Use the following procedure to select the consistency level:
Sign in to the Azure portal (http://portal.azure.com).
In the Search box at the top of the Azure portal, type the name of your Cosmos DB account and click the name of the account.
On your Cosmos DB account blade, click Default Consistency in the Settings section.
On the Default Consistency blade, select the desired consistency level. Your choices are Strong, Bounded Staleness, Session, Consistent Prefix, and Eventual.
Click the Save icon in the top-left corner of the Default Consistency blade.
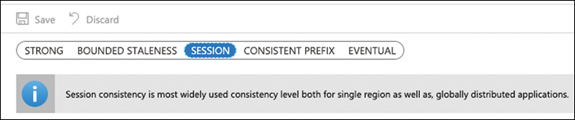
Figure 2-2 Selecting the consistency level
Strong The read operations are guaranteed to return the most recently committed version of an element; that is, the user always reads the latest committed write. This consistency level is the only one that offers a linearizability guarantee. This guarantee comes at a price. It has higher latency because of the time needed to write operation confirmations, and the availability can be affected during failures.
Bounded Staleness The reads are guaranteed to be consistent within a preconfigured lag. This lag can consist of a number of the most recent (K) versions or a time interval (T). This means that if you make write operations, the read of these operations happens in the same order but with a maximum delay of K versions of the written data or T seconds since you wrote the data in the database. For reading operations that happen within a region that accepts writes, the consistency level is identical to the Strong consistency level. This level is also known as “time-delayed linearizability guarantee.”
Session Scoped to a client session, this consistency level offers the best balance between a strong consistency level and the performance provided by the eventual consistency level. It best fits applications in which write operations occur in the context of a user session.
Consistent Prefix This level guarantees that you always read data in the same order that you wrote the data, but there’s no guarantee that you can read all the data. This means that if you write “A, B, C” you can read “A”, “A, B” or “A, B, C” but never “A, C” or “B, A, C.”
Eventual There is no guarantee for the order in which you read the data. In the absence of a write operation, the replicas eventually converge. This consistency level offers better performance at the cost of the complexity of the programming. Use this consistency level if the order of the data is not essential for your application.
The best consistency level choice depends on your application and the API that you want to use to store data. As you can see in the different consistency levels, your application’s requirements regarding data read consistency versus availability, latency, and throughput are critical factors that you need to consider when making your selection.
You should consider the following points when you use SQL or Table API for your Cosmos DB account:
The recommended option for most applications is the level of session consistency.
If you are considering the strong consistency level, we recommend that you use the bonded staleness consistency level because it provides a linearizability guarantee with a configurable delay.
If you are considering the eventual consistency level, we recommend that you use the consistent prefix consistency level because it provides comparable levels of availability and latency with the advantage of guaranteed read orders.
Carefully evaluate the strong and eventual consistency levels because they are the most extreme options. In most situations, other consistency levels can provide a better balance between performance, latency, and data consistency.
When you use Cassandra or MongoDB APIs, Cosmos DB maps the consistency levels offered by Cassandra and MongoDB to the consistency level offered by Cosmos DB. The reason for doing this is because when you use these APIs, neither Cassandra nor MongoDB offers a well-defined consistency level. Instead, Cassandra provides write or read consistency levels that map to the Cosmos DB consistency level in the following ways:
Cassandra write consistency level This level maps to the default Cosmos DB account consistency level.
Cassandra read consistency level Cosmos DB dynamically maps the consistency level specified by the Cassandra driver client to one of the Cosmos DB consistency levels.
On the other hand, MongoDB allows you to configure the following consistency levels: Write Concern, Read Concern, and Master Directive. Similar to the mapping of Cassandra consistency levels, Cosmos DB consistency levels map to MongoDB consistency levels in the following ways:
MongoDB write concern consistency level This level maps to the default Cosmos DB account consistency level.
MongoDB read concern consistency level Cosmos DB dynamically maps the consistency level specified by the MongoDB driver client to one of the Cosmos DB consistency levels.
Configuring a master region You can configure a region as the MongoDB “master” by configuring the region as the first writable region.
Create Cosmos DB containers
When you are working with Cosmos DB, you have several layers in the hierarchy of entities managed by the Cosmos DB account. The first layer is the Azure Cosmos DB account, where you choose the API that you want to use for accessing your data. Remember that this API has implications about how the data is stored in the databases.
The second layer in the hierarchy is the database. You can create as many databases as you need in your Cosmos DB account. Databases are a way of grouping containers, and you can think in databases like in namespaces. At this level, you can configure the throughput associated to the containers included in the database. Depending on the API that you are using, the database has a different name:
SQL API Database.
Cassandra API Keyspace.
MongoDB API Database.
Gremlin API Database.
Table API This concept does not apply to Table API, although under the hood when you create your first Table, Cosmos DB creates a default database for you.
A container in an Azure Cosmos DB account is the unit of scalability for throughput and storage. When you create a new container, you need to set the partition key for establishing the way that the items that are going to be stored in the container are distributed across the different logical and physical partitions. As we reviewed in the “Implement partitioning schemes” section earlier in this chapter, the throughput is distributed across the logical partitions defined by the partition key.
When you create a new container, you can decide if the throughput for the container is one of the two following modes:
Dedicated All the throughput is provisioned for a container. In this mode, Azure makes a reservation of resources for the container that is backed by SLAs.
Shared The throughput is shared between all the containers configured in the database, excluding those containers that have been configured as dedicated throughput mode. The shared throughput is configured at the database level.
When you create a Cosmos DB container, there are a set of properties that you can configure. These properties affect different aspects of the container or the way the items are stored or managed. The following list shows those properties of a container that can be configured. Bear in mind that not all properties are available for all APIs:
IndexingPolicy When you add an item to a container, by default, all the properties of the item are automatically indexed. It doesn’t matter if all the items in the collection share the same schema, or each item has its own schema. This property allows you to configure how to index the items in the container. You can configure different types of indexes and include or exclude some properties from the indexes.
TimeToLive (TTL) You can configure your container to delete items after a period of time automatically. TimeToLive is expressed in seconds. You can configure the TTL value at the container or item level. If you configure the TTL at the container level, all items in the container have the same TTL, except if you configure a TTL for a specific item. A value of -1 in the TTL means that the item does not expire. If you set a TTL value to an item where its container does not have a TTL value configured, then the TTL at item level has no effect.
ChangeFeedPolicy You can read the changes made to an item in a container. The change feed provides you with the original and modified values of an item. Because the changes are persisted, you can process the changes asynchronously. You can use this feature for triggering notifications or calling APIs when a new item is inserted or an existing item is modified.
UniqueKeyPolicy You can configure which property of the item is used as the unique key. Using unique keys, you ensure that you cannot insert two items with the same value for the same item. Bear in mind that the uniqueness is scoped to the logical partition. For example, if your item has the properties email, firstname, lastname, and company, and you define email as the unique key and company as the partition key, you cannot insert an item with 96the same email and company values. You can also create compound unique keys, like email and firstname. Once you have created a unique key, you cannot change it. You can only define the unique key during the creation process of the container.
Use the following procedure to create a new collection in your Cosmos DB account. This procedure could be slightly different depending on the API that you use for your Cosmos DB account. In this procedure, you use a Cosmos DB account configured with the SQL API:
Sign in to the Azure portal (http://portal.azure.com).
In the Search box at the top of the Azure portal, type the name of your Cosmos DB account and click the name of the account.
On your Cosmos DB account blade, click Data Explorer.
On the Data Explorer blade, click the New Container icon in the top-left corner of the blade.
On the Add Container panel, shown in Figure 2-3, provide a name for the new database. If you want to add a container to an existing database, you can select the database by clicking the Use Existing radio button.
Ensure that the Provision database throughput check is selected. Using this option, you are configuring this container as a shared throughput container. If you want to create a dedicated throughput container, uncheck this option.
Leave the Throughput value set to 400. This is the value for the database throughput if the previous option is checked. Otherwise, this value represents the dedicated throughput reserved for the container.
In the Container Id text box, type a name for the container.
In the Partition Key text box, type a partition key, starting with the slash character.
If you want to create a unique key for this container, click the Add Unique Key button.
Click the OK button at the bottom of the panel.
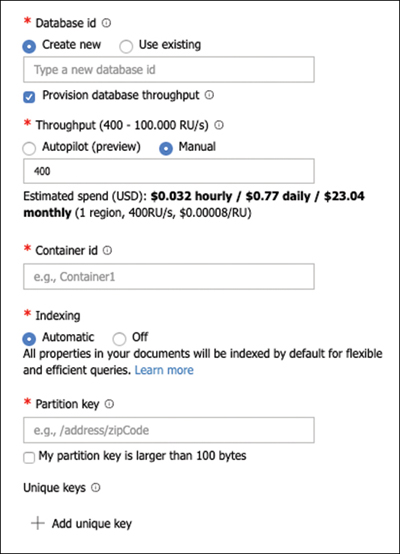
Figure 2-3 Creating a new collection
Implement server-side programming including stored procedures, triggers, and change feed notifications
When you work with Cosmos DB API, Azure allows you to write your triggers, stored procedures, and user-defined functions. You can write these procedures and functions using JavaScript. Before you can call a stored procedure, trigger, or user-defined function, you need to register it. You can use the Azure portal, the JavaScript language integrated query API in Cosmos DB, or the Cosmos DB SQL API client SDK for creating and calling your stored procedures, triggers, and user-defined functions.
Any stored procedure, trigger, or user-defined function that you write is registered on a container basis. That means that you need to register the stored procedure on each container where you want to execute your stored procedure. You also need to consider that stored procedures and triggers are scoped to partitions. Any item with a partition key value different from the partition key of the item that fired the trigger or the stored procedure is not visible.
When you are writing a stored procedure, trigger, or user-defined function, you need to create a reference to the execution context. This context gives you access to the requests that fired the stored procedure or trigger and allows you to work with the responses and items that you want to insert into the database. In general terms, the context gives you access to all the operations that you can perform in the Azure Cosmos DB database. The following procedure shows how to create a stored procedure in an Azure Cosmos DB SQL API account:
Open the Azure portal (https://portal.azure.com).
In the Search text box in the top area of the portal, type the name of your Cosmos DB account. Remember that this needs to be an SQL API Cosmos DB account.
On your Cosmos DB SQL API account, click Data Explorer.
Click an existing database. If you don’t have any database, create a new one for testing purposes.
Click an existing container, or you can create a testing container following the procedure that we reviewed in a previous section.
Click the New Stored Procedure button. This button creates a new sample stored procedure that you can use as a template for your stored procedures.
In the Stored Procedure Id text box, provide a name for the stored procedure.
Replace the content of the New Stored Procedure tab with the content of Listing 2-6.
Listing 2-6 Cosmos DB SQL API stored procedure
//JavaScript
function createNewDocument(docToCreate) {
    var context = getContext();
    var container = context.getCollection();
    var response = context.getResponse();

    console.log(docToCreate);
    var accepted = container.createDocument(container.getSelfLink(),
        docToCreate,
        function (err, docCreated) {
            if (err) throw new Error('Error creating a new document: ' + err.message);
            response.setBody(docCreated);
        });

    if (!accepted) return;
}
Click the Save button.
Click the Execute button. This button opens the Input Parameters blade.
In the Input Parameters blade, in the Partition Key Value section, change the type from Custom to String.
In the Partition Key Value section, in the Value text box, type a value to the partition key. Remember that this partition key is the one that you have defined for the container where you are creating this stored procedure.
In the Type drop-down menu in the Enter Input Parameters section, ensure that the value String is selected.
In the Param text box, type the document in JSON format that you want to insert. For the sake of simplicity, use a string with a structure similar to {“id”: “12345”, “key”: “value”}.
Click the Execute button at the bottom of the Input Parameters panel.
In the Data Explorer navigation tree, click on the Items leaf below the container where you are creating the stored procedure.
Ensure that the new document has been correctly inserted in your container.
Although the previous example is quite simple, there are some interesting points that we should review. One of the essential points that you need to consider when programming your stored procedures, user-defined functions or trigger, is the fact that the input parameters always have the string type. This means that if you need to pass an object to the stored procedure, you need to stringify the object, and then convert back to a JSON object by using the JSON.parse() method.
As you can see, we use the global getContext() method for getting a reference to the context. That context gives us access to the features of the Cosmos DB account. Then we got a reference to the current container by using the getContainer() method in the context. We also use the getResponse() method from the context for sending back information to the client.
Because we are going to create a new document in the container, we need to use the createDocument() method in the container. This method requires a link to the container where we are going to insert the document, and the document itself. Because the methods require a JSON document, if the value of the input parameter is not a valid JSON string, you get a JSON parse error here. We also provided an optional anonymous function for managing any error that may arise during the creation of the document. If you don’t provide a callback function, any error is thrown as an exception.
Creating a trigger is quite similar to create a stored procedure. The concepts are equivalent, but you need to consider when you need to execute the action of your trigger. If you need to make an operation before the item is inserted into the container, you need to use a pre-trigger. If you need to make an action after the item has been successfully inserted in the container, you need to use a post-trigger.
Pre-triggers cannot have input parameters. Because the item is not actually in the database, you need to work with the request that fired the trigger. This request contains the information needed for inserting the new item into the collection. You can get a reference to the request by using the getRequest() method from the context object. Once you have made your modifications to the original item, you can send the modified item to the database by using the request.setBody() method.
Skill 2.2: Develop solutions that use Blob Storage
Storing information in SQL or NoSQL databases is a great way to save that information when you need to save schemaless documents or if you need to guarantee the integrity of the data. The drawback of these services is that they are relatively expensive for storing data that doesn’t have such requirements.
Azure Blob Storage allows you to store information that doesn’t fit the characteristics of SQL and NoSQL storage in the cloud. This information can be images, videos, office documents, or more. The Azure Blob Storage still provides high-availability features that make it an ideal service for storing a large amount of data but at a lower price compared to the other data storage solutions that we reviewed earlier in this chapter.
Move items in Blob Storage between Storage Accounts or containers
When you are working with Azure Blob Storage, there can be situations in which you may need to move blobs from one Storage Account to another or between containers. For particular situations, there are several tools that you can use for performing these tasks:
Azure Storage Explorer Is a graphical tool that allows you to manage the different operations with the storage services like Azure Storage, Azure Data Lake Storage, Azure Cosmos DB, and virtual disks.
AzCopy Is a command-line tool for performing bulk copy operations between different sources and Azure Storage accounts.
Python Using the azure-storage-blob package, you can manage your Azure Storage Account using Python.
SSIS The SQL Server Integration Service Feature Pack for Azure allows you to transfer data between your on-premises data sources and your Azure Storage Account.
One of the things that all these options have in common is that they don’t provide the move operation as an option. If you need to move blobs or containers between different locations, you need to perform a copy operation, and then delete the source blob or container once the copy operation finishes successfully.
The following example shows how to move a blob called testing.zip between two different containers in different Azure Storage Accounts using Azure Storage Explorer. For this example, you need to create two Azure Storage Accounts with two different containers. Then upload a blob to one of the storage accounts.
Open Azure Storage Explorer. You can download it from https://azure.microsoft.com/en-us/features/storage-explorer/.
On the Azure Storage Explorer, on the left side of the window, click the Manage Accounts button.
On the Account Management section, click the Add An Account link.
On the Connect To Azure Storage window, shown in Figure 2-4, ensure that the option Add An Azure Account is selected, and in the Azure Environment drop-down menu, the Azure option is selected.
Click Next.
Log into your Azure subscription.
Once you are logged in your Azure subscription, your Azure account should appear in the Account Management.
Click Apply. This would automatically switch to the Explorer section.
On the Explorer section, in the navigation tree on the left side of the Azure Storage Explorer window, navigate to your source Storage Account.
Expand the leaf representing your source Storage Account.

Figure 2-4 Creating a new Collection
Expand the Blob Containers leaf below your source Storage Account leaf.
Click the leaf representing the container with the blob that you want to move. This action opens a new tab in the Azure Storage Explorer window with the name of your container.
Click the blob that you want to move.
Click the Copy button on the menu bar on the top side of the container’s tab.
Navigate to the destination container and click on the leaf representing the destination container.
On the tab for the destination container, click the button Paste in the menu bar.
Ensure that on the Activities tab at the bottom of the Azure Storage Explorer window appears a message similar to the one shown in Figure 2-5.
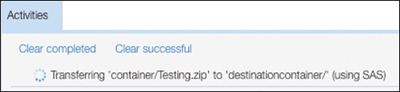
Figure 2-5 Creating a new Collection
Click on the source container’s tab.
Select the blob that you want to move.
Click the Delete button on the menu bar in the container’s tab.
On the Microsoft Azure Storage Explorer – Delete dialog box, click Delete.
The procedure for performing the same move action using other tools like Python or AzCopy is similar to the one shown in the previous example. You need to first copy the blob to the destination container and once the copy finishes successfully, you can remove the original blob.
The AzCopy tool is ideal for doing incremental copy scenarios or copying an entire account into another account. You can use the following command for copying blob items between containers in different Storage Accounts:
azcopy copy <URL_Source_Item><Source_SASToken> <URL_Target_Container><Target_SASToken>
Set and retrieve properties and metadata
When you work with Azure Storage services, you can work with some additional information assigned to your blobs. This additional information is stored in the form of system properties and user-defined metadata:
System properties This is information that the Storage services automatically adds to each storage resource. You can modify some of these system properties, while others are read-only. Some of these system properties correspond with some HTTP headers. You don’t need to worry about maintaining these system properties because the Azure Storage client libraries automatically make any needed modification for you.
User-defined metadata You can assign key-value pairs to an Azure Storage resource. These metadata are for your own purposes and don’t affect the behavior of the Azure Storage service. You need to take care of updating the value of these metadata according to your needs.
When working with blob metadata, you can use the appropriate SDK from your preferred language, or you can use the command az storage blob metadata from the Azure CLI. The following example shows how to work with properties and metadata using the .NET SDK:
Open Visual Studio Code and create a folder for your project.
In the Visual Studio Code Window, open a new terminal.
Use the following command to create a new console project:
dotnet new console
Use the following command to install NuGet packages:
dotnet add package <NuGet_package_name>
Install the following NuGet packages:
Microsoft.Azure.Storage.Blob
Microsoft.Azure.Storage.Common
Microsoft.Extensions.Configuration
Microsoft.Extensions.Configuration.Binder
Microsoft.Extensions.Configuration.Json
In the project folder, create a new JSON file and name it AppSettings.json. Copy the content from Listing 2-7 to the JSON file and replace the value of the variables with the values of your storage accounts.
Create a C# class file and name it AppSettings.cs.
Replace the contents of the AppSettings.cs file with the contents of Listing 2-8. Change the name of the namespace to match your project’s name.
Create a C# class file and name it Common.cs.
Replace the contents of the Common.cs file with the contents of Listing 2-9.
Change the name of the namespace to match your project’s name.
Replace the contents of the Program.cs file with the contents of Listing 2-10. Change the name of the namespace to match your project’s name.
Edit your .csproj project file and add the following code inside the ItemGroup section:
<None Update="AppSettings.json">
    <CopyToOutputDirectory>PreserveNewest</CopyToOutputDirectory>
</None>
At this point, you can set some breakpoints in the Program.cs file to see, step by step, how the code moves the blob items between the different containers and Storage Accounts.
In the Visual Studio Window, press F5 to build and run your code.
Listing 2-7 AppSettings.json configuration file
{
    "SASToken": "<SASToken_from_your_first_storage_account>",
    "AccountName": "<name_of_your_first_storage_account>",
    "ContainerName": "<source_container_name>"
}
Listing 2-8 AppSettings.cs C# class
//C# .NET Core

using Microsoft.Extensions.Configuration;

namespace ch2_2_2
{
    public class AppSettings
    {
        public string SASToken { get; set; }
        public string AccountName { get; set; }
        public string ContainerName { get; set; }

        public static AppSettings LoadAppSettings()
        {
            IConfigurationRoot configRoot = new ConfigurationBuilder()
                .AddJsonFile("AppSettings.json",false)
                .Build();
            AppSettings appSettings = configRoot.Get<AppSettings>();
            return appSettings;
        }
    }
}
Listing 2-9 Common.cs C# class
//C# .NET Core

using System;
using Microsoft.Azure.Storage;
using Microsoft.Azure.Storage.Auth;
using Microsoft.Azure.Storage.Blob;

namespace ch2_2_2
{
    public class Common
    {

        public static CloudBlobClient CreateBlobClientStorageFromSAS(string SAStoken,
string accountName)
        {
            CloudStorageAccount storageAccount;
            CloudBlobClient blobClient;
            try
            {
                bool useHttps = true;
                StorageCredentials storageCredentials =
                new StorageCredentials(SAStoken);
                storageAccount = new CloudStorageAccount(storageCredentials,
accountName, null, useHttps);
                blobClient = storageAccount.CreateCloudBlobClient();
            }
            catch (System.Exception)
            {
                throw;
            }

            return blobClient;

        }
    }
}
Listing 2-10 shows how to create a new container and get a list of some system properties assigned automatically to the container when you create it.
Listing 2-10 Program.cs C# class
//C# .NET Core
// Getting system properties from a storage resource
using System;
using System.Threading.Tasks;
using Microsoft.Azure.Storage.Blob;

namespace ch2_2_2
{
    class Program
    {
        static void Main(string[] args)
        {
            Console.WriteLine("Getting System properties Demo!");

            AppSettings appSettings = AppSettings.LoadAppSettings();

            //Create a CloudBlobClient for working with the Storage Account
            CloudBlobClient blobClient = Common.CreateBlobClientStorageFromSAS
             (appSettings.SASToken, appSettings.AccountName);

            //Get a container reference for the new container.
            CloudBlobContainer container = blobClient.GetContainerReference
             (appSettings.ContainerName);

            //Create the container if not already exists
            container.CreateIfNotExists();

            //You need to fetch the container properties before getting their values
            container.FetchAttributes();
            Console.WriteLine($"Properties for container {container.StorageUri.
PrimaryUri.ToString()}");
            System.Console.WriteLine($"ETag: {container.Properties.ETag}");
            System.Console.WriteLine($"LastModifiedUTC: {container.Properties.
LastModified.ToString()}");
            System.Console.WriteLine($"Lease status: {container.Properties.LeaseStatus.
ToString()}");
            System.Console.WriteLine();
        }
    }
}
As you can see in the previous code in Listing 2-10, you need to use the FetchAttributes() or FetchAttributesAsync() method before you can read the properties from the container, stored in the Properties property of the CloudBlobContainer or CloudBlockBlob objects. If you get null values for system properties, ensure that you called the FetchAttributes() method before accessing the system property.
Working with user-defined metadata is quite similar to working with system properties. The main difference is that you can add your custom key pairs to the storage resource. These user-defined metadata are stored in the Metadata property of the storage resource. Listing 2-11 extends the example in Listing 2-10 and shows how to set and read user-defined metadata in the container that you created in Listing 2-10. Copy the content from Listing 2-11 and insert the code in the Program.cs file after the last System.Console.WriteLine().
Listing 2-11 Setting user-defined metadata
//C# .NET Core
//Add some metadata to the container that we created before
            container.Metadata.Add("department", "Technical");
            container.Metadata["category"] = "Knowledge Base";
            container.Metadata.Add("docType", "pdfDocuments");

            //Save the containers metadata in Azure
            container.SetMetadata();


            //List newly added metadata. We need to fetch all attributes before being
            //able to read if not, we could get nulls or weird values
            container.FetchAttributes();

            System.Console.WriteLine("Container's metadata:");
            foreach (var item in container.Metadata)
            {
                System.Console.Write($"\tKey: {item.Key}\t");
                System.Console.WriteLine($"\tValue: {item.Value}");
            }
You can find a complete list of system properties in the Microsoft.Azure.Storage.Blob .NET client reference at https://docs.microsoft.com/en-us/dotnet/api/microsoft.azure.storage.blob.blobcontainerproperties. The BlobContainerProperties and BlobProperties classes are responsible for storing the system properties for the storage resources in a Blob Storage account.
You can also view and edit system properties and user-defined metadata by using the Azure portal, using the Properties and Metadata sections in the Settings section of your container, or clicking on the ellipsis next to the blob item and selecting the Blob Properties option in the contextual menu.
Interact with data using the appropriate SDK
Although using any of the options that we reviewed at the beginning of the skill may be appropriate for some situations, you may need to get more fine-grained control of the items that you need to move between containers or even Storage Accounts.
Microsoft provides several SDKs for working with data in your Storage Accounts. You can find SDKs for the main programming languages supported by Microsoft, like .NET, Java, Python, JavaScript (Node.js or browser), Go, PHP, or Ruby.
The following example written in .NET Core shows how to move a blob item between two containers in the same Storage Account and how to move a blob item between two containers in different Storage Accounts. Before you can run this example, you need to create two Storage Accounts with two blob containers. For the sake of simplicity, you should create the two containers with the same name in the two different Storage Accounts. Also, you need to upload two control files as blob items to one of the containers in one Storage Account:
Open Visual Studio Code and create a folder for your project.
In the Visual Studio Code Window, open a new terminal.
Use the following command to create a new console project:
dotnet new console
Use the following command to install NuGet packages:
dotnet add package <NuGet_package_name>
Install the following NuGet packages:
Azure.Storage.Blobs
Azure.Storage.Common
Microsoft.Extensions.Configuration
Microsoft.Extensions.Configuration.Binder
Microsoft.Extensions.Configuration.Json
In the project folder, create a new JSON file and name it AppSettings.json. Copy the content from Listing 2-12 to the JSON file.
Create a C# class file and name it AppSettings.cs.
Replace the contents of the AppSettings.cs file with the contents of Listing 2-13. Change the name of the namespace to match your project’s name.
Create a C# class file and name it Common.cs.
Replace the contents of the Common.cs file with the contents of Listing 2-14.
Change the name of the namespace to match your project’s name.
Replace the contents of the Program.cs file with the contents of Listing 2-15. Change the name of the namespace to match your project’s name.
Edit your .csproj project file and add the following code inside the ItemGroup section:
<None Update="AppSettings.json">
    <CopyToOutputDirectory>PreserveNewest</CopyToOutputDirectory>
</None>
At this point, you can set some breakpoints in the Program.cs file to see, step by step, how the code moves the blob items between the different containers and Storage Accounts.
In the Visual Studio Window, press F5 to build and run your code. You can use the Azure portal or the Microsoft Azure Storage Explorer desktop application to review how your blob items change their locations.
Listing 2-12 AppSettings.json configuration file
{
    "SourceSASConnectionString": "<SASConnectionString_from_your_first_storage_
account>",
    "SourceAccountName": "<name_of_your_first_storage_account>",
    "SourceContainerName": "<source_container_name>",
    "DestinationSASConnectionString": "<SASConnectionString_from_your_second_storage_
account>",
    "DestinationAccountName": "<name_of_your_second_storage_account>",
    "DestinationContainerName": "<destination_container_name>"
}
Listing 2-13 AppSettings.cs C# class
//C# .NET Core
using Microsoft.Extensions.Configuration;

namespace ch2_2_3
{
    public class AppSettings
    {
        public string SourceSASConnectionString { get; set; }
        public string SourceAccountName { get; set; }
        public string SourceContainerName { get; set; }
        public string DestinationSASConnectionString { get; set; }
        public string DestinationAccountName { get; set; }
        public string DestinationContainerName { get; set; }

        public static AppSettings LoadAppSettings()
        {
            IConfigurationRoot configRoot = new ConfigurationBuilder()
                .AddJsonFile("AppSettings.json",false)
                .Build();
            AppSettings appSettings = configRoot.Get<AppSettings>();
            return appSettings;
        }
    }
}
Listing 2-14 Common.cs C# class
//C# .NET Core
using Azure.Storage.Blobs;

namespace ch2_2_3
{
    public class Common
    {

        public static BlobServiceClient CreateBlobClientStorageFromSAS(string
SASConnectionString)
        {
            BlobServiceClient blobClient;
            try
            {
                blobClient = new BlobServiceClient(SASConnectionString);
            }
            catch (System.Exception)
            {
                throw;
            }

            return blobClient;

        }
    }
}
In Listing 2-15, portions of the code that are significant to the process of working with the Azure Blob Storage service are shown in bold.
Listing 2-15 Program.cs C# class
//C# .NET Core
using System.Threading.Tasks;
using System;
using Azure.Storage.Blobs;
using Azure.Storage.Blobs.Models;

namespace ch2_2_3
{
    class Program
    {
        static void Main(string[] args)
        {
            Console.WriteLine("Copy items between Containers Demo!");
            Task.Run(async () => await StartContainersDemo()).Wait();
            Console.WriteLine("Move items between Storage Accounts Demo!");
            Task.Run(async () => await StartAccountDemo()).Wait();
        }

        public static async Task StartContainersDemo()
        {
            string sourceBlobFileName = "Testing.zip";
            AppSettings appSettings = AppSettings.LoadAppSettings();

            //Get a cloud client for the source Storage Account
            BlobServiceClient sourceClient = Common.CreateBlobClientStorageFromSAS
(appSettings.SourceSASConnectionString);

            //Get a reference for each container
            var sourceContainerReference = sourceClient.GetBlobContainerClient
(appSettings.SourceContainerName);
            var destinationContainerReference = sourceClient.GetBlobContainer
Client(appSettings.DestinationContainerName);

            //Get a reference for the source blob
            var sourceBlobReference = sourceContainerReference.GetBlobClient
(sourceBlobFileName);
            var destinationBlobReference = destinationContainerReference.
GetBlobClient(sourceBlobFileName);

            //Copy the blob from the source container to the destination container
            await destinationBlobReference.StartCopyFromUriAsync(sourceBlob
Reference.Uri);

        }

        public static async Task StartAccountDemo()
        {
            string sourceBlobFileName = "Testing.zip";
            AppSettings appSettings = AppSettings.LoadAppSettings();

            //Get a cloud client for the source Storage Account
            BlobServiceClient sourceClient = Common.CreateBlobClientStorageFromSAS
(appSettings.SourceSASConnectionString);
            //Get a cloud client for the destination Storage Account
            BlobServiceClient destinationClient = Common.CreateBlobClientStorage
FromSAS(appSettings.DestinationSASConnectionString);

            //Get a reference for each container
            var sourceContainerReference = sourceClient.GetBlobContainerClient
(appSettings.SourceContainerName);
            var destinationContainerReference = destinationClient.GetBlobContainer
Client(appSettings.DestinationContainerName);

            //Get a reference for the source blob
            var sourceBlobReference = sourceContainerReference.GetBlobClient
(sourceBlobFileName);
            var destinationBlobReference = destinationContainerReference.
GetBlobClient(sourceBlobFileName);

            //Move the blob from the source container to the destination container
            await destinationBlobReference.StartCopyFromUriAsync(sourceBlob
Reference.Uri);
            await sourceBlobReference.DeleteAsync();
        }
    }
}
In this example, you made two different operations—a copy between containers in the same Storage Account and a movement between containers in different Storage Accounts. As you can see in the code shown previously in Listing 2-15, the high-level procedure for moving blob items between containers is
Create a BlobServiceClient instance for each Storage Account that is involved in the blob item movement.
Create a reference for each container. If you need to move a blob item between containers in a different Storage Account, you need to use the BlobServiceClient object that represents each Storage Account.
Create a reference for each blob item. You need a reference to the source blob item because this is the item that you are going to move. You use the destination blob item reference for performing the actual copy operation.
Once you are done with the copy, you can delete the source blob item by using the DeleteAsync() method.
Although this code is quite straightforward, it has a critical problem that you can solve in the following sections. If someone else modifies the source blob item while the write operation is pending, the copy operation fails with an HTTP status code 412. We are going to fix this later in this section.
You may notice that the code in this example uses a different SDK from the code in the previous sections. The reason for this is that, at the time of this writing, there are available two different versions of the .NET SDK for working with Azure Storage:
Microsoft.Azure.Storage.Blob This is the SDK version 11. You can configure permissions on the blobs using this version.
Azure.Storage.Blobs This is the SDK version 12. This version simplifies the way of working with Azure Storage Blobs but does not offer the full set of features that has version 11. You cannot set permissions using this version.
When you are working with the Blob Storage service—in which several users or processes can simultaneously access the same Storage Account—you can face a problem when two users or processes are trying to access the same blob. Azure provides a leasing mechanism for solving this kind of situation. A lease is a short block that the blob service sets on a blob or container item for granting exclusive access to that item. When you acquire a lease to a blob, you get exclusive write and delete access to that blob. If you acquire a lease in a container, you get exclusive delete access to the container.
When you acquire a lease for a storage item, you need to include the active lease ID on each write operation that you want to perform on the blob with the lease. You can choose the duration for the lease time when you request it. This duration can last from 15 to 60 seconds or forever. Each lease can be in one of the following five states:
Available The lease is unlocked, and you can acquire a new lease.
Leased There is a lease granted to the resource, and the lease is locked. You can acquire a new lease if you use the same ID that you got when you created the lease. You can also release, change, renew, or break the lease when it is in this status.
Expired The duration configured for the lease has expired. When you have a lease on this status, you can acquire, renew, release, or break the lease.
Breaking You have broken the lease, but it’s still locked until the break period expires. In this status, you can release or break the lease.
Broken The break period has expired, and the lease has been broken. In this status, you can acquire, release, and break a lease. You need to break a lease when the process that acquired the lease finishes suddenly, such as when network connectivity issues or any other condition results in the lease not being released correctly. In these situations, you may end up with an orphaned lease, and you cannot write or delete the blob with the orphaned lease. In this situation, the only solution is to break the lease. You may also want to break a lease when you need to force the release of the lease manually.
You use the Azure portal for managing the lease status of a container or blob item, or you use it programmatically with the Azure Blob Storage client SDK. In the example shown in Listings 2-12 to 2-15, in which we reviewed how to copy and move items between containers or Storage Accounts, we saw that if some other process or user modifies the blob while our process is copying the data, we get an error. You can avoid that situation by acquiring a lease for the blob that you want to move. Listing 2-16 shows in bold the modification that you need to add to the code in Listing 2-15 so that you can acquire a lease for the blob item.
Listing 2-16 Program.cs modification
//C# .NET Core
//Add lines in bold to StartContainersDemo method on Listing 2-15
//Add the following using statement to the beginning of the file:
//using Azure.Storage.Blobs.Specialized;
public static async Task StartContainersDemo()
        {
            string sourceBlobFileName = "Testing.zip";
            AppSettings appSettings = AppSettings.LoadAppSettings();

            //Get a cloud client for the source Storage Account
            BlobServiceClient sourceClient = Common.CreateBlobClientStorageFromSAS
(appSettings.SourceSASConnectionString);

            //Get a reference for each container
            var sourceContainerReference = sourceClient.GetBlobContainerClient
(appSettings.SourceContainerName);
            var destinationContainerReference = sourceClient.GetBlobContainerClient
(appSettings.DestinationContainerName);

            //Get a reference for the source blob
            var sourceBlobReference = sourceContainerReference.GetBlobClient
(sourceBlobFileName);
            var destinationBlobReference = destinationContainerReference.GetBlobClient(
sourceBlobFileName);

            //Get the lease status of the source blob
            BlobProperties sourceBlobProperties = await sourceBlobReference.
GetPropertiesAsync();
            System.Console.WriteLine($"Lease status: {sourceBlobProperties.
LeaseStatus}" +
                        $"\tstate: {sourceBlobProperties.LeaseState}" +
                        $"\tduration: {sourceBlobProperties.LeaseDuration}");

            //Acquire an infinite lease. If you want to set a duration for the lease
            //use
            //TimeSpan.FromSeconds(seconds). Remember that seconds should be a value
            //between 15 and 60.
            //We need to save the lease ID automatically generated by Azure for release
            //the lease later.
            string leaseID = Guid.NewGuid().ToString();
            BlobLeaseClient sourceLease = sourceBlobReference.
GetBlobLeaseClient(leaseID);

            sourceLease.Acquire(new TimeSpan(-1));

            sourceBlobProperties = await sourceBlobReference.GetPropertiesAsync();
            System.Console.WriteLine($"Lease status: {sourceBlobProperties.
LeaseStatus}" +
                        $"\tstate: {sourceBlobProperties.LeaseState}" +
                        $"\tduration: {sourceBlobProperties.LeaseDuration}");

            //Copy the blob from the source container to the destination container
            await destinationBlobReference.StartCopyFromUriAsync
(sourceBlobReference.Uri);

            //Release the lease acquired previously
            sourceLease.Release();

        }
As you can see in the previous example, you need to get a reference to a BlobLeaseClient. This object allows you to acquire new leases by invoking the method Acquire(). In this example, we created an infinite lease because we used a TimeSpan with the value -1. Once we have copied the blob, we need to release the lease by using the Release() method of the BlobLeaseClient.
Implement data archiving and retention
When you are working with data, the requirements for accessing the data change during the lifetime of the data. Data that has been recently placed on your storage system usually is accessed more frequently and requires faster access than older data. If you are using the same type of storage for all your data, that means you are using storage for data that is rarely accessed. If your storage is based on SSD disk or any other technology that provides proper performance levels, this means that you can be potentially wasting expensive storage for data that is rarely accessed. A solution to this situation is to move less-frequently accessed data to a cheaper storage system. The drawback of this solution is that you need to implement a system for tracking the last time data has been accessed and moving it to the right storage system.
Azure Blob Storage provides you with the ability to set different levels of access to your data. These different access levels, or tiers, provide different levels of performance when accessing the data. Each different access level has a different price. Following are the available access tiers:
Hot You use this tier for data that you need to access more frequently. This is the default tier that you use when you create a new Storage Account.
Cool You can use this tier for data that is less frequently accessed and is stored for at least 30 days.
Archive You use this tier for storing data that is rarely accessed and is stored for at least 180 days. This access tier is available only at the blob level. You cannot configure a Storage Account with this access tier.
The different access tiers have the following performance and pricing implications:
Cool tier provides slightly lower availability, reflected in the service-level agreement (SLA) because of lower storage costs; however, it has higher access costs.
Hot and cool tiers have similar characteristics in terms of time-to-access and throughput.
Archive storage is offline storage. It has the lowest storage cost rates but has higher access costs.
The lower the storage costs, the higher the access costs.
You can use storage tiering only on General Purpose v2 (GPv2) Storage Accounts.
If you want to use storage tiering with a General Purpose v1 (GPv1) Storage Account, you need to convert to a GPv2 Storage Account.
Moving between the different access tiers is a transparent process for the user, but it has some implications in terms of pricing. In general, when you are moving from a warmer tier to a cooler tier—hot to cool or hot to archive—you are charged for the write operations to the destination tier. When you move from a cooler tier to a warmer tier—from the archive to cold or from cold to hot—you are charged for the read operations from the source tier. Another essential thing to bear in mind is how the data is moved when you change your data tier from archive to any other access tier. Because data in the archive tier is saved into offline storage, when you move data out of the access tier, the storage service needs to move the data back to online storage. This process is known as blob rehydration and can take up to 15 hours.
If you don’t manually configure the access tier for a blob, it inherits the access from its container or Storage Account. Although you can change the access tier manually using the Azure portal, this process creates an administrative overload that could also lead to human errors. Instead of manually monitoring the different criteria for moving a blob from one tier to another, you can implement policies that make that movement based on the criteria that you define. You use these policies for defining the lifecycle management of your data. You can create these lifecycle management policies by using the Azure portal, Azure PowerShell, Azure CLI, or REST API.
A lifecycle management policy is a JSON document in which you define several rules that you want to apply to the different containers or blob types. Each rule consists of a filter set and an action set.
Filter set The filter set limits the actions to only a group of items that match the filter criteria.
Action set You use this set to define the actions that are performed on the items that matched the filter.
The following procedure for adding a new policy using the Azure portal:
Sign in to the Azure portal (http://portal.azure.com).
In the Search box at the top of the Azure portal, type the name of your Storage Account.
On the Blob service section, click Lifecycle Management.
Copy the content from Listing 2-17 and paste it into the Lifecycle Management panel.
Click the Save button on the top-left corner of the panel.
Listing 2-17 Lifecycle management policy definition
{
    "rules": [
        {
            "enabled": true,
            "name": "rule1",
            "type": "Lifecycle",
            "definition": {
                "actions": {
                    "baseBlob": {
                        "tierToCool": {
                            "daysAfterModificationGreaterThan": 30
                        },
                        "tierToArchive": {
                            "daysAfterModificationGreaterThan": 90
                        },
                        "delete": {
                            "daysAfterModificationGreaterThan": 2555
                        }
                    },
                    "snapshot": {
                        "delete": {
                            "daysAfterCreationGreaterThan": 90
                        }
                    }
                },
                "filters": {
                    "blobTypes": [
                        "blockBlob"
                    ],
                    "prefixMatch": [
                        "container-a"
                    ]
                }
            }
        }
    ]
}
The previous policy applies to all blobs under the container named container-a, as stated by the prefixMatch in the filters section. In the actions sections, you can see the following things:
Blobs that are not modified in 30 days or more are moved to the cool tier.
Blobs that are not modified in 90 days or more are moved to the archive tier.
Blobs that are not modified in 2,555 days or more are deleted from the Storage Account.
Snapshots that are older than 90 days are also deleted. The lifecycle management engine process the policies every 24 hours. This means that it is possible that you won’t see your changes reflected on your Storage Account until several hours after you made the changes.
Implement hot, cool, and archive storage
In the previous section, we reviewed how to configure archiving and retention policies in your Storage Accounts. In this section, we are going to review how to work with the different performance tiers using the Azure Storage SDK.
The following example shows how to switch a blob between the different access tiers:
Open Visual Studio Code and create a folder for your project.
In the Visual Studio Code Window, open a new terminal.
Use the following command to create a new console project:
dotnet new console
Use the following command to install NuGet packages:
dotnet add package <NuGet_package_name>
Install the following NuGet packages:
Azure.Storage.Blobs
Azure.Storage.Common
Microsoft.Extensions.Configuration
Microsoft.Extensions.Configuration.Binder
Microsoft.Extensions.Configuration.Json
In the project folder, create a new JSON file and name it AppSettings.json. Copy the content from Listing 2-18 to the JSON file.
Create a C# class file and name it AppSettings.cs.
Replace the contents of the AppSettings.cs file with the contents of Listing 2-19. Change the name of the namespace to match your project’s name.
Create a C# class file and name it Common.cs.
Replace the contents of the Common.cs file with the contents of Listing 2-20.
Change the name of the namespace to match your project’s name.
Replace the contents of the Program.cs file with the contents of Listing 2-21. Change the name of the namespace to match your project’s name.
Edit your .csproj project file and add the following code inside the ItemGroup section:
<None Update="AppSettings.json">
    <CopyToOutputDirectory>PreserveNewest</CopyToOutputDirectory>
</None>
At this point, you can set some breakpoints in the Program.cs file to see, step by step, how the code moves the blob items between the different containers and Storage Accounts.
In the Visual Studio Window, press F5 to build and run your code. You can use the Azure portal or the Microsoft Azure Storage Explorer desktop application to review how your blob items change their locations.
Listing 2-18 AppSettings.json configuration file
{
    "SASConnectionString": "<SASConnectionString_from_your_first_storage_account>",
    "AccountName": "<name_of_your_first_storage_account>",
    "ContainerName": "<source_container_name>"
}
Listing 2-19 AppSettings.cs C# class
//C# .NET Core
using Microsoft.Extensions.Configuration;

namespace ch2_2_6
{
    public class AppSettings
    {
        public string SASConnectionString { get; set; }
        public string AccountName { get; set; }
        public string ContainerName { get; set; }

        public static AppSettings LoadAppSettings()
        {
            IConfigurationRoot configRoot = new ConfigurationBuilder()
                .AddJsonFile("AppSettings.json",false)
                .Build();
            AppSettings appSettings = configRoot.Get<AppSettings>();
            return appSettings;
        }
    }
}
Listing 2-20 Common.cs C# class
//C# .NET Core
using Azure.Storage.Blobs;

namespace ch2_2_6
{
    public class Common
    {

        public static BlobServiceClient CreateBlobClientStorageFromSAS(string
SASConnectionString)
        {
            BlobServiceClient blobClient;
            try
            {
                blobClient = new BlobServiceClient(SASConnectionString);
            }
            catch (System.Exception)
            {
                throw;
            }
            return blobClient;
        }
    }
}
In Listing 2-21, portions of the code that are significant to the process of working with the different Access Tiers are shown in bold.
Listing 2-21 Program.cs C# class
//C# .NET Core
using System.Threading.Tasks;
using System;
using Azure.Storage.Blobs;
using Azure.Storage.Blobs.Models;
using Azure.Storage.Blobs.Specialized;

namespace ch2_2_6
{
    class Program
    {
        static void Main(string[] args)
        {
            Console.WriteLine("Moving blobs between Access Tiers");
            Task.Run(async () => await StartContainersDemo()).Wait();
        }

        public static async Task StartContainersDemo()
        {
            string BlobFileName = "Testing.zip";
            AppSettings appSettings = AppSettings.LoadAppSettings();

            //Get a cloud client for the  Storage Account
            BlobServiceClient blobClient = Common.CreateBlobClientStorageFromSAS
(appSettings.SASConnectionString);

            //Get a reference for each container
            var containerReference = blobClient.GetBlobContainerClient(appSettings.
ContainerName);

            //Get a reference for the  blob
            var blobReference = containerReference.GetBlobClient(BlobFileName);

            //Get current Access Tier
            BlobProperties blobProperties = await blobReference.GetPropertiesAsync();
            System.Console.WriteLine($"Access Tier: {blobProperties.AccessTier}\t" +
                        $"Inferred: {blobProperties.AccessTierInferred}\t" +
                        $"Date last Access Tier change: {blobProperties.
AccessTierChangedOn}");

            //Change Access Tier to Cool
            blobReference.SetAccessTier(AccessTier.Cool);

            //Get current Access Tier
            blobProperties = await blobReference.GetPropertiesAsync();
            System.Console.WriteLine($"Access Tier: {blobProperties.AccessTier}\t" +
                        $"Inferred: {blobProperties.AccessTierInferred}\t" +
                        $"Date last Access Tier change: {blobProperties.
AccessTierChangedOn}");

            //Change Access Tier to Archive
            blobReference.SetAccessTier(AccessTier.Archive);

            //Get current Access Tier
            blobProperties = await blobReference.GetPropertiesAsync();
            System.Console.WriteLine($"Access Tier: {blobProperties.AccessTier}\t" +
                        $"Inferred: {blobProperties.AccessTierInferred}\t" +
                        $"Date last Access Tier change: {blobProperties.
AccessTierChangedOn}");

            //Change Access Tier to Hot
            blobReference.SetAccessTier(AccessTier.Hot);

            //Get current Access Tier
            blobProperties = await blobReference.GetPropertiesAsync();
            System.Console.WriteLine($"Access Tier: {blobProperties.AccessTier}\t" +
                        $"Inferred: {blobProperties.AccessTierInferred}\t" +
                        $"Date last Access Tier change: {blobProperties.
AccessTierChangedOn}\t" +
                        $"Archive Status: {blobProperties.ArchiveStatus}" );
        }
    }
}
As you can see, you can change to the different access tiers by using the SetAccessTier() method from the BlobClient object representing the blob that you are working with. You should also use the metadata property AccessTier from the blob for getting, which is the current access tier where the blob is stored. You should pay special attention to the ArchiveStatus property. If you try to change the access tier for a blob that is being rehydrated from the archive tier, you get an exception. The AccessTierInferred property is also essential, as it indicates if the current access tier is inherited from the container or is configured in the blob.
Chapter summary
Cosmos DB is a premium storage service that provides low-latency access to data distributed across the globe.
The PartitionKey system property defines the partition where the entity is stored.
Choosing the correct PartitionKey is critical for achieving the right performance level.
You can access Cosmos DB using different APIs: SQL, Table, Gremlin (Graph), MongoDB, and Cassandra.
You can create your custom indexes in Cosmos DB.
You can choose the property that is used as the partition key.
You should avoid selecting partition keys that create too many or too few logical partitions.
A logical partition has a limit of 20 GB of storage.
Consistency levels define how the data is replicated between the different regions in a Cosmos DB account.
There are five consistency levels: strong, bounded staleness, session, consistent prefix, and eventual.
Strong consistency level provides a higher level of consistency but also has a higher latency.
Eventual consistency level provides lower latency and lower data consistency.
You can move blob items between containers in the same Storage Account or containers in different Storage Accounts.
Azure Blob Storage service offers three different access tiers with different prices for storage and accessing data.
You can move less frequently accessed data to cool or archive access tiers to save money.
You can automatically manage the movement between access tiers by implementing lifecycle management policies.
Thought experiment
In this thought experiment, you can demonstrate your skills and knowledge about the topics covered in this chapter. You can find the answers to this thought experiment in the next section.
You are developing a web application that needs to work with information with a structure that can change during the lifetime of the development process. You need to query this information using different criteria. You need to ensure that your application returns the results of the queries as fast as possible. Your application needs to get information from an external system. The external system uploads information to an Azure Blob Storage Gen1 account.
With this information in mind, answer the following questions:
1. During the testing phases, you realize that the partition key is creating “hot spots.” What should you do to solve the situation?
2. The information provided by the external system should be stored for several years due to legal reasons. Once the information is processed by your application, the information is no longer needed. You need to provide a secure and cost-effective solution.
Thought experiment answers
This section contains the solutions to the thought experiment.
1. A “hot spot” appears in a Cosmos DB container when you choose a partition key that stores most of the items in the same logical partition. You can solve the “hot spot” by changing the partition key and choosing a partition key that distributes the items evenly across the different logical partitions. Unfortunately, you cannot modify a partition key once you have created the container. In this scenario, you need to create a new container with the new partition key, and then migrate all the data to the new container using the AzCopy tool.
2. Because you need to keep the data for several years, you need to use the Storage Account Access Tiers. Because you are using a Gen1 Storage Account, you cannot use access tiers in that Storage Account. You need to upgrade your Blob Storage account to a Gen2. Once you have your Gen2 Storage Account, you can configure a lifecycle management policy for automatically moving to the archive tier for those files that have not been accessed for some time.