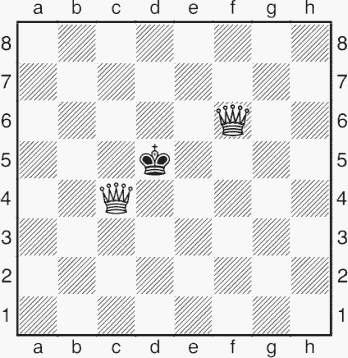
The king is not a very fast moving piece. He can move only one square at a time, and so, even on an open board, has a maximum of only eight squares at his disposal, and at the edge of a board a mere five, while in the corner, he can move to at most three squares.
Checkmate occurs when the king is attacked and there is no way of stopping the attack (whether by taking the attacking piece or putting something in the way), and all of the king’s possible flight squares are either attacked by enemy pieces or blocked by “friendly” pieces.
It is not difficult to mate a king. If you have several pieces near your opponent’s king, and his defences are not in order, you should expect to find a mate. Likewise, make sure your own king has protection when he needs it – but more on that in the later chapter on attack and defence.
If you are an experienced player, I suggest you skip this introduction and the 25 novice warm-up positions and go directly to the trickier mates in two.
To introduce you to a systematic way of thinking about checkmate, let’s consider how many squares in the king’s field (i.e. the square he is on, and those he might be able to go to) each piece can attack – see the following diagrams.
First, let’s consider the most powerful piece, the queen.

A queen can attack six squares in the king’s field (only five if not giving check). This leaves only three to be covered by other pieces.

A rook can attack four squares in the king’s field, or only three if it is giving check.
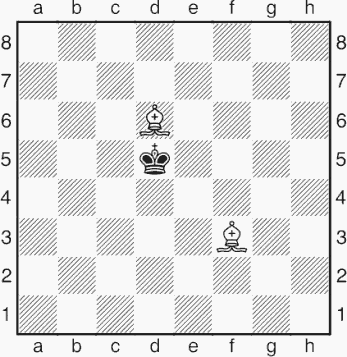
A bishop can attack three squares in the king’s field (only two if not giving check). All of these squares are of the same colour.
Next we consider the knight, which makes up for its short-range move by moving in a way that no other pieces can.

A knight can attack two squares in the king’s field. Like the bishop, all the squares are of the same colour, though the colour squares that a knight attacks changes each time it moves.
It is all too easy to forget that the humble pawn can also participate in mating attack. A pawn can attack two squares in the king’s field (only one if giving check).

Let us also not forget that the king itself can also help to deliver mate to his opposite number.

A king can attack three squares in the enemy king’s field (and cannot of course give check).
If in each case the above comments are not immediately clear, then I suggest you write down a list of the squares attacked by each white piece in the diagrams. Answers are given later.
One conclusion we can draw immediately is that the queen is a very powerful mating force in itself, and needs only a little help to deliver mate. A single piece attacking a square next to the enemy king is often all the queen needs. If you think of chess as a medieval war game, then this is the equivalent of needing only the most menial spy in the enemy palace – then a state visit by the queen (as we shall see later) wins the war in itself!
Since the rook attacks squares in a straight line, it can be particularly deadly against a king at the edge of the board.
The knight should not be underestimated. Since it moves in a different way from the other pieces, it is the perfect complement to them. Indeed a queen and knight work together so well that when they are buzzing around a king, there is more often than not a mate.
Two bishops also complement each other well, whether attacking along parallel diagonals or at right angles to each other.
This chapter features a series of positions that test your ability to deliver mate. First, here’s a brief look at some standard mating patterns.
Note that in many of the diagrams that follow, only the pieces relevant to the mating idea are shown; in a real game situation there would be plenty of other pieces present.
This is one of the simplest mating ideas, but a tremendously important one. A rook (a queen is also ideal for the purpose) attacks all the squares along the king’s first rank, while a row of pawns prevents the king from advancing to avoid the mate.

White plays 1 Rd8#.
In games between inexperienced players, it is all too common a sight for the player who has been winning to fall victim to a back-ranker. “How can they mate with just a rook?” It is a cruel and bitter blow to lose a game in this way. The simplest way to avoid all risk of a back-ranker is to move one of the pawns in front of the king one square forward. However, I would recommend this precaution only when the game is fully under control and you can spare the time. While the game is still tense, to play any of the moves ...f6, ...g6 and ...h6 not only wastes time, but may also constitute a weakness that invites an attack.
At top level, back-rankers are important too. Not generally as a one-move mating attack, but the value of a complex tactical sequence may hinge on a back-rank trick. (See the glossary entry for Back-rank Mate.)
The back-ranker is also known as the Corridor Mate, though this term also incorporates rare cases (generally in problems) where “friendly” pieces block the king’s movement forwards and backwards, or else on both sides.
If you thought “friendly” pieces didn’t live up to their name in the back-rank mate, here they are positively evil! In a smothered mate, a knight gives check, but this is enough to mate, since all of the king’s possible escape squares are occupied.
It is a bit much to expect that the opponent will block off all of his king’s escape squares and allow a knight to hop in and give mate, so generally a sacrifice will be necessary. Here is a very simple example to set up a smothered mate:

The black king has only the g8-square to which it might flee, so White lures the black queen onto that square: 1 Qg8+ Qxg8 (there is no other way to get out of check) and then 2 Ng6# finishes off nicely.
The idea of smothered mate is by no means new. The earliest recorded example is from half a millennium ago, in 1497, not long after the queen’s powers had been extended:
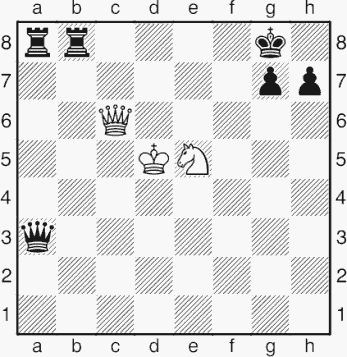
1 Qe6+ Kh8
1...Kf8 allows instant mate by either 2 Qf7# or 2 Nd7#.
2 Nf7+ Kg8 3 Nh6++
3 Nd8+ also forces mate – by modern standards an alternative solution is a major flaw in a composition.
3...Kh8 4 Qg8+! Rxg8 5 Nf7#
This position was published by Lucena in his chess manual. It is therefore rather rough on him that in common chess parlance the name Philidor is generally associated with this idea. As if to compensate for this, a standard, and very important, position in the theory of rook and pawn versus rook, first published by Salvio in 1634 is generally known as the “Lucena Position”.
The simplest way to give mate is to put your queen right next to the opponent’s king, provided your queen is defended, of course. Then only a few squares need to be denied to the king for it to be mate; none if the king is at the edge of the board. The following are a few examples.

Here a pawn provides the support, and the edge of the board prevents the king from running, so...
1 Qg7#
Here’s another, which should be very familiar.

This position has arisen after the moves 1 e4 e5 2 Bc4 Bc5 3 Qh5 (a bad move played millions of times by novices) 3...Nf6 (an even worse move, also unfortunately played millions of times by other novices). Black’s last move was a blunder; instead 3...Qe7 gives Black an excellent position. White now plays:
4 Qxf7#
Here’s a more sophisticated idea, often relevant when the king has been dragged out into the open, and the queen is chasing it towards hostile pawns:
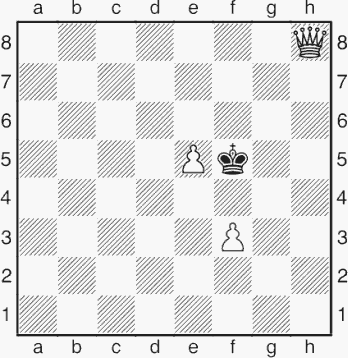
1 Qf6#
A very economical mate. One pawn covers the two squares the queen cannot reach, while the other pawn defends the queen.
Here are some of the most important patterns:

White’s minor pieces dive in and mate the king:
1 Bxf7+ Ke7 2 Nd5#
This finish is characteristic of Legall’s Mate, which is a drastic tactical method of breaking a pin.
Two knights can suffice to mate a king when he is short of squares:
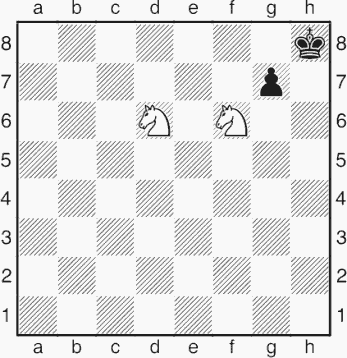
1 Nf7# finishes off nicely. Note that in general knights are more effective when standing next to each other than when defending one another.
Here are two examples of a pair of bishops delivering mate:

1 Bg6# is very light compared to some of the mates we have seen. It’s very easy to miss such ideas at the board.
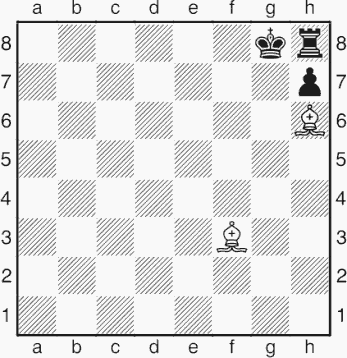
1 Bd5# is the finish this time.