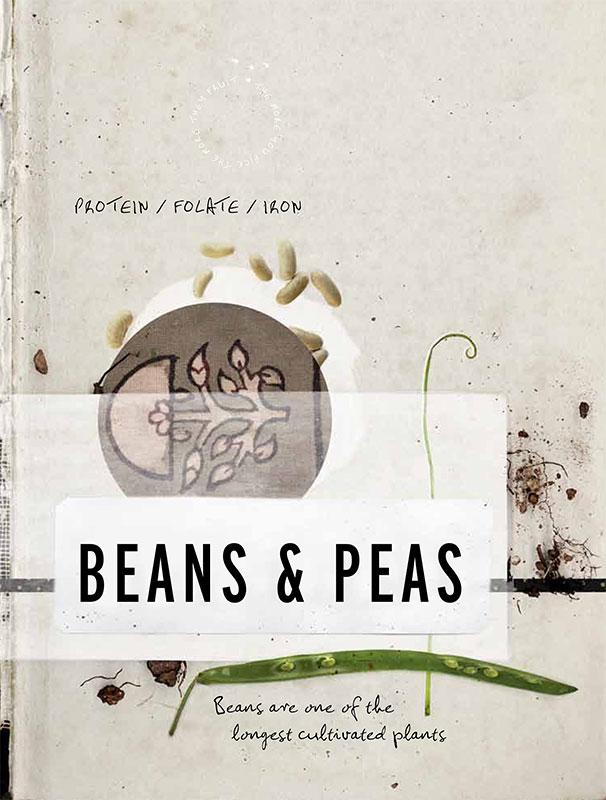
(FABALES)
I have to admit, for something that seems so simple, I’m really not the greatest at growing beans and peas—specifically sweet peas, runner beans and their ilk. But I have always been successful at growing fava beans. Beans and peas are vegetables so firmly entrenched in the English food lexicon that, when I was growing up, the standard question when you ordered anything at a pub was, “Peas or beans with that?” Peas being mushy peas and beans being baked beans. Beans and peas. Is it because they are readily available nearly all year round that we love them so much?
RECIPES
CRUSHED FAVA BEAN & LENTILS, GOAT CHEESE & PEAR
PEA & MASCARPONE PLIN WITH SAGE & BUTTER SAUCE
SOME DIFFERENT BEANS AS A SALAD
They are what I like to think of as a “universal” vegetable, found in different guises as a staple foodstuff the whole world over. They are all members of what is known as the Fabales group, an order of flowering plants that include legumes, like chickpeas and lentils. And there are more varieties than you can count.
The Chinese have yard-long beans, which can grow up to a foot long. These are used throughout South-East Asia. Indians love to use both dried and fresh beans in their cuisine, in iconic dishes such as lentil dhal and chickpea curry. Middle Easterners have haricot blanc beans (better known to the rest of the world as “the bean found in your baked beans”), Italians love their cannellini and borlotti beans, and South Americans have the lima bean and red kidney bean varieties. All over the world, beans have been embraced and used fresh or dried. They are an extremely important part of the diets of people from developing nations, where meat may be too expensive or difficult to come by, as they are a valuable source of protein. Of course, this is precisely why vegetarians are big fans of beans: these powerhouses of protein are also a great source of many vitamins and minerals.
In the UK, where I hail from, we have become so accustomed to fine straight green beans (especially from areas like Kenya) that it is common practice to buy these beans judged on looks and not taste. We will discard a bean with a black spot, if it’s not straight or has a bit of diversity in color. Watch people in the supermarket and see how they select fruit and veg, especially green beans. They always go for the best-looking ones and leave behind the less pretty ones … But when it comes to beans, they all have the same flavor.
As I mentioned, I haven’t had the greatest success growing beans and peas. I always set up a trellis and prepare the soil well but I can’t seem to protect them from being attacked by bugs and being eaten alive. I don’t like to spray as I’ve found this dries them out. So, for best tips on growing beans and peas, I will humbly direct you to look in gardening manuals.
But fava beans are a different story. Well, at least here, I can boast and say I have been very successful, getting two crops a year by seed saving and preparing the soil really well, with quite a bit of manure dug in. Plant your seeds quite close together, and then when the shoots get to knee height place some stakes into the ground for support. You don’t need to tie the shoots to the stakes unless the plants are struggling to stay upright. Fava beans self-pollinate, in a similar way to corn, by the wind brushing them against one another, so they need to be close enough to each other to do that, otherwise you won’t get any beans. But make sure they are far enough apart to allow some sunlight to penetrate in between.
By the time they have grown to shoulder height, they should start to produce lovely little pods. Now I like to think that these pods are like the beans’ own sleeping bag and protector, which means I never buy beans or peas pre-podded. Imagine how nice it must be being a pea or bean in its sleeping bag, all snuggled up and tasty, then without warning being podded out into the world! And then put into the fridge as well. They go all dry and start to shrivel. This is why I always buy them still in their pods. It may take you a few more minutes to get dinner on the table but it is worth it to only pod them just before cooking.
In terms of pests and blights there has only been one enemy I have had attacking my fava bean crop and that is earwigs. Earwigs just love fava beans. And the only way to know for sure if you have earwigs is to go out late at night with a flashlight and look for the little beggars. They hide away during the day, but catch them by surprise at night and you’ll be amazed how many there can be attacking your broadies! I have two good tips for this. Place some linseed oil in a plastic container with a lid and pierce some large holes in it, then place it in the garden near the beans—the earwigs (and also some other pests) will be attracted to the oil and will drop themselves into the container. The other method is to use egg cartons. Place five half-dozen egg cartons stacked together and place in and around your crop—earwigs love to squeeze into tight, dark places and will find the nooks of the cartons irresistible. First thing every morning, empty each egg carton over a bucket of water. Keep doing this for a week and you should have got rid of enough of the little buggers to stop the damage to the plants.
Remember too that growing beans and peas is highly beneficial for your garden beds as a whole as the nitrogen stock in their roots is very good for your soil. Once you have harvested the entire bean crop, don’t be tempted to pull out the plant straight away. Just leave them for a couple of weeks to die in the ground. They may not look great in your garden but the benefits are enormous. After they have died, cut about 2 inches from the base of the stalk and discard the rest of the plant. Dig the remaining stalk and roots right in and around, and really turn the soil over to release the nitrogen into the soil. This will really improve the soil for whatever you choose to plant into that bed next.
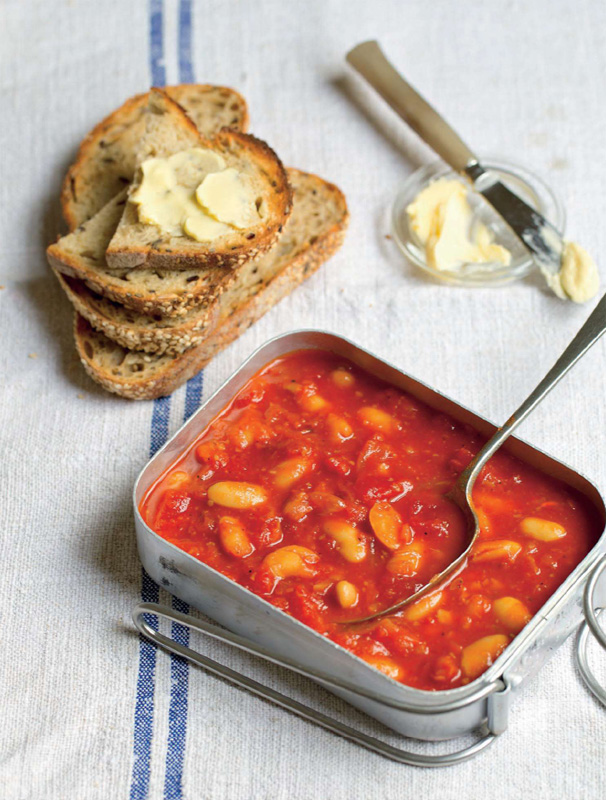
BAKED BEANS
SERVES 6
What is a cupboard or English breakfast without baked beans? Nothing
So here is my recipe that we have on the menu at my restaurant Pope Joan.
⅔ CUP OLIVE OIL
1 WHITE ONION, SLICED
1 TEASPOON SMOKED PAPRIKA
1 TEASPOON FRESHLY GROUND BLACK PEPPER
1 TEASPOON FINE SEA SALT
1 TEASPOON GROUND ALLSPICE
1 TEASPOON GROUND CUMIN
½ TEASPOON GROUND TURMERIC
2 TABLESPOONS TOMATO PASTE
½ CUP SUGAR (ANY TYPE)
1 CUP RED WINE VINEGAR
2 × 14 OUNCE CANS CRUSHED TOMATOES
1 CAN OF WATER (USE AN EMPTY TOMATO CAN)
1 POUND 10 OUNCES CANNED COOKED WHITE BEANS (SEE NOTE)
Heat the olive oil in a saucepan (measuring at least 10 ½ inches in diameter by 4 inches deep) over medium heat. Add the onion and gently sweat. Once the onion has started to go translucent, add all the spices and cook out for 4 minutes. Add the tomato paste and cook out for 3 minutes. Add the sugar and vinegar and reduce by one-third or until sticky.
Add the tomatoes and water and bring to a boil. Continue to cook for 5 minutes on full heat, stirring continuously.
Turn the heat back down to medium, add the beans and cook until the beans have started to absorb the tomato and flavors of the sauce, about 15–25 minutes.
I serve the beans in little tins placed in the middle of the table for a bit of fun at breakfast with generously buttered slices of toast (you may want to peel the labels off the canned tomatoes and use them for serving in). The beans will keep refrigerated for up to 1 week.
Note You can use 2 × 13 ounce cans cooked white beans (cannellini or haricot), drained and rinsed, or 1 pound 10 ounces cooked dried white beans. If using the latter, soak 14 ounces of dried white beans in plenty of water, then drain and cook in boiling water for 30 minutes or until tender.
CRUSHED FAVA BEAN & LENTILS, GOAT CHEESE & PEAR
SERVES 2 AS A SALAD TO SHARE
I’m a fanatic about keeping fava beans in their “sleeping bags” or pods until just before cooking, but to double pod or not to double pod, now that is the question. If the beans are small and have just come in season, I’d keep them in their skins, otherwise, if they’re slightly older and bigger, blanch and pod them.
½ BUNCH OF BABY BEETS, TOPPED AND TAILED
⅓ CUP RED WINE VINEGAR
10½ OUNCES PODDED FAVA BEANS (SEE NOTE)
½ CUP COOKED TINY BLUE-GREEN LENTILS (SEE INSTRUCTIONS), AT ROOM TEMPERATURE
1 PEAR (I LIKE TO USE RIPE WILLIAM PEARS FOR THIS SALAD)
¼ CUP ROUGHLY CHOPPED WALNUTS
3 TABLESPOONS WHITE BALSAMIC VINEGAR
3 TABLESPOONS EXTRA VIRGIN OLIVE OIL
3 TABLESPOONS CHOPPED ITALIAN PARSLEY
1¾ OUNCES BABY RED CHARD LEAVES, TRIMMED
1 PUNNET (ABOUT 2 OUNCES) MUSTARD CRESS, TRIMMED
SEA SALT AND FRESHLY GROUND BLACK PEPPER
1 ⅔ CUPS SOFT, FRESH GOAT CHEESE OR FROMAGE BLANC
Place the beets, red wine vinegar and 2 cups of water in a saucepan and bring to a boil, then reduce to a simmer and cook for 35–45 minutes or until tender. Remove from the heat and allow to sit in the liquid until they are cool enough to handle, then peel off their skins with your fingers (you may like to put on gloves to keep your hands from going purple). Discard the liquid. Halve the beets and set aside.
Place 3 cups of water and some salt in a clean saucepan and bring to a boil. Add the podded fava beans and cook for 2 minutes. Drain, refresh under cold water, then peel off their skins, place the beans in a large bowl and lightly crush with a fork. Add the lentils.
Cut the pear into quarters, then finely dice and add to the fava bean mixture. Add the walnuts, white balsamic vinegar, olive oil, parsley, baby red chard and mustard cress (but reserve some of the chard and cress for garnishing) and season with salt and pepper. Toss gently to combine.
To plate, spoon a little of the goat cheese onto a serving plate, arrange the beet halves on the goat cheese, then gently top with some of the fava bean mixture. Finish with a few spoonfuls more goat cheese and garnish with the reserved baby chard and mustard cress.
Note To get 10½ ounces podded fava beans you’ll need about 2 pounds 4 ounces of beans in their pods.
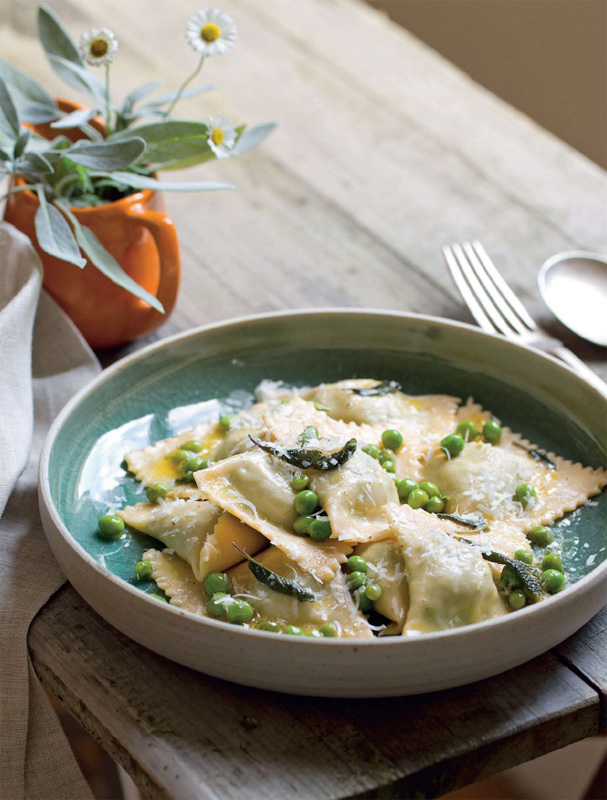
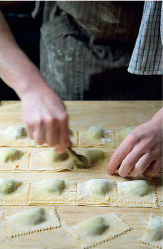
PEA & MASCARPONE PLIN WITH SAGE & BUTTER SAUCE
SERVES 4–6
In October 2010 I was lucky enough to be an Australian delegate for Slow Food Melbourne at the legendary food conference Terra Madre in Turin, Piedmont, Italy. It was at the festival’s Italian food Mecca called Eataly, housed in an old Fiat car workshop, that I was introduced to the mighty plin, essentially rough ravioli. Traditionally, plin is a very egg-yolky pasta filled with ground rabbit, pork and veal in a kind of ravioli shape. I have adapted the plin and made it with a vegetarian filling here, which I think is just as good, and served it with the same butter and sage sauce.
The Piedmontese style of pasta is much more egg yolky than anywhere else I know and, like bread, the recipe for pasta varies from region to region and country to country. I have accumulated many pasta recipes that are used to make different shapes and sizes, and the recipe below is a great one for plin, ravioli and tortellini. If you are wanting to make spaghetti or linguini, say, I’d suggest you use a recipe with less egg yolk in it (I’d try a recipe from Giorgio Locatelli’s Made in Italy).
7½ OUNCES EGG YOLK (ABOUT 13) (SEE NOTE)
1⅔ CUPS BREAD FLOUR
1¾ CUPS FROZEN PEAS (YES, YES, I DO USE FROZEN PEAS)
⅔ CUP MASCARPONE
1 TABLESPOON FINELY CHOPPED CHIVES
SEA SALT AND FRESHLY GROUND BLACK PEPPER
1 CUP BUTTER, DICED
1½ TABLESPOONS EXTRA VIRGIN OLIVE OIL
30 BABY SAGE LEAVES (OR 15 NORMAL LEAVES, ROUGHLY CHOPPED)
⅔ CUP FRESH PEAS, PODDED
2 TABLESPOONS PASTA COOKING WATER
2 CUPS ARUGULA, PICKED AND WASHED (OPTIONAL)
1 CUP FINELY GRATED PARMESAN
For the pasta, add the egg yolk and flour to a food processor or the bowl of an electric mixer and slowly combine. It may seem dry initially but keep slowly working the dough and when a few crumbs are left in the base, turn the dough out onto a clean work surface and punch down until the yolk and flour are completely combined, about 5 minutes. Wrap in plastic wrap and set aside for 2 hours.
For the pea and mascarpone filling, cook the peas in salted boiling water for 3½ minutes. Drain and purée in a food processor until mushy. Scrape out into a bowl, fold in the mascarpone and chives and season with salt and pepper. Cover and chill for 30 minutes to firm up.
To make the plin, traditionally they are rolled out by hand but I use a pasta machine. The plin will take about 1 hour to make. Divide the pasta into quarters. Work with one-quarter at a time and cover the other pieces of pasta dough with a tea towel. Flatten the dough a little on a lightly floured work surface with a rolling pin so it will fit through the pasta machine. The widest setting on my pasta machine at home is number 7, so I roll the pasta through that setting twice, then I go down two notches at a time, rolling the pasta through each notch twice. The last notch you should roll at is number 2.
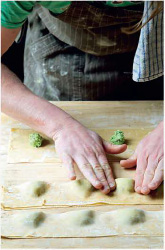
The length of the pasta should be around 35½ inches. Cut the sheet in half and lay one half above the other. Now fold the bottom part of one strip of the pasta sheet in half lengthways, run your finger along the edge and then unfold. Repeat with the other sheet of pasta. Now place ½ teaspoon of the filling along the fold line, spacing 1¼ inches apart. Gently dab the top part of the fold with water using a pastry brush. Now take the bottom part of the sheet and fold over to the top edge. Gently pat between the filling and push around to remove any air pockets. Using a ravioli or pastry roller cutter, trim along the top of the sheet to give it a serrated edge, then roughly cut in between each filling to make the plin. Place the plin onto a floured tray. Repeat with the remaining pasta and filling.
Fill a 12-cup capacity saucepan with 6 cups of water, add some salt and bring to a boil. Heat a skillet (measuring 12½ inches in diameter by at least 2½ inches deep) over low heat. Add the plin to the boiling water and cook for 4½ minutes, then drain.
Meanwhile, add the butter and oil to the hot skillet, turn up the heat to medium and cook until the butter turns light brown. At this point, add the sage leaves and peas and cook for 1 minute.
Add the pasta cooking water and turn the heat down to low again. Add the drained plin, turn the heat back up to medium and toss the plin around in the butter sauce to coat. Divide among bowls with a little of the sauce spooned over. Top with the arugula and Parmesan. To add a little something extra to this dish, you could put a little of the pumpkin and yogurt purée under the plin.
Note It’s a good idea to weigh egg yolks when making pasta for accuracy, especially if you’re using free-range or organic eggs, as they vary in size.
1 Roll the pasta out into sheets.
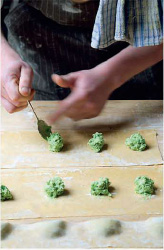
2 Place a heaping teaspoon of the pea and mascarpone filling on the fold line in the center of the pasta sheet, leaving about 1 inch between each dollop.
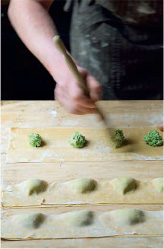
3 Brush the top edge of the pasta with water.
4 Fold the pasta over the filling.
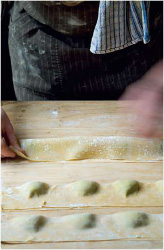
5 Gently pat between the filling and push around to remove any air pockets.
6 Using a ravioli cutter trim along the top of the sheet to give it a serrated edge.
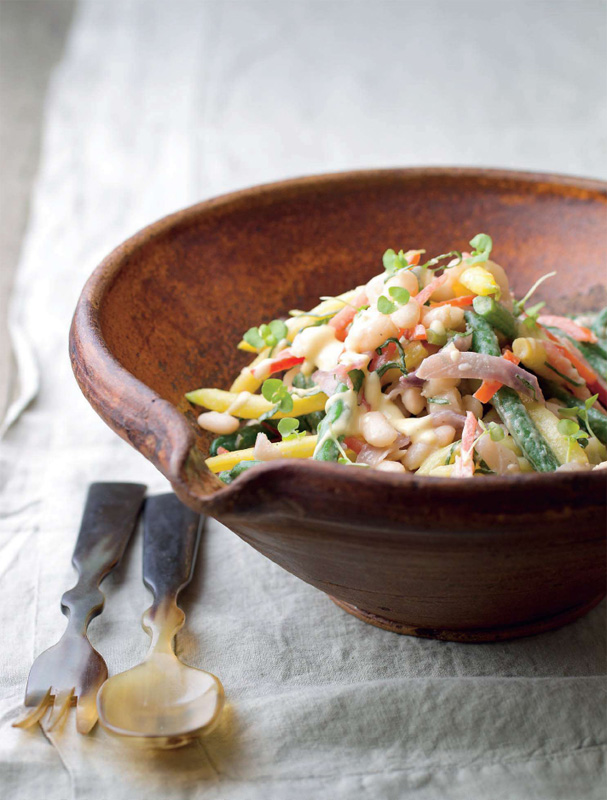
SOME DIFFERENT BEANS AS A SALAD
SERVES 4
This is a variation of a garnish I used to do when I worked for Andrew McConnell. It’s now a home-meal regular. It has such a great contrast of texture and flavor.
2 SMALL RED ONIONS, SKIN ON
1½ CUPS GREEN BEANS, TOPS REMOVED
1½ CUPS YELLOW BEANS, TOPS REMOVED
13 OUNCES COOKED CANNELLINI BEANS (SEE NOTE)
3 PLUM TOMATOES, QUARTERED, SEEDS REMOVED AND FLESH CUT INTO THIN STRIPS
1 BUNCH BABY BASIL, OR 20 BASIL LEAVES, FINELY CHOPPED
SEA SALT AND FRESHLY GROUND BLACK PEPPER
1 TABLESPOON DIJON MUSTARD
2⅔ OUNCES CRÈME FRAÎCHE
⅓ CUP EXTRA VIRGIN OLIVE OIL
2 TABLESPOONS CHARDONNAY VINEGAR
SEA SALT AND FRESHLY GROUND BLACK PEPPER
Preheat the oven to 400°F. Wrap the onions in foil and bake for 15–20 minutes or until a sharp knife pierces the onions easily. Take out of the oven, unwrap and set aside to cool.
Bring 4 cups of water to the boil with some salt. Add the green and yellow beans and cook for 4 minutes or until just still crisp. Drain and refresh in icy cold water. Drain again and place in a large bowl. Add the cannellini beans, tomato and basil. By this time the onions should be cool enough to peel off their outer skins. Cut the flesh into eighths and add to the beans. Season with salt and pepper.
For the dressing, whisk the mustard and crème fraîche together, then add the rest of the ingredients.
Pour the dressing over the bean mixture and serve. This salad is awesome for lunch the next day, too—just store in an airtight container in the fridge.
Note You can use 1 × 13 ounce can cooked cannellini beans, drained and rinsed, or 13 ounces cooked dried white beans. If using the latter, soak 7 ounces of dried white beans in plenty of water, then drain and cook in boiling water for 30 minutes or until tender.