Performing Fascia Mobility Assessments
There are two types of FMA: the quick FMA and the more detailed complete FMA.
Complete Fascia Mobility Assessment
You may also refer to this as the complete test. Although many problems can be eliminated with the previously described quick test, the complete FMA uses more detailed testing to find the source of the problem and prescribes self-treatment to address it.
The six complete assessment steps are as follows:
- Create the personal record.
- Perform a posture check.
- Perform movement checks.
- Perform a tissue check.
- Review results.
- Create a plan.
Step 1: Create the Personal Record
The purpose of creating a personal record is to review what events or injuries may be contributing to your less-than-optimal athletic performance. It may also help explain why you have chronic pain, soreness, or injuries.
Before creating your personal record, you should understand the following basic differences between a symptom and a sign:
- A symptom is subjective pain, soreness, aching, or something that doesn't quite feel right when you perform a movement.
- A sign is objective. It is anything that indicates that the movement does not look or feel right, even to others. A good way to assess this is to compare how a movement looks and feels when you do it on your good side. If you don't have a good side, compare with how it felt before any adverse changes occurred. If it doesn't feel normal, then there is a sign that there is something going on that can negatively affect athletic training and performance.
In your record, note whether you have had any surgeries. Note any type of surgery, the date of each surgery, and the part of the body it involved. If the surgery was a success and corrected the problem, list that separately from those surgeries that did not correct problems. If there are many, number them starting with the most recent. Note any scars, because these can be factors in decreased performance.
Create a current health section that describes any problems, complaints, and injuries you have, and list any diagnoses that have been made by health professionals. Lack of mobility and faulty movement patterns in a healthy, uninjured athlete may be caused by many things. While a comprehensive discussion of motor training and faulty movement patterns is beyond the scope of this book, many common problems due to tight muscles, stiff or restricted joints, or restricted or painful fascial line movements can be self-assessed and managed.
Pain and soreness may occur when you do particular movements. Sometimes you can easily pinpoint where the tightness or pain is coming from, which may indicate a local problem. Other times, the location is more broad or vague and spans several joints, muscles, tendons, and ligaments, which may indicate a global problem across multiple tissues. A complete FMA will use more detailed screening tests to determine what is going on.
Record any symptoms you are experiencing by answering the following questions.
1. Do you have any pain or stiffness?
If yes, is the feeling distributed throughout your whole body, or is it localized to one area? Start by listing all your symptoms of tightness, stiffness, or pain. Then assign a number to each, with number one being the most affected area, number two being the next most affected area, and so on. Once you have completed and ordered your list, write the number in a circle on the corresponding area of the body diagram in the complete assessment form at the end of this chapter; see figure 5.2. The number in the circle will represent local pain in that spot. If you have pain that extends up, down, or around, draw arrows to show the direction and how far the discomfort extends. Creating an accurate visual record of the location of your discomfort allows you to see where you need to focus your work, and it is an invaluable way to track your progress as you gain flexibility.
If you are in obvious pain or you were recently injured, you should seek medical help before you continue. If you are sore or are experiencing discomfort before, during, or after athletic activity because of stiffness or tightness, continue with this evaluation.
2. Are there other things that you feel are not quite right with your body that you would not describe as pain, stiffness, or tightness?
For example, you may feel or know that one leg is shorter than the other. This may make you feel uneven or asymmetrical when you walk or run. Another example is one foot feeling different from the other when you run; the arch may feel collapsed compared to the other foot, or it may feel less stable and be more prone to ankle sprains. Note these observations in your numbered list of symptoms, and also write a brief comment about exactly what this feels like and how it affects your athletic performance.
Step 2: Perform a Posture Check
To check your posture, you must wear only underwear and look into a full-length mirror. In chapter 2, we discuss the function of fascia and how patterns of stress and strain are reflected in your posture. The fascia behaves like a net or web, and stress and strain create forces of compression and tension that pull the web out of alignment. When this happens, athletic performance suffers. For example, tightness on one side of the back can disrupt a pitcher’s throw, a diver’s routine, a gymnast’s move, or a basketball player’s ability to shoot the ball. This happens because asymmetrical tightness interrupts the normal activation patterns of muscles, resulting in less-efficient movement compensations. Compensatory movement patterns eventually cause chronic pain syndromes that jeopardize long-term participation in a sport.
Posture assessment allows you to see what areas of the fascial net that may be shifting or twisting you out of alignment. When you complete all of the steps of your FMA, you will be able to reach informed conclusions about your flexibility needs. You can then use the findings to create an individualized flexibility program and modify it as your condition and requirements change. The end results are injury prevention and optimal performance through rapid and accurate problem solving. As you practice using your FMA, you will gain confidence and personal control over your body and mind. In the process, you’ll become more aware, self-reliant, and healthy.
When you examine your posture in the mirror, look for asymmetries in alignment: differences between the right and left sides; between the front and back; and between the top, middle, and bottom thirds of the body. You are not comparing your body to some concept of perfect alignment; rather, you are looking for a relative symmetry of parts to the whole body and a sense of length and space in the body. This look and feeling of length and space, rather than of compression, defines a healthy body that is more fluid than solid (remember that the body is two-thirds water) and that is highly mobile. When you are observing your posture, don’t focus on the tiny details; instead, focus on obvious differences between one part and another part. The more you practice this kind of observation, the better you’ll get at spotting postural imbalances.
This book focuses on stretching the myofascial system for optimal flexibility of your entire body, so we zero in on ways to identify and eliminate restrictions in your myofascia. If the cause of your postural or movement asymmetry lies in your myofascia, then we will be able to help you correct the problem. If our system does not correct the problem, you should see your physician for referral to a practitioner who can give you a proper evaluation. If after working with your FMA for about four weeks you get the impression that the problems you are having are due to poor posture, or if you cannot seem to move efficiently, consider scheduling an appointment with a certified fascial stretch specialist.
If, like most people, you have a full-length mirror that shows only one view of the body at a time (unlike the three-way mirrors you find in fitting rooms), you will focus primarily on the front view of your body. However, when you do use the front view in your FMA, keep in mind the three-dimensional shape of your body, and do your best to mark the other views on the body chart. For example, if your right shoulder is lower than your left, mark all views (front, sides, and back) to show a lower right shoulder.
Head
Is your chin in line with the notch at the bottom of your neck, or is it rotated to one side? Does one ear appear lower than the other, showing that your head is slightly tilted? Mark down any asymmetries and misalignments you can see. These signs, among others, may be due to tightness in joint, ligament, or myofascial structures. One reason your head position is important is that your eyes will rotate in their sockets to accommodate for any asymmetry. This often happens after whiplash and other head and neck injuries. Your head position may be a result of a poor habitual posture. Many people assume poor postures when they work in front of computers all day; these people start slumping their spines and craning their heads forward as they sit all day, peering into the screen. This forward head position creates shearing forces in the neck, with the lower part of the neck flexing too much and the upper part of the neck hyperextending. We call this having a turtle head, and it eventually creates a compensatory rotation of the eyes in the sockets such that they turn downward (looking down the nose). There are many reflexive movements initiated with the eyes that directly activate muscles throughout your body; any change in eye and head position will have a trickle-down effect on the rest of the body. This trickle-down effect will create additional compensations during athletic movement and eventual problems from the extra stress and strain on your myofascial system.
An example of a different trickle-down effect is shown by a right-handed golfer whose head is rotated slightly to the right of center. Her eyes naturally counter this head rotation by rotating to the left. When she drives the ball, she will have to make other adjustments in her body to compensate for the fact that her head cannot keep a left-rotated position relative to the rest of her body during the backswing. In fact, she might have a chronic inability to get into her ideal position when she drives a ball, and as a result, she forces her swing instead of flowing with it. This a cardinal sign of a flexibility deficit. We have seen this many times in our clinic.
Shoulders
Are the collarbones horizontal and lined up with each other, or do they (or does one) angle upward or downward? Is the point of one shoulder higher or lower than the corresponding point on the other? Does one shoulder appear to be shifted more forward than the other? Mark any differences you see.
We have seen a great majority of right-handed people with right shoulders that are lower than their left shoulders when viewed from the front. Various professionals debate whether this a normal state because so many people have this discrepancy without any apparent problems or pain.
Of course, there is no perfect or ideal posture. How could there be given the variety in human shapes? Still, we find it helpful to observe whether one shoulder is tighter, more compressed, or significantly out of line with the other. Any discrepancy you see statically will be confirmed dynamically when you start moving the problem side later in this assessment.
What we commonly see in the clinic is that the shoulder of an athlete’s dominant arm is not only lower but is also pulled more forward than the less-dominant side. The significance of this is that a forward shoulder can start to drag or pull on structures in the neck. This can lead to a compensated neck position that in turn may contribute to a pinched nerve or disc bulges. Hopefully, you can see that it’s better to prevent this kind of problem before it becomes a permanent injury.
Ribs
Does the rib cage as a whole appear centered, or is it shifted to the left or right? Does one side of the rib cage stick out farther than the other? The effects of a rib cage that is shifted or rotated to one side are similar to those of an asymmetrical head position. When you need to perform an athletic movement that requires your rib cage to move freely to the opposite side, such as swinging a bat or racket, you will encounter some form of resistance to the movement. You will have to either force the movement, which is inefficient and ultimately injurious to your body, or perform a compensated movement—a “detour” swing when you move that bat or racket. Over time, you may get good at adapting your swing or other movement, but it will come at the cost of stressing or straining your body. Medications only mask the cumulative damage being done each time you move this way.
Pelvis
With the palms facing the floor and the fingers pointing straight ahead, press the edges of the hands to the upper sides of the pelvis. Is one side higher than the other? If so, this may indicate that the leg on that side is longer, which means that the other leg is shorter due to myofascial tightness in your body. One common contributor to this situation is the quadratus lumborum (QL) muscle, which is a deep back and waist muscle that connects your lower ribs to the top of your pelvis and both of those areas to almost every bone in your lumbar spine. Another muscle that may functionally shorten your leg if it is tight is a deep one called the psoas. This rather long muscle is part of what controls your posture; it connects to every bone in your lower spine and then travels across your hip joint to attach to the inside of your femur or thigh bone. Uneven leg length can cause problems in running, skating, jumping, or performing any sport that works the legs. Neck, shoulder, back, hip, knee, ankle, and foot pain or dysfunction in movement can all result from a functionally short leg. Once you’ve identified the contributors to this problem, you can make a plan to fix it.
Hips
You can quickly learn a great deal about the flexibility of your hips by looking at your knee and foot position as you view them in the mirror. We address those areas in detail later in the assessment, but here we will discuss their relevance to your hips.
What we commonly see with tight hips is that the knee and foot on one or both sides are turned outward. In what is considered a normal and relaxed position for the feet, the toes may point out slightly, but the kneecaps generally still point straight ahead. With a tighter-than-normal hip, the knee and foot will face significantly outward compared to the normal position just described. Consequently, walking, running, and lunging movements are less efficient; speed and power decrease; and the chance for injury increases. Note your own kneecap and foot positions to see if they might correlate with tightness in your deep hip external rotators (the layer of muscles beneath the large gluteus maximus).
Knees
Look at your kneecaps. If your feet are placed directly under your hips and are comfortably toed out slightly, do your kneecaps point straight ahead, as they generally should, or is one (or are both) rotated inward or outward? Are both knees bowed in, perhaps even touching each other (genu valgus), or are they bowed out (genu varum), or is just one knee affected? Are the knees hyperextended (genu recurvatum), or are they slightly flexed? Mark which way your knees are pointing on your FMA.
The position or placement of your knees depends on how you were born, the shape and function of your hips and the arches of your feet, and the position of your feet in a given moment. When a knee has to function with suboptimal alignment, whatever the cause, it becomes more susceptible to injury. The ligaments that stabilize the knees are vulnerable to sprains and ruptures when they have to function under the repetitive strain conditions that misalignment can create. For example, the anterior cruciate ligament may have a complete rupture after an athlete does a move he or she has done safely many times in the past.
Feet
Look down and see if you stand with your feet relatively parallel or slightly toed out to each other. If their angles are quite different from each other or are greatly toed out or in, recheck them by marching in place for a few steps, stopping, and looking again to see if there is a change. If your feet place differently after the march, your original standing position was probably a little out of balance. If the placement is the same after the march, you can consider it a reliable indicator of how you stand. Does one foot (or do both feet) point in or out from the parallel? How do the arches look? Do they seem pretty flat to the ground, or are they high enough to make you bear more weight on the outside of the foot?
The way you naturally place your feet is a good indicator of what kinds of stress and strain the knees and hips are under. If your arches are too low or touch the floor (pronated feet) and they still give you problems after trying our system, getting orthotics from a practitioner (such as a podiatrist) may be in order. If you are in the minority and have the opposite problem of high arches (supinated feet), you should also see a specialist who can advise you on proper athletic footwear. In either case, getting your feet—the literal foundation of your body—functioning correctly will automatically improve the structural balance and function of the rest of your body.
Finally, close your eyes and get a sense of how you stand. Does your stance feel evenly distributed onto both feet, or do you feel that you bear more weight on one side? Maybe more weight is exerted on the heels or balls of the feet (or perhaps you feel this in only one foot). When you have a good sense of the way you stand, mentally scan your body from head to toe and note any areas of tension, tightness, or soreness. Write these down, describing what you feel and marking where you feel it on the figure diagram. This is a great starting point from which to begin to track the way your body looks, feels, and performs.
Step 3: Perform Movement Checks
Now that you have recorded your physical history and symptoms (step 1) and examined your posture (step 2), it is time to look at some simple movement patterns and how you perform them to assess specific fascial net movements. If you perform simple movements incorrectly because you have inadequate ROM to do them properly, or if they are painful, then complex movements with added forces like those encountered in sports and fitness training will be problematic. For example, if someone who is training to be a baseball pitcher has deficient external rotation and abduction in shoulder movement, then that pitcher will develop severe problems not only in the shoulder and elbow but also in the rest of the body due to the compensations that must occur. Even if you don’t detect any imbalances during your first assessment, it’s a good idea to check again from time to time to see if you’ve remained in balance after a hard workout, game, or competition.
Before starting, it is essential to keep in mind that, as with posture, there is no such thing as ideal mobility. But you do need a reference for what is “normal” when you move. What has worked exceptionally well for us is to tell our clients that normal daily movements we do for personal care should be pain-free and effortless. Pain-free needs no explanation; effortless means that your movements are easy and smooth. We can also apply this to athletic movements. Even though they typically require more power to perform, after you are warmed up well enough to do a few rounds of unloaded jumping, pushing, pulling, sprinting, and so on, these movements should feel relatively easy with no resulting pain, restrictions, or weakness. This is considered your baseline normal, and anything other than that indicates that you should perform a self-assessment to identify and solve issues in your tissues before they become problems. If stretching and/or movement pattern corrections are required, this is good place to start. We discuss details of this later in the chapter.
You should not hold your breath when you do any of the movements in this assessment. If you catch yourself doing so, you will need to determine whether there is some restriction that is making you hold your breath. Smooth movement flows without any evidence of tension, shaking, or popping or cracking sounds. Many people get so used to ignoring these signs from their bodies that their movements are not optimal. The problem is compounded when, after years of ignoring these signs of structural imbalance, they develop into more serious and chronic problems such as tendinitis, bursitis, and osteoarthritis. All these problems tend to afflict professional athletes at earlier ages than the general public.
What is considered optimal mobility or ROM is often contingent on a particular sport’s movement requirements. For some sports, it might be beneficial to have certain areas of excessive mobility. For example, it is advantageous for breaststroke swimmers to have hypermobility in their knees for the most effective kick; however, although this mobility might serve them well in the pool, if they do not work on maintaining good stability in the knees, they can develop severe problems that will progressively deteriorate the joints, forcing them to quit swimming and deal with lifelong knee problems. You must gain the mobility level that is appropriate for your activity. Candid discussions with your coach and trainer about what is needed for your sport will help you determine this. Then, with your completed FMA, you will be able to identify potential sources of mobility problems before they become serious. There are two parts to your movement check: the functional movement check and fascial net check.
Functional Movement Check
One of the best ways to test movement is to gauge how you feel when you do warm-up drills for your sport or fitness activity. You are ready to do skill training and advanced activities or to engage in your sport when you feel strong, stable, and dynamically mobile and you do not have discomfort or resistance (tightness or stiffness) in your body. The following are examples of imbalances you may notice during your preactivity training and preparation that need to be corrected:
- Stiffness
- Tightness
- Immobility
- Poor balance
- Lack of coordination
- Slowness
- Heaviness
After your general warm-ups and sport-specific drills, list any body part in which you feel imbalances. You should feel strong, mobile, fast, reactive, coordinated, and balanced. Some examples of imbalances are when one side feels more restricted, slower, or heavier than the other when you are doing walking lunges, jogging with high knees, sprinting, kicking, punching, or doing other activities.
In addition, list any other training activity that is a regular part of your athletic preparation but in which you’re not making satisfactory progress, you’ve hit a plateau, you have not been able to overcome a challenge, or your performance is just not optimal. Examples of this include specific lifts in weight training (especially when you can compare sides) or any other activity that you engage in to round out your athletic preparation. One- or two-sided weakness, mobility restrictions, and losing your form are examples of some imbalances that need to be listed.
Finally, after cooling down from your athletic activity or training, make note of any areas of your body where you feel tight, stiff, sore, or weak. These feelings indicate problems that will negatively affect your performance and cause injury if they are not eliminated.
Fascia Mobility Check
A fascia mobility check assesses the body’s connective tissue system with movement. The fundamental stretch movements specific to each fascial net are provided in chapter 6.
So, which net should you check? If you just did the functional movement check, identify the nets in which you felt restrictions using the fascial net illustrations found in chapter 2. Once you know the fascial nets that you need to work on, find specific stretches for those nets in chapter 6.
If you do not find a restriction in the functional movement check, then you can test fascial net for restrictions using chapter 6. Follow the Recovery and Maintenance program in table 5.1, Self-Stretch Program Parameters, and then retest your movement. If you note an improvement in mobility, follow the Restoration and Correction stretch program in table 5.1.
Finally, always test one or more movements with which you have problems or challenges in a game, competition, or event. Some movement problems can be difficult to duplicate or simulate without the unpredictability, power, and force of real athletic engagement.
With the movement check examples discussed, you will be able to find the sources of and solutions to the issues in your tissues. Proceed to step 4 only if you did not significantly improve your mobility in step 3. If you did improve, go to step 5.
Step 4: Perform a Tissue Check
In step 3, you identified the specific fascial nets that are restricting your mobility. In this step, we guide you in assessing whether SMFR to the muscle-tendon junctions will more rapidly and effectively increase your mobility. If it does, then we recommend doing SMFR before stretching. If it doesn’t, skip it and go directly to step 5. As described in chapter 2 in our discussion of front nets, you can do SMFR to release local restrictions in your soft tissues. This enables you to more effectively stretch and move. In this book, restrict SMFR to the muscle and tendon region for one of the fastest techniques to get positive results. We leave details of other effective SMFR techniques to the many books and videos dedicated to this topic.
Fascial mobility blocks such as glue, thickening, and trigger points were described in detail in chapter 2. These common local restrictions can be found almost anywhere in your soft tissue, including in the muscle-tendon region. SMFR can eliminate or reduce them. Before moving on, we suggest you review that section on FMBs if you have not recently read it.
SMFR Test
Golgi tendon organs, which are sensors located in your tendons, are still not fully understood. In our experience, stimulating them with proper pressure can help release, relax, and increase the mobility of neighboring myofasciae and joints. When stretch movements or other training do not remove all your mobility restrictions, you can gently and very slowly position your muscle-tendon region over or under a semifirm object such as a ball or roller designed for this purpose. If you already do a form of SMFR or something similar (such as melting, rolling, or mashing tissue), try applying your technique to muscle and tendon regions that you identified as restricting your movement in step 3.
The following are basic instructions for doing SMFR on the muscle-tendon regions within fascial nets:
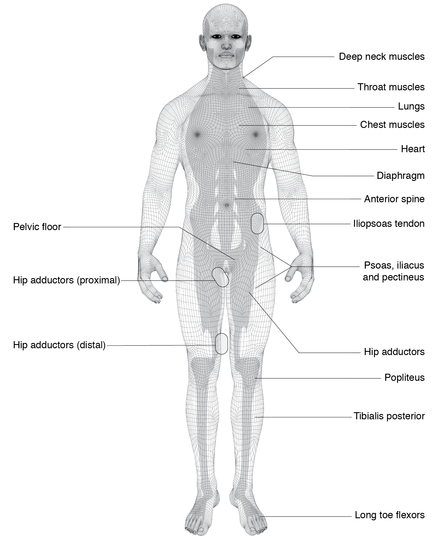
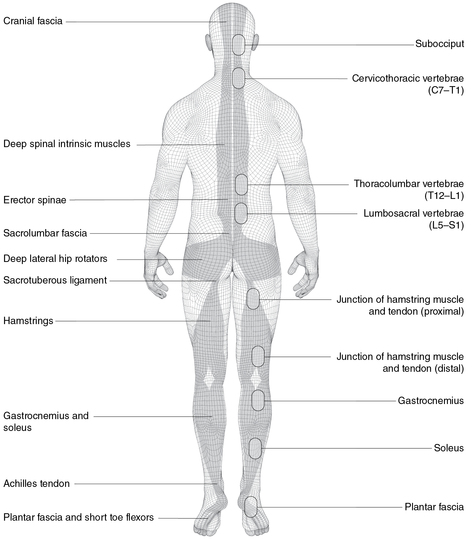
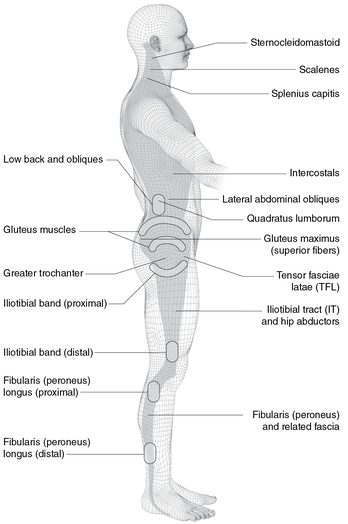
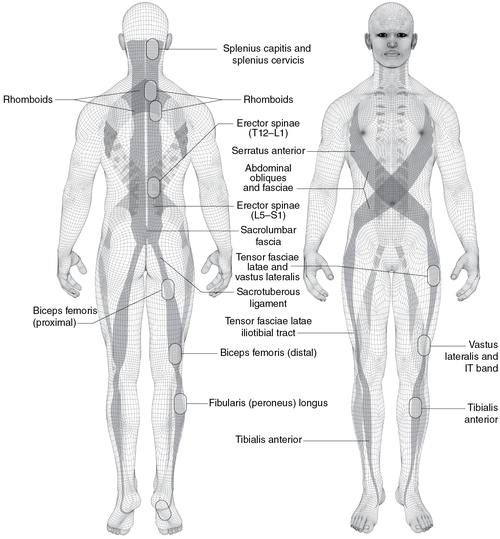
- Use figure 5.1,a through e, to locate the specific fascial net that was restricted during your mobility test in step 3.
- Locate the muscle-tendon regions noted in the figure and do SMFR on those areas.
- Press on the tendon right off where it attaches to the bone. Then move slowly and gently away from the bone about 1 to 2 inches (2.5-5 cm) toward the muscle. Do the same at the other end of the muscle or as indicated in the figures.
- Take up to three deep, slow breaths as you imagine the tissue melting under the pressure. Avoid pain from pressure that is too deep or held too long.
- Retest your mobility assessment in step 3.
- Mark down any fascial nets that improved after doing SMFR.
SMFR Precautions and Contraindications
There are several contraindications to performing this part of the assessment. Do not roll on balls, rollers, or other tools if you are receiving anticoagulant therapy; if you suffer from malignancy, osteoporosis, osteomyelitis, acute rheumatoid arthritis, inflammatory conditions, systemic or localized infection, sensitive diabetes, or circulatory conditions (e.g., edema, hematoma, blood pressure conditions); or if you have open wounds, stitches, fractures, or hypersensitive skin conditions. Also, be aware that this can be very powerful and intense work. If you ever feel dizzy, light-headed, or nauseated, please stop immediately.
You should not use the ball to put pressure on any of the following areas: the coccyx (tailbone); the lower 11th and 12th ribs (the floating ribs), which start in the middle to lower back region and extend to your sides above the pelvis; any part of the front of your abdomen from the bottom tip of your breastbone down to the bottom of the pelvis and out to the sides above your pelvis and below the ribs; the genital area; any part of the neck; or any other areas that are too sensitive to tolerate pressure.
If you are new to SMFR, be cautious. If you use pressure that is too firm, it mashes your tissues, and it will cause damage and even more scar tissue. If you’ve been doing SMFR for some time, but you keep getting the same restrictions or pains, then you are treating your symptoms and not the cause. Follow the directions for self-assessment and self-treatment in this and the following chapters, and you will find solutions to your problems.

Step 5: Review Results
It will be easier to see correlations in your assessment data if you review the results in the following order:
- Review your personal tissue map.
- Review the fascial nets where you felt mobility restrictions. Do they correlate with the ones identified in your movement map in step 3 or the FMBs in step 4? They may not, but they are still important factors to be addressed because they lie within your fascial net. These are likely the prime regions that are causing faulty and restrictive movement patterns.
- Review your personal movement map.
- Check for correlations between your tested movements and your tissue if you did the SMFR test.
- Review your personal posture map.
- Check for correlations between your posture, movement, and tissue checks. For example, do you see a connection between sitting all day and your forward head, anterior pelvic tilt, restricted front net mobility, and tight hip flexors?
- List issues that are occurring with and without movement that negatively affect your athletic performance and fitness.
- Check for correlations between the previous items along with where and what you think indicate restrictions to optimal mobility.
Reviewing these findings together will often reveal correlations between posture, movement, the state of your tissue, and suboptimal athletic performance. For example, marathoners or triathletes who work at a desk for long periods of time might see correlations between sitting at work and poor flexion dominant posture, tightness and restrictions in the front net, weakness in the back net, and right-left imbalances in the lateral and power nets. With this information, the smart athlete can develop a plan.
Step 6: Create a Plan
The data you gathered and reviewed in step 5 can be used to create a plan to restore and maintain optimal mobility for fitness and athletic performance. Table 5.1 is divided into the following three types of programs:
Preparation Stretch Program
- Do this before training or a competitive event.
- Do this right before you do other dynamic movement preparation.
Recovery and Maintenance Stretch Program
- Do this after training.
- Do this after a competitive event.
Restoration and Correction Stretch Program
- Do this whenever the recovery and maintenance program does not restore mobility.
- Do this after rehabilitation or recovery from injury or surgery (when you are medically cleared).
- Do this to correct imbalances in mobility, strength, balance, and so on.

In this chapter, you learned one of the most important assessment skills to ensure your continued participation in sports or fitness. We taught you how to do a quick FMA that has helped many athletes quickly solve problems in training and sports. For those with more challenges, we took you through a more detailed, complete FMA to critically examine your body for imbalances in posture and movement. Both assessments refer you to our stretch programs in chapter 6, in which you learn how to stretch each fascial net; in chapter 7, in which you learn sport-specific fascial stretches; and in chapter 8, in which you learn how to stretch others on a table. Once you choose a stretch program, you can then chose the parameters from table 5.1 to follow based on your goals. Now that the theory, science, principles, and assessments have been discussed, the rest of the book will cover the stretch programs.
To record your own assessment for reference as we discuss the stretch programs, please see figure 5.2. Keep this and other copies as a record of your progress for yourself and any professionals with whom you are working or with whom you may work with in the future. Please refer to the Complete Fascia Mobility Assessment section in chapter 5 for more detailed instructions.