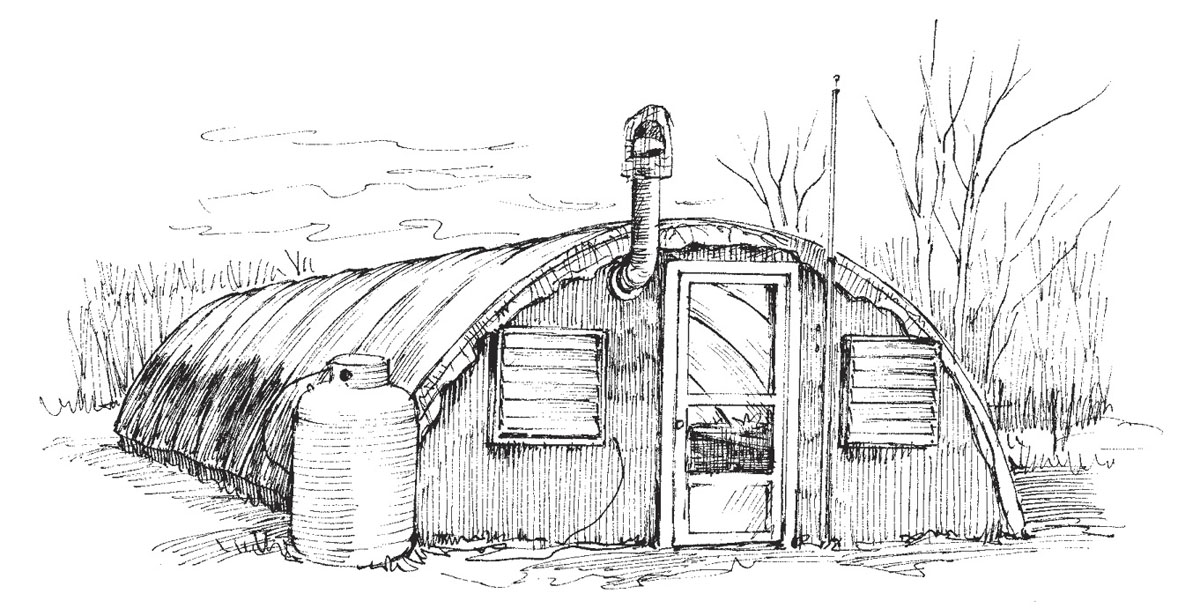
Front view of greenhouse. The louvers on either side of the doors open automatically when the thermostatically controlled fan turns on. Note the propane tank and the heater exhaust stack.
My first three years of farming, I made do without a greenhouse for the simple reason that I didn’t have one. I managed, with mixed success, to start some trays of seedlings on a table in our front room. The seeds germinated well enough, but the plants themselves grew tall and thin as they competed for the limited amount of light that was available. Outside, I seeded many crops directly in the field and, as a consequence of this, spent a lot of time on my hands and knees pulling weeds that were engulfing the tiny seedlings I was trying to rescue.
In late spring and early summer of those first years, I was able to purchase some nonorganic tomato and pepper transplants from a local nursery. (At that time organic growers were not required to start with organically grown transplants, as they are now.) The nursery’s selection of plants was limited and geared to backyard gardeners rather than to commercial growers. There wasn’t much for me to choose from, and often the plants I came home with didn’t adapt very well to the open field.
Looking back, it’s hard to believe I lasted without a greenhouse as long as I did. Today the greenhouse is an integral part of our operation; running the farm without it would be almost unthinkable.
A greenhouse enables you to captain your own ship to a far greater degree than is possible without one. It gives you flexibility and reduces your dependence on outside sources. It will allow you to work with a schedule of your own design and more readily adapt to changing weather. Without a greenhouse, you’ll find yourself faced with unwelcome constraints. In this section, we’ll look at these and other reasons a greenhouse is such a necessary component of a diversified, organic vegetable farm.
NOP rules now require that organic growers use transplants grown according to organic standards, in certified organic greenhouses; that is, grown with organic seed (when this is available), in approved potting mixes, and without the use of synthetic fertilizer or pesticides. This fact alone makes having your own greenhouse almost a necessity.
Today, there are more commercial greenhouses and nurseries producing organic transplants than there were 25 years ago, but the number is still not high. Many of those that do exist are mail-order operations or businesses that cater more to home gardeners than to farmers. Relying on others to grow your transplants will limit your options and significantly increase your production costs.
In the struggle against weeds, a greenhouse is an important ally. For a moment, imagine that you had the perverse desire to plant the seed of a known weed (say, a lamb’s quarters or a redroot pigweed) next to the seed of a vegetable or herb. Invariably, the weed seed will germinate sooner and grow more vigorously. It will hungrily consume nutrients, water, and light that might otherwise have gone to your crop plant, causing the latter to become a paltry version of what it might have been. This is exactly what happens to many crops that are seeded directly into the field, unless the grower is vigilant about protecting his or her germinating plants from the onslaught of weeds. And that vigilance, of course, demands a significant input of labor.
If you take a month-old, 3- or 4-inch-tall transplant from your greenhouse and set it into freshly tilled ground, with no weeds in sight, the transplant will have several days to adapt to its new environment before any fast-growing annual weeds emerge. When weeds do appear, they will be smaller than your crop plant and should be relatively easy to dispatch with a hoe or cultivator. This is why most organic growers who do not have herbicides at their disposal prefer to use transplants whenever they can.
When you have your own greenhouse, you can select exactly what you want to grow. There are thousands of varieties of vegetables and herbs to choose from. Commercial greenhouses, whether they cater to an organic clientele or not, usually grow only a few of the better-known varieties of any given vegetable — they simply don’t have the space to grow everything that is available.
Once you have a little experience under your belt, you’ll want to try multiple varieties to see which perform best on your farm and please your customers the most. If you don’t have a greenhouse, you might approach commercial operations and ask if they will custom-grow for you.
Some crops — most notably beans, peas, carrots, radishes, and turnips — don’t like being transplanted. For them, direct seeding in the field is the only option. Fortunately, most of these crops germinate and grow fairly quickly. They will give the weeds a run for their money and give you time to go to work with a hoe without disrupting your crop plants.
Carrots, though, can be difficult. If carrot seeds are kept moist and warm, they can germinate in a week, but they get off to a slow start and can soon be overrun by fast-growing annual weeds. For the first few weeks after a carrot germinates, you will usually need to undertake some painstaking weeding. See page 308 for strategies to reduce weeding time in carrots.
Most commercial nurseries (and remember, you would need one that conforms to organic standards if you plan to be certified organic) sell the lion’s share of their vegetable transplants in late spring and early summer. At other times, the selection may be very limited or lacking entirely.
Take a crop such as lettuce: Lettuces are in demand by the general public throughout the growing season, and most small farmers who directly market their produce want to have a steady supply of them for as long as possible. For those of us in southern New York, this means planting lettuces almost weekly from early March through late August. The only way to ensure we can do this (besides direct seeding lettuces in the field, which, for reason number 2 given above, is not practical) is to start the varieties of lettuces we want in our own greenhouse. This way, we can have transplants available exactly when we want them and in the right quantities so we can keep our customers happy.
If you live in any part of North America that has freezing temperatures in winter, a heated greenhouse enables you to start seeds in a warm environment long before you can venture out into the field. This gives you a big jump on the season. For example, we start onions from seed in late February and set them out at the end of April.
By early March, when there’s often still plenty of snow on the ground, you can find us in our greenhouse, seeding perennial herbs, lettuces, kale, chard, and, before long, peppers and tomatoes. As soon as soil conditions are suitable (i.e., not too wet and not too cold, which for us is usually not until late April), we set out sturdy transplants of multiple crops in the field.
A greenhouse can also be of good service at the end of the season. We seed mesclun greens in our greenhouse in September and transplant the seedlings into one of our high tunnels a month later, for late November and December harvest.
Crops in the field live at the pleasure or displeasure of Mother Nature. If she drops 6 inches of rain over a couple of days, young outdoor plants may be harshly pelted and, if they happen to be on low-lying ground, may find themselves in standing water, unable to survive. Hail, gale-force winds, or a late-spring frost can damage or slow the growth of plants in the field.
Plants in a greenhouse are protected from these forces of nature, and they can stay put until outside conditions improve and the weather becomes more settled. In the things that matter most to them — temperature, moisture, and sunlight — they enjoy close to optimal conditions in a greenhouse. The one possible exception is sunlight, which will be in short supply on overcast days. (A greenhouse does afford the opportunity to use grow lights, a benefit under low-light conditions, but few organic growers resort to this measure.)
Of course, your seedlings can’t stay in the greenhouse forever. In the same way that children grow up and venture out into the world, at a certain point, seedlings must take their chances in the field with Mother Nature. They need to be in good health when this occurs. Experienced growers will tell you that their own transplants are usually more robust, disease resistant, and dependable than those available through off-farm nurseries. But for this to be the case, you must be vigilant about maintaining a healthy and sanitary environment in your greenhouse. More on this later.
You’re not likely to build a greenhouse for this reason alone, but once you have one, you’ll appreciate the environment it provides. A greenhouse is a quiet place, untroubled by wind and other of nature’s elements. When we begin seeding onions in mid-February, the outside temperature is frequently well below freezing. Inside the greenhouse on such days, as long as the sun is shining, it can be a balmy 65 or 70°F (18 or 21°C), without the heater running. Overcast days, of course, are another story. On such days an unheated greenhouse will be warmer than outside, but not a whole lot.
When heavy rain or thunderstorms threaten at any time during the growing season, we’re likely to retreat to the greenhouse, where there is usually seeding to do or thinning to catch up on. During these times, the greenhouse enables us to stay productive.
I also enjoy our greenhouse because it offers a more microscopic view of the growing process. It’s a lot easier to observe a seed germinating and passing through its cotyledon stage while it is living in a flat on a bench inside a greenhouse than it would be in the wide expanse of the field. And when your diminutive seedling is finally transformed into a mature vegetable ready for harvest, you have a sense of fulfillment from knowing you’ve been following its progress from the beginning.
Before the invention of plastics, greenhouses were made from panes of glass inserted into rectangular metal or wooden lattice frames. They were often called “glass houses” and were generally shaped like actual houses, with straight sides and pitched roofs. Many still exist and function quite well, but the panes of glass are easily broken and irksome to replace. These days, you can still find the old-style pitched-roof houses on the market, but most of them are designed for backyard gardens and are too small for commercial growers. Some of these small houses are still clad with glass, others with more durable polycarbonate panels, and some with polyethylene film.
Most modern commercial growers use Quonset- or Gothic-style hoop houses. For larger greenhouses, the Gothic style is preferred because it has a peaked central ridge that sheds snow and ice more effectively. The Quonset has a strictly semicircular shape. Both are relatively inexpensive and easy to build. Their primary elements are:
Building one of these is not rocket science. Any greenhouse supply company should be able to give you the specs, along with pros and cons, on the different houses available and everything you need to get started.
Before investing in a greenhouse, you’ll want to determine what size house will best fit the scale of your operation. It should be big enough to accommodate the maximum number of seedlings that you expect to be growing at any one time over the course of a season. The Weekly Planting Schedule in your farm plan (see chapter 3) will help you determine this number. Simply count how many plants you plan to start over your busiest 6- to 8-week period.
Each year on our farm, there are two periods when the greenhouse is operating at full capacity. The first of these is early April to mid-May. Through most of April, our fields are too cold and wet to plant much outside, other than peas, onions, and some cold-hardy greens. Even until mid-May, we are still worrying about late-spring frosts and are reluctant to move tender crops (such as tomatoes, peppers, basil, and squash) into the field. So through much of April and the first half of May, our greenhouse is pretty crowded.
We started with a 17- by 48-foot hoop house with polyethylene covering, plywood endwalls, and a hinged door. We installed a propane heater and an exhaust fan with a thermostat and louvers, which served us well enough for about 10 years. Then, as our operation grew bigger, it became increasingly too small. Our solution was to remove one of the endwalls, extend the ridgepole, add seven more hoops, then reattach the endwall and staple on a larger sheet of plastic. (Note: A 4-foot spacing between hoops is standard, which means our new length needed to be divisible by four.)
This expansion brought us to 17 by 76 feet, or 1,292 square feet of covered space — definitely an improvement over the original house, though not quite as big as I would have liked. At that point we were constrained by the size of the existing heater and fan. If we had extended the length any farther, we would have needed to replace both heater and fan with bigger units. We opted instead to make do with a smaller house.
Our second busy period is mid-June to mid-August, as we prepare for the fall planting of hardy greens (kales, collards, broccoli, chard, lettuces, and others). During these two periods, we need to be able to accommodate as many as 40,000 plants over a 6- to 8-week stretch to keep pace with our planting schedule.
Access space and work areas. Only a portion of a greenhouse will actually be used for plants. Our greenhouse is 1,292 square feet, but much of this space is needed for other uses. Aisles and crosswalks allow us to reach plants with a hose and watering wand, as well as perform general maintenance on the greenhouse. These walkways consume a lot of space. The propane heater takes up space, and so does the frost-free hydrant that brings water to the greenhouse. Some space is also needed for greenhouse activities such as seeding, thinning, and filling flats with potting mix. Together, these uses account for about 60 percent of our floor space. This leaves us with just 40 percent, or 516.8 square feet, of bench space for the actual plants.
We like to be able to move around our greenhouse easily. Many growers are probably able to get by with less access space, which would permit them to dedicate more space to plants, albeit in a more crowded environment.
Propagation system. The type and size of flats you use, along with the number of cells they contain, will affect how many plants will fit in your greenhouse.
There are numerous propagation trays, flats, or containers to choose from. Most are plastic; some are Styrofoam; others are made from coconut husks and other naturally occurring, biodegradable materials. There is also the option of using stand-alone soil blocks, which don’t require any container, only a flat surface to sit on.
Most commercial growers use plastic flats because they are inexpensive, an efficient use of space, and, if handled carefully, reusable. Styrofoam flats are more expensive and require more space, but they do last longer than plastic flats (if you can keep them away from small rodents that like to build nests in them during winter). Biodegradable containers are bulky and a lot more expensive, but they are an obvious plus for the environment. Soil blocks also take up a fair amount of space and require a more exact potting mix (in terms of ingredients) that will hold together well when pressed into a block. Soil block enthusiasts claim that their method produces transplants with better roots that adapt more quickly when moved to the field, but in my experience, most growers who are farming more than an acre or two find them impractical.
We do most of our seeding in the industry-standard “1020” plastic flats and try to reuse them for as long as possible. These flats are approximately 101⁄2 inches wide by 21 inches long, which means each has a footprint of 1.54 square feet. By dividing the amount of bench space available in our greenhouse by the size of a single flat, we can arrive at the number of flats we have room for:
516.8 sq ft ÷ 1.54 sq ft = 335.59 flats
Cells per flat. The next thing to consider is how many cells each flat contains. On our farm, we work mostly with flats containing 72, 98, 128, 144, or 162 cells. All these flats have the same 101⁄2- by 21-inch footprint, which means that the 72s have the biggest cells and the 162s the smallest. Which cell size we choose depends on the crop being planted (more on this later). The 128-cell flat is the one we use most often and serves as a good average. For this reason, I’m going to use it in my example.
To determine how many flats we need for our maximum number of plants:
40,000 (plants needed) ÷ 128 (avg. # cells per flat) = 312.5 flats
Fortunately, we have space for 335.59 flats, so we can fit in another 23 flats if necessary.
If our average flat had 162 cells, instead of 128, we would be able to fit in more plants — a total of 50,625, to be exact — so the choice of flat (namely, its cell size and number of cells) does offer a grower some flexibility. But of course, flats with a smaller cell size would result in smaller plants with less substantial root systems. It’s a trade-off.
Allow for expansion. Once you’ve determined the right size for your greenhouse, based on existing and projected crop plans, I suggest that you build it about one-third bigger, assuming you have the space and can afford the modest additional cost. I wish we had done this — it would have saved us labor and expenses down the road. Of course, a larger greenhouse means a larger area to heat during cold weather, so don’t go overboard on size. We’ll consider ways to keep down heating costs later in this chapter.
These days, I apply the one-third-bigger rule to almost all construction projects on our farm. Over the years, we’ve put up several outbuildings — sheds, pole barns, worker housing, high tunnels, and a greenhouse. There’s not a single structure that I wish we had made smaller, but there are quite a few that I wish were a little bigger. As your business grows, you will very likely acquire more tools and equipment, plant more crops, and need more help. You’ll find that covered space of all sorts is an asset that will often pay for itself surprisingly quickly. This is especially true of greenhouses.
If you don’t want to start out building a larger greenhouse, you could site the one you do build in a location where you could add to its length in the future. But be aware: When you expand the size of an existing house, you may need to replace your heating and ventilation units with larger ones — unless you had the foresight and capital to install somewhat larger units than were necessary in the beginning.
More than one greenhouse. Yet another approach is to start with a small house and build an additional house (or houses) as needed. Obviously, additional structures will cost more money, but they will also increase your management options. A second greenhouse will enable you to separate plants by type and adjust temperature (and possibly humidity) to meet different plants’ needs.
For example, heat-loving plants such as tomatoes, peppers, and eggplants might be grouped together in one house where you maintain a high ambient temperature. Plants that can be quite happy in cooler growing conditions, such as brassicas, lettuces, and most other greens, could be grouped in a different house, where fans and heat sources are set to keep the ambient temperature lower. With a second greenhouse you may be able to save on heating costs by keeping one house at a consistently lower temperature than the other, or keeping one house shut down during periods when you have less need of space.
If you’re still with me after this lengthy discussion of how big to make your greenhouse, there are a few other things to consider before you get to break ground. Choosing an appropriate site is an obvious one. Another is the greenhouse’s orientation with respect to the sun’s movement across the sky and the prevailing winds. It’s also important to site your greenhouse in a location that has good access and will be easy to reach with water and electricity, and you’ll need to think about the type of heating and ventilation systems you plan to use.
It’s best to build a greenhouse on level ground, even if you have to move around some earth or bring in fill to achieve this. A slight slope along the length of the house is acceptable, but any slope from side to side should be avoided. Uneven ground makes it difficult to maintain level benches, and unlevel benches mean unlevel flats. Because water obeys the law of gravity, even on the mildest slope, unlevel flats will invariably result in uneven watering. Also, it is much harder to attach polyethylene film evenly and securely to a structure that is not on level ground.
Orientation. An east–west orientation is preferable (it will allow more light to reach your plants) but not crucial. Many greenhouses are oriented in other directions. Not all plants need full sun all day, so having some shady areas (for instance, near the endwalls) isn’t necessarily a bad thing.
Shade. Stay well away from human-made structures (e.g., barns, silos, and other buildings) and natural features (e.g., hedgerows and large trees) that will block the sun. You don’t want shade on your greenhouse that you can’t control. This doesn’t mean all shade is bad. In midsummer, we drape a large shade tarp over our greenhouse to reduce the inside temperature, with full knowledge that a little less light will reach the plants. But this is shade we have control over. In cool, overcast weather we have the option of removing the shade tarp.
Proximity to utilities and home. It’s important to consider the greenhouse’s proximity to water and electricity. You’ll need to have both of these. Water comes into our greenhouse through a buried line and a frost-free hydrant (a hydrant that will not freeze in the winter). Our electric feed line is also buried.
All water lines need to be below the frost level, which might be 3 or 4 feet below ground, depending on where you live. Unless you’re big on ditch digging, or live in a region with mild winters, you will almost certainly need to hire someone with a backhoe to install them. If you’re starting from scratch, it may be easiest to bury your electric and water lines in the same trench. In most cases, the closer you locate your greenhouse to existing water and electric lines that you can easily access, the less cost and disruption you will incur.
Also consider the proximity to where you live. On a cold winter’s day with snow or ice on the ground, you may not want to be trudging great distances to get to your greenhouse.
On a warm, sunny day, the temperature inside an unventilated greenhouse can get to be over 100°F (38°C) very quickly (uncomfortably hot for most plants). A large fan at one end of the house and louvers at the other end will keep things cooler. A thermostat will let you program the fan to come on when the ambient temperature reaches a certain point. Additional wiring will ensure that the louvers open whenever the fan starts up. We’ve put screening over our louvers so that unwanted insects are not easily drawn into the greenhouse. Also, during warmer weather we fit a screen into our greenhouse door for further ventilation.
Small greenhouses heat up faster than larger ones, so good ventilation is imperative. On the bright side, small greenhouses cost less money to heat. If you’re on a very low budget, you might use roll-up sides and open doors for ventilation, but this approach will allow insects easy access and require that you make a lot more trips to your greenhouse to maintain an optimum temperature.
Front view of greenhouse. The louvers on either side of the doors open automatically when the thermostatically controlled fan turns on. Note the propane tank and the heater exhaust stack.
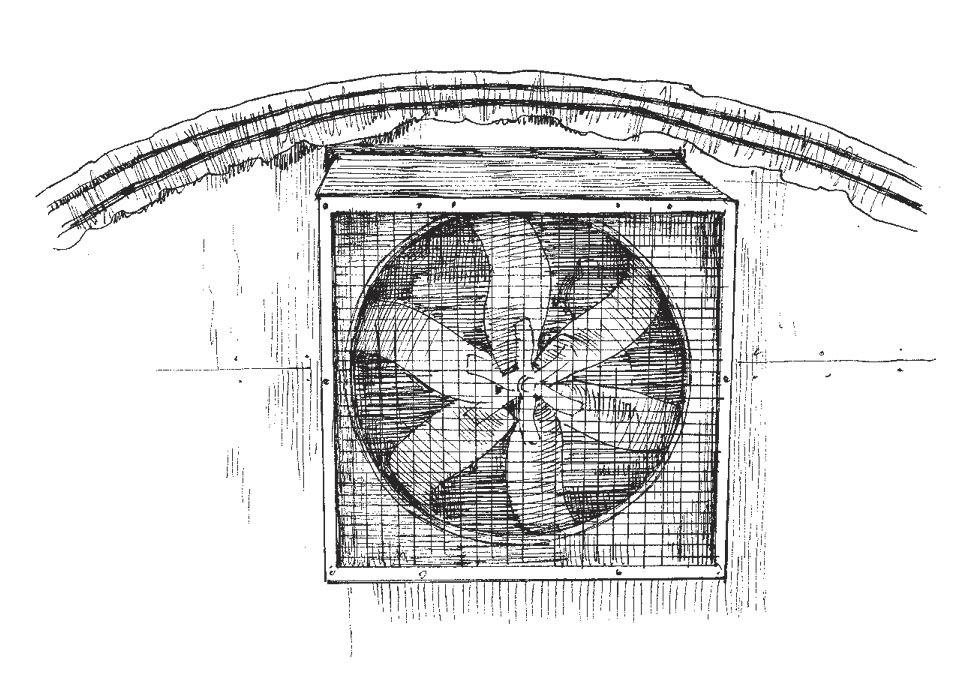
Rear view of greenhouse. The fan draws outside air into and through the house.
After the labor and materials needed to build a greenhouse, the main expense is heat. For summer use only, a ventilated, unheated greenhouse will suffice. But a major reason to have a greenhouse is to start plants inside when it is cold outside. For this, you need artificial heat.
Greenhouse furnaces are most often fueled by propane, oil, or wood. Propane tends to be more expensive but is a cleaner fuel. Wood, especially from your own woodlot, is the least expensive, but you must feed it to the furnace on a daily basis.
Some growers outfit their greenhouses with temperature alarm systems that alert them if the heating system fails and the temperature inside the house drops to a dangerously low level.
As already mentioned, we drape a shade tarp over our greenhouse in the hot summer months of June, July, and August. This brings down the daytime temperature by at least 5°F (3°C), creating a better environment for the fall greens that are usually occupying the greenhouse at that time. Of course, a shade tarp also reduces the amount of light coming into the greenhouse. Choose a shade tarp with a light transmissivity rating of 80 percent or higher.
You’ve sited and built your greenhouse. You’ve installed a fan and heater. You’ve brought in power and water. Or maybe you’ve been lucky enough to arrive at a farm with an existing greenhouse.
Now it’s time to get to work and grow some plants. In this section I’ll discuss what goes on inside a greenhouse. I’ll cover greenhouse benches, potting soils, choosing the right flats, seeding methods, germination aids, and fertility — and a few other matters along the way.
It is possible to leave flats of germinating seeds and seedlings on the greenhouse floor — possible, but not advisable. If you do use the floor, be sure to put down greenhouse fabric first so the flats don’t have direct contact with the soil. The fabric will reduce the chance of a soilborne disease making its way to your plants.
Plants will have better air circulation and better drainage if you set flats on benches. A couple of feet off the ground, they are less likely to contract diseases. Benches also make it easier to observe the progress and condition of plants and to move around the greenhouse with a hose and water wand. Most growers soon opt for a bench system.
There are several types of greenhouse benches on the market. Most are made from metal or plastic. Good-quality, commercial-grade benches can be costly, unless you pick them up secondhand. Many small growers choose to build their own.
Whichever type of bench you choose, the surface should be level and non-sagging; otherwise, water will pond in low spots. Also, because good drainage and air circulation are important, bench surfaces for seedlings should not be made from a solid material, such as plywood. Wire mesh, wooden lath, or a heavy-duty plastic grid will do the job and allow excess water to drain away. The one exception to this rule is when the seeds are first germinating and they need only a light misting of water. At this time, they may be set on a solid surface or on heat mats.
We constructed our own benches using old, salvaged 4×4s for the legs, 2×4s for the frames, and heavy-duty, galvanized wire mesh for the surfaces. They have served us well enough, though here and there we’ve found it necessary to put additional 2×4s under the wire mesh to prevent sagging.
These homemade greenhouse benches are keeping seeded flats a couple of feet off the ground, allowing for better air circulation.
Greenhouse benches are usually at least 10 feet long. Those placed along the edges of the house should not be more than 3 to 4 feet wide, so you can comfortably reach over them. Benches situated in the middle of the house, with aisles on either side, can be double this width, but they will be difficult to move. A better and more versatile alternative is to set two 3- to 4-foot-wide benches side by side.
There are many potting soils, or potting mixes, on the market, but most of them contain synthetic fertilizer and other substances that are not permitted in organic systems. Certified organic growers must use mixes that meet the standards of the NOP. These mixes usually include a fair amount of compost and are not sterile — meaning that they contain living organisms.
Some growers make their own potting soil using various combinations of compost, peat moss, sand, and naturally occurring forms of phosphorus, potassium, and calcium. In the early years on our farm, we made our own potting soil with mixed success. We had problems with consistency, and sometimes our compost contained viable weed seeds that germinated and competed with the vegetables we were sowing. Not a good thing. Now we find it easier and more cost-effective to let the professionals make the potting mix. We buy at least a ton of mix every year from a place called McEnroe Organic Farm in Millerton, New York, and start our seeds with confidence.
I’ve already mentioned that all of our flats have the same dimensions but different numbers of cells. Our most commonly used flat has 128 cells that measure 1⅛ inches on each side and are 2 inches deep. These work quite well for lettuces and most of the other greens we grow. Swiss chard, broccoli, and cabbage seem to do better when they have a little more space, so we seed these crops in flats with 98 cells, each of which is a little bigger — 11⁄4 inches on each side.
Mesclun greens are seeded in 144- or 162-cell flats — we neither expect nor want them to grow into tall plants. We also use the 144s and 162s to start tomatoes and peppers, but once the seedlings have put on 2 or 3 inches of height and developed enough roots to fill their cells, we replant them into our larger 72-cell flats. This is called “potting-on” and always results in sturdier, healthier, and more vigorous plants.
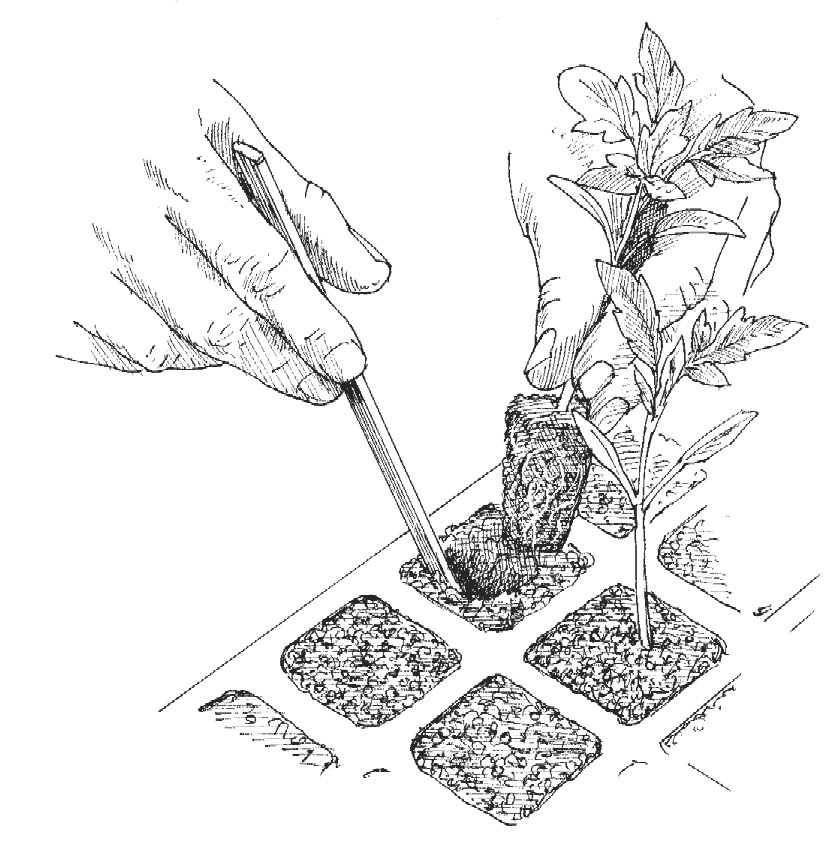
Potting-on. A table knife is used to open a wedge-shaped hole for a tomato seedling.
We commonly use 10-cell flats for onions, shallots, and small seeded herbs. These flats have the same 1020 dimensions (101⁄2" × 21") but only 10 large cells, each measuring 31⁄2 by 43⁄4 by 21⁄4 inches deep. We seed onions and shallots in three shallow rows per cell, with an inch between rows. Each row receives approximately 15 seeds, for a total of about 45 seeds per cell. We’ve found these flats work quite well for our allium crops, even though some roots intermingle, making the seedlings a little more difficult to separate and transplant. Because we usually transplant our alliums in groups of two or three, this doesn’t bother us too much.
The 10-cell flats are also used for certain herbs (sage, thyme, rosemary, marjoram, oregano). After germination we thin the tiny herb seedlings down to about 15 per cell and later pot them in 98- or 128-cell flats.
Don’t feel compelled to copy the system below. Variations on it will work fine, and there are several other flat sizes to choose from. Just be aware that some crops need more growing space or more time to grow than others. Experiment with different flat sizes and see which work best for you. Remember, those plants that need to stay in the greenhouse for more than 6 weeks will usually benefit from the extra space and fresh growing medium that potting-on will give them.
A final note: When we run out of a certain flat size, we don’t hesitate to go one step smaller or bigger and seldom notice much difference. On our farm, very few things are written in stone.
144s and 162s: Mesclun salad greens, scallions. For starting tomatoes, peppers, eggplant.
128s: Lettuces and most other greens, basil, parsley. Potted-on rosemary, sage, thyme.
98s: Swiss chard, broccoli, cabbages, celeriac, winter squash.
72s: Summer squash, zucchini, cucumbers. Potted-on tomatoes, peppers, eggplant. Also sometimes use for broccoli.
10s: Onions, shallots. Many herbs that will later be potted-on to 128-cell flats.
If you own a greenhouse, you’ll learn how to seed flats soon enough. Depending on the type of seed you’re sowing, there are a few different approaches. Large seeds such as cucumbers, squash, and Swiss chard can be picked up easily between thumb and forefinger and pressed into the potting soil. Medium-size and small seeds are a bit trickier. Many small growers fold a sheet of stiff white paper in half to create a V-channel for their seeds. With the folded paper in one hand and a pointed object such as a pencil or a large nail in the other, they are able to coax the seeds — one or two at a time — into each cell of the flat they are working on.
Handheld seeders. There are a few simple devices on the market that claim they can help you with seeding. Most don’t offer much of an improvement over the folded-paper-and-nail method, but we’ve found one to be quite useful. It’s a vibrating device called the Vibro Hand Seeder from Gro-Mor. It runs off a 9-volt battery or a power converter cord. Seeds are placed in a shallow metal channel and dribbled into the cells of your flat, either slowly or quickly, depending on the vibration setting you choose. But a word of warning: These seeders work best with oval or elongated seeds and not so well with perfectly round seeds, which tend to roll out of the metal channel uncontrollably.
Vacuum seeders. If you want to go a step beyond a vibrating seeder, you might consider investing in a vacuum wand seeder. This will speed up the process considerably because it will enable you to drop an entire row of seeds into a flat at the same time; however, it is a lot more expensive (over $500 versus $60 to $70 for a vibrating seeder), and it is less versatile. If you’re using a vacuum seeder, you’ll want to standardize your flats, with regard to both size and number of cells. Large growers and commercial greenhouse operations use vacuum seeders that can seed an entire flat at the same time.
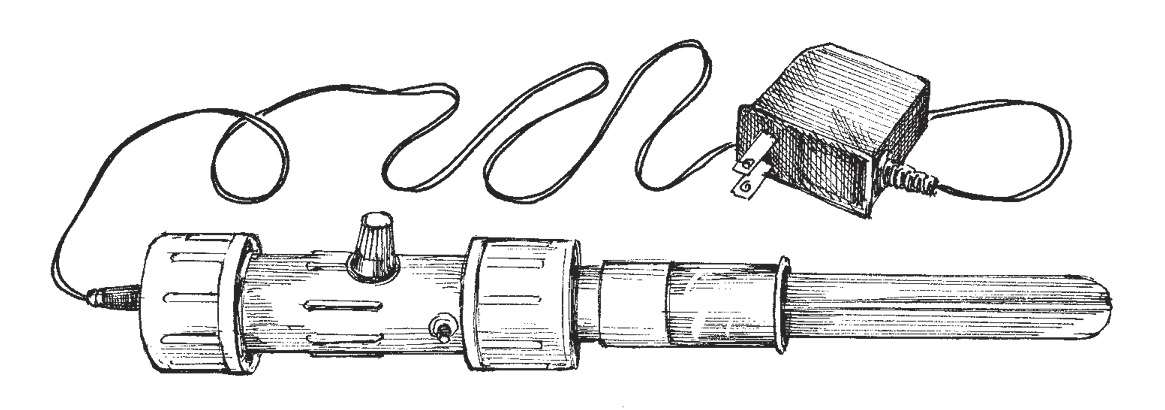
Vibrating hand seeder
My advice would be to start out seeding by hand, or with a handheld vibrating seeder. If you find that you are specializing in just a few crops and seeding multiple flats (more than 10 or 20) of each every week, and you’re willing to work with just one or two flat sizes, it’s time to look into more advanced seeding equipment.
In addition to having lower germination rates, older seeds often have less vigor. This means they may grow poorly and produce less vigorous plants, especially when they are subjected to the variable and more challenging conditions that generally prevail in the open field, as opposed to the controlled environment of the greenhouse. The result can be rows of disappointing plants that may not be able to properly complete their life cycle.
It makes sense to use new or relatively new seed whenever you can. If you do use seed that is more than a couple of years old, be aware that vigor usually declines before the germination rate does. There are ways to test older seed for vigor, but since I’ve never done this, I’ll let the seed experts advise you.
When you are deciding how many seeds to place in each cell, there are three factors to consider: Germination rate, cost, and the amount of thinning you’re willing to do. The seed’s germination rate should be given on the packet. The higher the germination rate — let’s say, above 90 percent — the more likely it is that a single seed in its own cell will germinate for you.
The second consideration is cost. Most seeds are relatively inexpensive, but not all. For example, some fancy hybrid tomato seeds, with various disease resistances built into them, can cost as much as 30 cents apiece. Five hundred of those will cost you $150. That’s expensive. A third factor to consider is how much time you’re willing to spend thinning.
Taking these factors into account, we’ve come up with the following guidelines for all crops that will be transplanted into the field as single plants (singletons):
A final word on seeds per cell: When dealing with more expensive seeds, or seeds in short supply, we sometimes put two seeds in roughly 20 percent of the cells at one end of the flat, and one seed in the remaining 80 percent. If we don’t get full germination in the 80 percent of cells that received just one seed, we can fill in the empties from the cells that received two seeds. We usually dig, separate, and replant the little seedlings a couple of weeks after germination. This requires gentle fingers, a small implement like a table knife, and a little water to set the roots.
When you put more than one seed in a cell, you are normally assured of getting a flat in which 100 percent of the cells will give you seedlings, but you’ll almost certainly need to do some thinning. In my mind, knowing that we will get close to or exactly the number of plants we want (and are planning for) justifies the time spent thinning. Also, by using flats at full capacity, we make more efficient use of our greenhouse space, which is in short supply during busy periods.
Crops like lettuces or cabbages, which are sold by the head, should always be transplanted as singletons, and therefore must be thinned. The same goes for most other greens that we grow, even though many of them are sold by the bunch. There are certain crops, though, especially Asian greens such as mizuna or mibuna, that can be transplanted singly or in groups of two or three. With these plants, you don’t need to be so strict about thinning.
The three main variables influencing the germination of seeds are moisture, temperature, and light.
Moisture. This is pretty much a universal requirement for seed germination. At the most basic level, a watering can will do the job. Better than a watering can is a hose, with a watering wand, that comes to the greenhouse from an outside source. Still better is a frost-free hydrant installed in your greenhouse. A hose or some other watering system (overhead sprinklers and a timer, if you want to get really fancy) can be connected directly to the hydrant. For more information on watering, see page 153.
Temperature. Soil temperature has a big effect on how well seeds germinate. As long as they are kept moist, most vegetable seeds will germinate well when the soil or potting mix is between 65 and 85°F (18 and 29°C). Above and below this range, some seeds will fail to germinate, while others will take longer to germinate and their rate of germination will drop. Minor deviations from the ideal range may not be so consequential, but big deviations will have very negative results. Bear in mind that the longer it takes for a seed to germinate, the greater the chance that it will rot or meet with some other misfortune, such as getting eaten by a mouse.
Some varieties of lettuce prefer cooler soil — 65 to 75°F (18–24°C) — and germination of all lettuces drops off sharply above 85°F (29°C). This can pose a problem for growers trying to start lettuce in midsummer.
Light. When their moisture and temperature requirements are met, most vegetable seeds will germinate happily when covered with a thin layer (usually about twice the diameter of the seed being planted) of potting mix or soil. Others, especially very small seeds, some flowers, and certain varieties of lettuce, prefer being exposed to some light. These should be left uncovered after sowing or covered with an extremely thin layer of soil or a moist paper towel. A good seed catalog will tell you which seeds should be left uncovered.
An excellent way to keep your potting medium warm, ensure rapid germination, and reduce the incidence of damping-off diseases, is to sit your flats on electric heat mats (also called plant propagation mats). The bottom heat provided by these thermostatically controlled mats will keep the potting soil at an optimum temperature.

Electric heat mats on a table. A 6-inch-high wooden perimeter fence surrounds the heat mats.

Germinating flats on heat mats. Note the paper towels on the surface of some of the flats and the row cover on the right that will be draped over them at night.
For most seeds, we set our heat mats to turn on when the soil temperature drops below 75°F (24°C). On sunny days, even in winter, there is usually enough warmth in the greenhouse that heat mats are not needed. But on overcast days or at night, when temperatures drop, they turn on and do their important work.
In addition to hastening germination, we’ve found that heat mats can help us reduce fuel consumption in our greenhouse during a short but significant period of the year — when outside temperatures are low and only a small portion of the greenhouse is occupied.
Our method. We lay out the heat mats on a long table, the surface of which is two sheets of 4- by 8-foot plywood, end to end, covered with heavy-duty plastic (old greenhouse poly works just fine for this). On all four sides of the table, there is a 6-inch-high wooden fence or wall made from lengths of 2×6 lumber. See illustration on page 149. The seeded flats are set on the heat mats and watered or misted as needed during the day. At the end of the day, we drape a large sheet of heavy-gauge row cover over the tables and use spring clamps to secure it at each end.

Hoops and row cover are used at night to retain the warmth provided by the heat mats (this is a variation on the wooden fence and upright post system described in the text).
The row cover is held up by the wooden fence or walls and an 18-inch-tall upright post, with a padded top, placed in the center of the two tables. In no place does the cover rest on the surface of the flats. The arrangement looks a bit like a low, elongated tent. The row cover acts like an insulating blanket and creates a microclimate for the seeded flats. It ensures that most of the heat generated by the mats stays with the potting soil and does not dissipate into the larger expanse of the greenhouse. This saves electricity and more to the point, it means we do not have to run our propane heater.
Heat mats are not the only way to provide bottom heat to speed seed germination. Another approach is to install copper or PVC water pipes in shallow beds of sand or some other heat-conducting medium. Hot water, from a hot-water heater, is circulated through these pipes and keeps the sand at a steady warm temperature. A system of this sort is more elaborate and costly to put in place but should pay for itself over time. High-quality, durable heat mats and the thermostats to operate them are also quite expensive. But they, too, will pay for themselves within a few years.
If you want to reduce energy costs, you might consider installing solar panels to power your heat mats or hot-water germination system.
Once seeds germinate, they are removed from the heat mats and placed on benches in another part of the greenhouse. Again, our goal is to avoid running the propane heater until absolutely necessary. To this end, we have constructed a simple rectangular box frame from 1.5-inch PVC pipe and corner fittings. Its dimensions are 10 feet long by 15 feet wide by 4 feet tall. It stands about 20 inches above the two large benches that it encompasses. On cold days and at night, when temperatures drop, we drape row cover over the PVC frame, creating another small, insulated environment. Spring clamps at both ends and on the sides keep the row cover in place and taut.
Underneath one of the benches, we place a small ceramic electric heater, which is set to go on when the temperature under the row cover drops below 60°F (16°C). On an average night in late winter or early spring, with temperatures well below freezing, the electric heater might use a few dollars’ worth of electricity. The propane heater, on the other hand, if it were turned on and asked to maintain a temperature of 55°F (13°C) throughout the entire greenhouse, would gobble up several times as much fuel every night. Not good for the wallet or the environment.
By creating these small, insulated zones within the larger greenhouse and applying heat locally, we are able to speed germination and maintain excellent growing conditions for at least a few weeks without having to heat our entire greenhouse, which would certainly require burning more fuel.
Our insulated and individually heated zones can accommodate about 75 flats. Once we exceed this number, we begin using the propane heater to maintain the entire greenhouse at or above 55°F (13°C), though, for a few weeks, we may continue to use the small ceramic heater under the benches blanketed with row cover for heat-loving plants. We also continue to use the heat mats for germination, keeping them set to go on at about 75°F (24°C). When no longer needed, the PVC frame is easily dismantled and stored.

PVC frame and row cover sit over flats on greenhouse benches. You might also place a small ceramic heater underneath the flats.
You don’t need to provide any supplemental feed to seeds while they are germinating. Also, in the first couple of weeks after germination, there should be adequate nutrition in a compost-based potting mix.
But seedlings that are rooted in 1 cubic inch or less of potting soil soon use up the nutrients available to them. Furthermore, frequent watering of such a small volume of soil can cause nutrients to leach out through the drain hole in the bottom of the flat. Your plants are not likely to die from malnutrition during their relatively short stay in the greenhouse, but if you want to keep them in peak health, it’s best to give them some supplemental feed in the few weeks before transplanting. You can do this by spraying a fish emulsion and kelp mix every couple of weeks, a practice known as “foliar feeding” (the emulsified fish parts provide nitrogen and phosphorus, and the kelp furnishes micronutrients). Alternately, you can water them periodically with a diluted fish and kelp mix.
pH. Water used in a greenhouse should have a pH between 5.2 and 6.8. Water with a pH outside this range, especially above 6.8, will severely limit the availability of certain nutrients (most notably, manganese, iron, copper, zinc, and boron), resulting in poor plant growth. This can be a big problem when seedlings are growing in very small cells. If you suspect your water is highly alkaline, you should have it tested. The problem can be corrected by adding citric or sulfuric acid to the irrigation water, but seek professional advice before doing this.
As I already mentioned, water comes to our greenhouse through a frost-free hydrant fed by an underground line. A hose long enough to reach all corners of the greenhouse is connected to the hydrant; then a 3-foot water wand, with a shutoff, is attached to the hose. At the end of the water wand, we attach a Y divider that allows us to use two different sprinkler heads on the same wand. One has very fine nozzles for misting flats of ungerminated or just germinating seeds. The other sprinkler emits a heavier flow, like falling rain, and is used to more thoroughly penetrate the potting soil as plants grow and develop root systems. Each sprinkler head has its own shutoff, allowing us to use just one at a time.
Watering a greenhouse is no simple matter, especially when you are dealing with a variety of crops at different stages of development in flats with cells of different sizes and under changing weather conditions. The fact that these variables often influence and interact with each other only adds to the challenge.
I view greenhouse watering as more of an art than a science, but an art that is grounded in common sense and easily understood principles. A good greenhouse waterer/manager needs to develop an observant eye and always be on the lookout for telltale signs that the plants under his or her care are not entirely happy.
To start out, you need to get a handle on the following five basic variables:
The above five are the basics to keep in mind, but there’s more to it than that. Here are some other important guidelines to observe when watering your greenhouse:
Water according to stage of growth. Flats with germinating seeds should be kept moist at all times but not saturated. Try to keep the top 0.5 inch of potting soil damp, especially during the day.
As seedlings grow and develop roots, there should be water throughout the entire depth of the potting soil, especially in the lower portion, where the roots are. If only the top portion of each cell is moist, the roots will stay there. You want them to branch out in search of water and ultimately fill the entire cell.
Allow flats to dry down. After seeds germinate, you should let the flats get moderately dry at least once a day. It is better to water thoroughly and less frequently. By allowing the soil to dry before rewatering, you encourage root growth. If there is a constant supply of water, plant roots have no incentive to go in search of moisture. Moreover, constantly wet plants are more vulnerable to disease.
Pay attention to time of day. Adequate moisture is important during the warmest and sunniest part of day; that is, midmorning to late afternoon. Toward the end of the day, flats should be allowed to dry off somewhat. Avoid watering plants late in the day, unless they are drooping and clearly in stress. Plants need minimal water at night, and wet leaves at night will make a plant more vulnerable to foliar diseases.
Establish a regular schedule. Develop a regular watering schedule, or at least a schedule to determine whether watering is needed. The first watering of the day is usually best done 2 or 3 hours after the sun rises. But the condition of the plants and the amount of moisture in the flats are the best indicators of when to give water.
Check weights. Periodically check the weights of a few sample flats to determine moisture content. Flats should be lightest in the morning before the first watering. Be aware that flats with different cell sizes can have very different weights. It helps to become familiar with the average weight of each type of flat — when it is saturated and when it is fairly dry.
Organize flats. Flats with small or shallow cells dry out faster than flats with big cells, and therefore require more frequent watering. Separate and organize flats in the greenhouse according to cell size. This makes watering easier.
Water evenly. Keep flats level and water them evenly. There is a strong tendency to apply more water to the center of a flat than to the edges. Always take this into account.
Remain flexible. Remember, every day is a new day and will call for its own approach to watering. Don’t mindlessly repeat what you did the day before, unless everything — temperature, sunlight, humidity, condition of plants — is just the same.
Use one waterer. Avoid having several different people water your greenhouse. If at all possible, have the same person do it every day, and that person should have an eye for detail.
Bottom watering involves setting a flat of seedlings in a larger tray containing an inch or two of water and allowing the water to enter the flat from below. This method is time consuming but sometimes necessary.
Excessive top watering and prolonged surface wetness can cause a crusty, green mold to form on the surface of your flats. This condition is unhealthy for plants. It severely reduces soil aeration and makes it harder for water to penetrate down to the lower plant roots, where you need it. Allowing water to rise up, by capillary action, through the bottom half to three-quarters of the flat can mitigate this problem. The process shouldn’t take more than 2 or 3 minutes. Don’t leave the flats immersed so long that the water rises to the soil surface.
Bottom watering is more likely to be necessary on slow-growing plants that spend a couple of months or more in the greenhouse — onions and celeriac, for example, or Mediterranean herbs such as sage, thyme, and rosemary. If you do have to resort to this method, consider adding some fish emulsion to the tray of water, so that your plants get a nutritional boost as they receive their water.
The protected and controlled environment of a greenhouse is ideal for starting and growing tender young plants. But it can also provide a haven for certain pests and diseases, which, once established, can spread rapidly. Good hygiene and a vigilant eye are your best defenses. Healthy plants that are getting the attention, water, air movement, and nutrients they need are much less likely to succumb to pests and diseases. Here are some simple steps you can take to minimize problems.
Two of the more common problems you will likely deal with are aphids and damping-off.
Aphids are most likely to show up in midsummer, when the greenhouse is crowded and receiving frequent waterings. Aphid populations can surge quickly and do significant damage. They can also spread diseases. If you catch them early, they are relatively easy to control by spraying insecticidal soap. Another approach is to release parasitic wasps or lady bugs into your greenhouse. But again, this should be done when the infestation is still light.
Damping-off is a complex of fungal diseases — most commonly, Rhizoctonia and Pythium — that can be deadly to greenhouse seedlings. Rhizoctonia is active at the soil surface. It creates a girdling, hourglass impression near the base of a plant’s stem, soon causing it to fall over and die. Pythium operates farther down in the soil. It attacks and kills a seedling’s roots.
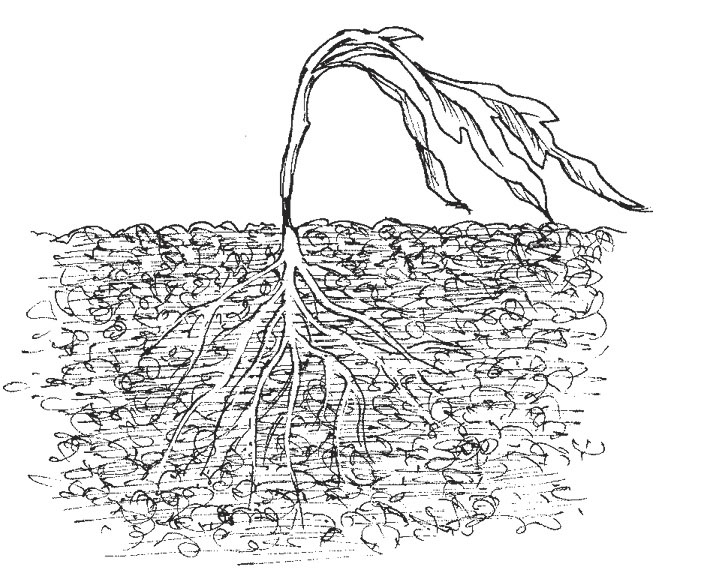
Seedling damping-off. Note the hourglass-shape thinning of the seedling’s stem, just above the soil line.
Damping-off is most likely to occur under cold, wet, crowded conditions and will often take hold at night. Using clean flats, keeping plants well thinned, and maintaining good air circulation are your best defenses. If you detect damping-off, rogue out affected plants immediately.
Allowing a greenhouse to experience extremes of heat and cold can be a good way to eliminate certain pests and diseases. An unheated greenhouse in a northern winter will get cold enough to knock out some of the “bad guys.” Similarly, in the full heat of summer, closing down a greenhouse and shutting off ventilation for a couple of weeks can put the kibosh on some troublemakers. Replacing the weed barrier on the floor with clear plastic will cause the soil underneath to get very hot. This process is known as “solarization.”
There are numerous other pests and diseases that can invade your greenhouse. You’d be wise to acquire a book that tells you more about them and provides information on prevention and control. But don’t get too anxious. By taking the simple precautions outlined above, you should encounter very few problems. At least, that’s been our experience.
Before seedlings are transplanted to the field, they should be hardened off. This is done by moving them from the controlled and somewhat pampered environment of the greenhouse to the outside world and placing them on something we call “hardening-off structures.” The plants remain in their flats but are more directly exposed to nature’s elements, in the form of sun, wind, rain, and lower temperatures. On the hardening-off structures they get a taste of what lies ahead and some time to prepare themselves.
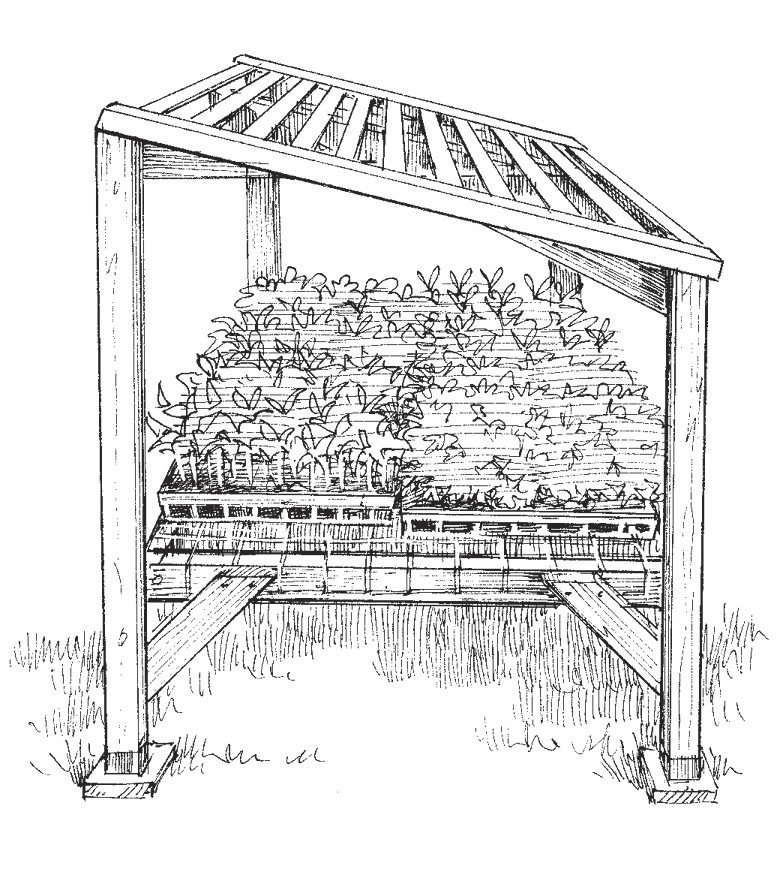
This hardening-off structure has flats of tomato seedlings.

This hardening-off structure holds onion seedlings.
Our hardening-off structures resemble greenhouse benches, in that they have legs that hold the flats a couple of feet off the ground and a surface of galvanized wire mesh to ensure good drainage. But they differ in that they are built with a sloping, partial canopy a few feet above the plants that provides some shade and a little protection from heavy rain.
The hardening-off period can last anywhere from a few days to a week or more. During this time, plants continue to receive water but somewhat less than they are used to. The idea is to toughen them up a little but not expose them to severe weather changes that might be harmful or fatal. Sometimes, if a cold spell is headed your way, it might be necessary to interrupt the hardening-off process and return tender plants such as basil or tomatoes to the greenhouse for a night or two.
Hardening off is most important early in the season or at any time when plants are going from a heated greenhouse to outside temperatures (especially nighttime temperatures) that might be a lot lower than they are accustomed to. In midsummer, when outdoor temperatures remain well above freezing both day and night, hardening off is less critical, though still advisable.
As with managing your entire farm, managing a greenhouse requires some organization. With a little experience under your belt, you’ll come up with an arrangement that works well for you. In the meantime, here are a few suggestions to get you started: