
UP TO THIS POINT, we’ve talked about the basics of crocheting and following patterns. Now it’s time to sample some extras that can enhance your newly found knowledge. If you are intrigued by any of these techniques, take time to explore them further using additional resources (see Books, page 305).
Q What is Tunisian crochet?
A Tunisian crochet, also called afghan stitch, is a crochet technique worked with a long-handled tool called an afghan hook, which looks like a cross between a knitting needle and a crochet hook. Indeed, Tunisian crochet combines elements of both crochet and knitting. Simple Tunisian crochet stitches are square, making them an ideal base for cross-stitch embellishment.

afghan hook
Q How does Tunisian crochet work?
A Tunisian crochet is made with a combination of forward rows and return rows. Here’s how:
1. Base row. With an afghan hook, chain as many stitches as you need for the width of your piece. Insert hook into second chain from hook and pull up a loop as you would for single crochet. Leave that loop on the hook, and pull up another loop in the next chain. Continue on down the chain, pulling up a loop in each chain and leaving it on the hook. Do not turn the work.

2. Return Row. Yo and pull through first loop on hook (the equivalent of a turning chain), *yo, and pull through 2 loops on hook; repeat from * across row.
3. Forward Row. *Insert hook from right to left (left to right for Lefties) under vertical bar of the next-to-last stitch in the previous row and pull up a loop; repeat from * across row. Do not turn the work.
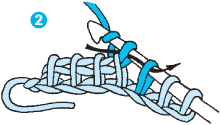
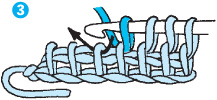
4. Continue working these last two rows for the Tunisian simple pattern, ending with a Return Row.
5. To bind off. Work a slip stitch row as follows: *Insert hook under next vertical bar and pull up a loop, pulling the loop all the way through loop on hook, so that one loop remains on hook; repeat from * across row.
Q Can I work stitch patterns in Tunisian crochet?
A Absolutely! You can make a fabric that closely resembles knitting, or you can work Tunisian rib, basket weave, bobbles, clusters, and a variety of other stitches. You can increase and decrease.
Q What projects are best suited to Tunisian crochet?
A Most people associate Tunisian crochet with afghans. (After all, another name for the technique is “afghan stitch”!) Warm garments can be made with afghan stitch, as well. The length of the hook limits the width of the fabric, however, so wide garment pieces and afghans must be stitched separately, then seamed.
Q What is double-ended crochet?
A Double-ended crochet is a type of Tunisian crochet worked with a long, double-ended hook. It is usually done with two contrasting colors and makes a thick fabric perfect for afghans, potholders, and so on.

double-ended hook
Q How do I work double-ended crochet?
A There are several different techniques you can use when working double-ended crochet. Here’s just one: Using a double-ended hook and two contrasting color yarns, begin by chaining the number of stitches needed for your desired width with Color A.
ROW 1: Pick up a loop in each chain as for Tunisian crochet. Drop Color A, but do not cut it.

ROW 2: Turn the work and push it to the other end of the hook. With Color B, work a return row under the vertical bar as for Tunisian crochet. Do not turn.
ROW 3: With Color B, work a Forward Row of Tunisian crochet. You’ll be working under the vertical bar formed by Color A. Count to see that you’ve maintained the same number of stitches. Drop Color B.
ROW 4: Turn the work and push it to the other end of the hook. With Color A, work a Return Row of Tunisian crochet.
ROW 5: With Color A, work a Forward Row of Tunisian crochet, working under the vertical bars formed by Color B. Count your stitches again.
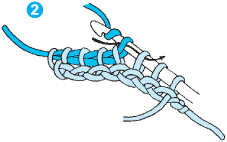
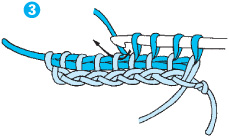


Repeat Rows 2–5 until desired length. Finish off with a Tunisian bind-off.
Note: As you finish each pair of rows, the yarn you need to pick up will be waiting for you at the beginning of the row. There are variations of this simple double-ended stitch. Buy a published pattern and experiment!
Q How can I keep track of where I am in double-ended crochet?
A If you are lost, take a look at where you are, what’s on your hook, and what needs to happen next. You’ll see that you are working two rows of each color. The first row of each color starts when the hook is full of stitches in the contrasting color, and ends with just a single stitch on the hook. The second row of each color loads up the hook again with stitches. Turn the hook at the end of every other row, when it is full of stitches and a new color is about to begin.
Q What is thread crochet?
A Thread crochet is crochet made with very smooth yarn, called thread. The thread is most commonly made of cotton, although there are silk and linen threads as well. The thread may be fine, requiring a small steel hook. Thread crochet is used to make lace and filet stitch patterns.
A Irish crochet is a type of thread crochet that results in beautiful three-dimensional lace. It was developed in Ireland to mimic the more expensive European needle laces. Floral motifs are worked individually, then joined with a mesh or filling stitch to form the lace fabric. Traditionally, stitches in the motifs were worked over a cord to pad and add dimension to the stitches. Traditional Irish crochet is not currently in fashion, although modern crochet borrows certain techniques and motifs from Irish crochet, and we tend to call any thread crochet involving flowers “Irish crochet.” Thread flower and leaf motifs on mesh backgrounds are a bow to the traditional Irish techniques.
Q What is filet crochet?
A Filet crochet is another type of thread crochet. In filet crochet, double crochet and chain stitches are arranged to form a grid or ground of blocks and spaces. Filet crochet often depicts letters and pictures. When you work a pattern, the pictures and motifs are presented as graphs. The example shown here is a simplified version of a technique that often results in an intricate and beautifully lacy fabric.
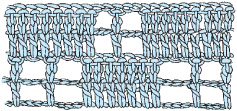
filet crochet
Q What kind of hook and thread should I use for filet crochet?
A You can use any size thread you like; the size of the thread will determine the size of the grid. The smaller the thread/grid, the more detail you can incorporate into your design. Use an appropriate-sized hook for your chosen thread.
Q How do I read a filet crochet graph?
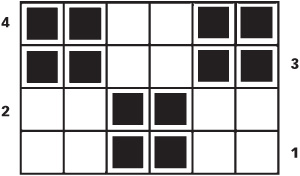
A Each square in a filet crochet chart represents either a block that is filled with double crochets or a space that is created by chain stitches. The block can be made up of either three, four, or five double crochet stitches. The space is made by either one, two, or three chains and a double crochet. When working a block over a space, you work the stitches into the chain space rather than into the chain stitches.
fillet crochet
Start at the bottom right-hand corner of the chart. (Lefties should start at the bottom left, and reverse the following directions.) Follow the first row from right to left; follow the second row from left to right. It may be easier to understand this if you pick up the yarn and hook and try it out, using the sample filet crochet chart on page 265. Each darkened square represents three double crochet stitches, and each white square represents a chain 2 and a double crochet. In addition, there is a double crochet at the end of the row to balance the pattern.

symbol crochet
To determine the number of stitches you need for the foundation chain, count the number of squares across the bottom row. Multiply that number by three, then add one. Next, note whether the beginning square of the first row is a block or a space. If it’s a block, add chain 3 to your starting chain to count as the first dc of the block. If the first square is a space, add chain 5 to your starting chain to count as a ch-3 dc plus a ch-2 mesh.
For example: (6 × 3) +1 = 19
19 + 5 = 24 sts for starting chain on filet chart.
Here is the text version of the first three rows of the sample chart:
ROW 1: Dc in 9th ch from hook, skip 2 ch, dc in next ch, *dc in next 6 ch, (skip 2 ch, dc in next ch) twice; repeat from * across, turn.
ROW 2: Ch 5 (counts as dc plus ch-2), dc in next dc, ch 2, dc in next dc, *dc in next 6 dc, (ch 2, dc in next dc) twice; repeat from * across, ending last repeat with a dc in top of turning chain, turn.
ROW 3: Ch 3, (2 dc in ch-2 sp, dc in next dc) twice, *(skip 2 dc, dc in next dc) twice, (2 dc in chain space, dc in next dc) twice; repeat from *, ending last repeat with a dc in top of turning chain, turn.
Q What is free-form crochet?
A It’s fun! Free-form crochet is a completely pattern-free way of crocheting. Indeed, to do it properly, you can’t have a plan. You use scraps of yarn and a variety of stitch patterns and shapes to paint a textural fabric. Hard to explain, but easy to do!
Using a yard or two of yarn, crochet a little piece in any shape, in any stitch pattern that suits you. Increase and decrease willy-nilly to create a free-form shape. We’re not talking squares here, but little pieces that move. Do only a few rows/rounds, then end off the first yarn. Add on to the first piece with other yarns in your choice of coordinating colors, picking up stitches from the edge of the existing piece. Your free-form motif can be any size or shape. If you are trying to make a particular shape (such as for a purse or a vest), you may have to crochet a few extra pieces to fit your puzzle, but that’s the only time you should have to plan.
This is a technique that unleashes your artistic side! Mix a variety of yarns, weights, and colors to create a unique fabric.
Q What do crocheters do with their free-form pieces?
A You can do anything you chose. Use tiny free-form shapes as brooches or embellishments. Use larger freeform pieces to make vests, coats, afghans, pillows, or wall hangings. If you are shaping a garment, use newsprint to make a full-sized template of each garment piece you need. Make smaller free-form pieces [about 6-8 square inches (15-20 square cm) each] and place them on your template, then fill in the spaces as necessary to create your desired shape.
Q Is there anything I should be cautious about with free-form crochet?
A It can be addictive! You may not want to go back to traditional crocheting when you get a taste of freeform fun.
Q My first tries at free-form crochet are very rippled. How can I get them to lay flat?
A Are you sure you want them to be flat? Free-form crochet is just that. Three-dimensionality, including bumps and ripples, can be part of the beauty of the design. However, if you don’t like the results you are getting, review the guidelines in Chapter 6 about making round motifs lie flat, and those in Chapter 10 about making flat edges.
Q Can I combine crochet with knit?
A Great idea! There are some items that are better knitted than crocheted — and vice versa. Three-dimensional items are easier to crochet than to knit. Knitted fabric’s flexibility means that it may be better suited for sweaters and garments, but stockinette stitch tends to curl. However, crochet is less flexible and more likely to lie flat. You might want to add crocheted edging onto your knitted sweaters, or knitted cuffs onto your crocheted sweater. Use your imagination and you’ll think of dozens of other ways to combine the two.
Q How do I add beads to my crochet?
A There are several different beading techniques for crochet — enough for another book or two! Here is a method I like:
The first step is to string the beads onto your yarn before you begin to crochet. You have to plan ahead to know how many beads you need. The beads wait near your yarn ball until you’re ready for them. When you work them in, they show on the back side of the stitch; your beading row is always a wrong side row so that they will appear on the right side of the fabric.
For single crochet. Work to the spot where you want to insert a bead; insert hook into stitch and pull up a loop, pull a bead up so that it is next to the hook, then yarn over and pull through both loops on hook. You can also pull up beads between single crochet stitches.
beading with single crochet
beading between single crochet
For double crochet. You can pull up the bead at one of two places, either after the first “yarnover, insert hook and pull up loop,” or following that, after the “yarnover and pull through two loops on hook.”
beading with double crochet
You can also make loops of beads for fringe, by pulling up many beads together and allowing them to hang from the front of the fabric before working the next stitch.
beads as fringe
Q My beads don’t show. What did I do wrong?
A You probably worked them in on a right-side row. Be sure to work them in on wrong-side rows only. If your yarn is fuzzy or highly textured, the beads may be hidden by the yarn. Try larger beads or a different yarn. If you are following a pattern, check the instructions to make sure you have followed them correctly.
A Cut lengths of yarn twice the length you want your finished fringe to be, plus 1 or 2 inches (2.5–5 cm). You need the extra length to allow for the knot and for a bit to be trimmed off. Holding 3 or more strands together, fold them in half to form a loop. Insert a crochet hook from the wrong side to the right side of the edge of the fabric and pull through the loop made by the folded strands. Draw the ends of the fringe through the loop and tug gently to tighten the knot.
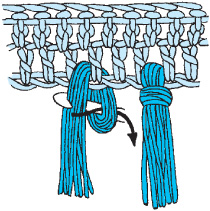
making and attaching fringe
Q My fringe looks pitiful. What’s wrong?
A Don’t be stingy with your yarn! Good fringe takes lots of yarn. Use lengths that are long enough to be in proportion to your crocheted item, use enough strands in each bundle, and place the bundles close enough together to give a luxurious look. Thin yarn can make thin fringe; use lots of yarn or use a different yarn for the fringe.
Some yarns don’t hold up well for fringe. Test your yarn’s hardiness and suitability for fringe by holding a few strands together and running your hands down past the ends of the yarn, squeezing a bit as you do so. Do this several times. Now shake the ends. Are they starting to look ragged? Did you harvest large bits of fuzz when you ran your hand over the yarn? If so, you may want to choose another yarn for fringing, or to omit the fringe altogether.
Q Is it “pompom” or “pompon”?
A Either one.
Q How do I make a pompom?
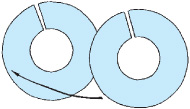
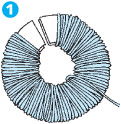
A Start with either a commercial pompom maker or cut out two doughnut-shaped cardboard disks for a homemade pompom maker. The pompom will be slightly smaller than the outside diameter of your disks, so you can make any size you wish.
1. Holding the disks together, wrap yarn through the center and around the outside of both pieces until you can’t fit any more yarn through the center hole — or until you can’t stand wrapping any more! (Voice of Experience: You’ll be tired of this process long before you are finished, but keep wrapping.)
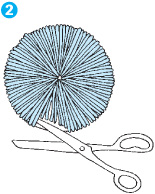
2. Using sharp scissors and holding the center of the pompom maker carefully, cut along the outer edge of the disks, making sure the bottom blade of the scissors is between the two disks, as if you were cutting along the groove of a yo-yo. Don’t separate the disks yet!
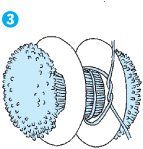
3. Take a 10” (25 cm) long piece of yarn, and wrap it tightly around the center of the pompom bundle, between the disks. Tie a knot, leaving enough of a tail on each end to sew the pompom onto the item you’ve crocheted.
4. Fluff pompom with your fingers, and trim it, if necessary.
A Tassels are easier than pompoms!
Cut a piece of strong cardboard ½ to 1″ (1.25–2.5 cm) longer than the desired length of your tassel. (If you can find a book about the right size, use that as your template.) Next, cut a 4″ to 7″ (10–17.5 cm) length of yarn and place it across the top of the template. This will be the hanging loop.
1. Wrap yarn lengthwise around the template as many times as you need to get the desired thickness. Tie the hanging loop securely around the top of the tassel. Cut yarn at base of cardboard.
2. Slide the wraps and hanging loop carefully off the template.
3. Cut an additional length of yarn about 2½ times the length of the tassel. Wrap this piece tightly around all the strands, ¼″ to 1″ (.5–2.5 cm) from the hanging loop. Secure the ends of the wrapping yarn by threading them under the wraps and down through the center of the tassel. Trim the ends.


Q How do I make a twisted cord?
A Also known as a monk’s cord, this popular cord is simple for even non-crocheters.
1. Cut three or more strands of yarn at least 3 times the desired finished length. Place an overhand knot at each end of the bundle of yarn. Put a crochet hook or pencil into one end to act as a handle. Slip the other end over a hook or doorknob. (Voice of Experience: Even better — get someone to help you hold one end. Kids love to do this!)
2. Using the “handle,” twist the yarn until it is tight. You may have to move a little closer to the stationary end as you twist, but keep some tension on it and hold on! As it twists, it tends to jump out of your hands and kink up.


3. Pinch the yarn at the halfway point and bring the knotted ends together, allowing the cord to twist on itself.
4. Carefully untie the knots and re-tie all the strands together.

If you like, you can make tassels at each end of the cord by tying a knot several inches from each end and allowing the ends to unravel.
Q How do I clean my finished piece?
A Now that you’ve spent all that time making your gorgeous crocheted project, you’ll want it to last a long time. When you made your swatch, you read the care instructions on the yarn label, and then washed and blocked your swatch if it was appropriate for the fiber content, so you know what to expect.
Before you launder your handiwork, take a look to see that buttons and any embellishments are secure, and that no ends are coming loose. (Voice of Experience: Some buttons cannot be laundered; others cannot be dry-cleaned. You may need to remove these before washing or dry cleaning.)
If you can machine-wash and -dry your item, by all means do so. Use the gentle cycle and low heat. Many machine-washable yarns need to be machine-dried as well to regain their elasticity.
Hand wash fabrics by using tepid water and a small amount of gentle soap or detergent. Put the item into the sudsy water and gently squeeze the lather through the fabric. Rinse well. Squeeze out excess water gently. Do not wring or twist! Now you have two options for removing excess water:
Pick up the wet item carefully, supporting its weight, and lay it flat between two clean towels. Roll the item and towels together, and squeeze to blot out the excess water.
Put the wet item into the washing machine, and run a gentle spin cycle for a few moments. Finish by laying the piece flat to dry.
Dry cleaning is a good option for novelty yarns and others labeled “dry clean only.” (Voice of Experience: Some yarns labeled “dry clean” can be carefully hand washed. If you suspect yours can be hand washed, try washing a swatch.)
Q How should I store crocheted items?
A Clean them first; body oils attract dirt that appears like magic when items are put away and makes wool more attractive to moths. Fold crocheted items, if possible, and store them in a dark, dust-proof container. If the item is going to be stored for a long time, refold it from time to time to avoid permanent creases that might weaken the fabric. Use a moth repellent for animal fibers or blends.