Chapter 4
Assembling the Quilt Top
When you’ve completed the blocks for your project, you’re ready to sew them together to make the quilt top (or to turn a single block into a small project of your choice). Most quilts have two or more rows of two or more blocks. The arrangement of the blocks is called the quilt setting. If you are following a pattern, the setting was determined by the designer.
Easy Quilt Settings
The two most common quilt settings are straight and diagonal. We’ll stick to straight settings in this book; diagonal settings are a bit more challenging. They are dynamic and interesting and something to explore in future projects, when you have a bit more experience.
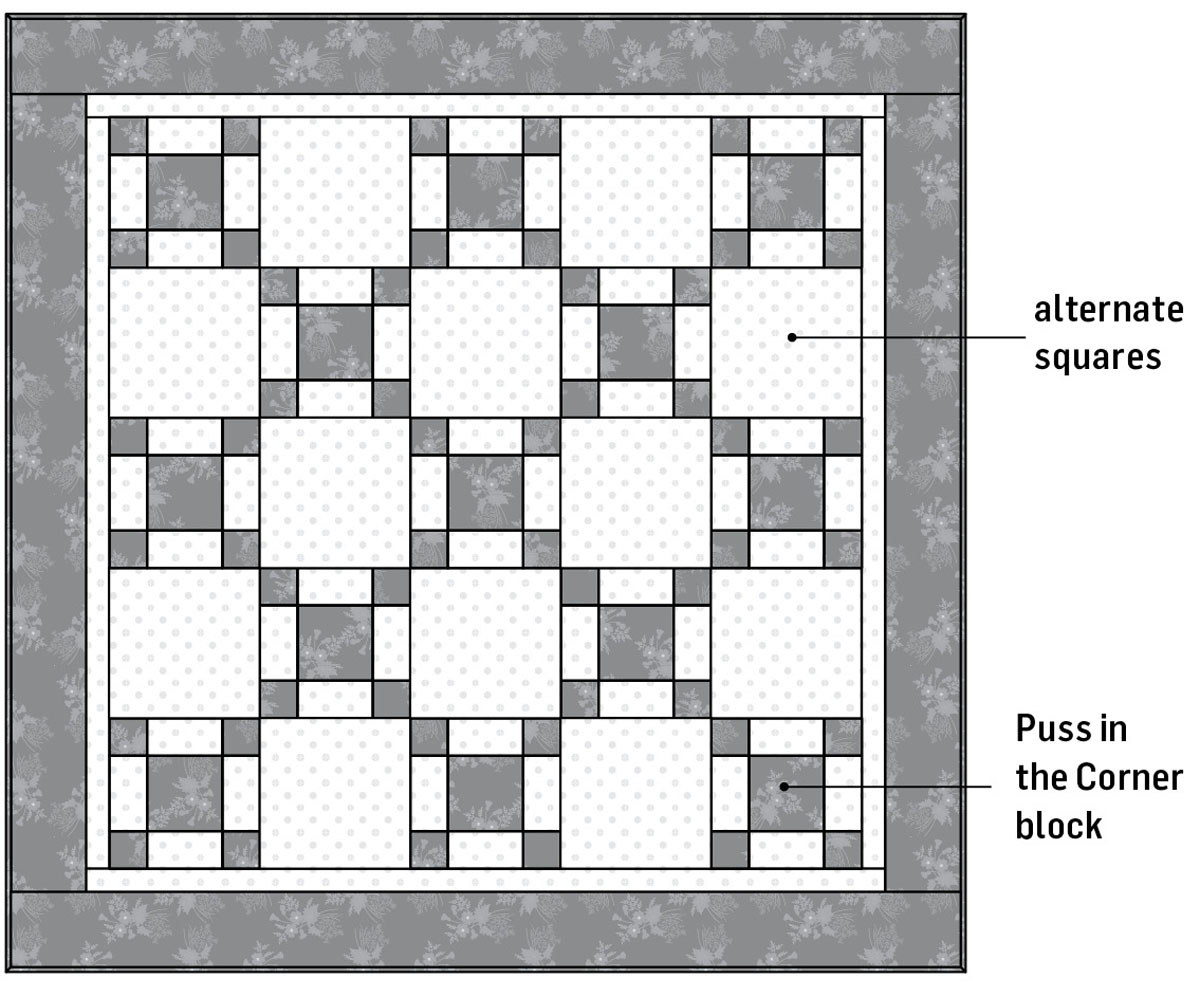
In the traditional straight setting, blocks are placed side by side with other blocks or alternating plain squares and sewn together to create rows. Then the block rows are sewn together to complete the quilt top. The simplest version of this setting combines pieced squares with alternating plain squares. This setting makes it faster to create a quilt top because only half of the squares are pieced. It’s easier, too, because when you join pieced squares to plain ones, there are no seam intersections to match (as there would be when joining pieced squares to each other, side by side). As an example, when you alternate Puss in the Corner blocks with plain squares, the result is the traditional Single Irish Chain quilt design (below).
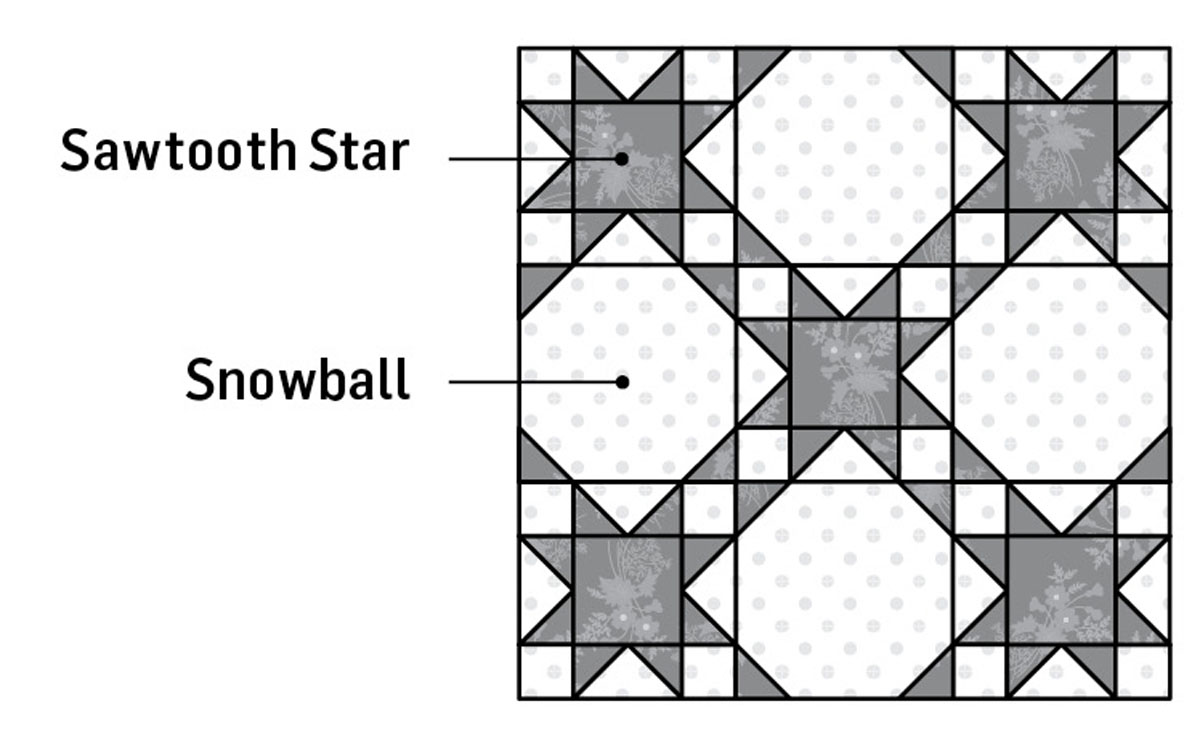
When you alternate two pieced blocks, side by side, and then row to row, you can create interesting secondary patterns as shown in this nine-block arrangement of Sawtooth Stars and Snowballs. Blocks with triangles in the outer corners, such as Snowball and Square-in-a-Square, or with squares in the outer corners, such as Puss in the Corner (above), are some popular choices for this type of setting.
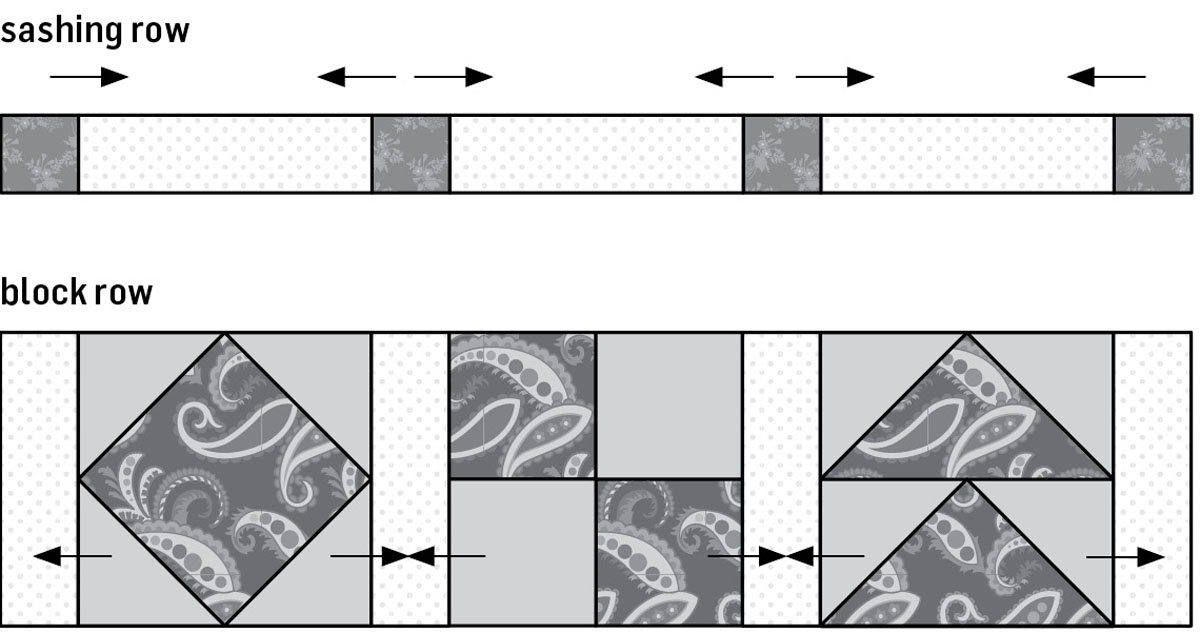
The straight setting with sashing is an easy variation. The blocks in each horizontal row are joined with vertical sashing strips, and then the block rows are sewn together with horizontal sashing strips connected with cornerstones. This setting is often used in sampler quilts, where each block is different, to create a frame around each one that allows it to sparkle on its own. It’s easy because there are no block seams to match when you join the blocks into rows. The Beginner’s Sampler Quilt features a sashed setting.
Preparing and Arranging the Blocks
Before you arrange the blocks in any setting, follow these steps to get them ready:
- 1. Turn each block to the wrong side and trim any thread tails close to the outer raw edges and seam allowance edges. If left on the wrong side, these threads will show through light-colored fabrics in your quilt blocks, creating a visual distraction. Also remove any stray threads on the block surface.
- 2. Check all seam allowances and make sure they are pressed flat on the wrong side of the block. If you find some accidentally twisted seam allowances, it’s not necessary to undo and restitch them; press them as flat as possible on the wrong side and press from the right side as needed. Use a dry iron; too much steam can distort your carefully pieced blocks.
- 3. Check the finished blocks to make sure they are the same size. Use your rotary cutting tools to square them up. A large square rotary ruler is handy for this step. All blocks should measure 1⁄2 " larger all around than the finished block size specified in your pattern. For example, a 9" finished block should measure 91⁄2" square. If there are any blocks that are way off in size, take the time to make a new block if you have enough fabric to do so. It’s easier and less time-consuming than trying to adjust seams in small pieces. If you don’t have fabric for a new block, carefully undo stitching and repair the block. Be careful not to stretch bias edges on the patches.
- 4. Follow the pattern directions to cut any setting pieces you need, such as plain squares or sashing strips and cornerstones.
- 5. Refer to your quilt pattern directions to arrange the blocks (and setting squares or sashing and cornerstone pieces, if applicable) on a large flat surface. This puts them in ready-to-sew position.
Sewing the Blocks and Rows Together
After arranging all the blocks and setting pieces and labeling the rows as directed in Keeping the Pieces Organized (below), get ready to sew and press. Choose the appropriate directions from those on the following pages for the setting style you are using.
Keeping the Pieces Organized
When there are a number of pieces in each row, label the blocks and rows to keep them in order at the machine. After arranging the blocks in rows, label each block with its row number and position. Work from left to right as in 1A, 1B, 1C, etc., write the numbers on small pieces of paper, and pin each one in the upper left-hand quadrant of the blocks. Placing labels in the left upper corner helps identify the orientation of the blocks in each row.
Straight Setting Assembly
Instructions
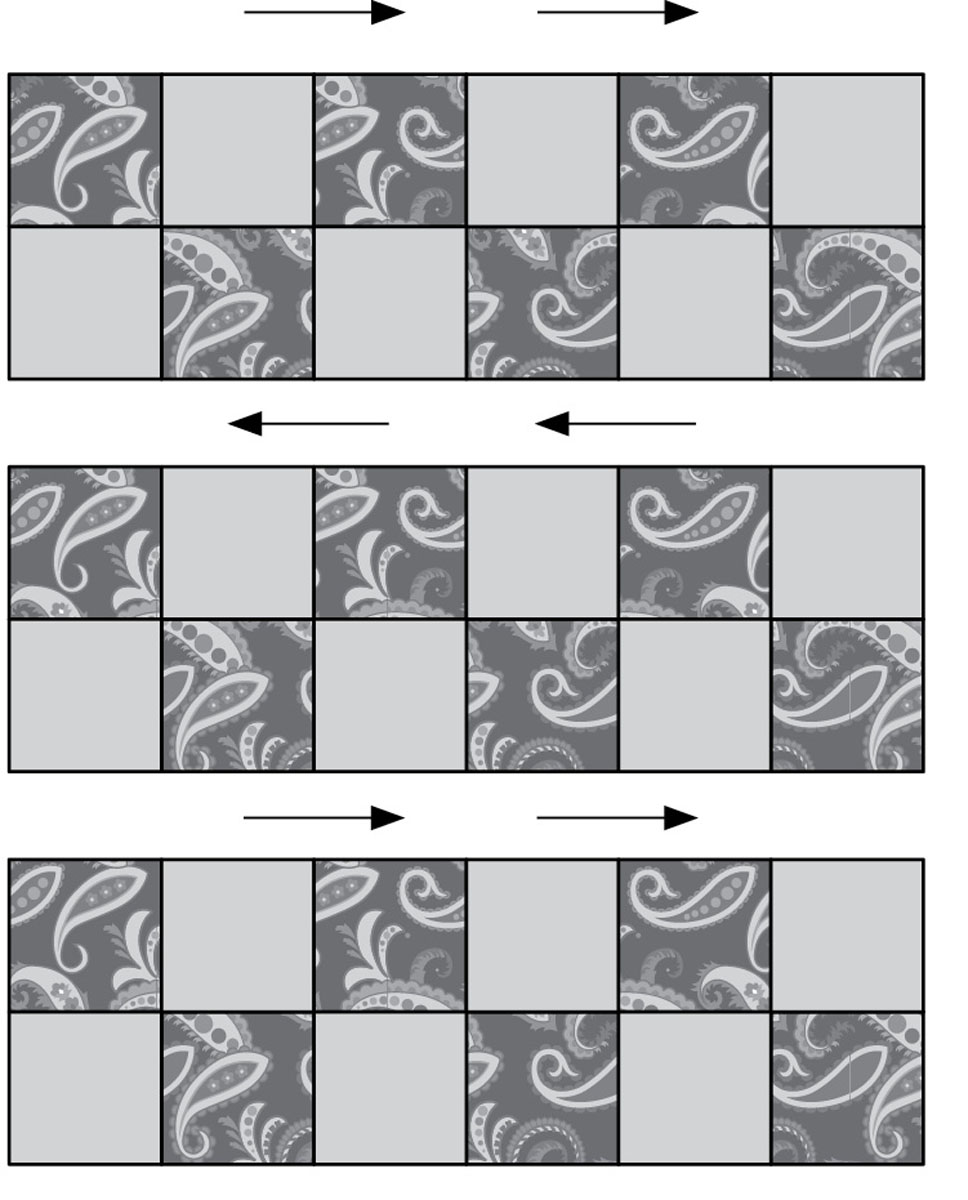
- 1. Sew the blocks together in each horizontal row of the layout, carefully matching and pinning any intersecting seamlines as you learned for block assembly (see here). When joining pieced blocks to pieced blocks, you may need to repress or twist one or more pressed seam allowances in the opposite direction so the seamlines will nest into each other for a perfect match.
- 2. Press the seam allowances in opposite directions from row to row so the intersecting seamlines will nest into each other when joining rows. However, if you are joining pieced blocks with alternating plain squares or pieced blocks with fewer seams (a Snowball or Puss in the Corner block, for example), press the seam allowances toward the alternate squares or pieced blocks with fewer seams. That’s the direction the seam allowances will want to go anyway.
- 3. Joining two rows at a time, use as many pins as you need to hold the block rows together for seam matching and smooth seaming. When rows are joined in pairs, sew the pairs together, adding the remaining odd-numbered row if there is one. Press all the seam allowances toward the bottom edge of the quilt top.
Straight Sashed Setting Assembly
For each step, press all seam allowances toward the sashing strips to position them in opposing directions for easy row-to-row matching. (See the pressing arrows in the illustrations.)
Instructions
- 1. Arrange the blocks and vertical sashing strips together in horizontal rows; sew together and press.
- 2. Arrange the remaining sashing strips with the cornerstones in horizontal rows. Sew together and press.
- 3. Arrange the block rows with the sashing/cornerstone strips in alternating fashion on your work surface. With right sides together and the sashing/cornerstone strip on the bottom, pin the first sashing/cornerstone row to the upper edge of the first block row. Carefully match and nest the seamlines at the intersections of the sashing and cornerstones. Sew, removing pins as you reach them and keeping the block seam allowances in position as you sew. After completing a seam, flip to the sashing side and check the stitching and seam accuracy; correct as needed. Press the seam allowances toward the sashing strip.
- 4. Continue in this manner to add the remaining sashing/cornerstone and block rows in alternating fashion. Press all seam allowances toward the sashing rows.
Cutting and Adding Borders
A border acts like a frame around your quilt top: it stops the viewer’s eye and draws it back to the blocks, where you’ve put all your work. Borders also add space to show off a special quilted design, adding more visual appeal. Some quilts have multiple borders, pieced borders, or appliquéd borders, but we’ll stick to adding only one border with straight-cut corners. (For multiple borders, however, you simply repeat the basic steps for measuring, cutting, and adding a single border.) Modern quilters often avoid adding borders entirely, finishing the quilt top with binding only.
For your border, choose one of the fabrics you’ve used in the blocks of your quilt or one that coordinates with all of the other fabrics. It should complement and set off the blocks, not compete with them. When following someone else’s pattern, examine the sample quilt photo and follow the designer’s lead for fabric choices. Don’t copy it precisely; just look for similar fabric types in a color palette you like and in the values shown.
Measuring accurately and cutting carefully are essential when adding borders so the resulting quilt is “square and true.” The side borders must be cut the same length, even if the measurements at the outer edges of the quilt top do not match. Otherwise, one edge of the finished quilt will be shorter than the other, creating a lopsided quilt. The same is true for the top and bottom borders.
Step-by-Step Borders
Instructions
- 1. Press the finished quilt top and then smooth it out on a flat, firm surface. Use a long ruler or a tape measure to measure the length through the center (see illustration here).
- 2. Use rotary cutting tools to cut two border strips the desired or specified width by the length measurement from step 1. Cut the required number of border strips across the width of the border fabric, unless otherwise directed in the pattern. If the border measurement is greater than 40" of usable width, you will cut additional strips as needed and join them into one long strip as described in Joining Strips with Diagonal Seams.
- 3. Once the border strips are the desired length, fold each in half crosswise and mark the center with a pin or water- or air-soluble marker on the right side. Repeat with the quilt top.
- 4. With right sides together, place a border strip on one edge of the quilt top; pin and match centers and ends. Pin the block seam allowances in place as needed to keep the long raw edges aligned. Pin the other border to the opposite edge in the same way.
- 5. With the quilt top and pins facing you, sew 1⁄4" from the raw edges, removing the pins as you reach them. Secure the stitches at the beginning and end of the seam with backstitching. Press the borders away from the quilt top, toward the seam allowances. (Note: If your quilt top has sashing/cornerstone strips, press the seam allowances toward the sashing instead.)
- 6. Repeat steps 1 and 2 to measure the quilt-top width through the center and cut two border strips (join strips if necessary) to match that measurement. Mark, pin, stitch, and press as directed for the first two borders in steps 3–5. With the borders in place, you are ready to finish, quilt, and bind your project (see Chapter 5).
Joining Strips with Diagonal Seams
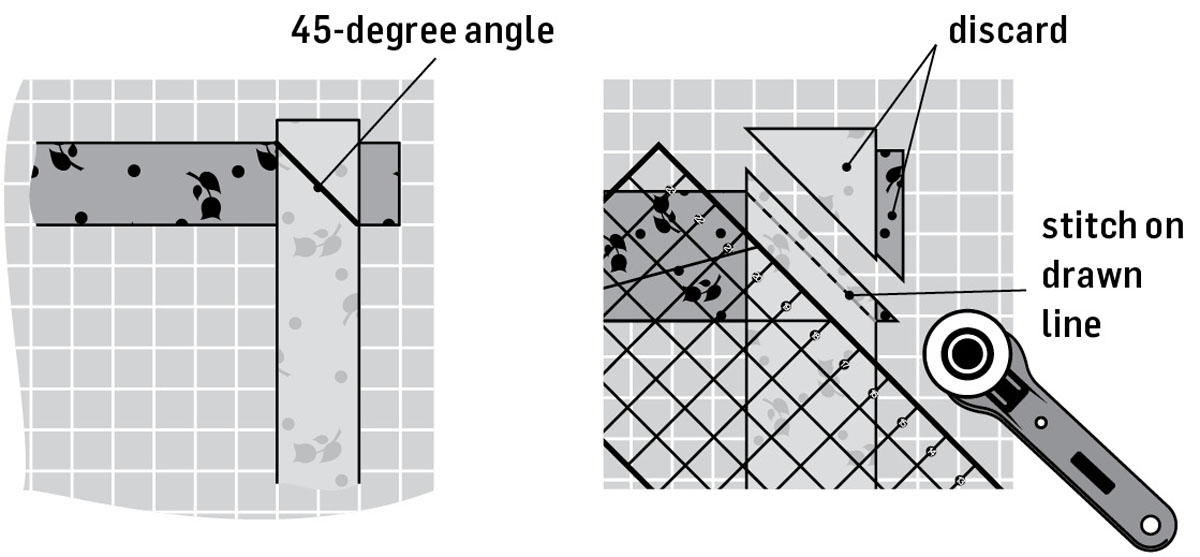
Use this technique when joining strips to make them long enough for quilt borders and binding strips (here). Using diagonal seams helps distribute the bulk of the seam allowances along the seams, and they aren’t as noticeable in the finished border or binding as end-to-end straight joins are.
- 1. Place two strips right sides together at a perfect right (90-degree) angle. Use the grid on the cutting mat to help with alignment. Place a ruler diagonally at the strip edges where they intersect and draw a stitching line at a 45-degree angle with a sharp pencil. Do not cut on this line.
- 2. Remove the ruler. Without moving the strips, place one or two pins across the line through both fabric layers; stitch on the line. Trim the excess 1⁄4" outside the stitching line. Repeat to make one long strip to the required length. Press the seams open.
