Chapter 5
Finishing Your Quilt
When your quilt top is completed, you are ready to turn it into a quilt. First, you create a “quilt sandwich” with the quilt top, batting, and backing, and then you baste the layers together for machine quilting. After completing the quilting, you will bind the outer edges of the quilt to finish it. And, finally, you’ll add a label to the back to document your work.
Preparing the Quilt Top
To ensure successful results, don’t skip this all-important step.
- 1. Clip all stray threads on the back of the quilt so they won’t show through light-colored patches on the front.
- 2. Press any seam allowances that are not smooth and flat. If there are any twisted seam allowances, make sure the twisted area is pressed as flat as possible.
- 3. Press the right side as needed. Look for seamlines that are not lying smooth and flat. Eliminate any wrinkles in the patches, continuing the up-and-down pressing motion you learned when making blocks (see here). Use light steam as needed.
- 4. Make sure all four corners are true and square. Square up with rotary cutting tools as required.
- 5. Read about and prepare the batting as described in Selecting-and-Preparing-Batting.
Making the Quilt Sandwich
To make a quilt sandwich, you need the finished patchwork top with borders attached, plus batting and backing. Work on your cutting table, a kitchen counter, the top of your dryer, or even on the floor if necessary — any large, flat area will do. If you belong to a church or other organization, you may be able to set up a time to use their long rectangular tables for layering large quilts.
Step-by-Step Quilt Sandwich
Refer to the illustration here for the following steps.
Instructions
- 1. Cut a piece of backing fabric at least 2" larger all around than the size of a small quilt top, or at least 1" larger all around for small projects such as a pot holder, pillow cover, or placemat. For projects larger than 38" wide, make a backing 6" to 8" larger all around with two or more panels of fabric as detailed in How to Piece a Backing. Make sure the backing panel is wrinkle-free.
- 2. Use your hands to smooth out wrinkles and creases in the quilt batting before cutting it the same size as the backing.
- 3. Find the center of each edge of the backing and mark with water- or air-soluble marker on the wrong side. Also find the center of each edge of the batting and the quilt top and mark on the right side of each.
- 4. Place the backing right side down on your work surface. Beginning at each center mark, work to the outer corners of each edge and keep the backing taut, but not stretched while you secure it to the work surface with small pieces of masking tape. It must be smooth and flat on the work surface, with square corners in order to avoid lots of undesirable “tucks” in the quilt backing after you have quilted it.
- 5. Place the batting on top of the backing, aligning centers. Smooth in place from the center out; it’s not necessary to tape it. Don’t worry if the raw edges don’t align precisely.
- 6. Place the quilt top, right side up, on top of the batting with centers aligned. Make sure the top is squarely positioned on the batting/backing layers with true, square corners. Use a long ruler and a large square ruler to check, paying attention to the outer corners; do not stretch them out of “square.” All horizontal seamlines should be straight and parallel to each other, and perpendicular to those running in the opposite direction. The vertical seamlines must be parallel to each other, too, and perpendicular to the horizontal ones. Take your time to get this right; accuracy here will have a profound effect on the appearance of the finished quilt.
- 7. Baste the layers together using pins or glue as outlined in Baste It!
The Backing
Some patterns provide the backing dimensions; others do not. For projects that measure more than 38" in either direction, you will need to sew panels together to make a backing of the required size. For larger projects, up to 54" wide, the backing should measure at least 6" larger around. For bed-size and larger quilts, add 8" to the quilt-top dimensions to determine the backing size.
Although there are other ways to piece backings, the following is one is the most commonly used. Refer to The Quilting Answer Book (see Resources and Links) for more options for making pieced backings. We will use a 54"-square quilt top as the example in the following steps.
How to Piece a Backing
Instructions
- 1. Determine the required backing size; in this example, it’s 60" square (54" + 6").
- 2. Divide the required width by 40" (the usable width of most quilters’ cottons after preshrinking). Round up to the nearest full number for the number of panels to cut. Most quilts require at least two, some three. For this example we need two 40"-wide panels (60" ÷ 40" = 1.5, rounded up to 2). Each one should be the length of the quilt top, plus the extra 6" you need. Trim the selvages from the long edges of each panel.
- 3. Cut one panel in half lengthwise and sew a narrow panel to each long edge of the remaining full panel with 1⁄4"-wide seam allowances. Press the seam allowances toward the center panel.
- 4. Trim the resulting panel to the required width (60" in this example), making sure to center the middle panel. You can cut a hanging sleeve (here) from backing cutaways, or store the fabric excess in your stash.
Baste It!
Basting with safety pins is the method most recommended for machine-quilting. You can also glue-baste the layers with temporary spray adhesive, which is done while you make the quilt sandwich.
Pin Basting
Use 1" or 11⁄2" curved, rustproof, brass- or nickel-plated pins designed especially for quilters. The curve makes it easier to maneuver the pins through the quilt layers, including the backing, which is anchored to the work surface with tape. You will need lots of pins for a large quilt. Buy them in quantity to keep secreted away for quilting only.
Open all pins before you begin; I recommend leaving them open when you remove and store them later so they are ready for the next project. As an alternative on small projects, use flat flower-head straight pins to secure the layers for machine quilting.
Work on one quarter of the project at a time and place safety pins in a grid, positioning them no more than 4" to 6" apart (about a hand’s width). Note: You may place pins in the borders and sashing as well as in the block patches, as shown in the quilt illustration here.
Insert the pins through all three layers of the quilt sandwich and then bring the point back to the quilt top. As much as possible, keep the pins away from the long horizontal or vertical seamlines if you plan to quilt-in-the-ditch (stitch in the seamlines; see here). You will have to remove any pins that are in the way of your quilting process as you machine-stitch, so don’t place them right where you know you will be quilting. Don’t close the pins until you have all of them in the right place, adjusting the position of any that need it before closing them.
Glue Basting
For glue basting, use temporary spray adhesive to hold the quilt-sandwich layers together. It’s a quick-and-easy method for basting small projects that fit on your cutting surface or countertop.
Glue basting allows for repositioning as needed before you start stitching, and it dissipates over time — or you can remove it right away by laundering your finished quilt. Of course this means that you must preshrink your fabrics before cutting and assembling the quilt top, and you must like the appearance of laundered quilts. They have a more puckered, slightly “worn” look, much like that of antique and vintage quilts. For wall hangings, this laundered, vintage look is probably not appropriate, but consider it for lap- and bed-size quilts.
Step-by-Step Glue Basting
Instructions
- 1. Read the directions on the spray adhesive can. Work in a well-ventilated area — for example, a garage or outdoors — as well as where adhesive overspray is not a problem. You can place small projects in a box with high sides to catch overspray while applying the adhesive.
- 2. Prepare, position, and tape the backing to the work surface as directed in Making the Quilt Sandwich. Fold the batting in half lengthwise and apply a light mist of adhesive to the exposed half of the batting only. Position the folded batting, adhesive side up, on the backing’s wrong side with the center marks matching. Roll the adhesive-coated side onto the backing, a bit at a time, smoothing it into place.
- 3. Fold the loose half of the batting back on itself and apply adhesive before smoothing it in place on the backing. Make sure everything is wrinkle-free; if not, lift and replace the piece as needed while you work out any wrinkles.
- 4. Repeat step 2 with the quilt top and you are ready to machine-quilt. If adhesive collects on the sewing machine needle, causing skipped stitches, wipe it off with a cotton ball saturated with rubbing alcohol.
Quilt It!
Most quiltmakers have a favorite part of the quiltmaking process. Some love the design and fabric selection; others enjoy the fun of seeing the blocks come together into the quilt top. Still others love the actual quilting — perhaps because it means the project is nearing completion. Quilting adds another element of visual and artistic dimension to a quilt, bringing the flat layers to life as they are stitched together with simple lines of stitching or more elaborate designs. Like most quilters, you will probably discover that, when it comes to quilting your quilt, “a little more is better than not enough.”
Is quilting really necessary? Absolutely — it’s not a quilt until it’s quilted! The batting fibers cling together, but they can and will shift and separate inside a quilt unless the layers are held together with appropriately spaced quilting stitches. Check the batting packaging and plan your quilting so the stitches are the package-recommended distance apart — it differs for different batting types. Quilts that will receive hard wear and regular laundering — lap and bed size — require more closely spaced quilting than those that will hang on the wall.
Some quilters still quilt by hand, an often time-consuming, meditative labor of love. In today’s busy world, with today’s specialized sewing machines, doing the quilting by machine has become the favorite method for many. However, some prefer to finish the quilt top and then pay a quilter with a long-arm machine do the layering and quilting. This frees quiltmakers to start their next quilting project!
Machine-quilting requires patience, practice, and attention to detail. Some quilting designs must be marked on the quilt top before making the quilt sandwich. However, we will concentrate on easy methods that don’t require premarking. (For more on that subject, refer to The Quilting Answer Book; see Resources and Links.)
Quilting-in-the-ditch of existing seamlines in the quilt is one of the most common and simplest machine-quilting methods. It is often used to attach the quilt top to the batting and backing before adding more quilting in the blocks and borders; see here for how-tos. Additional quilting in the blocks and borders adds beauty and dimension and can help disguise minor errors in the piecing. Other easy quilting methods include those featured in Quilting the Blocks.
When you are ready to expand your quilting skills beyond those discussed in this chapter, take a machine-quilting class at your local quilt shop. There are many methods for marking and stitching more elaborate designs, as well as for doing free-motion quilting without a presser foot and with the feed dogs lowered. All of these methods require instruction and practice.
Setting Up the Machine
- 1. Make sure the feed dogs are engaged. Adjust the machine for a stitch length of 6 to 10 stitches per inch.
- 2. Attach the 1⁄4" quilters’ presser foot or a walking foot, or engage the even-feed feature if available on the machine. Another option is the open-toe foot, which gives you a clear view of the seamlines while stitching.
- 3. If possible on your machine, set the needle to stop in the needle-down position, so that stopping and pivoting when turning corners is easier. Otherwise it will be necessary to hand-lower the needle into the quilt before lifting the presser foot to pivot at corners in the block outlines and patches.
- 4. Some machines have a special quilting stitch that somewhat mimics the appearance of hand quilting. Check out and test available quilting stitches on your machine and choose the one you like.
- 5. Thread the needle with the desired thread. Choose from machine-quilting thread, all-purpose sewing thread, or, for invisible quilting stitches, use monofilament nylon or polyester thread. Use a matching- or contrasting-color, machine-quilting or all-purpose thread in the bobbin. Test different thread combinations on small quilt sandwiches made of fabric and batting scraps to see which appeals to you and works best.
- 6. Refer to your sewing machine manual to adjust the tension so that the top and bobbin threads lock in the center of the layers in your test. If the thread lies on the surface and there are little “freckles” of the bobbin thread showing, loosen the top tension. If the thread floats on the back of the quilt, tighten the top tension.
Quilting-in-the-Ditch
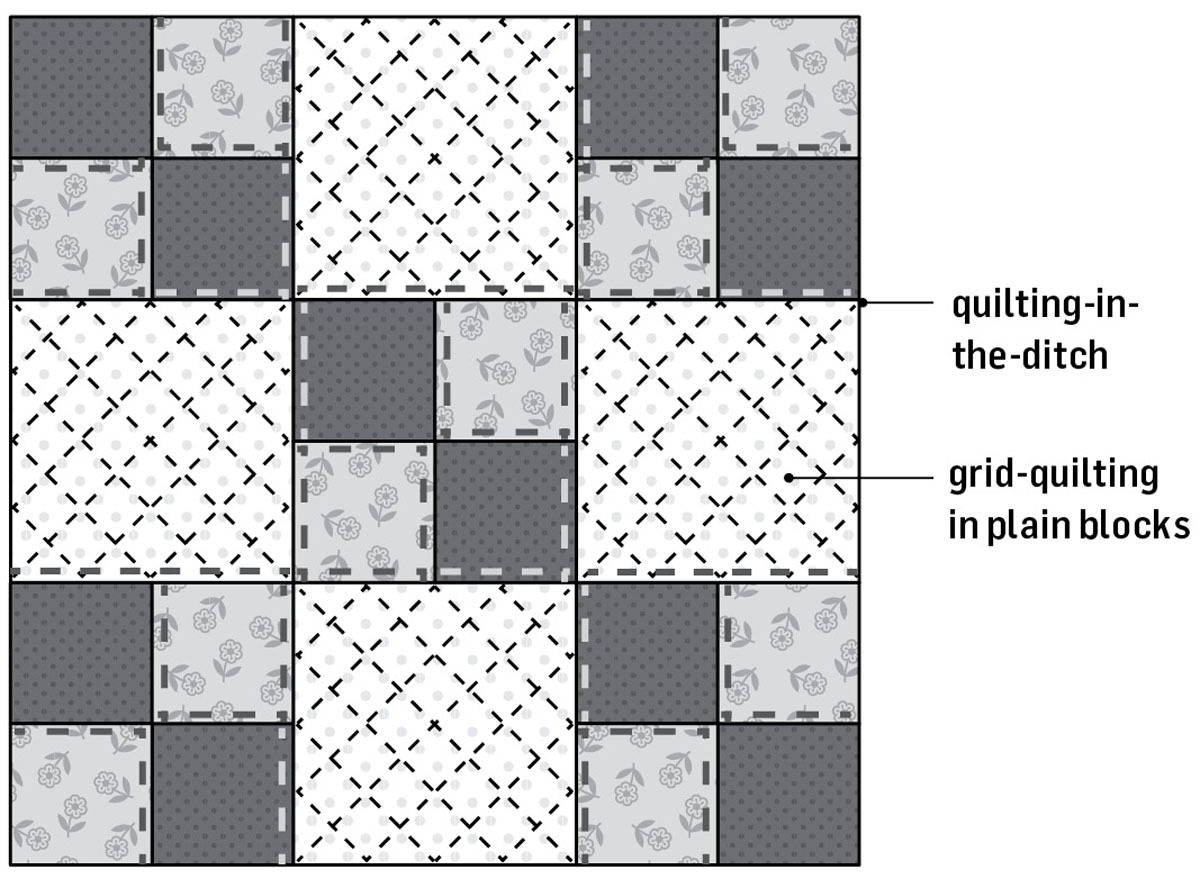
Quilting-in-the-ditch (also called stitch-in-the-ditch) is an essential skill to know because it is easy and can be used to quilt the blocks as well as for a process called setting the quilt. To quilt-in-the-ditch means to stitch right in the well of the seamline, and when you use it to set a quilt, you stitch in the well of the long horizontal and vertical seams that join the blocks, thus attaching the quilt top to the batting and backing layers. It creates a stitched grid that holds the blocks and batting in place and is all but invisible on the quilt front. You can see it on the back, however.
Setting the top makes it easier to keep the blocks “square” in the quilt top while you add more quilting within the blocks (and borders). If you don’t want this stitching to remain permanently in the quilt, you can use water-soluble basting thread in the needle and bobbin and remove it by laundering, following the manufacturer’s directions. Test first on a trial quilt sandwich made of batting and fabric scraps.
On a small quilt, setting the quilt may be all the quilting you need. However, quilting-in-the-ditch adds even more visual dimension when you also do it in the seamlines between some or all of the patches within each block, as well as along the border (and sashing) seamlines.
Setting the Quilt
Follow these steps to stitch the quilt top to the batting and backing before doing additional quilting in the blocks and borders.
Instructions
- 1. Place the quilt sandwich under the machine needle and adjust so the needle is next to the first seamline where you wish to begin. Lower the needle through the layers in the seamline, right alongside the “ledge” created by pressing seam allowances to one side. This is called the valley or well of the seam.
- 2. Lower the presser foot. Draw the bobbin thread up to the surface. Grasping both threads in your left hand as you begin to stitch, lock the stitches with the stitch-locking feature on your machine, or adjust the stitch length so you use a few very short stitches in place before adjusting the stitch length for the quilting. Begin stitching.
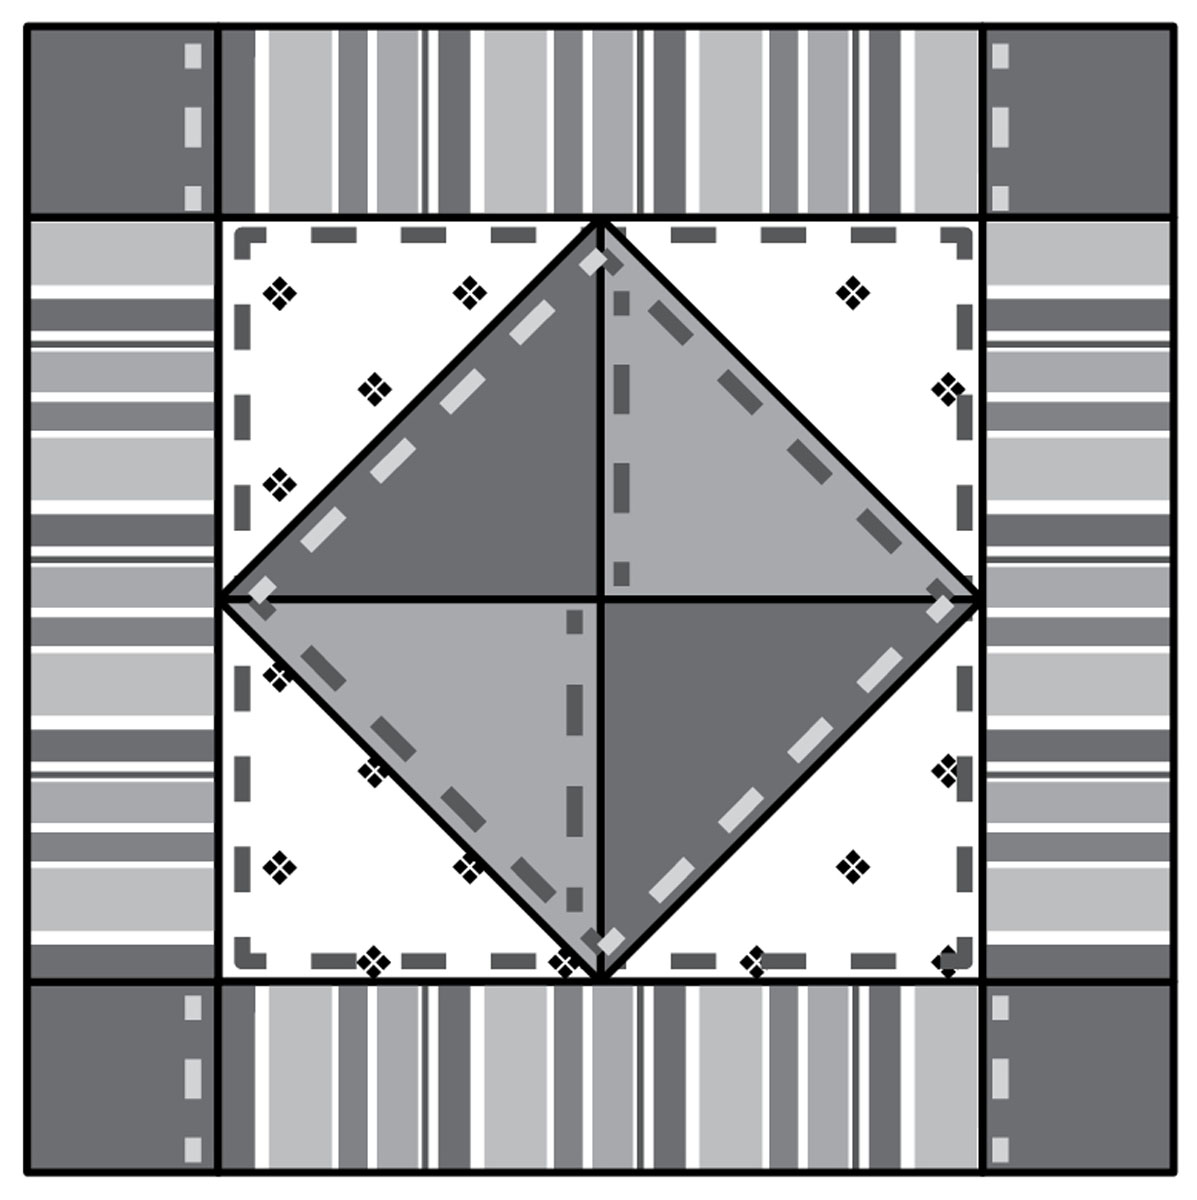
- 3. Do not stitch through the pressed seam allowances. Jog to the opposite side of the seam when the pressed direction of the seam allowances changes at seam intersections. (You can see this in the vertical seamlines in the quilt shown here.) Use your hands to gently spread the fabric along the seamline so your stitches stay in the valley of the seam.
- 4. When you reach the end of a long row of stitching, lock the stitches and clip the threads.
Handling Large Quilts at the Machine
When quilting lap-size and larger quilts, you will need to handle the bulk of the quilt under the arm of the sewing machine. Roll the quilt sandwich from opposite edges toward the quilt center, leaving 12" of the center unrolled. Secure the rolls with oval quilt clips or large safety pins. Quilt as desired, working from the center out to one edge, unrolling and securing as you go.
Quilting the Blocks
For your first quilting experience, choose from the methods below. Only one requires marking on the quilt top.
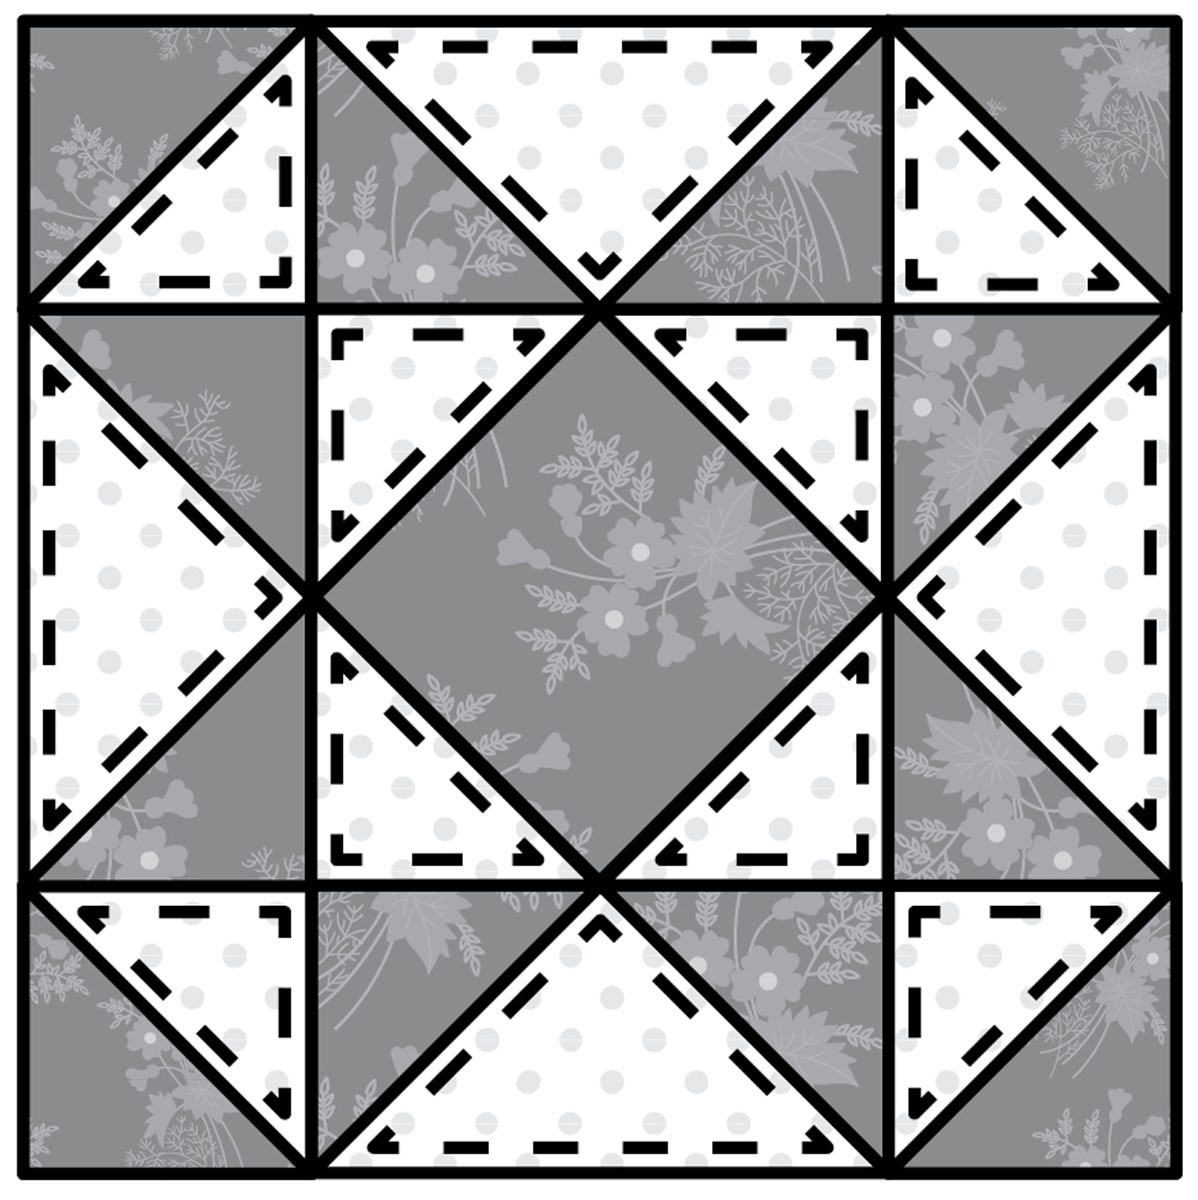
Quilt-in-the-ditch of the seamlines that join the patches in the block. Follow the same procedure described in Setting the Quilt. Study the illustration (below) for an example of this stitching in a pieced block.
Outline-quilt instead of quilting-in-the-ditch to highlight the patchwork shapes. Place the outer edge of a 1⁄4" presser foot right along the seamline and stitch, pivoting at corners where necessary. Lock stitches at the beginning and end of the stitching.
Quilt individual blocks or a small quilt in a simple, allover grid. First set the quilt as described here. Place it on a firm surface and use a ruler and chalk marker to draw guidelines at a 45-degree angle, spaced at least 1" apart in one direction across the quilt. For marking any design on your quilt top, always use a washable graphite pencil, a fine-point water- or or air-soluble pen, a chalk wheel with powdered chalk, or 1⁄4"-wide masking tape. Ask for any of these at your quilt shop and use them with a long acrylic ruler to keep lines straight and evenly spaced.
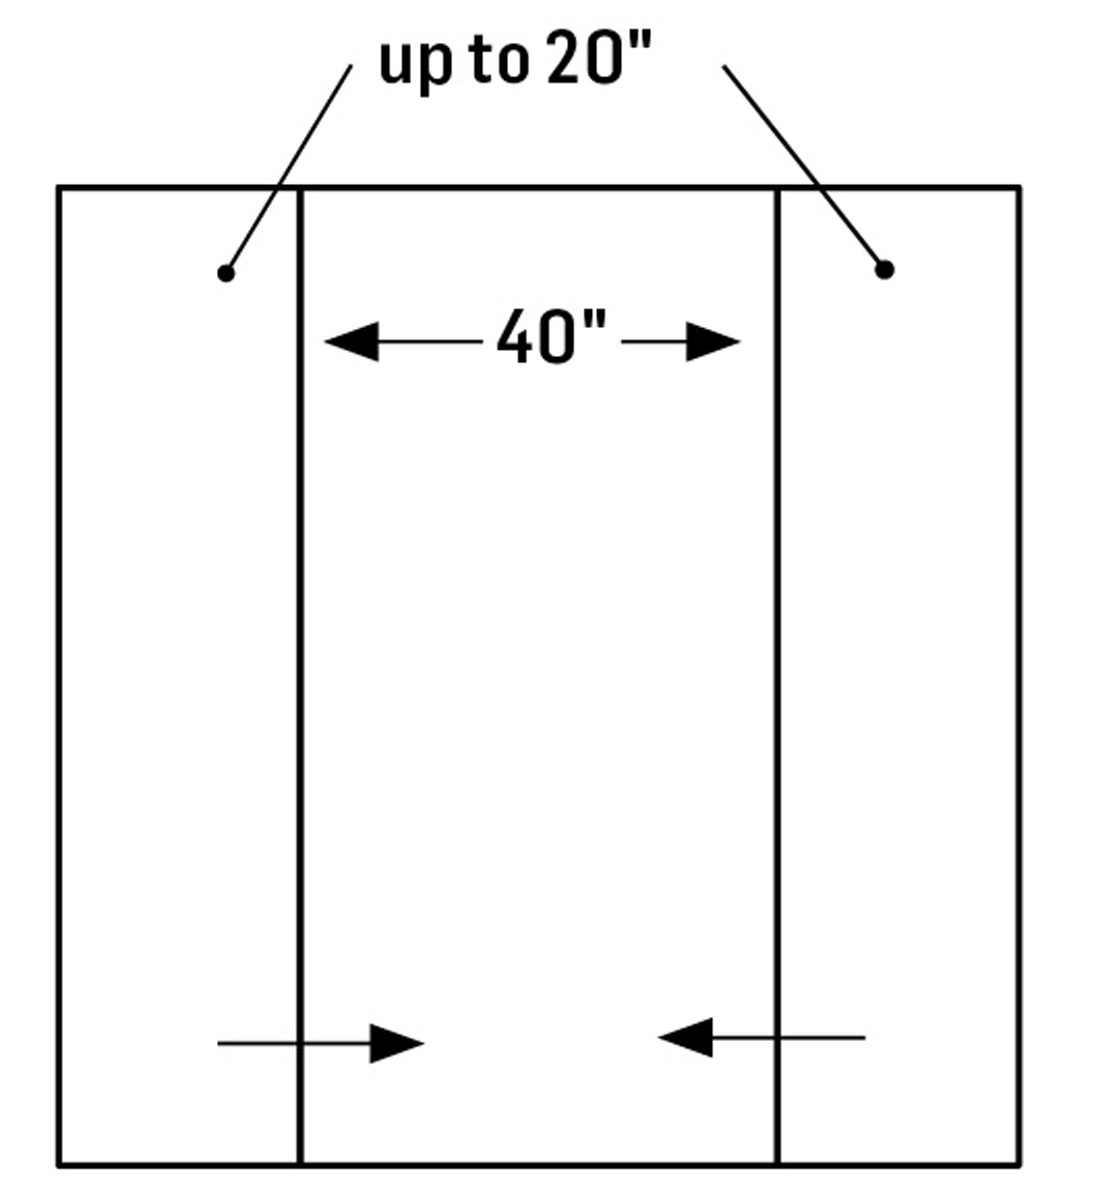
Stitch on all the lines, then draw lines in the opposite direction (at 90 degrees) and stitch. For large quilts with a grid, mark the grid in both directions on the quilt top before making the quilt sandwich. Then, quilt one quadrant (a quarter of the quilt top) at a time. This keeps the other three quadrants of the quilt to the left and above the quadrant you are quilting — lots easier to manage on the sewing machine.
Quilting the Borders
To quilt the borders, the easiest solution is to quilt-in-the-ditch of the long border seams first, and then add evenly spaced rows of straight stitching within the borders and parallel to the border seams. (See the quilt illustration; here for an example.) For an alternative, try a serpentine zigzag stitch, which adds visual texture and motion to the borders. Experiment with stitch width and length on a test quilt sandwich.
After choosing and adjusting the desired stitch, machine-baste a scant 1⁄4" from the quilt-top raw edges through all quilt layers — quilt top, batting, and backing — to prevent shifting during stitching. Don’t pivot: stitch from raw edge to raw edge and clip the threads so the corners won’t pucker or draw up.
To quilt evenly spaced rows of stitching, use the edge of the presser foot as a spacing guide, ending all quilting at least 1⁄2 " to 3/4" from the outer edges of the borders so you have room for the binding seam. Begin and end the stitching in the side borders at the upper and lower border seamlines. Then quilt the top and bottom borders from raw edge to raw edge in the same manner.
Border Quilting Options
Quilt shops carry a variety of quilting stencils designed for borders, with coordinating designs for the border corners. As a beginner, look for designs with either straight lines or smooth and gentle curves. Trace along the cut lines in the borders with a removable marking method. You will need help from a more experienced quilter or teacher to choose a border stencil design and adjust it to fit the borders of your quilt before marking it on the quilt top borders.
Before Binding
With the quilting complete, you’re ready for the finishing steps: adding a method to hang your quilt if you plan to do so, and finishing the raw edges with binding. It’s a good idea to label your quilt, too.
Carefully trim the excess batting and backing to be even with the quilt-top edges, and make sure the corners are square. If you are making a quilted project to hang on the wall, add corner rod pockets or a hanging sleeve to the back of the quilted layers, as instructed on the following pages, before binding the quilt.
Adding Corner Rod Pockets (Optional)
Corner rod pockets provide an easy way to hang a small quilt without damaging it.
Instructions
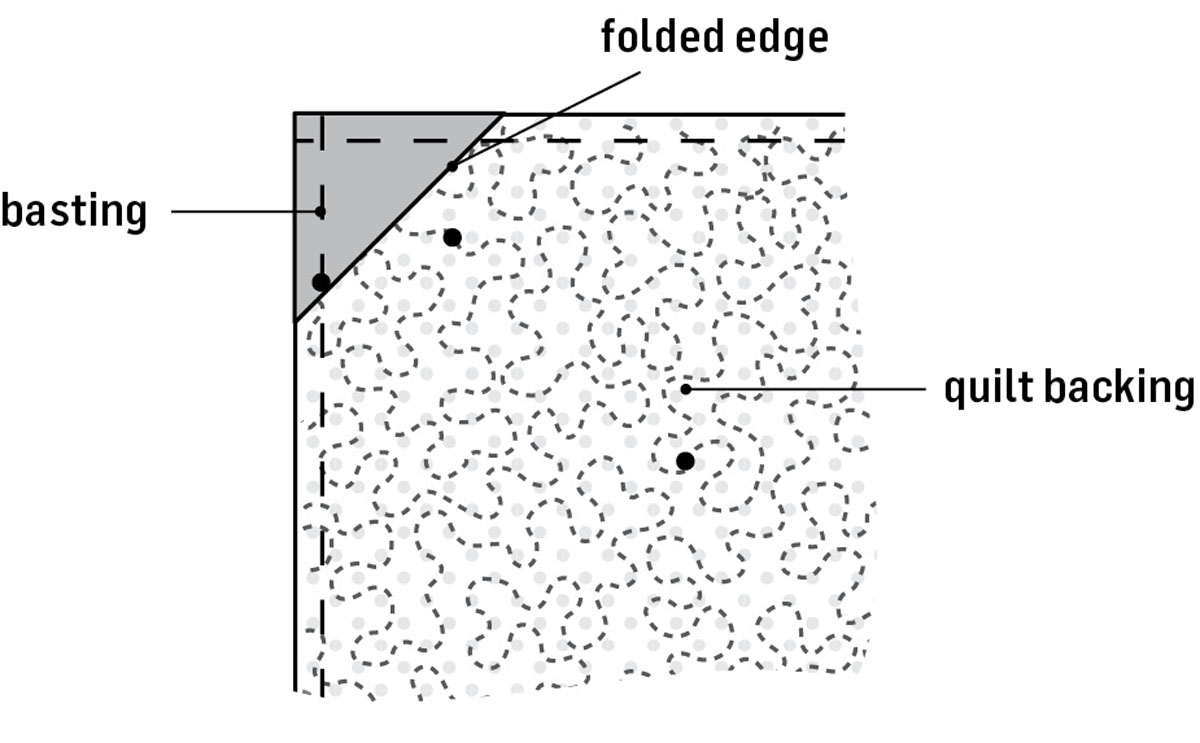
- 1. Cut two 2" squares. Fold each one in half diagonally with wrong sides facing and raw edges even; press. Place the triangles in opposite corners at the upper edge of the quilt backing with raw edges aligned. Machine-baste in place and finish the quilt edges with binding. Do not baste the folded edge.
- 2. To hang, cut a 1⁄4"- to 1⁄2"-diameter dowel that will fit under the corners. Hang the dowel on two small nails that extend from the wall to support the quilt.
Adding a Hanging Sleeve (Optional)
A fabric sleeve on the back of your wall quilt provides a stress-free way to hang it, which is especially important for large quilts. Quilts that will be entered in competitions or hung in exhibitions must have a hanging sleeve.
Instructions
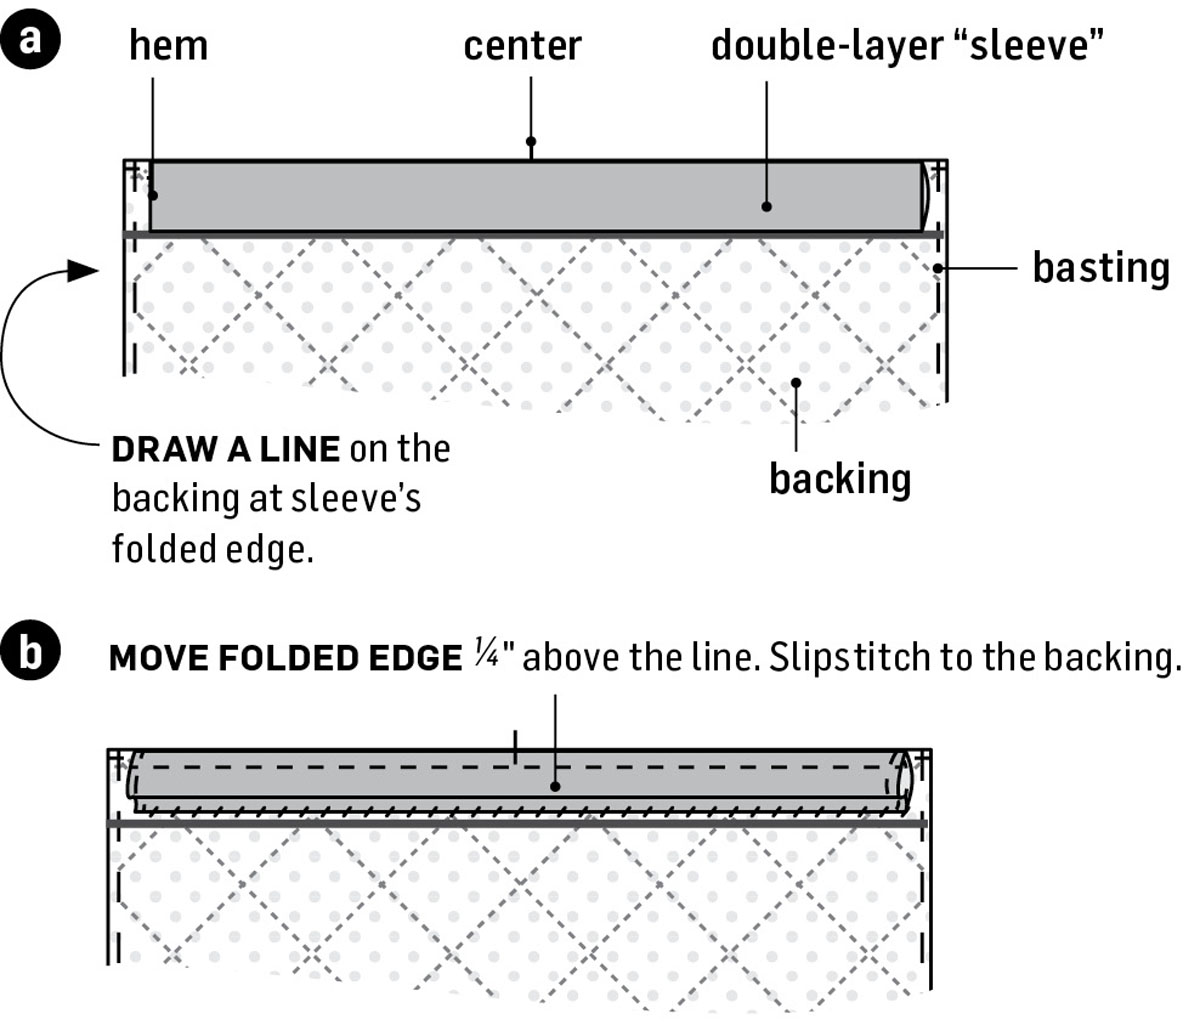
- 1. Measure the width of the finished quilt. For small quilts, cut a 6"-wide strip of fabric 1" shorter than the width measurement; for large ones, cut it at least 8" wide (and still 1" shorter). Turn under 1⁄4" at each short end of the strip and press; turn each end again and machine-stitch the narrow double hems in place.
- 2. Fold the strip in half with wrong sides facing and raw edges even but don’t press the long folded edge. Fold the strip in half crosswise and mark the center. Fold and mark the center of the upper edge of the quilt, too.
- 3. Matching the centers, pin the sleeve in place on the quilt backing with the raw edges even at the upper edge of the quilt. Machine-baste in place a scant 1⁄4" from the raw edges.
- 4. Use a removable marking method to draw a line on the backing along the folded lower edge of the sleeve (a) (see below). Move the bottom edge of the sleeve 1⁄4" above the line you drew; pin and then slipstitch in place (b). This creates a little slack in the front of the tube to eliminate stress at the upper edge of the quilt from the quilt’s weight when hanging.
Remove the marked line and smooth the slack in the sleeve down, creating a new fold. Slipstitch the short ends on the back layer of the sleeve to the backing.
- 5. After binding the quilt (see below), slip a dowel through the sleeve and hang it on nails behind the quilt.
Binding Your Quilt
The most common method for finishing the outer raw edges of a quilt is with a narrow binding; a double-layer binding that finishes to 1⁄4" or 3/8" is most common. For 1⁄4"-wide finished double-layer binding, cut enough 21/8"-wide strips across the fabric width (about 40") to equal the quilt perimeter, plus enough additional length for seam allowances to join them into one long strip. For 3/8"-wide finished binding, cut strips 21⁄2" wide.
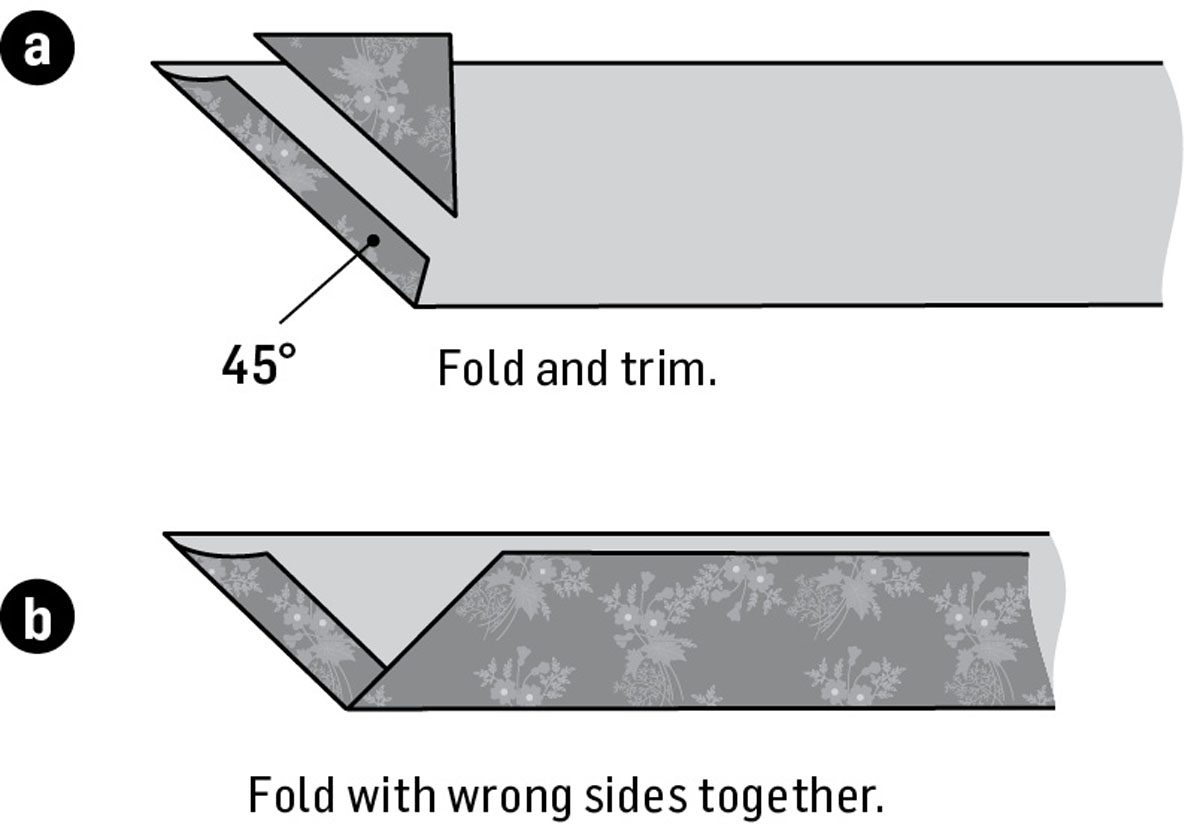
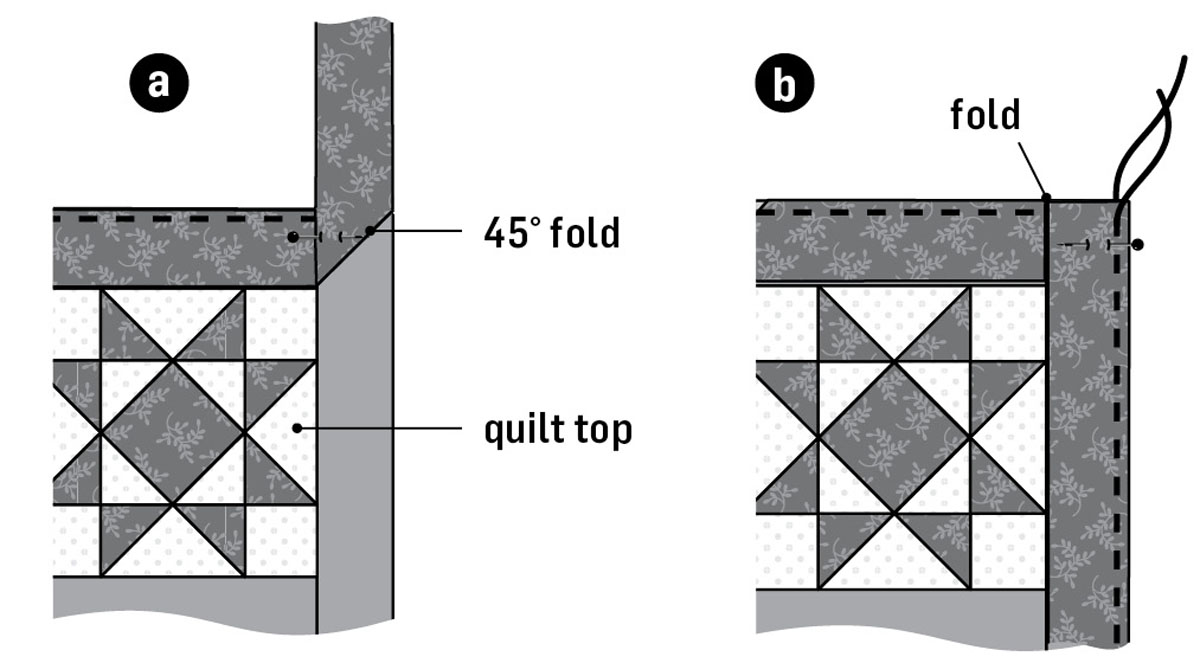
Join the strips into one long piece using diagonal seams as shown here. Next, fold the left end of the long strip at a 45-degree angle and press (a). Trim, leaving a 1⁄4"-wide allowance as shown, and then fold the strip in half lengthwise with raw edges even and press (b).
Attaching the Binding
Instructions
- 1. Engage even-feed if available on your machine, or attach a walking foot.
- 2. If you haven’t done so already, machine-baste the quilt layers together a scant 1⁄4" from the quilt top’s raw edges. To prevent pulls and puckering at the corners, stitch from raw edge to raw edge instead of pivoting as you go around the edges. Stop at each edge and clip the threads. Remove the quilt layers from the machine, turn counterclockwise, and stitch the next edge.
- 3. Trim the backing and batting even with the quilt-top raw edges.
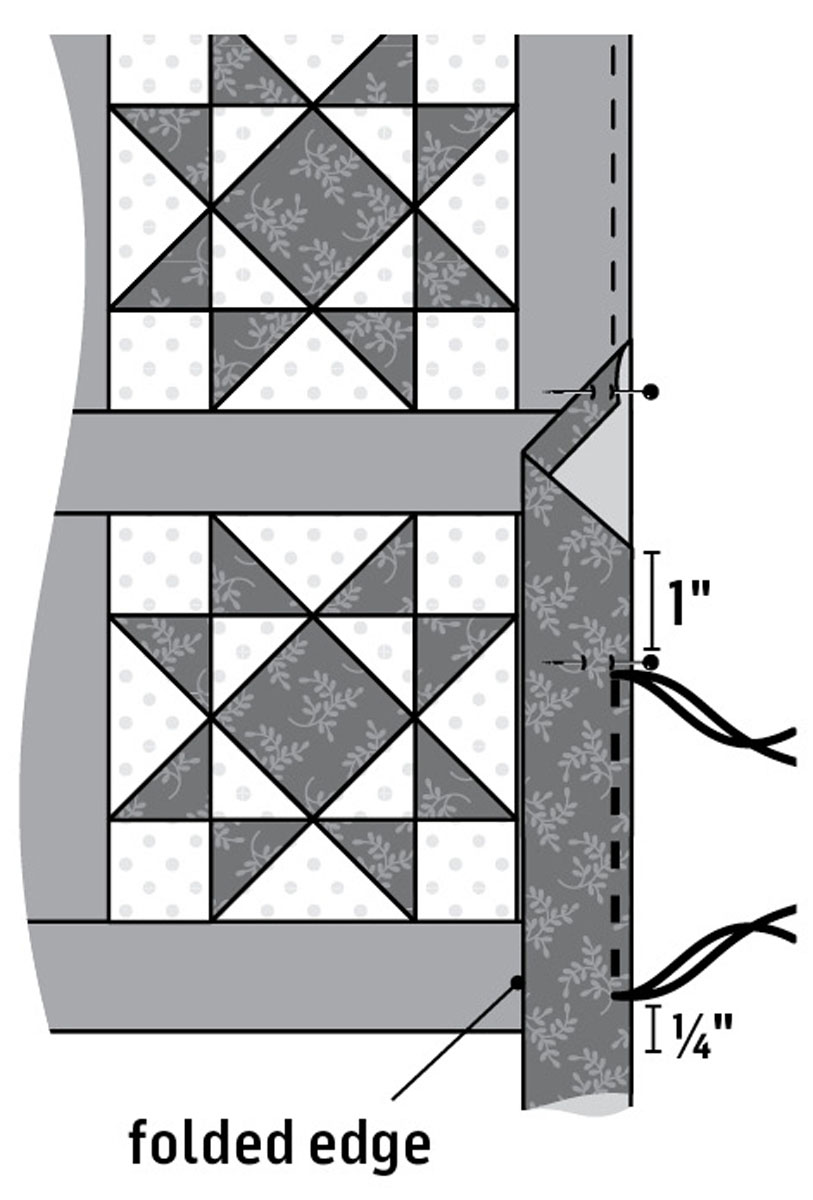
- 4. Position the folded, pointed end of the binding at the quilt edge, 1" below the quilt-top center; pin in place, ending at the first corner. Begin stitching 1" from inner folded edge of the binding, using a 1⁄4"-wide seam allowance and removing pins as you go. End the stitching precisely 1⁄4" from the raw edge at the first corner you reach. Backstitch a few stitches, clip the threads, and remove the quilt from the machine.
Note: For 3/8"-wide finished binding, use 21⁄2"-wide binding strips, sew them to the quilt with a 3/8" seam, and end the stitching precisely 3/8" from the corners.
- 5. Rotate the quilt 90 degrees counterclockwise. Carefully turn back the binding strip so the long edge is aligned with the next edge of the quilt in a straight line above the quilt (a). Pin the folded edge in place, and then turn the binding strip down with the new fold in the binding at the quilt raw edge. Pin in place (b).
- 6. Continue stitching until you reach the next corner; repeat step 5 to miter the next corner. Continue in this manner until you have passed all corners and stop within 1" of where you started stitching the binding in place. Do not remove the quilt from the machine. Lay the end of the binding strip on top of the turned end and trim away any excess strip, leaving 1⁄4" to tuck into the binding folded end. Complete the stitching.
- 7. Turn the binding toward the seam allowances and press. A mitered fold will form in each corner. Turn the binding to the backing over the raw edges and pin in place around the quilt with the folded edge just past the stitching line. Form mitered folds in the binding at each corner; pin in place.
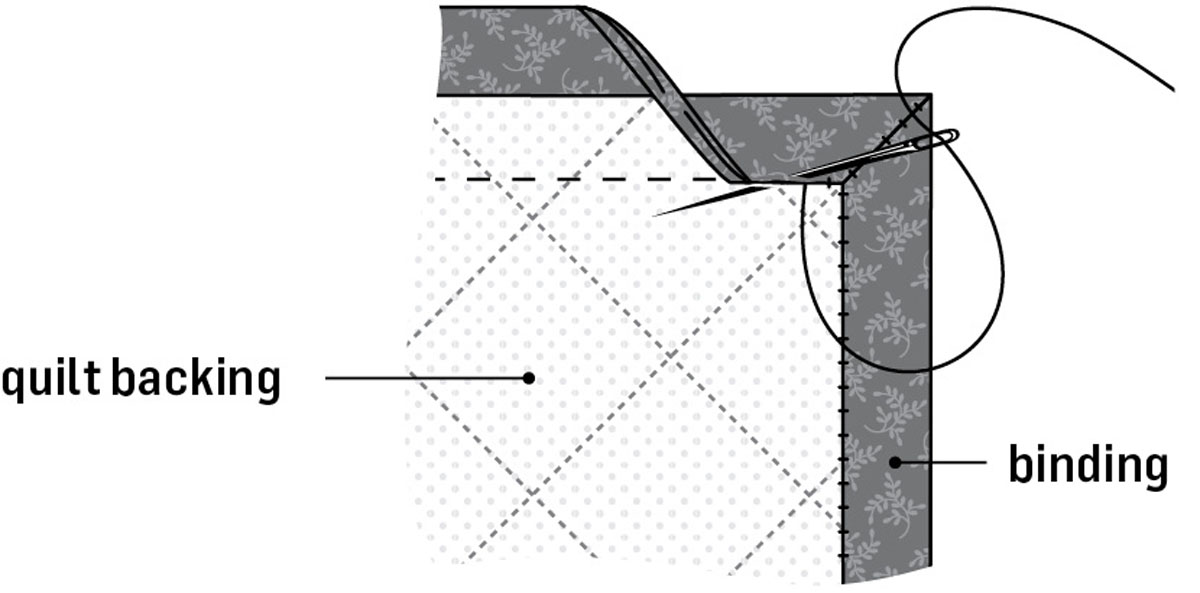
- 8. Hand-stitch the binding and the mitered corner folds in place (see Hand-Stitching below).
Hand-Stitching
Use this stitch (similar to slipstitching) to sew the binding to the quilt backing, or to add a label (here) to the back of the finished project.
Instructions
- 1. Thread the needle with a single strand of all-purpose sewing thread that closely matches the binding or label color (not the backing color). Knot one end.
- 2. Slip the needle under the folded edge of the binding (or label), so it is hidden underneath. Sewing from right to left (reverse if left-handed), insert the needle into the folded edge, catching only a few threads of it (just a tiny “bite”). Reinsert the needle into the backing right beside the folded edge where it entered.
- 3. Take a short (1/16") stitch in the backing, and then catch the folded edge as before. Continue across in this manner. As you take each stitch, tug gently to snug the stitch, but not so tight that the fabric edge puckers. Stitches should be all but invisible.
- 4. End with several small stitches in the backing fabric.
Labeling Your Quilt
Vintage quilts were sometimes signed and dated by the maker, but often they were not, leaving us to wonder who was responsible for the beautiful quilts passed on to new generations. It’s really a nice thing to do — to honor yourself for the work you’ve put into your quilts. It’s also a lovely way to leave a legacy behind for those who might inherit the work of your heart and hands. While you may not think a small or utilitarian project deserves a label, it’s nice to get into the habit of adding one to the back of your quilts, especially if you plan to give them away.
You can purchase simple or elaborate ready-made labels to write on, or make your own fabric labels, choosing from a variety of methods, including hand-writing on a piece of fabric, designing a label on the computer and printing on ink-jet-ready fabric, or designing and then embroidering one by hand or machine.
To make a simple label, you’ll need a small piece of muslin or other plain 100% cotton fabric and permanent-ink pen with a fine tip, plus a piece of freezer paper. Ask for the pen at your local quilt shop. They may also carry freezer paper; if not, you’ll find it at the grocery store.
- 1. Cut a 4" × 6" rectangle of muslin, or larger as needed to accommodate as much of the information commonly included on a quilt label as desired. At the least, your label should include your name and where you live, along with the completion date, and the name of the quilter if you didn’t quilt it yourself. In addition, you can include any of the following as they pertain to your work: the name of the quilt, block name(s), person for whom it was made, a pertinent quote, or coordinating artwork of your own design.
- 2. Machine-baste 1⁄4" from the rectangle raw edges. Cut a matching piece of freezer paper and press its shiny side to the fabric’s wrong side with a dry iron to stabilize it for writing.
- 3. Use a disappearing ink pen to draw writing guidelines on the fabric label. Make sure to leave some space around the label information so it’s not crowded. Use a fine-point, permanent ink pen to write the information. Heat-set the ink with a dry iron; remove the freezer paper.
- 4. Turn under and press 1⁄4" at the label edges, making neat corners. Pin the label in place in one of the lower corners on the quilt backing and hand-sew it in place. (See Hand-Stitching.) Remove the basting.
The Beginner’s Sampler Quilt
Each of the blocks in the Beginner’s Sampler Quilt is made of only two fabrics — a medium-light or medium print, and a dark print. Sashing strips are cut from a light print to set off the blocks. Borders and binding are cut from coordinating prints.
Finished Size
301⁄2" square
Materials
Fat quarters (see Pre-cuts: Fat Quarters, Fat Eighths, and Others, here) or 44"/45"-wide quilters’ cotton with 40" of usable width.
- 2 fat quarters of light print for blocks
- 2 fat quarters of dark print for blocks and cornerstones
- 1⁄2 yard of medium-light or medium print for borders
- 1⁄2 yard of dark print for binding
- 3/8 yard of light print for sashing strips
- 1 yard of coordinating print for backing
- 34" square of thin batting
Cutting the Pieces
If you have not yet made the sampler blocks, refer to Chapter 3 for cutting directions for each block.
Cut the following setting and finishing pieces:
- Sashing Strips: Four 2" × 40" strips; crosscut into twenty-four 2" × 61⁄2" sashing strips.
- Cornerstones: One 2" × 40" strip; crosscut sixteen 2" squares.
- Borders: Four 31⁄2" × 40" strips; trim to size following the directions in Step-by-Step Borders here.
- Binding: Four 21⁄2" × 40" strips
- Backing: One 34" square
- Batting: One 34" square
Assembling and Finishing the Quilt
Note: Use 1⁄4"-wide seam allowances throughout.
Instructions
- 1. Make each block following the directions in Chapter 3. Measure and square up the completed blocks. They should measure 61⁄2" square before you join them into the quilt top.
- 2. Follow the quilt diagram here to arrange the blocks in three rows, alternating with four vertical sashing strips. Arrange the cornerstones and remaining sashing strips in four horizontal rows. Refer to Straight Sashed Setting Assembly.
- 3. Pin and sew the pieces together in each block and sashing row; press all seam allowances toward the sashing strips. Use Chain Piecing wherever possible to speed up the sewing and pressing. Check all seams for straight stitching and accurate 1⁄4" seam allowances. Check the points at seam edges in the blocks that have them (Flying Geese, Square-in-a-Square, Hourglass, and Tam’s Patch) to make sure they weren’t nipped off in the stitching. Correct stitching as needed.
- 4. Trim all threads. Arrange the block rows and sashing rows following the quilt diagram (here). Pin and sew together, following the directions in Sewing the Blocks and Rows Together. Press all seam allowances toward the sashing strips.
- 5. Trim the border strips to the correct size and add to the quilt top (see Cutting and Adding Borders).
- 6. Layer, baste, quilt, and bind your quilt following the directions in this chapter, beginning here.
Congratulations! Your quilt is finished and ready to hang or to use! Now it’s time to start your next quilt!