Chapter 2
Essential Skills
Cutting, Sewing, and Pressing
The most traditional pieced quilts are made of square blocks composed of a number of patches of fabric: a “patchwork” quilt. The patches are cut and then sewn together following a block layout. Piecing accurate blocks that fit together relies on mastering three essential skills: accurate cutting, precise sewing, and careful pressing. Slight errors in any step of block assembly add up to bigger ones, resulting in patches that won’t fit together right and/or blocks that are not the right size or shape.
The focus of this book is on making easy blocks with pieces you can rotary-cut from fabric strips and squares. This requires cutting strips and patches of the correct size (which is stated in the block pattern you choose to follow). The strip and patch sizes include 1⁄4"-wide seam allowances all around. This seam-allowance width is different from the standard 5/8"-seam width for garments, and the 1⁄2" standard for home dec items. You will also use a 1⁄4"-wide seam allowance to join the completed blocks to make the quilt-top center and add the borders.
Mastering accurate cutting and sewing before pressing are both essential for a successful quilting project. And pressing patchwork requires special attention, too.
Rotary Cutting Basics
Old-time quiltmakers used templates to mark their patches and scissors to cut them, but you won’t use either. Today’s rotary cutter and mat, along with an acrylic ruler, make it possible to quickly cut squares, rectangles, and triangles — the most basic patch shapes in many block designs. Cutting each of these shapes begins with cutting strips from the appropriate fabric for the block design you are following. From the strips, you will crosscut the required squares and rectangles. If you need triangles, you will cut squares and then rotary-cut those into triangles.
To begin, prepare the fabric for cutting as directed beginning in Preparing Your Fabric. Then gather your rotary-cutting tools and place the cutting mat, grid side up, on your cutting table; a kitchen counter is a good alternative cutting space.
Cutting Strips
Refer to your quilt pattern for the width and number of strips to cut across the width of each fabric. Strips will be approximately 40" to 44" long, depending on how much the fabric shrinks if you wash it before you begin cutting (see How to Preshrink Fabric). Don’t be surprised that different fabrics are different widths after preshrinking, even if they were all labeled 44"/45" wide. If using fat quarters or eighths (see Pre-Cuts: Fat Quarters, Fat Eighths, and Others), the strips will usually be between 20" and 22" long. (Take care to cut strips parallel to the longest edge of these pre-cuts, unless the directions specify otherwise.)
There are two rules you should remember when cutting strips.
- Strip Width Rule #1: For squares and rectangles, cut all strips 1⁄2" wider than the desired finished width in the block. This allows for the standard 1⁄4"-wide seam allowance at each edge.
- Strip Width Rule #2: For squares that will be cut into triangles, cut strips and squares that are more than 1⁄2" wider than the finished patch size in the finished block. That’s because you need enough seam allowance on the diagonal edges for joining them to other pieces in the blocks. Just follow the pattern for the correct strip width.
How to Cut Strips
Instructions
- 1. Iron the fabric to remove creases and wrinkles if necessary. Fold it in half lengthwise with selvages aligned, and smooth the layers together so there are no wrinkles along the folded edge. Don’t worry about aligning the short raw edges if they don’t match up. You will do a clean-up cut to straighten the cut edges before cutting strips from each fabric; this is different from garment and home-dec sewing, where accurate grainline is essential for things to hang correctly.
- 2. Fold the fabric in half lengthwise again, with the folded edge smooth, flat, and wrinkle-free. Align the just-folded edge along a grid line close to you on the cutting mat.
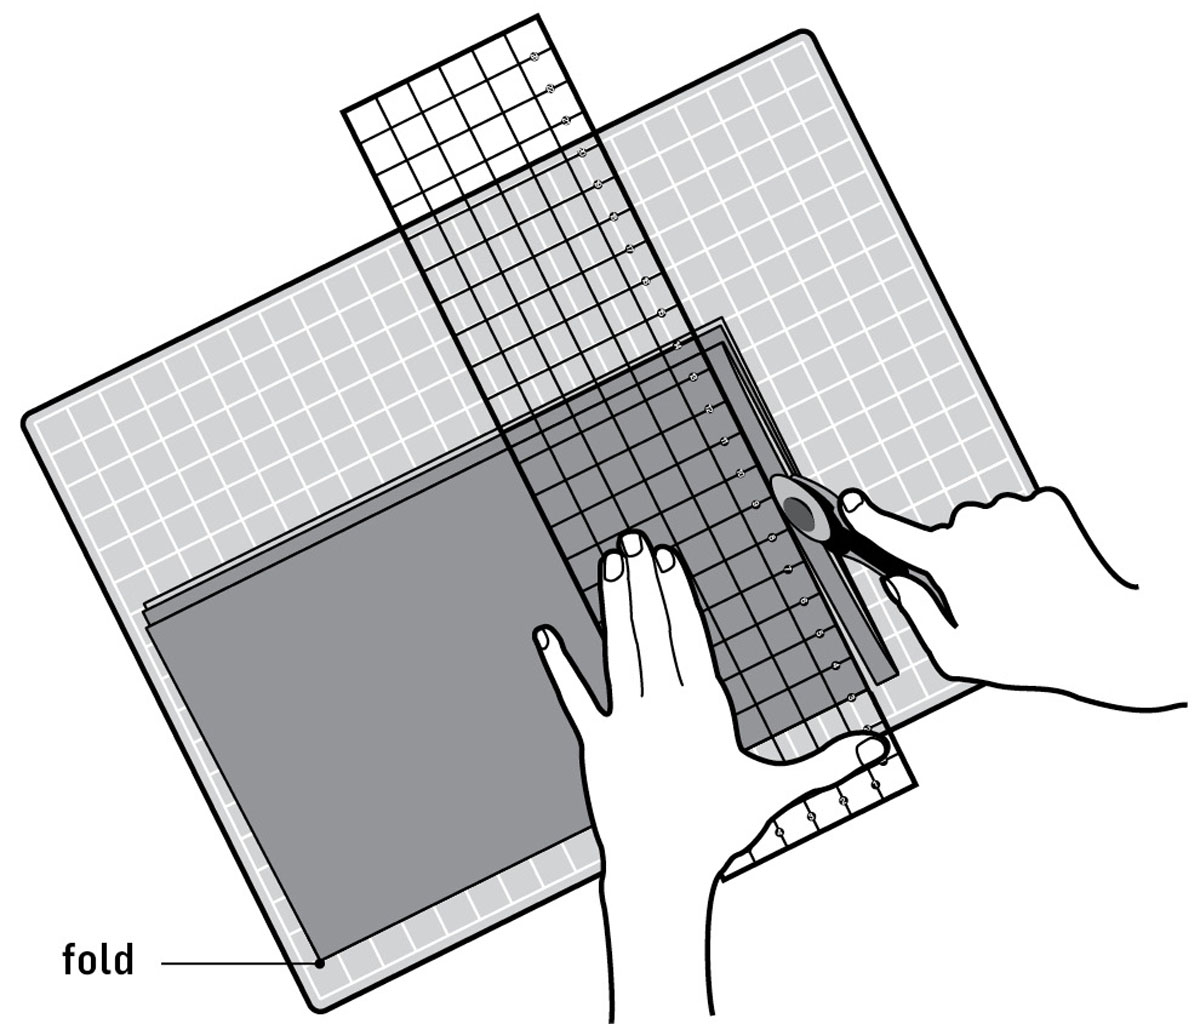
- 3. To make the clean-up cut, place the 6" × 24" acrylic ruler on top, just inside the cut edges, and align one of the horizontal inch-lines with the folded edge. Release the blade on the cutter, and then position your other hand firmly on the ruler with fingers spread to secure the ruler width so it won’t slip. Use firm and steady pressure as you press the blade into the fabric layers and roll away from you right along the ruler edge to the selvages. Cut as far as is comfortable, then carefully lift and replace your hand on the ruler to continue cutting across the fabric width. With practice, you will be able to “walk” your fingers up the ruler. Discard the cutaway strip.
- 4. If you can walk around your cutting table to the opposite side, do so. If not, carefully lift and turn the just-cut edges and reposition the fabric on your cutting mat with the folded edge along one line and the cut edges along a perpendicular line. When everything is perfectly aligned, you’re ready to cut strips.
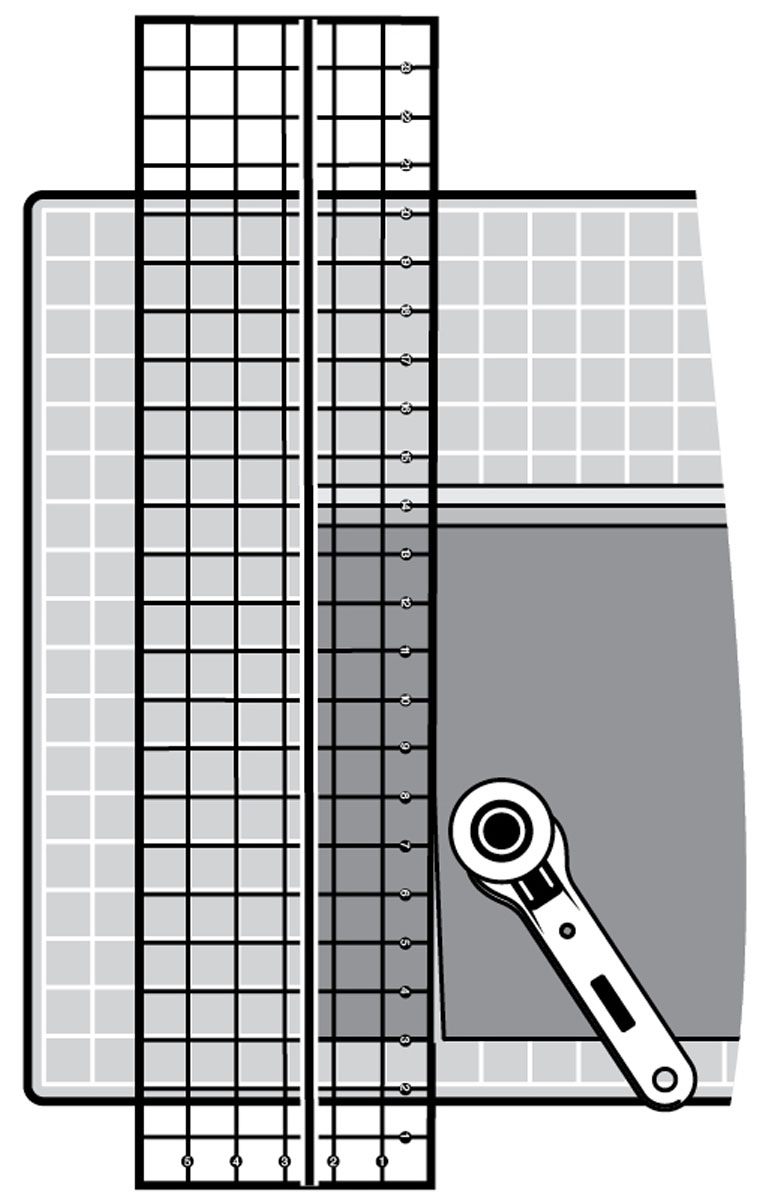
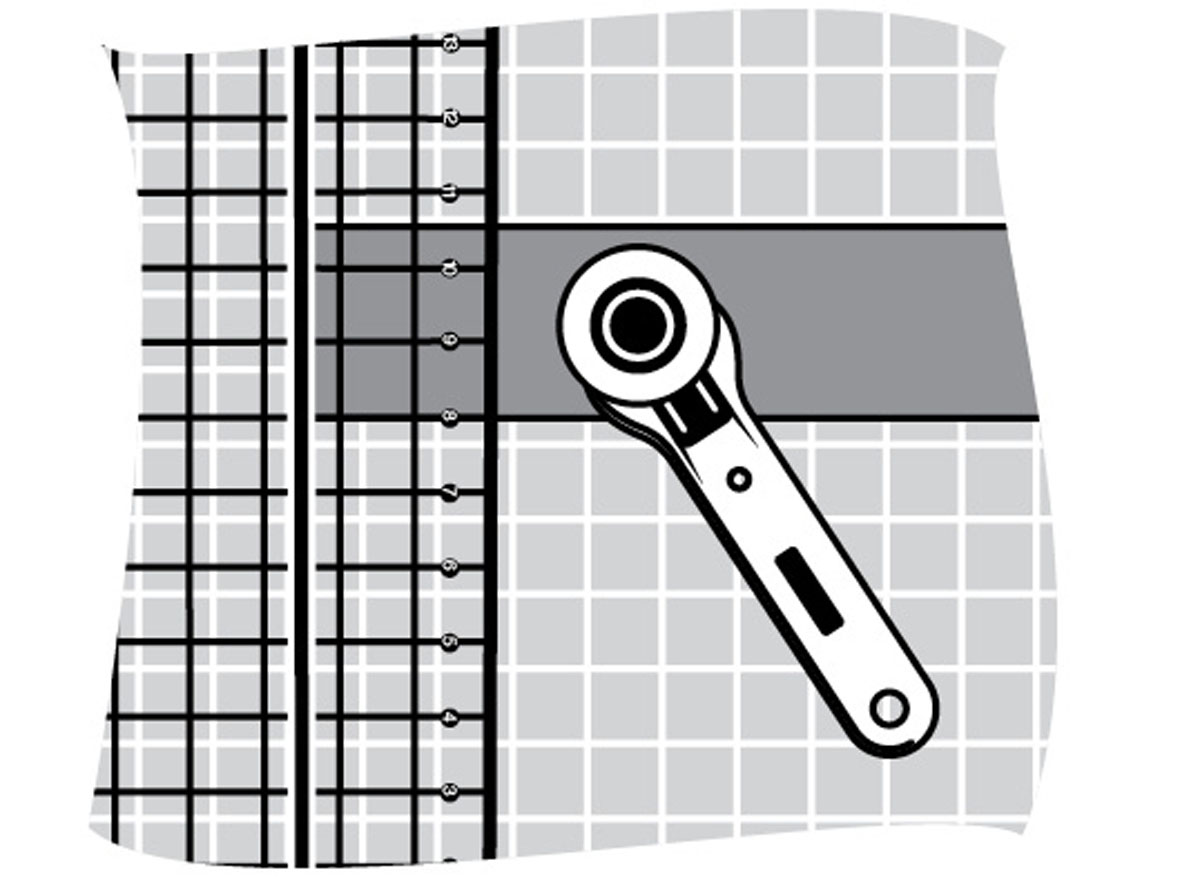
- 5. Place the ruler on the fabric with a horizontal line perfectly aligned with the fabric’s folded edge. Position the line for the desired strip width along the clean-cut edges. If the horizontal ruler line is not perfectly aligned with the fold, adjust and check the ruler alignment with the cut edge again. With the ruler perfectly positioned, cut along the ruler as described for the clean-up cut in step 3 (see the illustration below).
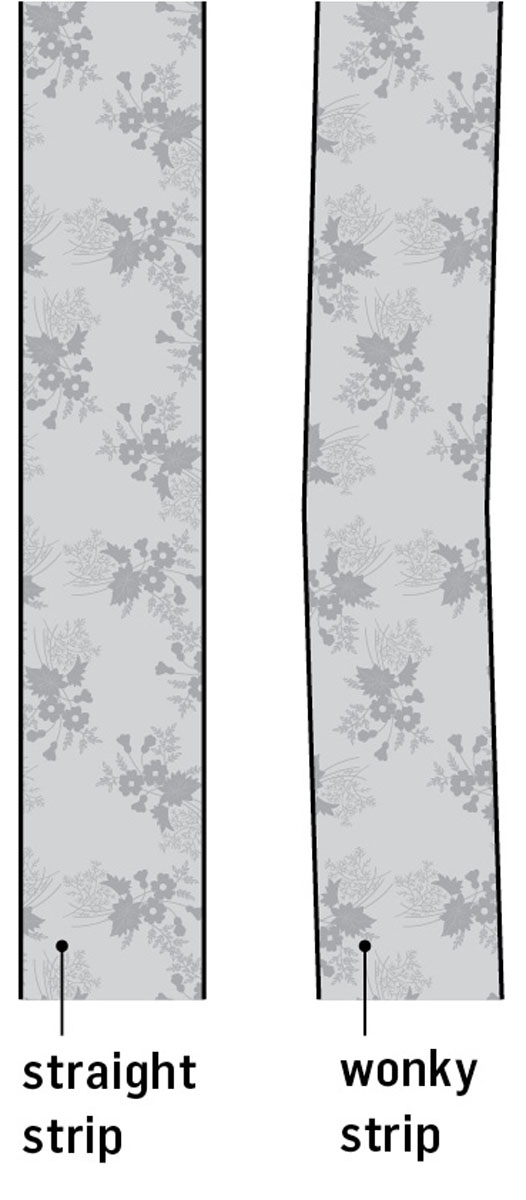
- 6. After cutting the first strip, open it to make sure it is straight along both cut edges without a bend in it, or what I call a “wonky” strip. If the strip is not straight, set it aside, refold the fabric, do a new clean-up cut at the raw edges so they are straight, and then cut another strip. It’s a good idea to stop and check the cut edges of the folded fabric after cutting every set of two or three strips, and then do another clean-up cut if necessary before cutting more strips. Remember, slight errors in cutting will add up to big ones when the patches are sewn together.
Discard “wonky” strips.
Cutting Squares, Rectangles, and Triangles
Simple shapes, such as squares, rectangles, and triangles, are used in many traditional block patterns. Check your pattern for the required strip width to cut for each of these patch shapes in the block. Work with one fabric at a time and cut the required strips before cutting the patches from them.
How to Cut Simple Shapes
Instructions
- 1. After cutting the strips as directed in your quilt pattern, use a small square rotary ruler to cut away the selvages on each cut strip. They are too stiff to include in your patches. Make sure the cut is perpendicular to the long cut edges.
- 2. Fold each strip in half crosswise to make four layers. The folded edge must be smooth and flat, with all raw edges perfectly aligned before you cut.
- 3. For squares and rectangles: Position the ruler across the strip with the line for the desired width of the patchwork square or rectangle aligned with the short cut edges. Cut across the layers. Continue in this fashion until you have cut the required number of pieces for your project.
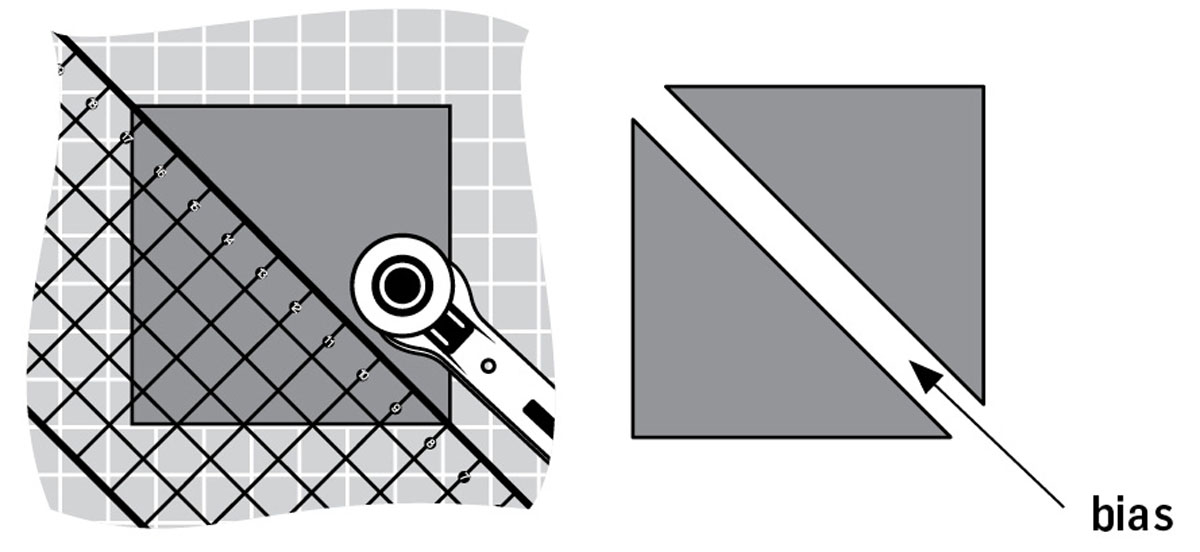
- For half-square triangles: First cut strips and then squares of the required size. Cut the squares in half diagonally from corner to corner. The diagonal edge is on the bias in each triangle; take care not to stretch it.
- For quarter-square triangles, first cut strips and then squares of the required size; next cut half-square triangles as described above. Without moving the just-cut triangles, reposition the ruler diagonally across them so you can cut them in half diagonally in the opposite direction. The two shorter adjacent edges of the triangles are on the bias; the longer edge is on the straight of grain.
There are many other geometric shapes that can be cut from strips. When you need a special shape, the pattern will give you a method for cutting it, using one of many specialty rulers or ready-made acrylic templates available in a range of sizes for block patches. Alternatively, you may be directed to use one of the angled lines on a standard rotary ruler to cut the shapes. To learn more about making and using patchwork templates, check out The Quilting Answer Book (see Resources and Links) or other basic guides to cutting patchwork shapes.
There are also easy ways to rotary-cut some blocks that would normally require templates. For example, the classic (Snowball block) requires an octagon and four half-square triangles. However, you can avoid using a template for the center octagon, and then cutting and sewing triangles to the angled edges, by substituting the folded-corner piecing method (here). With this method, you will cut only squares to make the classic Snowball block.
Strip Width Rule #3
There is a third rule to remember when cutting strips: Measure twice, cut once to avoid errors. Every time you get ready to make the next cut, take the time to position the ruler and then double-check it before cutting. Be especially careful when measurements are in 1/8" increments, as in 37/8".
Stitching a Perfect Seam
Before you start sewing, take the time to make sure you can stitch the standard-width patchwork seam. This is critical so that all the patches in the blocks will fit together perfectly — and so that all the blocks will fit together to assemble the quilt top.
There may be a 1⁄4"-seam guideline engraved on the bed of your machine, but maybe not. Even if there is, don’t trust it until you’ve tested it as detailed below. Many modern quilters now rely on a 1⁄4" presser foot, also called a patchwork foot, designed specifically for quiltmaking. You can probably purchase one for your machine if it wasn’t provided. It’s worth the investment! This foot is designed so that the distance from the center needle position to either outer edge of the foot is a scant 1⁄4".
Why a scant seam allowance? Unlike traditional sewing, both seam allowances in patchwork blocks are usually pressed to one side rather than open. This results in a slight loss of width in the finished unit because of the “turn of cloth” when the seam allowances are both pressed in the same direction. Sewing a seam that is a thread or two narrower than 1⁄4" makes up for this loss. The 1⁄4" foot for your machine may also have handy marks along the outer edges to help you stop exactly where you need to when applying the binding to the finished quilt.
Whether you use a guide on the machine or a 1⁄4" foot, you must test the seam width and adjust your stitching if necessary to perfect your seaming technique. Even if the difference in your seam width is only 1/16" wider than 1⁄4", that adds up to 1⁄2" if your block has three patches across and three patches down, as in a Ninepatch block ; in this case, a block that should finish to 9" square would end up only 81⁄2" square. The reverse is also true: if the seam is too narrow, the finished block will be larger than required. Either way, the difference will really affect the finished size of your project if there are lots of seams and lots of blocks!
How to Sew 1⁄4" Seam Allowances
Instructions
- 1. On a piece of 1⁄4" graph paper, with four squares to the inch, make sure the first row at the right-hand edge has no margin and is 1⁄4" wide. If it isn’t, trim as needed.
- 2. Place the graph paper on the bed of your machine and adjust the position so you can lower the needle into the paper, just barely to the right of the first line at the right-hand edge of the paper (here). Make sure the paper is straight and parallel to any stitching guidelines on the machine bed and lower the presser foot to hold it in place.
- 3. Rotary-cut a 3/8"-wide strip of Dr. Scholl’s moleskin (or other similar sticky-back foam product). It should be long enough to extend 2" in front of the presser foot toes and at least 1" behind the back edge of the presser foot. Remove the paper backing and adhere the foam strip to the machine right next to the edge of the paper. If the strip will interfere with the feed dogs, carefully cut a notch in the foam strip as shown on the next page so it will fit around them.
Note: Even if the foam strip actually aligns perfectly with the edge of your 1⁄4" foot or with a line on the machine, it’s a good idea to leave it in place. It creates a ledge against which to guide the fabric layers as you sew, making it easy to prevent the edges from wandering, for a perfect seam allowance every time! That means no guesswork for a beginner — and even for old pros! If using pins, though, you will need to pin with the points toward the raw edge; otherwise the pin heads will run into the ledge.
There’s one more option for accurate 1⁄4" seams. If you don’t have a 1⁄4" foot, use the regular straight-stitch presser foot and adjust the seam width by moving the needle position so you can use the edge of the foot as a guide.
After you’ve established the perfect seam width following the guidelines on the facing page, you will be ready to cut and sew patches together for your blocks.
Before you start piecing blocks, always test the seam allowance on actual fabric patches.
How to Check Seam Allowances
Instructions
- 1. Rotary-cut two 3" squares of fabric (here), making sure the cuts are accurate. Place right sides together with all raw edges aligned.
- 2. Place the patches under the presser foot and stitch with the right-hand raw edges against the foam ledge (if you are using it; see the previous how-to) or with the presser foot perfectly aligned with the right-hand raw edges. Watch the edge of the foot, not the needle, as you stitch.
Don’t backstitch at the beginning and end of a seam as you normally do with other types of sewing. Try to break that habit when making patchwork blocks; the backstitched area will have more thread in it than the remainder of the seam. This adversely affects seam accuracy because pressing backstitched areas perfectly flat is more difficult.
Some quiltmakers suggest adjusting the stitch length to 2.00 mm (15 stitches per inch) to ensure that the beginning and ending stitches won’t come undone as you work with your blocks; however, this will make it a bit more difficult to “unstitch seams” if you make an error! For the safest way to remove incorrect stitching, see Seam Ripping: A Necessary Skill on the next page.
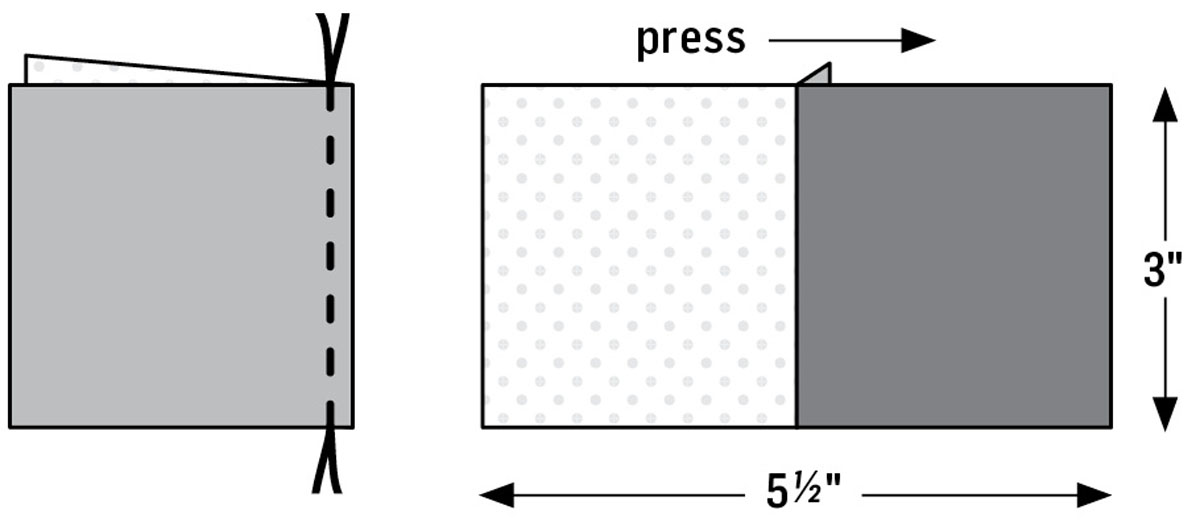
- 3. Press along the stitches to set the thread into the seam, and then flip to the right side. Use a dry iron to press both seam allowances toward one of the squares.
- 4. Check the width from edge to edge across the seam in the resulting two-patch unit; it should measure exactly 51⁄2". If it doesn’t, adjust the needle position one step to the right for a narrower seam or one step to the left for a slightly wider seam. Cut another set of patches and test again.
Seam Ripping: A Necessary Skill
No matter how careful you are, stitching mistakes are inevitable. When “unstitching” a seam or section of a seam is necessary, slip the tip of a sharp seam ripper or double-pointed scissors under every sixth stitch on the bobbin-thread side of the seamline. (For some reason, bobbin threads are easier to clip.) How do you know which is which? Use different color threads in the needle and the bobbin, for example, tan on top, gray on the bottom. After clipping from the bobbin side, it should be easy to pull on the top thread and lift it away from the seamline. Use a piece of masking tape to make it easy to remove the bobbin-thread tufts left behind on the wrong side. Be careful not to stretch any bias edges when removing stitching.
Cutting and Stitching Practice
The simplest of quilt tops is made of squares joined together in as many rows as desired. Depending on fabric choices, these simple quilts can be quite exciting and modern looking. Cutting and sewing together lots of squares provides lots of practice with sewing accurate seams and then assembling them into a quilt top following the directions provided in Chapter 4, adding borders if you wish. Finish your quilt following the directions in Chapter 5.
Instructions
- 1. Begin by cutting 5"-wide strips from seven of your favorite fabrics, then crosscut 5" squares from the strips. You should get eight squares from a 40"-long strip. That makes 56 squares.
- 2. Arrange the squares as desired in eight rows of seven squares each.
- 3. Sew each row of squares together with the 1⁄4"-wide seam allowance you’ve established.
- 4. Arrange the rows in the desired order and press the seam allowances in opposite directions from row to row, following the pressing guidelines in Press It Right on the next page. Set the pressed rows aside to use later when learning how to assemble a quilt top and add borders in Chapter 4.
Press It Right
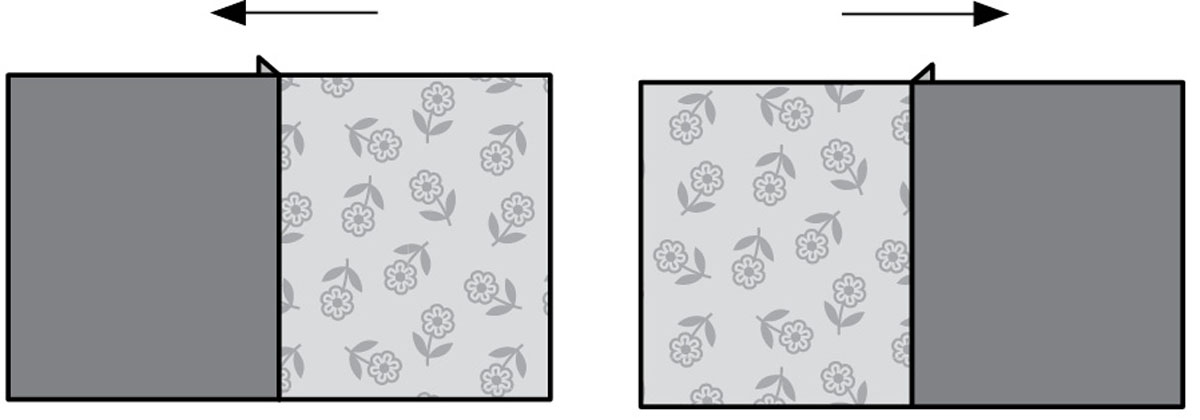
Careful pressing is essential for fitting blocks together perfectly. Heavy-handed ironing is not pressing and can distort your blocks; too much steam can cause unwanted shrinkage. Most quilt patterns direct you to press patchwork seam allowances to one side, not open, making it easier to match seam intersections when sewing block pieces together and when joining blocks into rows to complete the quilt top. This is often referred to as pressing for opposing seams. See the example in the illustration below. It’s also generally agreed that pressing seam allowances to one side results in a stronger, more durable quilt top that will better withstand wear and repeated laundering.
Do You Iron or Do You Press?
It’s important to know the difference!
Iron your fabrics before cutting the pieces. Move the iron back and forth with downward pressure to remove all wrinkles and restore the fabric’s shape. Use a steam iron if necessary, but be careful not to stretch the fabric out of shape or off-grain.
Press seam allowances to coax them into a specified position. Pressing is a simple up-and-down motion. Use your fingers to arrange the seam allowance in the desired direction. Lower the iron, press down, and then lift it to move to the next seam or section of a long seam. To avoid distorting the blocks and moving already-pressed allowances into undesired positions, do not push the iron along the seam allowances.
Patchwork Pressing Details
For best results when pressing seams in patchwork blocks and quilt tops, remember the following tips.
- Press along all stitching lines to set the stitches and the thread for a flatter, crisper seamline. Then press seam allowances in the desired direction. It’s easiest to press from the right side, using the tip of the iron to press over the seam allowances lying underneath. Pressing seam allowances in this manner creates a tiny fabric “ledge” at the seamline — a high and low side of the seam. Since you can see the seamline on the right side of the block, it also results in flat seamlines, with no little tucks or pleats of fabric obscuring them.
- Follow the pressing directions or arrows in your pattern. The general rule for pressing patchwork seam allowances is to press both of them toward the darker patch in a unit, so the darker fabric won’t shadow through the lighter one. However, this rule is broken on purpose all the time — to make it easier to join units in many patchwork blocks and to join pieced blocks to pieced blocks. If you must press seam allowances toward the lighter fabric, after stitching the seam trim the darker seam allowance just a bit narrower than the light one for less shadow-through on the block’s right side.
- Press seams in opposing directions on pieced units that will be joined. This makes it easy to snugly “nest” the opposing high and low sides of the seamline into each other for perfect matching at seam intersections. It distributes seam allowance bulk evenly on each side of the joining seam. It also facilitates Quilting-in-the-Ditch.
- Any seam that will be crossed by another must be pressed first.
How to Press Patchwork Units
Instructions
- 1. Use the cotton setting for quilters’ cottons and little or no steam to prevent unwanted block shrinkage and distortion. (It’s easier to unknowingly stretch damp fabrics out of shape when pressing with steam.)
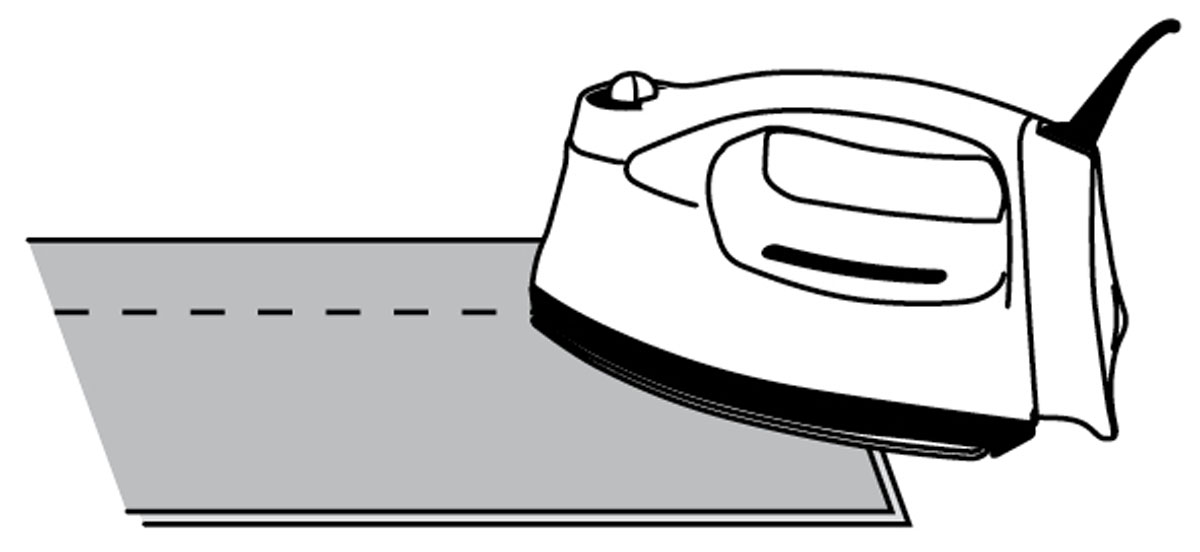
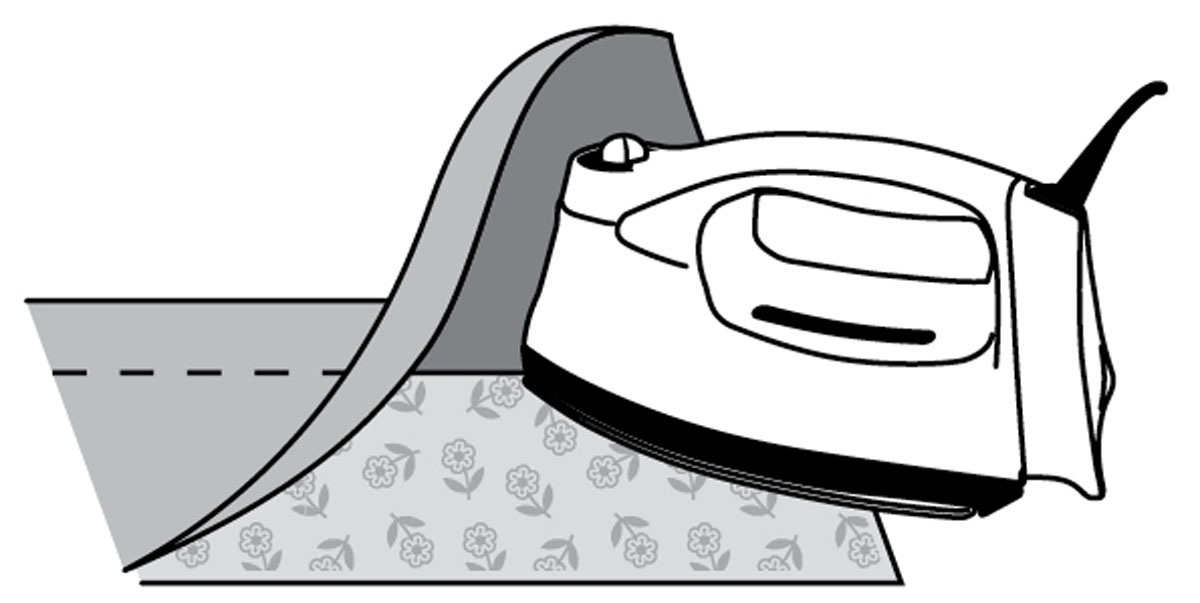
- 2. Place the pieced unit on the pressing surface with the piece that will lie on top of the seam allowances facing you as shown in the illustration below. Set the stitches by pressing the seam allowances flat for a few seconds to help stitches sink into the fabric and press out any minor puckering in the seamline. (Big puckers must be eliminated by removing the stitches and reassembling the unit.)
- 3. Use your fingertips and the point of the iron to direct and press the patch on the top of the unit so that it lies smooth and flat over the seam allowances. Remember the pressing mantra: Lower, press, lift, lower, press, lift. Don’t slide the iron.
- 4. Flip over the unit and press from the wrong side, too.
