Chapter 10
HOUSEHOLD KNOTS
Whether it’s tying a knot to truss a chicken for dinner, hanging a clothesline, or hanging a child’s swing, knots are an everyday occurrence around any household. For the most part, we barely give them any thought.
Yet, with a little practice and care, we can tie knots that will do the job right and won’t cause us frustration or concern by giving way at awkward moments. You may even find some new uses for them that you hadn’t anticipated.
BOA CONSTRICTOR
Also known as the Boa Knot, the Boa Constrictor forms an even more tenacious hold than the regular Constrictor Knot.
STEP 1 Begin by forming two crossing turns.

STEP 2 Overlap the crossing turns and twist one end over by a half turn.
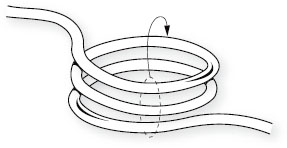
STEP 3 Place over the end of a pole, as shown. (The ends can be folded up to ease placement.)

STEP 4 Tighten by pulling the ends in opposite directions.
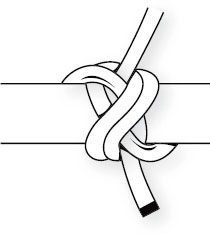
To learn how to tie this knot around a bar without access to an end, first tie it with this method, place it over a bar or pole end, then untie with just one end to see how the wraps and tucks are made.
DOUBLE OVERHAND NOOSE
Also called the Poacher’s Noose, the Poacher’s Knot, and the Strangle Snare, this knot is a very good general-purpose noose to learn.
STEP 1 Tie a Double Overhand Knot (see Chapter 1) with the running end over the standing part.
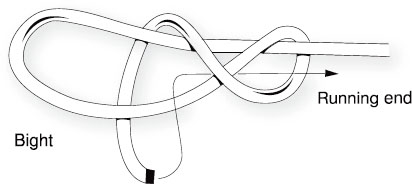
STEP 2 Tighten as shown.

Because the Double Overhand Knot can hold tension when tightened down, the loop opening will not close down until it is pulled on, which helps to explain its nefarious past with poachers. Knots that make use of the Double Overhand structure remain very useful today due to their high security even when tied with slippery synthetic cordage. The Triple Overhand version of this knot is even more secure.
GUY LINE HITCH
A “guy line” is a rope or wire used to hold a pole, antenna mast, or tent in place. There is generally more than one guy line, and when the Guy Line Hitch is used, the length and tension of each can quickly be adjusted.
STEP 1 Make an Overhand Knot some distance from the end, so that you leave enough running end to pass around the object and then back to the Overhand.

STEP 2 Pass the running end back through the bottom of the Overhand Knot.
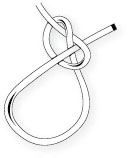
Sometimes two Overhand Knots are tied next to each other in the standing part. The running end is passed through the first one to provide the grip and the second one to hold the end down.
Tie two Overhand Knots in the standing part, and tuck the running end into the second one.

Like the Tautline Hitch, the Guy Line Hitch is meant for a support line and not for serious hoisting or for rescue and safety lines.
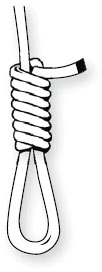
HANGMAN’S NOOSE
This noose is also called Jack Ketch’s Knot, named after a well-known hangman. It handles shock loads, and is also a handy way to store rope.
Never toy with the Hangman’s Noose, and be particularly careful with it around children. Nooses can also be highly offensive in some situations and should only be used where there is a specific reason for them.
STEP 1 Fold the running end back along the standing part, and fold the new running end back on itself. Wrap the running end around the standing part, moving from bottom to top.

STEP 2 Tuck the running end through the top bight.

STEP 3 Put tension on the knot by pulling on the bottom loop.
HONDA KNOT
Also called the Lariat Knot and the Bowstring Knot, this knot can be used to make an especially small loop because it is circular instead of oval, like most loops.
STEP 1 Tie an Overhand Knot, then lead the running end back through it, finishing with another Overhand Knot at the tip. Then tighten down the first Overhand Knot. The second Overhand locks the loop.
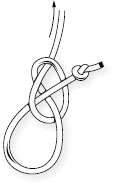
STEP 2 If a running loop is desired, the Honda Knot itself can be tied around its standing part.
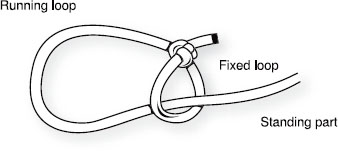
As you pass the running end through the Overhand Knot in Step 1, it helps to remember that Overhand Knots have three openings. To be tied correctly, you must lead the running end through the opening closest to the loop, and take care that it stays in this part when tightening. If the lead slips into the middle part, the knot will not be secure.
The Honda Knot makes a good low-friction running loop. It is used to make a lariat, which is a running loop also known as a lasso. This knot has been used to tie off bowstrings because the size of the loop can be adjusted by changing the place of the Overhand Knot on the tip.
It’s worth noting that the Honda Knot is tied in the same manner as the Guy Line Hitch. It is how they are used that makes them different. The Honda Knot is used when a locking loop is desired, and the Guy Line Hitch is used when the size of the loop will need to be decreased one or more times, thereby shortening the line it is tying off. If needed, however, the Honda Knot can be adjusted in size by changing the place on the locking Overhand Knot. This adjustability is why the Honda Knot has been used to attach bowstrings.
PILE HITCH
The Pile Hitch is very quick and easy to tie, as long as you’re working at the end of a stick or pole.
STEP 1 Pass a bight of rope around a post near the edge.
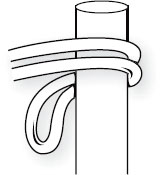
STEP 2 Open up the bight to pass it over the two standing parts and through the top of the post.
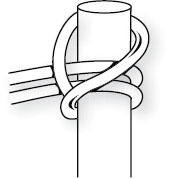
It helps to learn tying the Pile Hitch before going on to the Icicle Hitch (see Chapter 8), which is an extension of the Pile Hitch.
SLIPPED OVERHAND KNOT
You start the Slipped Overhand Knot the same way you begin tying the Overhand Knot, with one variation—the last tuck is made with a bight of the running end, so that the very end is not pulled through the crossing turn. This is what you do when you tie the bows in your shoelaces.

Pass the running end around the standing part, making a loop; then, make a bight in the running end and pass it through the crossing turn. Pull on the standing part and the bight to tighten.
Whereas the Overhand Knot can be difficult to untie, this knot can be untied simply by pulling on the running end to take out the last tuck, just as you do when you untie shoelaces. However, this trick does not work with all knots, as not all knots can be released by letting out the last tuck.
SLIPPED NOOSE
This knot is similar to the Slipped Overhand Knot. The difference is that the last tuck is made with a bight of the standing part, instead of the running end.

Pass the running end around the standing part, making a loop; then, make a bight in the standing part and pass it through the crossing turn. Pull on the running end and on the bight loop to tighten.
It is important to learn the difference between the Slipped Overhand Knot and the Slipped Noose. Each one will serve you as the starting point for other knots.
SURGEON’S KNOT
Used by surgeons to tie off blood vessels, the Surgeon’s Knot works well with small and slippery tying materials. Because the first crossing is double, it holds tension better than a Half Knot while completing the top half of the knot.
STEP 1 Make the bottom half of the knot with two crossings instead of the single crossing of the Half Knot.

STEP 2 Finish the top half with a single crossing, as for the Reef Knot (see Chapter 6).
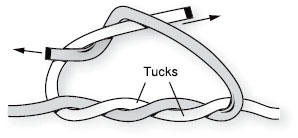
If you wish, you can also tie the top half of the Surgeon’s Knot with two crossings.
TIMBER HITCH
Just as its name suggests, the Timber Hitch is traditionally used to hoist or drag logs or poles.
STEP 1 Start by tying a Half Hitch (see Chapter 4).
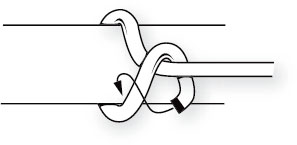
STEP 2 Continue making additional wraps, as shown.

As you can see, this hitch will work best if you place strain on it along the direction of the object the rope is hitched to—it will keep the knot tight.