Chapter 16. Throwing and Catching Exceptions
Things go wrong. Programmers always need to plan for the inevitable problems that might arise while their program is running: networks go down, disks fail, computers exhaust their memory, and so forth.
In C#, you address these problems with exceptions. An exception is an object that encapsulates information about an unusual program occurrence. When an exceptional circumstance arises, an exception is “thrown.” You might throw an exception in your own methods (for example, if you realize that an invalid parameter has been provided), or an exception might be thrown in a class provided by the Framework Class Library (for example, if you try to write to a read-only file). Many exceptions are thrown by the .NET runtime when the program can no longer continue due to an operating system problem (such as a security violation).
Your job as programmer is to try potentially
dangerous code, and if an exception is thrown, you
catch the exception in your "catch block.”
Tip
Both try and catch are keywords in C#. Catching an
exception is sometimes referred to as handling the
exception.
Ideally, after the exception is caught, the program can fix the problem and continue. Even if your program can’t continue, by catching the exception, you have an opportunity to print a meaningful error message and terminate gracefully.
Bugs, Errors, and Exceptions
It is important to distinguish exceptions from bugs and errors . A bug is a programmer mistake that should be fixed before the code is shipped. An exception is not the result of a programmer mistake (though such mistakes can also raise exceptions). Rather, exceptions are raised as a result of predictable but unpreventable problems that arise while your program is running (e.g., a network connection is dropped or you run out of disk space).
An error is caused by user action. For example, the user might enter a number where a letter is expected. Once again, an error might cause an exception, but you can prevent that by implementing code to validate user input. Whenever possible, user errors should be anticipated and prevented.
Even if you remove all bugs and anticipate all user errors, you will still run into predictable but unpreventable problems, such as running out of memory or attempting to open a file that no longer exists. These are exceptions. You cannot prevent exceptions, but you can handle them so that they do not bring down your program.
Throwing Exceptions
All exceptions are either of type System.Exception or of types derived from System.Exception. Microsoft suggests that all
the exceptions you use in your program derive from System.Exception, though you are also free to
derive from System.ApplicationException (which was the
previous recommended strategy).
The CLR System namespace includes a number of pre-defined
exception types that you can use in your own programs. These exception
types include ArgumentNullException,
InvalidCastException, and OverflowException, as well as many others. You
can guess their use based on their name. For example, ArgumentNull exception is thrown when an
argument to a method is null when that is not an expected (or
acceptable) value.
This chapter describes how to write your programs to catch and
handle exceptions. This chapter also shows you how to use the properties
of the Exception class to provide
information to the user about what went wrong, and it shows you how to
create and use your own custom exception types.
Searching for an Exception Handler
When your program encounters an exceptional circumstance, such as running out of memory, it throws an exception. Exceptions must be handled before the program can continue.
If the currently running function does not handle the exception, the current function terminates and the calling function gets a chance to handle the exception (this is called “unwinding the stack”). If none of the calling functions handles it, the exception ultimately is handled by the Common Language Runtime (CLR), which abruptly terminates your program.
In other words, if function A calls function B, and function B calls function C, these function calls are all placed on the stack. When a programmer talks about “unwinding the stack,” what is meant is that you back up from C to B to A, as illustrated in Figure 16-1.
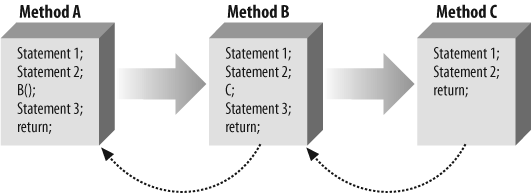
If you must unwind the stack from C to B to A to handle the exception, when you are done, you are in A; there is no automatic return to C.
The throw Statement
To signal an abnormal condition in a C# program, throw an
exception by using the throw keyword.
The following line of code creates a new instance of System.Exception and then throws it:
throw new System.Exception( );
Example 16-1
illustrates what happens if you throw an exception and there is no
try/catch block to catch and handle
the exception. In this example, you’ll throw an exception even though
nothing has actually gone wrong, just to illustrate how an exception can
bring your program to a halt.
using System;

namespace UnhandledException
{
   class Tester
   {

      static void Main(  )
      {
         Console.WriteLine( "Enter Main..." );
         Tester t = new Tester(  );
         t.Run(  );
         Console.WriteLine( "Exit Main..." );
      }
      public void Run(  )
      {
         Console.WriteLine( "Enter Run..." );
         Func1(  );
         Console.WriteLine( "Exit Run..." );
      }

      public void Func1(  )
      {
         Console.WriteLine( "Enter Func1..." );
         Func2(  );
         Console.WriteLine( "Exit Func1..." );
      }

      public void Func2(  )
      {
         Console.WriteLine( "Enter Func2..." );
         throw new ApplicationException(  );
         // this next line can never execute
         Console.WriteLine( "Exit Func2..." );
      }

   }
}
The output looks like this:
    Enter Main...
    Enter Run...
    Enter Func1...
    Enter Func2...

    Unhandled Exception: System.Exception: Exception of type
    System.Exception was thrown. at
    ExceptionHandling.Tester.Func2(  ) in source\exceptions\exceptionhandling\class1.cs:line
 34
     at ExceptionHandling.Tester.Func1(  ) in source\exceptions\exceptionhandling\class1.cs:
    line 27
     at ExceptionHandling.Tester.Run(  ) in source\exceptions\exceptionhandling\class1.cs:
    line 19
     at ExceptionHandling.Tester.Main(  ) in source\exceptions\exceptionhandling\class1.cs:
    line 13
Tip
When you run this code, you’ll also receive a warning that the following line is unreachable:
Console.WriteLine( "Exit Func2..." );
That’s because the compiler can tell that there’s no way this line will ever be reached. In this example, you can ignore the warning, but as noted earlier, you should usually try to write warning-free code.
This simple example writes to the console as it enters and exits
each method. Main( ) calls Run( ), which in turn calls Func1( ). After printing out the “Enter Func1”
message, Func1( ) immediately calls
Func2( ). Func2( ) prints out the first message and
throws an object of type System.Exception.
Execution immediately stops, and the CLR looks to see if there is
a handler in Func2( ). There is not,
and so the runtime unwinds the stack (never printing the exit statement)
to Func1( ). Again, there is no
handler, and the runtime unwinds the stack back to Main( ). With no exception handler there, the
default handler is called, which prints the error message, and
terminates the program.
The try and catch Statements
As you saw, the exception in your previous example stopped your program dead. That’s usually not the desired behavior. What you need is a way to tell the compiler, “If any exceptions are thrown in this section of code, take this action.” That way, your program can continue on from the error, or at least end gracefully. This process is called handling the exception. To handle exceptions, take the following steps:
Execute any code that you suspect might throw an exception (such as code that opens a file or allocates memory) within a
tryblock.Catch any exceptions that are thrown in a
catchblock.
A try block is created using
the keyword try and is enclosed in
braces. The try block is the area of
code where you want to watch for exceptions. A catch block holds the code where you take
action based on the type of exception thrown. It is created using the
keyword catch and is also enclosed in
braces. Example 16-2
illustrates these constructs. Note that Example 16-2 is identical to
Example 16-1 except that
now the program includes a try/catch
block.
using System;

namespace TryAndCatchBlocks
{
   class Tester
   {
      static void Main(  )
      {
         Console.WriteLine( "Enter Main..." );
         Tester t = new Tester(  );
         t.Run(  );
         Console.WriteLine( "Exit Main..." );
      }
      public void Run(  )
      {
         Console.WriteLine( "Enter Run..." );
         Func1(  );
         Console.WriteLine( "Exit Run..." );
      }


      public void Func1(  )
      {
         Console.WriteLine( "Enter Func1..." );
         Func2(  );
         Console.WriteLine( "Exit Func1..." );
      }

      public void Func2(  )
      {
         Console.WriteLine( "Enter Func2..." );
         try
         {
            Console.WriteLine( "Entering try block..." );
            throw new ApplicationException(  );
            // this code never executes because of the exception
            Console.WriteLine( "Exiting try block..." );
         }
         catch
         {
            Console.WriteLine( "Exception caught and handled!" );
         }
         Console.WriteLine( "Exit Func2..." );
      }
   }
}
The output looks like this:
    Enter Main...
    Enter Run...
    Enter Func1...
    Enter Func2...
    Entering try block...
    Exception caught and handled!
    Exit Func2...
    Exit Func1...
    Exit Run...
    Exit Main...
Following the try statement is
the catch statement. In a real
catch statement, you might silently
fix the problem (for example, by retrying a database connection), or you
might interact with the user to solve the problem (such as offering the
user the opportunity to close other applications and free up memory). In
Example 16-2, the
catch statement simply reports that
the exception has been caught and handled.
Notice that the exit statements are now written. With the
exception handled, execution resumes immediately after the catch block.
How the Call Stack Works
Examine the output of Example 16-2 carefully. You
see the code enter Main( ), Func1( ), Func2( ), and the try block. You
never see it exit the try block,
though it does exit Func2( ),
Func1( ), and Main( ). What happened?
When the exception is thrown, execution halts immediately and is
handed to the catch block. It
never returns to the original code path. It never
gets to the line that prints the exit statement for the try block. The catch block handles the error, and then
execution falls through to the code following the catch block.
If there is no exception handler at all, the stack is unwound,
returning to the calling method in search of an exception handler. This
unwinding continues until the Main( ) method is reached, and if no exception handler is found, the
default (ugly) exception handler is invoked and the program
terminates.
In this example, because there is a catch block, the stack does not need to
unwind. The exception is handled, and the program can continue
execution. Unwinding the stack becomes a bit more clear if you move the
try/catch blocks up to Func1( ), as Example 16-3 shows.
using System;

namespace UnwindingTheStackByOneLevel
{
   class Tester
   {

      static void Main(  )
      {
         Console.WriteLine( "Enter Main..." );
         Tester t = new Tester(  );
         t.Run(  );
         Console.WriteLine( "Exit Main..." );
      }
      public void Run(  )
      {
         Console.WriteLine( "Enter Run..." );
         Func1(  );
         Console.WriteLine( "Exit Run..." );
      }

      public void Func1(  )
      {
         Console.WriteLine( "Enter Func1..." );
         try
         {
            Console.WriteLine( "Entering try block..." );
            Func2(  );
            Console.WriteLine( "Exiting try block..." );
         }
         catch
         {
            Console.WriteLine( "Exception caught and handled!" );
         }
         Console.WriteLine( "Exit Func1..." );
      }

      public void Func2(  )
      {
         Console.WriteLine( "Enter Func2..." );
         throw new ApplicationException(  );
         Console.WriteLine( "Exit Func2..." );
      }
   }
}
Now the output looks like this:
    Enter Main...
    Enter Run...
    Enter Func1...
    Entering try block...
    Enter Func2...
    Exception caught and handled!
    Exit Func1...
    Exit Run...
    Exit Main...
This time the exception is not handled in Func2( ); it is handled in Func1( ). When Func2( ) is called, it uses Console.WriteLine( ) to display its first
milestone:
Enter Func2...
Then Func2( ) throws an
exception and execution halts. The runtime looks for a handler in
Func2( ), but there isn’t one. Then
the stack begins to unwind, and the runtime looks for a handler in the
calling function: Func1( ). There is
a catch block in Func1( ), so its code is executed. Execution
then resumes immediately following the catch statement, printing the exit statement
for Func1( ) and then for Main( ).
Notice that even though the exception is handled, you are now in Func1, and there is no automatic way to return to where you were in Func2.
If you’re not entirely sure why the “Exiting Try Block” statement and the “Exit Func2” statement are not printed, try putting the code into a debugger and then stepping through it.
Creating Dedicated catch Statements
So far, you’ve been working with generic catch statements only. You can create
dedicated catch statements that
handle only some exceptions and not others, based on the type of
exception thrown. Example
16-4 illustrates how to specify which exception you’d like to
handle.
using System;

namespace ThreeDedicatedCatchStatements
{
   class Tester
   {

      public void Run(  )
      {
         try
         {
            double a = 5;
            double b = 0;
            Console.WriteLine( "Dividing {0} by {1}...", a, b );
            Console.WriteLine( "{0} / {1} = {2}",
            a, b, DoDivide( a, b ) );
         }

         // most specific exception type first
         catch ( DivideByZeroException )
         {
            Console.WriteLine(
            "DivideByZeroException caught!" );
         }

         catch ( ArithmeticException )
         {
            Console.WriteLine(
            "ArithmeticException caught!" );
         }

         // generic exception type last
         catch
         {
            Console.WriteLine(
            "Unknown exception caught" );
         }
      }

      // do the division if legal
      public double DoDivide( double a, double b )
      {
         if ( b == 0 )
            throw new DivideByZeroException

(  );
         if ( a == 0 )
            throw new ArithmeticException

(  );
         return a / b;
      }

      static void Main(  )
      {
         Console.WriteLine( "Enter Main..." );
         Tester t = new Tester(  );
         t.Run(  );
         Console.WriteLine( "Exit Main..." );
      }
   }
}
The output looks like this:
    Enter Main...
    Dividing 5 by 0...
    DivideByZeroException caught!
    Exit Main...
In Example 16-4,
the DoDivide( ) method does not let
you divide zero by another number, nor does it let you divide a number
by zero. If you try to divide by zero, it throws an instance of DivideByZeroException. If you try to divide
zero by another number, there is no appropriate exception; dividing zero
by another number is a legal mathematical operation and shouldn’t throw
an exception at all. However, for the sake of this example, assume you
don’t want to allow division of zero by any number; you will throw an
ArithmeticException.
When the exception is thrown, the runtime examines each exception
handler in the order in which they appear in the code and matches the
first one it can. When you run this program with a=5 and b=7, the output is:
5 / 7 = 0.7142857142857143
As you’d expect, no exception is thrown. However, when you change
the value of a to 0, the output
is:
ArithmeticException caught!
The exception is thrown, and the runtime examines the first
exception: DivideByZe-roException.
Because this does not match, it goes on to the next handler, Arithmetic-Exception, which does match.
In a final pass through, suppose you change a to 7 and b to 0. This throws the DivideByZeroException.
Tip
You have to be particularly careful with the order of the
catch statements in this case
because the DivideByZeroException
is derived from ArithmeticException. If you reverse the
catch statements, then the DivideByZeroException matches the ArithmeticException handler and the
exception never gets to the DivideByZeroException handler. In fact, if
their order is reversed, it is impossible for any
exception to reach the DivideByZeroException handler. Then the
compiler recognizes that the DivideByZeroException handler cannot be
reached and reports a compile error!
Typically, a method catches every exception it can anticipate for
the code it is running. However, it is possible to distribute your
try/catch statements, catching some specific
exceptions in one function and more generic exceptions in higher calling
functions. Your design goals should dictate exactly where you put each
try and catch statement.
Assume you have a Method A that calls another Method B, which in
turn calls Method C, which calls Method D, which then calls Method E.
Method E is deep in your code, while Methods B and A are higher up. If
you anticipate that Method E might throw an exception, you should create
a try/catch block deep in your code to catch that
exception as close as possible to the place where the problem arises.
You might also want to create more general exception handlers higher up
in the code in case unanticipated exceptions slip by.
The finally Statement
In some instances, throwing an exception and unwinding the stack can create a problem. For example, if you opened a file or otherwise committed a resource, you might need an opportunity to close the file or flush the buffer.
If there is some action you must take
regardless of whether an exception is thrown, such as closing a file,
you have two strategies to choose from. One approach is to enclose the
dangerous action in a try block and
then to perform the necessary action (close the file) in both the
catch and try blocks. However, this is an ugly
duplication of code, and it’s error prone. C# provides a better
alternative in the finally
block.
You create a finally block with
the keyword finally, and you enclose
the block in braces. The code in the finally block is guaranteed to be executed
regardless of whether an exception is thrown. The TestFunc( ) method in the next listing, Example 16-5, simulates
opening a file as its first action. The method then undertakes some
mathematical operations, and then the file is closed.
Tip
A finally block can be
created with or without catch
blocks, but a finally block
requires a try block to execute. It
is an error to exit a finally block
with break, continue, return, or goto.
It is possible that sometime between opening and closing the file,
an exception will be thrown. If this were to occur, it would be possible
for the file to remain open. The developer knows that no matter what
happens, at the end of this method, the file should be closed, so the
file close function call is moved to a finally block, where it is executed regardless
of whether an exception is thrown. Example 16-5 uses a finally block.
using System;

namespace UsingAFinallyBlock
{
   class Tester
   {
      public void Run(  )
      {
         try
         {
            Console.WriteLine( "Open file here" );
            double a = 5;
            double b = 0;
            Console.WriteLine( "{0} / {1} = {2}",
            a, b, DoDivide( a, b ) );
            Console.WriteLine(
            "This line may or may not print" );
         }

         // most derived exception type first
         catch ( DivideByZeroException )
         {
            Console.WriteLine(
            "DivideByZeroException caught!" );
         }
         catch
         {
            Console.WriteLine( "Unknown exception caught" );
         }
         finally
         {
            Console.WriteLine( "Close file here." );
         }
      }
      // do the division if legal
      public double DoDivide( double a, double b )
      {
         if ( b == 0 )
            throw new DivideByZeroException(  );
         if ( a == 0 )
            throw new ArithmeticException(  );
         return a / b;
      }

      static void Main(  )
      {
         Console.WriteLine( "Enter Main..." );
         Tester t = new Tester(  );
         t.Run(  );
         Console.WriteLine( "Exit Main..." );
      }
   }
}
The output looks like this:
    Enter Main...
    Open file here
    DivideByZeroException caught!
    Close file here.
    Exit Main...
In Example 16-5,
one of the catch blocks from Example 16-4 has been
eliminated to save space and a finally block has been added. Whether or not
an exception is thrown, the finally
block is executed; thus, in both examples, the following message is
output:
Close file here.
Of course, in a real application, you would actually open the file
in the try block, and you’d actually
close the file in the finally block.
The details of file manipulation have been eliminated to keep the
example simple.
Exception Class Methods and Properties
So far you’ve been using the exception as a sentinel—that
is, the presence of the exception signals the errors—but you haven’t
touched or examined the Exception
object itself. The System.Exception
class provides a number of useful methods and properties.
The Message property provides information about the exception, such
as why it was thrown. The Message
property is read-only; the code throwing the exception can pass in the
message as an argument to the exception constructor, but the Message property cannot be modified by any
method once set in the constructor.
The HelpLink property provides a link to a help file associated with
the exception. This property is read/write. In Example 16-6, the Exception.HelpLink property is set and
retrieved to provide information to the user about the DivideByZeroException. It is generally a good
idea to provide a help file link for any exceptions you create, so that
the user can learn how to correct the exceptional circumstance.
The read-only StackTrace
property is set by the CLR. This property is used to
provide a stack trace for the error statement. A
stack trace is used to display the call stack: the series of method
calls that lead to the method in which the exception was thrown.
using System;

namespace InsideTheExceptionClass
{
   class Tester
   {
      public void Run(  )
      {
         try
         {
            Console.WriteLine( "Open file here" );
            double a = 12;
            double b = 0;
            Console.WriteLine( "{0} / {1} = {2}",
            a, b, DoDivide( a, b ) );
            Console.WriteLine(
            "This line may or may not print" );
         }

         // most derived exception type first
         catch (DivideByZeroException e )
         {
            Console.WriteLine(
            "\nDivideByZeroException! Msg: {0}",
            e.Message );
            Console.WriteLine(
            "\nHelpLink: {0}", e.HelpLink );
            Console.WriteLine(
            "\nHere's a stack trace: {0}\n",
            e.StackTrace );
         }
         catch
         {
            Console.WriteLine(
            "Unknown exception caught" );
         }
         finally
         {
            Console.WriteLine(
            "Close file here." );
         }

      }

      // do the division if legal
      public double DoDivide( double a, double b )
      {
         if ( b == 0 )
         {
            DivideByZeroException e =
            new DivideByZeroException(  );
            e.HelpLink =
            "http://www.libertyassociates.com";
            throw e;
         }
         if ( a == 0 )
            throw new ArithmeticException(  );
         return a / b;
      }

      static void Main(  )
      {
         Console.WriteLine( "Enter Main..." );
         Tester t = new Tester(  );
         t.Run(  );
         Console.WriteLine( "Exit Main..." );
      }
   }
}
The output looks like this:
    Enter Main...
    Open file here

    DivideByZeroException! Msg: Attempted to divide by zero.

    HelpLink: http://www.libertyassociates.com

    Here's a stack trace:
     at ExceptionHandling.Tester.DoDivide(Double a, Double b) in class1.cs:line 54
     at ExceptionHandling.Tester.Run(  ) in class1.cs:line 14

    Close file here.
    Exit Main...
In the output of Example
16-6, the stack trace lists the methods in the reverse order in
which they were called; by reviewing this order, you can infer that the
error occurred in DoDivide( ), which
was called by Run( ). When methods
are deeply nested, the stack trace can help you understand the order of
method calls and thus track down the point at which the exception
occurred.
In this example, rather than simply throwing a DivideByZeroException, you create a new
instance of the exception:
DivideByZeroException e = new DivideByZeroException( );
You do not pass in a custom message, and so the default message is printed:
DivideByZeroException! Msg:Attempted to divide by zero.Tip
The designer of each Exception class has the option to provide a
default message for that exception type. All the standard exceptions
provide a default message, and it is a good idea to add a default
message to your custom exceptions as well (see the section "Custom Exceptions,” later
in this chapter).
If you want, you can modify this line of code to pass in a custom message:
    new DivideByZeroException(
     "You tried to divide by zero which is not meaningful");
In this case, the output message reflects the custom message:
    DivideByZeroException! Msg:
    You tried to divide by zero which is not meaningful
Before throwing the exception, set the HelpLink property:
e.HelpLink = "http://www.libertyassociates.com";
When this exception is caught, Console.WriteLine prints both the Message and the HelpLink:
    catch (DivideByZeroException e)
    {
     Console.WriteLine("\nDivideByZeroException! Msg: {0}",
     e.Message);
     Console.WriteLine("\nHelpLink: {0}", e.HelpLink);
The Message and HelpLink properties allow you to provide
useful information to the user. The exception handler also prints the
StackTrace by getting the StackTrace property of the Exception object:
    Console.WriteLine("\nHere's a stack trace: {0}\n",
     e.StackTrace);
The output of this call reflects a full StackTrace leading to the moment the exception
was thrown. In this case, only two methods were executed before the
exception, DoDivide( ) and Run( ):
    Here's a stack trace:
     at ExceptionHandling.Tester.DoDivide(Double a, Double b) in class1.cs:line 54
     at ExceptionHandling.Tester.Run(  ) in class1.cs:line 14
Note that I’ve shortened the pathnames, so your printout might look a little different.
Custom Exceptions
The intrinsic exception types the CLR provides, coupled
with the custom messages shown in the previous example, will often be
all you need to provide extensive information to a catch block when an exception is
thrown.
There will be times, however, when you want to provide more extensive information or need special capabilities in your exception. It is a trivial matter to create your own custom exception class. Example 16-7 illustrates the creation of a custom exception.
using System;

namespace ACustomException
{
   // custom exception class
   public class MyCustomException :
   System.Exception
   {
      public MyCustomException( string message ):
      base( message ) // pass the message up to the base class
      {

      }
   }

   class Tester
   {
      public void Run(  )
      {
         try
         {
            Console.WriteLine( "Open file here" );
            double a = 0;
            double b = 5;
            Console.WriteLine( "{0} / {1} = {2}",
            a, b, DoDivide( a, b ) );
            Console.WriteLine(
            "This line may or may not print" );
         }

         // most derived exception type first
         catch ( System.DivideByZeroException e )
         {
            Console.WriteLine(
            "\nDivideByZeroException! Msg: {0}",
            e.Message );
            Console.WriteLine(
            "\nHelpLink: {0}\n", e.HelpLink );
         }
         // catch custom exception
         catch ( MyCustomException e )
         {
            Console.WriteLine(
            "\nMyCustomException! Msg: {0}",
            e.Message );
            Console.WriteLine(
            "\nHelpLink: {0}\n", e.HelpLink );
         }
         catch // catch any uncaught exceptions
         {
            Console.WriteLine(
            "Unknown exception caught" );
         }
         finally
         {
            Console.WriteLine( "Close file here." );
         }
      }

      // do the division if legal
      public double DoDivide( double a, double b )
      {
         if ( b == 0 )
         {
            DivideByZeroException e =
            new DivideByZeroException(  );
            e.HelpLink =
            "http://www.libertyassociates.com";
            throw e;
         }
         if ( a == 0 )
         {
            // create a custom exception instance
            MyCustomException e =
            new MyCustomException(
            "Can't have zero divisor" );
            e.HelpLink =
            "http://www.libertyassociates.com/NoZeroDivisor.htm";
            throw e;
         }
         return a / b;
      }

      static void Main(  )
      {
         Console.WriteLine( "Enter Main..." );
         Tester t = new Tester(  );
         t.Run(  );
         Console.WriteLine( "Exit Main..." );
      }
   }
}
The output looks like this:
    Enter Main...
    Open file here

    MyCustomException

! Msg: Can't have zero divisor

    HelpLink: http://www.libertyassociates.com/NoZeroDivisor.htm

    Close file here.
    Exit Main...
MyCustomException is derived
from System.Exception and consists of
nothing more than a constructor that takes a string message that it
passes to its base class.
The advantage of creating this custom exception class is that it
better reflects the particular design of the Test class, in which it is not legal to have a
zero divisor. Using the ArithmeticException rather than a custom
exception would work as well, but it might confuse other programmers
because a zero divisor wouldn’t normally be considered an arithmetic
error.
You are free, of course, to add methods and properties to your custom exception classes as needed.
Summary
Throwing (or raising) an exception halts execution of your program in place, and execution proceeds in the most immediately available
catchblock (exception handler). If the exception was not raised within atryblock, or there is nocatchblock, the stack is unwound until acatchblock is found. If nocatchblock is ever found, the built-in exception handler is invoked, which terminates your program with an error message.An exception object can contain information about the circumstances that cause the exception to be raised. Typically, exception objects contain at least a text message explaining the exception.
Exceptions can be derived from and can contain other exceptions within them to allow for very flexible error handling.
A bug is a programming mistake that should be fixed before the program is released. An exception, however, is the result of a predictable but unpreventable problem that arises during run-time (for example, running out of disk space).
All exceptions used in C# derive from
System.Exception, and all exceptions in your program should derive fromSystem.Exception.When a program encounters a problem that it cannot solve or work around, it may throw an exception to halt execution and allow the exception handler to fix the problem.
You throw an exception yourself using the
throwkeyword.It is good programming practice to enclose code that has a high risk of throwing an exception within a
tryblock and to provide an exception handler (acatchblock) and perhaps afinallyblock.The
catchblock follows thetryblock and contains the code used to handle the exception.You can create dedicated
catchstatements to catch specific types of exceptions taking advantage of the inheritance hierarchy of exceptions.Any action that must be taken whether or not an exception is raised (such as closing a file) should be enclosed in a
finallyblock.
Quiz
- Question 16–1.
What is an exception?
- Question 16–2.
What does the framework do if no exception handler is found in the method that throws an event?
- Question 16–3.
How do you create a handler?
- Question 16–4.
What is the syntax for throwing a new
ArgumentNullexception?- Question 16–5.
How do you write code to handle various exceptions differently?
- Question 16–6.
What is the
finallystatement?
Exercises
- Exercise 16-1.
Create a
Catclass with oneintproperty:Age. Write a program that creates aListofCatobjects in atryblock. Create multiplecatchstatements to handle anArgumentOutOfRangeException, and an unknown exception, and afinallyblock to simulate deallocating theCatobjects. Write test code to throw an exception that you will catch and handle.- Exercise 16-2.
Modify Exercise 16-1 so that it does not throw an error. Create a custom error type
CustomCatErrorthat derives fromSystem.Exception, and create a handler for it. Add a method toCatManagerthat checks the cat’s age, and throws an error of typeCustomCatErrorif the age is less than or equal to 0, with an appropriate message.