Water Requirements
Dispelling Myths About Water
Insects
Birds
Frogs and Salamanders
Mammals
Land Features that Indicate Water
Dowsing
Water Sources and Procurement 176
Surface Water
Ground Water
Precipitation
Condensation
Vegetation
Water Filters
Water Purification
Treating Water: Comparing Methods 180
Packed Water
Desalting Tablets
Solar Stills
Reverse Osmosis Water Maker
Collecting Precipitation
Water from Dew
Ice
Water Needs in High-Temperature Areas 181
Water Indicators
Natural Water Sources
Man-made Water Sources
Animals as Signs of Water
Water from Plants
Water Sources in Arctic and Subarctic Regions 184
Water in Cold Weather and Cold Regions 185
Importance of Liquids
Water
Types of Ice and Snow
Procedures for Melting Snow and Ice
Melting Snow
Storing Water
Thawing a Frozen Water Bottle
Water Storage and Conservation 186
Water Storage
Water Conservation
Finding Water and Making It Potable 186
Water Sources
Still Construction
Water Purification
Water Filtration Devices
Greg Davenport
Our bodies are composed of approximately 60 percent water, and it plays a vital role in our ability to get through a day. About 70 percent of our brains, 82 percent of our blood, and 90 percent of our lungs are composed of water. In our bloodstream, water helps to metabolize and transport vital elements, carbohydrates, and proteins that are necessary to fuel our bodies. Water also helps us dispose of our bodily waste.
During a normal, nonstrenuous day, a healthy individual will need 2 to 3 quarts of water. When physically active or in extreme hot or cold environments, that same person would need at least 4 to 6 quarts of water a day. Being properly hydrated is one of the various necessities that wards off dehydration and environmental injuries. A person who’s mildly dehydrated will develop excessive thirst and become irritable, weak, and nauseated. As the dehydration worsens, individuals will show a decrease in their mental capacity and coordination. At this point it will become difficult to accomplish even the simplest of tasks. The ideal situation would dictate that you don’t ration your water. Instead you should ration sweat. If water is not available, don’t eat.
By the time you think about drinking your urine, you are very dehydrated, and your urine would be full of salts and other waste products. For a hydrated person, urine is 95 percent water and 5 percent waste products like urea, uric acid, and salts. As you become dehydrated, the concentration of water decreases and the concentration of salts increases substantially. When you drink these salts, the body will draw upon its water reserves to help eliminate them, and you will actually lose more water than you might gain from your urine.
The concentrations of salts in salt water are often higher than those found in urine. When you drink these salts, the body will draw upon its water reserves to help eliminate them, and you will actually lose more water than you might gain from salt water.
Blood is composed of plasma, red blood cells, white blood cells, and platelets. Plasma, which composes about 55 percent of the blood’s volume, is predominately water and salts, but it also carries a large number of important proteins (albumin, gamma globulin, and clotting factors) and small molecules (vitamins, minerals, nutrients, and waste products). Waste products produced during metabolism, such as urea and uric acid, are carried by the blood to the kidneys, where they are transferred from the blood into urine and eliminated from the body. The kidneys carefully maintain the salt concentration in plasma. When you drink blood, you are basically ingesting salts and proteins, and the body will draw upon its water reserves to help eliminate them. You will actually lose more water than you might gain from drinking blood.
—From Wilderness Survival
Greg Davenport
If bees are present, water is usually within several miles of your location. Ants require water and will often place their nest close to a source. Swarms of mosquitoes and flies are a good indicator that water is close.
Birds frequently fly toward water at dawn and dusk in a direct, low flight path. This is especially true of birds that feed on grain, such as pigeons and finches. Flesh-eating birds can also be seen exhibiting this flight pattern, but their need for water isn’t as great, and they don’t require as many trips to the water source. Birds observed circling high in the air during the day are often doing it over water, as well.
Most frogs and salamanders require water and if found are usually a good indicator that water is near.
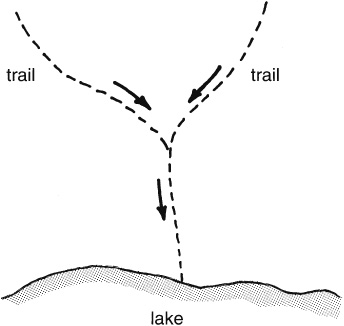
Like birds, mammals will frequently visit watering holes at dawn and dusk. This is especially true of mammals that eat a grain or grassy-type diet. Watching their travel patterns or evaluating mammal trails may help you find a water source. Trails that merge into one are usually a good pointer and following the merged trail often leads to water.
Drainages and valleys are a good water indicator, as are winding trails of deciduous trees. Green plush vegetation found at the base of a cliff or mountain may indicate a natural spring or underground source of water.
Dowsing, or witching, is a highly debated skill that some say helps them find water. Those who profess to have this skill use a forked stick (shaped like a Y) about 18 to 20 inches long and ⅛ to ¼ inch in diameter. The most common branch used comes from a willow tree. The two ends of the Y are held in the hands, which are positioned palms up, while the dowser walks forward. The free end of the stick is supposed to react when it passes over water. This reaction may be toward or away from the body.
—From Wilderness Living
Greg Davenport
Illustrations by Steven Davenport and Ken Davenport
Since your body needs a constant supply of water, you will eventually need to procure water from Mother Nature. Various sources include surface water, ground water, precipitation, condensation, plant sources, and man-made options that transform unusable sources.
Surface water may be obtained from rivers, ponds, lakes, or streams. It is usually easy to find and access, but because it is prone to contamination from protozoan, viruses, and bacteria, it should always be treated. If the water is difficult to access or has an unappealing flavor, consider using a seepage basin to filter the water. The filtering process is similar to what happens as ground water moves toward an aquifer. To create a seepage basin well, dig a 3-foot-wide hole about 10 feet from your water source. Dig it down until water begins to seep in, and then dig about another foot. Line the sides of your hole with wood or rocks so that no more mud will fall in, and let it sit overnight so the dirt and sand will settle.

Two trails that merge together often point toward water.
Ground water is found under the earth’s surface. This water is naturally filtered as it moves through the ground and into underground reservoirs called aquifers. Although treating this water may not be necessary, you should always err on the side of caution. Locating ground water is probably the most difficult part of accessing it. Look for things that seem out of place, such as a small area of green plush vegetation at the base of a hill or a bend in a dry riverbed that is surrounded by vegetation. A marshy area with a fair amount of cattail or hemlock growth may provide a clue that ground-water is available. Using these same clues, I have found natural springs in desert areas and running water less than 6 feet below the earth’s surface. To easily access the water, dig a small well at the source (see direction for seepage basin above), line the well with wood or rocks, and let it sit overnight before using the water. When close to shore, you can procure fresh water by digging a similar well one dune inland beyond the beach.
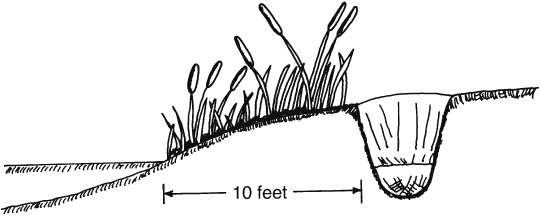
Seepage basin well.
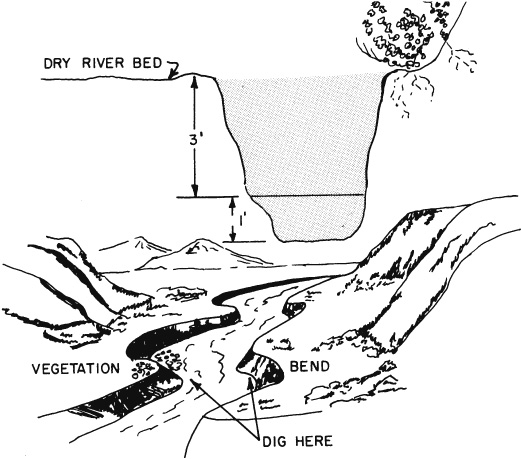
Dry riverbed water source.
The four forms of precipitation are rain, snow, sea ice, and dew.
When it rains, you should sit out containers or dig a small hole and line it with plastic or any other nonporous material to catch the rainwater. After the rain has stopped, you may find water in crevasses, fissures, or low-lying areas.
Snow provides an excellent source of water, but it should not be eaten. The energy lost eating snow outweighs the benefit. Instead, melt it by suspending it over a fire or adding it to a partially full canteen and then shaking the container or placing it between the layers of your clothing and allowing your body’s radiant heat to melt the snow. If you are with a large group, a snow-to-water generator can be created from a tripod and porous material. Create a large pouch by attaching the porous material to the tripod. Fill the pouch with snow, and place the tripod just close enough to the fire to start melting the snow. Use a container to collect the melted snow. Although the water will taste a little like smoke, this method provides an ongoing large and quick supply of water. If the sun is out, you could melt the snow by digging a cone-shaped hole, lining it with a tarp or similar nonporous material, and placing snow on the material at the top of the cone. As the snow melts, water will collect at the bottom of the cone.
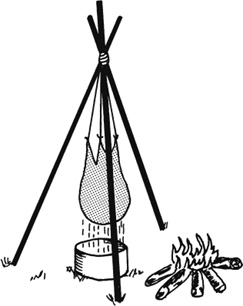
Snow water generators produce large volumes of water from snow.
If using sea ice, you will want to make sure the ice is virtually free of any salts in the sea water. Sea ice that has rounded corners, shatters easily, and is bluish or black is usually safe to use. When in doubt, however, do a taste test. If it tastes salty, don’t use it. As with snow, ice should be melted prior to consumption. Melt sea ice next to a fire or add it to a partially full container of water and either shake the container or place it between the layers of your clothing and allow your body’s radiant heat to melt the snow.
Although dew does not provide a large volume of water, it should not be overlooked as a source of water. Dew accumulates on grass, leaves, rocks, and equipment at dawn and dusk and should be collected at those times before it freezes or evaporates. Any porous material will absorb the dew, and the moisture can be consumed by wringing it out of the cloth and into your mouth.
Solar stills are a great water procurement option in hot climates. The vegetation bag and transpiration bag are great land options.
To construct a vegetation bag, you will need a clear plastic bag and an ample supply of healthy, nonpoisonous vegetation. A 4- to 6-foot section of surgical tubing is also helpful. To use, open the plastic bag and fill it with air to make it easier to place vegetation inside. Next fill the bag one-half to three-quarters full of lush green vegetation. Be careful not to puncture the bag. Place a small rock or similar item into the bag, and if you have surgical tubing, slide one end inside and toward the bottom of the bag. Tie the other end in an overhand knot. Close the bag, and tie it off as close to the opening as possible. Place the bag on a sunny slope so that the opening is on the downhill side slightly higher than the bag’s lowest point. Position the rock and surgical tubing at the lowest point in the bag. For best results, change the vegetation every two to three days. If using surgical tubing, simply untie the knot and drink the water that has condensed in the bag. If no tubing is used, loosen the tie and drain off the available liquid. Be sure to drain off all liquid prior to sunset each day, or it will be reabsorbed into the vegetation.
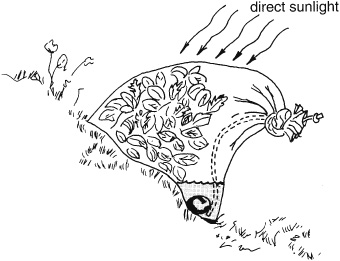
Vegetation bag.
Because the same vegetation can be reused after allowing enough time for it to rejuvenate, a transpiration bag is better than a vegetation bag. To construct a transpiration bag, you will need a clear plastic bag and an accessible, nonpoisonous brush or tree. A 4- to 6-foot section of surgical tubing is also helpful. Open the plastic bag and fill it with air to make it easier to place the bag over the brush or tree. Next place the bag over the lush leafy vegetation of a tree or brush, being careful not to puncture the bag. Be sure the bag is on the side of the tree or brush with the greatest exposure to the sun. Place a small rock or similar item into the bag’s lowest point, and if you have surgical tubing, place one end at the bottom of the bag next to the rock. Tie the other end in an overhand knot. Close the bag, and tie it off as close to the opening as possible. Change the bag’s location every two to three days to ensure optimal outcome and to allow the previous site to rejuvenate so it might be used again later. If using surgical tubing, simply untie the knot and drink the water that has condensed in the bag. If no tubing is used, loosen the tie, and drain off the available liquid. Be sure to drain off all liquid prior to sunset each day, or it will be reabsorbed into the tree or brush.
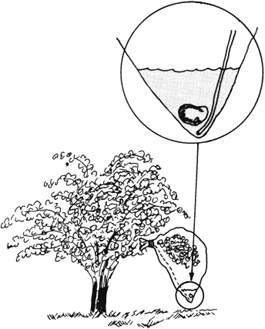
Transpiration bag.
Depending on your location, you may find an abundant source of water from vegetation. Plants and trees with hollow portions or leaves that overlap, such as air plants and bamboo, often collect rainwater in these natural receptacles. Other options include cacti, water vines, banana trees, and coconuts.
Cacti are prominent in the deserts of the Southwest and can provide a limited supply of liquid. To procure it, cut off the top of a cactus (this will be difficult without a large knife because the cactus has a tough outer rind), remove the inner pulp, and place it inside a porous material, such as a cotton T-shirt. The pulp’s moisture can now be easily wrung out directly into your mouth or an awaiting container. Since the amount of fluid obtained will be minimal, don’t eat the pulp. It will require more energy and body fluids to digest the pulp than can be gained from it.
Banana trees are common in the tropical rain forests and can be made into an almost unending water source by cutting them in half with a knife or machete, starting about 3 inches from the ground. Next, carve a bowl into the top surface of the trunk. Water will almost immediately fill the bowl, but do not drink it; the initial water will be bitter and upsetting to your stomach. Scoop the water completely out of the bowl three times before consuming.
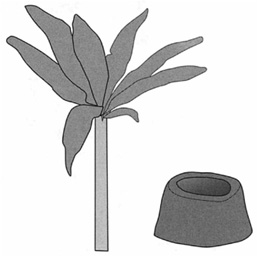
The initial water from a banana tree will be very bitter and should be avoided.
Water vines average from 1 to 6 inches in diameter, are relatively long, and usually grow along the ground and up the sides of trees. Not all water vines provide drinkable water. Avoid water vines that have a white sap when nicked, provide cloudy milklike liquid when cut, or produce liquids that taste sour or bitter. Nonpoisonous vines will provide a clear fluid that often has a woody or sweet taste. To collect the water, cut the top of the vine first and then cut the bottom, letting the liquid drain into an awaiting container. If you plan to drink it directly from the vine, avoid direct contact between your lips and the outer vine as an irritation sometimes results.
Green unripe coconuts about the size of grape-fruits provide an excellent source of water. Once coconuts mature, however, they contain an oil, which, if consumed in large quantities, can cause an upset stomach and diarrhea. If you do not have a knife, accessing the liquid in coconuts presents the greatest challenge.
Filtering water does not purify it. Filtering is done to reduce sediment and make the water taste better. There are several methods of filtering water.
This system is used for stagnant or swamp water. For best results, dig a hole approximately 3 feet from the swamp to a depth that allows water to begin seeping in. Line the sides with rocks or wood to prevent dirt or sand from falling back into the hole. Allow the water to sit overnight so that all the sediment can settle to the bottom.
This system should be used for filtering sediment from the water. To construct it, you’ll need three 7- to 8-foot-long wrist-diameter poles, line, three 3-foot-square sections of porous cloth, grass, sand, and charcoal.
1. Build a tripod with the poles and line by laying the poles down, side by side, and lashing them together 6 inches to 1 foot from the top. For details on lashing see chapter 13.
2. With the lashed end up, spread the legs of the poles out to form a stable tripod.
3. Tie the three sections of cloth to the tripod in a tiered fashion with a 6-inch to 1-foot space between each section.
4. Place grass on the top cloth, sand on the middle cloth, and charcoal on the bottom cloth.
5. To use, simply pour the water into the top section of cloth and collect it as it filters through the bottom section.
Any porous material can be used to filter out sediment by simply pouring your liquid through it and into a container.
According to the Centers for Disease Control (CDC), water contaminated with microorganisms will cause over 1 million illnesses and 1,000 deaths in the United States each year. The primary pathogens (disease-causing organisms) fall into three categories: protozoan (including cysts), bacteria, and viruses. Other potential risks that can be found in water include disinfectants and their by-products, inorganic chemicals, organic chemicals, and radionuclides. There are three basic methods for treating your water: boiling, chemical treatments, and commercial filtration systems.
To kill any disease-causing microorganisms that might be in your water, the Environmental Protection Agency’s (EPA) Office of Water advocates using a vigorous boil for one minute. My rational mind tells me that this must be based on science and should work. After seeing a friend lose about 40 pounds from a severe case of giardiasis, however, I tend to over-boil my water. As a general rule, I almost always boil it longer. I’ll let you decide what is right for you. Boiling is far superior to chemical treatments and should be done whenever possible.
When unable to boil your water, you may elect to use chlorine or iodine. These chemicals are effective against bacteria, viruses, and Giardia, but according to the EPA, there is some question about their ability to protect you against Cryptosporidium. In fact, the EPA advises against using chemicals to purify surface water. Once again, I’ll let you decide. Chlorine is preferred over iodine since it seems to offer better protection against Giardia. Both chlorine and iodine tend to be less effective in cold water.
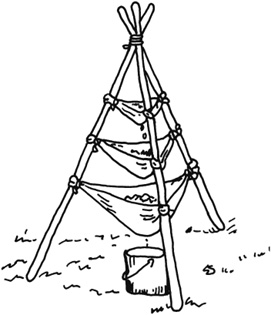
Three-tiered tripod.
The amount of chlorine to use for purifying water will depend upon the amount of available chlorine in the solution. This can usually be found on the label.
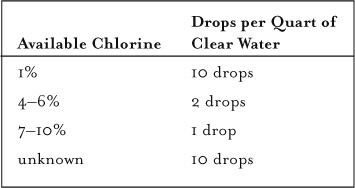
If the water is cloudy or colored, double the normal amount of chlorine required for the percentage used. Once the chlorine is added, wait three minutes, and then vigorously shake the water with the cap slightly loose (allowing some water to seep out through the seams). Then seal the cap on the container, and wait another twenty-five to thirty minutes before loosening the cap and shaking it again. At this point consider the water safe to consume, provided there is no Cryptosporidium in the water.
IODINE
There are two types of iodine that are commonly used to treat water: tincture and tablets. The tincture is nothing more than the common household iodine that you may have in your medical kit. This product is usually a 2 percent iodine solution, and you’ll need to add five drops to each quart of water. For cloudy water, double the amount. The treated water should be mixed and allowed to stand for thirty minutes before used. If using iodine tablets, you should place one tablet in each quart of water when it is warm and two tablets per quart when the water is cold or cloudy. Each bottle of iodine tablets should have instructions for how it should be mixed and how long you should wait before drinking the water. If no directions are available, wait three minutes, and then vigorously shake the water with the cap slightly loose (allowing some water to seep out through the seams). Then seal the cap on the container, and wait another twenty-five to thirty minutes before loosening the cap and shaking it again. At this point consider the water safe to consume, provided the water does not contain Cryptosporidium.
A filter is not a purifying system. In general, filters remove protozoan; microfilters remove protozoan and bacteria; and purifiers remove protozoan, bacteria, and viruses. Purifiers are simply a microfilter with an iodine and carbon element added. The iodine kills viruses, and the carbon element removes the iodine taste and reduces organic chemical contaminants like pesticides, herbicides, and chlorine, as well as heavy metals. Unlike filters, purifiers must be registered with the EPA to demonstrate effectiveness against waterborne pathogens, protozoan, bacteria, and viruses. A purifier costs more than a filter. You’ll need to decide what level of risk you are willing to take, as waterborne viruses are becoming more and more prominent. One downside is that a purifier tends to clog more quickly than most filters. To increase the longevity of your system, you should carefully read and follow the manufacturer’s guidelines on how to use and clean the system you have. Purifiers come in a pump style or a ready-to-drink bottle design.
PUMP PURIFIERS
There are many pump filters on the market, and new ones arrive each year. As a purifying system, they protect against protozoan, bacteria, and viruses. I advise choosing a system that is lightweight, easy to use, has a high output, and is self-cleaning.
BOTTLE PURIFIERS
Probably the best-known bottle filter is the 34-ounce Exstream Mackenzie, an ideal system for the wilderness traveler. As a purifying system, it protects against protozoan, bacteria, and viruses. The benefit of a bottle purifier is its ease of use—simply fill the bottle with water and start drinking (according to the manufacturer’s directions). It requires no assembly or extra space in your pack. On the downside, it only filters about 26 gallons (100 liters) before you’ll need to replace the cartridge, and unless you carry several, you will need to be in an area with multiple water sources throughout your travel.
—From Wilderness Survival
Linda Frederick Yaffe
The water fushing over rocks, shooting bubbly plumes into the air, forming blue pools, looks so clean, so inviting. Can you safely dip your cup into the clear blue pool and enjoy a refreshing drink?
Today, pollution from larger numbers of careless outdoorspeople and infected wildlife compel you to treat all of the water you drink, use to clean your teeth, and use to prepare your food. Never drink untreated water, no matter how “clean” it appears. Most of the surface water in the United States is contaminated with Giardia lamblia and Cryptosporidium. These disease-causing microorganisms are invisible to the naked eye. They can make you seriously ill, causing months of stomach cramps, diarrhea, nausea, dehydration, and fatigue. Cases of Giardia, the most common waterborne pathogen, have more than doubled in the United States during the past decade.
Giardia and Cryptosporidium are spread through fecal-oral transmission. They are passed from person to person and from domestic and wild animals to humans. You can avoid spreading these pathogens by using good field practices and common sense. Camp at least 200 feet from any water source. Properly bury your feces, pack out toilet paper, and always wash your hands thoroughly with soap and water after defecating or changing a diaper and before handling food. When scouting for a water source, use the best-looking one available. Avoid water that contains floating material or water with a dark color or an odor. Filter murky water through a clean cloth before treating it. …
Carry plenty of treated water from home. Always carry five to ten gallons of treated water from home in your vehicle. Pack in as much as you can comfortably carry and have plenty available in your vehicle when you pack out of the wilderness.
—From Backpack Gourmet
Linda Frederick Yaffe
Fortunately, you can choose from several effective drinking water treatment methods: boiling, filtering, purifying, ultraviolet purification, or chemical treatment (tablets). Choose the method or combination of methods that suit the locale of your trip, your style of camping for the trip, and your personal preference.
This is the most effective, fail-safe field treatment method. Vigorously boil untreated water for one to two minutes to kill the microorganisms that can make you ill.
Advantages: This is a very effective and inexpensive method. Anyone with a cooking pot, a stove and fuel, or the resources to build an open fire, can treat as much water as they need, anywhere in the world.
Disadvantages: Boiling all of your drinking water is inconvenient unless you are staying in a base camp. It is time and fuel consuming to boil quantities of water, and then let it cool enough to drink. While you are base-camped, it is feasible to spend the evenings boiling and filling containers with purified water, but it is a big chore. Boiled water, having lost oxygen in the process, tastes unpleasantly flat. Aeration (pouring the boiled water back and forth from one clean container to another) can improve the flat taste. Try letting the boiled water stand for several hours or overnight, or add a small pinch of salt to each quart of boiled water to improve the flavor. Since the taste of good mountain water is one of the attractions of a wilderness adventure, boiled water makes the trip less special.
Choose a modern microporous water filter to pump water from a groundwater source into your water container. Look for a filter that has an absolute pore size of one micron or less for protection from Cryptosporidium as well as Giardia.
Advantages: Cool, good-tasting treated water is available immediately. In areas of frequent surface water availability, the filter weighs far less than extra containers filled with clean water.
Disadvantages: Filters weigh from eleven to twenty-three ounces. They are costly. You need to clean filters regularly and periodically replace the filtering cartridges. Filters do not protect against waterborne viruses such as polio and hepatitis. Waterborne viruses are rare in North America but prevalent in some other parts of the world.
These are water filters with an added purifying device that forces the water through chlorine beads, killing most viruses as well as the Giardia and Cryptosporidium parasites.
Advantages: Worry-free water treatment.
Disadvantages: Purifiers are slightly heavier and more costly than regular water filters.
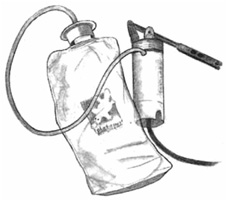
Water filter and bottle.
A portable battery-powered wand uses ultraviolet light to neutralize bacteria, viruses, and protozoa.
Advantages: The wand is fast and easy to use: Just swish the device around in a container of water. No pumping is required, and there are no chemical flavors.
Disadvantages: This technology is new to the backcountry. It is costly.
Tiny, lightweight tablets kill viruses in ground-water, but they do not effectively eliminate Giardia or Cryptosporidium.
Advantages: Convenient and lightweight, the tablets effectively kill waterborne viruses. They can be used as emergency substitutes only when you are unable to boil or filter your water. Potable Aqua treatment tablets, used with P.A. Plus, which is added twenty minutes after the first tablets, erase the unpleasant iodine taste of the initial tablets. The flavor can be further improved by letting the water stand for several hours or by adding powdered drink mix.
Disadvantages: Not as effective as boiling, filtering, purifying, or ultraviolet purification, tablets are an excellent supplement to filtering your water in parts of the world where viruses are a threat.
—From Backpack Gourmet
Greg Davenport
Packed water, which comes inside a pouch or a box, holds between ⅛ to 1 quart of water. USCG-approved packed water has a five-year shelf life. While emergency water is a great item to carry on your trip, you should also carry something that allows you to procure additional water once your emergency supply is gone. Be sure to protect the pouches and boxes of packed water so they aren’t accidentally punctured. Storing them inside a hard plastic 1-quart water bottle (big-mouthed screw top) will not only protect them but will provide a container that will come in handy for storing other water that you procure. An option to the packed water would be to bring along tap water inside the hard plastic 1-quart container. The shelf life for tap water is approximately six months.
One desalting tablet will desalt 1 pint of water. Salt water treated this way tastes like water obtained from a water hose that has set out in the sun all day. Desalting tablets come alone or in a kit. Kits have a plastic bag that holds about 1 pint of water and has a filter that will keep the sludge by-product from being drunk. To use, place seawater in the bag with the tablet, and wait one hour—agitating the water periodically—before drinking the water through the valve attached to the bag. If you don’t have a kit, follow the same process using an available container, and be sure not to drink the sludge left at the bottom.
A solar still uses seawater and the sun to create drinkable water through a condensation process. Most stills are inflatable balls that allow you to pour seawater into a cup on top of the bottom. The balloon has a donut-shaped ballast ring that keeps it afloat and upright. It takes about a ½ gallon of seawater to fill the ballast. Note that the ballast ring has a fabric-covered center that must be wet before the balloon can be inflated. Additional seawater is required to fill the cup on top of the balloon, and this water provides a constant drip onto multiple cloth wicks located inside the balloon. As the outside air warms, condensation forms on the inner wall and runs down into a plastic container. The use of a solar still is limited to calm seas, and results will depend on temperatures. When seas are calm, stills should be put out as soon as possible even if clouds obscure the sun. For complete details on how to use these devices, read the manufacturers’ directions.

Solar still.
Standard freshwater filters and purifiers will not desalt seawater and should not be used for this process. Instead, a reverse osmosis water maker that turns seawater into drinkable water should be part of your survival gear. These hand-powered devices range in weight from 2 to 7 pounds and can roughly produce 6 gallons of water a day, depending on the model you have. To use, simply place the hose of the device into seawater and pull the handle. To achieve the maximum amount of water output requires a pump rate of thirty to forty times a minute. Be sure to follow the manufacturer’s maintenance and use instructions, and have the system serviced accordingly.
Most life rafts have canopies designed to catch rainwater. This catchment system uses gutters to funnel rainwater into a storage container inside the raft. Since salt spray has probably dried on top of the canopy, the initial water collected will probably be too contaminated to drink. Lining the gutters, when it starts to rain, with a space blanket or similar material can alleviate this problem. Contamination can also be an issue in rough seas where the wind and waves constantly splash seawater onto the canopy and raft. You can also procure rainwater by tying a piece of plastic (a space blanket or similar item) to two paddles and holding it out the raft’s door in such a way as to funnel the rain into an awaiting container. Try to fill all available containers with rainwater, and drink this water before packaged water.
Although dew does not provide a large amount of water, it should not be overlooked as a source of water. Dew accumulates on the raft and canopy (on land, it can be found on grass, leaves, rocks, and equipment) at dawn and dusk and should be collected at those times before it freezes or evaporates. Any porous material will absorb the dew, and the moisture can be consumed by wringing the water out of the cloth and into your mouth.
As with snow, ice should be melted prior to consumption. To melt ice, add it to a partially full container of water and either shake the container or place it between layers of your clothing and allow your body’s radiant heat to melt the snow. On land, you can melt ice with a fire. If using sea ice, you will want to make sure the ice is virtually free of any salts in the seawater. Sea ice that has rounded corners, shatters easily, and is bluish or black in color is usually safe to use. When in doubt, however, do a taste test. If it tastes salty, don’t use it.
—From Surviving Coastal and Open Water
U.S. Army
The subject of man and water in the desert has generated considerable interest and confusion since the early days of World War II when the U.S. Army was preparing to fight in North Africa. At one time the U.S. Army thought it could condition men to do with less water by progressively reducing their water supplies during training. They called it water discipline. It caused hundreds of heat casualties.
A key factor in desert survival is understanding the relationship between physical activity, air temperature, and water consumption. The body requires a certain amount of water for a certain level of activity at a certain temperature. For example, a person performing hard work in the sun at 43 degrees C requires 19 liters of water daily. Lack of the required amount of water causes a rapid decline in an individual’s ability to make decisions and to perform tasks efficiently.
Your body’s normal temperature is 36.9 degrees C (98.6 degrees F). Your body gets rid of excess heat (cools off) by sweating. The warmer your body becomes—whether caused by work, exercise, or air temperature—the more you sweat. The more you sweat, the more moisture you lose. Sweating is the principal cause of water loss. If a person stops sweating during periods of high air temperature and heavy work or exercise, he will quickly develop heat stroke. This is an emergency that requires immediate medical attention.
Understanding how the air temperature and your physical activity affect your water requirements allows you to take measures to get the most from your water supply. These measures are—
• Find shade! Get out of the sun!
• Place something between you and the hot ground.
• Limit your movements!
• Conserve your sweat. Wear your complete uniform to include T-shirt. Roll the sleeves down, cover your head, and protect your neck with a scarf or similar item. These steps will protect your body from hot-blowing winds and the direct rays of the sun. Your clothing will absorb your sweat, keeping it against your skin so that you gain its full cooling effect. By staying in the shade quietly, fully clothed, not talking, keeping your mouth closed, and breathing through your nose, your water requirement for survival drops dramatically.
• If water is scarce, do not eat. Food requires water for digestion; therefore, eating food will use water that you need for cooling.
Thirst is not a reliable guide for your need for water. A person who uses thirst as a guide will drink only two-thirds of his daily water requirement. To prevent this “voluntary” dehydration, use the following guide:
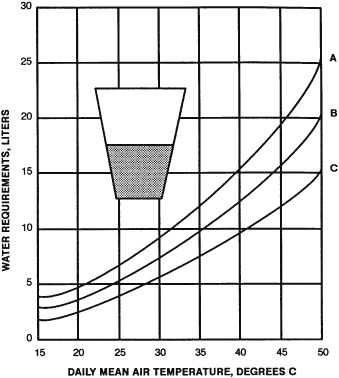
Daily water requirements for three levels of activity:
A: Hard work in sun (creeping and crawling with equipment on).
B: Moderate work in sun (cleaning weapons and equipment).
C: Rest in shade.
This graph shows water needs, in liters per day, for men at three activity levels in relation to the daily mean air temperature. For example, if one is doing 8 hours of hard work in the sun (curve A) when the average temperature for the day is 50 degrees C (horizontal scale), one’s water requirement for the day will be approximately 25 liters (vertical scale).
From Technical Report E-P118. Southwest Asia: Environment and Its Relationship to Military Activities. July 1959.
• At temperatures below 38 degrees C, drink 0.5 liter of water every hour.
• At temperatures above 38 degrees C, drink 1 liter of water every hour.
Drinking water at regular intervals helps your body remain cool and decreases sweating. Even when your water supply is low, sipping water constantly will keep your body cooler and reduce water loss through sweating. Conserve your fluids by reducing activity during the heat of day. Do not ration your water! If you try to ration water, you stand a good chance of becoming a heat casualty.
—From Survival (Field Manual 21-76)
Greg Davenport
In the desert, the lack of water plays a major role in survivability. It is an extremely valuable resource and is far more important than food. You can live anywhere from three weeks to two months without food, but only days without water. Thus you need to pack in enough water for at least one day, along with the necessary equipment to procure more. Check with the local authorities on accessible water related to your trip before departing. Don’t rely on someone who hasn’t been in the area recently or is giving you hearsay information. It’s better to adjust or delay your trip than to run out of water . . .
The importance of water in a hot environment cannot be overemphasized, and its availability—carried on you or otherwise—must be continually assessed during any trip into the desert.
The best storage container for your water is your body. If water becomes scarce, do not ration it. Instead, follow these basic guidelines to limit water loss from sweat:
• Work in the evening and morning, when temperatures are lower.
• During the day, rest in a shaded area.
• Wear protective clothing in a loose and layered fashion, with a wide-brimmed hat and neck covering. …
In hot environments, water may be difficult to find. Map indicators may be misleading, since most desert water is intermittent. Map markings that represent intermittent streams and springs are often relevant only after it has rained, and the windmills, tanks, and troughs shown may be broken down or dry. Understanding water indicators created by plants and trees, insects, birds, mammals, and the terrain will be helpful when trying to find water.
Plush green vegetation found at the base of a cliff or mountain may indicate a natural spring or underground source of water. Most deciduous trees require large amounts of water to survive and often indicate the presence of surface water or groundwater.
Drainages, valleys, and ground depressions are good water indicators and may hold surface water or groundwater, especially after a rain. Often springs can be found at the base of a plunge pool (dry waterfall) or the bend of a dry riverbed with lush green vegetation.
Since your body needs a constant supply of water, you’ll eventually need to procure water from Mother Nature. Various sources include surface water, groundwater, precipitation, and plants.
Surface water may be obtained from rivers, creeks, springs, basin lakes, and rock depressions. These sources may be found year-round, but in desert environments they typically are present only when there has been a recent rainfall. Most sources are stagnant or slow-moving and prone to contamination from protozoans, bacteria, and viruses. They should all be treated.
Rivers and Creeks
Rivers often support deciduous trees and other vegetation not otherwise found in a desert. When you spot an area with vegetation, especially plants or trees that run in a line, you should investigate—surface water might be there, too. Creeks, on the other hand, are often dry, and finding water there may be a difficult task. Look for areas of lush green vegetation, which is often found downstream and at the bend of a pool. Water may be on the surface here, or you might find groundwater by digging down 2 or 3 feet.
Springs
Springs occur when the water table crosses the ground’s surface and are often dependent on rains. In other words, if it hasn’t rained for some time, it is doubtful water will be present. It is hard to know where a spring will occur. However, they are often found in low-lying areas next to a hillside and support lush green vegetation.
Basin Lakes
Basin lakes occur where water is trapped without any means of escape. They can appear in low-lying areas or when intermittent creeks or rivers flow into an area that provides no exit. Water may or may not be present, depending on when the last rainfall was.
Rock Depressions
If there has been a recent rain, water is often trapped in rock depressions. This water is often stagnant, but it nevertheless is an option that should be considered in a desert climate. As with most water, it should be purified before consumed.
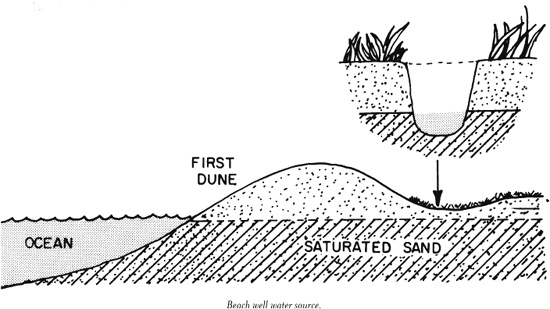
Groundwater is found under the earth’s surface. This water is naturally filtered as it moves through the ground and into underground reservoirs known as aquifers. Although treatment may not be necessary, always err on the side of caution. Locating groundwater is probably the most difficult part of accessing it. Look for things that seem out of place, such as a small area of lush green vegetation at the base of a hill or a bend in a dry riverbed that is surrounded by sparser green or even brown vegetation. A marshy area with a fair amount of cattail or hemlock growth may provide a clue that ground-water is available. I have found natural springs in desert areas and running water less than 6 feet below the earth’s surface using these clues. For ease of access, you can dig a small seepage basin well at the source, following the directions on page 176. If you are on a coastal desert, you can procure fresh water by digging such a well one dune inland from the beach.
The two forms of precipitation in a hot desert climate are occasional rain and dew. If it rains, set out containers or dig a small hole and line it with plastic or other nonporous material. After the rain has stopped, look for water in crevasses, fissures, and low-lying areas. If morning dew is present, use a porous cloth to absorb it, then wring out the moisture into your mouth.
Depending on the type of desert and time of year, you might be able to get some water from plants. Solar stills that collect moisture from plants in the form of condensation can provide some water in hot climates and should be considered. These include the vegetation bag and transpiration bag. Contrary to popular belief, most cacti (including the saguaro cacti) do not provide an unending water source when cut into. Often a moist pulp is present, and a small amount of water can be obtained by squeezing it inside a porous material.
Since water is often a scarce commodity in desert climates, mankind has derived multiple procurement, transport, and storage systems where it is found. These include windmills, storage tanks, pipelines, spring boxes, and man-made dams. Water from any source should be purified and, when appropriate, filtered.
A water pump windmill, still common in many rural areas of the United States, uses the energy from wind to draw water from underground. These machines have several obliquely angled blades mounted on a descending horizontal shaft and a fantail rudder that steers the blades into the wind. When the windmill’s blades turn, the energy is transmitted downward through a system of horizontal shafts and gears that operate a piston pump. These pumps use suction to transport water from underground to the earth’s surface. Windmills are also used to help move water through pipes from the source to another location. When wind velocities become excessive, safety devices automatically turn the rotor out of the wind to prevent damage to the mechanism.
If you come across a windmill, take the time to check it out. Although many have been abandoned, it may still provide a water source. However, don’t get your hopes up. Most active sites have signs that maintenance has occurred, and there may be grease on the moving parts, newer paint, or a storage area with modern tools. Is the windmill over the water source, or is it part of a transport system? If it appears to be the original pump, look for a storage tank. In either situation, look for a smaller water container that might be kept full in case the pump needs to be primed during maintenance. The windmill will not work if the brake is on, so check to see if it is on or off. When on, the windmill’s tail will be folded next to the fan, keeping it out of the wind. When off, the tail will be extended and cause the fan to turn into the wind. The brake lever is normally located at the base of the windmill. If a wind is present and you release the brake, an operational windmill should begin to work. If it doesn’t, look for a hand pump or consider turning the blades by hand. If you decide to climb the tower to manually turn the blades, survey it well beforehand. If you fall and get hurt, your situation will be worse. If the fan is rusted or rotates but nothing happens, try hitting the windmill’s shaft (not the casing) with a rock or similar object. Doing this might free it up from rust or dislodge a rock that is preventing it from working.
Storage tanks and pipelines can often be found next to windmills or other energy sources. These tanks and lines often have open and close valves, plugs, and spigots on the outlet pipe. If you can’t access the water via a spigot, you may have trouble getting it from a valve or plug source without a wrench. If all else fails and your survival is in question, try to break the line by whatever means you can.
A spring box is a natural spring with a rock or concrete box built around it. Usually the source is covered, with pipelines carrying the water to a storage system. Man-made dams are often created in creek beds and drainages where rain runoff can be collected.
—From Surviving the Desert

Water pump windmills are still common in many rural areas.
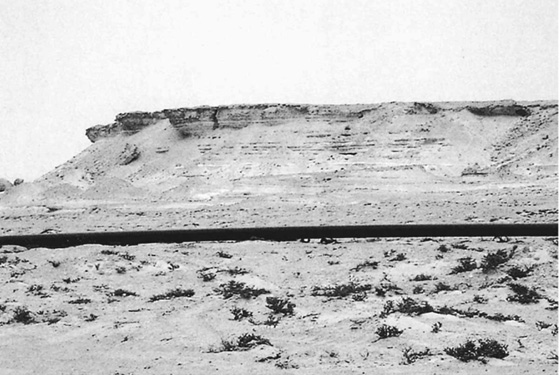
Pipelines can often be found next to windmills and are a potential water source.
U.S. Army
Vines with rough bark and shoots about 5 centimeters thick can be a useful source of water. You must learn by experience which are the water-bearing vines, because not all have drinkable water. Some may even have a poisonous sap. The poisonous ones yield a sticky, milky sap when cut. Nonpoisonous vines will give a clear fluid. Some vines cause a skin irritation on contact; therefore let the liquid drip into your mouth, rather than put your mouth to the vine. Preferably, use some type of container.
In Australia, the water tree, desert oak, and bloodwood have roots near the surface. Pry these roots out of the ground and cut them into 30-centimeter lengths. Remove the bark and suck out the moisture, or shave the root to a pulp and squeeze it over your mouth.
The buri, coconut, and nipa palms all contain a sugary fluid that is very good to drink. To obtain the liquid, bend a flowering stalk of one of these palms downward, and cut off its tip. If you cut a thin slice off the stalk every 12 hours, the flow will renew, making it possible to collect up to a liter per day. Nipa palm shoots grow from the base, so that you can work at ground level. On grown trees of other species, you may have to climb them to reach a flowering stalk. Milk from coconuts has a large water content, but may contain a strong laxative in ripe nuts. Drinking too much of this milk may cause you to lose more fluid than you drink.
Often it requires too much effort to dig for roots containing water. It may be easier to let a plant produce water for you in the form of condensation. Tying a clear plastic bag around a green leafy branch will cause water in the leaves to evaporate and condense in the bag. Placing cut vegetation in a plastic bag will also produce condensation. This is a solar still.
—From Surviving (Field Manual 21-76)
U.S. Army
Mountain water should never be assumed safe for consumption. Training in water discipline should be emphasized to ensure soldiers drink water only from approved sources. Fluids lost through respiration, perspiration, and urination must be replaced if the soldier is to operate efficiently.
Maintaining fluid balance is a major problem in mountain operations. The sense of thirst may be dulled by high elevations despite the greater threat of dehydration. Hyperventilation and the cool, dry atmosphere bring about a three- to four-fold increase in water loss by evaporation through the lungs. Hard work and overheating increase the perspiration rate. The soldier must make an effort to drink liquids even when he does not feel thirsty. One quart of water, or the equivalent, should be drunk every four hours; more should be drunk if the unit is conducting rigorous physical activity.
Even though water is abundant in most tropical environments, you may, as a survivor, have trouble finding it. If you do find water, it may not be safe to drink. Some of the many sources are vines, roots, palm trees, and condensation. You can sometimes follow animals to water. Often you can get nearly clear water from muddy streams or lakes by digging a hole in sandy soil about 1 meter from the bank. Water will seep into the hole. You must purify any water obtained in this manner.
Animals can often lead you to water. Most animals require water regularly. Grazing animals, such as deer, are usually never far from water and usually drink at dawn and dusk. Converging game trails often lead to water. Carnivores (meat eaters) are not reliable indicators of water. They get moisture from the animals they eat and can go without water for long periods.
Birds can sometimes also lead you to water. Grain eaters, such as finches and pigeons, are never far from water. They drink at dawn and dusk. When they fly straight and low, they are heading for water. When returning from water, they are full and will fly from tree to tree, resting frequently. Do not rely on water birds to lead you to water. They fly long distances without stopping. Hawks, eagles, and other birds of prey get liquids from their victims; you cannot use them as a water indicator.
Insects can be good indicators of water, especially bees. Bees seldom range more than 6 kilometers from their nests or hives. They usually will have a water source in this range. Ants need water. A column of ants marching up a tree is going to a small reservoir of trapped water. You find such reservoirs even in arid areas. Most flies stay within 100 meters of water, especially the European mason fly, easily recognized by its iridescent green body.
Human tracks will usually lead to a well, bore hole, or soak. Scrub or rocks may cover it to reduce evaporation. Replace the cover after use.
Plants such as vines, roots, and palm trees are good sources of water.
Three to six quarts of water each day should be consumed. About 75 percent of the human body is liquid. All chemical activities in the body occur in water solution, which assists in removing toxic wastes and in maintaining an even body temperature. A loss of two quarts of body fluid (2.5 percent of body weight) decreases physical efficiency by 25 percent, and a loss of 12 quarts (15 percent of body weight) is usually fatal. Salt lost by sweating should be replaced in meals to avoid a deficiency and subsequent cramping. Consuming the usual military rations (three meals a day) provides sufficient sodium replacement. Salt tablets are not necessary and may contribute to dehydration.
Even when water is plentiful, thirst should be satisfied in increments. Quickly drinking a large volume of water may actually slow the soldier. If he is hot and the water is cold, severe cramping may result. A basic rule is to drink small amounts often. Pure water should always be kept in reserve for first aid use. Emphasis must be place on the three rules of water discipline:
• Drink only treated water.
• Conserve water for drinking. Potable water in the mountains may be in short supply.
• Do not contaminate or pollute water sources.
Snow, mountain streams, springs, rain, and lakes provide good sources of water supply. Purification must be accomplished, however, no matter how clear the snow or water appears. Fruits, juices, and powdered beverages may supplement and encourage water intake (do not add these until the water has been treated since the purification tablets may not work). Soldiers cannot adjust permanently to a decreased water intake. If the water supply is insufficient, physical activity must be reduced. Any temporary deficiency should be replaced to maintain maximum performance.
All water that is to be consumed must be potable. Drinking water must be taken only from approved sources or purified to avoid disease or the possible use of polluted water. Melting snow into water requires an increased amount of fuel and should be planned accordingly. Nonpotable water must not be mistaken for drinking water. Water that is unfit to drink, but otherwise not dangerous, may be used for other purposes such as bathing. Soldiers must be trained to avoid wasting water. External cooling (pouring water over the head and chest) is a waste of water and inefficient means of cooling. Drinking water often is the best way to maintain a cool and functioning body.
Water is scarce above the timberline. After setting up a perimeter (patrol base, assembly area, defense), a watering party should be employed. After sundown, high mountain areas freeze, and snow and ice may be available for melting to provide water. In areas where water trickles off rocks, a shallow reservoir may be dug to collect water (after the sediment settles). Water should be treated with purification tablets (iodine tablets or calcium hypochlorite), or by boiling at least one to two minutes. Filtering with commercial water purification pumps can also be conducted. Solar stills may be erected if time and sunlight conditions permit. Water should be protected from freezing by storing it next to a soldier or by placing it in a sleeping bag at night. Water should be collected at midday when the sun thaw available.
—From Military Mountaineering (Field Manual 3–97.61)
U.S. Army
There are many sources of water in the arctic and subarctic. Your location and the season of the year will determine where and how you obtain water.
Water sources in arctic and subarctic regions are more sanitary than in other regions due to the climatic and environmental conditions. However, always purify the water before drinking it. During the summer months, the best natural sources of water are freshwater lakes, streams, ponds, rivers, and springs. Water from ponds or lakes may be slightly stagnant, but still usable. Running water in streams, rivers, and bubbling springs is usually fresh and suitable for drinking.
The brownish surface water found in a tundra during the summer is a good source of water. However, you may have to filter the water before purifying it.
You can melt freshwater ice and snow for water. Completely melt both before putting them in your mouth. Trying to melt ice or snow in your mouth takes away body heat and may cause internal cold injuries. If on or near pack ice in the sea, you can use old sea ice to melt for water. In time, sea ice loses its salinity. You can identify this ice by its rounded corners and bluish color.
You can use body heat to melt snow. Place the snow in a water bag and place the bag between your layers of clothing. This is a slow process, but you can use it on the move or when you have no fire.
Note: Do not waste fuel to melt ice or snow when drinkable water is available from other sources.
When ice is available, melt it, rather than snow. One cup of ice yields more water than one cup of snow. Ice also takes less time to melt. You can melt ice or snow in a water bag, MRE ration bag, tin can, or improvised container by placing the container near a fire. Begin with a small amount of ice or snow in the container and, as it turns to water, add more ice or snow.
Another way to melt ice or snow is by putting it in a bag made from porous material and suspending the bag near the fire. Place a container under the bag to catch the water.
During cold weather, avoid drinking a lot of liquid before going to bed. Crawling out of a warm sleeping bag at night to relieve yourself means less rest and more exposure to the cold.
Once you have water, keep it next to you to prevent refreezing. Also, do not fill your canteen completely. Allowing the water to slosh around will help keep it from freezing.
—From Survival (Field Manual 21–76)
U.S. Army
In cold regions, as elsewhere, the body will not operate efficiently without adequate water. Dehydration, with its accompanying loss of efficiency, can be prevented by taking fluids with all meals, and between meals if possible. Hot drinks are preferable to cold drinks in low temperatures since they warm the body in addition to providing needed liquids. Alcoholic beverages should not be consumed during cold weather operations since they can actually produce a more rapid heat loss by the body.
Water is plentiful in most cold regions in one form or another. Potential sources are streams, lakes and ponds, glaciers, freshwater ice, and last year’s sea ice. Freshly frozen sea ice is salty, but year-old sea ice has had the salt leached out. It is well to test freshly frozen ice when looking for water. In some areas, where tidal action and currents are small, there is a layer of fresh water lying on top of the ice; the lower layers still contain salt. In some cases, this layer of fresh water may be 50 to 100 cm (20” to 40”) in depth.
If possible, water should be obtained from running streams or lakes rather than by melting ice or snow. Melting ice or snow to obtain water is a slow process and consumes large quantities of fuel, 17 cubic inches of uncompacted snow, when melted, yields only 1 cubic inch of water. In winter a hole may be cut through the ice of a stream or lake to get water; the hole is then covered with snowblocks or a poncho, board, or a ration box placed over it. Loose snow is piled on top to provide insulation and prevent refreezing. In extremely cold weather, the waterhole should be broken open at frequent intervals. Waterholes should be marked with a stick or other marker which will not be covered by drifting snow. Water is abundant during the summer in lakes, ponds, or rivers. The milky water of a glacial stream is not harmful. It should stand in a container until the coarser sediment settles.
In winter or summer, water obtained from ponds, lakes and streams must be purified by chemical treatment, use of iodine tablets or in emergencies by boiling.
When water is not available from other sources, it must be obtained by melting snow or ice. To conserve fuel, ice is preferable when available; if snow must be used, the most compact snow in the area should be obtained. Snow should be gathered only from areas that have not been contaminated by animals, humans, or toxic agents.
Ice sources are frozen lakes, rivers, ponds, glaciers, icebergs, or old sea ice. Old sea ice is rounded where broken and is likely to be pitted and to have pools on it. Its underwater part has a bluish appearance. Fresh sea ice has a milky appearance and is angular in shape when broken. Water obtained by melting snow or ice may be purified by use of water purification tablets, providing it has not been contaminated by toxic agents.
Burning the bottom of a pot used for melting snow can be avoided by “priming.” Place a small quantity of water in the pot and add snow gradually. If water is not available, the pot should be held near the source of heat and a small quantity of snow melted in the bottom before filling it with snow.
The snow should be compacted in the melting pot and stirred occasionally to prevent burning the bottom of the pot.
Pots of snow or ice should be left on the stove when not being used for cooking so as to have water available when needed.
Snow or ice to be melted should be placed just outside the shelter and brought in as needed.
In an emergency, an inflated air mattress can be used to obtain water. The mattress is placed in the sun at a slight inclined angle. The mattress, because of its dark color, will be warmed by the sun. Light, fluffy snow thrown on this warm surface will melt and run down the creases of the mattress where it may be caught in a canteen cup or other suitable container.
—From Basic Cold Weather Manual (Field Manual 31–70)
Buck Tilton and John Gookin
Subfreezing temperatures present an immediate problem for winter campers: natural water sources may become natural ice sources instead. Finding water in liquid form, either running or pooling, is a great reason to camp in a certain spot, or at least to stop and fill your water containers. It’s easier and faster than melting snow, and it conserves petroleum products by saving you the burden of carrying extra fuel. Some streams are year-round sources of running water. Intermittent streams are usually dry or frozen in winter. Lakes are always liquid somewhere underneath the snow and ice. So, in the depths of winter, you’ll need to carry a tool for breaking through ice to reach water. You can use an ice ax, but a good ice chisel is easier and faster. In early winter, you may find open water or thin ice at the inlets or outlets of lakes. In late winter, many frozen lakes have “overflow” on them—water on the surface that has seeped up from cracks in the old ice.
Taking water from a natural source in winter creates the potential for injury. You might slip, slide, or otherwise fall in. When streamside snowbanks are deep, dig into the snow to install a ramp to the water’s edge. The ramp makes getting water safer and easier. Don’t venture onto the surface of frozen lakes or rivers without a considerable amount of discriminating caution.
Melting snow for water—always time-consuming and fuel-inefficient—is often your only option. There are bad ways and good ways to do it, however. Bad ways scorch the snow (actually the dust and other particulate matter in the snow), the pot, or both, and the taste of the water you make is startlingly unappealing. A good way is to start with a little water in the pot (using a large pot saves time). If you have no water at all, start with a little snow in the pot and stir it rapidly, over low heat, until it melts. Then add snow as it fits. Putting a lid on the pot speeds up the melting process. A small shovel makes your “water factory” more efficient, but you can also scoop snow with pots, your gloved hands, or whatever works. Soft, fluffy snow is beautiful but low in water content. Heavy, dense, icy snow has the most water. [NOLS Tip, see box at left]
It’s a good idea to make sufficient water for the evening, plus enough to get started the next morning. In fact, it’s wise to make all the water you can store before going to bed at night, filling your pots and water bottles. It’s inefficient to make water in the morning. Besides, a winter evening is almost always warmer than a winter dawn.
You don’t need to disinfect melted snow, if you choose your snow with care. Avoid any color but white, and pay attention—as you dig down into clean snow, you might hit a dirty layer.
A second challenge faced by winter campers is keeping water warm enough to stay a fluid. Some people sleep with their water bottles. This is fine, as long as the lids are screwed on tightly. If it’s not screaming cold, a well-insulated bottle of water will not freeze in your tent at night.
Water can also be stored in camp by burying containers in snow. Use wide-mouthed containers, since those with narrow mouths freeze up faster and thaw more slowly. Snow is a wonderful insulator: under a foot of snow, a pot of water will remain mostly unfrozen, even if the temperature dips to minus 40. Take care to seal the hole well with snow to keep cold air out. Store water bottles with the top down, so that if a bit of ice forms on the top—which is now the bottom—the bottles will not be frozen shut. Mark the burial site, just in case it snows.
Any insulation, even just a little, extends the time water will stay a fluid. Water placed near your body inside your pack usually gets enough heat from you to prevent freezing. Storing water in your pack wrapped in extra clothing, especially a good insulator such as fleece, gives you a lot more time before freezing starts—the exact amount of time depends on the ambient air temperature.
It takes about an hour to thaw a liter water bottle that has frozen solid. Therefore, the best advice is to do everything necessary to prevent your water bottle from freezing. If you fail, follow these directions:
1. Place the frozen water bottle upside down in a pot of boiling water until you can get the lid off.
2. Remove the lid and pour a little hot water into the bottle.
3. When a little ice has melted, pour that water into the pot to reheat.
4. Repeat the process until the ice is gone.
5. Use the hot water in the pot to make hot drinks.
—From NOLS Winter Camping
Greg Davenport
An ideal water container will hold a minimum of 1 quart. It should have a wide mouth, which allows for easier filling. The best storage container, of course, is the survivor.
It sometimes becomes necessary to improvise containers in which to store water. You can use such things as plastic bags, cooking pots or pans, hollowed-out pieces of wood, ponchos (must use ingenuity to create a pouch), or nonlubricated and nonspermicidal condoms (these will work provided they are placed in a scarf or other forming structure). Don’t limit yourself. Anything that doesn’t leak can hold water.
There is nothing worse than waking up with a frozen water bottle. Make sure you store your water in a way that keeps it liquid and allows you to remove the cap and continue using the container. If this can’t be done and there is a replacement supply of water available, empty the container each night and leave the cap off. If water is scarce, store it in a sealed container between the layers of your bedding (make sure it doesn’t leak), or place it in a snow refrigerator. A snow refrigerator can be made by digging a 2-foot-square section 3 feet into the side of a snow bank, placing the water container inside, and then covering the outside opening with a foot-wide piece of snow. Make sure to loosen the water container caps, and place them inside the hole in an upright position.
If water is in short supply, ration your sweat, not the water. In addition, don’t eat unless you have water, limit your daytime physical activity, and try to work or travel at dawn and dusk.
—From Wilderness Survival
U.S. Army
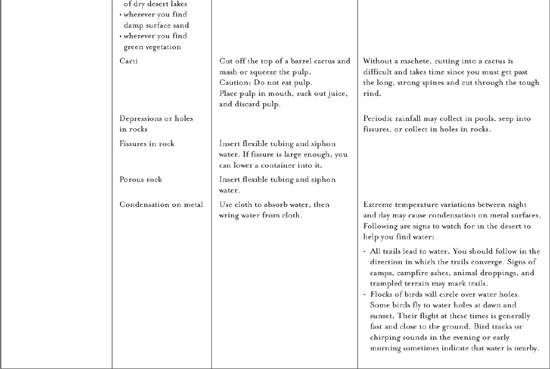
Almost any environment has water present to some degree. [The following chart] lists possible sources of water in various environments. It also provides information on how to make the water potable.
Note: If you do not have a canteen, a cup, a can, or other type of container, improvise one from plastic or water-resistant cloth. Shape the plastic or cloth into a bowl by pleating it. Use pins or other suitable items—even your hands—to hold the pleats.
If you do not have a reliable source to replenish your water supply, stay alert for ways in which your environment can help you.
Heavy dew can provide water. Tie rags or tufts of fine grass around your ankles and walk through dew-covered grass before sunrise. As the rags or grass tufts absorb the dew, wring the water into a container. Repeat the process until you have a supply of water or until the dew is gone. Australian natives sometimes mop up as much as a liter an hour this way.
Bees or ants going into a hole in a tree may point to a water-filled hole. Siphon the water with plastic tubing or scoop it up with an improvised dipper. You can also stuff cloth in the hole to absorb the water and then wring it from the cloth.
Water sometimes gathers in tree crotches or rock crevices. Use the above procedures to get the water. In arid areas, bird droppings around a crack in the rocks may indicate water in or near the crack.
Green bamboo thickets are an excellent source of fresh water. Water from green bamboo is clear and odorless. To get the water, bend a green bamboo stalk, tie it down, and cut off the top. The water will drip freely during the night. Old, cracked bamboo may contain water.
Wherever you find banana or plantain trees, you can get water. Cut down the tree, leaving about a 30-centimeter stump, and scoop out the center of the stump so that the hollow is bowl-shaped. Water from the roots will immediately start to fill the hollow. The first three fillings of water will be bitter, but succeeding fillings will be palatable. The stump will supply water for up to four days. Be sure to cover it to keep out insects.
Some tropical vines can give you water. Cut a notch in the vine as high as you can reach, then cut the vine off close to the ground. Catch the dropping liquid in a container or in your mouth.
The milk from green (unripe) coconuts is a good thirst quencher. However, the milk from mature coconuts contains an oil that acts as a laxative. Drink in moderation only.
In the American tropics you may find large trees whose branches support air plants. These air plants may hold a considerable amount of rainwater in their overlapping, thickly growing leaves. Strain the water through a cloth to remove insects and debris.
You can get water from plants with moist pulpy centers. Cut off a section of the plant and squeeze or smash the pulp so that the moisture runs out. Catch the liquid in a container.
Plant roots may provide water. Dig or pry the roots out of the ground, cut them into short pieces, and smash the pulp so that the moisture runs out. Catch the liquid in a container.
Fleshy leaves, stems, or stalks, such as bamboo, contain water. Cut or notch the stalks at the base of a joint to drain out the liquid.
The following trees can also provide water:
• Palms. Palms, such as the buri, coconut, sugar, rattan, and nipa, contain liquid. Bruise a lower frond and pull it down so the tree will “bleed” at the injury.
• Traveler’s tree. Found in Madagascar, this tree has a cuplike sheath at the base of its leaves in which water collects.
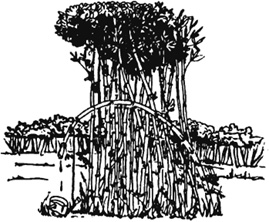
Water from green bamboo.
• Umbrella tree. The leaf bases and roots of this tree of western tropical Africa can provide water.
• Baobab tree. This tree of the sandy plains of northern Australia and Africa collects water in its bottlelike trunk during the wet season. Frequently, you can find clear, fresh water in these trees after weeks of dry weather.
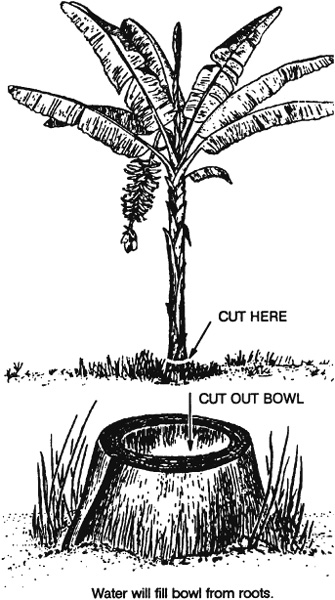
Water from plantain or banana tree stump.
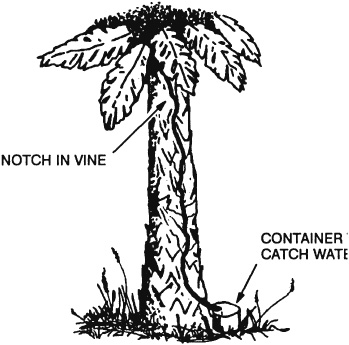
Water from a vine.
You can use stills in various areas of the world. They draw moisture from the ground and from plant material. You need certain materials to build a still, and you need time to let it collect the water. It takes about 24 hours to get 0.5 to 1 liter of water.
To make the aboveground still, you need a sunny slope on which to place the still, a clear plastic bag, green leafy vegetation, and a small rock. To make the still—
• Fill the bag with air by turning the opening into the breeze or by “scooping” air into the bag.
• Fill the plastic bag half to three-fourths full of green leafy vegetation. Be sure to remove all hard sticks or sharp spines that might puncture the bag.
• Place a small rock or similar item in the bag.
• Close the bag and tie the mouth securely as close to the end of the bag as possible to keep the maximum amount of air space. If you have a piece of tubing, a small straw, or a hollow reed, insert one end in the mouth of the bag before you tie it securely. Then tie off or plug the tubing so that air will not escape. This tubing will allow you to drain out condensed water without untying the bag.
• Place the bag, mouth downhill, on a slope in full sunlight. Position the mouth of the bag slightly higher than the low point in the bag.
• Settle the bag in place so that the rock works itself into the low point in the bag.
To get the condensed water from the still, loosen the tie around the bag’s mouth and tip the bag so that the water collected around the rock will drain out. Then retie the mouth securely and reposition the still to allow further condensation.
Change the vegetation in the bag after extracting most of the water from it. This will ensure maximum output of water.
To make a belowground still, you need a digging tool, a container, a clear plastic sheet, a drinking tube, and a rock. Select a site where you believe the soil will contain moisture (such as a dry stream bed or a low spot where rainwater has collected). The soil at this site should be easy to dig, and sunlight must hit the site most of the day. To construct the still—
• Dig a bowl-shaped hole about 1 meter across and 60 centimeters deep.
• Dig a sump in the center of the hole. The sump’s depth and perimeter will depend on the size of the container that you have to place in it. The bottom of the sump should allow the container to stand upright.
• Anchor the tubing to the container’s bottom by forming a loose overhand knot in the tubing.
• Place the container upright in the sump.
• Extend the unanchored end of the tubing up, over, and beyond the lip of the hole.
• Place the plastic sheet over the hole, covering its edges with soil to hold it in place.
• Place a rock in the center of the plastic sheet.
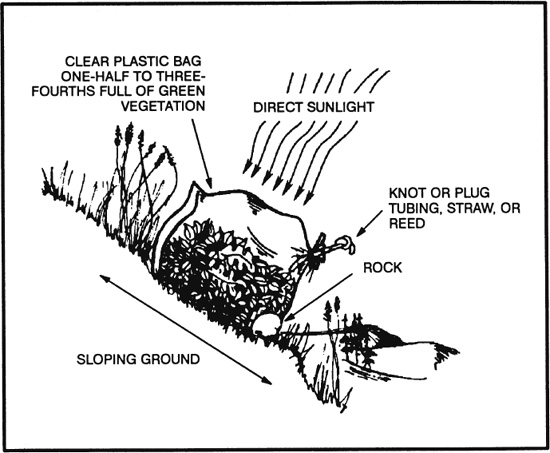
Aboveground solar water still.
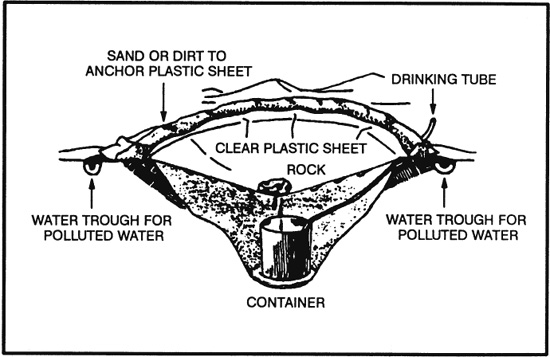
Belowground still to get potable water from polluted water.
• Lower the plastic sheet into the hole until it is about 40 centimeters below ground level. It now forms an inverted cone with the rock at its apex. Make sure that the cone’s apex is directly over your container. Also make sure the plastic cone does not touch the sides of the hole because the earth will absorb the condensed water.
• Put more soil on the edges of the plastic to hold it securely in place and to prevent the loss of moisture.
• Plug the tube when not in use so that the moisture will not evaporate.
You can drink water without disturbing the still by using the tube as a straw.
You may want to use plants in the hole as moisture source. If so, dig out additional soil from the sides of the hole to form a slope on which to place the plants. Then proceed as above.
If polluted water is your only moisture source, dig a small trough outside the hole about 25 centimeters from the still’s lip. Dig the trough about 25 centimeters deep and 8 centimeters wide. Pour the polluted water in the trough. Be sure you do not spill any polluted water around the rim of the hole where the plastic sheet touches the soil. The trough holds the polluted water and the soil filters it as the still draws it. The water then condenses on the plastic and drains into the container. This process works extremely well when your only water source is salt water.
You will need at least three stills to meet your individual daily water intake needs.
Rainwater collected in clean containers or in plants is usually safe for drinking. However, purify water from lakes, ponds, swamps, springs, or streams, especially the water near human settlements or in the tropics. When possible, purify all water you got from vegetation or from the ground by using iodine or chlorine, or by boiling.
Purify water by—
• Using water purification tablets. (Follow the directions provided.)
• Placing 5 drops of 2 percent tincture of iodine in a canteen full of clear water. If the canteen is full of cloudy or cold water, use 10 drops. (Let the canteen of water stand for 30 minutes before drinking.)
• Boiling water for 1 minute at sea level, adding 1 minute for each additional 300 meters above sea level, or boil for 10 minutes no matter where you are.
By drinking nonpotable water you may contract diseases or swallow organisms that can harm you. Examples of such diseases or organisms are—
• Dysentery. Severe, prolonged diarrhea with bloody stools, fever, and weakness.
• Cholera and typhoid. You may be susceptible to these diseases regardless of inoculations.
Belowground still.
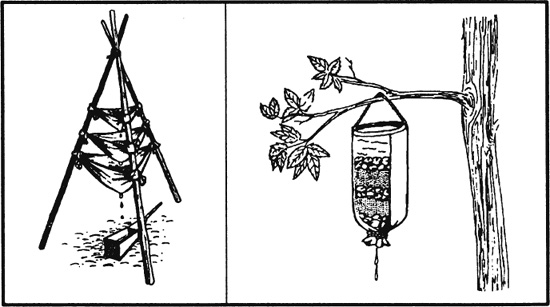
Water filtering systems.
• Flukes. Stagnant, polluted water—especially in tropical areas—often contains blood flukes. If you swallow flukes, they will bore into the bloodstream, live as parasites, and cause disease.
• Leeches. If you swallow a leech, it can hook onto the throat passage or inside the nose. It will suck blood, create a wound, and move to another area. Each bleeding wound may become infected.
If the water you find is also muddy, stagnant, and foul smelling, you can clear the water—
• By placing it in a container and letting it stand for 12 hours.
• By pouring it through a filtering system.
Note: These procedures only clear the water and make it more palatable. You will have to purify it.
To make a filtering system, place several centimeters or layers of filtering material such as sand, crushed rock, charcoal, or cloth in bamboo, a hollow log, or an article of clothing. Remove the odor from water by adding charcoal from your fire. Let the water stand for 45 minutes before drinking it.
—From Survival (Field Manual 21–76)