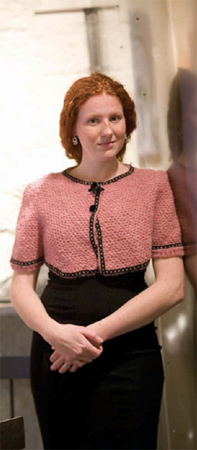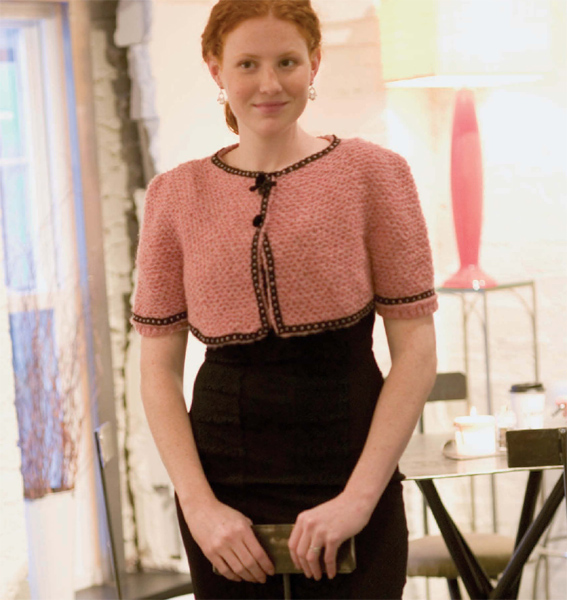
There’s no rule that says that a wrap has to have a loose fit. In this capelet-cum-jacket, Mari Lynn Patrick works a circular piece from the bottom up, then uses the simplest detail—narrow “cuffs” at the lower edge—to transform the cape into a classically feminine, fitted “jacket.” Mari Lynn has worked the body in a frothy slip-stitch pattern, trimmed it with a commercial velvet ribbon, and finished it with two buttons and a tiny bow at the neck.
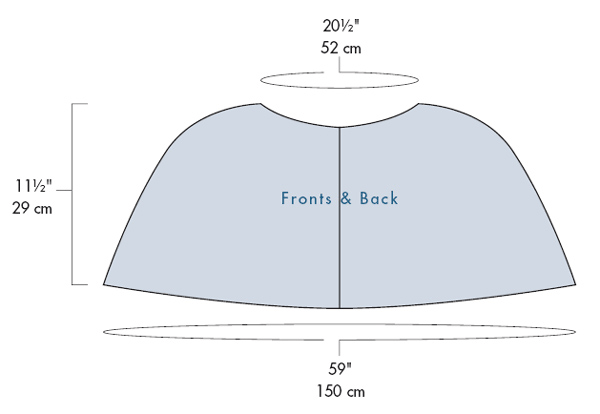
59" (150 cm) circumference at lower edge, 20½" (52 cm) circumference at neck edge, and 11½" (29 cm) long.
About 560 yd (512 m) of chunky-weight (Bulky #5) yarn.
We used: Crystal Place Merino Frappe (80% wool, 20% nylon; 140 yd [128 m]/50 g): #029B new sorbet (pink), 4 balls.
Size 10 (6 mm): 24" (60-cm) circular (cir). Size 8 (5 mm): straight. Adjust needle size if necessary to obtain the correct gauge.
Markers (m); tapestry needle; size I/9 (5.5 mm) crochet hook; 3 yd (3 meter) ⅜" (1-cm) wide black stretch lace trim; 12" (30.5 cm) ¼" (6-mm) wide black velvet ribbon for bow; two ¾" (2-cm) black velvet buttons; sewing pins; sharp-pointed sewing needle and black sewing thread.
19 sts and 29 rows = 4" (10 cm) in stamen st patt on larger needle.
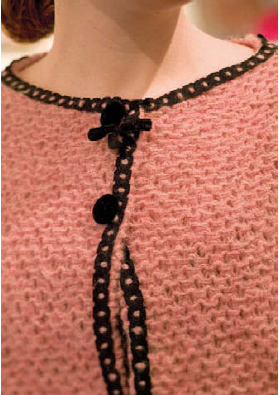
Stamen Stitch Pattern: (even number of sts)
Rows 1 and 3: (RS) Knit.
Row 2: *K1, sl 1 purlwise (pwise) with yarn in back (wyb); rep from * to last 2 sts, k2.
Row 4: K2, *sl 1 pwise wyb, k1; rep from *.
Repeat Rows 1–4 for pattern.
With larger cir needle, CO 280 sts. Do not join.
Row 1: (RS, Row 1 of patt) K20, [place marker (pm), k40] 6 times, pm, k20. Slip markers every row.
Rows 2–8: Work Rows 2–4 of stamen st patt (see Stitch Guide) once, then work Rows 1–4 of patt once more.
Row 9: (Row 1 of patt) [Knit to 3 sts before m, sl 1, k2tog, psso, slip marker (sl m)] 7 times, knit to end—266 sts rem.
Rows 10–16: Work 7 rows even in patt.
Row 17: (Row 1 of patt) [Knit to m, sl m, sl 1, k2tog, psso] 7 times, knit to end—252 sts rem.
Rows 18–24: Work 7 rows even in patt.
Row 25: Rep Row 9—238 sts rem.
Rows 26–32: Work 7 rows even in patt.
Row 33: Rep Row 17—224 sts rem.
Rows 34–40: Work 7 rows even in patt.
Row 41: Rep Row 9—210 sts rem.
Rows 42–48: Work 7 rows even in patt.
Row 49: Rep Row 17—196 sts rem.
Rows 50–52: Work 3 rows even in patt.
Row 53: (buttonhole row, Row 1 of patt) K3, BO 1 st, knit to end.
Row 54: (Row 2 of patt) Work in patt to gap formed by BO on previous row, use the backward loop method (see Glossary, page 146) to CO 1 st over gap to complete buttonhole, work in patt to end.
Rows 55 and 56: Work 2 rows even in patt.
Row 57: Rep Row 9—182 sts rem.
Rows 58–64: Work 7 rows even in patt.
Row 65: Rep Row 17—168 sts rem.
Row 66: (Row 2 of patt) Work even in patt, removing all markers—piece should measure about 9¼" (23.5 cm) from CO.
Shape shoulders:
Row 67: (Row 3 of patt) K41, sl 1, k2tog, psso, pm for shoulder, sl 1, k2tog, psso, k74, sl 1, k2tog, psso, pm for other shoulder, sl 1, k2tog, psso, k41—160 sts rem.
Row 68: Work even in patt.
Row 69: (Row 1 of patt) *Knit to 3 sts before shoulder m, sl 1, k2tog, psso, sl m, sl 1, k2tog, psso; rep from * once more, knit to end—152 sts rem.
Row 70: Work even in patt.
Row 71: Rep Row 69—144 sts rem.
Row 72: Work even in patt.
Row 73: (buttonhole row; Row 1 of patt) K3, BO 1 st, * knit to 3 sts before m, sl 1, k2tog, psso, sl m, sl 1, k2tog, psso; rep from * once more, knit to end—135 sts rem.
Row 74: (Row 2 of patt) Work in patt to gap formed by BO on previous row, use the backward loop method to CO 1 st over gap to complete buttonhole, work in patt to end—136 sts.
Row 75: Rep Row 69—128 sts rem.
Shape front neck:
Row 76: (Row 4 of patt) BO 6 sts, work in patt to end—122 sts rem.
Row 77: BO 6 sts, *knit to 3 sts before m, sl 1, k2tog, psso, sl m, sl 1, k2tog, psso; rep from * once more, knit to end—108 sts rem.
Rows 78–83: Rep Rows 76 and 77 three more times—48 sts rem.
BO all sts kwise.
Think “outside the box” to come up with innovative designs.
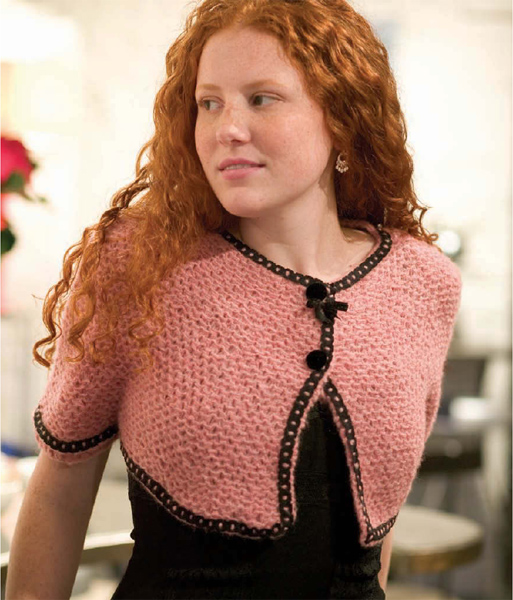
Do not block or press. With crochet hook and RS facing, work 1 row of single crochet (see Glossary, page 149) around neck opening, inserting the hook into the second row down from the BO edge into the “eyes” of the last row of slipped sts. Beg at lower right front corner, pin stretch lace trim to fit around the lower edge, up the left front opening, around the neck, and down the right front opening, mitering the corners at top and bottom of front openings. With yarn threaded on a tapestry needle, sew lace trim to capelet, stitching in and out of holes in trim to create a decorative effect. Cut yarn and fasten securely. With yarn threaded on tapestry needle, sew buttons to left front opposite buttonholes. Fold velvet ribbon into a small bow, and use sewing needle and thread to sew bow to right front just below top buttonhole.
Cuffs: Measure about 10" (25.5 cm) from center front opening along lower edge of cape at each side and mark with waste yarn or safety pin. Measure 12" (30.5 cm) beyond each marker and place another marker. *With smaller needles and WS facing, working into the purl ridge one row from the CO edge (not into the CO edge itself), pick up and knit 51 sts between one pair of markers. Work k1, p1 rib for 2 rows. BO all sts in rib. Rep between other pair of markers for second cuff. Sew short edges of each cuff tog. Weave in loose ends.
