Chapter 8. Working with Files in iCloud
In this chapter, we’ll discuss working with documents in iCloud on iOS. File management in iOS is handled by the apps themselves, rather than by a system-provided app like the Finder. As a result, we need to take care of tasks like providing a list of all available files to the user, opening the files, and saving changes.
This means that, when you work with documents in iOS, you need to do quite a bit more work. While you still have built-in automatic saving, you need to manually open and close documents; additionally, because bindings don’t exist on iOS, you need to manually update the contents of the document object whenever the user provides input.
We’ll start by listing whatever’s already in iCloud, to demonstrate that we’ve got access to the same container as the Mac app and also to provide what will eventually become the user interface for opening these documents; next, we’ll implement the Document class, which is the iOS counterpart of the Mac app’s Document class. Finally, we’ll add support for creating new documents.
The App Sandbox
Apps on iOS are extremely limited in terms of the files that they’re allowed to access. Any app that you install via the App Store—which means any third-party app—is sandboxed: the system will only permit it to read and write files in a single folder. This keeps any other app from reaching into the app’s files and prevents your app from poking around the user’s other files. The goal is to preserve user privacy: if apps can’t get into files they shouldn’t, it becomes a lot less likely for the user’s data to be breached by a malicious app.
When installed, apps are placed inside a directory with a predefined structure that looks like Figure 8-1.
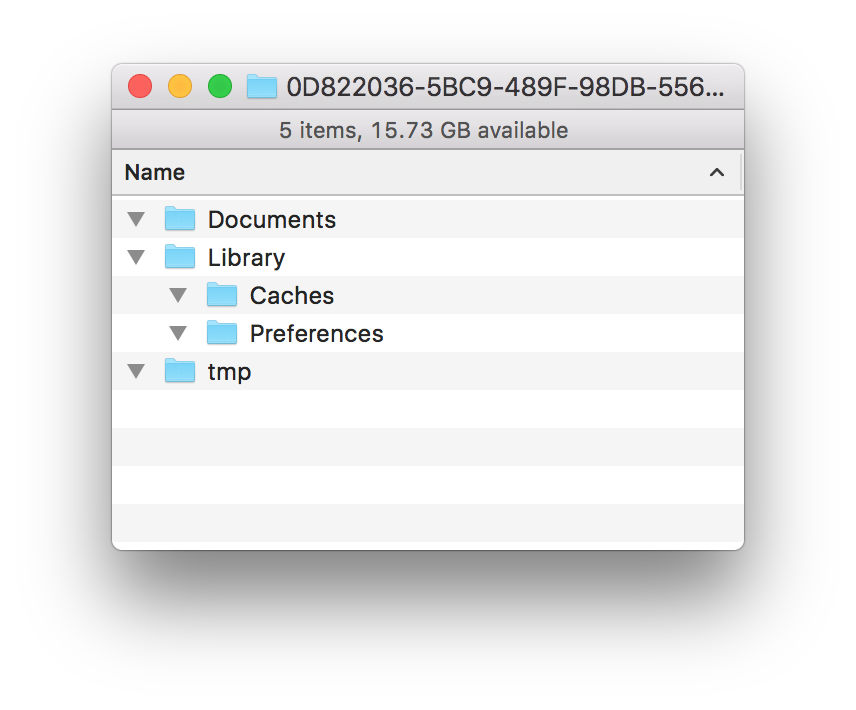
Figure 8-1. An empty application sandbox
The different folders that exist in the sandbox have special meaning to iOS:
-
The Documents folder contains documents created by the user. Everything inside this folder is backed up to iCloud or to the user’s computer if iCloud backups are disabled.
-
The Library folder contains files that the app uses to operate. It has two subfolders:
-
The Preferences folder contains the user preferences, which are accessed via the
NSUserDefaultsclass (more on this class later in this chapter!). These files are included in the backup. -
The Caches folder stores data that the app stores locally to improve performance. This includes things like resources downloaded from the Internet or files that can otherwise be regenerated if needed. These files are not included in the backup, and the system will delete the contents of the Caches folder when it begins to run low on storage space.
-
-
The tmp folder is a temporary storage area that gives users a place to store files that they only need for a moment. This folder is not included in the backup; additionally, the system reserves the right to delete the contents of this folder at any time.
The sandbox also includes the iCloud container, which is a folder stored on disk. However, the specific location of the iCloud container is irrelevant to you as the developer, since you don’t actually use the built-in filesystem management tools to work with it. Instead, as you’ll see as we implement the application, you treat the whole thing as a separate layer of abstraction.
iCloud Availability
When you’re writing an application, you can never assume that your app will always have access to iCloud. For example, consider the following scenarios:
-
Your app is downloaded, but the user has no iCloud account.
-
The user has an iCloud account, and is using your app to store documents in iCloud, but later signs out of the account.
-
The user starts with no iCloud account, but later signs into iCloud.
Apps that use iCloud aren’t allowed to rely on access to iCloud. If you’re making an app, you’re required to let users decline to store their files in iCloud; if they do, their files have to be stored locally.
This means that any code that works with files needs to work with both files saved locally and files saved inside iCloud. For this reason, we strongly recommend that you never store data both in iCloud and locally at the same time; for one reason, users should never care about the details of where the files they’re looking at are stored (they should just be “on the phone”), and for another, you don’t want to have to keep track of which file is local and which is remote.
There isn’t a single solution to this problem, so we’ll describe how the Notes application deals with it:
-
When the application first launches (and only on the first launch), it asks if the user wants to use iCloud or use local files only. It saves the user’s choice.
-
Depending on whether the user chose to use iCloud or not, the app will store all documents in either iCloud or in local storage.
-
The app will expose a setting to let users change their minds (which we’ll cover in “Settings”).
-
If the user previously chose to store files locally, and later opts to store them on iCloud instead, all files will be moved from local storage to iCloud.
With this in mind, let’s get building!
Creating the Document List View Controller
The documents in the application’s iCloud container need to be shown to the user so that they can be selected and opened. To do this, we’ll need to create a user interface that can present this list.
There are three main options for presenting this sort of list in apps:
-
A list, using
UITableView, that looks similar to the list seen in the iOS Settings application (Figure 8-2) -
A grid, using
UICollectionView, that looks similar to the iOS Photos application (Figure 8-3) -
Something entirely custom and handcoded
Figure 8-2. The Settings list
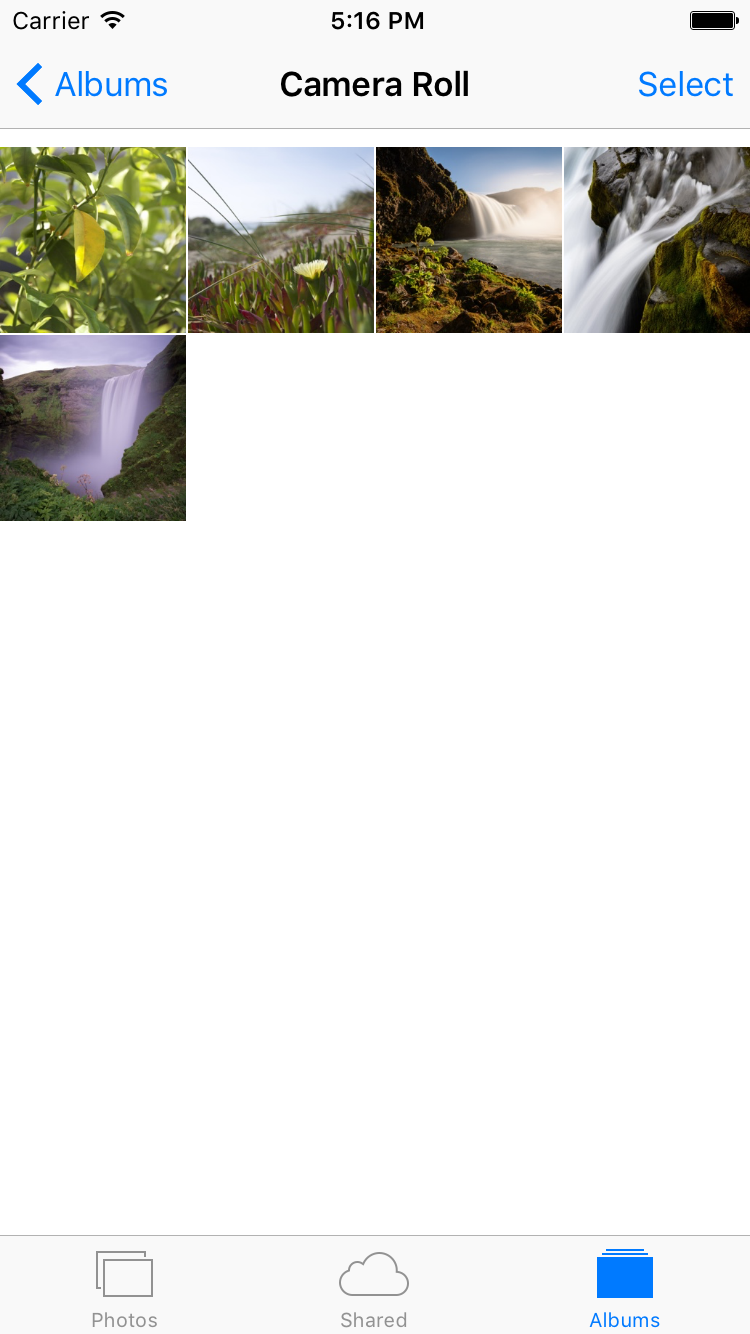
Figure 8-3. The Photos grid
In this app, we’ll use a UICollectionView. The main reason for this choice is that table views don’t look good when they’re very wide, which is what will happen on the iPad, whereas collection views can look good at any size.
To get started, we’ll first rename the view controller that the template starts with to something more descriptive. This is purely for our own convenience—the app will function the same way, but it’s a lot clearer to refer to a “document list view controller” than to just a “view controller.”
-
Find the ViewController.swift file in the Project navigator.
-
Rename ViewController.swift to DocumentListViewController.swift (Figure 8-4). Do this by clicking on
ViewController.swiftand pressing Return. -
Open this file, and rename the
ViewControllerclass toDocumentListViewController. MakeDocumentListViewControllerbe a subclass ofUICollectionViewController.

Figure 8-4. The newly renamed file
View Controllers and Storyboards
The code that runs the view controller is kept inside the DocumentListViewController.swift file. However, this is only half of the picture; in addition to the code, you also need to design the interface. To do this, you’ll work with a storyboard.
A storyboard is a file that contains the interfaces for multiple view controllers, all linked together with segues. Storyboards allow you to work with your application’s screens all in a single place, which gives you a much better idea of how the whole thing fits together. Storyboards are the preferred method of building apps for iOS, because the constraints placed upon the software by the device (such as the limited screen size) mean that what the user sees is limited to one screen at a time. Storyboards help you navigate the structure of your app.
When you created the project, a storyboard file was created for you. For most apps, you generally don’t need to create a new storyboard beyond the first one.
The Navigation Controller
Now we’ll start building the interface for the document list view controller.
-
Open Main.storyboard. You’ll be looking at an empty view controller, which was created when the project was first created.
-
Select the existing view controller in the canvas and delete it. We’ll replace it with our own in order to get a better picture of how these things come together.
-
Enter
navigation controllerin the Object library. The list will be reduced to just the navigation controller object, allowing you to quickly drag it out into the empty storyboard (see Figure 8-5).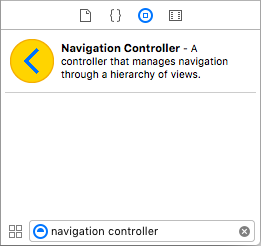
Figure 8-5. Locating the navigation controller
-
Drag out a navigation controller into the storyboard. By default, it comes with a table view controller, which we don’t need; we’ll be using a collection view controller, so select the table view controller and delete it (Figure 8-6).
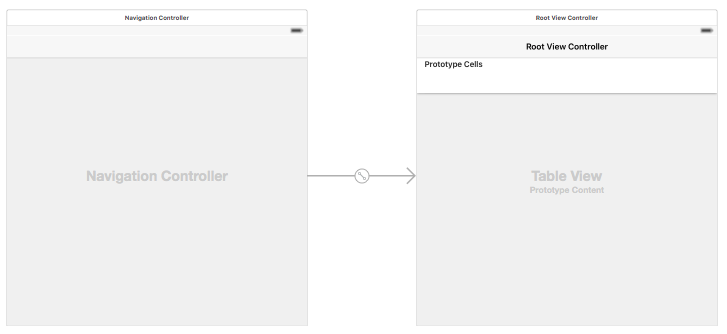
Figure 8-6. The navigation controller, with the table view controller that comes with it by default; you’ll need to delete the table view controller
When the storyboard starts up, it needs to know what view controller to show first. This view controller, which Xcode calls the initial view controller, will be installed as the window’s root view controller before the app is presented to the user.
Currently, there is no initial view controller, because we just deleted the earlier ones. This means that if you were to launch the app now, you’d simply get a black screen.
-
Select the navigation controller that you just added, and go to the Attributes Inspector. Select the Is Initial View Controller checkbox (Figure 8-7).
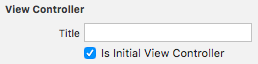
Figure 8-7. Making the navigation controller the initial view controller.
-
Go to the Object library, and search for a collection view controller. Drag it out into the storyboard (Figure 8-8).
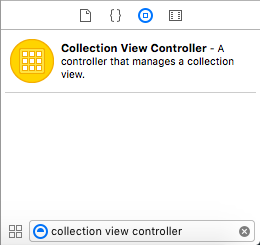
Figure 8-8. Locating the collection view controller
By default, collection view controllers have a transparent background, which isn’t exactly nice to look at, so we need to change it to white so we can properly see it.
-
Select the collection view inside the collection view controller we just added.
-
If it isn’t open, open the Attributes Inspector and scroll down to the View section.
-
Under the background property, press the small disclosure arrow and choose White Color. Now the collection view has a background we can more easily see (Figure 8-9).
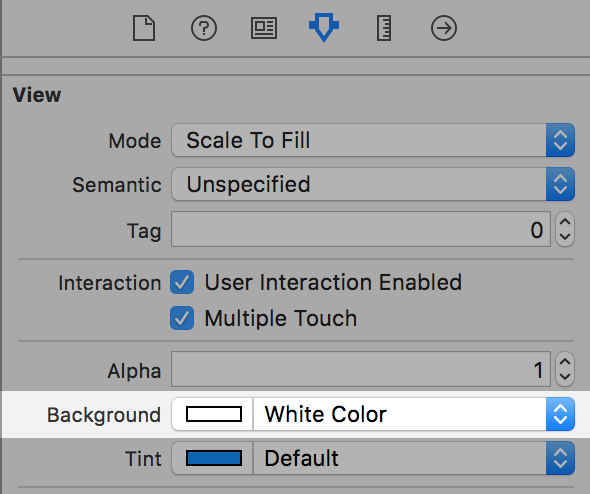
Figure 8-9. Changing the background color of the collection view
The entire purpose of a navigation controller is to present other view controllers. When it first appears, the navigation controller needs to have at least one view controller to present: the root view controller.
We’ll now make the new collection view controller be the root view controller of the navigation controller.
-
Hold down the Control key, and drag from the navigation controller to the collection view controller. Select “root view controller” from the menu that appears.
Note
Drag from the view controller, not the view. It’s easiest to do this by zooming out first. You can also use the navigation controller and collection view controller representations in the outline if your prefer.
Now we need to link the new collection view controller up to our custom class we created.
-
Select the collection view controller and open the Identity Inspector.
-
Change the class to
DocumentListViewController.
Collection Views
Collection views present a grid of cells; each cell contains views that present whatever information you want.
You don’t create the individual cells in a collection view yourself; instead, you create a single prototype cell and prepare the views inside that. Typically, you also create a subclass of the base UICollectionViewCell class and set it as the custom class for the cell. Doing this allows you to create outlets in the custom class that link to the views you design in the interface builder.
In order to display its data, a collection view contacts an object, known as its data source, to ask questions about the information it should display. These questions include, “how many sections are there?”, “how many items are there in each section?” and “what should I display for this specific item in this specific section?” This works exactly the same as the NSCollectionView we wrote in the OS X application, just with different method calls.
Note
When you use a collection view controller, the link between the collection view and the data source (which the view controller itself acts as) is automatically set up. If you’re doing it yourself, you make your view controller—or any other object in the scene—conform to the UICollectionViewDataSource protocol (see “Protocols”).
Once you’ve designed the cell, you give it an identifier. This is used in the collectionView(_, cellForItemAtIndexPath:) method to prepare and return the correct type of cell for a given item in the collection view; we’ll be creating this method later in the chapter.
Next, we’ll set up the cell that will represent each note. To do that, we’ll define the class that controls each cell, and then we’ll set up the cell’s interface.
-
Open DocumentListViewController.swift.
-
Add the
FileCollectionViewCellclass to the end of the file:classFileCollectionViewCell:UICollectionViewCell{@IBOutletweakvarfileNameLabel:UILabel?@IBOutletweakvarimageView:UIImageView?varrenameHander:(Void->Void)?@IBActionfuncrenameTapped(){renameHander?()}}This code defines the class, a subclass of
UICollectionViewCell, that specifies how each cell showing a note will behave. Right now it doesn’t do much; it just has aUIImageViewand some stubs to handle renaming in the future. But, now that the class exists, we can use it to set up the cell. -
Open Main.storyboard, and select the collection view in the document list view controller (Figure 8-10).
Figure 8-10. Locating the collection view in the outline
-
Open the Size Inspector, and set Cell Size to 180 × 180 (Figure 8-11). If you don’t see any fields to change the cell size, change the cell size from Default to Custom in the drop-down box .
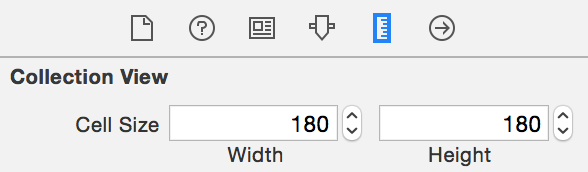
Figure 8-11. Setting the size of the cells
-
Select the cell. It looks like Figure 8-12.
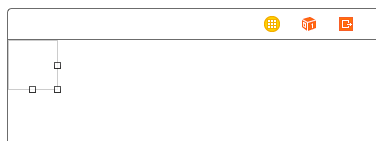
Figure 8-12. The collection view cell
-
Open the Identity Inspector, and change its class from
UICollectionViewCelltoFileCollectionViewCell. -
Open the Attributes Inspector and set the cell’s Identifier to
FileCell. -
Drag in a
UILabeland place it at the bottom of the view.
Using Constraints to Control Size and Position
When a view is added to the screen, it needs to know its size and position. Views on iOS are never shown in isolation—they’re always displayed alongside other content, inside other views, and in cooperation with other stuff that the user cares about. This means that the position and size of any view depends upon where everything else on the screen is: content should never overlap other content, for example; and if you place a button in the bottom-right corner of a view, it should stay in that corner even when that view changes size.
This is where constraints come in. A constraint is a rule that defines some component of a view’s size and position. These constraints are rules like, “view A’s top edge is always 10 points away from view B’s bottom edge” or, “view A’s width is equal to half of the screen width.”
The constraints of a view always need to be sufficient to define the size and position of that view. If there aren’t enough constraints to fully define this, then the system will warn you, and you’ll end up with a different layout to what you expect.
Tip
If you add no constraints to a view, the system will automatically add the constraints that set its size and position, based upon where it was placed in the interface builder.
To add constraints, you select a view and click one of the buttons at the bottom right of the canvas (Figure 8-13).
Figure 8-13. The constraint buttons, at the bottom right of the canvas
The buttons in this collection are, from left to right:
- Stack
-
This button allows you to quickly arrange a collection of views into a vertical or horizontal stack. We’ll be working with stack views later in this book, in Chapter 10.
- Align
-
This button allows you to add constraints that align the selected view(s) to other views. For example, you can add constraints that say “the horizontal center of this view is the same as its containing view”; doing this will center the view along that line.
- Pin
-
This button allows you to define the spacing between the selected view(s) to other views. For example, using this button, you can add constraints that say “the leading edge of this view is always 20 points away from the trailing edge of another view.”
- Resolve Auto Layout Issues
-
This button opens a menu that contains useful tools for resolving common problems with your constraints.
To place this label in the correct location, we need to add constraints to it that centers it horizontally, keeps it at the bottom of the container, and makes it fill the width of the container while also ensuring that it has the correct height.
-
With the label selected, click the Align button, and turn on Horizontally in Center. Click Add Constraints.
-
Click the Pin button, and click the red bar icons at the left, right, and bottom. Additionally, set the Height to 20. Click Add Constraints.
Tip
By doing this, you’ve added the following constraints:
-
Align Center X to container
-
Leading Space to container margin = 0
-
Trailing Space to container margin = 0
-
Bottom Space to container margin = 0
-
Height = 20
These constraints make the label take up the bottom section of the view.
-
-
Next, drag in a
UIView. This will eventually be the preview image for the note documents. -
Set its background color to something visible, like an orange color. (The precise color doesn’t matter; this is just for your temporary use so that you can see the position and size of the view.)
-
Using the Align and Pin menus, add the following constraints:
-
Next, drag in a
UIImageView, and place it inside the orange view. -
Resize it to fill the entire view.
The cell should now look like Figure 8-14.
Figure 8-14. The laid-out collection view cell
-
Add the following constraints:
-
Leading space to superview = 0
-
Trailing space to superview = 0
-
Top space to superview = 0
-
Bottom space to superview = 0
Note
For this view, ensure that Constrain to Margins is off. This is because the view should be flush with the edges; we want the constraints to be relative to the edge, not to the margins. The view would be inset if the constraints were relative to the margins.
These constraints make the image view fill its container.
You can now connect the label and image view to the
FileCollectionViewCell.
-
-
Open the Assistant, and ensure that it’s got DocumentListViewController.swift open. If it doesn’t, use the jump bar to navigate to Automatic→DocumentListViewController.swift.
-
Drag from the well—the small circle just to the left of the number 13 in Figure 8-15—at the left of the
fileNameLabelproperty to the label in the cell. When you release the mouse button, the property will be connected to the label.
Figure 8-15. Connecting from the outlet to the label
-
Repeat the process for the image view: drag from the
imageViewproperty to the image view.
Each document can now display its filename, as well as its preview image.
Creating the Document Class
We need a Document class for the iOS app. It’s similar to the Mac app, but we subclass UIDocument instead of NSDocument, and implement different methods.
Note
NSDocument, which we used earlier for the OS X app, behaves a bit differently than UIDocument on iOS. They provide the same fundamental features, but approach things a little differently.
One of the main differences is that NSDocument has some knowledge of the interface that the user will interact with, while UIDocument does not. The reason for this is that, on OS X, it’s easy to take an interface and use bindings to connect it to the document’s code, whereas we need to create a view controller on iOS to mediate the flow of information between the document and the interface.
There are a few minor API differences, as well. In NSDocument, you implement either dataOfType or fileWrapperOfType in order to provide the ability to save the document; in UIDocument, you implement contentsForType, which can return either an NSData object or an NSFileWrapper object.
-
Open the File menu and choose New→File.
-
Select “Cocoa Touch class” and click Next.
-
Set the name of the class to
Documentand set the “Subclass of” toUIDocument(see Figure 8-16). Click Next.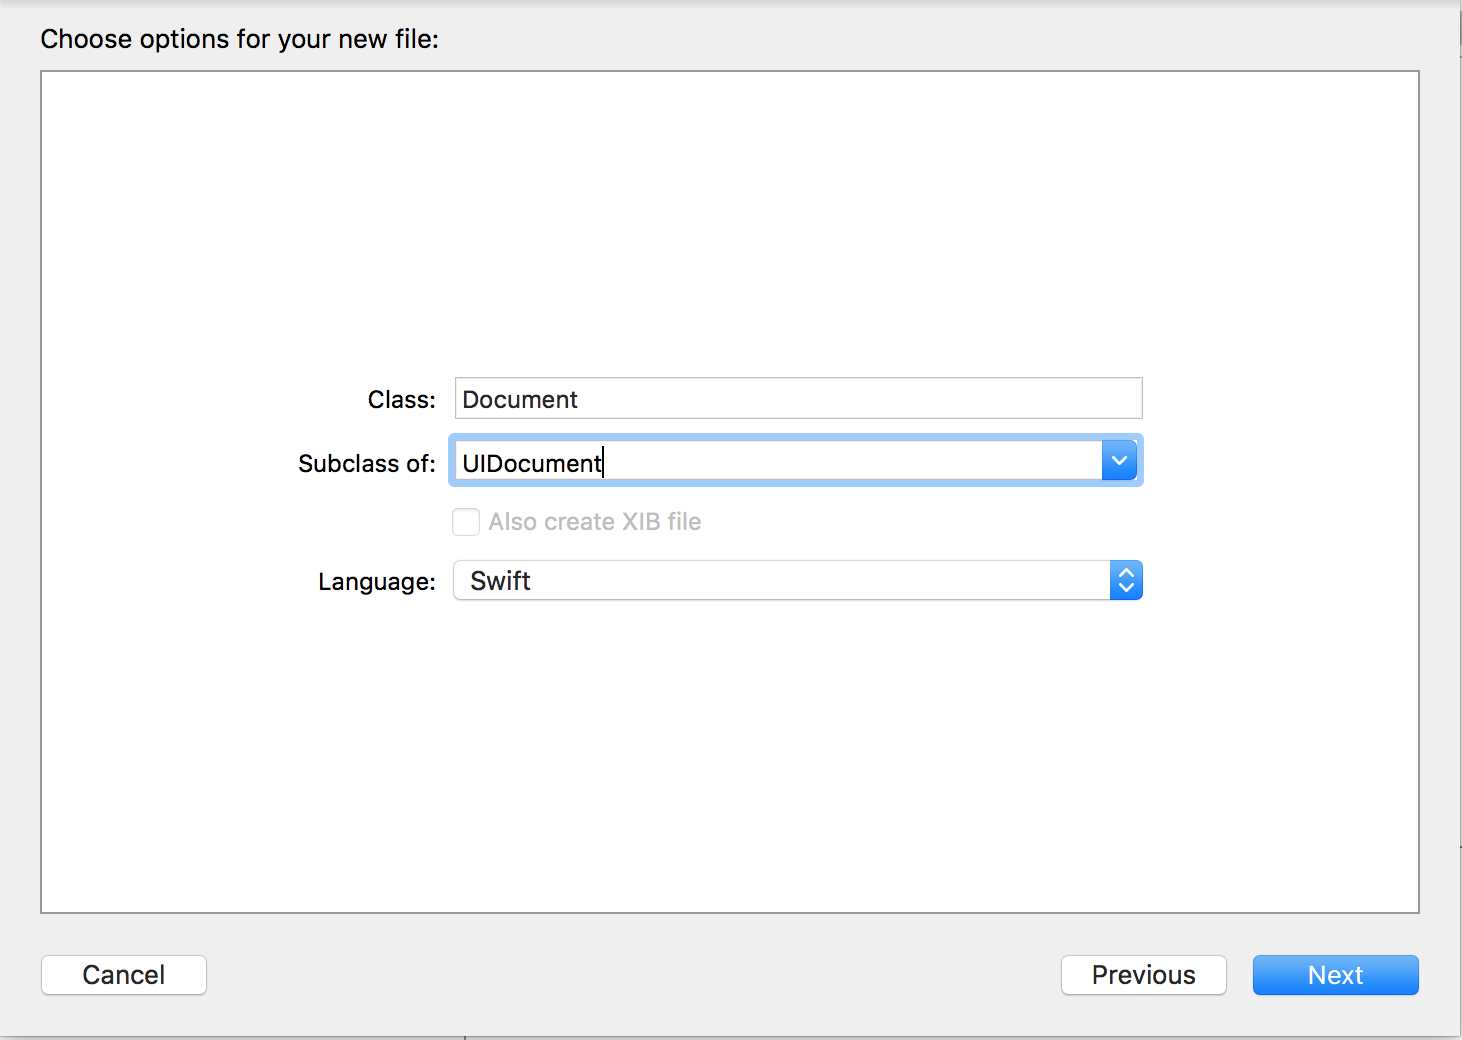
Figure 8-16. Adding the class
-
When saving the new class, make sure that it’s added to the Notes-iOS target.
Several important things need to be the same across the two different classes—for example, the names of the files in the file package. For this reason, we’ll move the code that’s common to both the Mac and iOS document classes into a separate file.
-
Right-click the project and select New Group. A new group will appear in the Project Navigator; name it
Common. -
Select this new group and go to the File Inspector.
-
Click on the little folder icon to set its location (see Figure 8-17). An open dialog box will appear, showing the project.
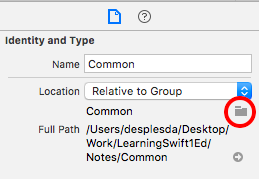
Figure 8-17. The location icon
-
In it, make a new folder called Common and then click Choose.
You’ve just made a new folder in which to put files that are common to both projects.
Tip
A group in Xcode does not necessarily have to map to a folder on the filesystem. Here, we created a group and then assigned it to a folder location that happened to have the same name. Groups don’t have to represent a real folder at all, and can simply exist within the project hierarchy. The metadata that says what files live in the group is maintained by Xcode when you drag a file into them.
-
Right-click the Common group and add a new Swift file.
Warning
Don’t add a new Cocoa Touch class; you’re adding a new, empty file. We’re not using this file to make a Swift class, we’re going to use it to store some variables that are common to both the iOS and OS X project, and we don’t need a class to do that.
-
Name this new document DocumentCommon.swift.
-
With the DocumentCommon.swift file selected, open the File Inspector and add it to both the Notes and Notes-iOS targets by checking the boxes for each target in the Target Membership pane (see Figure 8-18).
Note
A target in Xcode specifies a thing (called a product) to build and tells Xcode how to build it and what files to use. Because we want DocumentCommon.swift to be part of both the OS X and the iOS products, we add it to both targets.
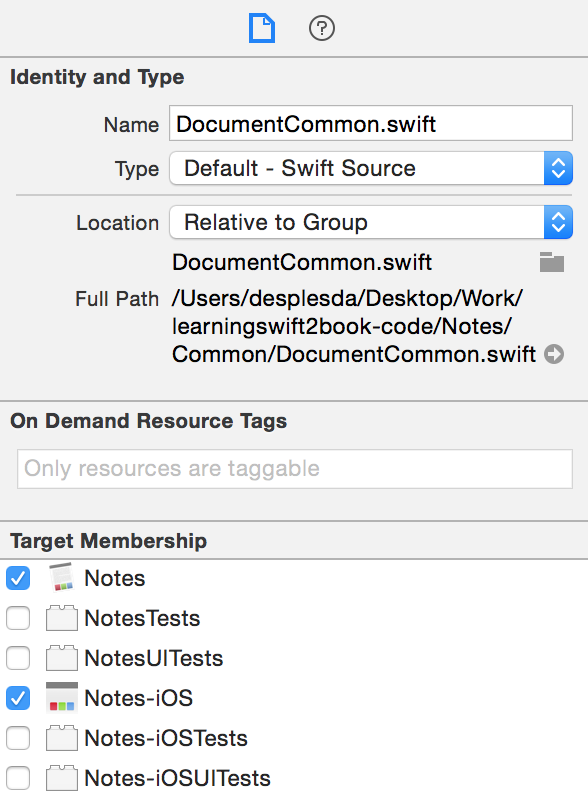
Figure 8-18. Adding the file to the targets
-
Open the DocumentCommon.swift file, and add the following code to it:
// We can be throwing a lot of errors in this class, and they'll all// be in the same error domain and using error codes from the same// enum, so here's a little convenience func to save typing and spaceletErrorDomain="NotesErrorDomain"funcerr(code:ErrorCode,_userInfo:[NSObject:AnyObject]?=nil)->NSError{// Generate an NSError object, using ErrorDomain and using whatever// value we were passed.returnNSError(domain:ErrorDomain,code:code.rawValue,userInfo:userInfo)}// Names of files/directories in the packageenumNoteDocumentFileNames:String{caseTextFile="Text.rtf"caseAttachmentsDirectory="Attachments"caseQuickLookDirectory="QuickLook"caseQuickLookTextFile="Preview.rtf"caseQuickLookThumbnail="Thumbnail.png"}letNotesUseiCloudKey="use_icloud"letNotesHasPromptedForiCloudKey="has_prompted_for_icloud"/// Things that can go wrong:enumErrorCode:Int{/// We couldn't find the document at all.caseCannotAccessDocument/// We couldn't access any file wrappers inside this document.caseCannotLoadFileWrappers/// We couldn't load the Text.rtf file.caseCannotLoadText/// We couldn't access the Attachments folder.caseCannotAccessAttachments/// We couldn't save the Text.rtf file.caseCannotSaveText/// We couldn't save an attachment.caseCannotSaveAttachment}All this code contains is a convenience function for errors, an enumeration containing all the possible files inside the package of our Note document type and the error codes we created earlier. Check back to “Package File Formats”, when we were setting up the OS X app, for a reminder.
Because we are building this application in stages, we have just rewritten a whole bunch of code that already existed inside Document.swift. Because of this, we need to delete the duplicated code.
-
Open Document.swift and delete the
ErrorDomainconstant,errmethod, andNotesDocumentFileNamesandErrorCodeenums.Warning
If you don’t delete the duplicate code, you will get build errors.
If you’ve done everything correctly, the Mac app should still build with no errors. Double-check that now by changing the scheme to the Notes app and pressing ⌘-B. If it doesn’t, double-check that the DocumentCommon.swift file’s Target Membership settings include the Mac app.
You’re now ready to set up the iOS document class.
-
Open the iOS app’s Document.swift file.
-
Add the following code to the
Documentclass:vartext=NSAttributedString(string:""){didSet{self.updateChangeCount(UIDocumentChangeKind.Done)}}vardocumentFileWrapper=NSFileWrapper(directoryWithFileWrappers:[:])overridefunccontentsForType(typeName:String)throws->AnyObject{lettextRTFData=tryself.text.dataFromRange(NSRange(0..<self.text.length),documentAttributes:[NSDocumentTypeDocumentAttribute:NSRTFTextDocumentType])ifletoldTextFileWrapper=self.documentFileWrapper.fileWrappers?[NoteDocumentFileNames.TextFile.rawValue]{self.documentFileWrapper.removeFileWrapper(oldTextFileWrapper)}self.documentFileWrapper.addRegularFileWithContents(textRTFData,preferredFilename:NoteDocumentFileNames.TextFile.rawValue)returnself.documentFileWrapper}overridefuncloadFromContents(contents:AnyObject,ofTypetypeName:String?)throws{// Ensure that we've been given a file wrapperguardletfileWrapper=contentsas?NSFileWrapperelse{throwerr(.CannotLoadFileWrappers)}// Ensure that this file wrapper contains the text file,// and that we can read itguardlettextFileWrapper=fileWrapper.fileWrappers?[NoteDocumentFileNames.TextFile.rawValue],lettextFileData=textFileWrapper.regularFileContentselse{throwerr(.CannotLoadText)}// Read in the RTFself.text=tryNSAttributedString(data:textFileData,options:[NSDocumentTypeDocumentAttribute:NSRTFTextDocumentType],documentAttributes:nil)// Keep a reference to the file wrapperself.documentFileWrapper=fileWrapper}This block of code:
-
adds the
NSAttributedStringpropertytext, which defaults to the empty attributed string. -
adds the
NSFileWrapperpropertydocumentFileWrapper, which defaults to an empty directory file wrapper. -
implements
loadFromContentsto load the text. -
implements
contentsForTypeto store the text. Importantly, in thecontentsForTypemethod, the app first checks to see if there’s already an existing text file. If one exists, it’s removed so that the new text file can replace it.
-
With this done, we’ve now implemented the text-related features of the Document system.
Listing Documents
We can now start listing documents in our UICollectionView. In order to show the user a list of available files, we need to have a way of finding out what files exist. As we discussed in “iCloud Availability”, there are two possible places where files can be found: in the iCloud container or locally on the device.
Tip
Strictly speaking, files stored in iCloud are also stored locally on the device, but it’s useful to think of them as existing outside the device. Doing this helps you to remember that the files may not yet have been downloaded and are therefore not ready to use.
To find files in iCloud, we use a class called NSMetadataQuery to compose a search query to return all files with a .note extension inside the iCloud container. Finding files stored locally simply involves asking the operating system to give us a list of files.
Regardless of how we find the list of files that are available, we need to keep track of this list so that it can be used to populate the list of documents that the user can see. To handle this, we’ll create an array of NSURL objects.
-
Open DocumentListViewController.swift.
-
Add the
availableFilesproperty:varavailableFiles:[NSURL]=[]This variable will store the
NSURLfor every file in the container that the app currently knows about. We’ll now add code that will watch for changes to the list, so that if a new file is added—such as by another device—then the app will find out about it. -
Add the
iCloudAvailableproperty to theDocumentListViewControllerclass:classvariCloudAvailable:Bool{ifNSUserDefaults.standardUserDefaults().boolForKey(NotesUseiCloudKey)==false{returnfalse}returnNSFileManager.defaultManager().ubiquityIdentityToken!=nil}Tip
This is a class property: one that’s part of the class, and not attached to any specific instance of that class. You access this property by saying
DocumentListViewController.iCloudAvailable; you don’t need to have an instance of the class to access it.This computed property returns
trueif the user is signed in to iCloud and has indicated that he or she wants to use iCloud; otherwise, it returnsfalse. If you need a reminder on computed properties in Swift, flip back to “Properties”. -
Add the
metadataQuery,queryDidFinishGatheringObserver, andqueryDidUpdateObserverproperties:varqueryDidFinishGatheringObserver:AnyObject?varqueryDidUpdateObserver:AnyObject?varmetadataQuery:NSMetadataQuery={letmetadataQuery=NSMetadataQuery()metadataQuery.searchScopes=[NSMetadataQueryUbiquitousDocumentsScope]metadataQuery.predicate=NSPredicate(format:"%K LIKE '*.note'",NSMetadataItemFSNameKey)metadataQuery.sortDescriptors=[NSSortDescriptor(key:NSMetadataItemFSContentChangeDateKey,ascending:false)]returnmetadataQuery}()This composes a
NSMetaDataQueryquery to look for files with our Notes file extension by making itspredicatesearch for filenames ending in .note. You can customize and refine this search query by providing a different query; you can find more information on how to compose these queries in the Predicate Programming Guide.Note
Note the parentheses at the end of the preceding code snippet and the equals sign before the opening brace near the top. This format means that, when the
DocumentListViewControlleris created, themetadataQueryobject will be created and prepared before any other code executes. This means that the rest of the code doesn’t need to check to see ifmetadataQueryis ready to use or not—we’re guaranteeing that it always will be ready. -
Add the following code, which implements the
localDocumentsDirectoryURLproperty. That property gives us the folder in which to store our local documents and implements theubiquitousDocumentsDirectoryURLproperty, which in turn gives us the location of where to put documents in order for them to be stored in iCloud:classvarlocalDocumentsDirectoryURL:NSURL{returnNSFileManager.defaultManager().URLsForDirectory(.DocumentDirectory,inDomains:.UserDomainMask).first!}classvarubiquitousDocumentsDirectoryURL:NSURL?{returnNSFileManager.defaultManager().URLForUbiquityContainerIdentifier(nil)?.URLByAppendingPathComponent("Documents")}The
URLsForDirectorymethod allows you to request a type of directory that you’d like—for example,.DocumentDirectorylets you request a place to store user documents. The method returns an array ofNSURLs that you can use; on iOS, this will always point to the app sandbox’s Documents folder. Because we specifically want theNSURL, and not an array ofNSURLs, we return thefirstentry in the array; because this is optional, we must first unwrap it with!. It’s worth pointing out that this will crash the program if, for some reason,URLsForDirectoryreturns an empty array; however, this won’t happen, because all iOS apps are given a Documents directory when they’re installed.Tip
These two variables are
classvariables in order to ensure that they don’t depend on the state of any specific instance of theDocumentListViewControllerclass. This isn’t strictly necessary, but it helps to keep things tidier. -
Make
viewDidLoadset up the observers, which will be updated when the metadata query discovers new files:overridefuncviewDidLoad(){super.viewDidLoad()self.queryDidUpdateObserver=NSNotificationCenter.defaultCenter().addObserverForName(NSMetadataQueryDidUpdateNotification,object:metadataQuery,queue:NSOperationQueue.mainQueue()){(notification)inself.queryUpdated()}self.queryDidFinishGatheringObserver=NSNotificationCenter.defaultCenter().addObserverForName(NSMetadataQueryDidFinishGatheringNotification,object:metadataQuery,queue:NSOperationQueue.mainQueue()){(notification)inself.queryUpdated()}}When the document list controller’s view loads, we need to register with the system the fact that if either
NSMetadataQueryDidFinishGatheringNotificationorNSMetadataQueryDidUpdateNotificationis posted, we want to run some code in response. TheNSMetadataQueryDidFinishGatheringNotificationis sent when the metadata query finishes its initial search for content, and theNSMetadataQueryDidUpdateNotificationis sent when any new files are discovered after this initial search. In both of these cases, we’ll call a method calledqueryUpdated, which we’ll add shortly. -
Implement the
refreshLocalFilesmethod:funcrefreshLocalFileList(){do{varlocalFiles=tryNSFileManager.defaultManager().contentsOfDirectoryAtURL(DocumentListViewController.localDocumentsDirectoryURL,includingPropertiesForKeys:[NSURLNameKey],options:[.SkipsPackageDescendants,.SkipsSubdirectoryDescendants])localFiles=localFiles.filter({(url)inreturnurl.pathExtension=="note"})if(DocumentListViewController.iCloudAvailable){// Move these files into iCloudforfileinlocalFiles{ifletdocumentName=file.lastPathComponent,letubiquitousDestinationURL=DocumentListViewController.ubiquitousDocumentsDirectoryURL?.URLByAppendingPathComponent(documentName){do{tryNSFileManager.defaultManager().setUbiquitous(true,itemAtURL:file,destinationURL:ubiquitousDestinationURL)}catchleterrorasNSError{NSLog("Failed to move file \(file) "+"to iCloud: \(error)")}}}}else{// Add these files to the list of files we know aboutavailableFiles.appendContentsOf(localFiles)}}catchleterrorasNSError{NSLog("Failed to list local documents: \(error)")}}This looks for files stored locally. If it finds local files, and if iCloud is available, those files will be moved into iCloud for the
NSMetadataQueryto find; if iCloud is not available, their URLs will be added to theavailableFilesarray so that the collection view displays them.You’ll notice that we use the
NSFileManagerclass to access the list of files and also to move documents into iCloud. TheNSFileManagerclass is your gateway to the filesystem. Just about anything you can do with files or folders can be done withNSFileManager, including creating, moving, copying, renaming, and deleting files.Next, we need to make the
viewDidLoadmethod ask users if they want to use iCloud; if they’ve been asked already, then it should either start searching iCloud or list the collection of local files. -
Add the following code to the end of the
viewDidLoadmethod:overridefuncviewDidLoad(){super.viewDidLoad()self.queryDidUpdateObserver=NSNotificationCenter.defaultCenter().addObserverForName(NSMetadataQueryDidUpdateNotification,object:metadataQuery,queue:NSOperationQueue.mainQueue()){(notification)inself.queryUpdated()}self.queryDidFinishGatheringObserver=NSNotificationCenter.defaultCenter().addObserverForName(NSMetadataQueryDidFinishGatheringNotification,object:metadataQuery,queue:NSOperationQueue.mainQueue()){(notification)inself.queryUpdated()}>lethasPromptedForiCloud=NSUserDefaults.standardUserDefaults()>.boolForKey(NotesHasPromptedForiCloudKey)>>ifhasPromptedForiCloud==false{>letalert=UIAlertController(title:"Use iCloud?",>message:"Do you want to store your documents in iCloud, "+>"or store them locally?",>preferredStyle:UIAlertControllerStyle.Alert)>>alert.addAction(UIAlertAction(title:"iCloud",>style:.Default,>handler:{(action)in>>NSUserDefaults.standardUserDefaults()>.setBool(true,forKey:NotesUseiCloudKey)>>self.metadataQuery.startQuery()>}))>>alert.addAction(UIAlertAction(title:"Local Only",style:.Default,>handler:{(action)in>>NSUserDefaults.standardUserDefaults()>.setBool(false,forKey:NotesUseiCloudKey)>>self.refreshLocalFileList()>}))>>self.presentViewController(alert,animated:true,completion:nil)>>NSUserDefaults.standardUserDefaults()>.setBool(true,forKey:NotesHasPromptedForiCloudKey)>>}else{>metadataQuery.startQuery()>refreshLocalFileList()>}}This code displays an alert that, on the first launch of the application, asks users if they’d like to use iCloud. It first checks to see if the user has already seen the iCloud prompt. If not, then an alert is constructed from a
UIAlertControllerobject. There are two possible actions that the user can take: choose to use iCloud, or choose to save documents locally only. If the user chooses to save it in iCloud, then the iCloud-searching metadata query is started; if the user chooses to save locally, then therefreshLocalFileListmethod that you just wrote is called. In either case, the user’s preference is recorded in the user preferences system. The alert is then presented, and the method records the fact that the user has seen this prompt.If the user has previously seen the prompt, then the query is started and the file list is refreshed. This is done on purpose:
-
If the user is not using iCloud, then the metadata query will find no files. This is fine, because checking for local files will happen immediately afterward.
-
If the user is using iCloud, then the metadata query will begin searching for files; at the same time, by searching for local files, it will move any files that were stored locally into iCloud. This is useful for when the user previously elected to not use iCloud, but then changed his or her minds because we don’t want any files to be stranded in local storage, we want to ensure that we sweep up any local files and store them in iCloud.
-
-
Implement the
queryUpdatedmethod, which is called if theNSMetadataQueryfinds any files in iCloud. This method updates the list of known files in iCloud:funcqueryUpdated(){self.collectionView?.reloadData()// Ensure that the metadata query's results can be accessedguardletitems=self.metadataQuery.resultsas?[NSMetadataItem]else{return}// Ensure that iCloud is available—if it's unavailable,// we shouldn't bother looking for files.guardDocumentListViewController.iCloudAvailableelse{return;}// Clear the list of files we know about.availableFiles=[]// Discover any local files that don't need to be downloaded.refreshLocalFileList()foriteminitems{// Ensure that we can get the file URL for this itemguardleturl=item.valueForAttribute(NSMetadataItemURLKey)as?NSURLelse{// We need to have the URL to access it, so move on// to the next file by breaking out of this loopcontinue}// Add it to the list of available filesavailableFiles.append(url)}}We’ll now add the two critical methods that provide data to the
UICollectionView:-
collectionView(_, numberOfItemsInSection:), which is given a section number (starting at zero) and returns the number of items in that section. -
collectionView(_, cellForItemAtIndexPath:), which is given anNSIndexPathobject, which contains a section number and an item number. It’s expected to return aUICollectionViewCellthat’s been prepared with the data that should appear for this point in the grid.
-
There’s also a third important method: numberOfSectionsInCollectionView, which returns the number of sections in the table view. However, if you don’t implement it, the collection view assumes that there is one section. We only have one section in this collection view, so we’ll save some typing and not include it:
-
Implement the
numberOfItemsInSectionandcellForItemAtIndexPathmethods:overridefunccollectionView(collectionView:UICollectionView,numberOfItemsInSectionsection:Int)->Int{// There are as many cells as there are items in iCloudreturnself.availableFiles.count}overridefunccollectionView(collectionView:UICollectionView,cellForItemAtIndexPathindexPath:NSIndexPath)->UICollectionViewCell{// Get our cellletcell=collectionView.dequeueReusableCellWithReuseIdentifier("FileCell",forIndexPath:indexPath)as!FileCollectionViewCell// Get this object from the list of known filesleturl=availableFiles[indexPath.row]// Get the display namevarfileName:AnyObject?do{tryurl.getResourceValue(&fileName,forKey:NSURLNameKey)ifletfileName=fileNameas?String{cell.fileNameLabel!.text=fileName}}catch{cell.fileNameLabel!.text="Loading..."}returncell}The
numberOfItemsInSectionsis responsible for letting the collection view know how many items need to be displayed. There are always as many items in the collection view as there areNSURLobjects in the list, so we just ask theavailableFilesvariable for itscount.The
cellForItemAtIndexPathmethod is more complex. It’s responsible for providing to the collection view each of its cells and making sure that each cell has the correct content.You might notice that we don’t actually create our own cells—that is, we never call the initializer for
FileCollectionViewCell. Instead, we call thedequeueReusableCellWithReuseIdentifiermethod on the collection view.We do this for performance reasons. If you had a large number of items to display in the collection view, it’s extremely inefficient to create all of the possible cells, and creating a cell on demand is bad as well, because memory allocation can be CPU-intensive.
Instead, the collection view system maintains a reuse queue system. When a cell is scrolled off-screen, it’s not removed from memory; instead, it’s simply taken off the screen and placed in the queue. When a new cell needs to appear, you call
dequeueReusableCellWithReuseIdentifierto retrieve a cell from the queue. If the queue is empty, a new cell is allocated and created.Note
This approach to reusing a small number of UI elements is quite common in Cocoa and Cocoa Touch, where only a small number of elements ever exist and are simply reconfigured and reused as needed.
This, by the way, is why you gave the cell an identifier in the interface builder. The reuse identifier you pass in to the call to
dequeueReusableCellWithReuseIdentifieris what the collection view uses to determine which queue ofUICollectionViewCells to get a cell from. -
Run the app! If there are documents in the container from before (when you were making the OS X app), they will appear—it might take a moment.
Creating Documents
Currently, the app can show documents that have been added to the iCloud container, but it can’t create its own. Let’s make that happen!
Note
At this point, the icons shown in the document list will still be a flat color. Additionally, the code that actually makes the documents download from iCloud hasn’t yet been added yet, so you’ll just see the word “Loading…” under each of the icons. Don’t panic—we’ll be adding both of these in time.
In iOS, documents must be manually created by your code. You do this by creating a new instance of your UIDocument class, and then telling it to save; this will create the document on the disk.
Note
This is the same method that is used to update an existing document on disk.
Now we can start creating new documents.
The way that saving works is this: we first create the document and save it to the local Documents directory. Once it’s written, we can then move it into iCloud, where it will be synced to all devices.
Inside DocumentListViewController.swift implement the createDocument function, which creates and saves the document:
funccreateDocument(){// Create a unique name for this new document by adding a random numberletdocumentName="Document \(arc4random()).note"// Work out where we're going to store it temporarilyletdocumentDestinationURL=DocumentListViewController.localDocumentsDirectoryURL.URLByAppendingPathComponent(documentName)// Create the document and try to save it locallyletnewDocument=Document(fileURL:documentDestinationURL)newDocument.saveToURL(documentDestinationURL,forSaveOperation:.ForCreating){(success)->Voidinif(DocumentListViewController.iCloudAvailable){// If we have the ability to use iCloud...// If we successfully created it, attempt to move it to iCloudifsuccess==true,letubiquitousDestinationURL=DocumentListViewController.ubiquitousDocumentsDirectoryURL?.URLByAppendingPathComponent(documentName){// Perform the move to iCloud in the backgroundNSOperationQueue().addOperationWithBlock{()->Voidindo{tryNSFileManager.defaultManager().setUbiquitous(true,itemAtURL:documentDestinationURL,destinationURL:ubiquitousDestinationURL)NSOperationQueue.mainQueue().addOperationWithBlock{()->Voidinself.availableFiles.append(ubiquitousDestinationURL)self.collectionView?.reloadData()}}catchleterrorasNSError{NSLog("Error storing document in iCloud! "+"\(error.localizedDescription)")}}}}else{// We can't save it to iCloud, so it stays in local storage.self.availableFiles.append(documentDestinationURL)self.collectionView?.reloadData()}}}
This code first creates the file locally, and then does different things depending on whether the user has access to iCloud or not:
-
If the user has access to iCloud, it works out where it should exist in iCloud, and then moves it to that location. It does this in a background queue, because it can take a moment to finish moving to the iCloud container.
-
If the user has no access to iCloud, it manually adds the document to the list of files and reloads the list. It does this because, unlike when iCloud is available, there’s no object watching the directory and keeping the file list up to date. Once that’s done, the document is opened.
Now that we have the ability to create documents, we need a way to let the user initiate the process. We’ll do this by adding a little button to the top of the screen, by adding a UIBarButtonItem to the view controller’s UINavigationItem.
Every view controller that exists inside a UINavigationController has a UINavigationItem. This is an object that contains the content for the navigation bar for that view controller: its title and any buttons that should go in the bar. When the view controller is on screen, the navigation controller will use our DocumentListViewController’s navigation item to populate the navigation bar (see Figure 8-19).
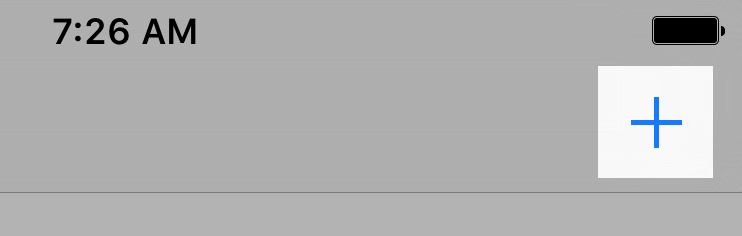
Figure 8-19. The Add button, which will be added to the top of the screen
Note
There’s only ever one navigation bar in the entire navigation controller. When you switch from one view controller to another, the navigation controller notices this fact and updates the contents of the bar, animating it into place.
To create the button, we’ll use a UIBarButtonItem. This is a button designed to go inside either a navigation bar or a toolbar. You can create one in the storyboard, but it’s useful to know how to create one programmatically as well.
We’ll use a UIBarButtonItem to show our Add button, which will look like a little + icon. When the button is tapped, the createDocument method that you just added will be run.
-
Add the following code to the
viewDidLoadmethod:letaddButton=UIBarButtonItem(barButtonSystemItem:.Add,target:self,action:"createDocument")self.navigationItem.rightBarButtonItem=addButtonNotice the
targetandactionparameters that are passed to theUIBarButtonItem’s initializer. When the user taps on the button, iOS will call theactionmethod on thetargetobject. This means that tapping on the Add button will call thecreateDocumentmethod that you added earlier.
Downloading from iCloud
We’ve already got the app listing files, whether the user has chosen to get them locally or use iCloud. If the files are all stored locally, then we have no problem: the files are in place, and we can open them. However, if they’re stored in iCloud, we hit a snag: the files that are in iCloud and are being reported by the NSMetadataQuery are not yet downloaded to the local device, which means we can’t use them.
On OS X, this isn’t a problem, because the system will automatically download every single file that’s in the iCloud container. iOS doesn’t do this, because there’s significantly less storage space available on the smaller device, and the user may be on a cellular network.
If we want to be able to open the user’s files, we need to download them. Additionally, we need to be able to tell whether a file is downloaded or not. Finally, we need to be able to convey to users that a file is not yet ready to be opened so that they don’t get confused when they try to open a file that the system hasn’t downloaded yet.
Warning
In this application, we’re automatically downloading all files that we know about. This isn’t the best approach for all apps, especially if the files can be quite large; in those situations, you should wait for the user to explicitly request for a file to be downloaded.
First, we need to show files that aren’t yet downloaded.
-
Still inside DocumentListViewController.swift, implement
itemIsOpenable, which tells us if we have downloaded the latest version of the file:// Returns true if the document can be opened right nowfuncitemIsOpenable(url:NSURL?)->Bool{// Return false if item is nilguardletitemURL=urlelse{returnfalse}// Return true if we don't have access to iCloud (which means// that it's not possible for it to be in conflict - we'll always have// the latest copy)ifDocumentListViewController.iCloudAvailable==false{returntrue}// Ask the system for the download statusvardownloadStatus:AnyObject?do{tryitemURL.getResourceValue(&downloadStatus,forKey:NSURLUbiquitousItemDownloadingStatusKey)}catchleterrorasNSError{NSLog("Failed to get downloading status for \(itemURL): \(error)")// If we can't get that, we can't open itreturnfalse}// Return true if this file is the most current versionifdownloadStatusas?String==NSURLUbiquitousItemDownloadingStatusCurrent{returntrue}else{returnfalse}}The
itemIsOpenablemethod returnstruewhen the file is fit to be opened, andfalseotherwise. If the app doesn’t have any access to iCloud, then the file must be openable; however, if the app does have access to iCloud, we have to do some additional checks.First, we ask the
NSURLto let us know what the downloading status is for the file. We do this by using thegetResourceValuemethod, which works by receiving a reference to a variable, along with the name of the resource value we want; when the method returns, the variable that we pass in contains the value. Note the ampersand (&) in front of thedownloadStatusvariable—that’s what tells Swift that the variable that we’re passing in will have its value changed.A file can be in one of several download states:
-
NSURLUbiquitousItemDownloadingStatusNotDownloadedmeans we don’t have it; -
NSURLUbiquitousItemDownloadingStatusDownloadedmeans it’s downloaded, but it’s out of date; -
NSURLUbiquitousItemDownloadingStatusCurrentmeans it’s downloaded and up to date.We can only open files that are downloaded and up to date; otherwise, we have to tell the user that it’s not openable.
-
-
Add checks in
cellForItemAtIndexPathto make unavailable documents transparent:overridefunccollectionView(collectionView:UICollectionView,cellForItemAtIndexPathindexPath:NSIndexPath)->UICollectionViewCell{// Get our cellletcell=collectionView.dequeueReusableCellWithReuseIdentifier("FileCell",forIndexPath:indexPath)as!FileCollectionViewCell// Get this object from the list of known filesleturl=availableFiles[indexPath.row]// Get the display namevarfileName:AnyObject?do{tryurl.getResourceValue(&fileName,forKey:NSURLNameKey)ifletfileName=fileNameas?String{cell.fileNameLabel!.text=fileName}}catch{cell.fileNameLabel!.text="Loading..."}>// If this cell is openable, make it fully visible, and>// make the cell able to be touched>ifitemIsOpenable(url){>cell.alpha=1.0>cell.userInteractionEnabled=true>}else{>// But if it's not, make it semitransparent, and>// make the cell not respond to input>cell.alpha=0.5>cell.userInteractionEnabled=false>}returncell}In order to let the user know whether a document can be opened or not, we’ll set the
alphaproperty of the cell to 0.5 if the cell is not openable. Thealphaproperty controls how transparent the view is: 1.0 means it’s fully opaque, and 0.0 means it’s entirely see-through. -
Next, update
queryUpdatedto begin downloading any files that aren’t already downloaded:funcqueryUpdated(){self.collectionView?.reloadData()// Ensure that the metadata query's results can be accessedguardletitems=self.metadataQuery.resultsas?[NSMetadataItem]else{return}// Ensure that iCloud is available - if it's unavailable,// we shouldn't bother looking for files.guardDocumentListViewController.iCloudAvailableelse{return;}// Clear the list of files we know about.availableFiles=[]// Discover any local files that don't need to be downloaded.refreshLocalFileList()foriteminitems{// Ensure that we can get the file URL for this itemguardleturl=item.valueForAttribute(NSMetadataItemURLKey)as?NSURLelse{// We need to have the URL to access it, so move on// to the next file by breaking out of this loopcontinue}// Add it to the list of available filesavailableFiles.append(url)>// Check to see if we already have the latest version downloaded>ifitemIsOpenable(url)==true{>// We only need to download if it isn't already openable>continue>}>>// Ask the system to try to download it>do{>tryNSFileManager.defaultManager()>.startDownloadingUbiquitousItemAtURL(url)>>}catchleterrorasNSError{>// Problem! :(>print("Error downloading item! \(error)")>>}}}When this code has been added, when you launch the iOS app, documents that have already been added to the iCloud container from other locations—such as from the OS X app—will start downloading. You’ll see the “Loading…” text under the icons start gradually disappearing and being replaced with the actual filenames.
As you can see, there’s not a huge amount of work that needs to be done in order for the app to ensure that files are available. All we have to do is first check to see if it’s not already available; if it’s not, then we ask the
NSFileManagerto start downloading the file. TheNSMetadataQuerywill update us later when the file finishes downloading. -
Run the app. Any files that are not yet downloaded to the device will start downloading; until they’re downloaded, they’ll be semi-transparent in the documents list.
Deleting Documents
Now we’ll add some of the groundwork support for editing. We need to do two things to hook this up: first, we’ll add an icon into the project that can be used for the Delete button, and then we’ll add a button that will use that icon.
-
Open the Assets.xcassets asset catalog.
-
Drag the Delete icon, available in the Design folder in the downloaded resources (see “Resources Used in This Book”), into the list of assets. Unlike in the past where we’ve been dragging images into predetermined slots, we can just drag the image into anywhere in the asset pane.
-
Open Main.storyboard and select the
FileCollectionViewCell. -
Search for
UIButtonin the Object library and drag a new button into the cell. -
Go to the Attributes Inspector, and change the button’s Type from System to Custom.
-
Delete the button’s title and set its image to Delete.
-
Position it at the top-right corner of the cell.
-
Open the Editor menu, and choose Resolve Auto Layout Issues→Reset to Suggested Constraints. The result is shown in Figure 8-20.
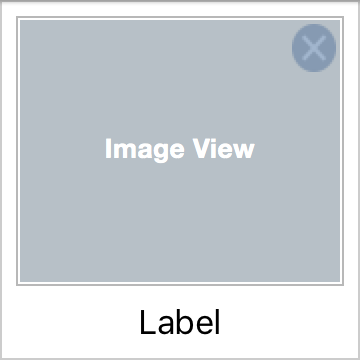
Figure 8-20. The delete button
-
Open DocumentListViewController.swift in the Assistant.
-
Hold down the Control key, and drag from the delete button into
FileCollectionViewCell. Create a new outlet for the button calleddeleteButton. -
Hold down the Control key again, and drag from the delete button into
FileCollectionViewCell. Create a new action for the button calleddeleteTapped. -
Add the following property to
FileCollectionViewCell:vardeletionHander:(Void->Void)?This will be a closure that is run when the user taps on the delete button.
-
Add the following code to the
deleteTappedmethod:@IBActionfuncdeleteTapped(){deletionHander?()}This method calls the deletion closure; the actual content of the closure will be set up in
cellForItemAtIndexPath.
We want to draw the user’s attention to the deletion buttons when they appear. To do this, we’ll make the cells fade out, using iOS’s animation system, when the deletion buttons are visible.
Animating a property of a UIView is as simple as telling the UIView class that you’d like to animate and indicating how long the animation should take. You also provide a closure, which the UIView class will run when it’s ready to start animating content. Inside this closure, you make the changes you want: changing size, opacity, color, and mode.
Add the following method to FileCollectionViewCell:
funcsetEditing(editing:Bool,animated:Bool){letalpha:CGFloat=editing?1.0:0.0ifanimated{UIView.animateWithDuration(0.25){()->Voidinself.deleteButton?.alpha=alpha}}else{self.deleteButton?.alpha=alpha}}
The setEditing method simply changes the opacity of the cell’s deleteButton. When setEditing is called, it receives two parameters: first, whether the button should be visible or not, and second, whether the change in opacity should be animated.
The change in opacity should be animated if the cell is on screen. It doesn’t look great for a view to suddenly pop from fully opaque to slightly transparent, so it should gradually fade, via an animation. However, if the view is off-screen, it shouldn’t fade.
If the change in opacity needs to be animated, the second parameter of this method is set to true. This makes the change to the deleteButton’s alpha property wrapped inside a call to UIView’s animateWithDuration; otherwise, it’s simply assigned.
We’ll now add a button that puts the collection of documents into Edit mode. There’s actually an incredibly simple way to add an Edit button, and you can do it with a single line of code.
Add the following code to the viewDidLoad method:
overridefuncviewDidLoad(){super.viewDidLoad()letaddButton=UIBarButtonItem(barButtonSystemItem:.Add,target:self,action:"createDocument")self.navigationItem.rightBarButtonItem=addButtonself.queryDidUpdateObserver=NSNotificationCenter.defaultCenter().addObserverForName(NSMetadataQueryDidUpdateNotification,object:metadataQuery,queue:NSOperationQueue.mainQueue()){(notification)inself.queryUpdated()}self.queryDidFinishGatheringObserver=NSNotificationCenter.defaultCenter().addObserverForName(NSMetadataQueryDidFinishGatheringNotification,object:metadataQuery,queue:NSOperationQueue.mainQueue()){(notification)inself.queryUpdated()}>self.navigationItem.leftBarButtonItem=self.editButtonItem()lethasPromptedForiCloud=NSUserDefaults.standardUserDefaults().boolForKey(NotesHasPromptedForiCloudKey)ifhasPromptedForiCloud==false{letalert=UIAlertController(title:"Use iCloud?",message:"Do you want to store your documents in iCloud, "+"or store them locally?",preferredStyle:UIAlertControllerStyle.Alert)alert.addAction(UIAlertAction(title:"iCloud",style:.Default,handler:{(action)inNSUserDefaults.standardUserDefaults().setBool(true,forKey:NotesUseiCloudKey)self.metadataQuery.startQuery()}))alert.addAction(UIAlertAction(title:"Local Only",style:.Default,handler:{(action)inNSUserDefaults.standardUserDefaults().setBool(false,forKey:NotesUseiCloudKey)self.refreshLocalFileList()}))self.presentViewController(alert,animated:true,completion:nil)NSUserDefaults.standardUserDefaults().setBool(true,forKey:NotesHasPromptedForiCloudKey)}else{metadataQuery.startQuery()refreshLocalFileList()}}
The editButtonItem method returns a UIBarButtonItem that, when tapped, calls the setEditing method. We’ll implement that now.
Inside DocumentListViewController.swift, implement the setEditing method to make all cells that are visible change their editing state:
overridefuncsetEditing(editing:Bool,animated:Bool){super.setEditing(editing,animated:animated)forvisibleCellinself.collectionView?.visibleCells()as![FileCollectionViewCell]{visibleCell.setEditing(editing,animated:animated)}}
First, notice the call to super.setEditing. The superclass implementation of setEditing updates the class’s editing property, which we’ll make use of in a moment, and also updates the edit button that you added a moment ago to show either Edit or Done. Once it’s done with that, it asks the collection view to provide an array of all visible FileCollectionViewCells. Each of these cells then has its setEditing method called.
Finally, we need to ensure that any cells that aren’t visible also have their deletion button’s opacity at the correct level. Remember, collection view cells that aren’t visible don’t actually exist; they’re waiting in limbo to be added to the collection view on demand. This means that, in our cellForItemAtIndexPath method, we’ll need to ensure that the deletion button’s opacity is set correctly.
Tip
This is why the FileCollectionViewCell’s setEditing method allows you to control whether the change is animated or not. Cells that are being prepared in cellForItemAtIndexPath should not animate the change, because it would look a little odd for them to be fading in as you scroll. In addition, we’ll give all cells a closure to call when the deletion button is tapped.
Add the following code to collectionView(_, cellForRowAtIndexPath:) to add the deletion handler for cells. When the cell’s delete button is tapped, we’ll call the deleteDocumentAtURL method, which we’ll add in a moment:
overridefunccollectionView(collectionView:UICollectionView,cellForItemAtIndexPathindexPath:NSIndexPath)->UICollectionViewCell{// Get our cellletcell=collectionView.dequeueReusableCellWithReuseIdentifier("FileCell",forIndexPath:indexPath)as!FileCollectionViewCell// Get this object from the list of known filesleturl=availableFiles[indexPath.row]// Get the display namevarfileName:AnyObject?do{tryurl.getResourceValue(&fileName,forKey:NSURLNameKey)ifletfileName=fileNameas?String{cell.fileNameLabel!.text=fileName}}catch{cell.fileNameLabel!.text="Loading..."}>cell.setEditing(self.editing,animated:false)>cell.deletionHander={>self.deleteDocumentAtURL(url)>}// If this cell is openable, make it fully visible, and// make the cell able to be touchedifitemIsOpenable(url){cell.alpha=1.0cell.userInteractionEnabled=true}else{// But if it's not, make it semitransparent, and// make the cell not respond to inputcell.alpha=0.5cell.userInteractionEnabled=false}returncell}
Finally, add the deleteDocumentAtURL method, which actually deletes it:
funcdeleteDocumentAtURL(url:NSURL){letfileCoordinator=NSFileCoordinator(filePresenter:nil)fileCoordinator.coordinateWritingItemAtURL(url,options:.ForDeleting,error:nil){(urlForModifying)->Voidindo{tryNSFileManager.defaultManager().removeItemAtURL(urlForModifying)// Remove the URL from the listself.availableFiles=self.availableFiles.filter{$0!=url}// Update the collectionself.collectionView?.reloadData()}catchleterrorasNSError{letalert=UIAlertController(title:"Error deleting",message:error.localizedDescription,preferredStyle:UIAlertControllerStyle.Alert)alert.addAction(UIAlertAction(title:"Done",style:.Default,handler:nil))self.presentViewController(alert,animated:true,completion:nil)}}}
The deleteDocumentAtURL method, as its name suggests, removes a document from the system. However, you might notice that the line that actually does the deleting—that is, the call to NSFileManager’s removeItemAtURL method—is wrapped in a lot of other stuff. All of that is necessary, because the app is being extremely cautious about deleting the file at a safe time to do it. It does this through the use of an NSFileCoordinator.
The NSFileCoordinator class allows you to ensure that file-related tasks, such as opening, saving, deleting, and renaming files, are done in a way that won’t interfere with any other task on the system trying to work with the same file. For example, if you happen to attempt to open a file at the same time it’s deleted, you don’t want both actions to happen at the same time.
The coordinateWritingItemAtURL method lets you tell the system ahead of time what you intend to do with the file. In this case, we’re passing the .ForDeleting flag, indicating that we’d like to remove the file entirely. We also pass in a closure, which is run after the system has ensured that it’s safe to make changes. You’ll notice that the closure itself receives a parameter, called urlForModifying. This is an NSURL that the file coordinator provides to you to make changes to. This may or may not be the same as the original URL that you passed in; it’s possible that, in some cases, the file coordinator might provide you with a temporary URL for you to use instead.
Inside the closure, we remove the file by calling removeItemAtURL, passing in the URL that the file coordinator has given us. We also remove the original URL—not the one that the file coordinator has given us—from the list of available files. We do this by using the filter method on the array, which filters the array to only include items that are not url. We use the original URL, because if urlForModifying is different from the original url variable, we may not actually remove the entry from the list.
Lastly, we update the list of files by calling the collection view’s reloadData method.
Run the app, and tap the Edit button. The delete buttons will appear, and you can tap them to delete them.
Renaming Documents
Finally, we’ll add the ability to rename documents when you tap on their labels. The code for this will work in a similar way to deleting them: we’ll give each cell a closure to run when the user taps on the label, and in this closure, we’ll present a box that lets the user enter a new name.
To detect taps on the label, we need to create a gesture recognizer and connect it. We’ll be using a very simple “tap” gesture recognizer in this chapter, but we’ll be using a more complex one later, in “Deleting Attachments”.
-
Open Main.storyboard, and locate the label in the collection view cell.
-
Select the label, and go to the Attributes Inspector. Scroll down to the View section in the inspector, and select the User Interaction Enabled checkbox. This will allow the label to respond to taps.
Let’s now add the ability to detect when the user has tapped on the label.
-
Add the following code to the
collectionView(_, cellForItemAtIndexPath:)method, after the deletion code:overridefunccollectionView(collectionView:UICollectionView,cellForItemAtIndexPathindexPath:NSIndexPath)->UICollectionViewCell{// Get our cellletcell=collectionView.dequeueReusableCellWithReuseIdentifier("FileCell",forIndexPath:indexPath)as!FileCollectionViewCell// Get this object from the list of known filesleturl=availableFiles[indexPath.row]// Get the display namevarfileName:AnyObject?do{tryurl.getResourceValue(&fileName,forKey:NSURLNameKey)ifletfileName=fileNameas?String{cell.fileNameLabel!.text=fileName}}catch{cell.fileNameLabel!.text="Loading..."}cell.setEditing(self.editing,animated:false)cell.deletionHander={self.deleteDocumentAtURL(url)}>letlabelTapRecognizer=UITapGestureRecognizer(target:cell,>action:"renameTapped")>>cell.fileNameLabel?.gestureRecognizers=[labelTapRecognizer]>>cell.renameHander={>self.renameDocumentAtURL(url)>}// If this cell is openable, make it fully visible, and// make the cell able to be touchedifitemIsOpenable(url){cell.alpha=1.0cell.userInteractionEnabled=true}else{// But if it's not, make it semitransparent, and// make the cell not respond to inputcell.alpha=0.5cell.userInteractionEnabled=false}returncell}This code does several things:
-
First, it removes any existing gesture recognizers from the label. This is necessary, because cells get reused; if we don’t remove existing recognizers, we’ll end up with labels that attempt to rename multiple files at once when they’re tapped.
-
Next, it creates a new
UITapGestureRecognizerand makes it call the cell’srenameTappedmethod. It then adds it to the label. Once this is done, tapping on the label will make the cell call the rename handler block, which is added next. The rename block simply calls therenameDocumentAtURLmethod, which you’ll add in a second.
-
-
Add the following method to
DocumentListViewController:funcrenameDocumentAtURL(url:NSURL){// Create an alert boxletrenameBox=UIAlertController(title:"Rename Document",message:nil,preferredStyle:.Alert)// Add a text field to it that contains its current name, sans ".note"renameBox.addTextFieldWithConfigurationHandler({(textField)->Voidinletfilename=url.lastPathComponent?.stringByReplacingOccurrencesOfString(".note",withString:"")textField.text=filename})// Add the cancel button, which does nothingrenameBox.addAction(UIAlertAction(title:"Cancel",style:.Cancel,handler:nil))// Add the rename button, which actually does the renamingrenameBox.addAction(UIAlertAction(title:"Rename",style:.Default){(action)in// Attempt to construct a destination URL from// the name the user providedifletnewName=renameBox.textFields?.first?.text,letdestinationURL=url.URLByDeletingLastPathComponent?.URLByAppendingPathComponent(newName+".note"){letfileCoordinator=NSFileCoordinator(filePresenter:nil)// Indicate that we intend to do writingfileCoordinator.coordinateWritingItemAtURL(url,options:[],writingItemAtURL:destinationURL,options:[],error:nil,byAccessor:{(origin,destination)->Voidindo{// Perform the actual movetryNSFileManager.defaultManager().moveItemAtURL(origin,toURL:destination)// Remove the original URL from the file// list by filtering it outself.availableFiles=self.availableFiles.filter{$0!=url}// Add the new URL to the file listself.availableFiles.append(destination)// Refresh our collection of filesself.collectionView?.reloadData()}catchleterrorasNSError{NSLog("Failed to move \(origin) to "+"\(destination): \(error)")}})}})// Finally, present the box.self.presentViewController(renameBox,animated:true,completion:nil)}This method does several things:
-
First, it creates a
UIAlertController, which will be the interface through which the user actually renames the file. -
It adds a text field to it, using the
addTextFieldWithConfigurationHandlermethod. This method takes a closure, which is called to fill the text field with content; in this case, it will contain the file’s current name. -
It then adds two buttons: a cancel button, which does nothing except close the box, and a rename button.
The rename button, when tapped, gets the text that was entered and constructs a new
NSURLfor the document, representing where it will be moved to.Note
In Unix-based operating systems, such as iOS, “renaming” a file really means moving it to a new location. If you move a file called apples.txt to a new location called oranges.txt, you’ve renamed that file.
Once it has the new URL, it creates an
NSFileCoordinatorand asks it to coordinate a writing operation that involves both the file’s original location and the file’s new location.When the file coordinator is ready to perform the write, the
NSFileManageris then used to move the file from its original location to the new location. The file’s original URL is removed from theavailableFileslist, and the new location is then added.Finally, the collection view is asked to refresh its contents, and the user can view the result of the rename.
-
Conclusion
We have done a lot in this chapter, and we’ve added a whole lot of code! We’ve:
-
implemented the iOS
Documentversion of the document class, usingUIDocument, as a counterpart to the OS X version of our document class, which usesNSDocument. -
added support for listing whatever note documents are stored in iCloud.
-
added support for creating new documents and deleting or renaming existing documents.
So we’ve covered lot of the ins and outs of working with iCloud on iOS for documents. In the next chapter, we’ll add a new view to display the text content of notes and allow people to actually edit their notes, as well as save them.