Grades are a necessary evil in modern education. They take a complex task—learning a new subject—and reduce it to a single measure. Grades can function as both carrot and stick for motivating students, and they are the primary measure of success in a course. Tracking and calculating grades are serious and tedious tasks. Fortunately, Moodle has a great tool to help.
The Moodle grades area is a sophisticated tool for tracking student scores in your course. You can use it for scored activities both in the classroom and in Moodle. Moodle 1.8 introduces a number of useful improvements, including options to assign extra credit, grade on a curve, and exclude a particular score from a student’s total grade.
With the new improvements, you should consider using the Moodle gradebook as your primary tool for recording scores and calculating grades. Students will appreciate being able to check their grades at any time and to compare themselves to the class average.
Grades aren’t the only way to give feedback to students. With Moodle’s scales, you can create lists of nonnumeric feedback options for assessing student work. Moodle comes with one scale by default, “Separate and Connected ways of knowing,” which we’ll discuss later in this chapter. You can easily create your own additional scales for feedback options that are meaningful to you and your students.
This section covers the following MTC skills: 7.4 Grades
You can access the grades area by clicking the Grades link in the Administration block on your course page.
The View Grades page, as shown in Figure 13-1, contains a table listing students in the course together with their grades for each activity.
You can sort the table by student last name or first name by clicking the respective links under the student column on either the left or right side. Initially, it’s sorted by last name.
Tip
To display the grades for one particular student only, click on his name. This is useful when you are looking at grades together with a student and you need to protect the privacy of other students.
On the right is the Total column. There are two arrows for sorting student totals in descending or ascending order. There is also a Stats link, which displays statistics for the class in a pop-up window.
Each graded activity name links to the grades for that particular activity.
Buttons above the grades table enable you to download course grades in a choice of three formats: Open Document Spreadsheet, Excel, or text. Also at the top of the page is the Set Preferences tab.
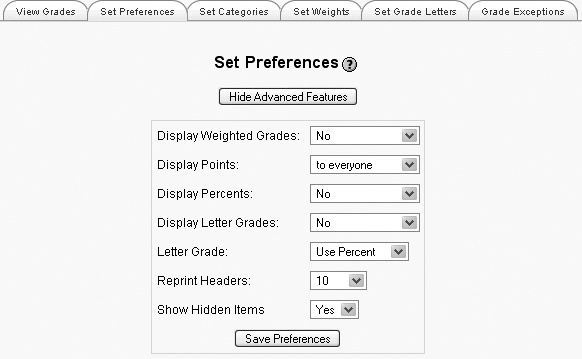
The Set Preferences page contains the following settings:
- Reprint Headers
This preference sets the frequency with which Moodle will display a row with the column labels rather than scores. With a large class, this feature can make it easier to view a large number of graded activities without losing track of individual grades.
- Show Hidden Items
You can choose whether to show or hide hidden graded activities on the View Grades page.
Clicking the “Use Advanced Features” button on the Set Preferences page reveals further settings, as shown in Figure 13-2. Tabs for setting categories, weights, grade letters, and grade exceptions appear at the top of the page. The advanced features enables you to manipulate the raw grade scores however you see fit.
- Display Weighted Grades
This determines whether or not the weighted percent will be displayed for you and/or students.
- Display Points
This determines whether points are displayed for you and/or students.
- Display Percents
This determines whether percentages are displayed for you and/or students.
- Display Letter Grades
This determines whether a letter grade is displayed for the course total.
- Letter Grade
This determines whether the letter grade is calculated using a raw or weighted percent.
Categories are the key to using most of the advanced features. Categories are simply collections of graded activities that you can manipulate together. The Extra Credit, Curving, and Weighting features all use Categories to identify which grades to use.
- Category
If you have a lot of graded activities in your course, then arranging them into categories will make grade viewing easier, since the View Grades page can be set to display grades for one particular category rather than for all activities. In addition, you will be able to set weights for the categories.
To add a new category:
On the Set Categories page, type a category name into the “Add category” box.
Click the “Add category” button.
You will then be able to categorize activities using the new category by selecting it from the Category drop-down menu next to the activity name.
- Curve To
Curving sets a new maximum point total for the category. For example, if the maximum grade for an assignment is 30 and the curve to is set to 25, then students’ grades and percentages will be calculated against a possible 25 points rather than 30.
- Extra Credit
This checkbox is for giving particular activities extra credit. If an activity is marked as extra credit, the points earned by a student will be added to the point total for the category but won’t increase the total possible points.
When you are done, click the “Save changes” button.
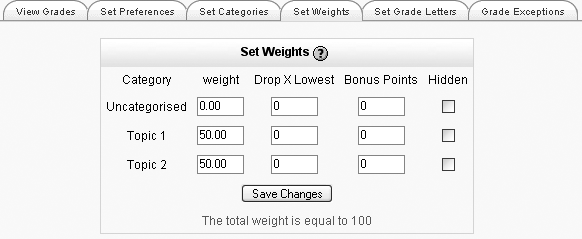
Once you have set up some categories, you can weight them appropriately on the Set Weights page, as shown in Figure 13-3. The options are:
- Weight
This allows you to weight grades by category. The weight is the percent that a category will contribute to a grade’s total. The individual weights must add up to 100.
- Drop X Lowest
This allows you to choose to omit grades for activities in which a student has performed badly. However, if you use this feature, the point totals for all activities in the category must be the same.
- Bonus Points
This is used to give extra points that do not change the point total for a category. For example, it can be used to adjust for unfair questions. Bonus points will be applied equally to all students.
- Hidden
If this box is checked it will remove a category from display and grade calculation.
Tip
The hidden category option provides a way of only adding items to the gradebook after they have been graded. Since graded items that have not been categorized will automatically be assigned to “Uncategorized,” you can set the Uncategorized category to hidden and then, as you grade items, move them to an appropriate category.
When you are done, click the “Save changes” button.
Here you can set an appropriate grade letter scale for the course total. You may choose letters (e.g., A, B, C, D, E) or words (e.g., Below Pass, Pass, Merit, Distinction).
To set your grade letter scale:
Edit the grade letters and/or low and high figures, or leave the default scale as it is. The figures must be written to two decimal places.
Click the “Save changes” button.
Here you can exclude students from having particular activities graded. This is useful, for example, in cases of extended illness.
To exclude a student from having an activity graded:
Click on the name of the activity(s) in the middle column. Holding down the Ctrl key will allow you to select multiple items.
Click on the student’s name in the left column.
Click on the “Exclude from Grading” button. The student’s name will be moved from the left column to the right.
The figures in brackets after the activity names in the middle column denote the number of students excluded from having the activity graded.
To include a previously excluded student:
Click on the name of the activity in the middle column.
Click on the student’s name in the right column.
Click on the “Include in Grading” button. The student’s name will be moved from the right column back to the left.
Students can check their grades by clicking the Grades link in their Administration block. They can see only their own grades, not the other students’, as shown in Figure 13-4.
As for the teacher view, on the right is a total column and a stats link, which displays statistics for the class in a pop-up window.


