In addition to the Touch, Color, and Infrared Sensors, the EV3 contains two types of built-in sensors: Brick Buttons and Rotation Sensors. You can use the Brick Buttons on the EV3 brick to control or influence a program while it’s running. For example, the program can ask you to press one of the buttons to choose what the robot should do next.
Each of the EV3 motors has a built-in Rotation Sensor that determines the position of the motor, allowing you to precisely control wheels or other mechanisms. The sensor also measures the motor speed, making it possible to detect when a motor is moving slower or faster than intended.
You can use the EV3 brick’s Up, Down, Left, Right, and Center buttons in your programs just as you use the Touch Sensor. You can make your robot respond by playing a sound when you press a particular button, for example. You can also make the robot wait for the button to be released or bumped (a press followed by a release).
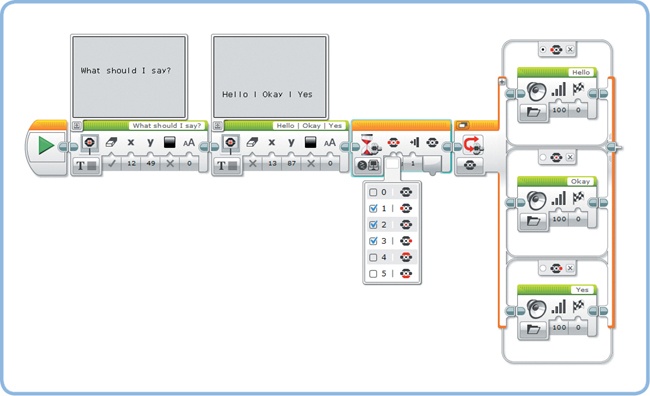
One interesting way to use multiple buttons in a program is to create a menu on the EV3 screen, letting you choose the next action in the program. The ButtonMenu program in Figure 9-1 plays one of three sounds based on which button the user presses.
Two Display blocks show a simple menu on the screen, asking the user to choose whether the robot should say “Hello,” “Okay,” or “Yes.” Then, a Wait block (in Brick Buttons – Compare mode) pauses the program until the user presses either the Left, Center, or Right button.
Figure 9-1. The ButtonMenu program. The Wait block is configured in Brick Buttons – Compare – Brick Buttons mode, and the Switch block is in Brick Buttons – Measure – Brick Buttons mode.
Next, a Switch block (in Brick Buttons – Measure mode) determines which button is being pressed, and the robot plays the requested sound. After the Wait block completes, the Switch block runs so quickly that the button is still pressed by the time the Switch checks the button state, even if you release it right away.
When you tell the robot to move forward for three rotations with the Move Steering block, the vehicle knows when to stop moving because the Rotation Sensor in each EV3 motor tells the EV3 how much it has turned. The program can also tell you how fast a motor is currently turning by measuring how fast the motor position changes.
You can use Wait, Loop, and Switch blocks in Motor Rotation mode to measure motor position (Degrees mode or Rotations mode) and motor speed (Current Power mode).
The motor position tells you how much a motor has turned since you started the program. Use the Port View app on the EV3 brick, navigate to motor B or C, and rotate the motors with your hands to see the sensor values change.
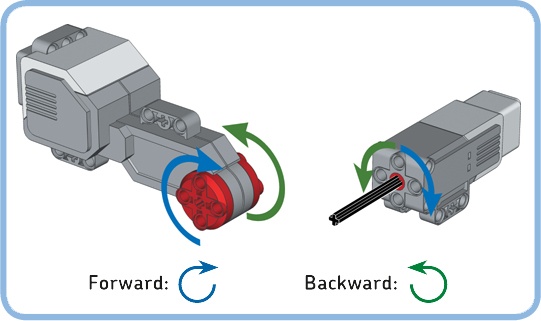
When you first start Port View (or your own program), the sensor value is 0. The value becomes positive when you rotate a motor forward; it becomes negative if you turn it backward past 0, as shown in Figure 9-2. For example, if you rotate the motor forward by 90 degrees and then backward for one rotation (360 degrees), the motor should report a position of −270 degrees.
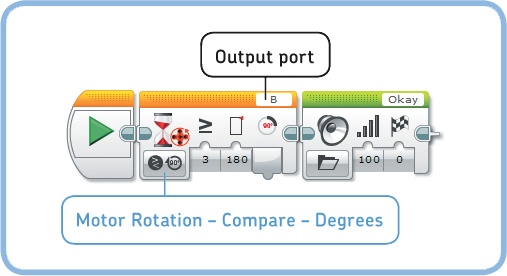
You can use the position measurement to create a program that plays a sound if you turn one wheel 180 degrees forward by hand, as shown in Figure 9-3. A Wait block in Motor Rotation – Compare – Degrees mode waits until the Rotation Sensor value is greater than or equal to (≥) 180 degrees. Because these sensors are built into the EV3 motors, they are always connected to output ports (you use the motor on output port B in this program).
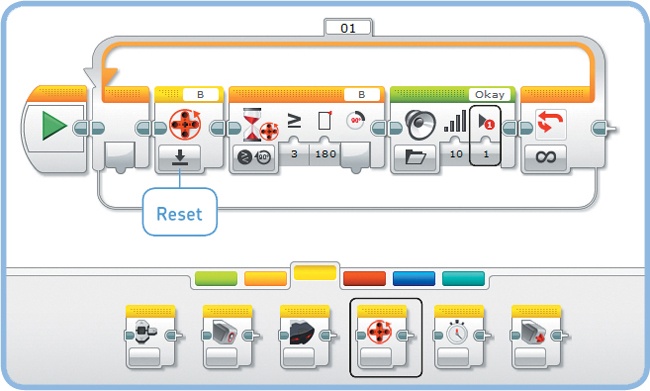
Now suppose you want to repeat the actions in the HandRotate program with a Loop block so that the sound plays again when you rotate the wheel another 180 degrees. The first sound plays when you rotate the motor forward by 180 degrees. But during the second run of the loop, the sound would play immediately because the sensor value is already greater than 180 degrees, which is not what you want.
The solution is to reset the Rotation Sensor value to 0 at the beginning of the Loop, using a Motor Rotation block in Reset mode, as shown in Figure 9-4. (You’ll explore the other features of this block and the other Sensor blocks later in Chapter 14.)
Run the program and verify that you hear the sound once each time you rotate the wheel 180 degrees forward.
The Rotation Sensor calculates how fast a motor turns as a value between −100% and 100% based on the rate at which the motor position changes. The value is positive when the motor turns forward (blue arrow in Figure 9-2), negative when the motor turns backward (green arrow), and 0 when the motor is not turning.
For the Large Motor, a Current Power sensor value of 50% corresponds to a rotational speed of 85 rotations per minute (rpm). You can reach this speed by rotating a motor with your hands or by using any of the Move blocks with its Power setting at 50%.
Figure 9-4. The HandRotateReset program sets the sensor value to 0 at the beginning of each loop with the Rotation Sensor block in Reset mode. Note that the Play Type setting in the Sound block is Play Once (1) so that the program doesn’t wait for the sound to finish.
You can calculate the speed measured in rotations per minute (rpm) using the Current Power value as follows:
large motor
rotational speed (rpm) = sensor value × 1.70
medium motor
rotational speed (rpm) = sensor value × 2.67
For example, if the Current Power value of a Large Motor is 30%, the motor rotates at 30 × 1.70 = 51 rotations per minute. Because one rotation per minute is equivalent to six degrees per second, you can calculate the rotational speed in degrees per second (deg/s) as follows:
rotational speed (deg/s) = rotational speed (rpm) × 6
In this example, you get 51 × 6 = 306 degrees per second.
To measure rotational speed in a program, you use the Current Power mode of the Rotation Sensor, as shown in Figure 9-6. The PushToStart program uses a Wait block configured to pause the program until motor B reaches a sensor value of 30% (51 rpm). Then, a Move Steering block takes over at the same speed. Run the program and push EXPLOR3R forward with your hands until it begins to move by itself.
So far, you’ve been using several kinds of green Move blocks to make your robot move. These blocks make the motors turn at a constant, regulated speed. When the motors slow down because of an obstacle or an incline, the EV3 supplies some extra power to the motor to keep it going at the desired speed. The Power setting on these blocks actually specifies the speed that the motors try to maintain. That is, a Large Motor turning at 20% speed (34 rpm) while performing a heavy task might consume more power than a motor doing a light task at 40% speed (68 rpm).
When you don’t want the EV3 to supply that extra power to maintain constant speed, you can use unregulated speed.
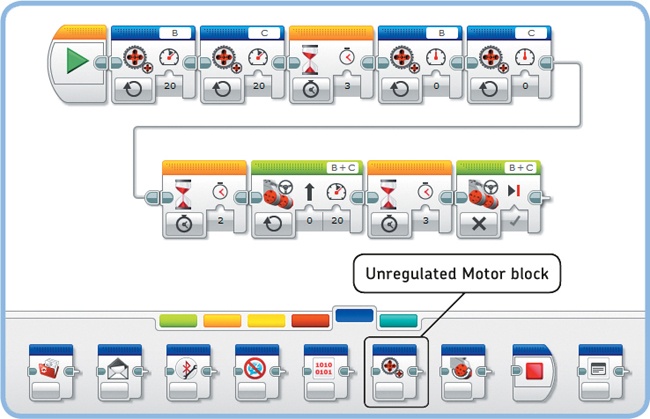
To see the difference between regulated speed and unregulated speed, you’ll create a program that makes the robot drive up a slope, such as a table with one end lifted up in the air. First, the robot drives at unregulated speed for three seconds, and then it drives at regulated speed for three seconds.
You need two Unregulated Motor blocks (one for each motor) from the advanced tab of the Programming Palette, with their Power setting at 20%, as shown in Figure 9-7. After waiting for three seconds, you stop the motors by setting their power to 0%. To drive at a regulated speed of 20% (34 rpm), the program uses the Move Steering block that you’ve seen before.
Figure 9-7. The SteepSlope program. Note that I used a Sequence Wire to split the program in two for better visibility, but you won’t need to do this in your program.
Place the EXPLOR3R on a tilted surface and run the SteepSlope program. You should find that the robot drives quite slowly up the slope during the first three seconds and that it goes faster during the next three seconds.
During the first part of the drive, the EV3 switches on both motors and leaves them alone for the next three seconds. The robot runs slowly because it takes more power to drive up a hill than to drive on even terrain. During the second part, the Rotation Sensors tell the robot that it’s going slowly, prompting the EV3 brick to supply some extra power to get the robot back up to speed.
If you try to slow down one of the wheels when a Move Steering block runs, you’ll feel that the robot tries harder to get back up to speed. This is fine for wheeled vehicles, but it’s often undesired for mechanisms that don’t make complete turns, such as a claw mechanism.
To avoid this problem, you can use the Unregulated Motor block and the Rotation Sensor to detect when the motor is stalled (blocked), as demonstrated by the WaitForStall program (see Figure 9-8). The program switches on motor B at 30% power and waits for the speed to drop below 5%, indicating that the motor is stalled. If you run this program on the EXPLOR3R, your robot should drive in circles until you slow down the robot by blocking its path.
Now that you’ve learned how to work with all of the sensors in the EV3 set, you can create robots that interact with their environment. The EXPLOR3R is, of course, only one example. As you continue reading this book, you’ll build several robots with sensors, each of which will use sensors differently.
So far, you’ve learned to use the components that are essential to create a working robot: the EV3, the motors, the sensors, and the programming software. The following chapters will explore each of these subjects in more detail so that you’ll be able to create increasingly sophisticated (and fun!) robots. In the next chapter, you’ll begin looking at how you can use the Technic building elements in the EV3 set to construct your own robots.
The following Discoveries will help you explore more possibilities with the sensors you’ve seen in this chapter.


