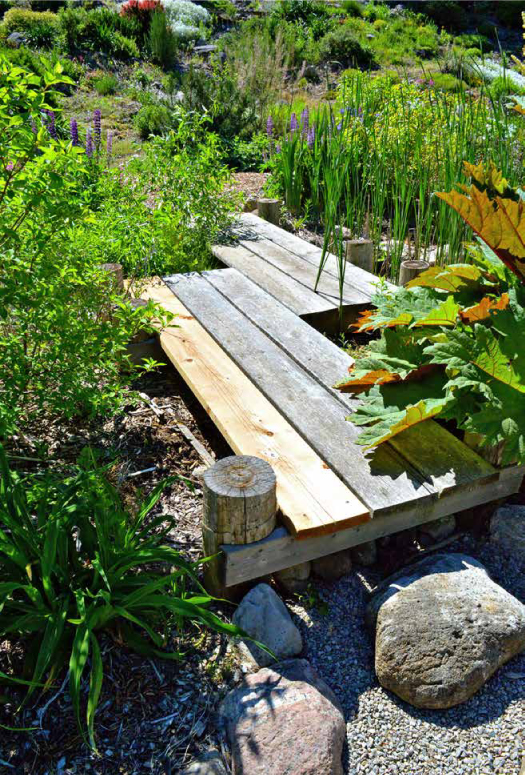
FIGURE 11
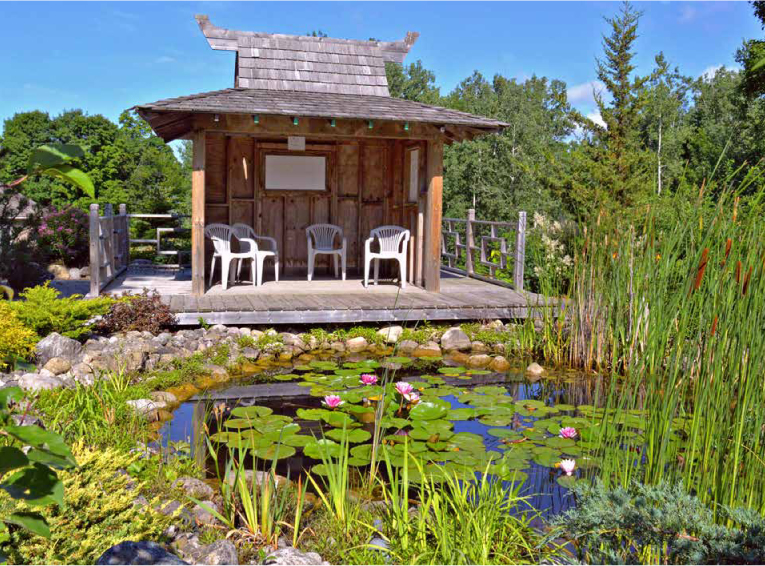
A dock provides easy access to the pond. This view shows the back to the teahouse pictured in figure 10.
Planning and Design
This chapter will help you go through a decision making process to create a plan for your project. While working through the sections, remember that many of them are interrelated, for example, the size of the pond and its location. When going through the process, you will probably have to change your original decisions to meet new requirements. Stay flexible and keep modifying your design as you progress.
It is advisable to write your plan down early in the process. Use lots of paper, and be prepared to discard a lot of it as the plan matures. Include drawings as well as lists of your decisions made or to be made. It is surprising how good an idea sounds while it is in your head. Once on paper, it’s not always as good. The act of drawing and writing forces you to more clearly analyze the plan. This also applies to designing the garden and the home.
The pictures in this chapter follow the construction of a new pond from start to finish.
The rest of this chapter will be mostly about practicable considerations for locating the pond. First I want you to think about the aesthetics of design. Where will the pond look its best? What kind of experience do you want from the pond? How do you want to enjoy it? A good way to start is to visualize the pond from inside the house. When you sit or stand inside, what do you see? Would you like that view to include a pond?
When building my waterfall, I positioned it so it was visible from the kitchen table. From this vantage point, I can look out at the waterfall, through a large bay window, every morning for breakfast. A big surprise for me was that I also enjoyed the view in winter when the water fall is covered in snow and ice. It is now a year-round feature for the house.
Do you have patio or plan to add one? It is great to situate the pond next to the patio so that you can get as much enjoyment out of it as possible.
A pond can also be put near the back of the property. Make it a destination at the end of a walk through your garden. Plan to put a bench there so you will sit and enjoy it while sipping morning coffee.
Ideally, you will be able to view your pond from several locations in the garden, but there will always be one that is most important. It might be the patio or it might be the bench you sit on while enjoying the pond. Stand at this spot and look beyond the imaginary pond. What do you see? Is the view pleasing? If the view is not that great, can you relocate the pond to give you a better view? If you don’t want to move the pond, consider relocating the primary viewing point. This may require changes to the garden, or it might be as simple as moving a bench. Looking at the same pond from a different direction may greatly enhance the pond experience.
My waterfall is placed so that I see it from both the house and patio. A separate pond, shown in figure 10, is located quite far from the house, at the top of a hill, a destination that takes me through much of the garden. There, facing away from the house, I am fully immersed in wilderness, seeing only trees and shrubs, away from the daily grind of life. Both water features were specifically located to provide these very different experiences. As part of the planning process, you need to decide on the type of experience you want to create.
Before you start dreaming of your new pond, check with local governments and organizations to understand the regulations for building ponds in your area. Each jurisdiction is different, and all this book can do is suggest places for you to check.
Safety issues are usually controlled at the local level. In my neighborhood, a pool has to be fenced to prevent children from accidently falling into it. A pond does not have the same requirements, which seems odd to me. What is the difference between a pool and a pond? It comes down to intent. If you build something that is intended for swimming, even if it is a pond, then the City considers it to be a pool and requires it to have a fence. If the design is clearly not meant for swimming, even if you could swim in it, it is a pond and requires no fence. This is my situation. Yours will probably be different, so check your own local requirements.
Properties that are located near natural water systems, such as lakes, rivers, and wetlands, are usually controlled by government regulations. You probably can’t divert a river to provide water to your pond. In wetlands, you will likely have additional restrictions about what you can and cannot do to change water levels. You might even need a permit to build a pond or have it inspected. The regulations may depend on the size and design of your pond. A detailed list of government regulatory bodies is given in the chapter on large-scale ponds.
This book recommends a natural pond design that does not require electricity, but you may want to have a source close by, for a variety of reasons. Small ponds can be dug by hand, and you don’t need any electrical equipment to do so. Large ones are usually dug by machinery using gasoline or diesel, not electricity. If your design includes wooden structures around the pond, you might want access to electricity for your power tools.
Adding electric lights to a pond can extend the amount of time you can enjoy it. New solar-powered lights are now also a viable option, provided that you are looking for lower light levels.
How will you turn the lights on and off? Will you use a timer at the pond? Do you want to be able to control them from inside the house? Running lights on a timer is an easy system to install, but wastes electricity when you are away or busy doing other things and can’t enjoy the outside lights.
When designing my waterfall, I planned to use lights in the water and the garden surrounding its lower pond. We have a great view of this area from both outside the house and a sunroom. It would be very inconvenient to run outside to turn the lights on and off. Instead they are wired directly to a switch in the kitchen. Now when I go to bed, I can easily turn the lights off without going outside.
Will you want to add a waterfall in the future? What about a fountain? If you think you might add these later, it is best to plan the electrical source now. If you use heavy equipment to dig the pond, the same excavator can dig trenches for the electrical lines and conduit can be put in place. This is much cheaper than doing it as a separate job in the future. It also means your lawn or garden will only be ripped up once.
Both solar and wind can be used at the pond to generate electricity, and these may be very good options if the pond is some distance from the home. These are detailed in the chapter called Large-scale Ponds.
Deciding on the size of the pond will be the most crucial, and probably the most difficult, decision you make. Unless you are creating an earth pond with no liner, it is a decision that can’t easily be changed. Once the pond is complete, it is almost impossible to enlarge or reduce it.
A good place to start is by visiting existing ponds on lots the same size as yours. This will give you the best perspective of how big the pond should be. Most owners will be quite happy talking to you and showing off their pond.
Many cities have annual garden tours that let you visit owners’ backyards and see their ponds. Some larger cities will even have tours featuring only gardens with water features. You can also look at pictures in books and online, but these will rarely give you a good perspective about the size of the pond relative to that of the property. You really need to see the pond in its surroundings.
As a general guide, I can state that you will always wish you had made it bigger. Larger ponds are more enjoyable and easier to maintain. However, your pond should look as if it fits into your yard. If you convert your whole backyard into a pond, it may look out of place. However, I know of one local pond and waterfall that takes up the whole backyard, and it is very impressive.
A larger pond costs more to dig the hole, get rid of the soil, and buy the liner. Purchased stones can add significantly to the expense. A larger surface area results in more evaporation, which requires more water, and in some locations, this can be a significant yearly cost. Plants are also more expensive, but you can always start with a small number and let them multiply naturally. It is easier to maintain a balanced ecosystem in a larger pond.
The natural pond design used in this book uses large planting shelves, compared to a standard pond. These shelves will take up one-third to one-half of the surface area and will make the pond look smaller than it is. A pond that is 10 × 10 feet, or 100 square feet, will only have about 55 square feet of open water. If you want 100 square feet of open water, you will have to build it 200 square feet.
Have you designed the rest of the garden? If you start with a grassy backyard and little in the way of landscaping, you may find it difficult to decide on the size of the pond. It is best to design the whole backyard as a single project. This allows you to understand how you will use the whole space and how much space to allocate to a pond. If you want to add a vegetable garden, a tool shed, and a patio, you might have automatically determined its allocated space. All of these landscape projects don’t have to be done simultaneously, but knowing the full plan will help you make the right decisions in sizing and placing your pond.
Shallow ponds heat up faster, which can be a problem for some types of fish. Goldfish and koi prefer cooler water. Warm water also encourages more algae growth. For these and other reasons, I recommend a depth of at least two feet deep; three feet is much better.
In cold climates, the pond may be covered with a full sheet of ice in winter. As the temperature drops, the ice thickens, mostly in a downward direction. Prolonged cold weather results in thicker ice and less water under the ice. You would think the pond would freeze solid fairly easily in zone 5 and colder areas, but there is also a warming factor. The center of the Earth is warm, and that warmth moves through the soil to the surface. In effect, there is a small heater at the bottom of the pond, the soil, which slows down the rate of freezing. A pond that is two feet deep will rarely freeze solid, except in extremely cold climates.
How thick will the ice get where you live? That is a difficult question to answer. The rate of ice thickening depends on temperature, wind, snow cover, and the current thickness of ice. Thick ice gets thicker more slowly than thin ice, and a cover of snow slows the process even more. As temperatures get near freezing, the ice gets thinner; on mild winter days, you actually loose ice. A more detailed discussion on how ice thickens is provided in the References section.
As a general guide, you can use the following information. It represents ice growth without the protection of snow.
Development of ice as a function of temperature and time
Average temperature (°F) |
Inches of ice growth in a week |
30 |
2 |
25 |
4 |
20 |
6 |
10 |
10 |
0 |
12 |
−20 |
16 |
Source: lakeice.squarespace.com/ice-growth/
After filling your pond the first time, you will probably need to top it up occasionally. Having easy access to water is a huge advantage. How will you fill the pond? In most backyards, you can easily run a garden hose from the house to the pond. With normal water pressure, you should be able to reach 1,000 feet with a 5/8-inch ID hose.
My previous house was on a normal-sized lot, and every couple of weeks, I would drag hoses all around the garden—it was always a lot of work. At my current house, I decided right from the start to lay some underground water lines. They are wonderful to use. If you are starting a landscape project, I would strongly recommend them. Have a tap in each garden and one near the pond. Ideally you want to reach the pond with one garden hose.
There are other sources of water to consider. Collecting rain water is not only cost-effective but also environmentally sound. Your roof collects quite a bit of rain, which can be used to top up your pond. Set up a series of barrels to collect the rain or run a line directly from the downspouts to the pond. An alternative is to make the pond an integral part of a rain garden. This is detailed in the chapter Pools, Bogs, and Rain Gardens.
Sloped ground can also be used to fill your pond. A hill or sloped area will have water runoff during a heavy rain that will follow the contours of your property to the lowest point. By locating the pond there, it will fill naturally each time it rains. However, this low spot can also cause a big problem. What happens if there is too much rain and the pond overfills? This is easily prevented by adding a spillway that will carry excess water away from the pond, provided it has some place to go.
Do you have a natural spring on your property? The water from this can be used to fill the pond, but do not build it on top of the spring. In this location, water comes up under the liner, which just does not work. A better setup is to locate the pond downhill and let the spring run into it. Alternatively, you might be able to add a pump to supply spring water to the pond.
Trees and ponds do not get along very well. Tree roots, which are mostly in the top six to eight inches of soil, are located much farther from the tree than most people realize. The old rule of thumb was that most feeder roots are at the drip line, the edge of the leaves, but we now know that they extend two or even three times this distance from the trunk of the tree. If you damage too many roots when excavating, you will harm or even kill the tree. How much is too much? That is really hard to say. It depends on the type of tree, age, and soil conditions. An arborist may be able to answer this, but they might not have much experience digging holes near trees. As a general rule, damage no more than one-quarter of the root system.
Trees cause another problem for ponds—they drop leaves. Even evergreen trees lose needles every year. The leaves falling into the pond add organic matter and put a strain on the balanced ecosystem. Some people recommend that ponds should not be placed near trees, and that certainly solves the problem. Others cover the pond in fall with netting to keep most leaves out. This works, but looks ugly and is extra work. In my experience, a properly planted natural pond can handle some leaves with no problem. A heavy load of leaves might need to be scooped out in fall.
Trees near the pond will make it look more natural. From a purely aesthetic point of view, they contribute a lot to the pond, so try to have some nearby. If you don’t have any, consider planting one or more on the north side of the pond.
The natural pond works because of all the plants, and most like lots of sun. For example, water lilies will not bloom without at least six hours of sun a day. Too many trees cause too much shade, especially on the south side. Locate your pond so that it gets at least six hours of direct sun, and keep in mind that trees grow. How much shade will you have in five and ten years?
There are basically three ways to create the bottom of a pond. Dig a hole, and let the natural soil create a seal to retain water. If your soil is suitable for holding water, this is a cheap and simple method. To determine if this will work, you will need to test your soil. This is detailed in the next chapter. The other two methods use a man-made material to keep the water in place: a rigid preformed liner or a flexible rubber liner
Preformed liners, hard plastic shells that are completely formed into the final shape of the pond, are available in various sizes for small and mid-sized ponds but not for large ponds. They are easier to install than a flexible liner, and you know exactly what the final pond will look like before you buy it. This convenience is balanced by the fact that you usually can’t have the exact shape you want. The natural pond design requires large planting shelves, and most preformed liners do not have them.
Preformed liners (figure 16) are a good choice for your first pond if you want to keep things simple, but the serious pond gardener will be much happier with a flexible liner. These can be used to make small ponds and can be joined together to make any size. Since the liner is flexible, it can also be formed into any desired shape, and installation is only marginally more difficult than a preformed liner.
The best way to enjoy your pond is to get close to the water. Many people like to sit right by the pond and daydream. You also need access, ideally on all sides, for doing maintenance on the plants.
Your design needs to include access to the pond. Will you have a patio next to it, or will there be a lawn? Will this access be on one side with plantings on the other three sides? How do you get from other key areas in your garden to the pond? If you come out of your back door and want to visit the pond, what kind of path will lead to the pond? Think about all of these questions as you select your location and start formalizing your design.
Because the path to the pond will be used quite a bit, it should be a significant part of your overall garden design and integrated into the pond design. Consider using the same material for this path as you have for others in the garden to create one cohesive landscape.
FIGURE 11
A dock provides easy access to the pond. This view shows the back to the teahouse pictured in figure 10.
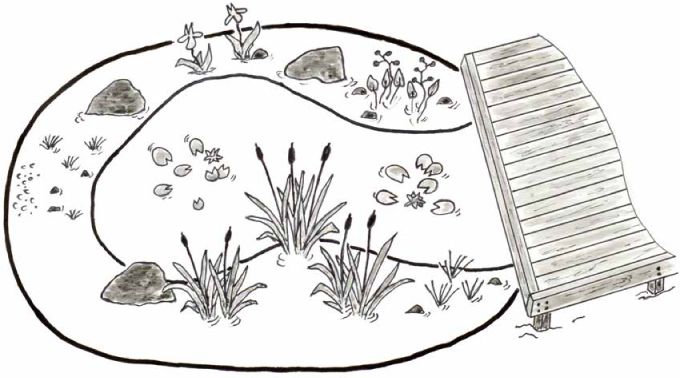
Think about accessing the actual edge of the water. The edge on most sides will consist of rocks that cover and hide the liner but are not easy to walk on. Some options to consider for the access point include a patio, a sandy beach, a dock, or even a bridge. A sandy beach is a nice feature on a larger pond, especially if you plan to swim in it. This also makes it easy for wildlife like small birds to come to the edge for a drink.
A bridge or dock can also add interest to the pond and garden. They offer a different outlook over the pond, more directly into the water, which is great for viewing fish. The dock shown in figures 10 and 11 crosses the pond, so that when you are standing on it, you don’t see the edge below the dock. The advantage of this design is that all four footings are outside of the pond liner, making construction a bit easier. In figure 28, the dock juts out over the water and also has all footings located outside of the pond liner. Alternatively, this dock could have been built with the two front footings in the water, using the construction methods described in chapter five.
It is essential to design the access points before construction starts, especially if you are adding bridges or docks, since they might change how you create the pond.
Most of the rocks that are used to hide the liner will eventually be hidden by plants, so their selection is not that critical. However, they will look best if they are roundish, without sharp edges, and don’t look man-made. Select some that are local to your area for a more natural look.
Choose rocks in various sizes from small to as large as you can handle. There is nothing as impressive as some very large rocks around a pond. A few good-sized ones will also be used inside the pond for aesthetic reasons. It is nice to have a few special rocks beside a beach area since it will be open and not hidden behind plants.
Although rocks can be expensive and you will need more than anticipated, in most areas of the country, they are easy to scrounge. Start by looking around your own property for some you can use. If your soil is naturally rocky, you will be getting a lot out of your excavation, but you will probably still need more. Start collecting them as soon as you begin planning a pond. Construction sites will usually let you take all the rocks you want. Farms and neighbor gardens may also have rocks they want to get rid of. Check the classified sections in newspapers and online. Anyone who doesn’t want the rocks will be happy to have you carry them away. However, rocks do belong to someone, and just because they are sitting along the side of the road does not mean they are yours for the taking. Always ask permission. Don’t take rocks from natural habitats because they are vital for wildlife.
Since the pond liner is either a square or rectangle, it naturally forms a circle or oval pond. Neither of these shapes is very natural looking. You could make an irregular-shaped pond, but that wastes a lot of liner. The best way to solve this problem is to make an oval pond with irregularly shaped planting shelves. Add wider shelves in some areas and narrower in others. The final apparent shape of the pond will follow the outline of the open water, not the actual shape of the edge. Once the plants are established, the pond will look irregular and natural.
Planting shelves should be equal to one-third to one-half of the total pond size.
Shelves that contain plants of different heights around the edge will also make the pond look less regular and more natural. Putting the right plants in the right places can also hide unwanted views behind the pond or expose desirable views. Stand at your main access point and decide where you want more or fewer plants. Then plan to have wider shelves where you want the most plants. You probably don’t want plants at your main access point because they reduce the view of the water. For the same reason, a beach area is usually designed without plants.
Adding some strategically placed larger rocks both around the perimeter of the pond and directly in the water will also change the perceived shape of the pond. A dock, bridge, or beach access point changes the view even more.
At this stage of planning, it is not essential to select the type of plants you will use, but there are some decisions you should make now. Most water plants will grow fine on the planting shelves in a few inches of water.
Water lilies are vital to the pond and need to be treated differently. They grow on the bottom of the pond and need a particular depth to grow properly. Figure out where to plant them at an appropriate depth. Small and medium-sized water lilies require one to two feet. Large ones thrive at two to three feet but should only be planted in ponds with more than 200 square feet of surface area.
There are two options for accommodating water lilies. You can create special planting shelves at the right depth, or you can make the pond deeper and then add some material that will create an artificial shelf. For example, cement blocks on the bottom of the pond could alter a four-foot-deep pond and raise large water lilies up to three feet. If you want to use planting shelves, plan their location and depth before you do any digging.
It is usually best to keep the water lilies away from the viewing area so they don’t block the view into the water. They also don’t like moving water, so plant them away from any inlet, waterfall, or fountain.
Start giving some thought to the plants that will be planted around the outside of the pond. Will these be short plants or tall? Are you trying to hide some views or open them up? Is the soil suitable or do you need to bring in some new top soil? What is the slope of the land surrounding the pond? Is it level or does it slope away from the pond? You might be able to use some of the excavated soil to fix a slope problem. It is easier to plant on level ground or a gentle slope.
Digging the hole for the pond will produce more soil than you think. What are you going to do with it? The excavated material is probably going to be poor, sub-soil quality. If you use this to level the garden, plan to top it with at least six inches of good top soil, which will make plants grow much better.
Is your property sloped? The excess soil can be used to level another part of the garden or allow you to build the pond on a slope. This will be discussed in more detail in the next chapter. If you can’t use the extra soil, it will need to be removed from the site, adding cost to the project. Check on free selling sites, like Craigslist, and you may find someone to take it away for free.