DEMONSTRATION using color studies as a reference
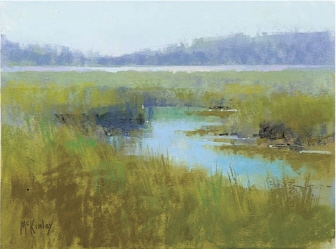
Artist Richard McKinley likes to work on location, but sometimes a painting done outdoors inspires him to paint a larger version of the subject back in the studio.
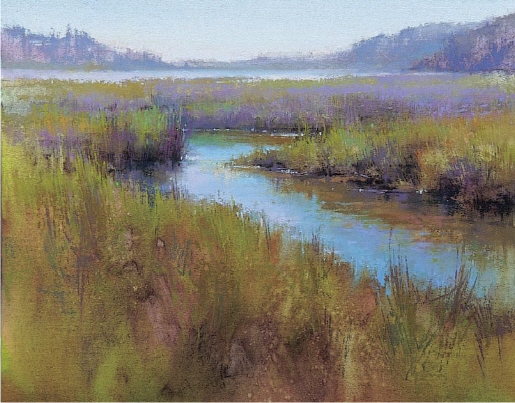
The artist spent a lot of time on location observing and studying the many moods of this landscape, its atmosphere and the play of textures in the tidal marshes. The quick study, on white Wallis Museum-Grade Sanded Paper mounted on illustration board, was done in less than an hour, with the purpose of capturing information that could be re-interpreted back in the studio.

Field study, Fir Island Afternoon
9" × 12" (23cm × 30cm) by Richard McKinley
materials list
White Museum Grade Wallis Sanded Pastel Paper mounted on museum board
Nos 4, 8 and 10 flat oil bristle brushes
2b drawing pencil
Soft paper towels
watercolor paints
Cadmium Yellow, Cadmium Red Orange, Burnt Sienna, Alizarin Crimson, Ultramarine Blue, Cobalt Blue, Paynes Gray, Sap Green
pastels
light warm white, middle-value lemon yellow, middle-value yellow-orange, light ochre yellow, middle-value orange-brown, middle-value ultramarine blue, light ultramarine blue, light cobalt blue, dark blue-green, light green-blue, middle-value turquoise blue, middle-value warm green, light warm green, light yellow-green, dark orange-green, light blue green, middle-value warm violet, light warm violet, dark blue-gray, middle-value blue-gray, light blue-gray, dark violet-gray, light violet-gray, middle-value gray-green
1 Make the Sketch for the Studio Piece
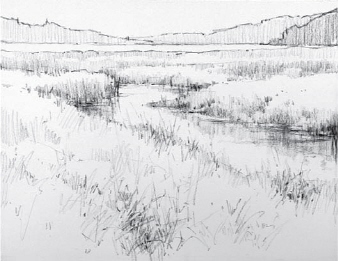
If you have any concerns about the composition, make a few thumbnail sketches. Otherwise, begin a pencil drawing with an ordinary 2b sketching pencil on a piece of 14" × 18" (36cm × 46cm) white Wallis Museum-Grade Paper, mounted on an illustration board. Work out the details of the composition and become familiar with the subject. Most of the drawing will be lost once the painting is started, but this allows you a chance to make sure everything is correct before adding pastel.
Look for rhythms and movement as you explore the subject in the drawing, and make changes and improvements from the initial field sketch. For example, moving the horizon higher in the studio composition adds more distance and a stronger sense of being grounded. The addition of a closer peninsula on the far right helps balance the composition.
2 Underpaint with Watercolor
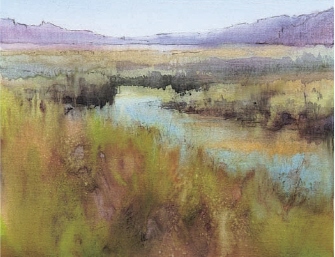
We already know that an under-painting is a way to set up the pastel painting to follow. Watercolor does not fill the tooth of the paper, so it’s a good choice of medium. (Note that the paper must be mounted to avoid buckling.)
As you underpaint, think about what colors and values of pastel you will be using. Where you plan to use light pastels, underpaint the watercolor a little darker to give the pastel layer depth and richness. Remember that pastel is an opaque medium and anything you do in the underpainting can be covered, so experiment. You have nothing to lose and everything to gain.

3 Begin Adding Pastel
After the underpainting dries thoroughly, you can start to apply pastel, mellowing some of the harder edges in the underpainting. Begin placing pastel around the focal point. In this composition, the focal point is located above center in the left side of the painting. Think about how you can use color and value to indicate aerial perspective—cooler, grayer and lighter colors in the distance and warmer, saturated and darker ones in the foreground.
Try not to just fill in the underpainting—use small strokes and bits and pieces of color to create texture and color. Lost and found edges are much more believable than overly rendered outlines. Since more can always be added it’s best to start in a softer, broken fashion, and refine just as much as necessary to complete the form. The beginning should be very soft; you’ll add more definition later.
To get rid of any strong pencil lines left from the drawing, use a light application of pastel and blend the color a little with a paper towel.
4 Refine and Move Forward
Begin painting the reflection of the water to create the shore. The underpainting works well for the grassy bank, so leave it until the end to resolve. If you paint it now, you could overwork it and lose the underpainting altogether. The water and bank are part of the center of interest, so paint them with stronger color notes, value contrasts and sharper edges.
Add more contrast to the distant water against the shore. Lighter values and more colors of similar value add importance, so add more violet to the distant marsh. As beautiful as the foreground and background are, this painting is about the mid-ground.
5 Complete the Foreground
Slowly paint the foreground—if you add too much pastel, the under-painting will be lost. Keep in mind the area of interest and avoid overworking other areas. Remember that the focal point is defined in part as the area of most detail.
Add more texture to the water surface with strokes of pastel, and continue to refine the reflections. The first indications of light sparks—those little twinkles of light where the sun hits the water and sparkles—and separation between the water and the shore can now be placed. It’s easy to get these too perfect and lose the sense of movement and air. Slight smudging helps, as does varying the pressure of the pastel.
Make any small adjustments you see fit now—each stroke of the pastel counts. Ask yourself this question: Will more help or hinder?
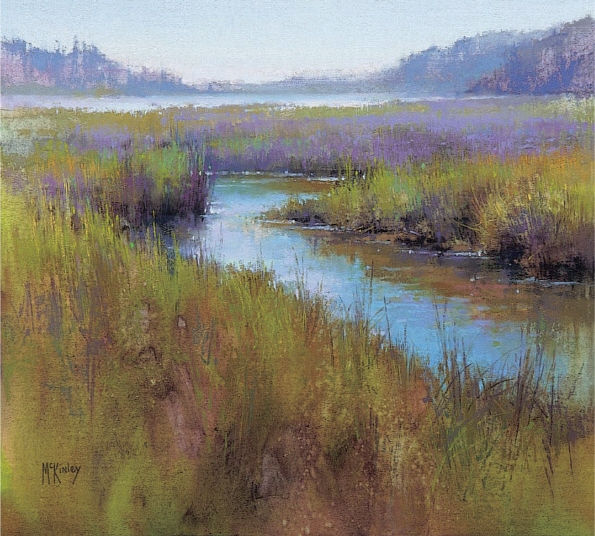
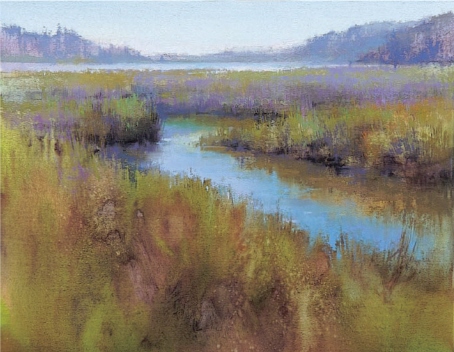
Fir Island Afternoon
14" × 18” (36cm × 46cm) by Richard McKinley
6 Finish the Painting
Before proceeding toward the finish, take a break. By resting from the concentration of the painting, you will come back to it with a fresh perspective. When you return to the painting, listen to it. Reevaluate your original concept so you can do what is needed to make the painting work, rather than force it to a predestined conclusion.
The final touches can be subtle. Strengthen the violet in the right-side grasses, which will intensify the green-silhouetted grasses in front of it and add interest. More separation of the water and shore can be accomplished with the addition of more light sparkles. Add intense, sharp notes of green to the green grasses on the left to make them stand out more. Paint soft violet-gray grasses in the foreground and silhouetted along the foreground shore, pulling the bank up above the water level. The violet helps to tie together the violet from the back into the foreground, creating more harmony. It is the same value but weaker in chroma so as not to compete with the focal area. Add some subtle, delicate golden grasses to the right shoreline to counterbalance the center of interest area. A few more notes of green can be added to the foreground grasses and a final strengthening of the light drifts on the water behind the grasses in the center of interest.
Compare this studio piece to the field study on using color studies as a reference. The experience and knowledge gained in the field study is translated to the studio piece and makes it stronger than working from a photo alone.