
Yin poses
Yin poses are passive and relaxing. Most of us live fast-paced and often stressful lifestyles. Combine this with challenging yang poses, yogacises and other types of exercise and an imbalance is created, which is why we need yin poses.
Yin poses are simple but also very challenging. They target the yin tissues (fascia, ligaments and tendons, rather than the yang tissues – muscles, blood and skin) and joints. This results in optimal mobility and strengthens the connective tissues. Each pose is held from 1 to 20 minutes to give the body time and space to open. Unlike muscles, which are elastic and respond well to the rhythmic movements of flows, yogacises and yang poses, connective tissues require a slow and gentle approach.
Rather than actively stretching and strengthening muscles as you do in yang poses, in yin poses the aim is to relax the muscles so we can target the joints. By stressing (not stretching) the connective tissues around the joints, the tissues will become longer, thicker and stronger over time. It is important not to use yang movements on yin tissues. Only with the long, gentle pressure of yin poses can yin tissues be strengthened and optimal mobility regained.
Yin poses can have a profound impact on our mental state too. By bringing our awareness inwards to our breath and the different sensations in our body during each pose, we will be able to notice changes in our emotional state as the yin nature of the poses brings a wholeness to our practice and unity to body, mind and heart. If you want to find out more about the philosophy on yin yoga then I highly recommend reading the work of Sarah Powers, Bernie Clark and Paul Grilley.
HOW TO PERFORM YIN POSES
•Move into the pose to an appropriate depth where you feel significant resistance, stretch, compression or twist – this is known as your edge.
•Play your edge and move deeper into the pose as your body opens.
•Remain still in the pose once you have found your edge to keep the muscles inactive, so you are targeting your joints.
•Hold the pose from 1–20 minutes, depending on the pose, by building the hold time up slowly. The hold times in this book are written as a number of breaths so you don’t have to clock watch. Aim to do 6–10 breaths per minute.
•Keep your focus on your breath to prevent your mind from wandering.
•Slight discomfort in yin poses is normal, but if you feel pain or tingling in the fingers or toes then come out of the pose slowly.
Benefits of yin poses
Yin poses help to improve flexibility by realigning muscle fibres in the fascia. They also increase range of motion by stimulating fibroblast growth and hydrate tissues and joints. Connective tissues are strengthened by the increased collagen production, and by working on the joints, yin poses help re-establish healthy spinal curves for optimal posture and movement. In addition to fibroblasts, osteoblasts, the cells that make bones, are also stimulated, which can help prevent bone degeneration that often occurs with age.
Performing yin poses also has many non-physical benefits, as it calms the body and mind, improves mindfulness by bringing awareness to the present moment and releases energy blockages trapped in the body.
LEGS & HIPS
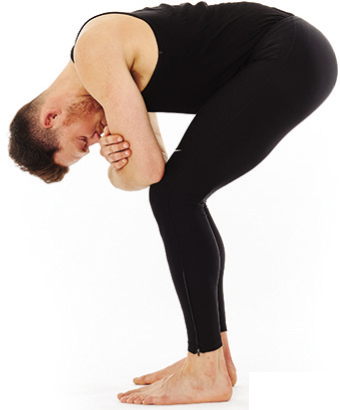
Ragdoll
TARGET AREAS
Stretches: Hamstrings, back and calves
Hold Time: 10–30 breaths
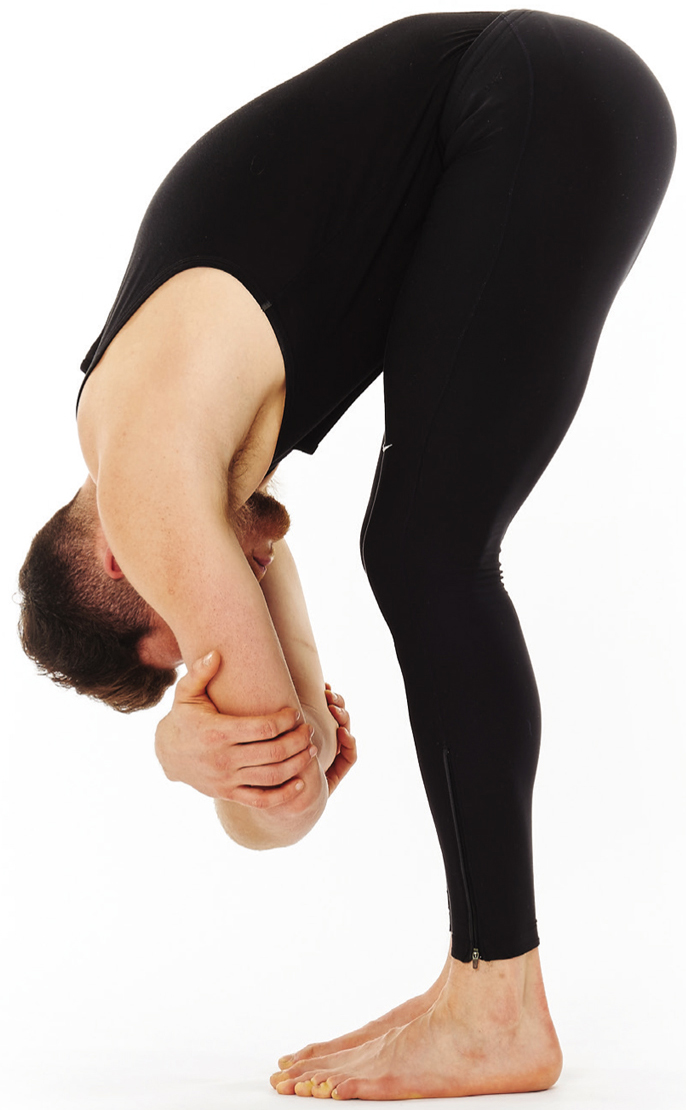
Ragdoll loosens the hamstrings and releases any tension from the lower back. Use as little muscular effort as possible so that your body can work with gravity to completely relax into the pose.
1. Start standing with your feet about hip-width apart. Soften your knees and slowly roll forwards one vertebrae at a time. Allow your spine to round and your head to hang. Take hold of the opposite elbow and dangle passively.
2. Allow gravity to help you fold forwards to release tension from your lower back and hamstrings. Let your head hang loosely and relax your elbows closer to the floor with each exhalation.
3. To come out of the pose, release your hands to the floor and slowly roll back up to standing.
Variations -- If you feel tightness in your back or hamstrings then bend your knees more and rest your elbows on your thighs.
Take it up a notch -- If you are already flexible then take hold of your elbows behind your thighs.
TIPS
Allow yourself to dangle passively in this pose and sway gently from side to side if that feels good.
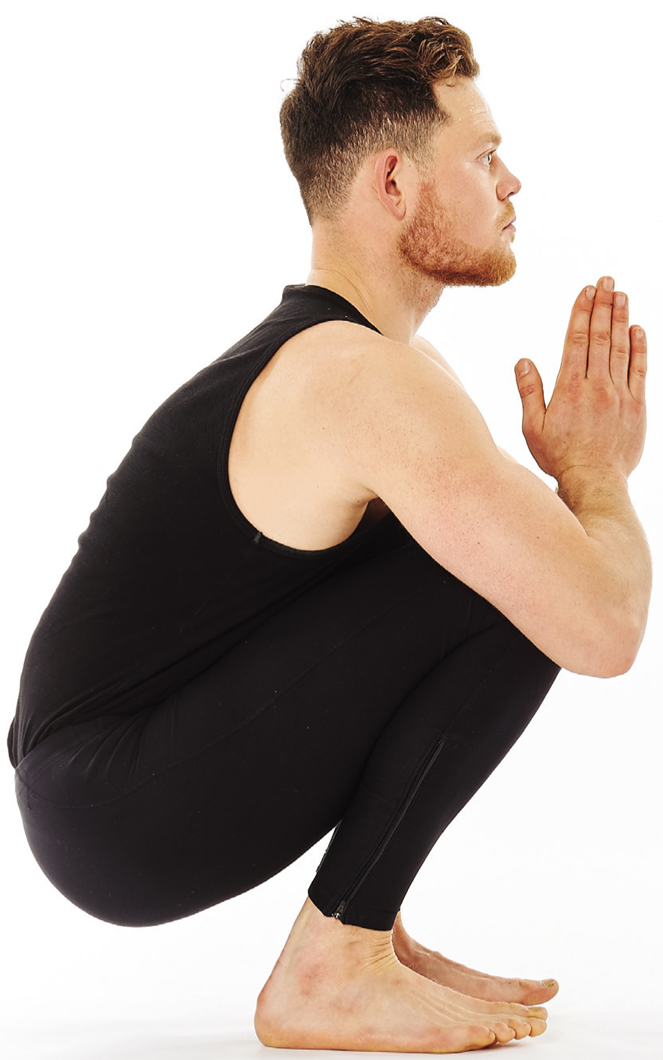
Wide Squat
TARGET AREAS
Stretches: Hips, inner thighs, lower back and ankles
Hold Time: 5–30 breaths

This is a lovely way to stretch the inner thighs, release tension from the hips, and increase mobility in the pelvis. Many people find it challenging to relax into the pose to begin with, so start holding the pose for 5 breaths and build it up to 30 breaths as your mind–muscle connection improves and your flexibility increases.
1. Begin standing with your feet slightly wider than hip-width apart. Turn your toes outwards about 45 degrees. Squat down to bring your bottom between your heels and bring your hands in front of you with your hands in Prayer Hands and your elbows resting on your inner thighs.
2. Focus on relaxing your heels and keeping your knees out to stretch the inner thighs.
3. To exit the pose, slowly straighten your legs to return to standing.
Variations -- If your heels are off the floor and you find it hard to balance with your hands in Prayer Hands then bring your fingertips to the floor either in front of or behind you or roll up some blankets under your heels.
TIPS
Flow between Wide Squat and Ragdoll to release tension from the lower back.
Toddler Squat
TARGET AREAS
Stretches: Back, hips, calves and ankles
Hold Time: 10–30 breaths
As children we could squat with our bottom on our heels quite easily, but as adults who sit in chairs most of the day, our mobility decreases and we lose our ability to squat. Toddler Squat helps restore flexibility by encouraging us to adopt a position that is innate.
1. Begin standing with your feet hip-width apart, feet parallel and your toes pointing forwards. Slowly bend your knees to lower your bottom down to your heels.
2. Keep your spine long and chest lifted. Focus on relaxing the muscles in your calves and anywhere else you feel restrictions in movement.
3. Exit the pose by straightening your legs and returning to standing.
Variations -- If you can’t squat all the way down then place a rolled up blanket under your heels to increase your range of movement.
TIPS
Check in with your feet once you are in the pose to make sure they are parallel.
Butterfly (yin) & Sleeping Butterfly
TARGET AREAS
Stretches: Back, inner thighs and hamstrings
Hold Time: 30–80 breaths

This pose is a passive version of Butterfly (yang). Although the name is the same, the intention of the pose is different. Butterfly (yang) actively stretches the muscles around the hips whereas Butterfly (yin) relaxes the muscles and targets the connective tissues to increase flexibility. Performing a Butterfly (yin) and Butterfly (yang) back to back increases mobility by working with the muscles, fascia, connective tissues and nervous system.
1. Begin seated and bring the soles of your feet together with your heels about foot-distance away from your groin. Fold forwards, allowing your spine to round. Gently keep hold of your toes or rest your hands in front of you.
2. Focus on relaxing the muscles in your hips and thighs by visualising your knees sinking closer to the floor.
3. Exit the pose by rolling back to seated. Bring your hands to the outside of your thighs and bring your knees together. Stretch out your legs in front of you to counter the pose.
Variations -- Sleeping Butterfly is a lovely alternative to Butterfly (yin). For this, bring the soles of your feet together and slowly lower yourself on to your back. Rest your hands on your belly to feel yourself breathing or leave them either side of you with your palms to the sky.
TIPS
To target the hamstrings move your feet further away from you, and to target the inner thighs draw your heels closer to your groin
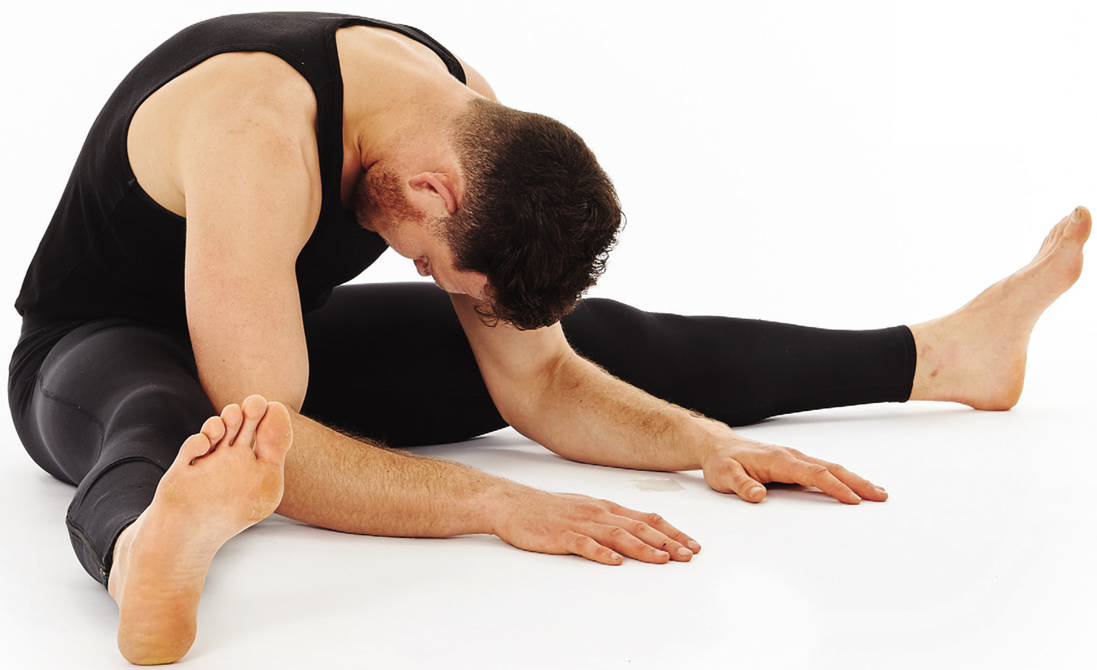
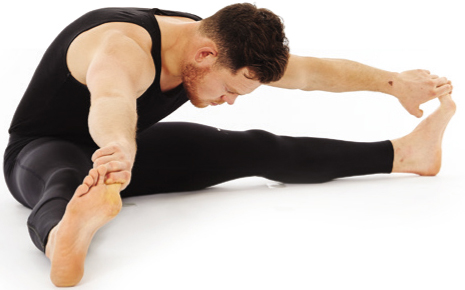
Half Butterfly (yin)
TARGET AREAS
Stretches: Back, inner thighs and hamstrings
Hold Time: 30–50 breaths each side

The yin version of Half Butterfly looks similar to the yang variation. However, instead of lengthening and strengthening the muscles, we are relaxing the muscles and releasing tension from the body with the power of the breath.
1. Begin seated in Butterfly (yin) and straighten your right leg out to the side. Fold forwards by allowing your back to round and rest your hands on the floor in front of you.
2. Notice any areas that feel particularly tight and concentrate on relaxing those muscles. Walk your fingers slightly further forwards as your body relaxes.
3. Exit the pose by rolling slowly up to seated and repeat with your left leg straight.
Variations -- To target the hamstrings, fold over the outstretched leg.
TIPS
Work just outside your comfort zone so you can feel the pose working but you don’t feel pain.
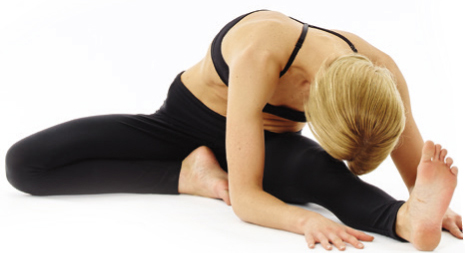
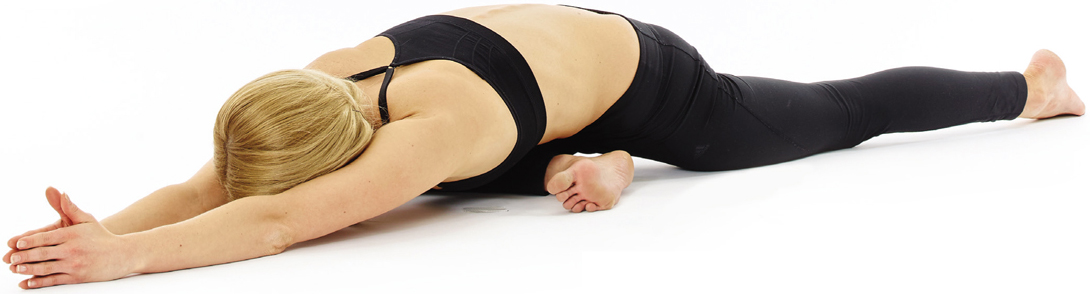
Straddle
TARGET AREAS
Stretches: Inner thighs, hamstrings and spine
Hold Time: 30–80 breaths
We tend to hold a lot of tension in our hips, so Straddle is a great pose to release any tightness. People often find that when they let go of physical tension in poses like Straddle they also feel an emotional release too, so don’t be surprised if you feel delicate for a time afterwards.
1. Begin seated and spread your legs as wide as you can. Allow your spine to round and fold forwards by walking your fingertips forwards with your weight in your palms.
2. Relax here and play your edge by creeping your fingers further forwards as your body opens.
3. To exit the pose, push the floor away through your hands and slowly roll up to seated. Bring your legs together and shake them out a little if needed.
Variations -- If you feel particularly tight then sit on a cushion or bolster to help tilt your hips forwards.
Take it up a notch -- If you can get your chest to the floor then spread your arms out to the sides.
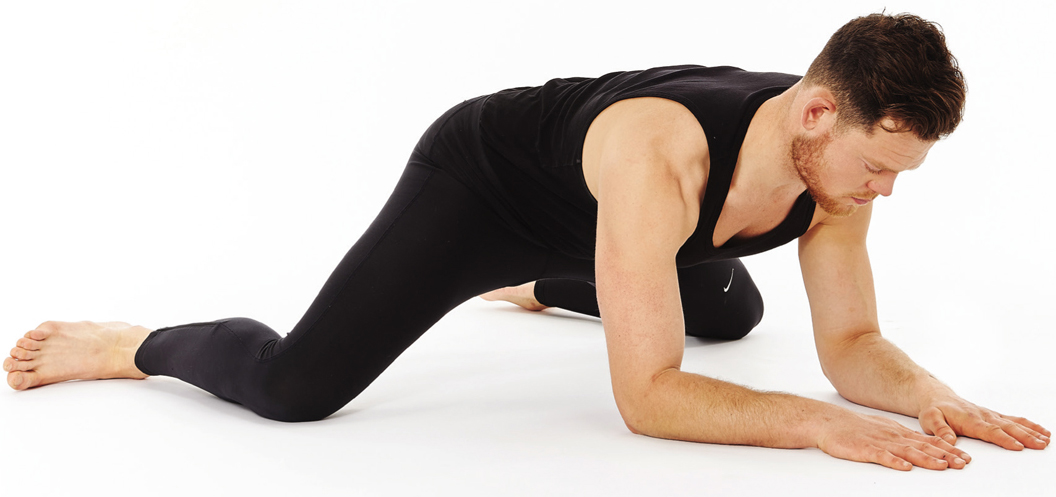
Sleeping Pigeon
TARGET AREAS
Stretches: Hips, inner thigh, bottom and lower back
Hold Time: 10–30 breaths each side
Sleeping Pigeon opens the hips and releases tension from the lower back. It is a great pose to get to know your body and where you hold your stress. Some people feel a stretch in their inner thigh and others feel it in the outside of the buttock of the bent leg.
1. Begin on all fours in Table Top and bring your right knee to the outside of your right wrist. Take hold of your right foot and bring your toes to meet your left wrist so your shin is horizontal in front of you. Hook your left toes under and lift your left knee back until you find your edge and feel your hips open. Stay here for a few moments in Pigeon pose to allow gravity to stretch the hips.
2. Fold forwards into Sleeping Pigeon by lying your chest on your shin and reaching your arms in front of you. As your muscles relax into the pose, play your edge by sinking your hips closer to the ground and moving your hands further forwards.
3. To exit the pose, lift your chest back to Pigeon pose, hook your left toes under and lift yourself back to Table Top or Down Dog. Repeat with the left leg bent in front.
Variations -- If you feel any pressure in your knee then bring the heel of the bent leg back towards the opposite hip so the shin is diagonal rather than horizontal.
TIPS
Flex the toes of the bent leg to protect your knee.
Keep your hips even to feel the full benefit of the pose.
Dragons
TARGET AREAS
Stretches: Hamstrings and hips
Hold Time: 10–30 breaths per Dragon each side

There are five different styles of Dragon and these can be performed individually or by cycling through all of them to target slightly different areas of the hips and thighs. Each of these poses open the hips deeply, so build up the hold time slowly as your body relaxes and loosens.
1. Begin in Table Top on your hands and knees and step your left foot between your hands so your left knee is directly above the ankle. Slide your right knee back as far as you can, leaving your hands either side of your right foot in Baby Dragon.
2. After holding Baby Dragon, more to Dragon Flying High by bringing both hands to rest on your left knee so your torso is upright.
3. To work the hips deeper, move to Dragon Flying Low by placing both hands on the inside of your left foot and then moving down on to your forearms.
4. Move to Winged Dragon by gently pushing your left knee away from you as you wing out on the outer edge of your foot.
5. Move to Twisted Dragon by placing your left hand on your left knee and leaving your right hand on the floor. Twist towards your left knee by rotating your chest to the sky.
6. Exit the pose by hooking your right toes under and lifting yourself back to Down Dog before repeating the Dragons with your left leg forwards.
Variations -- If your hips are tight and you’re feeling pressure in your back knee then roll up a blanket and place it underneath your knee.
TIPS
Notice the difference between pain and discomfort. If you ever feel pain, leave the pose, but if it is slight discomfort then lean into it and allow it to pass.
Shoelace
TARGET AREAS
Stretches: Hips and lower back
Hold Time: 30–50 breaths each side

Shoelace is a deep hip-opener and a psychologically challenging pose to remain in. If you have been sitting at a desk all day or doing any sport such as cycling for which you are moving your legs up and down rather than side to side or rotating them, then this is a great pose to restore optimum range of movement.
1. Begin sitting cross-legged on the floor and move your right heel to the outside of your left buttock. Stack your left knee on top of your right knee and bring your left heel to the outside of your right buttock.
2. Anchor your buttocks to the floor and then bring both feet as far forwards away from your buttocks as you can, keeping your knees stacked. Remain upright or fold forwards and reach your arms out in front of you.
3. Exit the pose by rolling back up to seated, leaning back to release the hips and lengthening your legs out in front of you. Repeat with your left knee stacked on top of your right one.
Variations -- If it is too challenging to stack your knees on top of each other, then keep the leg that is on top straight in Half Shoelace.
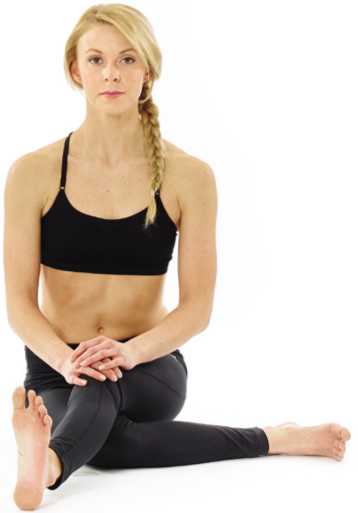
TIPS
Visualise the muscles in your hips lengthening and loosening to help you relax into the pose.
Deer
TARGET AREAS
Stretches: Thighs and hips
Hold Time: 30–50 breaths each side
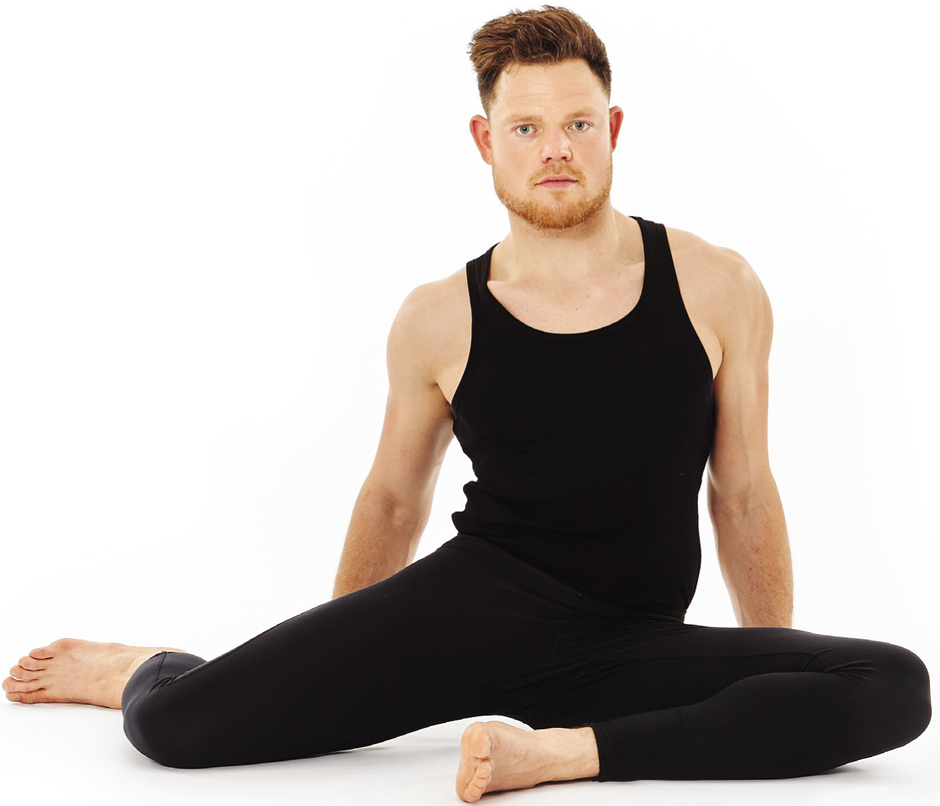
Deer pose is a deep hip-opener that brings the body into balance through internal and external rotation. You may need to play around with your leg angle and weight distribution until you feel a strong sensation in your hips.
1. Begin seated with the soles of your feet together in Butterfly (yin) pose. Swing your right leg around behind you and position the right foot so your right knee is at a right angle. Move your left foot forwards until your thigh and shin make a right angle.
2. When in the pose, focus on rooting both buttocks to the ground. As your hips relax, move your right foot further away from your right hip.
3. To exit the pose, lean to the left and bring your right foot back to Butterfly (yin) before repeating with your left leg behind.
TIPS
It is easy to tilt away from the back foot so make sure your hips are even and both buttocks are anchored to the ground.
Notice any difference between the left and right leg and be aware of these throughout your workout or yoga session.
Sleeping Hero
TARGET AREAS
Stretches: Thighs, hips and ankles
Hold Time: 10–50 breaths
This is a lovely pose to relax in if you’ve been on your feet all day. Many people, especially runners and cyclists, find the fronts of their thighs can be quite tight, so lower yourself slowly into the pose to give your body an opportunity to get used to the position.
1. Begin kneeling and bring your bottom to the ground in between your feet to Hero pose. Lower yourself backwards on to your elbows and then recline on to your back. Let your arms rest to your side.
2. Tune in to any tightness you feel in the fronts of your thighs and your hips and focus on relaxing those muscles so you can sink deeper into the pose.
3. Exit the pose the same way as you entered it, by pushing yourself back on to your elbows and up to kneeling. Lift your bottom off the ground before straightening your legs to seated.
Variations -- If you’re very tight in your hips or the fronts of your thighs then you may find it challenging to recline in this pose. Instead, remain with your bottom between your heels or sitting on a cushion and your torso upright in Hero. You can also focus on one leg at a time in Half Hero by lengthening one leg out in front of you before you lower yourself on to your back.
Take it up a notch -- If you want to deepen the stretch in the front of your thighs then lower yourself into Sleeping Half Hero, for which you bend the outstretched leg and hug the knee towards your chest.
TIPS
Keep your back flat to the floor so the pose focuses on the thighs and hips rather than the spine.
If your knees hurt then leave the pose slowly. If you have any existing knee problems, skip this pose.
Frog
TARGET AREAS
Stretches: Inner thighs and spine
Hold Time: 30–50 breaths
Frog is a lovely pose to increase flexibility in your hips. Depending on how open your hips are to begin with, you can start in Tadpole and work your way up to full Frog as your body learns the posture and relaxes into it.
1. Begin in Child’s Pose and reach forwards with your arms to bring your palms to the ground. Spread your knees as wide as you can into Tadpole, then separate your feet so they are in line with your knees and your shins are parallel.
2. Give yourself enough time in this pose for your hips and thighs to release to allow you to fully relax.
3. Exit the pose by bringing your toes and knees together and shift your bottom back to Child’s Pose.
Variations -- If your hips are tight then leave your toes together in Tadpole or lift your hips to bring them in line with your knees in Half Frog so gravity can have more impact on the pose.

TIPS
Use padding underneath your knees to protect them if the floor is hard.
Eye of the Needle
TARGET AREAS
Stretches: Hips, bottom, thighs and spine
Hold Time: 30–50 breaths
Eye of the Needle is a reclining version of Sleeping Pigeon. It opens the hips slowly and steadily because you have control of how deep you want to go into the pose. Begin gently and increase the stretch as your body opens.
1. Start on your back with your knees bent and feet about hip-width apart. Place your right ankle on your left knee so it is resting across the thigh. Flex the right foot and then take hold of your left thigh and pull it towards you so your left foot leaves the ground. Use your right elbow to push your right knee back to keep it in line with your ankle.
2. As your lower body relaxes, draw your left thigh closer towards you to deepen the pose in the outer right thigh and bottom.
3. Exit the pose by returning your left foot to the ground, releasing your right foot from across your left knee and placing your right foot on the floor. Repeat on the left side.
TIPS
Let your tailbone leave the floor if you want to release tension from the lower back.
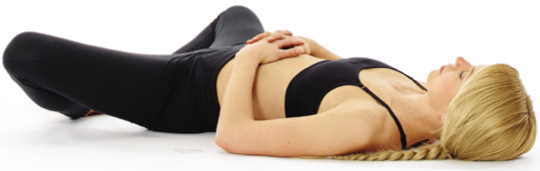
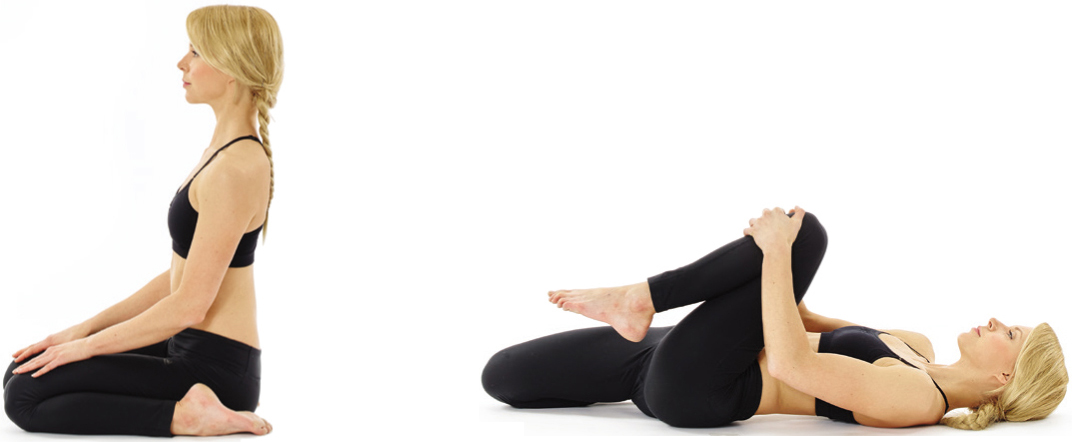
Happy Baby
TARGET AREAS
Stretches: Hips, hamstring and lower back
Hold Time: 3-5 minutes

Happy Baby is a pose you often see new-borns embracing. It is a deep hip-opener and also stretches the hamstrings and decompresses the lower back. If you have been working on backbends, this is a great counter pose to relax in afterwards.
1. Lie down on your back and hug your knees into your chest. Take hold of your big toes and bring your shins so they are vertical to the floor and the soles of your feet are facing the ceiling.
2. With your feet aligned above your knees, engage your biceps to pull your knees to the floor just below your armpits. Keep your head and shoulders relaxed on the floor.
3. Exit the pose by releasing your feet to the floor with your knees bent.
Variations -- You can also focus on one leg at a time in Half Happy Baby by keeping one leg straight.
TIPS
Allow your hips to come up off the floor to help release the lower back.
Rock slowly from side to side to give your spine a massage.
SHOULDERS & SPINE
Neck Release
TARGET AREAS
Stretches: Neck and shoulders
Hold Time: 10 breaths each side

We hold a lot of tension in our neck and shoulders from looking at computer screens, driving and other activities of daily living. Tight neck muscles are a common cause of headaches and migraines and can also affect your breathing so it is important to keep the neck mobile.
1. Begin in any comfortable seated position. Begin with lateral flexion of the neck by dropping your right ear towards your right shoulder. Bring your right hand to rest on the side of your head to increase the stretch. Release and repeat to the left.
2. For forward flexion of the neck, lengthen the top of your head to the sky as you inhale and then as you exhale stick your chin forwards and bring your chin towards your chest. Interlace your fingers and rest your palms on the back of your head with your elbows hanging down towards the floor. Release the pose by taking your hands off the back of your head and slowly rolling your head back up to neutral.
3. For neck extension, lengthen the crown of your head to the sky as you inhale and drop your head back slowly as you exhale. Open your mouth if you need to and notice any sensations. Come out of the pose by bringing your head back to neutral.
TIPS
When resting your hand on your head, don’t push down but allow the weight of gravity to increase the stretch.
Melting Heart
TARGET AREAS
Stretches: Back and shoulders
Hold Time: 30–50 breaths
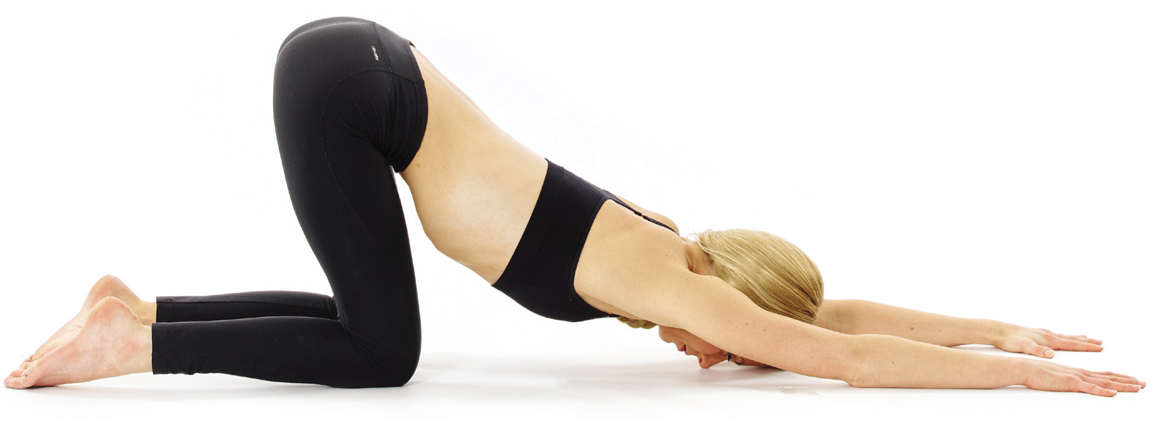
Melting Heart is a gentle backbend that can be used as a warm-up before deeper yang backbends such as Camel and Bridge. We tend to hold a lot of tension in our spine and shoulders so it is also a wonderful pose to do after a long day at work to help you release any stress and calm any anxiety.
1. Begin on all fours in Table Top and walk your fingers forwards. Allow your chest to sink towards the floor and rest your forehead on the ground. Aim to keep your hips stacked over your knees and your hands shoulder-width apart.
2. Focus on releasing any tightness from the shoulders and upper back. Channel every inhale into any areas of tension and with each exhale allow yourself to soften deeper into the pose as your muscles relax.
3. To come out of the pose, slowly shift your bottom to your heels and wrap your arms around behind you with your palms to the sky. Rest here in Child’s Pose for a moment before pushing back to Table Top.
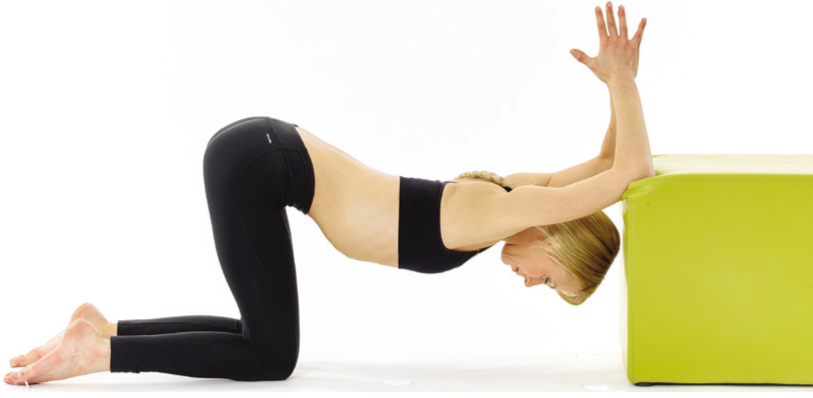
Take it up a notch -- To target the shoulders more deeply, come into Table Top in front of a stable surface and rest your upper arms on the edge of the surface. Bend your elbows and bring your palms together so your fingertips are facing the ceiling and sink your head down between your arms.
TIPS
If you feel any pinching in your shoulders then move your hands a bit further apart.
As any tightness in your shoulders and upper back subsides and your body opens, move into that space by walking your fingers slightly further forwards.
Child’s Pose
TARGET AREAS
Relaxes: Back and ankles
Hold Time: 30–50 breaths
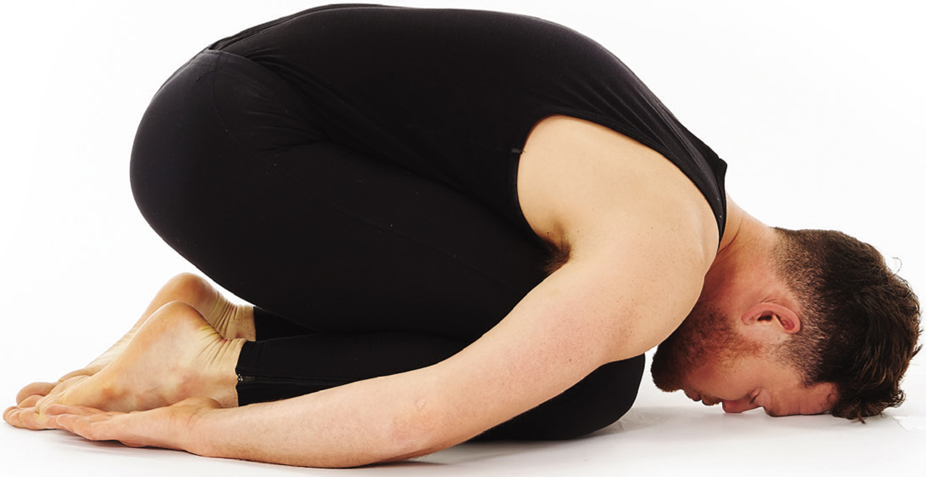
If you need a rest during a Yoga Gym workout or your own yoga practice then Child’s Pose is a lovely position in which to relax. It is a restorative pose that gently stretches the spine to relieve back and neck pain and compresses the stomach to improve digestion. Just as a child curls up into the foetal position when they are feeling upset, Child’s Pose is a good pose to use to soothe anxiety and depression.
1. Begin on all fours in Table Top, shift your bottom back to rest on your heels and wrap your arms around behind you with your palms to the sky. Bring your knees as close together as possible and rest your forehead on the ground in front of you.
2. Allow yourself to completely relax into this pose. This is the perfect opportunity to scan your body, become aware of your energy levels and notice any areas of tightness or tension you can release throughout your workout.
3. Exit the pose by using your hands to slowly push up to kneeling. Roll up one vertebrae at a time to bring your head up last.
Variations -- If you struggle to get your bottom resting on your heels then rest your head on a block to counterbalance the pose and support the neck.
TIPS
If you find your mind starts to wander when you’re in this pose then focus on your breathing.
Spreading your knees slightly wider can provide a good stretch to the inner thigh.
Thread the Needle
TARGET AREAS
Relaxes: Shoulders and spine
Hold Time: 30–50 breaths

This is a gentle twist for the spine that targets the upper back and shoulders. If you spend a lot of time at a desk then this is a brilliant pose to use to stretch out your shoulders, or if you are stressed try this pose to let go of any tension.
1. Begin on your hands and knees in Table Top. Thread your left arm underneath your right armpit to bring your left shoulder blade to the floor. Walk your right fingertips forwards to straighten your arm and look up and under your right armpit.
2. Allow your spine to unwind and your shoulders to relax by leaning into any discomfort until it passes.
3. Exit the pose by walking your right fingers back towards you and pushing up to Table Top. Repeat on the other side.
TIPS
The hips have a tendency to wander off to the side in this pose, so nudge them back to centre to help tension in your spine further unwind.
Caterpillar
TARGET AREAS
Relaxes: Back, neck and hamstrings
Hold Time: 30–50 breaths

Caterpillar is a relaxing forward bend. Unlike yang forward bends, for which the aim is to keep the spine long, in yin forward bends you allow the spine to round and the head to hang. This positively stresses the ligaments in the spine to strengthen them and releases tension in the back and hamstrings to increase flexibility.
1. Begin seated with both legs lengthened out in front of you. Fold forwards, allowing your back to round and resting your forehead on your shins or letting your head hang. Rest your arms either side of your legs.
2. Give your body the time and space to relax in this pose without any pushing or pulling. As you feel your muscles loosen then move into the slack that’s created to deepen the pose.
3. To exit the pose, slowly roll up to seated.
Variations -- If you feel tension in your neck then place a cushion on your legs to rest your head on, or bend your arms and rest your head in your hands.
Take it up a notch -- See if you can spread your legs slightly and allow your chest to sink down in between them.

TIPS
Feel free to bend your knees slightly if it makes the pose more comfortable.
Notice whether restrictions in movement are coming from the backs of your legs or your lower back and focus on relaxing those muscles.
Baby Cobra (yin)
TARGET AREAS
Relaxes: Lower back and belly
Hold Time: 10–50 breaths
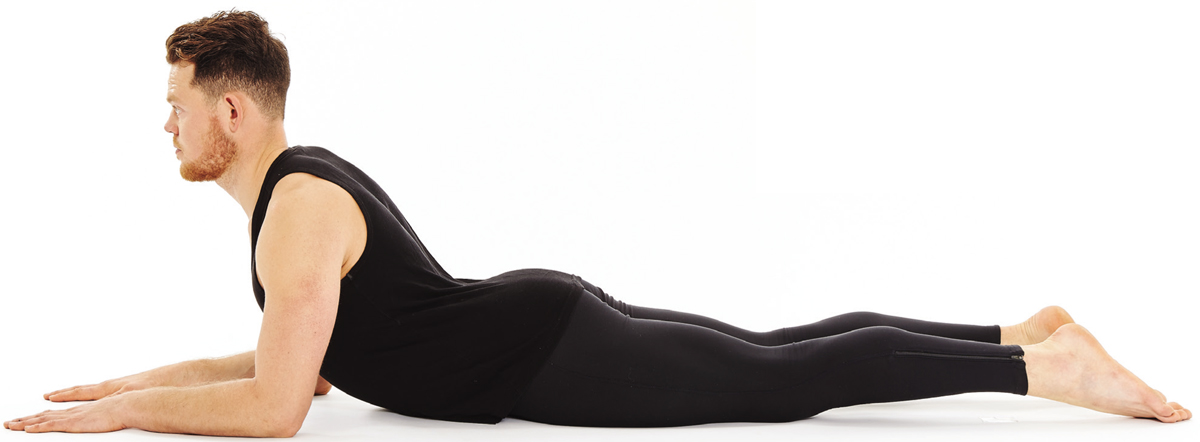
Baby Cobra (yin) is a baby backbend that is held very passively. Unlike the yang version, you are not attempting to strengthen your shoulders; instead you are focusing on the healthy compression in your lower back, which is very therapeutic and energising.
1. Begin lying on your belly and bring your forearms to the floor with your hands just in front of your shoulders. Lift your chest to prop yourself up on your forearms.
2. Allow your shoulders to relax in the pose and let your head hang back to stretch out the front of the neck if that feels good.
3. To exit the pose, slowly lower your chest to the floor and counter pose with a gentle forward bend such as Caterpillar.
Variations -- If the sensation in your back is too strong then slide your forearms forwards to lower your chest closer to the floor.
Take it up a notch -- If you have a healthy spine then you can deepen the back bend to Up Dog. Bring your hands either side of your chest and straighten your arms to lift your chest.
TIPS
This is a great pose to watch television in instead of slumping on the sofa.
Sleeping Crocodile
TARGET AREAS
Relaxes: Spine, hips and neck
Hold Time: 10–30 breaths

This is a great counter pose to any backbends and releases any tension from the spine. The more relaxed you are, the higher you will be able to get your knee and the greater the release you will feel.
1. Begin lying on your belly with your arms bent and palms resting on the floor by your head. Turn your head to the right and draw your right knee up beside you on the floor.
2. Focus on relaxing your inner thigh as well as letting go of any tension in your spine.
3. To exit the pose, straighten your leg and return your head to centre before repeating to the left side.
TIPS
Do Sleeping Crocodile in between backbends such as Baby Cobra (yin) as a counter pose.
Banana
TARGET AREAS
Relaxes: Waist, hips and spine
Hold Time: 30–50 breaths each side

Banana stretches the entire side of the body. We usually only move our spine forwards and backwards so by bending the spine laterally you release tension and increase mobility. The more flexible your spine, the more bendy your Banana will be.
1. Begin lying on your back with your legs together. Reach your arms over your head and take hold of each elbow. Keeping your bottom on the ground, move your feet as far as you can to the left and then move your upper body as far as you can to the left.
2. Find your edge so that you feel a gentle opening down your right-hand side, from your armpit all the way past your ribcage and waist and into the outside of your hips. As your spine opens move your feet and upper body further to the left.
3. Come back to centre to release the pose and then bend your Banana to the right.
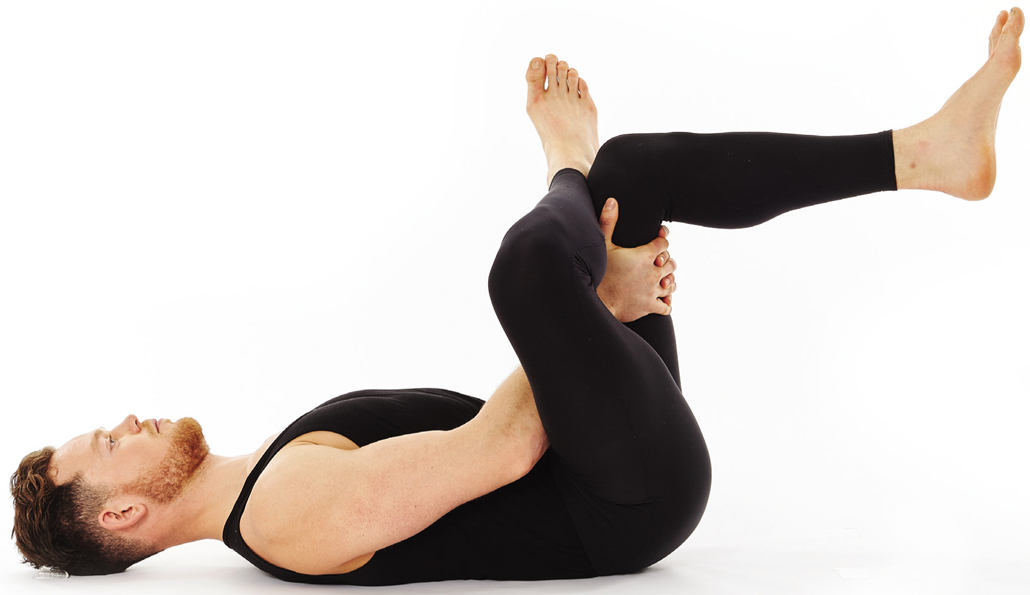
Reclining Twist
TARGET AREAS
Relaxes: Back and shoulders
Hold Time: 30–50 breaths each side
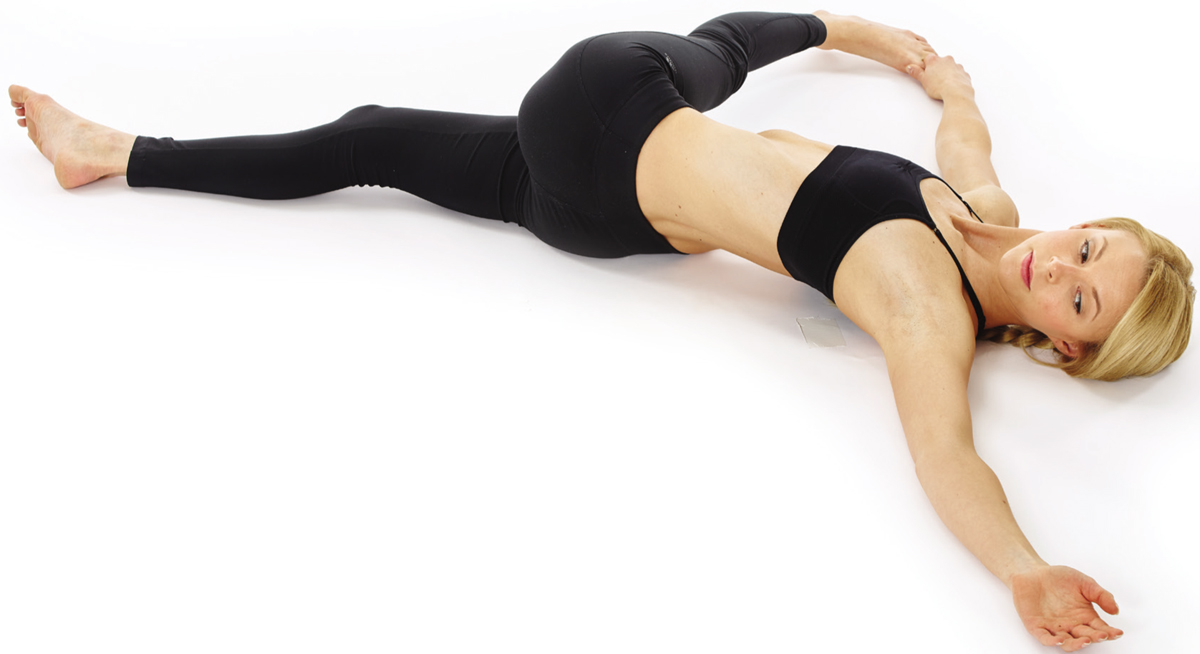
Passive twists are perfect for the end of your Yoga Gym workout or yoga session to allow the body to fully relax and release. As well as releasing tension from the spine, they rebalance the nervous system and massage the internal organs to help detoxify the body.
Adjust the height of your leg to target a specific area of the spine. The higher you have your knees, the higher you will feel the twist in your spine.
1. Begin lying on your back and hug your left knee into your chest. Take hold of the outside of your left knee with your right hand and bring your left leg across your body. Keep both shoulder blades on the floor and look over your left shoulder.
2. Either keep your left leg bent or see if you can straighten it and take hold of your left big toe with your right forefingers to increase the twist.
3. Come out of the pose by releasing your toe or knee, rolling on to your back and hugging your knees into your chest. Repeat with your right leg.
Variations -- For a simple twist, hug your knees into your chest and then let both knees fall across to your right as you turn to look over your left shoulder. Repeat with your knees to the left while looking over your right shoulder.
TIPS
Visualise the muscles down your side lengthening so you can deepen the bend of your Banana.
To increase the stretch, cross your ankles once you are in your Banana.
Legs Up The Wall
TARGET AREAS
Relaxes: Lower back and hamstrings
Hold Time: 30–80 breaths
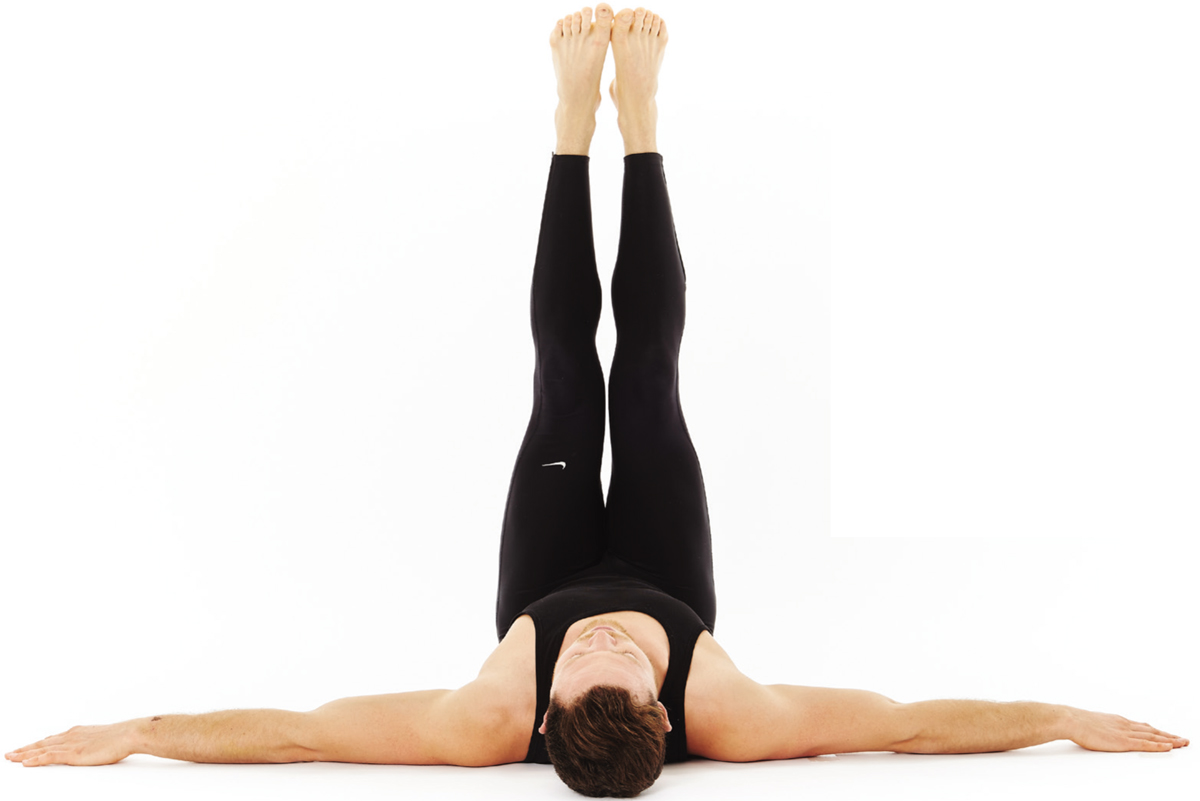
Inversions are very restorative. They bring the blood back to the heart and lungs and relax the nervous system. Legs Up The Wall pose allows you to completely relax at the same time as lengthening your hamstrings and releasing any tension from your lower back. If you have had a long day and don’t fancy a full Yoga Gym workout then use the time to rest and restore in this pose.
1. Sit sideways against the wall and swing your legs around so you are lying on your back with your Legs Up The Wall. Bring your bottom as close the wall as you can and straighten your legs, resting your heels on the wall. Spread your arms out sideways.
2. Rest here for as long as you need to. Focus on relaxing any areas of tension in your body.
3. To exit the pose, move your bottom away from the wall slightly and swivel your legs down to one side before pushing up to seated.
Variations -- You can bring your feet together in Butterfly (yin) pose, move your legs into a wide squat or spread them wide in Straddle for some alternative wall postures.

TIPS
Incorporate some breathing exercises when doing this pose to help you relax.
Shoulder Stand
TARGET AREAS
Relaxes: Shoulders, chest and neck
Hold Time: 30–50 breaths
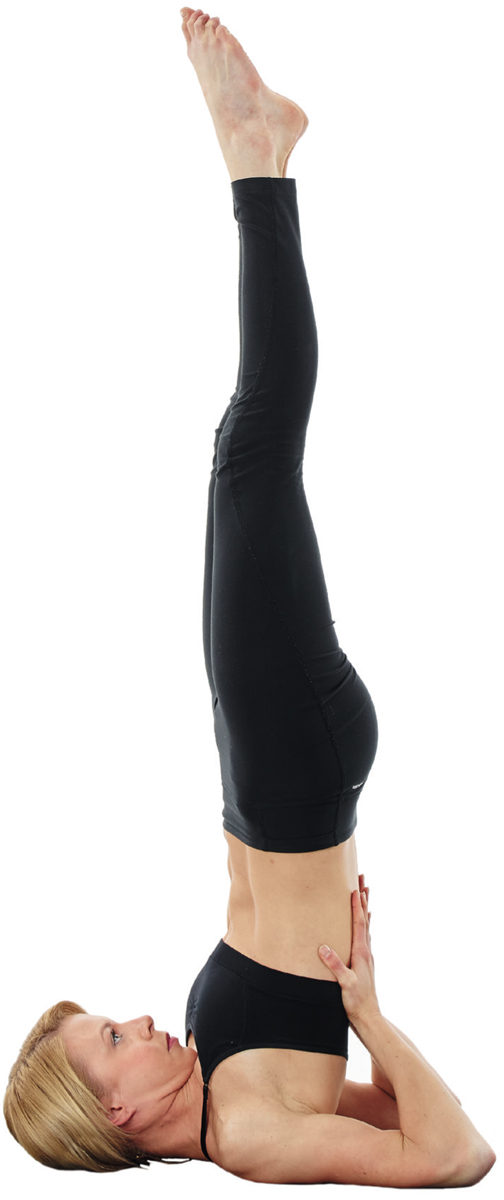
Shoulder Stand takes elements from both yin and yang postures. It requires muscular effort to maintain alignment, which strengthens and stretches the body and also encourages the nervous system to relax to leave you feeling re-energised.
1. Lie on your back and bring your legs up and over your head. Place your hands on your lower back with your fingers facing your bottom, engage your core and bring your legs up to vertical so your toes are pointing towards the sky.
2. Aim to bring your ankles over your knees, your knees over your hips and your hips over your shoulders. Be sure to have most of your weight in your upper arms and shoulders with minimal weight in your neck.
3. Exit the pose by slowly rolling back down to the floor.
Variations -- If you feel any discomfort in your neck then Legs Up The Wall pose is a good alternative.
TIPS
Squeeze your buttocks to help keep your pelvis stable and spine in alignment.
Draw your elbows closer together and push your upper arms into the ground to open your chest.
Plough
TARGET AREAS
Relaxes: Spine and neck
Hold Time: 30–50 breaths
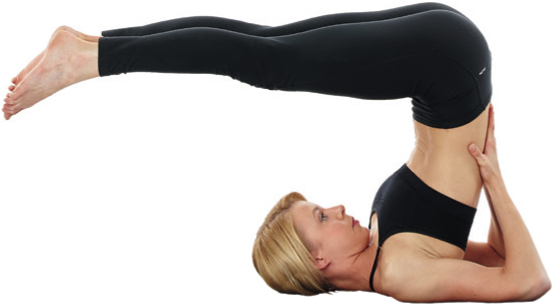
Plough is also known as Snail pose and is a lovely pose to perform at the end of a Yoga Gym workout or yoga session. It releases the spine and relaxes the whole posterior kinetic chain – a series of muscles in the back of the body. Because it is an inversion it also calms the nervous system to leave you feeling centred and refreshed.
1. Begin lying on your back and lift your legs up and over your head so your toes are on the floor. Interlace your fingers and allow your arms to rest on the floor in front of you.
2. Allow the spine to round, keeping your neck long so you can still breathe deeply.
3. To exit the pose, bring your hands to your lower back, bend your knees and lower yourself back down slowly to the ground. Rest here for a couple of moments to allow your blood pressure to readjust before sitting up.
Variations -- If your toes don’t touch the ground, you can either keep your legs parallel to the floor or bend your knees and rest them on your forehead.
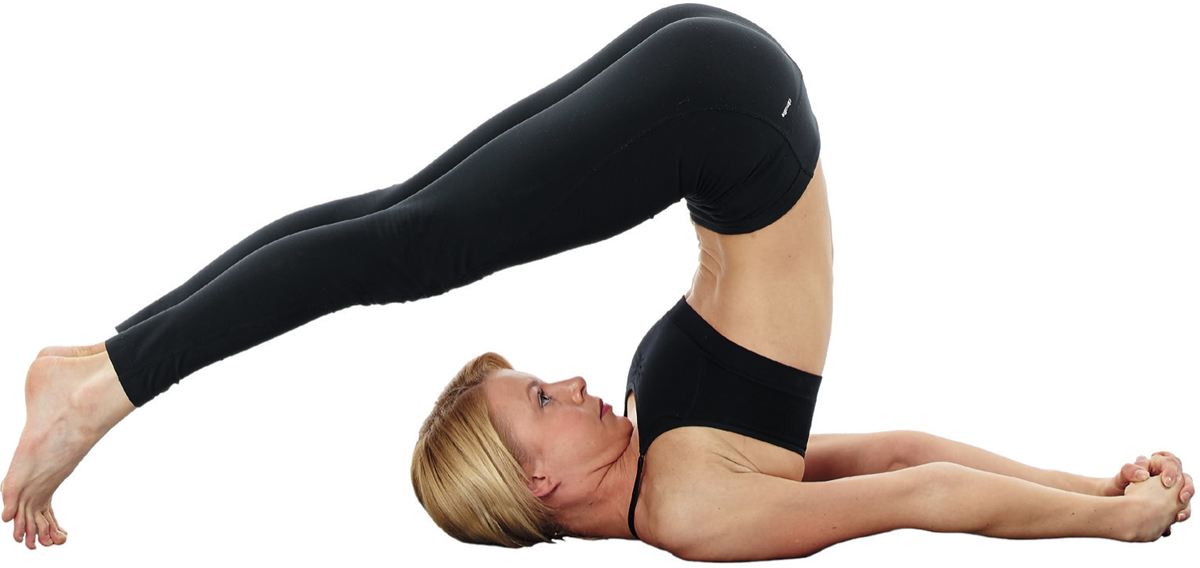
TIPS
Position most of the weight of your body in your shoulders with very little weight in your neck.
Prepare for the pose by doing the Neck Release stretches
Seagull Arms
TARGET AREAS
Relaxes: Wrists
Hold Time: 10–30 breaths

Wrist problems are common in people who type and drive a lot, so Seagull Arms is a great stretch to strengthen the tissues in the wrists. People who are new to yoga often find they get wrist pain in positions such as Down Dog and Plank, and Seagull Arms works well as a counter pose.
1. Sit or stand in any comfortable position. Snuggle the back of your hands underneath your armpits with your elbows winging out to the side.
2. As your wrists begin to relax then slowly lower your elbows closely to your body to deepen the pose.
3. Exit the pose by releasing your hands by your sides and wiggling your fingers.
Variations -- You can also massage out your wrists by bringing the backs of your hands together or by performing Table Top and bringing the back of your hands to rest on the floor one at a time.
TIPS
Use this pose in between arm balances, such as Plank, Crocodile and Crow, to help refresh your wrists.
Cow Face Arms
TARGET AREAS
Relaxes: Shoulders
Hold Time: 1–3 minutes each side
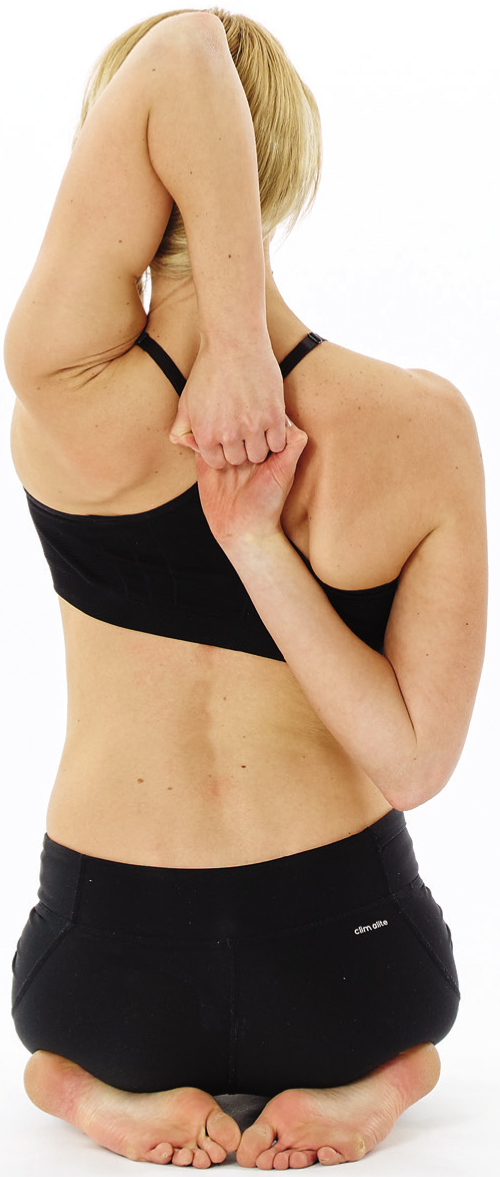
This is one of the best poses for loosening up your shoulders. You can add in Cow Face Arms to many seated postures such as Butterfly (yin), Lotus, and Hero to relax and stretch your hips and arms simultaneously.
1. Begin in any seated or standing position. Reach your left hand to the sky and bend your arm behind your head to pat yourself on the back. Bring your right arm down and behind your back and reach your right fingertips up as high as you can between your shoulder blades to take hold of your left hand.
2. Find your edge and lean into any discomfort to allow your shoulders to loosen and open.
3. Release your hands and stretch your arms out to the side to open your shoulders even more. Allow your arms to rest beside you before repeating with the right arm over the left arm below.
Variations -- If you can’t take hold of your hands then use a strap or belt to grasp on to.
TIPS
Keep your shoulders relaxed away from your ears to allow your upper body to fully release.
Bring your top elbow as far across to the centre of the head as you can so you can reach your fingers further down your back.
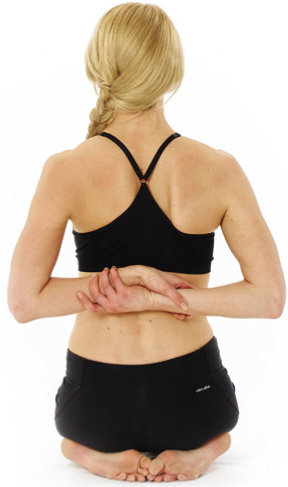
Reverse Prayer
TARGET AREAS
Relaxes: Shoulders and chest
Hold Time: 10–30 breaths
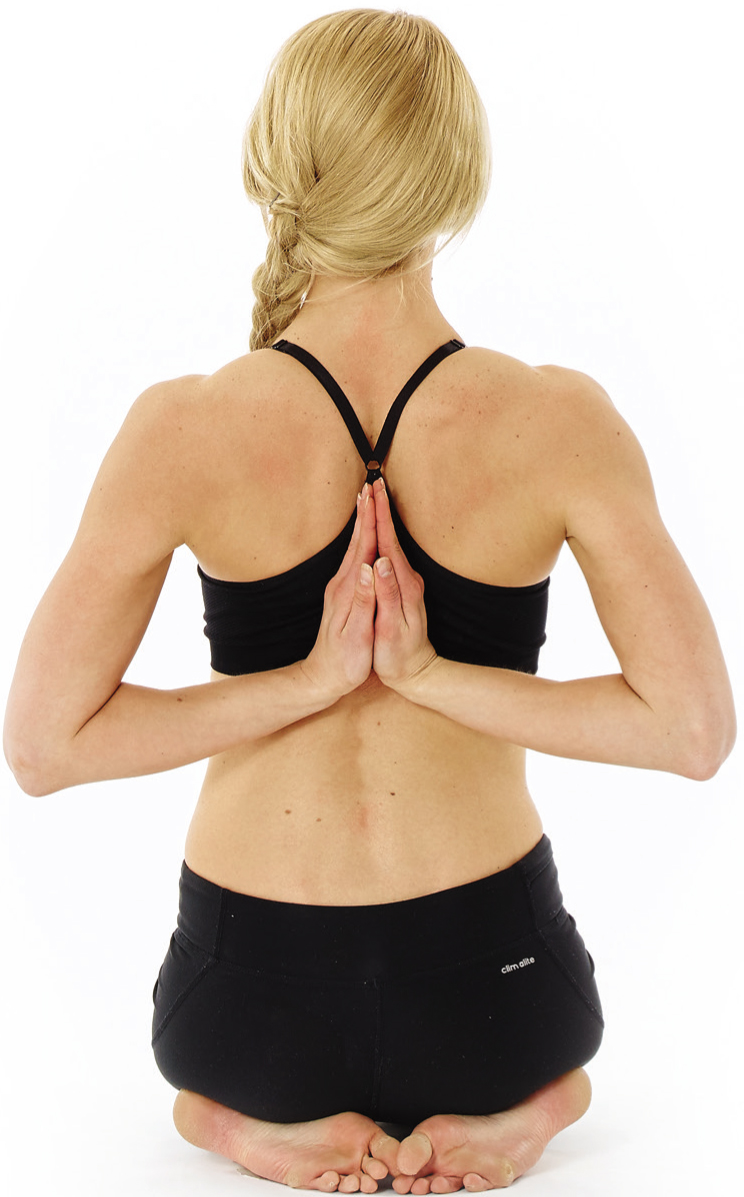
If you spend a lot of time hunched over a desk then Reverse Prayer is a great pose to do throughout the day to release stress from your shoulders and realign your spine.
1. Sit or stand in a comfortable position and reach your hands behind you so the backs of your hands are flat between your shoulder blades with your little fingers touching. Let your shoulders fall forwards as you bring your palms together. Roll your shoulders back and down to open your chest.
2. Work at your edge by pulling your elbows back to keep your chest open.
3. Release the pose slowly by reaching your arms out to the side with your palms facing forwards.
Variations -- If you can’t get your palms together then bring the backs of your hands together or take hold of the opposite wrist behind your back.
TIPS
Do this pose several times a day to stop you from storing stress in your shoulders and prevent tension headaches.
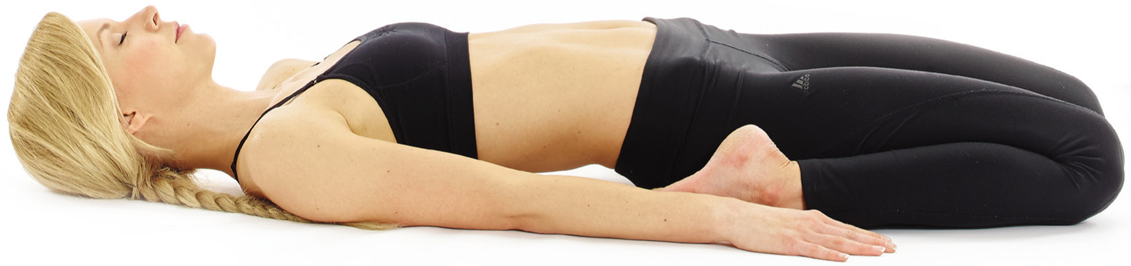
Corpse
TARGET AREAS
Relaxes: Full body
Hold Time: As long as possible

This is the easiest but also the most difficult pose of them all. In the hectic world we live in, relaxation is greatly undervalued and we can even feel guilty for allowing ourselves to relax. Corpse pose forces us to stop and give our body and mind the opportunity to absorb our workout or yoga practice and fully relax.
1. Lie down on your back and begin by taking a deep inhalation, stretching your arms above your head, pointing your toes and engaging every muscle in your body. As you exhale, release all the tension from your body, bring your arms down by your sides with your palms to the sky and allow your feet to wing out just wider than hip-width apart. If you have any back pain then you can also bend your knees and let them fall inwards.
2. Release any control over your breathing and allow every muscle in your body to completely relax. Stay here for as long as you want.
3. When you are ready to come out of the pose, start by wiggling your fingers and toes and then circle your ankles and your wrists. Hug your knees into your chest or have a stretch and a yawn and then roll over on to your right side. Spend a couple of moments here to rebalance your blood pressure before pushing yourself up slowly to a comfortable seated position.