RECIPE LIST
The vintage look is coming back into fashion, and these cupcakes are beautiful and delicate. They are a hit with everyone I serve them to. Using silicone moulds to make the decorations means they take no time at all, and the results are very impressive. They are a really easy way to create a great impact. These cakes are perfect for vintage weddings or shabby chic events. The shimmery lustre finish of the brooches gives them a true touch of class and sophistication.
PREPARATION TIME: 25 MINUTES | BAKING TIME: 20 MINUTES | MAKES 12 CAKES
FOR THE CUPCAKES
230G UNSALTED BUTTER, SOFTENED
230G CASTER SUGAR
4 EGGS
230G SELF-RAISING FLOUR, SIFTED
2 TEASPOONS BAKING POWDER
2 TABLESPOONS ROSE WATER
FOR THE ICING
250G FONDANT ICING SUGAR, SIFTED, PLUS EXTRA FOR DUSTING
1–2 TABLESPOONS ROSE WATER
TO DECORATE
150G WHITE READY-TO-ROLL ICING
BRONZE EDIBLE LUSTRE SPRAY
LARGE SUGAR PEARLS
SUGAR ROSES OR CRYSTALLIZED ROSE PETALS
EQUIPMENT: MIXER, 12-HOLE MUFFIN TIN LINED WITH MUFFIN CASES, PIPING BAG FITTED WITH LARGE STAR NOZZLE, BROOCH AND FRAME SILICONE MOULDS (BOTH WIDELY AVAILABLE ONLINE)
Begin by preparing the vintage decorations, as they need to dry before being used. Coat the silicone moulds with a little oil so that the decorations do not stick. Take small pieces of the ready-to-roll icing and press them into the moulds so that they take the shape of brooches and flowers. Remove from the moulds and place on a silicone mat or sheet of baking parchment to dry, trimming any excess icing with a sharp knife. Repeat with all the remaining icing. Leave the icing to set for 24 hours. Once the icing is dry, spray with bronze lustre to decorate.
Preheat the oven to 160°C/325°F/Gas Mark 3.
Using a mixer, whisk together the butter and caster sugar until light and creamy. Add the eggs and whisk again. Fold in the flour, baking powder and rose water using a spatula. Divide the cake mixture between the muffin cases and bake for 20 minutes, until the cakes are firm and spring back to your touch. Transfer to a rack to cool.
For the icing, mix together the icing sugar and rose water until you have a smooth, thick frosting. Pipe it over the top of the cakes and decorate with your choice of lustre brooches, sugar flowers, sugar pearls, sugar roses or crystallized rose petals. Leave the icing to set before serving.
The cakes will keep for up to 3 days if stored in an airtight container.

Pearls and Brooches Cupcakes
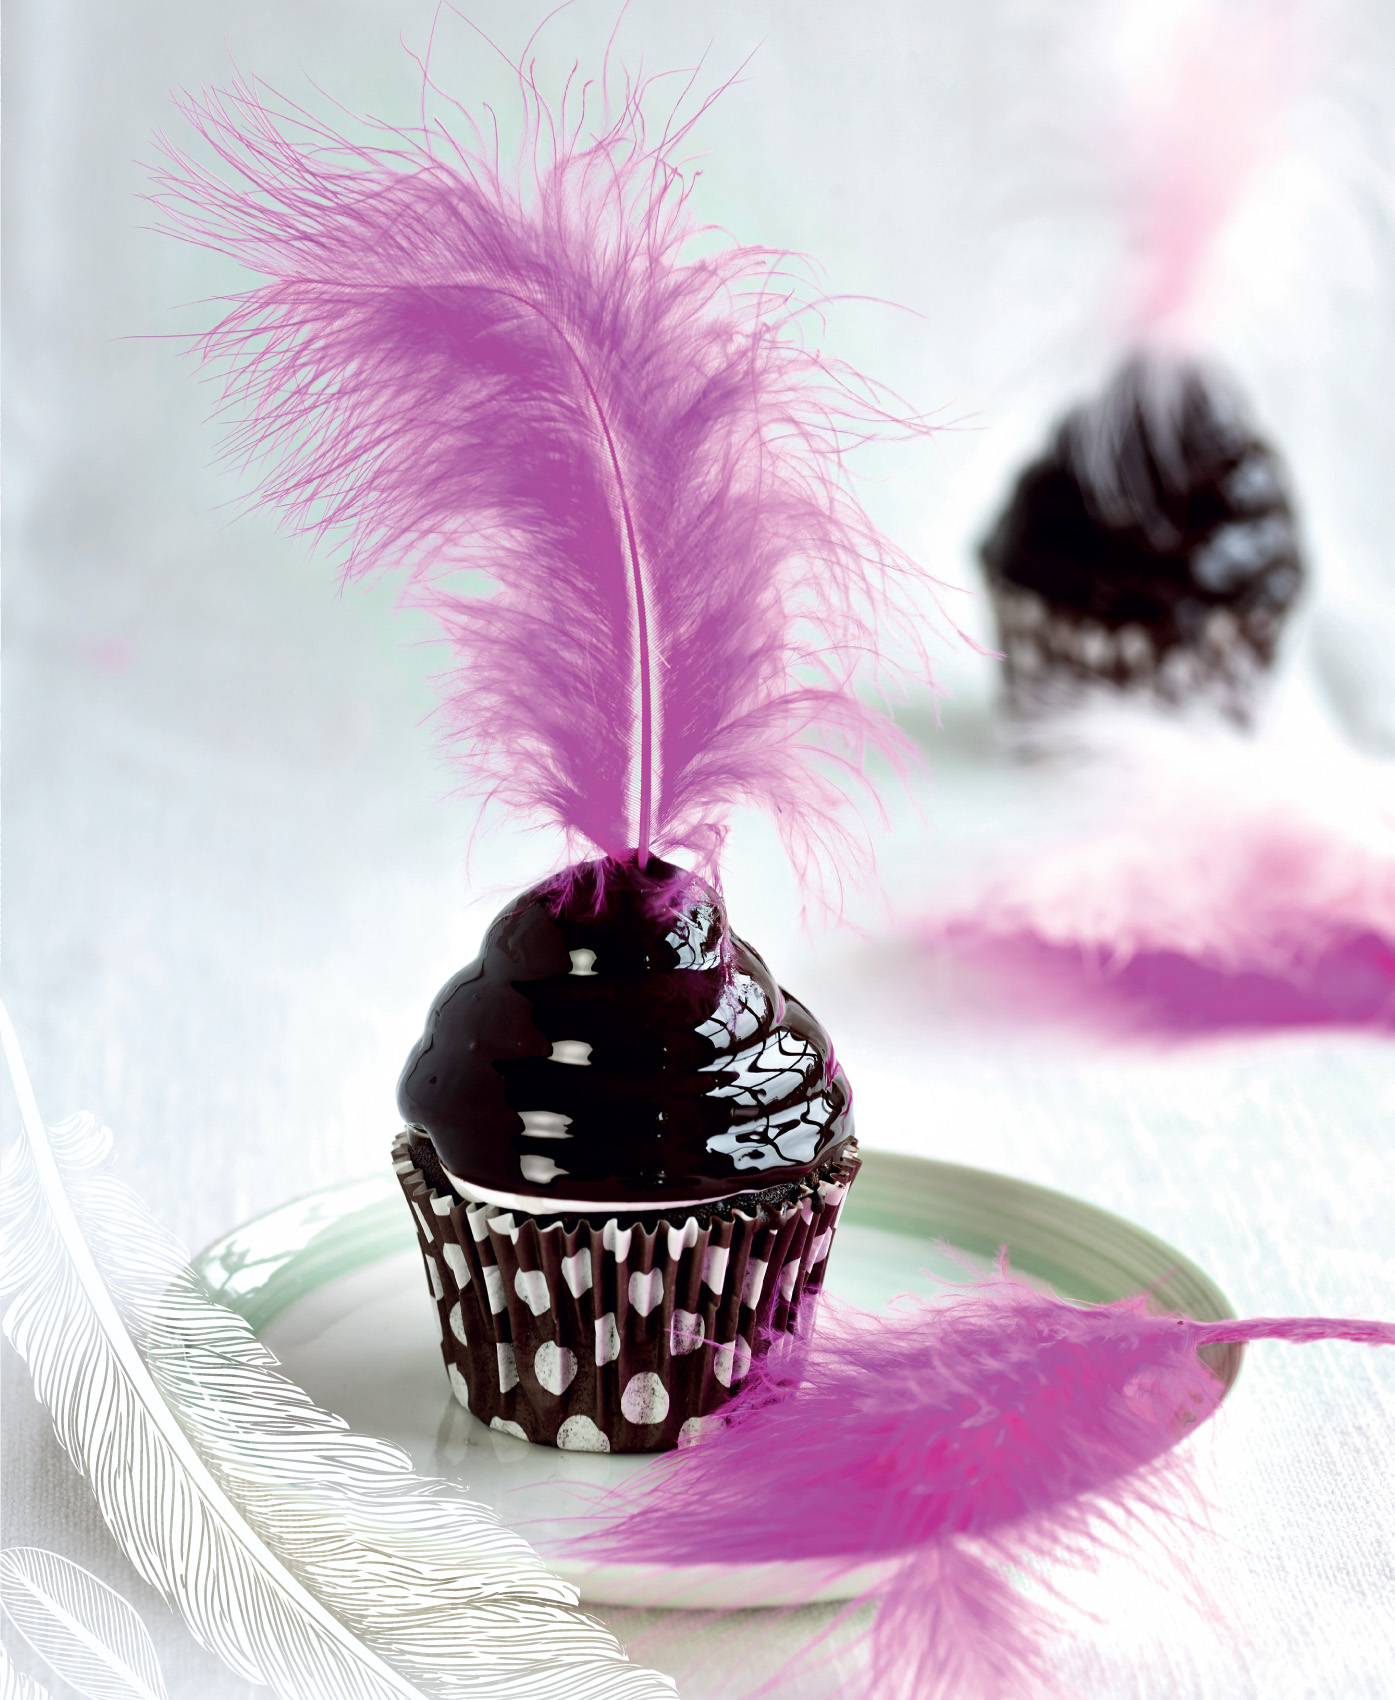
These ‘high hat’ cupcakes, decorated in Eliza Doolittle style with feathers and bows, make a spectacular centrepiece for any party.
PREPARATION TIME: 25 MINUTES | BAKING TIME: 20 MINUTES | MAKES 12 CAKES
FOR THE CUPCAKES
100G UNSALTED BUTTER, SOFTENED
100G CASTER SUGAR
100G LIGHT BROWN SUGAR
4 EGGS
160G SELF-RAISING FLOUR, SIFTED
60G COCOA POWDER, SIFTED
1 TEASPOON BICARBONATE OF SODA
80ML SOURED CREAM
2 TEASPOONS VANILLA BEAN PASTE
A PINCH OF SALT
FOR THE MARSHMALLOW TOPPING
250G CASTER SUGAR
3 EGG WHITES
2 TABLESPOONS COLD WATER
TO DECORATE
700G PLAIN CHOCOLATE
FEATHERS
EQUIPMENT: MIXER, 12-HOLE MUFFIN TIN LINED WITH MUFFIN CASES, SUGAR THERMOMETER, PIPING BAG FITTED WITH LARGE ROUND NOZZLE
Preheat the oven to 160°C/325°F/Gas Mark 3.
Using a mixer, whisk together the butter, caster sugar and light brown sugar until light and creamy. Add the eggs and whisk again. Gently fold in the flour, cocoa powder, vanilla bean paste, bicarbonate of soda, soured cream and salt using a spatula.
Divide the mixture between the muffin cases and bake for 20 minutes, until the cakes are firm and spring back to your touch. Transfer to a rack to cool.
For the marshmallow topping, place the caster sugar, egg whites and water in a saucepan and heat to 60°C, whisking continuously. Once it reaches 60°C, transfer it to a mixer with a whisk attachment and whisk until white and glossy peaks are formed.
Spoon the meringue into the piping bag and pipe four rings on to each cake, getting smaller and higher each time (see here). Leave to set.
Place the chocolate in a heatproof bowl over a pan of simmering water and leave until the chocolate has melted. Once melted, pour the chocolate into a deep bowl. One by one, turn the cupcakes upside down and carefully dip them into the bowl so that the marshmallow is covered with chocolate (see here). You will not need all of the chocolate, but it needs to be this much so that you can dip the cakes properly. You can use any leftover chocolate to flavour other cake mixtures or icings if you wish. Before the chocolate sets, insert a brightly coloured feather into the top and put the cakes into the fridge for 10 minutes to cool. Repeat with all the remaining cakes.
The cakes will keep for up to 3 days if stored in an airtight container.
High Hats

Gone are the days of lavender being associated with old ladies – it’s a great ingredient to add to cupcake batter, for a delicate floral flavour. Paired here with honey-flavoured buttercream and decorated with pretty pastel buttons, I love to serve these cupcakes to friends for afternoon tea.
PREPARATION TIME: 25 MINUTES | BAKING TIME: 20 MINUTES | MAKES 12 CAKES
FOR THE CUPCAKES
200ML MILK
8 TABLESPOONS DRIED CULINARY LAVENDER
200G UNSALTED BUTTER, SOFTENED
220G CASTER SUGAR
4 EGGS
220G SELF-RAISING FLOUR, SIFTED
2 TEASPOONS BAKING POWDER
2 TEASPOONS VANILLA BEAN PASTE OR VANILLA EXTRACT
FOR THE BUTTERCREAM
300G ICING SUGAR, SIFTED
150G UNSALTED BUTTER, SOFTENED
2 TABLESPOONS RUNNY HONEY
1–2 TABLESPOONS WHOLE MILK
FEW DROPS OF PASTEL FOOD COLOURING OF YOUR CHOICE
TO DECORATE
250G WHITE READY-TO-ROLL ICING
ICING SUGAR, FOR DUSTING
PASTEL EDIBLE LUSTRE SPRAY OR EDIBLE LUSTRE POWDER OR FOOD COLOURING
EDIBLE GLITTER
EQUIPMENT: MIXER, 12-HOLE MUFFIN TIN LINED WITH MUFFIN CASES, SILICONE BUTTON MOULD
Begin by preparing the buttons, as they need to dry before being used. Dust the silicone moulds with a little icing sugar so that the decorations do not stick. Take small pieces of the ready-to-roll icing and press them into the moulds so that they take the shape of buttons. Leave the icing in the mould for about 20 seconds, then carefully remove and place on a silicone mat or a sheet of baking parchment to dry. Repeat with all the remaining icing, making a variety of different-sized buttons. Colour the buttons with lustre spray or powder and leave to set overnight. Alternatively you can colour the fondant by kneading several drops of food colouring into the ready-to-roll icing before shaping in the moulds if you prefer. You can store the dried buttons for up to 3 weeks in a tin.
Preheat the oven to 160°C/325°F/Gas Mark 3.
Heat the milk and dried lavender in a saucepan until warm but not boiling. Remove from the heat and leave to cool. Once cooled, strain the milk and discard the lavender.
Using a mixer, whisk together the butter and caster sugar until light and creamy. Add the eggs and whisk again. Gently fold in the flour, baking powder, vanilla bean paste and lavender-infused milk, using a spatula.
Divide the mixture between the muffin cases and bake for 20 minutes, until the cakes are firm and spring back to your touch. Transfer to a rack to cool.
For the buttercream, whisk together the icing sugar, butter, honey and enough milk to make a smooth, stiff frosting. Colour it pale purple with a few drops of food colouring. Spoon it into the piping bag and pipe swirls on top of each cake. Decorate with the pretty pastel buttons.
The cakes will keep for up to 3 days if stored in an airtight container.

Lavender Button Cupcakes