dessert
IF YOU HAVE a sweet tooth like I do, then the very thought of having to give up pastries or cakes will send a shiver down your spine. We have a fantastic pastry chef in The Olde Post Inn who I have worked with very closely over the years, perfecting recipes.
Many shop-bought desserts are filled with sugar and preservatives, so I make my own sweets, which are by far a much tastier and healthier alternative. We’ve had many occasions in the restaurant where a coeliac diner has had to double check that their dessert was indeed suitable for them, so we must be doing something right.
sweet shortcrust pastry
This sweet shortcrust pastry can be used as a base for many recipes. This recipe is typical of any shortcrust pastry – it may appear a little wet when made and will need to rest for an hour before use.
MAKES ENOUGH FOR 1 X 20CM FLAN TIN
225g gluten-free plain white flour blend
50g icing sugar
1 tsp xanthan gum
150g cold butter, cubed
1 egg, beaten
Mix the flour, icing sugar and xanthan gum together in a large bowl. Rub in the cold butter with your fingertips until the mixture resembles fine breadcrumbs. It’s important that the butter is cool and not at room temperature, as the pastry will be tough if the butter is soft.
Make a well in the centre of the pastry and add the beaten egg. Combine all of the ingredients by hand, but try to work quickly to prevent the pastry from becoming too greasy. This mixture can be quite wet when it’s mixed, but once it’s rested it’s easy to use.
Once combined, form the dough into a ball, wrap in cling film and leave to rest for at least 1 hour in the fridge. (It’s also worth resting the dough for 20–30 minutes in the fridge after you line a flan tin and before filling it to reduce the possibility of shrinkage.)
Remove the pastry from the fridge, roll it out on a lightly floured work surface and use it to line a 20cm flan tin. Prod the base of the pastry all over with a fork and return to the fridge for 20–30 minutes.
Preheat the oven to 175°C. Cover the pastry with a layer of non-stick baking paper, ensuring the paper drapes over the edge of the tin and that it’s fitted snugly into the edges of the tin as well.
Fill with dried beans or ceramic beans. If you don’t have dried beans or ceramic beans, you can add a layer of tin foil over the baking paper and push it tightly into the edges. Place in the oven and bake for 15 minutes. Remove the baking paper and the beans and bake for a further 10 minutes.
If you’re using individual small pastry tins, line the tins with the pastry, prod the pastry and return to the fridge for 10 minutes. They can then be baked blind without the need for non-stick baking paper and beans.
GET AHEAD
The uncooked pastry will keep in the fridge for up to five days. Alternatively, wrap it very well in cling film and freeze for up to four weeks.

apple and pecan crumble tart
This is a real comfort dessert that I remember having as a child. You cannot beat the smell of it baking and then tucking into it. There are never any leftovers!
SERVES 8–10
1 batch of sweet shortcrust pastry (here)
1kg cooking apples, peeled, cored and quartered
250g caster sugar
FOR THE CRUMBLE TOPPING:
150g gluten-free plain flour
80g cold butter, cubed
60g caster sugar
60g Demerara brown sugar
50g pecans, roughly chopped
TO SERVE:
vanilla ice cream (here)
Make sure you allow the pastry to rest for at least 1 hour. Use it to line a 20cm flan tin and bake blind as per the instructions here. Let the pastry cool slightly to make it easier to assemble the crumble.
Once the pastry comes out of the oven, raise the temperature to 180°C.
Cut the quartered apples into chunks and place in a saucepan with the caster sugar. Place the saucepan on a high heat and cook, stirring continuously, until the apples change colour slightly but still hold their shape. It’s important to avoid overcooking the apples at this stage or the apples will lose their shape and structure and the pastry will become soggy. Set the cooked apples aside to cool.
To make the crumble topping, sieve the flour into a large bowl and rub in the cold cubed butter until the mixture resembles breadcrumbs. Add the caster sugar, Demerara brown sugar and pecans and mix well.
Place the cooked apples in the cooled pastry case. Top with the crumble mix, spreading it to the edges of the pastry case to ensure that the cooked apples are fully covered.
Bake in the oven for 20–25 minutes, until the topping is golden. Serve warm with a scoop of vanilla ice cream.
GET AHEAD
If you want to make elements of this in advance, then the crumble topping will keep in your fridge for one week in a sealed container. Once cooked and cooled, the apples can be frozen in batches or kept in the fridge for up to five days.
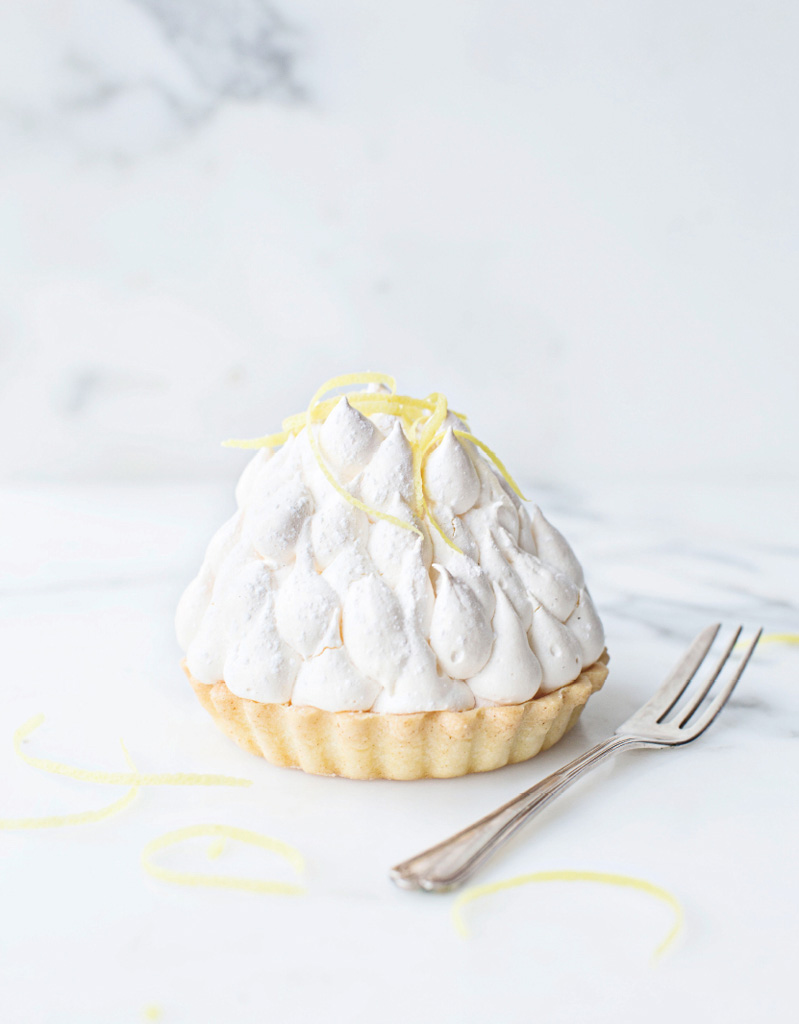
lemon meringue pie
This is an old-time classic dessert, loved by all. Making it as individual tartlets gives it the wow factor. This isn’t a simple dessert, but it’s worth the effort. The addition of the lemon zest to pastry gives it some extra zing.
SERVES 8 • FOR THE PASTRY:
225g gluten-free plain white flour blend
50g icing sugar
1 tsp xanthan gum
150g cold butter, cubed
1 egg, beaten
zest of 1 lemon
1 vanilla pod, cut in half and seeds scraped out
FOR THE LEMON CURD FILLING:
1 tbsp cornflour
125ml single cream
5 eggs
175g caster sugar
3 lemons, juice of 3 and zest of 2
FOR THE MERINGUE:
7 egg whites (200g)
300g caster sugar
Make the pastry as per the instructions here, adding the lemon zest and vanilla seeds to the dry ingredients. Make sure you allow the pastry to rest for at least 1 hour. Use it to line a 20cm flan tin or 8 individual tartlet tins and bake blind as per the instructions here. Raise the oven temperature to 180°C.
To make the filling, dissolve the cornflour in a cup with 1 tablespoon of the cream. Mix together the eggs, sugar, the remaining cream and the lemon zest and juice. Place in a saucepan and bring to the boil, stirring all the time. Reduce the heat and simmer for 2 minutes to ensure it’s cooked, then pour the curd into the cooled pastry case. If using a 20cm flan tin, return it to the oven and bake for 5 minutes to ensure the curd sets. If making individual tarts, there’s no need to do this.
To make the meringue, use the balloon whisk attachment on your mixer to whip the egg whites to soft peaks. Gradually add the caster sugar, whisking on a high speed until it’s stiff and glossy. This should take about 10 minutes.
Cover the lemon curd with the meringue. You can either use a piping bag with a nozzle to pipe the meringue onto the curd or you could use a spoon and a palette knife, making peaks with the back of the spoon or knife.
Place the pie in the oven and bake for 8–10 minutes, until the meringue is light golden. Allow the pie to cool before cutting into slices.

rhubarb baked alaska
This dessert is truly delightful and perfect if you want to impress guests. The key to this recipe is to have all of the different elements ready, and then assembly is straightforward. This recipe makes more compote and sponge than you’ll need, but as both can be frozen, you can save them for another day. You could also use these sponge discs instead of the amaretti biscuits in the tiramisu here.
MAKES 5 • FOR THE RHUBARB COMPOTE:
450g rhubarb, cut into 0.5cm dice
150g caster sugar
juice of 1 lemon
FOR THE SPONGE:
3 eggs
90g caster sugar
70g gluten-free self-raising flour
20g cornflour
FOR THE MERINGUE:
3 large eggs whites (100g egg whites)
150g caster sugar
TO ASSEMBLE:
good-quality vanilla ice cream (here)
icing sugar, to dust
First prepare the rhubarb compote by mixing all of the compote ingredients together in a bowl. Cover with cling film and refrigerate overnight to allow the juices to run. The next day, bring the rhubarb mixture to the boil in a small saucepan, then reduce the heat and simmer for 2–3 minutes, taking care not to overcook the rhubarb as you want it to retain its shape. Pour into a container until required.
Scoop the ice cream into balls ahead of time and place on a sheet of non-stick baking paper. Put in a container and put them back in the freezer, ready for assembly.
Preheat the oven to 180°C. Line a large rectangular baking tin (ideally one that is 20cm x 30cm x 5cm deep) with non-stick baking paper.
To make the sponge, place the eggs and sugar in a mixing bowl and beat together with an electric mixer for about 10 minutes, until it reaches the ribbon stage and the mixture holds a figure of eight. Sieve the flour and cornflour into a separate bowl. Using a metal spoon, gently fold the dry ingredients into the egg mixture, ensuring they are well combined.
Carefully pour the sponge batter into the lined tin and bake for 25 minutes, until the sponge starts to shrink away from the sides of the tin and the centre springs back when you press it. Remove from the oven and leave to cool in the tin, then turn out onto a board and peel off the paper. Using a round 5cm cutter, stamp out your sponge discs – you should get 22 discs.
To make the meringue, whisk the egg whites in a spotlessly clean, grease-free bowl to the soft peak stage, until they are light and stiff. Gradually add the sugar, whisking continuously on a medium speed. Once all the sugar has been added, whisk at a high speed for about 2 minutes, until the meringue is glossy. Fill the meringue into a clean, dry piping bag with a nozzle and set aside.
To assemble the baked Alaska, place the sponge discs on a baking tray lined with non-stick baking paper. Spoon a little rhubarb compote over each sponge disc, ensuring it is well moistened with the rhubarb syrup. Put a scoop of vanilla ice cream on top, then pipe the meringue all over the ice cream and sponge, ensuring it’s completely covered with meringue. Alternatively, you could use a spoon to cover the sponge with meringue, making peaks with the back of the spoon. Dust with icing sugar and bake for 1–2 minutes, until the meringue is set and slightly coloured. Serve immediately.
GET AHEAD
The sponge and the rhubarb can be prepared in advance – both freeze very well if you really want to get a good head start.
crème anglaise
This is a very simple recipe, but it’s important to follow it accurately and it’s best made with good-quality egg yolks. Served warm, the custard is an ideal accompaniment for tarts or crumbles and it can be used cold in trifles.
MAKES 550ML
500ml single cream
1 vanilla pod
50g icing sugar
5 egg yolks
Place the cream in a large heavy-based saucepan. It’s important to use a large saucepan to allow the cream to rise and triple in size as it cooks.
Cut the vanilla pod in half and scrape the seeds out into the cream. Place the seedless vanilla pod into the saucepan too along with 25g of the icing sugar. Bring to the boil, stirring occasionally.
In a heatproof bowl, whisk the egg yolks and the remaining 25g of icing sugar until fully combined and smooth.
Pour the boiling cream into the egg mixture and whisk well. Pour the custard through a fine-mesh sieve back into the saucepan to remove the vanilla pod and any lumps. Return the mixture to a low heat, whisking continuously until the custard coats the back of a spoon.
NOTE: The number of egg yolks will vary according to size. As a guide, one egg yolk should weigh 20g to achieve a good egg custard consistency.
GET AHEAD
The custard can be served immediately or kept in the fridge for three days with a sheet of cling film pressed directly on the surface so that a skin doesn’t form on it.

cherry clafoutis
This is ideal if you are entertaining guests and want to serve a warm dessert straight from the oven that is both light and not too sweet.
MAKES 6 PORTIONS
butter, for greasing
caster sugar, for dusting
3 eggs
50g honey
150ml cream
150ml milk
1 tbsp kirsch
80g gluten-free plain white flour blend
1 x 425g tin of cherries
crème anglaise (here), to serve
vanilla ice cream (here), to serve
Preheat the oven to 170°C. Grease six ramekins or shallow dishes (4.5cm x 5.5cm) with butter and dust with a little caster sugar, tapping out the excess sugar. Alternatively, you could use one large dish or pan.
Whisk together the eggs, honey, cream, milk and kirsch. Sieve the flour into a large mixing bowl, make a well in the centre and pour in the wet ingredients. Whisk into a smooth batter, then pour the batter through a fine-mesh sieve into a jug.
Drain the cherries and remove any stones. Divide them equally between the ramekins.
Before pouring the batter into the moulds, give it a good stir to make sure the flour is distributed. Cover the cherries with the batter. If using ramekins, only fill them three-quarters full to allow the mixture to rise. Place the ramekins on a baking tray and bake for 10–12 minutes. Once baked, the clafoutis will have increased in height, turned golden in colour, and when lightly pressed in the middle it will give but return to its shape.
Serve with crème anglaise and ice cream.
GET AHEAD
The batter can be made in advance and baked when required.

baked raspberry cheesecake with raspberry jelly
The raspberries in this baked cheesecake are a pleasant variation and means it’s not too filling, which some baked cheesecakes can be.
SERVES 12 • FOR THE CHEESECAKE:
700g full-fat cream cheese
120g caster sugar
1 tsp vanilla essence or the seeds from 1 vanilla pod
3 large eggs
80g fresh or frozen raspberries
FOR THE BISCUIT BASE:
220g gluten-free biscuits
100g butter, melted
FOR THE JELLY:
3 leaves of gelatine or 2½ tsp powdered gelatine
75g caster sugar
150ml water
150g fresh or frozen raspberries
1 dessertspoon crème de cassis, or to taste
TO DECORATE:
fresh Chantilly cream
fresh raspberries
Line a 20cm springform cake tin with non-stick baking paper. Wrap the outside of the base and sides of the cake tin with cling film, then wrap again with tin foil. The cheesecake will be baked in a water bath (bain-marie), so the cling film seals the tin and prevents the water from spoiling the cheesecake as it bakes.
Whizz the biscuits into fine crumbs in a food processor or place them in a sealed plastic bag and crush with a rolling pin. Add the melted butter and mix well. Place the biscuit mixture into the prepared tin, pressing it firmly into the base with the back of a spoon. Allow it to set in the fridge for 20–30 minutes.
Preheat the oven to 170°C.
Using the balloon whisk attachment of your food mixer, mix together the cream cheese, sugar and vanilla essence or seeds until smooth. Add the eggs one at a time, mixing thoroughly after each addition. Scrape down the sides of the bowl to make sure all the ingredients are mixed through. Fold in the raspberries by hand, then pour the filling over the biscuit base in the tin.
Place the tin in a deep roasting tray and fill with water until it comes halfway up the sides of the cake tin. The moisture from this water bath helps to prevent your cheesecake from cracking and baking too fast. Bake in the oven for 35–45 minutes, until the cake moves as one in the middle. Allow the cake to cool in the tin at room temperature, then place in the fridge for 3–4 hours or overnight.
If you’re using gelatine leaves to make the jelly, place them in a bowl of cold water and let it sit for 2 minutes to allow the gelatine to sponge. Remove the gelatine leaves and squeeze out the excess water.
Place the caster sugar and water in a saucepan and bring to a fast boil, stirring continuously to dissolve the sugar. Add the raspberries and return to the boil, then take off the heat. Blitz with a hand-held blender and pour through a fine-mesh sieve into a jug. If you’re using powdered gelatine, sprinkle it onto the hot liquid and mix until dissolved, but do not boil. If you have used gelatine sheets, add them to the hot mix at this point and mix well. Add the crème de cassis to taste. Place in the fridge and allow to firm up for about 20 minutes, just until it’s a wobbly consistency but not fully set – you still need to be able to pour it over the cheesecake.
Pour the jelly over the cheesecake and allow it to set. Once the jelly is set, remove the cheesecake from the tin and decorate with fresh Chantilly cream and fresh raspberries.
mixed berry white chocolate and almond tart
This particular tart is very adaptable. It looks so attractive once glazed, especially with the mixed berries and white chocolate. Pears poached in red wine and topped with flaked almonds or a simple Bakewell tart are other adaptations of this recipe.
SERVES 6–8
1 batch of sweet shortcrust pastry (here)
FOR THE FRANGIPANE FILLING:
200g butter, softened
200g icing sugar
200g ground almonds
40g gluten-free plain white flour
4 eggs, separated
700g frozen mixed berries
150g gluten-free white chocolate drops
FOR THE GLAZE:
4 tbsp apricot jam
1 tbsp boiling water
TO SERVE:
fresh cream
crème anglaise (here)
vanilla ice cream (here)
Make the pastry as per the instructions here. Make sure you allow the pastry to rest for at least 1 hour. Use it to line a 27cm flan tin, prod the base all over with a fork and return to the fridge for 15 minutes. You don’t need to blind bake the pastry for this recipe.
Preheat the oven to 180°C.
To make the frangipane, cream the butter and icing sugar together in the bowl of a stand mixer using the paddle attachment until light and fluffy. This can take up to 10 minutes.
Mix the ground almonds and plain flour together. Add the egg yolks to the butter mixture along with half of the flour mixture and mix well. Add the egg whites and the remaining flour mixture and mix well again, scraping down the sides of the bowl.
Pour the filling into the pastry case and bake for 25 minutes, until the tart is light golden and firm to the touch. Remove from the oven and cover with the frozen mixed berries and white chocolate drops. Turn off the oven but place the tart back in the oven for 2 minutes to allow the fruit to thaw out. I have to confess that the reason why I turn off the oven at this point is that I have often forgotten that the tart was in there and I end up burning the chocolate. This way, you’re only melting it slightly and defrosting the berries.
To glaze, combine the apricot jam with the boiling water and heat in the microwave or in a small saucepan on the hob until it melts. Brush gently onto the tart.
Serve with some fresh cream or crème anglaise and ice cream.

chocolate fondant
This is a very popular dessert in The Olde Post Inn, as chocoholics adore it. It’s very easy to make, but timing is everything and it’s best served immediately. It is optional to use the chocolate ganache – the recipe will work fine without it, but be careful of the cooking time, as you want a soft centre.
SERVES 5 • FOR THE FONDANT:
cocoa powder, for dusting
175g gluten-free dark chocolate drops or bar (70% cocoa solids)
165g butter, plus extra for greasing
6 eggs
215g caster sugar
75g gluten-free plain flour
FOR THE CHOCOLATE GANACHE:
50g cream
250g gluten-free dark chocolate drops (70% cocoa solids)
150g butter, softened and cubed
1 dessertspoon crème de cassis
icing sugar, for dusting
chocolate sauce (use the recipe with the brownies here), to serve
mint ice cream (here), to serve
Grease five dariole moulds or small ramekins with butter, then dust with a little cocoa powder, tapping out any excess.
To make the fondant, chop the chocolate into small pieces if using a bar. Place the chocolate and butter in a heatproof bowl set over a saucepan of gently simmering water, taking care not to let the water touch the bottom of the bowl. Melt slowly, then allow to cool.
Whisk the eggs and sugar together in a large bowl until they reach the ribbon stage, where the mixture holds a figure of eight. Fold in the cooled melted chocolate, then fold in the flour. Refrigerate for at least 2 hours or overnight.
To make the ganache, heat the cream in a saucepan and add the chocolate drops, stirring until smooth. Gradually add the butter cubes, whisking continuously until the ganache is smooth, shiny and glossy. Stir in the crème de cassis at this stage.
Transfer the ganache into a piping bag while it’s warm and leave until it starts to set. Line a baking tray with a piece of greaseproof paper and pipe into small 1cm drops onto the paper. Allow to set in the fridge.
Preheat the oven to 180°C.
Pipe or spoon the chocolate fondant mixture into the prepared moulds. Place one chocolate ganache drop into each fondant before baking to add extra richness.
Bake for 8–10 minutes. The fondants should be cooked on the outside but still soft in the centre.
To serve, dust with icing sugar and serve with chocolate sauce and mint ice cream.
GET AHEAD
The ganache drops freeze very well. If not using immediately, freeze them on the baking tray before storing in a ziplock freezer bag. The frozen chocolate ganache drops will last for three months and can be used directly from the freezer.
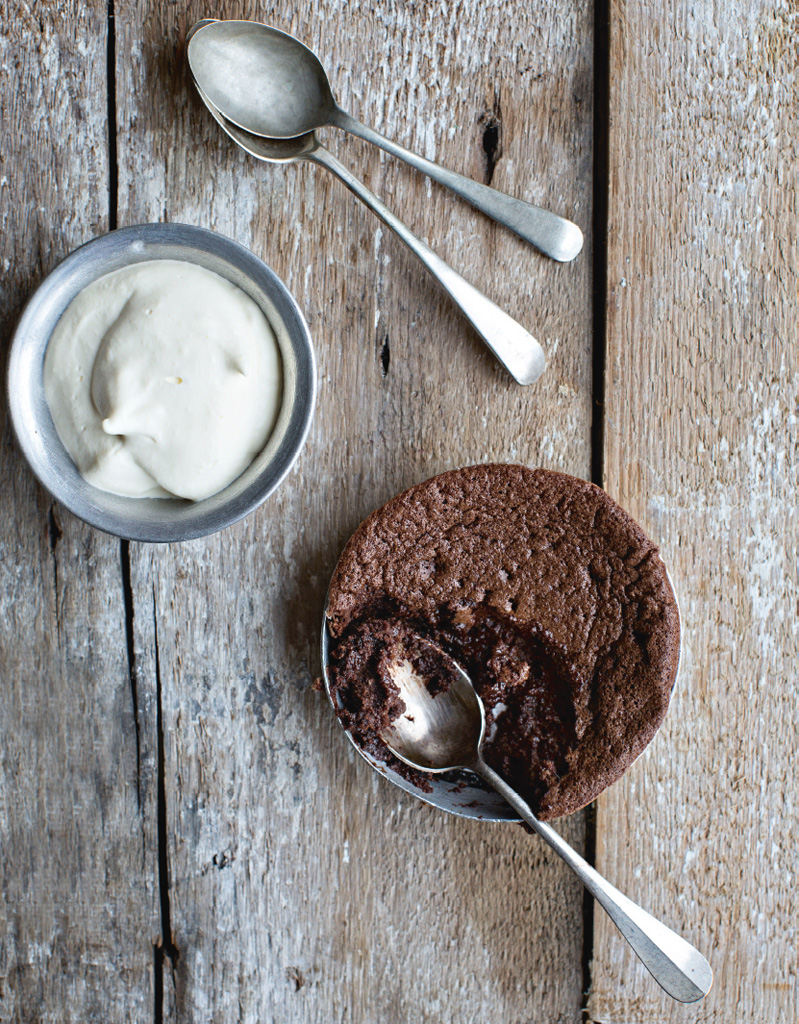
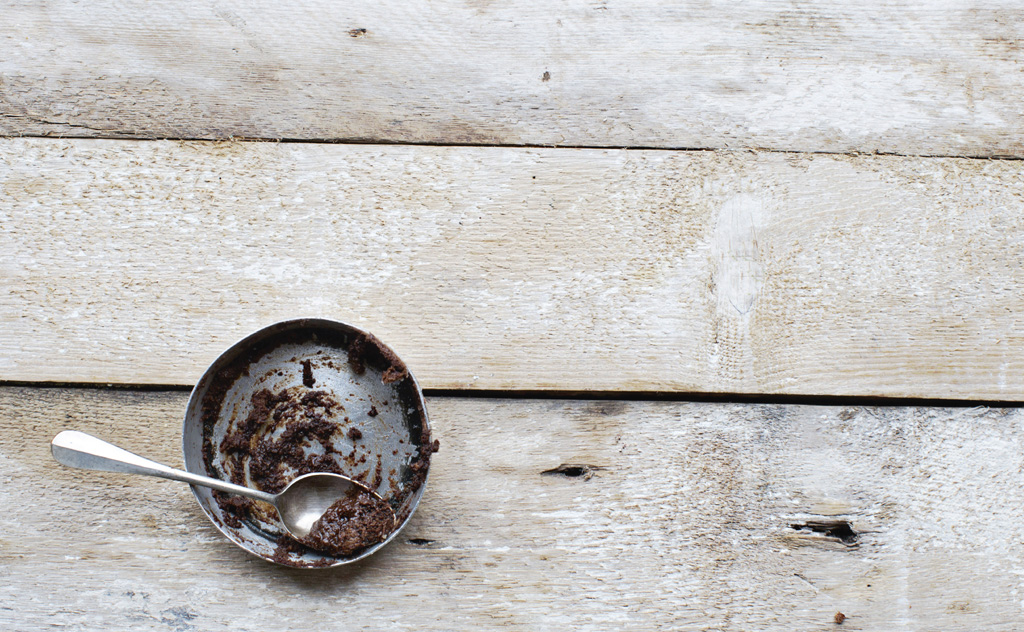
flourless chocolate torte
This chocolate dessert is both rich yet light in texture. The coffee enhances the chocolate flavour. You could make a raspberry torte by placing fresh or frozen raspberries on the base of the dishes and then covering with the chocolate mixture.
Chantilly cream is single cream with icing sugar and vanilla essence or seeds added to taste, then whisked together. It’s fantastic with this torte.
MAKES 4 INDIVIDUAL TORTES
125g gluten-free dark chocolate drops (70% cocoa solids)
60g butter, plus extra for greasing
1 shot of espresso (optional)
3 medium eggs, separated
125g caster sugar
vanilla ice cream (here) or Chantilly cream, to serve
Preheat the oven to 160°C. Grease four ramekins.
Place the chocolate and butter in a heatproof bowl set over a saucepan of simmering water, taking care not to let the bottom of the bowl touch the water. Allow the chocolate and butter to melt while stirring continuously, then add the espresso, if using.
Whisk the egg yolks and caster sugar together in a large bowl, then stir in the melted chocolate.
Whisk the egg whites in a spotlessly clean, grease-free bowl to soft peaks. Fold 1 tablespoon of the egg white into the chocolate mix, then gradually fold in the remaining egg white.
Pour the mixture into the greased soufflé dishes and bake for 8 minutes. The tortes will be soft in the centre and crunchy on the outside.
Serve in the soufflé dishes with vanilla ice cream or Chantilly cream.

chocolate fudge cake
This is the perfect chocolate fudge cake, gluten-free or not!
SERVES 12
240g light brown Demerara sugar
100g butter, softened, plus extra for greasing
1 tsp vanilla essence
240g gluten-free self-raising flour
40g good-quality cocoa powder
1 tsp bread soda
½ tsp xanthan gum
2 large eggs, separated
140g soured cream
40g gluten-free chocolate drops (70% cocoa solids)
190ml boiling water
1 tsp white wine vinegar
FOR THE FUDGE ICING:
175g chocolate drops (70% cocoa solids)
275g icing sugar
250g butter, softened
1 tsp vanilla essence
FOR THE GANACHE TOPPING:
100g icing sugar, sieved
100g butter
100g gluten-free chocolate drops (70% cocoa solids)
3 tbsp milk
TO ASSEMBLE:
2 tbsp raspberry jam
TO SERVE:
fresh whipped cream
To prevent the cake mixture from splitting, I always add the egg yolks first to stabilise the mixture and then I gradually add the egg white and flour. This is a foolproof method for any Madeira cake mix.
Preheat the oven to 180°C. Grease 2 x 20cm tins with butter and line with non-stick baking paper.
To make the cake, cream the brown sugar, butter and vanilla essence with the paddle attachment of a food mixer until light and fluffy, stopping to scrape down the sides of the bowl occasionally.
Sieve together the self-raising flour, cocoa power, bread soda and xanthan gum.
Add the egg yolks to the butter and sugar mixture, then add a tablespoon of flour and mix well. Scrape down the sides of the bowl, add one egg white and a tablespoon of flour and mix, once again scraping down the sides of the bowl as you go along. Repeat with the remaining egg white and another tablespoon of flour. Reserve the remaining flour. Add the soured cream and mix to combine.
Place the chocolate drops in a heatproof bowl, pour over the boiling water and mix until all the chocolate is melted before adding the white wine vinegar. Add the melted chocolate to the batter along with the remaining flour and mix through, scraping down the sides of the bowl as you mix.
Divide the batter between the two sponge tins and bake in the oven for 20–25 minutes. The cakes are baked when they are soft to the touch and spring back when gently pressed with a finger. Turn the sponges out onto a wire rack to cool.
To make the fudge icing, melt the chocolate drops in a heatproof bowl set over a saucepan of simmering water, stirring continuously with a spatula and taking care not to let the bottom of the bowl touch the water. Once melted, remove the bowl from the heat and set aside.
Beat the icing sugar and butter together until light and fluffy. Add the melted chocolate and vanilla essence and mix well. To use, place into a piping bag fitted with a star nozzle.
To make the ganache, sieve the icing sugar to remove any lumps. This will result in a smooth, shiny ganache. Place all the ingredients in a bowl set over a saucepan of simmering water, making sure the bottom of the bowl doesn’t touch the water. Once the chocolate has melted, remove from the heat and mix well. As it cools it will set and resemble a spread rather than a liquid. You need to use this immediately before it sets fully, so make the ganache just before you assemble the cake.
To assemble, remove the non-stick baking paper from the base of the sponges. Place one sponge on a cake board. Spread with raspberry jam, then spread with a layer of fudge icing and place the other sponge on top. Using a palette knife, spread a light layer of fudge icing on the top and sides of the cake.
To decorate, pipe rosettes of the fudge icing around the top edge of the cake and the base. Pour the chocolate ganache over the top of the cake, letting it run down the sides of the cake. Allow to set for a little while before cutting into slices. Serve with fresh whipped cream.
GET AHEAD
The icing will keep in the fridge for up to seven days. To use, bring back to room temperature so that it’s easy to pipe.
chocolate brownies
These gorgeous chocolate brownies are gooey in the centre and wonderful served warm. Instead of white chocolate drops, you can also use dried cranberries, sour cherries, chopped pecans or chopped hazelnuts.
MAKES 12 LARGE BROWNIES
375g gluten-free dark chocolate drops (60% cocoa solids)
375g butter
6 eggs
500g caster sugar
175g gluten-free white chocolate buttons
175g gluten-free self-raising flour
50g coconut flour
FOR THE CHOCOLATE SAUCE:
100g caster sugar
200ml boiling water
200g gluten-free dark chocolate drops (70% cocoa solids)
Preheat the oven to 180°C. Line a 23cm square baking tin with non-stick baking paper. Place the chocolate and butter in a heatproof bowl set over a saucepan of simmering water, making sure the bottom of the bowl doesn’t touch the water, and allow to melt slowly.
Using a whisk attachment on a food mixer, mix the eggs and caster sugar for approximately 3 minutes, until creamy but not stiff. Mix together the white chocolate drops, self-raising flour and coconut flour. Combine the melted chocolate, the egg mixture and the flour mixture and stir well.
Pour into the lined tin and bake for 25 minutes. Reduce the oven temperature to 100°C and bake for a further 15–20 minutes. To check if the brownies are baked, give the tin a shake – if there is only a slight movement on top, then the brownies are done. At this stage the top should be crusty, but with a gooey centre.
Leave the mixture in the tray overnight, then cut into equal-sized portions before serving or prior to freezing. The brownies can be stored for up to four days in an airtight container in the fridge, but remember to heat gently in a microwave prior to serving.
To make the chocolate sauce, combine the sugar and boiling water in a saucepan set over a medium heat and stir to dissolve the sugar. Bring to the boil, then add the chocolate drops and whisk until smooth.
Serve the warm brownies with the chocolate sauce, although the vanilla ice cream here or the crème anglaise here are also good.
GET AHEAD
The chocolate sauce can be made ahead and reheated as needed. Stored in an airtight container, it will last for up to four weeks in the fridge. When reheating the chocolate sauce, it should be done carefully as it can easily burn. The brownies are also suitable for freezing if you wrap them well individually.
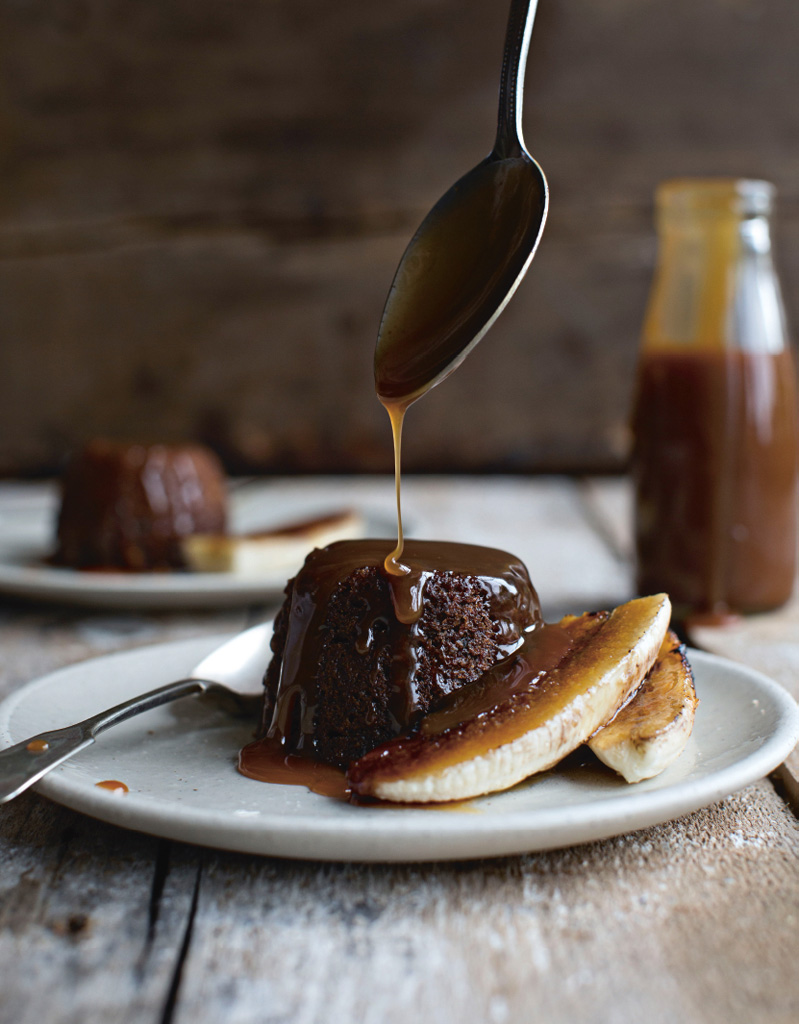
sticky toffee pudding
This recipe is foolproof. It actually works better with gluten-free flour. For the ultimate treat, I like to serve it with the toffee sauce as well as crème anglaise (here) or salted caramel ice cream and caramelised banana.
SERVES 8–10
175g dark muscovado sugar
75g butter, softened, plus extra for greasing
70g treacle
30g golden syrup
2 eggs, at room temperature
200g gluten-free self-raising flour
200g pitted dates
300ml water
1 tsp bread soda
FOR THE TOFFEE SAUCE:
100g butter
100g dark muscovado sugar
200ml double cream
Preheat the oven to 180°C. Grease 8–10 dariole moulds with a little butter.
Using the paddle attachment on a food mixer, cream together the sugar and butter until light and fluffy. This should take about 10 minutes. Scrape down the bowl from time to time to ensure that the mixture is fully combined. Add the treacle and golden syrup and mix well. Add the eggs one a time, mixing well between each addition, then add the flour and mix again, scraping down the sides of the bowl, until all the ingredients are fully combined.
Place the dates in a saucepan with the water and bring to the boil. Immediately remove from the heat and purée the date mixture with a hand-held blender to produce a sloppy mixture. Add the bread soda to the date purée and blend again, then add the date purée to the cake batter and blend well.
Pour the batter into the greased moulds and bake for 20–25 minutes, until the cake shrinks away from the sides of the moulds and springs back when gently pressed with a finger.
While the puddings are baking, you can make the toffee sauce. Melt the butter and sugar together in a saucepan, then add the double cream. Bring to the boil, then reduce the heat and simmer until the mixture coats the back of a spoon. Remove the puddings from the moulds and pour the warm toffee sauce over the puddings to serve.
GET AHEAD
The puddings freeze well. Place in a ziplock bag or sealed container, then freeze. Defrost at room temperature, top with toffee sauce and reheat in a microwave.
tiramisu
I love the amaretti biscuit flavour in this recipe. It brings all of the elements together seamlessly. Tiramisu is quite indulgent, but if you’re trying to impress, this dessert is guaranteed to do the trick, especially if you serve it in martini glasses, whiskey tumblers or any nice decorative glasses.
If you wish, you can use circles of sponge instead of the amaretti biscuits, especially if you have some stashed in the freezer after making the rhubarb baked Alaska here. Just soak the sponge in the coffee syrup before putting it into the glasses.
MAKES 5 INDIVIDUAL SERVINGS
125ml freshly brewed espresso
2 tbsp Tia Maria
1 tbsp brandy
45g caster sugar, plus extra for sweetening
2 egg yolks
150ml single cream
250g mascarpone cheese
30 amaretti biscuits (here)
cocoa powder, for dusting
Combine the hot coffee with enough sugar to sweeten it. Ensure all the sugar is dissolved before adding the Tia Maria and brandy, then leave to cool.
Place a heatproof bowl over a pan of simmering water. Add the 45g of caster sugar and the egg yolks. Whisk over the heat until they thicken and lighten in colour. If using a thermometer, the mixture will be cooked at 55°C. Remove from the heat and whisk until cold.
Whip the cream in a large bowl to achieve a softly whipped consistency. Add the mascarpone and the cooled egg mixture to the whipped cream. Whisk until all the ingredients are combined, you have achieved a smooth consistency and the mixture holds its shape. Place in a piping bag.
Layer the glasses by first crushing the amaretti biscuits and adding some to the bottom of the serving glasses. Add a dessertspoon of the coffee mixture on top of the biscuits, then pipe in some of the cream mixture. Repeat the layers until you reach the top of the glass, finishing with the cream. Dust with cocoa powder and serve.
amaretti biscuits
These biscuits can be used in the tiramisu here or on their own with a cup of coffee.
MAKES 100 SMALL BISCUITS
2 egg whites (60g egg whites)
150g caster sugar
120g ground almonds
15g gluten-free plain flour
15g cornflour
1 tsp ground cinnamon
icing sugar, for dusting
Preheat the oven to 180°C. Line a baking tray with non-stick baking paper or a silicone baking mat.
Whisk the egg whites in a spotlessly clean, grease-free bowl until stiff. Gradually add 75g of the caster sugar and whisk until the meringue is dry and glossy.
Sieve together the remaining 75g of caster sugar with the ground almonds, flour, cornflour and cinnamon. Gradually fold the dry mixture into the meringue. Spoon into a piping bag fitted with a plain nozzle and pipe into small balls on the lined tray. Dust liberally with icing sugar and set aside for 1 hour at room temperature before baking. This helps to form a skin on the biscuit.
Bake for 15–20 minutes, until the biscuits are firm and they lift easily from the tray. Allow to cool directly on the tray, then store in an airtight container for two to three weeks.
black forest trifle
This classic dessert consists of a layer of chocolate roulade with cherry compote, crème anglaise, whipped cream and chocolate shavings all presented in a glass serving dish. The layers of texture and colour is quite impressive.
SERVES 8–10 • FOR THE CHOCOLATE ROULADE:
sunflower oil, for greasing
5 eggs, separated
175g caster sugar
175g gluten-free dark chocolate drops (70% cocoa solids)
70ml boiling water
FOR THE CHERRY FILLING:
1 x 425g tin of black cherries, pitted
60ml kirsch
45g caster sugar
zest and juice of 1 orange
3 dessertspoons cornflour
1 batch of crème anglaise (here)
TO DECORATE:
whipped cream
gluten-free chocolate shavings
First drain the cherries and reserve the liquid. Soak the cherries in the kirsch for about 30 minutes.
Preheat the oven to 180°C. Line a Swiss roll tin (30cm x 20cm) with non-stick baking paper and brush the paper with a little sunflower oil.
To make the chocolate roulade, place the egg yolks and sugar in the bowl of a stand mixer. Use the balloon whisk attachment to beat the mixture until it’s light and fluffy, stopping to scrape down the sides of the bowl occasionally.
Place the chocolate drops in a heatproof bowl and pour over the boiling water. Mix the drops until they are melted and smooth.
Whisk the egg whites in a spotlessly clean, grease-free bowl until they form soft peaks. Do not overmix the whites at this point.
Add the melted chocolate to the egg yolk mixture and stir to combine. Gently fold in a small amount of the egg white, then add the remainder of the egg whites and carefully combine. Pour the mixture into the baking tray and spread out evenly with a spatula or palette knife. Bake in the oven for 12 minutes. The roulade is baked once it has a crust and is firm to touch. However, do not overcook as it could dry out quite easily.
Remove from the oven and leave to cool in the tin, then turn out onto a board and peel off the paper. Using a round 5cm cutter, stamp out into discs.
To make the cherry filling, strain the kirsch from the cherries into a saucepan. Add the reserved cherry liquid from the tin, the sugar and the orange zest and juice. Place the cornflour in a cup, add 1 tablespoon of the liquid from the saucepan and stir to combine. Bring the liquid in the saucepan to the boil, then add the cornflour mixture and cook for 1–2 minutes, stirring continuously. When the liquid has thickened, reduce the heat and simmer for 2 minutes. Add the cherries and set aside to cool.
To assemble, place a circle of roulade in the base of each individual trifle dish. Place a dessertspoon of the cherry filling on top and add a layer of crème anglaise. Repeat the layers. To finish, pipe a rosette or quenelle of whipped cream on top of the trifle and scatter with chocolate shavings. To complete, add a cherry on top.
pavlova nests
Pavlova nests are crisp on the outside with a soft, marshmallow-light centre. When served with seasonal fruits, it can be a real showstopper. I use fresh mixed berries in the summertime, while figs and toasted almonds or poached pears and toasted pistachios are wonderful combinations in the autumn or winter.
MAKES 8 • FOR THE PAVLOVA NESTS:
4 egg whites, at room temperature
225g caster sugar
1½ tsp cornflour
1½ tsp white wine vinegar
FOR THE FILLING:
250ml cream, whipped
1 dessertspoon icing sugar, sieved
1 vanilla pod, split in half and seeds scraped out, or ½ tsp vanilla essence
fresh fruit, to serve (see the recipe intro)
Preheat the oven to 100°C.
It’s very important that you use a spotlessly clean, dry, grease-free bowl for whisking the egg whites. You will never achieve the required volume in your pavlova if there is any trace of grease in the mixture. You can also achieve good volume by having your eggs at room temperature. Clean your whisk attachment and mixing bowl with boiling water before use and dry well. I use kitchen paper to wipe the bowl and attachment.
Using the balloon whisk attachment of a stand mixer, whisk the egg whites until they are foamy and maintain soft peaks. Gradually add the caster sugar one spoonful at a time, mixing well after each spoonful. When all the sugar has been added, mix on high speed for 3–4 minutes. The biggest mistake people make when making pavlova or meringues is under-mixing, which will result in the pavlova not holding its shape. It is impossible to overmix.
Mix the cornflour and white wine vinegar to a paste in a cup, then add to the meringue and mix well to fully combine.
Place a tiny drop of the meringue on the reverse side corners of non-stick baking paper to hold the paper in place on the baking tray (alternatively, you can use a silicone baking mat). Put six to eight separate dollops of the meringue onto the lined tray, making a slight hollow in the centre using the back of the spoon. This will hold the fresh cream and fruit when baked.
Bake for 80 minutes, then leave the tray in the oven, turn the oven off and leave the door open to allow the nests to dry out and cool.
To make the cream filling, combine the cream, icing sugar and vanilla in a bowl. Whip together until the mixture holds its shape and can be piped or placed in the centre of the pavlova nests. Top with the fresh fruit.
GET AHEAD
The nests can be made two or three days ahead of time and assembled when needed.

olde post inn vanilla crème brûlée
This is a favourite of our customers in The Olde Post Inn. Traditionally we serve it with seasonal berries and the ginger shortbread biscuits here.
SERVES 4
500ml single cream
50g icing sugar
½ vanilla pod, split in half and seeds scraped out
5 egg yolks
light brown Demerara sugar, for caramelising
fresh seasonal berries, to serve
Preheat the oven to 100°C.
To make the custard, place the cream and 25g of the icing sugar in a large saucepan along with the vanilla seeds and bring to the boil. Remove from the heat and set aside.
Mix the egg yolks and the remaining 25g of icing sugar together in a large heatproof bowl. Pour the hot cream into the egg yolks and whisk well.
Pour the custard through a fine-mesh sieve to remove the vanilla pod and any lumps and to ensure that you have a smooth custard. Pour equal portions of the custard into four ramekins or shallow ovenproof serving dishes.
Place the dishes in a roasting tin and pour in enough water to come halfway up the sides of the dishes. Transfer to the oven and bake for 20–30 minutes. The cooking time will vary depending on how deep your dishes are. The crème brûlée is baked when it wobbles slightly as a whole. Allow to cool, then place in the fridge until chilled.
Before serving, sprinkle with the Demerara sugar and caramelise with a kitchen blowtorch or under a hot grill. This results in a light sheet of caramel. Repeat the process three times to get a really good crust on the custard. Top with fresh seasonal berries and serve immediately.
GET AHEAD
This dessert can be prepared in advance and kept in the fridge overnight. To serve, simply remove from the fridge, glaze and serve immediately.
vanilla ice cream
There is nothing like homemade ice cream. It is absolutely worth the effort and time.
MAKES 1.5 LITRES
1 litre full-fat milk
250ml single cream
1 vanilla pod
13 egg yolks
275g caster sugar
Place the milk and cream in a large heavy-based saucepan. It’s important to use a large saucepan to allow the milk and cream to rise and triple in size as it cooks. Cut the vanilla pod in half and scrape out the seeds. Add the seeds and the pod to the pan. Bring the mix up to a very good boil that is rising up the sides of the pan. This will ensure that the custard is almost cooked already so that it won’t take long to attain the correct consistency at the next stage.
Whisk the egg yolks and caster sugar together in a heatproof bowl until fully combined. Add the boiling liquid to the egg mixture and whisk immediately to prevent it from curdling. Pour the mixture back into the saucepan through a fine-mesh sieve and place it back on the heat, whisking continuously, until it coats the back of a spoon. This should only take 1 minute.
Once cool, place the custard into an ice cream machine and churn according to the manufacturer’s instructions.
mint ice cream
This ice cream is wonderful with the chocolate fondant here.
MAKES 750ML
20 fresh mint leaves
40ml crème de menthe
½ x vanilla ice cream recipe (here)
Have a basin of ice-cold water ready. Bring a small pot of water to the boil. Blanch the mint leaves by placing them into the boiling water for 10 seconds, then remove and refresh in the iced water. Pat dry using kitchen paper.
Blitz the mint in a blender, then add the crème de menthe and blitz again. Add the mint mixture to the vanilla ice cream to taste and churn to combine.