Boo-boos happen. Even when you’re conscientious, careful, and vigilant—even when you’ve taken all the precautions and then some—you can’t prevent every injury. But, you can prepare for them—and that preparation can make all the difference. Hopefully, most of the boo-boos that happen in your baby’s life will be small (the kiss-and-make-better variety). Still, you’ll need to know how to respond in the event of a bigger mishap, and how to care for injuries (such as cuts, bruises, burns, and breaks) that need more treatment than a cuddle—and that’s what this chapter is for. It’ll also give you guidelines on lifesaving CPR and what to do if your child is choking.
Because quick action after an injury is often critical, don’t wait until your baby dunks a hand in your hot coffee or takes a swig of laundry detergent to look up what to do in an emergency. Before an accident happens is the best time to get as familiar as possible with the procedures for dealing with and treating common injuries. Review the protocol for handling less common injuries (snakebites, for instance) when you’re more likely to encounter them (say, you’re about to go on a camping trip).
But don’t stop there. It’s one thing to read about injury treatment—it’s another thing to apply your skills when an emergency strikes. So reinforce what you learn in this chapter by taking a course in baby safety, cardiopulmonary resuscitation (CPR), and basic first aid. Courses are available at many community centers and hospitals, and through fire departments, ambulance corps, the American Red Cross, and the American Heart Association—check online or with your child’s doctor for options. Some certified instructors will even bring the course to you (that way, anyone who might be caring for your baby, including grandparents, aunts, uncles, and babysitters, can attend with you in your home). Keep your skills current and ready to use with periodic refresher courses (or a video course approved by th AAP or Red Cross)—and be sure that anyone else who cares for your baby is also fully trained and prepared to deal with emergencies, from minor to major.
To further prepare yourself for emergencies:
• Discuss with your baby’s doctor what the best course of action would be in case of a non-life-threatening injury as well as in a serious emergency: when to call the doctor’s office, when to go to the emergency room (and when to do both), when to call 911, and when to follow some other protocol. For minor injuries, the ER—with its long waits, abundance of germs, and priority given to life-threatening conditions—may not be the best place to go.
• Keep your first-aid supplies in a childproof, easily manageable all-inclusive kit or box that can be moved where it’s needed. Always keep a charged phone easily accessible so that it can be used at the site of an injury, wherever it happens.
• Always keep handy (and accessible to anyone who cares for your child):
• Emergency phone numbers. The pediatrician, the Poison Control Center (800-222-1222), the hospital emergency room of your choice, your pharmacy, the Emergency Medical Service (EMS, which can be accessed by dialing 911 in most areas), and your places of work, as well as the number of a close relative, friend, or neighbor who can be called on in an emergency. A regular care provider should have these numbers programmed into her own phone for instant access.
• Personal information (updated regularly). Your child’s age, approximate weight, immunization record, medications, allergies, and/or chronic illnesses, if any. In an emergency, these should be supplied to the EMS and/or taken to the hospital or ER.
• Location information. Home address (include cross streets and landmarks, if necessary), apartment number, telephone number—for use by babysitters or other caregivers calling for emergency help.
• A pad and pen. For taking instructions from the doctor or 911 dispatcher, or Poison Control.
• Be sure there’s a clearly distinguishable number on your house and a light that makes the number visible after dark.
• Know the quickest route to the ER or other emergency medical facility your child’s doctor recommends.
• If you live in a city, keep some cash reserved in a safe place and the car seat handy in case you need to call a taxi to get to the ER or doctor’s office in an emergency. (If you’re very anxious, or you’re busy caring for your injured child, it’s best if you don’t drive.) Let any babysitter who stays with your little one know where that emergency money is, too. An easier option in cities where it’s available: an app for a taxi or car service (like Uber) that pinpoints your location instantly, picks you up usually within minutes, and charges your account for the ride.
• If you tend to overreact in stressful or emergency situations, try to learn how to respond calmly to your little one’s illnesses and injuries. Practice with everyday bumps and bruises, so that if a serious injury ever occurs, you’ll be better equipped to keep your cool. Taking a few deep breaths will help you relax and focus no matter what you’re facing. Try to remember that your expression, tone of voice, and general demeanor will affect how your baby responds to an injury. If you panic, your baby is more likely to panic—and less likely to be able to cooperate. And an uncooperative baby is more difficult to treat.
• To help you both stay calm when there’s been an injury, big or small, divert your baby’s attention from the injury by engaging at least three senses. Stand where your baby can see you, speak calmly so he or she can hear you, and touch a part of the body that doesn’t seem to be injured.
Following are the most common injuries, what you should know about them, how to treat (and not treat) them, and when to seek medical care for them. Types of injuries are listed alphabetically, with individual injuries numbered for easy cross-reference.
1. Internal bleeding. A severe blow to your baby’s abdomen could result in internal injury. The signs of such injury would include bruising or other discoloration of the abdomen, vomited or coughed-up blood that is dark or bright red and has the consistency of coffee grounds (this could also be a sign that a caustic substance has been swallowed), blood (it may be dark or bright red) in the stool or urine, and shock (cold, clammy, pale skin; weak, rapid pulse; chills; confusion; and possibly nausea, vomiting, and/or shallow breathing). Seek emergency medical assistance (call 911). If baby appears to be in shock (#48), treat immediately. Do not give food or drink.
2. Cuts or lacerations of the abdomen. Treat as for other cuts (#51, #52). With a major laceration, intestines may protrude. Do not try to put them back into the abdomen. Instead, cover them with a clean, moistened washcloth or diaper and get emergency medical assistance immediately (call 911).
3. Animal bites. Try to avoid moving the affected part. Call the doctor immediately. Then wash the wound gently with soap and water. Do not apply antiseptic or anything else. Control bleeding (#51, #52, #53) as needed with pressure, and apply a bandage.
Bats, skunks, coyotes, foxes, and raccoons that bite may be rabid, especially if they attacked unprovoked. The same is true for dogs and cats. Although most household pets are vaccinated against rabies, you can’t be sure unless you see proof of vaccination. You’ll need to consult with the pediatrician to determine if your baby needs postexposure rabies protection. Keep in mind that while rabies in humans is extremely rare, it is almost always fatal if not treated.
If a dog or cat bite breaks the skin, call the doctor for advice, even if the animal is known not to have rabies. Antibiotics may be prescribed to prevent infection. Call the doctor immediately if redness, swelling, and tenderness develop at the site of the bite—these are signs of infection, which must be treated with antibiotics. Infection is more common with a cat bite than a dog bite.
4. Human bites. If your baby is bitten by another child, don’t worry unless the skin is broken. If it is, wash the bite area thoroughly with mild soap and cool water. Don’t rub the wound or apply any spray or ointment (antibiotic or otherwise). Simply cover the bite with a sterile dressing and call the doctor. Use pressure to stem the bleeding (#52), if necessary. Antibiotics will likely be prescribed to prevent infection.
5. Insect stings or bites. Treat insect stings or bites as follows:
• Apply calamine lotion or another anti-itching medication to itchy bites, such as those caused by mosquitoes.
• Remove ticks promptly, using blunt tweezers or your fingertips protected by a tissue, paper towel, or rubber glove. Grasp the bug as close to the child’s skin as possible and pull upward, steadily and evenly. Don’t twist, jerk, squeeze, crush, or puncture the tick. If you’re not sure whether it’s a deer tick, you can save it and compare it with a picture of a deer tick (or take a photo of it and email or show the doctor later). But there’s no need to save it for any other reason—the doctor won’t need it for testing.
• If your baby is stung by a honeybee, remove the stinger by scraping it horizontally, using the edge of a blunt butter knife, your fingernail, or a credit card, or gently remove it with tweezers or your fingers. Try not to pinch the stinger, because doing so could inject more venom into the wound. Then treat as below.
• Wash the site of a minor bee, wasp, ant, spider, or tick bite with soap and water. Then apply cold compresses or ice wrapped in a towel if there appears to be swelling or pain.
• If there seems to be extreme pain after a spider bite, apply cold compresses and call Poison Control for emergency advice. If possible, describe the spider’s appearance to help determine if it is poisonous. If you know the spider is poisonous—a black widow or brown recluse spider, a tarantula, or a scorpion, for example—get emergency treatment (call 911) immediately, even before symptoms appear.
• Watch for signs of hypersensitivity, such as severe pain or swelling or any degree of shortness of breath after a bee, wasp, or hornet sting. About 90 percent of children react to an insect sting with brief (less than 24 hours) redness, swelling, and pain in a 2-inch area at the site of the sting. But the other 10 percent have a much more severe local reaction, with extensive swelling and tenderness covering an area 4 inches or more in diameter that doesn’t peak until 3 to 7 days after the sting. Those who experience such symptoms with a first sting usually develop hypersensitivities (or allergies) to the venom, in which case a subsequent sting could be fatal without immediate emergency treatment. Life-threatening anaphylactic reactions (which are uncommon) usually begin within 5 to 10 minutes of the sting. They may include swelling of the face and/or tongue; signs of swelling of the throat, such as tickling, gagging, difficulty swallowing, or voice change; bronchospasm (chest tightening, coughing, wheezing, or difficulty breathing); a drop in blood pressure causing dizziness or fainting; and/or cardiovascular collapse. Fatal outcomes in children are extremely rare, but do seek medical help immediately if you notice any systemic reaction (affecting body parts and/or systems other than the site of the sting). Should your child have a life-threatening systemic reaction, call 911 immediately.
After any systemic reaction, a skin test, and possibly other testing, will be performed to determine sensitivity to insect venom. If it is determined that your child is at risk of a life-threatening episode from an insect sting, it’ll probably be recommended that an epinephrine auto injector (EpiPen or other brand) be taken along on all outings during bee season.
6. Snakebites. Babies are rarely bitten by poisonous snakes, but such a bite is very dangerous. The four major types in the United States are rattlesnakes, copperheads, coral snakes, and cottonmouths or water moccasins. All have fangs, which usually leave identifying marks when they bite. Because of a baby’s size, even a tiny amount of venom can be fatal. After a poisonous snakebite, it is important to keep the baby and the affected part as still as possible. If the bite is on a limb, immobilize the limb with a splint and keep it below the level of the heart. Use a cool compress if available to relieve pain, but do not apply ice or give any medication without medical advice. Get prompt emergency medical help, and be ready to identify the variety of snake, if possible. If you won’t be able to get medical help within an hour, apply a loose constricting band (a belt, tie, or scrunchie loose enough for you to slip a finger under) 2 inches above the bite to slow circulation. (Do not tie such a tourniquet around a finger or toe, or around the neck, head, or trunk.) Check the pulse beneath the tourniquet frequently to be sure circulation is not cut off, and loosen it if the limb begins to swell. Make a note of the time the tourniquet was tied. Sucking out the venom by mouth (and spitting it out) may be helpful if done immediately. But do not make an incision of any kind, unless you are 4 to 5 hours from help and severe symptoms occur. If baby is not breathing and/or the heart has stopped, begin rescue techniques (click here). Treat for shock (#48), if necessary.
Treat nonpoisonous snakebites as puncture wounds (#54), and notify the doctor.
7. Marine animal stings. The stings of marine animals are usually not serious, but occasionally a child can have a severe reaction. Medical treatment should be sought immediately after any marine sting. First-aid treatment varies with the type of marine animal involved, but in general, any clinging fragments of the stinger should be carefully brushed away with a diaper, a credit card, or a piece of clothing (to protect your own fingers). Heavy bleeding (#52), shock (#48), or cessation of breathing (click here), should be treated immediately, and if necessary, call 911. Don’t worry about light bleeding, since it may help purge toxins. If possible, the site of the sting of a stingray, lionfish, catfish, stonefish, or sea urchin should be soaked in warm water (to break down the toxins) for 30 minutes, or until medical help arrives. The toxins from the sting of a jellyfish or Portuguese man-of-war can be counteracted by applying regular white vinegar or rubbing alcohol on the sting (pack a couple of alcohol pads in your beach bag, just in case). Unseasoned meat tenderizer, baking soda, ammonia, and lemon or lime juice can also help prevent pain.
see #1
8. Possible broken arms, legs, or fingers. It’s hard to tell when a bone is broken in a baby. Most “broken” bones in babies are usually just bent or buckled, not snapped, making a break harder to detect visually. Signs of a break can include inability to move or put weight on the part, severe pain (persistent crying could be a clue, or an extreme reaction of pain when the area is tapped), numbness or tingling (neither of which a baby would be able to communicate), swelling, discoloration, and/or deformity (though this could also indicate a dislocation, #17). If a fracture is suspected, don’t try to straighten it out. Try to immobilize the injured part by splinting it in the position it’s in with a ruler, a magazine, a book, a roll of newspaper, or another firm object, padded with a soft cloth to protect the skin. Or use a small, firm pillow as a splint. Fasten the splint securely with bandages, strips of cloth, scarves, or neckties, but not so tightly that circulation is restricted. If no potential splint is handy, try to immobilize the injured limb against your arm. Check regularly to be sure the splint or its wrapping isn’t cutting off circulation. Apply an ice pack to reduce swelling. Take your child to the doctor or ER even if you only suspect a break.
9. Compound fractures. If bone protrudes through the skin, don’t touch it. Cover the injury, if possible, with gauze or with a clean diaper, control bleeding with pressure (#52), and get emergency medical assistance (call 911).
10. Possible neck or back injury. If a neck or back injury is suspected, don’t move baby at all. Call 911 for emergency medical assistance. (If you must move baby away from a life-threatening situation, such as a fire or road traffic, splint the back, neck, and head with a board, a chair cushion, or your arm. Move him or her without bending or twisting the head, neck, or back.) Cover and keep baby comfortable while waiting for help, and if possible, put some heavy objects, such as books, around the child’s head to help immobilize it. Don’t give food or drink. Treat severe bleeding (#53), shock (#48), or absence of breathing and/or pulse (click here) immediately.
see #49
IMPORTANT: If a child’s clothing is on fire, use a coat, blanket, rug, bedspread, or even your own body to smother the flames.
11. Limited burns from heat (first degree). Immerse burned fingers, hands, feet, toes, arms, or legs in cool—not cold—water (50°F to 60°F). If baby is cooperative, hold the burned part under running cool water. Apply cool compresses to burns on the face or trunk. Continue until baby doesn’t seem to be in pain anymore, usually 15 to 30 minutes. Don’t apply ice, butter, or burn ointments (all of which could compound skin damage), and don’t break any blisters that form. After soaking the burned area, gently pat it dry with a soft towel and cover it with a gauze pad, a cloth bandage, or another nonadhesive bandage. If redness and pain persist for more than a few hours, call the doctor.
Call the doctor immediately for burns that look raw, that blister (second-degree burns), or are white or charred looking (third-degree burns), any burns on the face, hands, feet, or genitals, or burns that are the size of your child’s hand or larger.
12. Extensive burns from heat. Call 911 for emergency medical assistance. Keep baby lying flat. Remove any clothing from the burn area that does not adhere to the wound (cut it away as necessary but do not pull). Apply cool, wet compresses (you can use a washcloth) to the injured area (but not to more than 25 percent of the body at one time). Keep baby comfortably warm, with burned extremities higher than the heart. Do not apply pressure, ointments, butter or other fats, powder, or boric-acid soaks to burned areas. If baby is conscious and doesn’t have severe mouth burns, nurse or offer sips of fluid to prevent dehydration.
13. Chemical burns. Caustic substances (such as lye, drain cleaner, and other acids) can cause serious burns. Using a clean, soft cloth, gently brush off dry chemical matter from the skin (wear rubber gloves to protect your hands) and remove any contaminated clothing. Immediately flush the skin with large amounts of water. Call a physician, Poison Control (800-222-1222), or the doctor for further advice. Get immediate medical assistance (call 911) if there is difficult or painful breathing, which could indicate lung injury from inhalation of caustic fumes. (If a chemical has been swallowed, see #44.)
14. Electrical burns. Immediately disconnect the power source, if possible, or separate baby from the source using a dry, nonmetallic object such as a wooden broom, wooden ladder, rope, cushion, chair, or even a large book—but not your bare hands. If baby isn’t breathing and/or has no pulse, initiate rescue techniques (click here) and call 911. Even a minor electrical burn should be evaluated by a physician, so call your baby’s doctor as soon as possible.
15. Sunburn. If your baby gets a sunburn, treat it by applying cool compresses for 10 to 15 minutes, 3 or 4 times a day, until the redness subsides—the evaporating water helps to cool the skin. In between these treatments, apply a baby-safe sunburn relief spray or a mild moisturizing cream. Don’t use Vaseline or baby oil on a burn, because it seals in heat and seals out air, which is needed for healing. Acetaminophen may reduce pain of sunburn, but if there’s swelling and the baby is over 6 months, ibuprofen (which is anti-inflammatory) is a better choice. Antihistamines shouldn’t be given unless they are prescribed by the doctor. When sunburn is severe—there is blistering, pain, nausea, or chills—call the doctor immediately.
see #13
see Frostbite and Frostnip, #31, Hypothermia, #35
16. Symptoms of a seizure or convulsions include collapse, eyes rolling upward, foaming at the mouth, stiffening of the body followed by uncontrolled jerking movements, and in the most serious cases, breathing difficulty. Brief convulsions are not uncommon with high fevers (click here for how to deal with febrile seizures). For nonfebrile seizures: Clear the immediate area around baby or move baby to the middle of a bed or carpeted area to prevent injury. Loosen clothing around the neck and middle, and lay baby on one side with head lower than hips (elevate the hips with a pillow). Don’t put anything in the mouth, including food or drink, breast or bottle. Call the doctor.
If baby isn’t breathing or has no pulse, begin rescue techniques (click here) immediately. If someone else is with you, have them call 911. If you’re alone, wait until breathing has started again to call, or call if breathing hasn’t resumed within a few minutes. Also call 911 if the seizure lasts more than 2 to 3 minutes, seems very severe, or is followed by one or more repeat seizures.
Seizures may be caused by the ingestion of prescription medicines or toxic substances, so check the immediate vicinity for any sign that your baby may have gotten into any. If it’s clear that he or she has swallowed something hazardous, see #44.
17. Elbow dislocations (also known as nursemaid’s elbow) are not as common among babies as they are among toddlers, who get them mostly because they are often tugged along by the arm by adults in a hurry (or “flown” through the air by their arms). Inability or unwillingness to move the arms, usually combined with persistent crying because of pain, is typical with a dislocation. A trip to the doctor’s office or the ER, where an experienced professional can easily reposition the dislocated part, will provide virtually instant relief. If pain seems severe, apply an ice pack and splint before leaving.
see #3
18. Even a child who quickly revives after being taken from the water unconscious should get a medical evaluation. For one who remains unconscious, have someone else call 911 for emergency medical assistance, if possible, while you begin rescue techniques (click here). If no one is available to phone for help, call later. Don’t stop CPR until the child revives or help arrives, no matter how long that takes. If there is vomiting, turn baby to one side to avoid choking. If you suspect a back or neck injury, immobilize these parts (#10). Keep the baby warm and dry.
19. Foreign object in the ear. Try to dislodge the object with these techniques:
• For a live insect, use a flashlight to try to lure it out.
• For a metal object, hold a strong magnet at the ear canal to draw the object out (but don’t insert the magnet into the ear).
• For a plastic or wooden object that can easily be seen and is not deeply embedded in the ear, dab a drop of quick-drying glue on a straightened paper clip and touch it to the object (don’t touch the ear). Don’t probe into the ear where you can’t see. Wait for the glue to dry, then pull the clip out, ideally with the object attached. Don’t attempt this if there’s no one around to help hold baby still.
If you’re not comfortable attempting the above techniques, you don’t have the necessary equipment to try them, or you try them and they fail, don’t try to dig out the object with your fingers or with an instrument. Instead, take baby to the doctor’s office or the ER.
20. Injury to the ear. If a pointed object has been pushed into the ear or if your baby shows signs of ear injury (bleeding from the ear canal, sudden difficulty hearing, a swollen earlobe), call the doctor.
21. Break contact with the electrical source by turning off the power, if possible, or separate baby from the current by using a dry nonmetallic object such as a wooden broom, wooden ladder, robe, cushion, chair, rubber boot, or even a large book. If baby is in contact with water, do not touch the water yourself. Once baby has been separated from the power source, call 911. If he or she isn’t breathing and/or has no pulse, begin rescue techniques immediately (click here). For electrical burns, see #14.
IMPORTANT: Don’t apply pressure to an injured eye, touch the eye with your fingers, or administer medications without a physician’s advice. Keep baby from rubbing the eye by holding a small cup or glass over it or, if necessary, by restraining his or her hands.
22. Foreign object in the eye. If you can see the object (an eyelash or grain of sand, for example), wash your hands and use a moist cotton ball to gently attempt to remove it from baby’s eye while someone else holds baby still (attempt this only in the corner of the eye, beneath the lower lid, or on the white of the eye—stay away from the pupil). Or try pulling the upper lid down over the lower one for a few seconds. If those techniques don’t work, and if baby is very uncomfortable, try to wash out the object by pouring a stream of tepid (body temperature) water into the eye while someone holds baby still. Don’t worry about your little one crying—tears may help wash out the object.
If after these attempts you can still see the object in the eye or if baby still seems uncomfortable, the object may have become embedded or may have scratched the eye. Don’t try to remove an embedded object yourself—proceed to the doctor’s office or ER. Cover the eye with a small cup, a gauze pad taped loosely in place, or with a few clean tissues or a clean cloth to alleviate some of the discomfort en route. Do not apply pressure.
23. Corrosive substance in the eye. Flush baby’s eye immediately and thoroughly with lukewarm water for 15 minutes, holding the eye open with your fingers (see illustration). If one eye is involved, keep the chemical runoff out of the other eye by turning baby’s head so that the unaffected eye is higher than the affected one. Don’t use drops or ointments, and keep baby from rubbing the eye or eyes. Call Poison Control (800-222-1222) for further instructions. Depending on the substance, Poison Control may recommend a follow-up with an eye doctor to be safe.
Baby won’t enjoy an eye bath, but it’s necessary to wash away a corrosive substance.
24. Injury to the eye with a pointed or sharp object. Keep baby in a semireclining position while you seek help. If the object is still in the eye, do not try to remove it. If it isn’t, cover the eye lightly with a small cup, gauze pad, clean washcloth, or tissue, but do not apply pressure. In either case, get emergency medical assistance (call 911) immediately. Though such injuries often look worse than they are, check with the doctor any time the eye is scratched or punctured, even slightly.
25. Injury to the eye with a blunt object. Keep baby lying face up. Cover the injured eye with an ice pack or cold compress for about 15 minutes. Repeat every hour as needed to reduce pain and swelling. Consult the doctor if there is bleeding in the eye, if the eye blackens, if baby seems to be having difficulty seeing or keeps rubbing the eye a lot, if the object hit the eye at high speed, or if there seems to be continued eye pain.
26. Check for breathing and pulse. If they are absent, begin CPR immediately (click here). If you detect breathing, keep baby lying flat, head slightly lower than the rest of the body, lightly covered for warmth if necessary. Loosen clothing around the neck. Turn baby’s head to one side and clear the mouth of any food or objects. Call 911 immediately.
27. Bruises. Babies, ever curious, are particularly prone to painful bruises from catching fingers in drawers and doors. For such a bruise, soak the finger in cold water (add a couple of ice cubes to keep it cool). As much as an hour of soaking is recommended, with breaks every 10 minutes (long enough for the finger to rewarm) to avoid frostbite. Though few babies will sit still for this long, you may be able to treat your little one’s injury for a few minutes by using distraction or holding him or her tightly.
A stubbed toe will also benefit from soaking, but again, it often isn’t easy to do with a baby. Bruised fingers and toes will swell less if they are kept elevated.
If the injured finger or toe becomes very swollen very quickly, is misshapen, or can’t be voluntarily straightened by the baby, call the doctor. It may be broken (#8). Call the doctor immediately if the bruise is from a wringer-type injury or from catching a hand or foot in the spokes of a moving wheel. In these kinds of “crush” injuries, there may be more damage than is visible or apparent.
28. Bleeding under the nail. When a finger or toe is badly bruised, a blood clot may form under the nail, causing painful pressure. If blood oozes out from under the nail, press on it to encourage the flow, which will help to relieve the pressure. Soak the injury in cold water if baby will cooperate. If the pain continues, the doctor may have to make a hole in the nail to relieve the pressure.
29. A torn nail. For a small tear, secure with a piece of adhesive tape or a bandaid until the nail grows to a point where it can be trimmed. For a tear that is almost complete, carefully trim away along the tear line with scissors or baby nail clippers, and keep covered with a bandaid until the nail is long enough to protect the finger or toe tip.
30. Detached nail. If your baby injures a fingernail to the point that it detaches or almost detaches, don’t try to pull it off—just let it fall off by itself in time. Soaking the finger or toe is not recommended, since moisture can increase the risk of fungal infections. Do make sure, however, to keep the area clean. An antibiotic ointment can be applied but isn’t always necessary (ask the pediatrician). Keep the nail bed covered with a fresh bandaid until the nail starts growing back in (after that, you can leave it uncovered). It usually takes 4 to 6 months for a nail to grow all the way back. If at any point you notice redness, heat, and swelling, it could mean the area is infected, and you should call the doctor.
in the ear, see #19; in the eye, see #22; in the mouth or throat, see #40; in the nose, see #42
31. Babies are extremely susceptible to frostbite, particularly on fingers and toes, ears, nose, and cheeks. In frostbite, the affected part becomes very cold and turns white or yellowish gray. In severe frostbite, the skin is cold, waxy, pale, and hard. If you notice any signs of frostbite in your baby, immediately try to warm the frosty parts against your body—open your coat and shirt and tuck baby inside next to your skin. You can also breathe warm air on baby’s skin. As soon as possible, get to a doctor or an ER. If that isn’t feasible immediately, get baby indoors and begin a gradual rewarming process. Don’t massage the damaged parts or put them right next to a radiator, stove, open fire, or heat lamp—the damaged skin may burn. Don’t try to “quick-thaw” in hot water, either, since this can further damage the skin. Instead, soak affected fingers and toes directly in tepid water (about 102°F—just a little warmer than normal body temperature and just slightly warm to the touch). For parts that can’t be soaked, such as nose, ears, and cheeks, very gently apply warm compresses (wet washcloths or towels soaked in water slightly warm to the touch). Continue the soaks until color returns to the skin, usually in 30 to 60 minutes (add warm water to the soaks as needed to maintain tepid temperature). Nurse baby or give warm (not hot) fluids by bottle or cup. As frostbitten skin rewarms, it becomes red and slightly swollen, and it may blister. Gently pat the skin dry. If baby’s injury hasn’t yet been seen by a doctor, it is important to get medical attention now.
Once the injured parts have been warmed, and you have to go out again to take baby to the doctor (or anywhere else), be especially careful to keep the affected areas warm (wrapped in a blanket) en route, since refreezing of thawed tissues can cause additional damage.
Much more common than frostbite—and fortunately, much less serious—is frostnip. In frostnip, the affected body part is cold and pale, but rewarming (as for frostbite) takes less time and causes less pain and swelling. As with frostbite, avoid dry heat and avoid refreezing. Though an office or ER visit isn’t necessary, a call to the doctor makes sense.
After prolonged exposure to cold, a baby’s body temperature may drop below normal levels. This is a medical emergency known as hypothermia (see #35). Don’t waste any time getting a baby who seems unusually cold to the touch to the nearest ER. Keep baby warm next to your body en route.
IMPORTANT: Head injuries are usually more serious if a child falls onto a hard surface from a height equal to or greater than his or her own height, or is hit with a heavy object. Blows to the side of the head may do more damage than those to the front or back of the head.
32. Cuts and bruises to the scalp. Because of the profusion of blood vessels in the scalp, heavy bleeding is common with cuts to the head, and bruises there tend to swell to egg size very quickly. Treat as you would any cut (#51, #52) or bruise (#49). Check with the doctor for all but very minor scalp wounds.
33. Possibly serious head trauma. Most babies experience several minor bumps on the head during the first year. Usually these require no more than a few make-it-better cuddles and kisses. However, after a bad blow to the head, it’s wise to keep a close eye on your baby for the first 6 hours. Symptoms may occur immediately or not show up for several days—so continue to watch a child who has had a serious head injury even if he or she initially seems fine. Call the doctor or 911 immediately if your baby shows any of these signs after a head injury:
• Loss of consciousness (though a brief period of drowsiness—no more than 2 to 3 hours—is common and nothing to worry about)
• Difficulty being woken. Check every hour or two during daytime naps, and two or three times during the night for the first day after the injury, to be sure baby is responsive. If you can’t wake a sleeping baby, immediately check for breathing (click here).
• Vomiting
• Black-and-blue areas appearing around the eyes or behind the ears
• A depression or indentation in the skull
• A large swelling at the site of the injury, through which you would be unable to detect a depression or indentation
• Oozing of blood or watery fluid (not mucus) from the ears or nose
• Inability to move an arm or leg
• Unusual lack of balance that persists beyond 1 hour after the injury (a sign of dizziness)
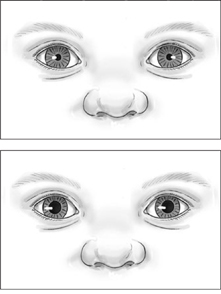
• Unequal pupil size, or pupils that don’t respond to the light of a penlight by shrinking or to the removal of the light by growing larger (see illustration)
Pupils should constrict (get smaller, top) in response to a light, and dilate (expand, bottom) when the light is removed.
• Unusual paleness that persists for more than a few minutes immediately after the injury
• Convulsions (see #16)
• Your baby just isn’t acting like him-or herself—seems dazed, confused, doesn’t recognize you, is unusually clumsy or unable to coordinate movements as usual, or any other behavior that is unusual, unexpected, or worrisome.
While waiting for help, keep your baby lying quietly with his or her head turned to one side. Do not move your baby if you suspect a neck injury, unless not doing so would be dangerous. Treat for shock (#48), if necessary. Begin rescue techniques (click here) if baby stops breathing or doesn’t have a pulse. Don’t offer any food or drink until you talk to the doctor.
34. Heat exhaustion, or mild hyperthermia (high body temperature), is the most common form of heat injury. Signs may include profuse sweating, thirst, headache, muscle cramps, dizziness or light-headedness, and/or nausea (a baby may be cranky, refuse food, or vomit). Body temperature may rise to 101°F to 105°F. Treat heat exhaustion by bringing your baby into a cool environment (air-conditioned, if possible) and giving cold fluids to drink. Cool compresses applied to the body and a fan may also help. If baby doesn’t quickly return to normal, vomits after drinking, or has a high fever, call the doctor.
Heatstroke, or severe hyperthermia, is less common and more serious. It typically comes on suddenly after overheating, as when a baby has been enclosed in a car in warm weather. Signs to watch for include hot and dry (or occasionally, moist) skin, very high fever (sometimes over 106°F), diarrhea, agitation or lethargy, confusion, convulsions, and loss of consciousness. If you suspect heatstroke, wrap baby in a large towel that has been soaked in cold tap water and summon immediate emergency medical help (call 911), or rush baby to the nearest ER. If the towel becomes warm, repeat with a freshly chilled one.
see #34
35. After prolonged exposure to cold, when heat loss exceeds heat production, a child’s body temperature may drop below normal levels. A child with hypothermia may seem unusually cold, shiver, be lethargic, or move stiffly. In severe hypothermia, shivering stops and there is a loss of muscle control and a decline in consciousness. Hypothermia is a medical emergency. Don’t waste any time in getting a child who appears to have hypothermia to the nearest ER (call 911 if you don’t have quick transportation). Remove any wet clothing, wrap your baby in blankets, and turn on the car heater en route to the hospital. If you are waiting for emergency medical help at home, tuck your baby under an electric blanket (if you have one), in a very warm bath (not hot enough to burn, of course), or against your body skin-to-skin and covered with blankets.
see #5
36. Split lip. Few babies escape the first year without at least one cut on the lip. Fortunately, these cuts usually look a lot worse than they are and heal a lot more quickly than you’d think. To ease pain and control bleeding, apply an ice pack, or let an older baby suck on a feeder bag filled with ice. If the cut gapes open, or if bleeding doesn’t stop in 10 or 15 minutes, call the doctor. Also call if you suspect a lip injury may have been caused by chewing on a plugged-in electrical cord.
37. Cuts inside the lip or mouth. Such injuries are also common in young children. To relieve pain and control bleeding inside the lip or cheek, give an older baby a feeder bag filled with ice to suck on. To stop bleeding of the tongue, if it doesn’t stop spontaneously, apply pressure to the cut with a piece of gauze, a washcloth, or a cloth diaper. Call the doctor if the injury is in the back of the throat or on the soft palate (the rear of the upper mouth), if there is a puncture wound from a sharp object (such as a pencil or a stick), or if bleeding doesn’t stop within 10 to 15 minutes.
38. Knocked-out tooth. If one of your baby’s teeth has been knocked out, there’s no need to try to preserve it, since there’s little chance that the dentist will attempt to reimplant it (such implantations rarely hold). But the dentist or doctor will want to see the tooth to be sure it’s whole, as fragments left in the gum could be expelled and then inhaled or choked on, or the area could become infected. So take the tooth along to the dentist or to the doctor (before you tuck it into a memento box, that is).
39. Broken tooth. Clean dirt or debris carefully from the mouth with warm water and gauze or a clean cloth. Be sure the broken parts of the tooth are not still in baby’s mouth, since they could cause choking. Place cold compresses on the face in the area of the injured tooth to minimize swelling. Call the dentist or doctor as soon as you can for further instructions.
40. Foreign object in the mouth or throat. Removing a foreign object from the mouth that can’t be grasped easily is tricky. Unless done carefully, the effort can push the object in even farther. To remove a soft object (such as a piece of tissue paper or bread), pinch baby’s cheeks to open the mouth, and use tweezers to take the object out. For anything else, try a finger swipe: Curl your finger (index or pinky) and swipe quickly at the object with a sideways motion. Do not attempt a finger swipe, however, if you can’t see the object. If a foreign object is lodged in the throat, see choking rescue procedures, beginning here.
41. Nosebleeds. Keeping baby in an upright position or leaning slightly forward (not back), pinch both nostrils gently between your thumb and index finger for 10 minutes. (Baby will automatically switch to mouth breathing.) Try to calm baby, because crying will increase the blood flow. If bleeding persists, pinch for 10 minutes more and/or apply cold compresses or ice (or an ice pack) wrapped in a dampened washcloth to the nose to constrict the blood vessels. If this doesn’t work and bleeding continues, call the doctor, keeping baby upright—to reduce swallowing of blood and the risk of choking on it—while you do. Frequent nosebleeds, even if easily stopped, should be reported to baby’s doctor. Sometimes, adding humidity to the air in your house with a humidifier will reduce the frequency of nosebleeds.
42. Foreign object in the nose. Difficulty breathing through the nose and/or a foul-smelling, possibly bloody nasal discharge may be a sign that something has been pushed up the nose. Keep baby calm and encourage mouth breathing. Remove the object with your fingers if you can reach it easily, but don’t probe or use tweezers or anything else that could injure the nose if baby moves unexpectedly or that could push the object farther into the nasal canal. If this fails, take baby to the doctor or ER.
43. A blow to the nose. If there is bleeding, keep baby upright and leaning forward to reduce the swallowing of blood and the risk of choking on it. Use an ice pack or cold compresses to reduce swelling. If swelling persists, or if there is a noticeable deformity, see the doctor.
44. Swallowed poisons. Any nonfood substance is a potential poison. The more common symptoms of poisoning include lethargy, agitation, or other behavior that deviates from the norm; racing, irregular pulse and/or rapid breathing; difficulty breathing; diarrhea or vomiting; excessive watering of the eyes, sweating, or drooling; hot, dry skin and mouth; dilated (wide open) or constricted (pinpoint) pupils; flickering, sideways eye movements; and tremors or convulsions.
If your baby has some of these symptoms and there’s no other obvious explanation for them, or if you have evidence that your baby definitely has swallowed a questionable substance (you saw it happen) or possibly has (you found your child with an open bottle of pills or hazardous liquid, found spilled liquid on clothing or loose pills on the floor, smelled chemicals on his or her breath), immediately call (or have someone else call) Poison Control (800-222-1222) or the ER for instructions. Call promptly for suspected poisoning even if there are no symptoms—they may not appear for hours. When calling, be ready to provide the name of the product ingested, along with the ingredients and package information, if available (if part of a plant was ingested, supply the name, or at least a description, of the plant); the time the poisoning was believed to have occurred; how much of it you know or believe baby ingested (give an estimate if you don’t know for sure); any symptoms that have appeared; and any treatment already tried. Have a pad and pen handy to write down exact instructions.
If your child has excessive drooling, breathing difficulty, convulsions, or excessive drowsiness after the ingestion (or suspected ingestion) of a dangerous substance, call 911 for emergency medical assistance. Begin emergency treatment immediately if your baby is unconscious (click here).
Do not try to treat poisoning on your own without expert advice, and don’t rely on the directions on the product label. Get explicit medical advice before giving anything by mouth (including food or drink, or anything to induce vomiting). The wrong treatment can do harm.
45. Noxious fumes or gases. Fumes from gasoline, auto exhaust, and some poisonous chemicals, and dense smoke from fires, can all be harmful. Symptoms of carbon monoxide poisoning include headache, dizziness, coughing, nausea, drowsiness, irregular breathing, and unconsciousness. Promptly take a baby who has been exposed to hazardous fumes into fresh air (open windows or go outside with baby). If baby is not breathing and/or doesn’t have a pulse, begin rescue techniques (click here) immediately. If possible, have someone else call 911. If no one else is around, call 911 yourself after 2 minutes of resuscitation efforts—and then return immediately to CPR, and continue until a pulse and breathing are established or until help arrives. Unless an emergency vehicle is on its way, transport baby to a medical facility promptly. Have someone else drive if you must continue CPR or if you were also exposed to the fumes and your judgment and reflexes may be impaired. Even if you are able to successfully reestablish breathing, immediate medical attention will be necessary.
46. Most children who come in contact with poison ivy, poison oak, or poison sumac will have an allergic reaction (usually a red, itchy rash, with possible swelling, blistering, and oozing) that develops within 12 to 48 hours and can last from 10 days to 4 weeks. If you know your baby has had contact with one of these plants, protect your hands from the sap (which contains urushiol, the resin that triggers the reaction) with gloves, paper towels, or a clean diaper and remove his or her clothes. To prevent resin from “fixing” to skin, immediately wash it with soap and cool water for at least 10 minutes and rinse thoroughly. In a pinch, use a wipe. The rash itself is not contagious and won’t spread from person to person or from one part of the body to another once the sap has been washed away. Also wash anything else that may have come in contact with the plants (including clothes, pets, stroller, and so on), since urushiol can remain active on them for up to a year. Shoes can be thoroughly wiped down if they aren’t washable.
If a reaction occurs, calamine lotion, or better yet, an anti-itch lotion that contains pramoxine (such as Caladryl), will help relieve the itching, but avoid lotions that contain antihistamines (such as Benadryl). Topical hydrocortisone cream can be applied to decrease inflammation. Cool compresses, and/or a colloidal oatmeal bath may also offer relief. Make sure your baby’s nails are cut short to minimize scratching. Contact the doctor if the rash is severe or is causing a great deal of discomfort because of its location (around the eyes, on the genitals).
see #54
see #50
see #16
47. Such serious injuries are rare, but knowing what to do when one occurs can mean the difference between saving and losing an arm, leg, finger, or toe. Take these steps as needed immediately:
• Control bleeding. Apply heavy pressure to the wound with several gauze pads, a maxi pad, or a clean diaper or washcloth. If bleeding continues, increase pressure. Don’t worry about pressing too hard. Do not apply a tourniquet.
• Treat shock if it is present (#48).
• Check for breathing and a pulse, and begin rescue techniques (click here) as needed.
• Preserve the severed limb or digit. As soon as possible, wrap it in a wet clean cloth or sponge, and place it in a plastic bag. Tie the bag shut and place it in another bag filled with ice (do not use dry ice). Do not place the severed part directly on ice, and don’t immerse it in water or antiseptics.
• Get help. Call or have someone else call 911 for immediate emergency medical assistance, or rush to the ER, calling ahead so they can prepare for your arrival. Be sure to take along the ice-packed limb, finger, or toe, since surgeons may attempt to reattach it. During transport, keep pressure on the wound and continue other basic life support procedures, if necessary.
48. Shock can develop in severe injuries or illnesses. It occurs when an inadequate amount of oxygen-containing blood is getting to the brain and body tissues to meet their needs. Signs include cold, clammy, pale skin; rapid, weak pulse; chills; convulsions; nausea or vomiting; excessive thirst; and/or shallow breathing. Call 911 immediately for emergency medical assistance. Until help arrives, position baby on his or her back. Loosen any restrictive clothing; elevate hips and legs on a pillow, folded blanket, or folded piece of clothing to help direct blood to the brain, and cover baby lightly to prevent chilling or loss of body heat. If breathing seems labored, raise baby’s head and shoulders very slightly. Do not give food or water.
IMPORTANT: Exposure to tetanus is a possibility whenever the skin is broken. If your child gets an open skin wound, check to be sure his or her tetanus immunization (part of the DTaP vaccine) is up-to-date. Also be alert for signs of possible infection (swelling, warmth, tenderness, reddening of surrounding area, oozing of pus from the wound), and call the doctor if they develop.
49. Bruises or black-and-blue marks. If the injury is painful, apply cold compresses, an ice pack, or cloth-wrapped ice (do not apply ice directly to the skin) to reduce bruising and swelling. Half an hour of soaking is ideal, but unlikely to be accomplished with a baby, and isn’t necessary for a minor bump. If the skin is broken, treat the bruise as you would an abrasion (#50) or cut (#51, #52). Call the doctor immediately if the bruise is from a wringer-type injury (for instance, from catching a hand or foot in the spokes of a moving wheel), no matter how minor it looks. Bruises that seem to appear out of nowhere or that coincide with a fever should also be seen by a doctor.
50. Scrapes or abrasions. In such injuries (most common on knees and elbows) the top layer (or layers) of skin is scraped off, leaving the underlying area raw and tender. There is usually slight bleeding from the more deeply abraded areas. Using gauze, cotton, or a clean washcloth, gently sponge the wound with soap and water to remove dirt and other foreign matter. If baby resists this treatment, try soaking the wound in the bathtub. Apply pressure if the bleeding doesn’t stop on its own. Apply a spray or cream antiseptic, if your baby’s doctor generally recommends one, and then cover with a bandaid that is loose enough to allow air to reach the wound. If there is no bleeding, no bandage is necessary. Most scrapes heal quickly.
51. Small cuts. Wash the area with clean water and soap, then hold the cut under running water to flush out dirt and foreign matter. Some doctors recommend applying an antiseptic spray before applying a bandaid. A butterfly bandage will keep a small cut closed while it heals. Remove the bandaid after 24 hours and expose the cut to air; rebandage only as necessary to keep the wound clean and dry. Check with the doctor about any cuts that show signs of infection (redness, swelling, warmth, and/or oozing of pus or a white fluid).
52. Large cuts. With a gauze pad, a fresh diaper, a maxi pad, a clean washcloth—or, if you have nothing else available, your bare finger—apply pressure to try to stop the bleeding. At the same time, elevate the injured part above the level of the heart, if possible. If bleeding persists after 15 minutes of pressure, add more gauze pads or cloth and increase the pressure. (Don’t worry about doing damage with too much pressure.) If the wound gapes open, appears deep, or is jagged; if blood is spurting or flowing profusely; or if bleeding doesn’t stop within 30 minutes, call the doctor for instructions or take baby to the ER. If there are other injuries, try to tie or bandage the pressure pack in place so that your hands can be free to attend to them. Apply a nonstick bandage to the wound when the bleeding stops, loose enough so that it doesn’t interfere with circulation. Do not put anything else on the wound, not even antiseptic, without medical advice. If the cut is deep or large, or on the face or the palm, stitches may be needed. In some cases the doctor may be able to use Dermabond (skin glue) instead of stitches. If the cut is on the face, consider having a plastic surgeon take a look at it.
53. Massive bleeding. Get immediate emergency medical attention by calling 911 or rushing to the nearest ER if a limb is severed (#47) and/or blood is gushing or pumping out of a wound. In the meantime, apply pressure to the wound with gauze pads, a fresh diaper or maxi pad, or a clean washcloth or towel. Increase the packing and pressure if bleeding doesn’t stop. Do not use a tourniquet without medical advice, as it can sometimes do more harm than good. Maintain pressure until help arrives.
54. Puncture wounds. Soak a small puncture wound (one caused by a thumbtack, needle, pen, pencil, or nail) in comfortably warm, soapy water for 15 minutes. Then consult the doctor about what to do next. For deeper, larger punctures—from a knife or a stick, for example—take your baby to the doctor or the ER immediately. (If there is extensive bleeding, see #53.) If the object still protrudes from the wound, do not remove it, as this could lead to increased bleeding or other damage. Pad or otherwise stabilize the object, if necessary, to keep it from moving around while on route to medical care. Keep baby as calm and still as possible to prevent thrashing that might make the injury worse.
55. Splinters or slivers. Wash the area with clean water and soap, then numb it with an ice pack or ice cube. If the sliver is completely embedded, try to work it loose with a sewing needle that has been sterilized with alcohol or the flame of a match. If one end of the sliver is clearly visible, try to remove it with tweezers (also sterilized by alcohol or flame). Don’t try to remove it with your fingernails or your teeth. Wash the site again after you have removed the splinter. If the splinter is not easily removed, and if baby will cooperate, try soaking the area in warm, soapy water for 15 minutes, 3 times a day for a couple of days, which may help it work its way out or make it easier to remove. Consult the doctor if the splinter remains embedded or if the area becomes infected (indicated by redness, heat, swelling). Also call the doctor if the splinter is deeply embedded or very large and your baby’s tetanus shots (part of the DTaP vaccine) are not up-to-date, or if the splinter is metal or glass. Some wood splinters that are embedded just end up being absorbed into the skin, and that’s fine. In that case, trying to remove the splinter can do more harm than good.
see #6
see #5
see #55
see #15
56. Coins, marbles, and other small objects. If a baby has swallowed such an object and doesn’t seem to be in any discomfort, check with the doctor for advice. If, however, your baby has difficulty swallowing, or if wheezing, drooling, gagging, vomiting, or difficulty swallowing develop immediately or later, the object may have lodged in the esophagus. Immediately call the doctor or take your child to the ER. If baby is coughing or seems to have difficulty breathing, the object may have been inhaled rather than swallowed. Treat this as a choking incident (click here).
57. Button batteries. If your child swallows a button battery of any kind, call the doctor and head to the ER immediately. The danger: The battery can become lodged in the digestive tract—anywhere from the esophagus to the intestines—and once there can start to burn through the organs, leading to serious injury and even death. Prompt medical attention (within hours) is necessary.
58. Sharp objects. Get prompt medical attention if a swallowed object is sharp (a pin or needle, a fish bone, a toy with sharp edges). It may have to be removed in the ER.
see #5
see #37
The instructions that follow should serve only to reinforce what you learn in a baby first-aid and CPR course. (The training you receive may vary somewhat from the protocol described here, and should be the basis for your actions.) Participating in a formal course is the best way to ensure you’ll be able to carry out these life support procedures correctly. Periodically review the guidelines below and/or the materials you receive from course instructors.
Coughing is nature’s way of trying to clear the airways or dislodge an obstruction. A baby (or anyone else) who is choking on food or some foreign object and who can breathe, cry, and cough forcefully should be encouraged to keep coughing. But if the baby who is choking continues to cough for more than 2 to 3 minutes, call 911 for emergency medical assistance. If the cough becomes ineffective (baby tries to cough, but no sound comes out) or baby is struggling for breath, making high-pitched crowing sounds, unable to cry, and/or starting to turn blue (usually starting around the lips and fingernails), begin the following rescue procedures:
IMPORTANT. An airway obstruction may also occur when a baby has croup or epiglottitis (an inflammation of the epiglottis, the tissue that covers the windpipe). A baby who is struggling to breathe and seems ill—has fever and possibly congestion, hoarseness, drooling, lethargy, or limpness—needs immediate medical attention at an ER. Do not waste time trying to treat your baby by yourself—that could be dangerous. Call 911.
1. Get help. Have someone call emergency medical assistance (911) immediately. If you’re alone, call 911 yourself, even if you’re familiar with rescue procedures (though do provide about 2 minutes of care before calling, if you can). This will ensure that help will be on the way in case the situation worsens. If you’re unfamiliar with rescue procedures—or if you panic and forget them—bring a phone to your baby’s side (or take baby with you to a phone if there is no cordless or cell phone available) and the 911 operators can help walk you through rescue procedures as you wait for emergency medical assistance to arrive (put your phone on speaker or hands-free mode if possible).
If baby is unconscious, skip to Step 5 below. If baby is conscious:
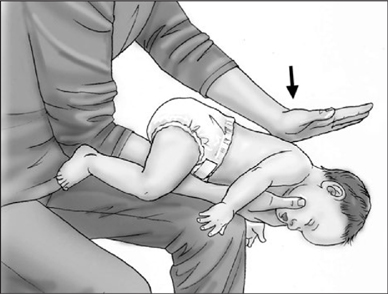
2. Position baby. Position baby faceup on your forearm, with baby’s head on your hand. Place your other hand on top of baby, using your thumb and fingers to hold baby’s jaw while sandwiching him or her between your arms. Turn baby over so that he or she is facedown on your forearm. Lower your arm onto your thigh so that baby’s head is lower than his or her chest (see illustration). If baby is too big for you to comfortably support on your forearm, sit in a chair or on your knees on the floor and place baby facedown across your lap in the same head-lower-than-body position. You can give back blows effectively whether you stand or sit, as long as the baby is supported on your thigh.
3. Administer back blows. Give 5 consecutive forceful slaps between baby’s shoulder blades with the heel of your free hand while keeping the arm that is holding the baby supported on your thigh (see illustration). Deliver each slap with enough force to attempt to dislodge the foreign body. After 5 back blows, continue to Step 4.
BACK BLOWS. With your arm resting on your thigh and baby’s head lower than the chest, give 5 forceful back blows to help dislodge what baby is choking on.
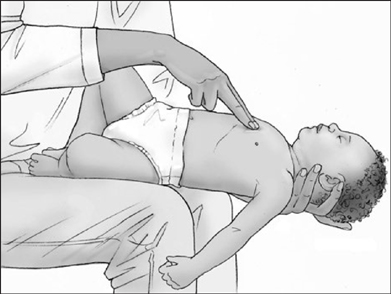
4. Administer chest thrusts. Turn baby from a facedown position to a faceup position by sandwiching him or her between your two hands and forearms, supporting baby’s head between your thumb and fingers from the front while you cradle the back of the head with your other hand (see illustration). Lower the arm that is supporting baby’s back onto your opposite thigh. The baby’s head should be lower than his or her chest, which will assist in dislodging the object. (A baby who is too large to hold in this position can be placed faceup on your lap or on a firm surface.)
Locate the correct place to give chest thrusts by imagining a line running across baby’s chest between the nipples. Place the pads of 2 or 3 fingers in the center of baby’s chest. Use the pads of these fingers to compress the breastbone to a depth of 1½ inches (about one-third of the depth of the chest) and then let the chest return to its normal position. Keep your fingers in contact with baby’s breastbone and give a total of 5 chest thrusts.
If baby is conscious, keep repeating the back blows and chest thrusts until the airway is cleared and the baby can cough forcefully, cry, or breathe—or the baby becomes unconscious. If baby becomes unconscious, call 911 if this has not already been done, and continue below.
CHEST THRUSTS. With baby in a faceup position, head lower than the chest, give 5 chest thrusts with the pads of your fingers.
5. Do a foreign-body check. Look in the mouth for a foreign object. If you can see the object and can easily remove it, do so with a finger sweep (see description and illustration).
FINGER SWEEP. If you can see an easily removable object in your baby’s mouth, hook your finger to sweep it out. Do not do a blind finger sweep (aka if you don’t see anything in the mouth) because doing so risks pushing an unseen object further into the airway, causing more choking.
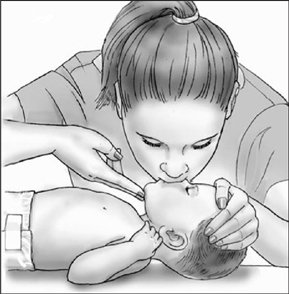
6. Give two rescue breaths. Open baby’s airway by gently tilting baby’s head back slightly while lifting the chin (see description; illustration). Give two rescue breaths with your mouth sealed over baby’s nose and mouth (see illustration). If baby’s chest does not rise and fall with each breath, reposition baby’s airway by re-tilting the head and try to give rescue breaths again. If the breaths still do not make baby’s chest rise, locate the correct hand position for chest compressions (imagine a line between the nipples and place two fingers just below that line in the center of the chest). Give 30 chest compressions in about 18 seconds (a rate of 100 per minute). Each compression should be about 1½ inches deep, or one-third the depth of the chest (see illustration).
7. Repeat sequence. If the breaths do not go in, repeat the cycle of chest compressions, rescue breaths, and foreign-object check until the airway is clear and the baby is conscious and breathing normally, or until emergency medical assistance arrives.
IMPORTANT: Even if your child recovers quickly from a choking incident, medical attention will be required. Call the doctor or go to the ER immediately.
Begin the protocol below only on a baby who has stopped breathing, or on one who is struggling to breathe and is turning blue (check around the lips and fingertips).
How will you know if you need to start resuscitation techniques? Assess your baby’s condition with the Check, Call, Care method recommended by the American Red Cross.
Check to make sure the location is safe to stay in. Then check baby for consciousness. Try to rouse a baby who appears to be unconscious by tapping the soles of her feet and shouting her name: “Ava, Ava, are you okay?”
If you get no response, have anyone else present call 911 for emergency medical assistance while you continue to Step 3 without delay. If you are alone, provide about 2 minutes of care, then call 911. If you can, periodically call out to try to attract help from neighbors or passersby. If, however, you are unfamiliar with CPR or feel overwhelmed by panic, bring a phone to baby’s side immediately (or, if there are no cordless or cell phones nearby and if there are no signs of head, neck, or back injury, go to the nearest phone with your baby), and call 911. The dispatcher will be able to guide you in the best course of action (put your phone on speaker or handsfree mode if possible).
IMPORTANT: The person calling for emergency medical assistance should stay on the phone as long as necessary to give complete information to the dispatcher. This should include the name, age, and approximate weight of the baby; any allergies, chronic illnesses, or medications taken; and present location (address, cross streets, apartment number, best route if there is more than one). Also tell the emergency dispatcher baby’s condition (Is baby conscious? Breathing? Bleeding? In shock? Is there a pulse?), cause of condition (fall, poison, drowning), and the telephone number where you can be reached. Tell the person calling for help not to hang up until the EMS dispatcher has concluded questioning and to report back to you after completing the call.
Move baby, if necessary, to a firm, flat surface, carefully supporting the head, neck, and back as you do. Quickly position baby faceup, head level with heart, and proceed with the C-A-B survey below.
If there is a possibility of a head, neck, or back injury—as there may be after a bad fall or car accident—go to Step B (Breathing) to look, listen, and feel for breathing before moving baby. If baby is breathing, don’t move him or her unless there is immediate danger (from traffic, fire, an imminent explosion). If breathing is absent and rescue breathing cannot be accomplished in the baby’s present position, roll the baby as a unit to a faceup position, so that head, neck, and body are moved as one, without twisting, rolling, or tilting the head.
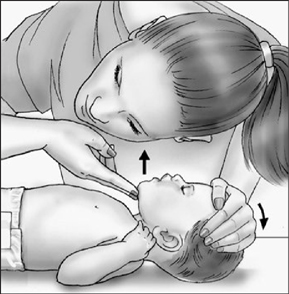
Open the airway: Gently tilt baby’s head back slightly while lifting the chin.
Begin rescue breathing: Form a tight seal with your mouth over baby’s nose and mouth.
1. Position your hands. Position the three middle fingers of your free hand on baby’s chest. Imagine a horizontal line from nipple to nipple. Place the pad of the index finger just under the intersection of this line with the breastbone, or sternum (the flat bone running midline down baby’s chest between the ribs). The area to compress is one finger’s width below this point of intersection (see illustration).
CHEST COMPRESSIONS
2. Begin compressions. Using two or three fingers, compress the sternum straight down to a depth of 1½ inches (your elbow should be bent) for 30 compressions. At the end of each compression, release the pressure without removing your fingers from the sternum and allow it to return to its normal position. Each compression should take less than a second.
Tilt baby’s head back slightly by gently pushing down on baby’s forehead with one hand while pulling up on the bony part of the jaw with two or three fingers of your other hand to lift the chin (see illustration). If there is a possibility of a head, neck, or back injury, try to minimize movement of the head and neck when opening the airway.
IMPORTANT: The airway of an unconscious baby may be blocked by a relaxed tongue or by a foreign object. It must be cleared before the baby can resume breathing (finger sweep, see description and illustration).
Maintaining your baby’s head in the same position, airway opened (A), take a breath in through your mouth and place your mouth over baby’s mouth and nose, forming a tight seal (see illustration). Blow 2 slow breaths (lasting 1 second each) into the baby’s mouth. Pause between rescue breaths (so you can lift your head and breathe in again, and to let the air flow out of baby’s mouth). Observe with each breath whether the baby’s chest rises. If it does, allow it to fall again before beginning another breath. After two successfully delivered breaths (as evident from the rising chest), repeat the C-A-B cycle of 30 compressions and 2 breaths.
NOTE: If the chest doesn’t rise and fall with each breath, your breaths may have been too weak or the baby’s airway may be blocked. Try to open the airway again by readjusting baby’s head (tilt the chin upward a bit more) and give 2 more breaths. If the chest still does not rise with each breath, it is possible the airway is obstructed by food or by a foreign object—in which case, move quickly to dislodge it, using the procedure described in When Baby Is Choking here.
If you’re alone, provide care for about 2 minutes before calling 911. If a phone is close by, bring it to your baby’s side. If not, and there is no evidence of head or neck injury, carry baby to the phone, supporting the head, neck, and torso. Continue rescue breathing as you go. Quickly and clearly report to the EMS dispatcher, “My baby isn’t breathing,” and give all pertinent information the dispatcher requests. Don’t hang up until the dispatcher does. If possible, continue compressions while the dispatcher is speaking. If it’s not possible, return to CPR immediately on hanging up.
IMPORTANT: Continue CPR until an automated external defibrillator (AED) becomes available or emergency medical assistance arrives.