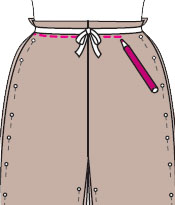
Pockets add style to pants and there are many different shape and style possibilities. Side seam and patch pockets are easy to sew. Slanted trouser pockets have a few more steps, but are still easy to sew. The most complex pockets are the welt styles so popular today.
You must fit pants before adding pocket bags.
TIP: In general, pocket bags can be made from your fashion fabric unless it is too bulky. To reduce bulk, use lining for the bag attached to the pants front. For light-colored pant fabrics, use skin-tone lining for pocket bags.
1. Mark waist seam.

2. Mark side seam final stitching lines. Trim to an even 5/8″.
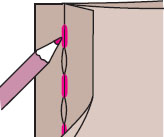
3. Sew or serge pockets to side seams 3/8″ from edge, right sides together. Pockets will go into waistband seam, which prevents them from drooping.
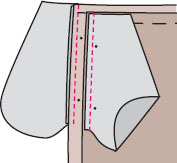
TIP: For pull-on pants with a cut-on casing, the pocket bags might be too bulky if included in the entire casing. So just barely catch them in the casing seam as shown.
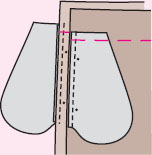
4. Pin pant front to back at sides.
5. Stitch side seams from lower edge to pocket opening; backstitch. Baste pocket opening closed, backstitch at upper opening and continue stitching to top edge. (The pocket opening averages 5½- 6½”.)
6. Press pockets toward front. Pin edges together. (Edges may not match.) Stitch around pocket edges.
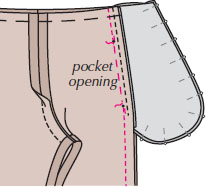
7. Clip back seam allowances below pockets. Press side seams open. (On most fabrics you can press the seam open without clipping. Then if you need to let out the seam, you can.)
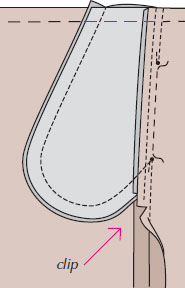
8. Baste upper edge of pockets to front.
TIP: On lightweight fabrics, serge all seams together and press toward the front.
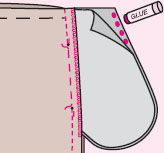
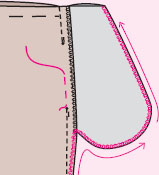
This technique is used when you want the entire side seam edgestitched as you see in expensive designer chinos or cotton pants.
1. Cut four pocket pieces, two from fashion fabric and two from a lightweight cotton if fashion fabric is too heavy.
2. Fit pants and mark waistline and side seams as shown on the simple pocket, page 121.
3. Place the lighter weight pocket pieces on the front of the pant, right sides together.
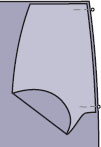
4. 2″ below the waistline, using a stitch length of 1.5 mm, sew in from the edge of the side seam for 5/8″; pivot; sew along side seam 5½”-6″; pivot; sew to edge again. Trim seam to ¼” and clip to corners.
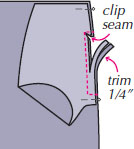
5. Turn pocket to wrong side. Press. Edgestitch.
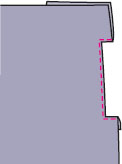
6. Place fashion fabric pocket under front. Pin to front and pin pocket bag edges together.
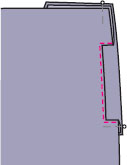
7. Stitch pocket bag edges together. (Edges may not match. Don’t worry!)
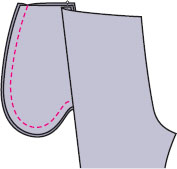
8. Stitch pocket to pant across the top and along the sides.
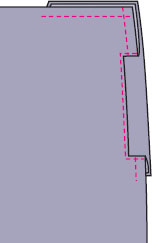
9. Sew pant side seams, being careful not to catch the pocket edge.
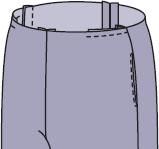
10. Press seams toward the front. Only the edge-stitching on the pocket front will show.
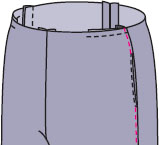
11. Edgestitch next to the side seam on the pant front above and below the pocket.
We’ve adapted this technique from Roberta Carr’s book Couture, the Art of Fine Sewing. We recommend reading this book because it improves the quality of all of your sewing, even if you don’t consider yourself a “couture” sewer.
1. From fashion fabric, cut one rectangle 7″ X 11″ for each pocket. Serge or zigzag all edges.
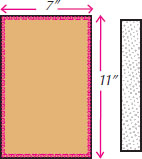
2. For each pocket cut a lightweight strip of fusible interfacing 1½” X 10″ with the stable direction the length of the strip.
TIP: PerfectFuse Sheer is an excellent choice.
3. Sew side seams after perfecting fit. Use a stitch length of 1.5 mm from top of pant to 3″ down. Backstitch; baste for 6″-6½” (pocket opening); backstitch. Sew remaining seam with a regular stitch length.
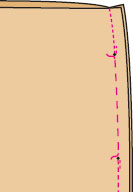
4. Fuse the strip of fusible interfacing to the front with ½” in the seam allowance and 1″ on the front.
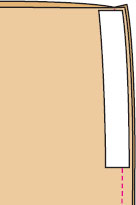
5. Press seams open. Finish seam allowances if necessary.
6. Topstitch the front seam allowance from the right side. Start at top of pant and stitch to the bottom of the pocket opening (or continue down entire side seam for a sporty look). If you stop at bottom of pocket, pull threads to the wrong side and tie a knot to anchor the ends.
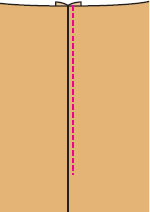
7. Stitch the rectangle pocket piece to the back seam allowance right sides together as close to the seamline as possible.
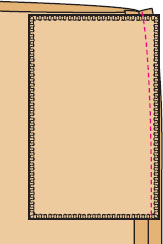
8. Pin pocket flat to front of pant.
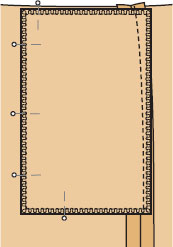
9. Draw shape of pocket topstitching (any shape you desire) with chalk on outside of pant. If fabric is slippery, it is wise to handbaste all the layers together along these stitching lines to prevent slippage. Or, use 505 Temporary Spray Adhesive to hold them in place.
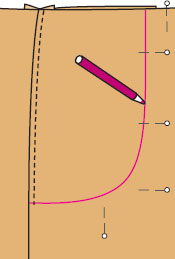
10. From right side, topstitch with one or two rows of stitching.
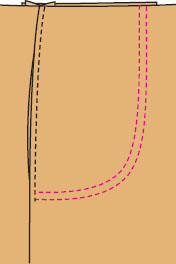
11. Remove basting from pocket opening.
Patch pockets are generally sporty and machine sewn in place on the pant back.
1. Finish upper edge of pocket by serging, zigzagging, or turning under ¼” and edgestitching.

2. Turn upper edge of pocket to right side along hemline.
TIP: You can shape the pocket facing for variety.
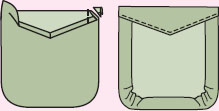
3. Starting at facing fold, stitch around raw edge 5/8″ from edge. To ease fullness on curves, machine baste ¼” from raw edges.
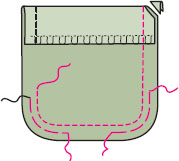
4. Turn facing to inside. Press under seam allowance on line of stitching, pulling up basting to ease in fullness on curves. Trim seam allowances to ¼”. Steam-shrink bulk at corners until flat.
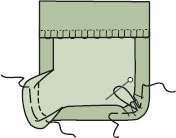
TIP: A quick way to get perfect curves is to use a pocket template. Pick the shape of the pocket curve from the template and insert it so edge is along stitching line. Attach clip section to hold pocket seam allowance in place. Press.
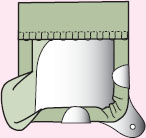
5. Stitch across facing 1½” from top fold.
6. Pin pockets to pants. Edgestitch and then topstitch ¼” from the edge along sides and lower edge.
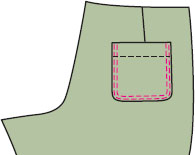

Use strips of fusible web or a temporary adhesive to hold pocket in place.
If you want to add a flap to the patch pocket, cut it 1/8″ wider than the top edge of the pocket. It can be sewn from two layers of fashion fabric or if too bulky, line it.
1. Stitch flap pieces right sides together along sides and lower edge. Trim seams to ¼” and trim diagonally across corners. Turn right side out and press. You may edgestitch close to edges and if you topstitched your pocket, topstitch ¼” away.

2. Make a buttonhole in the center if you wish to add a button. This is a good idea if the pocket is large.

3. With flap right sides together on pant and edge
along top of pocket, sew 5/8″ seam. Trim to 1/8″.
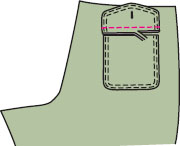
4. Press down over pocket and edge-stitch 1/8″ from fold through all layers to hold flap down.
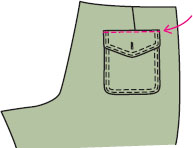
5. Sew on button.
Cargo pockets are like patch pockets with a pleat in the center (to hold more cargo!). Usually they have square corners. Often they are placed over the side seams just above the knee.
1. To add a pleat to a plain patch pocket, add 1½” to center of pocket.
2. Fold pocket in half lengthwise. Place a pin 2½” from top edge and 1 1/8″ from bottom edge.
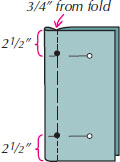
3. Sew 3/4″ from fold, using a 2mm stitch length, to the first pin. Backstitch; baste between pins; backstitch; sew 2mm stitch length to bottom.
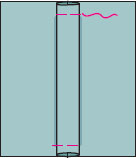
4. Press, centering pleat. Hold pleat in position with hand basting.
5. Finish upper edge of pocket with zigzagging, serging, or turning under ¼” and edgestitching.
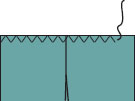
6. Turn upper edge of pocket to right side along facing fold line. Stitch hem to pocket at sides and continue around pocket if you want a guide for turning under the 5/8″ seam allowances. Cut upper corners diagonally.
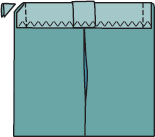
7. Turn hem to inside. Press under 5/8″ on sides and lower edge, folding in corners.
8. Stitch facing in place 1¼” from upper edge.
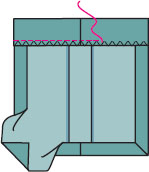
9. Pin pockets in place and stitch close to side and lower edge. You may also topstitch ¼” from edge. Pull out basting stitches in the pleat.
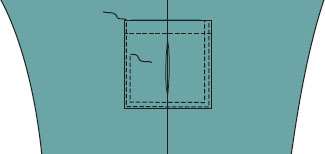

Use strips of fusible web or a temporary adhesive to hold pocket in place.
TIP: Add a flap if desired. A flap with a button will keep large pockets from sagging.
This is a great detail for a patch pocket in which you want to secure a credit card or cell phone.
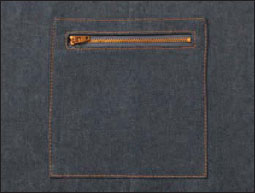
Use lining to create a faced box. Right sides together, sew a box ½” X 5″, clip to the corners, turn and press.
TIP: Before pressing, pin edges of lining into a ham or pressing board to anchor while pressing. This helps ensure the lining won’t show on the right side.
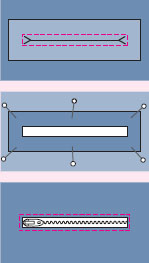
Place your zipper under the box, and from the right side, edgestitch with a zipper foot around the box. Turn under all pocket edges and topstitch to the pant.