
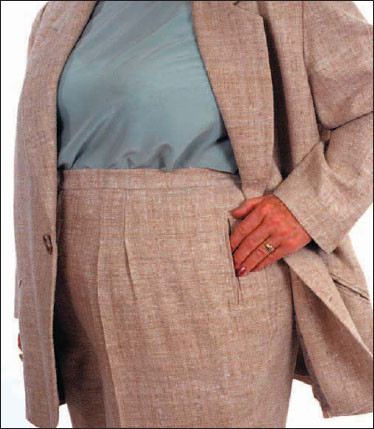
There are many variations of single and double welt pockets, which may be either horizontal or vertical. Some pants have back welts on both sides, some on just the left back, others only the right back. For women’s pants, we prefer a fake welt in the back without the pocket bag that adds bulk.
Fake double-welt—just a big bound buttonhole with the lips stitched closed. Or, if the lips are not stitched closed, then a button and loop are added to keep the buttonhole closed and a fabric piece is stitched under the lips for modesty.
Double-welt—horizontal in the back and generally vertical or diagonal on the front. However, Pati bought an Anne Klein pant with a tiny horizontal double welt pocket sewn over front pleats.
Single-welt—horizontal on the back and generally vertical on the front, but can be horizontal or diagonal on the front.
There is also the single welt with a wider welt constructed separately and inserted into a faced hole. (Traditional welts are sewn to the hole.)
This can be done two ways. You can use the windowpane bound buttonhole method as follows or the double-welt pocket on page 140, but leave out the pocket parts and add a facing for modesty.
1. To face the hole, cut a rectangle of lightweight crisp fabric like silk organza. Or stiffen a lightweight or sheer cotton with Perfect Sew liquid stabilizer. Draw a box on this facing fabric ½” by 4″or 5″ using a pencil.

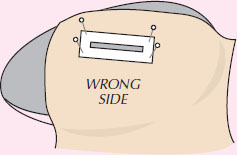
2. Pin facing on right side of fabric, placing marked box where you want pocket. Sew around the box beginning in the middle and using a stitch length of 1.5mm at the corners and ends.

3. Cut through the center of the box through all layers, stopping ½” - 3/4″ from the ends. Carefully cut to the corner stitching.

4. Push facing through the cut to wrong side. Press.

TIP: An easy way to press is to anchor facing by pinning to a pressing ham.
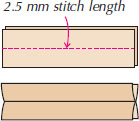
5. Prepare welts. Cut two pieces of fashion fabric 2″ x 7″. Welts should be on straight of grain unless fashion fabric is plaid—then use bias for interest. Stitch right sides together, through the center of the long side. Press open.
TIP: To hold welts in place, use fusible web strips on the facing edges. Lightly steam to hold in place. Or use paper-backed fusible web like Steam-A-Seam2®. Stick it around the window and peel away the paper.

6. From the right side, center welts under the faced window. If you used a fusible web, fuse using a press cloth. Welts will now stay in place without slipping while stitching.
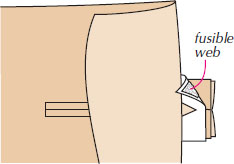
7. Fold pant away and sew long sides on original stitching line.
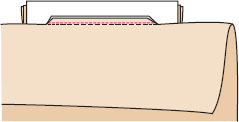
8. Fold back fashion fabric, exposing ends. Stitch on original stitching line and again over triangle.
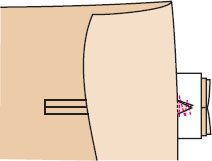
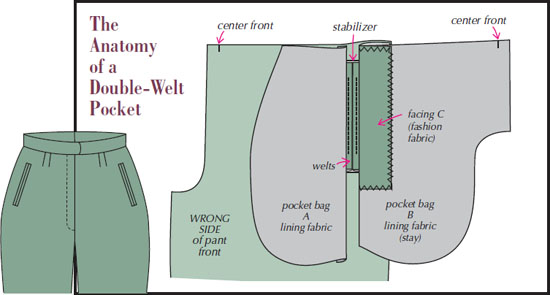
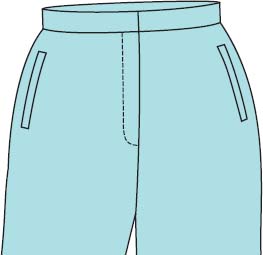
After looking at how these pockets were made in many ready-to-wear pants, we’ve adapted a method that will never gap open, because one pocket bag is a stay that is sewn into the center front and side seams. The finished pocket opening is 5″-5½” long by ½” wide.
With crotch and inseams sewn, try pant on RIGHT SIDES OUT with side seams pinned WRONG SIDES together. Adjust pins until pants fit like you want. If your hips are uneven, one side may need to be let out or taken in more than the other. Now determine pocket placement:
• To find where welts look best on your body, pin 5″-5½” by ½” rectangles of paper straight or at an angle to pant front.
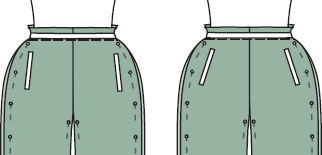
• For uneven hips, keep the lower edge of the pockets level. Keep the pockets equal distance from the side seam. Since center front is a larger distance, the difference won’t be noticeable.
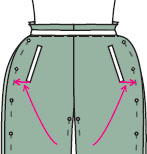
Mark side seams and welt placement lines on the WRONG sides of fabric. The pockets shouldn’t be closer than 1½” from the side seam and about 2″ from the waist seam. Use chalk or a washable marker.
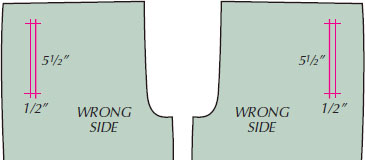
NOTE: The following instructions are for ONE standard 5″-5½” pocket. For two pockets cut TWO of everything!
Before creating pocket pattern pieces, place the front tissue on top of fabric fronts. If you made changes during pin-fitting, mark new side seam stitching lines on tissue.
Draw pocket placement on the front pattern tissue.
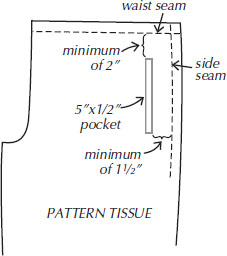
Make your pocket pattern pieces from a gridded tissue like Perfect Pattern Paper, using your altered pattern. First pin darts or tucks out of the pattern front. Smoosh the tissue flat.
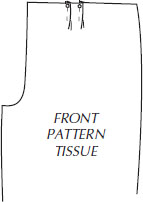
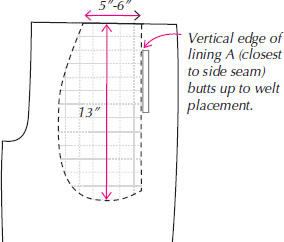
Pocket Bag “A” - to be cut from LINING
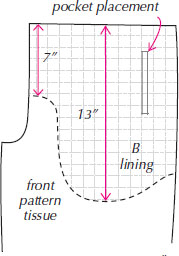
Pocket Bag “B” - To be cut from LINING.
Create as shown at the right. (It extends to center front in pleated trousers, but doesn’t have to in plain front pants.) Transfer the pocket placement onto “B.” This welt shape will vary depending on placement/tilt of welt and size of pattern.
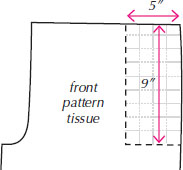
Pocket Facing “C”—To be cut from FASHION FABRIC.
This piece will go under welts, so if pocket opens, you will see fashion fabric.
Welt to be cut from FASHION FABRIC
on straight grain or bias (nice for plaids).

Welt Stabilizer to be cut from a medium weight NONWOVEN sew-in interfacing such as Pellon®.

With a pencil, draw a box ½” by 5″-5½” using a gridded see-through ruler.

NOTE: If your fabric is soft or loosely woven, interface welts with PerfectFuse™ Light fusible interfacing.
Sew darts and pleats in pants before starting welts.
Place one welt stabilizer on the wrong side of fabric, matching welt placement lines. Pin.
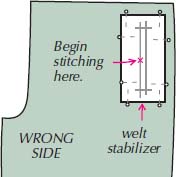
Starting in the center of a long side at the “X,” sew around the box using short stitches. Count the stitches at one end of the box. The other end should use the same number of stitches. Turn the fly wheel by hand near the corners, to be precise with your stitching.
From the right side of the pant, you will see only a stitched rectangular box.
(This assumes your hips are the same on both sides.) Place second piece of welt stabilizer on top of the first piece.
Place the wrong side of the other front on top, matching center fronts.
Pin the welt stabilizer to the other front. Now the stabilizers should be in the same place on both front pieces.
Sew the second welt stabilizer in place. First, compare both front pieces to make sure the stitching is in the exact same place. Now is the time to rip if they aren’t! (This doesn’t apply if your hips are uneven!) (See page 132.)
On the right side of the pant fabric, center the fashion fabric welt piece over stitches and pin (right sides together).
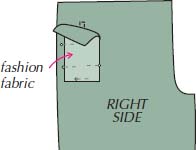
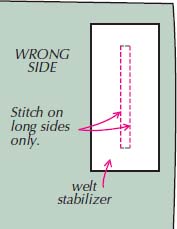
From wrong side of fabric, stitch on top of stitching lines on LONG sides of box only. Start and stop at ends. Carefully, turning the fly wheel by hand, backstitch on top of last stitch at both ends.
Remove pins.
Continuing on the wrong side, make two rows of machine basting stitches ¼” outside of each side of the box on the long sides through all layers. Stitches should extend 1″ beyond the box on both ends.
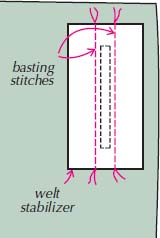
TIP: Don’t cut basting thread. Sew one line, pull slack in thread and sew other line. This makes a loop to pull out stitches later.
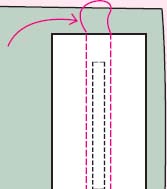
From the right side, fold one side of the welt up firmly against the basting line. Finger press. Pin in place taking a small “bite” through two layers only. For a better stitching line, points of pins should not extend into the seamline area. DO NOT IRON! Press firmly with your fingers.
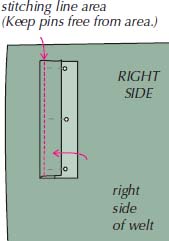
From the wrong side, stitch on the one long side of the box (where you pinned) on top of previous stitching, ending exactly at the end of the box. Backstitch carefully. Remove pins.
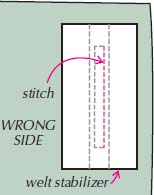
From the right side, fold other side of welt over stitching and repeat the previous step. (Fold and pin edge of first welt out of the way.)
You have created the “welt lips.”
Remove the basting threads. From the right side, carefully cut through the center of the WELT ONLY. Do not cut through pant yet.
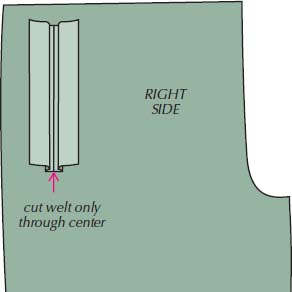
From the wrong side, cut through the center of the welt stabilizer “box” and through pant fabric to 3/4″ from the end. Angle cut to the corners right up to the stitches. Use your fingers underneath as a guide to make sure you don’t cut the welts.
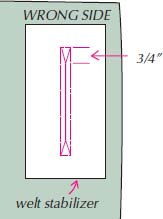
Turn or pull welts through to the wrong side.
To avoid imprints from all of the underneath layers, steam the welts over a ham from the wrong side.
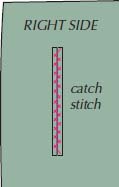
Catchstitch the welts together from the right side.
Don’t worry if welts lap at ends a little, they won’t after you stitch them later.
Center and pin the wrong side of the fashion fabric (“C”) over the welt placement lines on lining “B.” Zigzag in place using a 2mm length and 3mm width. This ensures that instead of seeing the lining peeking through the finished welt, you will see the fashion fabric.
TIP: Use temporary spray adhesive to hold layers together while you stitch.
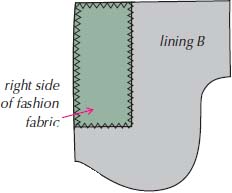
TIP: If fabric is bulky like some corduroys, trim “C” so it is only under the pocket area (1″ x 6½”). Zigzag to the lining along all edges.
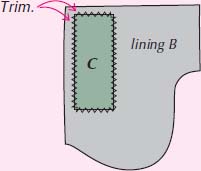
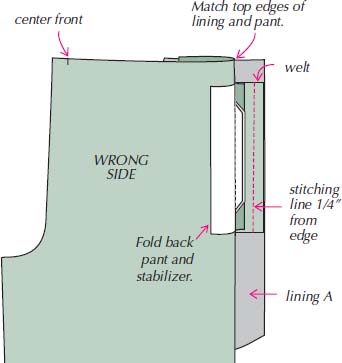
Lining “A” will be attached to the LONG edge of the welt that is closest to the center front of the pant. Match edge of lining to top of pant fabric on the wrong side. Fold back pant and stabilizer as shown. Stitch lining to the welt using a ¼” seam allowance. Sew with the lining on top, so the feed dogs won’t gather the lining. Press toward the center front.
Place lining B under pant front and line up top and sides. Fold pant fabric and stabilizer back. Stitch lining to the other side of the welt ¼” from the edge of the welt. Zigzag the welt seam allowances through all layers to flatten them, making them less bulky.
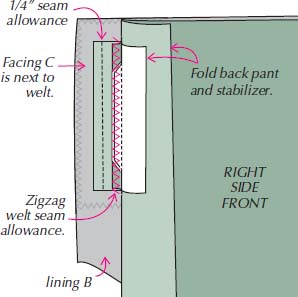
Now both pocket bags have been attached.
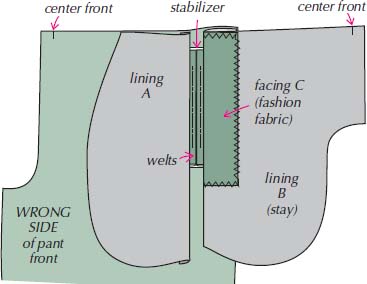
Fold lining B over pant to match center fronts.
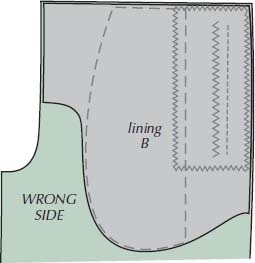
This is how it looks from the right side.
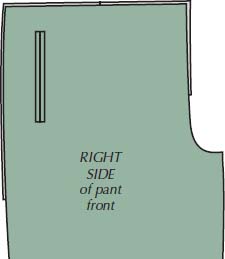
NOTE: If there is a pucker at the ends, check to see if you clipped all the way to the stitching at the corners.
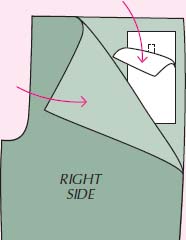
With the right side of the pant fabric facing up, fold down the top of pant fabric and the stabilizer as shown until you see the triangle. Sew directly on top of the first stitching line. Continue sewing back and forth over the triangle through all layers. Repeat on the lower triangle.
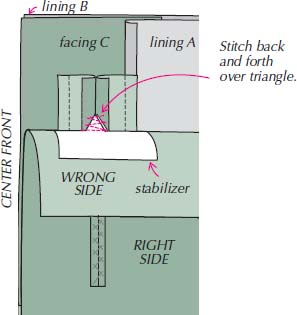
NOTE: If triangle isn’t centered on welts, pull on all layers to center it.
Fold pant away and to the side as shown. Pin pocket bags together. Sew linings with 5/8″ seam along edge of lining “A.” Stitch up to the welt stitching line, continuing at or just above triangle point and across to edge of welt.
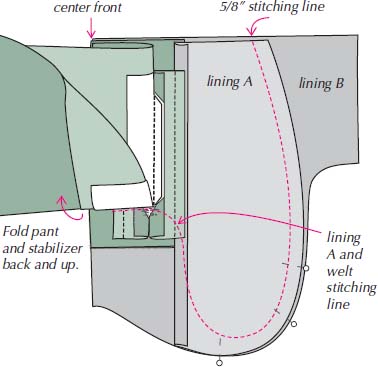
Don’t worry if edges of pocket bags don’t match. Just make sure bags are flat.
Stitch linings/pocket to the pant ½” from edges where shown. If you are using a fly front, baste to fold lines for overlap and underlap edges.
Be sure to trim stabilizer out of side seam allowances.
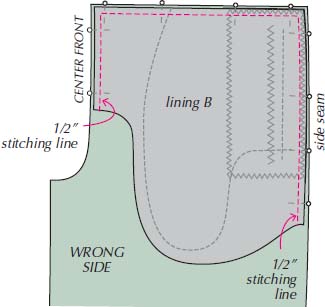
NOTE: The stay that goes to the center front should not have any play in it if you want to keep pockets from gapping.
This wonderful technique starts like the double-welt pocket using the same fabric pieces and a nonwoven stabilizer. You may want to interface the welt piece on softer fabrics with Perfect Fuse Sheer interfacing. (Read page 132 in double-welt pocket section for size and placement of pocket pieces.)
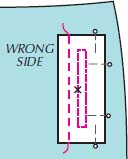
1. Draw a rectangle ½” by 5″-5½” on stabilizer. Place stabilizer on the wrong side, centered over pocket location. Stitch around the box using a short stitch length beginning in the middle of a long side. Then draw a pencil line ½” from the box toward the center front. Machine baste on the line.
2. Fold welt in half, wrong sides together, and crease with iron.
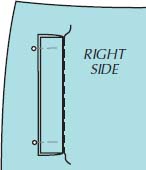
3. Place folded edge of welt along the basting on the right side of the pant. Pin as shown.
4. From WRONG side, stitch on side of box closest to the center front and the basting. Backstitch carefully at each end. Remove basting.
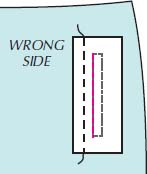
5. Fold welt out of way so you can sew pocket bag “B” to other side of box. Pin to hold.
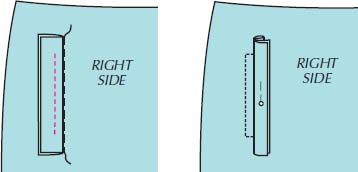
6. Place pocket bag “B” (with facing “C” sewn to it) flat on table.
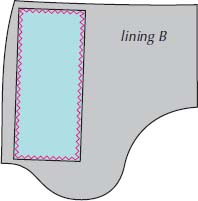
7. Place pant front on top of pocket. Put pins in each corner.
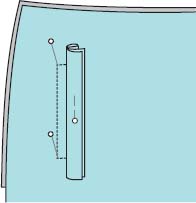
8. Lift front and mark where pins go into pocket bag.
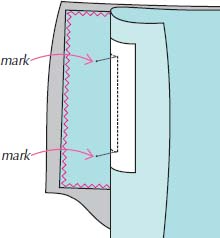
9. Place pocket bag “B” on RIGHT side of pant matching marks to corners of box closest to the side seam. Pin.
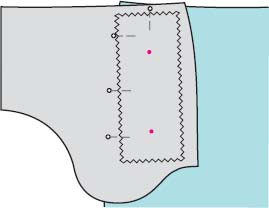
10. From WRONG side, stitch along side of box closest to side seam to catch pocket bag lining “B”.
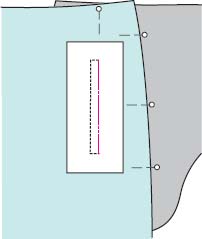
11. From stabilizer side, slash through center of box to corners in a “pie” shape.
12. Pull pocket bag and welt to wrong side. Carefully press.
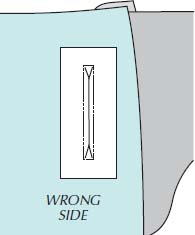
13. Match edge of pocket bag lining “A” to edge of welt seam allowance. Stitch pocket bag “A” to welt seam allowance on original stitching line of long side of box.
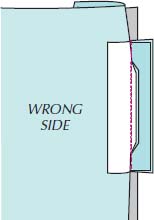
14. Stitch triangle ends of box on original stitching line and then through triangle.
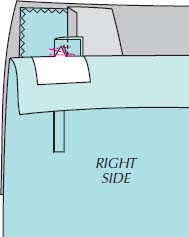
15. Sew pocket bags together. Do not worry if the pocket bag edges don’t match.
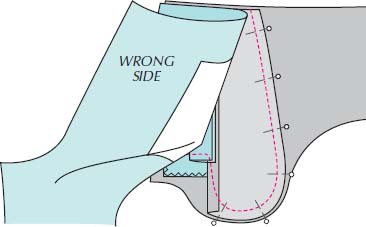
The finished single-welt should measure about ½”-1½”x 6″ and the opening should be about 2″-2½” from the side seam.
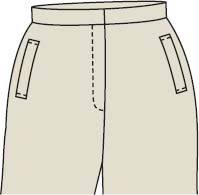
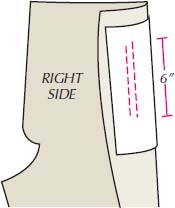
1. On WRONG SIDE of pant front, mark pocket stitching lines ½” apart. The one closest to the SIDE is 5½” long and the other is 6″ long. Mark the same lines on a piece of stabilizer 4″ x 8″. Pin stabilizer to pant matching lines.
2. Make welt.
3″ x 7″ = 1¼”-wide welt
2½” x 7″ = 1″-wide welt
1½” x 7″ = ½”-wide welt
Fold in half right sides together and sew a ½” seam at each end. Trim seams to ¼” Press seams open over a point presser. Turn to right side. Press. Baste raw edges ¼” from raw edge.

3. On right side of pants, place welt right side down on pocket marking closest to center front with welt fold toward center front. Line up stitching lines on welt and pant front. Stitch on right side from one end to the other. Do not stitch off end of welt. Backstitch.
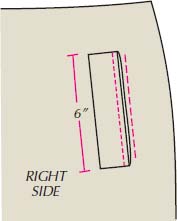
4. Create pocket bags using same instructions as double-welt pocket page 132 and 133. Place pocket bag A over welt with raw edge of pocket in middle of box. Stitch on same stitching line from wrong side. Backstitch at each end.
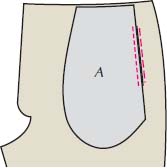
5. See page 138 for marking placement line on pocket bag B. Match these marks to second shorter line on right side of front. From wrong side, stitch carefully on this line. This row of stitching is ¼ shorter at each end than the first row.
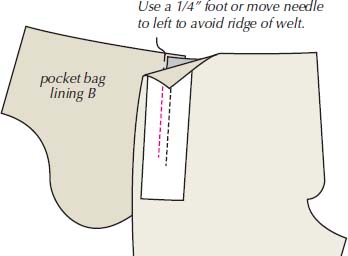
6. From wrong side, slit pant front between stitching lines to within ½” from ends. Snip to each corner.
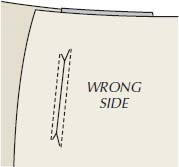
7. Pull pocket bags to wrong side. Place on a ham and lightly press. The welt will end up with fold toward side seam.
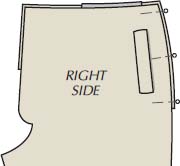
8. From wrong side, stitch pocket bags together. Don’t worry if edges of pocket bags don’t match; just be sure everything is flat!
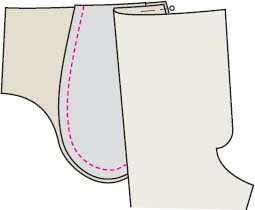
9. Baste top and side of bags to pant front.
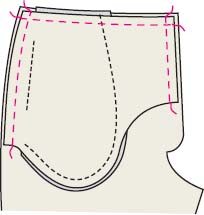
10. From right side, stitch top and bottom edges of welt through all layers, backstitching at each end. The “pies” at each end will be caught in the stitching.
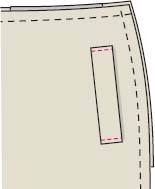
NOTE: See welt detail options on page 142)
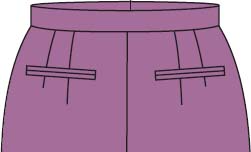
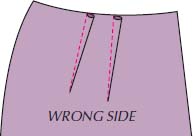
1. Stitch darts and press toward the center.
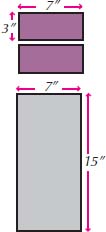
2. Cut two pieces of fashion fabric 7″ x 3″ for welts.
One will become the welt to be sewn to top end on lining. The other becomes the facing to be placed 2″ from the other end of lining.
Cut one piece of lining 7″ x 15″ for pocket bag.
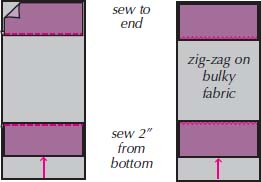
3. Turn under one edge of each fashion fabric welt and edge-stitch to lining, or, if fabric is bulky, zigzag it flat to lining
4. Cut pocket stay from a nonwoven interfacing 7″ x 3″. Draw a box ½” by 4″-5″ long.

5. On wrong side, place stabilizer with the box exactly where you want pocket on either left or right or both backs, 2″-3″ below waist seamline.
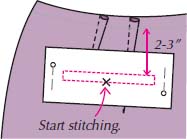
6. Stitch along dotted lines, using small stitches, forming a “box.” Start and stop at the center of a long side.
7. Pin pocket to back, right sides together, centering welt over stitched box.
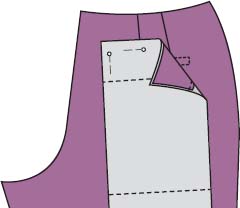
8. On INSIDE, stitch over previous stitching on LONG sides of box ONLY, back-stitching carefully at corners. Do not stitch short sides of box at this time.
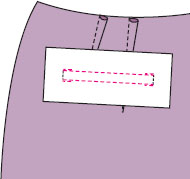
9. On INSIDE, machine-baste exactly ¼” above and below long sides of box.
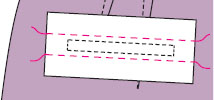
10. On OUTSIDE, fold pocket up firmly against basting line. Pin in place.
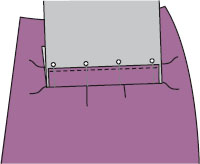
11. On INSIDE, stitch again over previous stitching on LOWER long side of box, backstitching at corners. (This stitching creates the welt.)
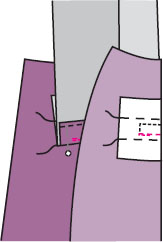
12. On OUTSIDE, fold upper edge of pocket down firmly against top basting line. Pin in place. Be sure first welt is out of the way.
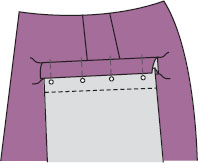
13. Flip once more to INSIDE and stitch on upper line of box; backstitch carefully.
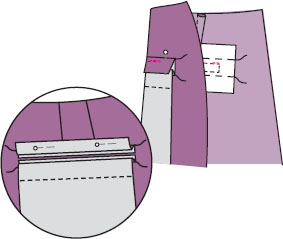
14. On OUTSIDE, slash through welt/pocket ONLY. DO NOT slash through pants yet. Remove basting threads.
15. For pocket opening, on INSIDE, slash along solid line and diagonally to corners as shown. Have your finger underneath as a guide to be sure you don’t cut the welts.
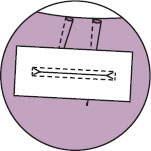
16. Turn pocket to INSIDE through opening. Whipstitch edges of welts together. Press.
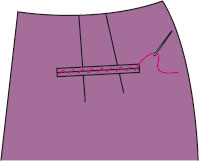
17. Fold back pant and stabilizer and stitch through triangle on original stitching line and a few more times to stabilize ends.
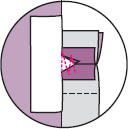
18. On OUTSIDE, edgestitch along lower edge through all thicknesses.
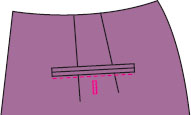
NOTE: If not making a tab (see next page), sew a buttonhole through pant and one layer of pocket before sewing bag to waistline. Later, sew a button to the inside pocket facing to keep pocket secure.
If you want a loop-type tab, sew the loop, turn, and fold into a tab.

Stitch the tab to the upper center of the box before making pocket. It will be included in the welt seam and will go over the upper welt rather than under as in the previous tab.
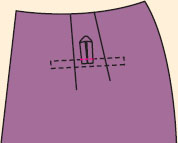
NOTE: Sew and insert tab before you attach pocket bag to waistline and sew sides.
1. Cut two pieces of fabric the shape of a tab. Interface wrong side of tab if needed.

2. Pin the pieces right sides together and stitch tab edges.
3. Trim, slash corners, turn and press.
4. Edgestitch if desired.

5. Sew buttonhole in center of tab.
6. Slip tab into center of opening. Pin.
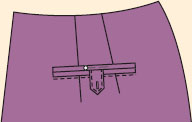
7. On INSIDE stitch tab to top welt over welt stitching.
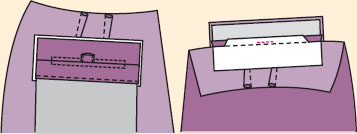
If you want B pocket flaps inserted between the welts, stitch them to inside BEFORE sewing the pocket bags.
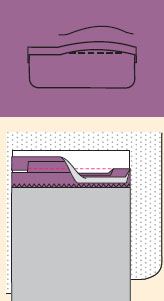
19. Fold pocket up with facing under welts. Stitch edges of pocket bag together. Shape top edge of pocket lining to match pant waist edge. Baste together ½” from waist edge.
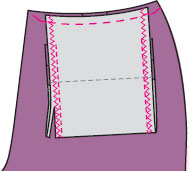
TIP: Round the lower corners if you wish, so less lint will collect.

20. If you made a buttonhole, sew button to inside of pocket.
The narrow single-welt pocket is a variation of our easy double welt. This is usually in the back, but we have seen it in the front of pants too.
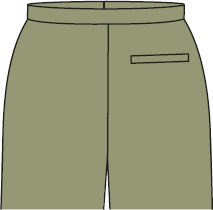
The pocket section is prepared like the double welt, then cut in half.
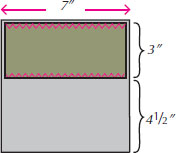
welt
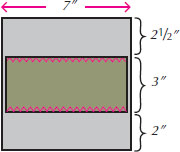
facing
1. Mark on a 3″ x 7″ piece of nonwoven stabilizer a ½” by 4″-5″ box. Place it on wrong side where you want the pocket—2″-3″ below the waist if a back pocket.
Beginning in the middle, stitch around the box, stitching corners accurately.
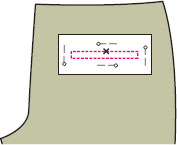
2. Center the welt section over the box on the right side.
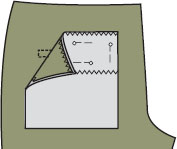
3. From the stabilizer side, stitch on the bottom line of the box.

4. Baste ½” below the bottom line.
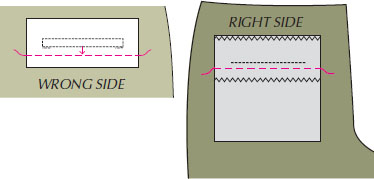
5. On OUTSIDE, fold the welt over basting. On INSIDE, stitch again on the lower long side of the box.
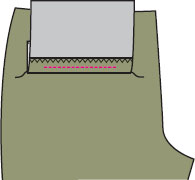
6. Carefully fold the back pocket so you won’t stitch through it when you sew on the top line.
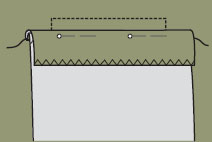
7. Place facing piece on right side, centering over box with the longer section of the pocket toward the waist. Stitch carefully from WRONG SIDE along top line of box. Remove basting.
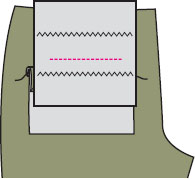
8. Slash though stabilizer and pant, cutting to corners.

9. Pull pockets through opening to wrong side and press. Lower section will form the welt.
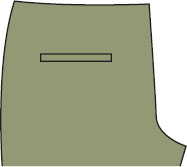
OPTIONAL: Hold pocket facing section away and edgestitch pant just below bottom of welt. Make a buttonhole in pant just below the center of the welt.
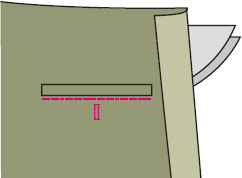
10. Fold back fabric and stabilizer. Sew triangles at ends to welt. Stitch through triangle on original stitching line and a few more times to flatten and stabilize ends.
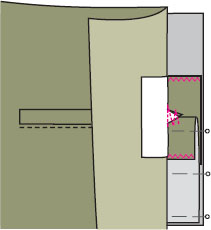
11. Fold back pant and stabilizer and sew seam at upper edge to welts.
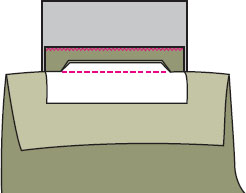
12. Sew pocket bags from triangle to bottom edge on each side and across bottom. Upper edge of pocket bag will be caught in waistline seam.
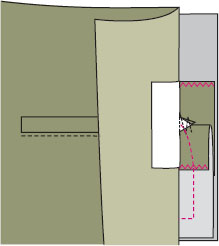
OPTIONAL: If you edgestitched the bottom, now edgestitch ends and above welt on pant.
13. If you sewed a buttonhole, sew button to inside of pocket bag.

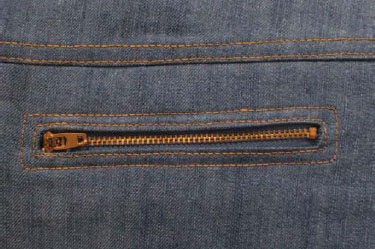
Instead of a welt, use a zipper. Face the rectangle with the top of your pocket bag lining by sewing a box ½” X 5″, cutting to the corners, and turning.
Place a zipper under the rectangular box. From the right side, topstitch close to the edge with a zipper foot. Topstitch ¼” away if desired.
Bring the bottom edge of the pocket bag up to the top edge and stitch the top and side edges together.
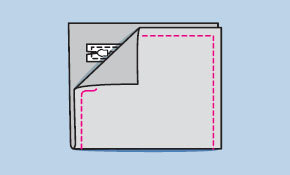
NOTE: This could be a faux zipper pocket if you just want a design detail. Simply face the box and sew a zipper under it. If you are using a metal zipper and find it scratchy, on the inside, cover the zipper with a piece of fabric.