Carving a Ham
(Découpage du Jambon)
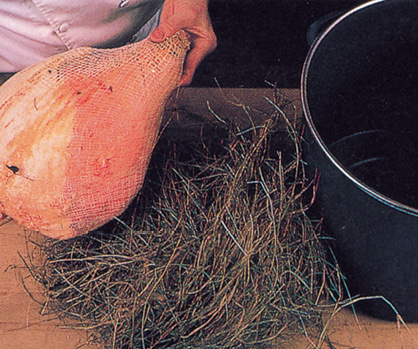
A large ham is always welcome at our house. Sometimes it is just roasted or, other times, with a crust on top. Recooking the ham improves the flavor greatly. During my apprenticeship, ham was sometimes poached with fresh hay to give it an earthy, country flavor. This step is optional.
YIELD: 20 servings
1 store-bought fully cooked ham (16½ pounds/7½ kilograms)
1 large handful fresh hay (optional) peach-mustard glaze
Peach-Mustard Glaze
⅓ cup (115 grams) peach preserves
½ teaspoon freshly ground black pepper
2 teaspoons dried mustard
Dash ground cloves
1. Place the ham in a large stockpot with the hay. Fill the pot with enough cold water to cover the ham. Bring the water to approximately 180 degrees (82°C). (Do not boil the water or the ham will crack open at the joint.) Cook at that temperature for 3 hours.
2. Lift the ham partially from the water to rest for doneness. Next to the shank bone there is a second smaller bone. With pliers, twist it and pull it out. If it comes out in one piece, the ham is done inside. If not, cook another hour. Let cool overnight in the cooling water.

3. Remove the skin. If the ham has been cooked with hay, the skin will be more discolored than it would be otherwise, but it can still be reserved for stews or soups, or for cooking with pea beans (navy beans), black beans, or split peas. Trim the fat and dark surface skin from the underside, leaving only a very thin layer of fat.
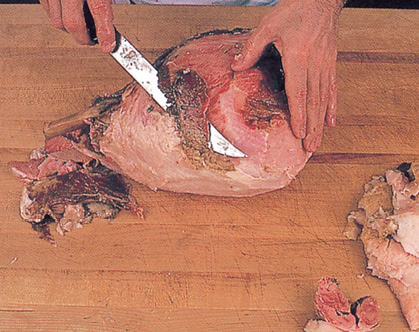
4. Keep trimming the surface of the meat where it is brown and skinlike around the shank bone. To make carving easier later on, remove the pelvis or hip bone by running a knife around it.

5. Remove most of the fat from the top, leaving only a think layer of white fat. The extra white fat can be used in soups, stews, or to enrich casseroles and bean dishes.

6. Run your knife in a criss-cross pattern through the remaining fat on top of the ham, cutting slightly into the surface of the meat. This scoring will help the glaze adhere to the meat while cooking. Preheat the oven to 350 degrees (177°C). Mix together the preserves, pepper, mustard, and cloves. Spread the coating mixture on top of the ham, position it in a roasting pan, and place in the oven for 30 minutes. Reduce the heat to 325 degrees (163°C) and continue cooking for 1 hour and 30 minutes, for a total roasting time of 2 hours. The ham is now ready to be carved.

7. To make the carving easier, cut into the ham to approximately 1 inch (2.5 centimeter) above the shank bone. The object is to make a guard that will give a clean bottom edge to the slices and also protect your hand from the knife in case it happens to slide while you are slicing the meat.

8. Slice the ham on the bias, stopping at the cut edge, and arrange the meat on a platter. Serve as needed.

Baking Bread
Very simple recipes are often the most deceptive because they are the hardest to make well. What is wine? Simply fermented grape juices. What is salami? Seasoned ground meat dried in a casing. What is French bread? Water, flour and yeast. Yet these ultra-simple recipes demand years of practice to achieve perfection. Once a recipe becomes complicated, the list of ingredients expands and the recipe becomes easier to adjust, change and control. But try to improve a hard-cooked egg! In addition to years of knowledge, professional bakers have the right flour, special equipment, temperature control, humidity control, and especially the brick-lined oven that gives enormous amounts of heat, as well as forced steam, which gives French bread its texture and crust. We have a friend, a professional boulanger, who makes bread at home once in a while with results that are never as good as the bread he makes at his shop.
There are a few things to keep in mind when making bread. Use a hard wheat organic flour, high in gluten, which is the protein part of the flour and gives you the elasticity needed for the bread to develop. Keep in mind that the thick, crips crust is usually caused by forced steam and dough made only with water.
Bread made with milk and with fat will have a softer crust. The smaller the amount of the yeast used, the longer the rising time, and the larger the air bubbles in teh bread. Some bakers add ascorbic acid (vitamin C) to the dough to make the air bubbles hold better and the bread stronger. Sugar, as well as a warm temperature, helps the enzymes (the yeast) to develop better and faster.
If the water or temperature is cold, the bread rises very slowly. Below a certain temperature, the enzymes won’t develop any more. Fresh yeast usually comes in .6 ounce (17-gram) packages, and dry yeast comes in 7 gram (¼-ounce) packages. They can be used interchangeably. A levain or a dough starter can also be added to the dough to start the fermentation; this gives the dough a slightly nutty, sour taste.
It is usuallly supplemented with yeast. The starter can be made by taking a piece of finished dough and keeping it in a jar with water. Refrigerated, it will keep there for a week to ten days. To measure out the flour, scoop a cup directly from the flour bag. This produces a fairly tightly packed cup (150 grams) and 3 cups will amount to roughly 1 pound (454 grams) of flour.
The moisture in the flour varies from season to season. Humidity will be absorbed by the flour in the summer and water should be decreased in the recipe. Vice versa in winter. The following recipe makes a basic dough used to make large country breads as well as thin baguettes or small breads.
Country Bread
(Pain de Ménage)
This beautiful, large loaf of country bread can be made, as I have done in this recipe, with the skin of a chicken cooked in the oven into cracklings, or with small pieces of cooked bacon, or you can bake it plain. The decoration on top makes the loaf attractive; pieces of dough (kept in the refrigerator) are placed on top of the loaf just before it goes in the oven.
A freshly baked baguette, the traditional long, crunchy loaf of French bread, is ideal with any meal, from breakfast to dinner. In the recipe here, the top is slashed diagonally on one baguette, another has crosses cut into the top, and the third just a line cut down the center. Two baguettes are sprinkled with flour and one with cornmeal.
YIELD: 1 large loaf and 3 baguettes
Dough
2½ cups (593 milliliters) warm water (95 to 100 degrees/35 to 38°C)
2 envelopes active dry yeast
1 teaspoon sugar
starter: 6 ounce (170-gram) piece of dough kneaded, risen, and stored with 1½ cups (355 milliliters) water (if starter is not available, increase the yeast to 2½ envelopes and the water to 3½ cups/828 milliliters)
About 9 cups (1.4 kilograms/3 pounds) organic bread flour
1 tablespoon salt
4 tablespoons cornmeal
Extra flour for the tops
Crackling (optional)
Skin from one chicken
⅛ teaspoon salt
1. Combine the water with the 2 envelopes of yeast and sugar, stirring gently just to mix. Set aside to proof for 10 minutes.

2. This starter consists of dough left over from the last time I made French bread and water. It has been in the refrigerator for one week. The water has a slight sour taste, and the dough is very spongy and airy with a sour smell. After the yeast has proofed for 10 minutes, add the starter with its liquid, 7 cups (1 kilogram) of the flour, and the salt.

3. Using the dough hook attachment of an electric mixer, mix the dough on speed 3 (medium) for about 5 minutes. At this point, the dough will be very elastic but still soft. All the flour is not added at the beginning because the mixer is not strong enough to work a very stiff dough and could become damaged. The 7 cups (1 kilogram) of flour produce a soft dough, well-kneaded by the machine and with its gluten well-developed.
Note: Although any of these breads can be kneaded by hand, an electric mixer will make your life easier. But you must use a heavy-duty mixer with a dough hook. I use a KitchenAid, but any comparable appliance will do the job. You will have to adjust your model to the different speeds I recommend for my mixer. It starts off with “stir,” then runs from 1 to 10 speeds, which can be translated as slow, medium, and fast.

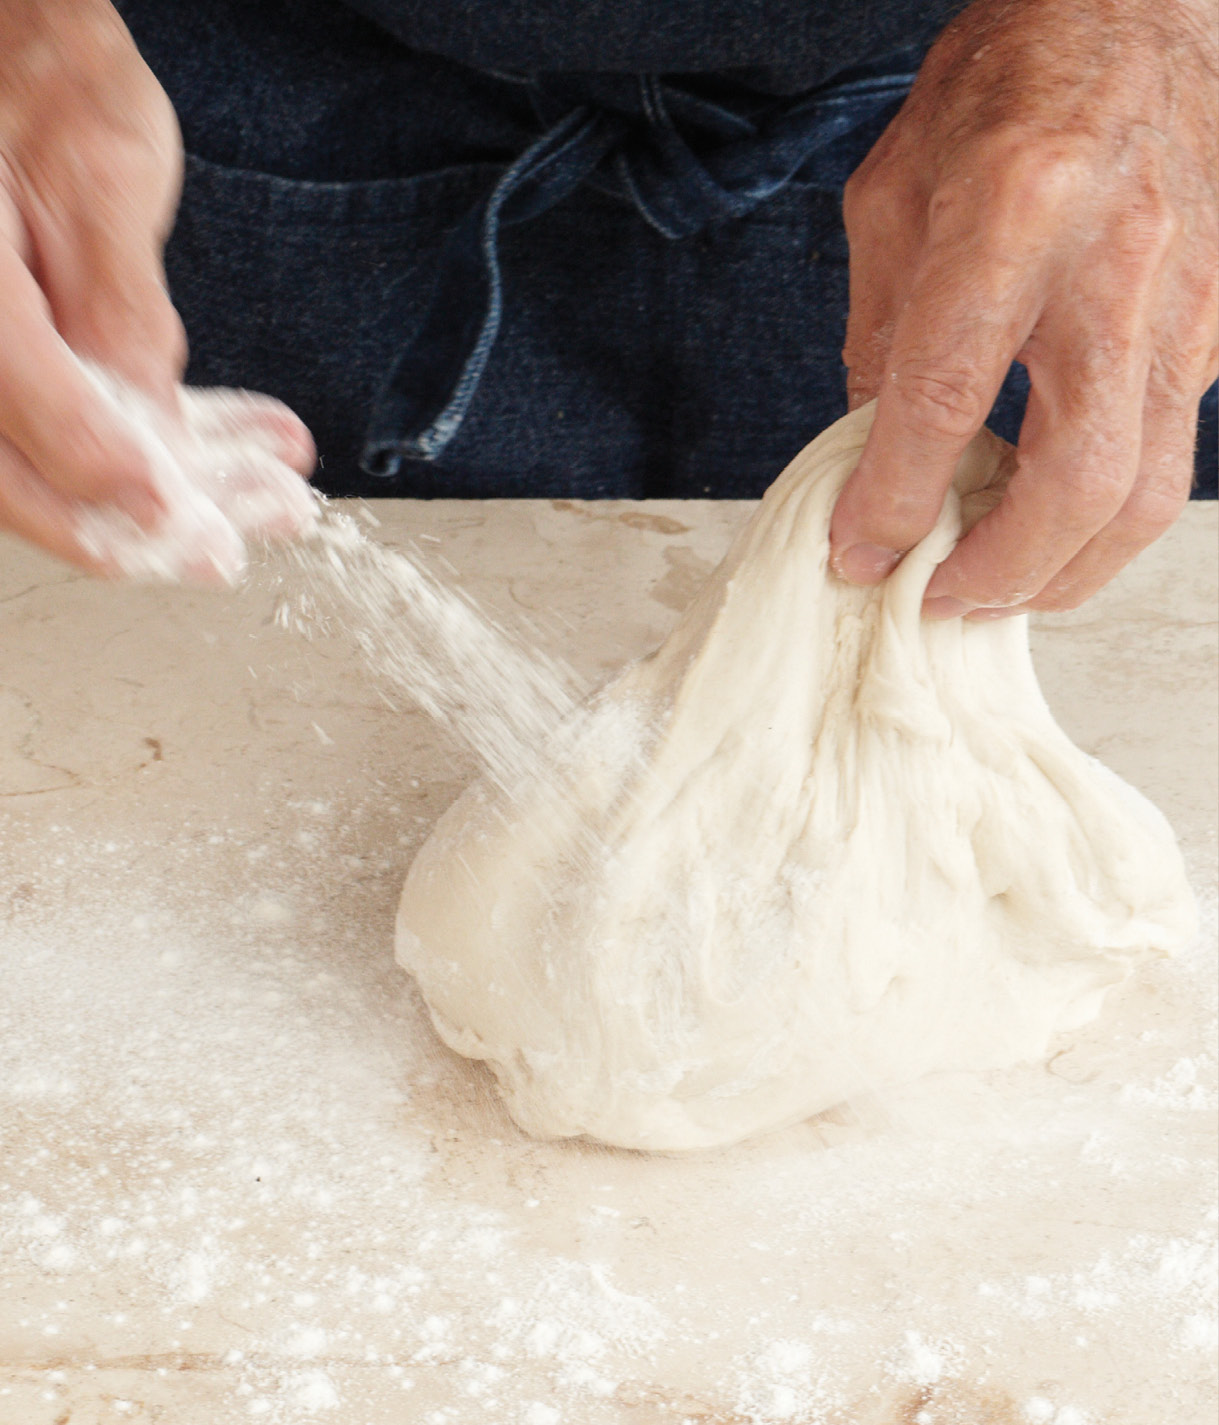
4. With the machine on speed 1, add about 1½ cups (225 grams) flour and mix gently, just enough (approximately 1 minute) to incorporate the flour into the dough. Turn the dough out onto a board with the remaining flour and knead for 5 minutes.

5. Press your hands into the dough, pushing forward, then fold the dough on itself. Press, push, and fold the dough on itself, rotating it each time. Repeat again and again.

6. After about 5 minutes of kneading, the dough will be ready. All of the flour may be used or some may be left, depending on the humidity. The dough should be very smooth but strong. It should resist your fingers when you press them into it, and bounce back when they are lifted.

7. Place the dough in a plastic bowl or other container with a cover (or use plastic wrap), and let rise, covered, in a warm place (70 to 75 degrees/21 to 24°C) for 2 to 2½ hours.

8. Preheat the oven to 400 degrees (204°C). If you decide to make the chicken cracklings, spread the chicken skin on a cookie sheet flesh-side down and sprinkle it with the salt. Place in the oven for 20 to 30 minutes, until well-baked and crisp.

9. When risen, the dough should have doubled in volume. Bring the sides of the dough to the center and knead it again in the bowl to deflate it and make it into a ball.

10. To make a starter for future use, cut a piece (approximately 5 to 6 ounces/142 to 170 grams) from the dough and put it in a plastic container with 1½ cups (355 milliliters) water. Cover and place in the refrigerator. Set aside another 2 ounce (57 gram) piece of dough, covered, in the refrigerator to decorate the loaf after the final rising.

11. Divide the dough: Cut 3 pieces, approximately 12 ounces (340 grams) each, for the baguettes and set aside, covered. With your hands, extend the remaining dough (about 2 to 2¼ pounds/1 kilogram) on a floured work surface to form a rectangle about 16 by 10 inches (40.6 by 25.4 centimeters). Break up the cracklings and arrange the pieces on top of the dough.

12. Roll the dough tightly on itself with the cracklings inside and form it into a loaf. Press it into an oval shape approximately 11 inches (28 centimeters) long by 6 inches (15.2 centimeters) wide.

13. Sprinkle 2 tablespoons of the cornmeal on a baking sheet and place the loaf on top. Prepare a proof box by inserting a trimmed cardboard box into a large plastic bag. When the bag is closed, you will have a humid hothouse similar to a professional proof box. This provides the perfect environment for the bread to rise properly. Insert the bread on the baking sheet into the proof box, tie it closed, and let rise at room temperature for 1½ hours.

14. Preheat the oven to 425 degrees (218°C). Remove the 2 ounce (57 gram) piece of dough from the refrigerator and make strips by rolling the dough with your hand, making one end thicker than the other.

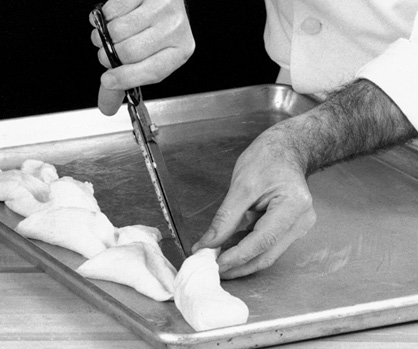
15. Brush the risen loaf with water and arrange the strips of dough on top with the thick part spread out at one end. With scissors, cut into the thick ends of the dough strips to make them resemble wheat stalks.

16. Sprinkle the bread with flour from a sieve and, using a razor blade, cut in between and around the “wheat stalks,” making slashes that follow the design. Bake in the center of the oven for 50 minutes. During the first 10 minutes of baking, throw water on the bottom of the over to create steam to help the bread develop. At 2- to 3-minute intervals, toss about 2 tablespoons of water onto the floor of the oven and repeat two more times—for a total of three times in the first 10 minutes of baking.

17. Remove the bread from the oven. Note how the steam created by tossing water onto the oven floor has helped the bread form a thick crust on top. Let the bread rest for at least one hour before cutting into it. The dough should be spongy and well-risen inside with pieces of crackling showing. This bread makes a beautiful centerpiece for a buffet. It is good with earthy things, such as pâté, cheese, salami, or a garlicky salad.

18. For the baguettes: Roll the 3 reserved pieces of dough into 18-inch (45.7-centimeter) lengths and place on a cookie sheet coated with the remaining 2 tablespoons cornmeal. Roll one of the baguettes in the cornmeal so it is coated all around.

19. Place the baguettes in the proof box (step 13), and let rise for 1 hour in a warm kitchen (70 to 75 degrees/21 to 24°C).

20. Preheat the oven to 425 degrees (218°C). Remove the baguettes from the homemade proof box and, if they have dried out a little on top (they should still be sticky), brush with water. Sprinkle the two outside loaves with flour. (The center loaf has been rolled in cornmeal.)

21. With a razor blade or serrated knife, score the surface of 1 floured loaf on the diagonal one way. Repeat on the other floured loaf, cutting a second set of lines across, in the opposite direction, to create a crisscross effect. Cut the surface of the loaf coated with cornmeal lengthwise with one long slit.

22. Bake in the center of the oven for 30 minutes. After 1 to 2 minutes, throw 2 tablespoons of water in the bottom of the oven to create steam. Repeat 3 to 4 minutes later, and again, a third time, 3 to 4 minutes after that. The loaves should be well-browned and crusty.

Milk Bread
(Petits Pains au Lait)
Dough made with milk and butter will have a more tender crust and a slightly more delicate inside than the regular country bread. This type of dough is often used to make individual rolls. The dough is started in the machine and finished by hand, although it can be made entirely by hand.
YIELD: About 2 dozen (24) 2 ½-ounce (71-gram) rolls
2⅓ cups (552 milliliters) milk at about 90 degrees (32°C)
2 packages dry yeast or 2 packages fresh yeast
1 teaspoon sugar
6 cups (900 grams) all-purpose, unbleached organic flour
½ stick (¼ cup/57 grams) unsalted butter, softened
2 teaspoons salt
1. Mix the milk, yeast, and sugar together in a bowl and let the mixture proof for 20 minutes at room temperature. Meanwhile, place 4 cups (600 grams) of flour in the bowl of the mixer. Add the butter and salt. After about 10 minutes, stir the milk and yeast mixture. Let it proof another 10 minutes, then combine with the flour. Beat on medium speed for about 5 minutes.

2. Add another cup (150 grams) of flour to the bowl and mix to incorporate the flour. The dough should come out of the bowl soft but rubbery.

3. Place the dough on a board and work in more flour by hand. Depending on the humidity and temperature, you may need all the flour or even a few tablespoons more, or you may not need it all.

4. Knead for about 5 minutes, until the dough doesn’t stick to your fingers. (It will be slightly softer and stickier than the country bread dough.)

5. Place the dough in a buttered bowl, turning the dough around so it is buttered on top. Cover with a towel and let raise in an 80 degree (25°C) place for 1 hour.

6. To approximate the type of heat in a baker’s oven, line a cookie sheet with quarry tiles and place them on the lower shelf of the oven preheated to 425 degrees (218°C). Set a small container of water between the lower shelf and the oven floor to generate humidity and steam. Cut the dough in about 2½-ounce (71-gram) pieces and roll each one into a ball with the palm of your hand, pushing out the air bubbles. Shape the balls into rounds, ovals or any shape you fancy.

7. For the épi (“head of wheat”), shape about 1 pound (454 grams) of the dough into a long loaf about 2 inches (5 centimeters) in diameter. Butter a tray lightly, place the dough on it and cut with a pair of scissors. Divide the dough into wedges to simulate a blade of wheat. Alternate from one side of the dough to the other, without cutting completely through. Pull out each “wheat” so it forms a pointed head. Let the breads and épi raise for 45 minutes to 1 hour at room temperature in the proof box. Preheat the oven to 425 degrees (218°C). Brush with an egg wash (1 whole egg, beaten) and place in the oven for 25 minutes for the small breads and 30 minutes for the épi. Every so often check that there’s water in the oven, throwing some in to produce steam during the first 10 to 15 minutes of cooking.
Pullman Bread
(Pain de Mie)
The pullman bread is often hollowed out and filled up with little sandwiches to serve at a buffet. Whereas sandwiches are usually trimmed on four sides, and the trimmings used for bread crumbs, in this technique the whole loaf is trimmed of its crust and the crust becomes a receptacle. After the party it can be transformed into bread crumbs. The dough for the pullman bread is softer than for the petits pains au lait on page 449.
YIELD: 1 16-inch (41-centimeter) loaf
2 cups (473 milliliters) milk
1 cup (237 milliliters) hot water
1½ envelopes active dry yeast
1 tablespoon sugar
6 cups all-purpose unbleached organic flour (2 pounds/900 grams)
1 tablespoon salt
1½ sticks (¾ cup/170 grams) unsalted butter, softened
1. Mix the milk and water (the temperature of both should be about 95 degrees/35°C). Mix in the yeast and sugar and stir until dissolved. Place 5 cups (750 grams) of the flour into the bowl of an electric mixer and add the yeast mixture. Using the dough hook, beat on medium speed for 5 to 6 minutes. Then add the rest of the flour, the salt and the butter. Mix again on low speed for 2 minutes. The dough will be sticky when you pull it off the hook, but it will come off clean and spring back as though it were rubber.

2. Butter a large bowl and place the dough in it. Turn the dough in the bowl to coat the top with a film of butter. Place the bowl in a large plastic bag and set it in a warm oven (about 80 degrees/25°C) for 2 hours. The dough, when pushed in with your fingers, should hold the indentation, which is an indication that it has risen enough. Knock the dough down by kneading it a few seconds in the bowl.

3. Place in a buttered 16- by 4- by 4-inch (41- by 10- by 10-centimeter) pullman mold or two smaller molds. Be sure to butter the mold well. The dough should come about one-third of the way up the mold. Let it rise again for 1 to 1½ hours, depending on the humidity, until the dough comes about three-quarters of the way up the mold. Brush with the egg wash (1 whole egg, beaten). Preheat the oven to 425 degrees (218°C).

4. A pullman bread mold has a special lid that slides in to keep the top flat; or you can improvise a cover for the mold. Butter a cookie sheet, place on top of the bread, buttered side down, and place a rock on top to hold it down. Place in the oven for 20 minutes, then remove the cookie sheet or the cover. By then the dough is set and will not rise further. Bake for another 40 minutes until the bread sounds hollow when tapped. If the top browns too much, top with a piece of aluminum foil to prevent further browning. Unmold the bread and cool on a rack.

5. Pictured here is the round country bread, crisscross cut on top, and the long, cooked pullman bread.

6. After cooling, cut off the top of the pullman bread to form a lid. Using a small pointed knife, cut all around the bread, about ¼ inch (6 millimeters) from the edge, to loosen the inside. It is now holding only from the bottom.

7. Place the bread on its side. Insert the knife into the bread about ¼ inch (6 millimeters) from the bottom crust and pivot the blade back and forth to loosen a section of the bottom.

8. The object is to loosen the bottom of the bread without cutting the bottom crust off. Make a few incisions along the base of the loaf, jiggling the knife back and forth at each point of entry to eventually loosen the whole inside.

9. Remove the inside, which should come out easily. Notice that the bottom crust is attached to the sides, except for a few holes along the edge where the knife was inserted.

10. Slice the bread into 1/4- to 3/8-inch (6- to 9.5-millimeter) slices. You should have approximately 40 slices. Make different varieties of sandwiches: sliced chicken with fresh herbs and mayonnaise; prosciutto with butter; anchovy fillets and butter; boiled ham and mustard, etc. Avoid fillings that could bleed on other sandwiches. Pack the sandwiches together inside the bread mold, cover with the lid and place on the buffet table. The bread container also can be dried and used as a basket.

Cheese Bread
(Pain au Fromage)
This delicate bread, made with sharp cheddar and dried pears, is lovely to serve with fresh fruit and nuts and is excellent for brunch. Any leftover bread is good cut into slices and toasted, which brings back the taste of the cheese.
YIELD: 1 loaf
1 cup (237 milliliters) milk
1 envelope active dry yeast
1 teaspoon sugar
3 cups (450 grams) organic bread flour
1 teaspoon salt
¾ stick (6 tablespoons/85 grams) unsalted butter
2 large eggs
2 cups (200 grams) grated sharp cheddar cheese
1 cup (115 grams) diced dried pear
Egg wash made with 1 egg with half the white removed, beaten
1 tablespoon oatmeal (not the instant kind)
1. Heat the milk to about 95 degrees (35°C) and add the envelope of yeast and the sugar. Combine gently and proof for 10 minutes in the bowl of a electric mixer. Add the flour, salt, butter, eggs, and, using the dough hook, beat on medium speed for about 5 minutes. Add the grated cheese and diced pear, and mix about 30 seconds to 1 minute, just long enough to incorporate. This dough doesn’t require further kneading. Cover the bowl with plastic wrap and let the dough rise at room temperature for 1½ hours. Fold the dough in on itself from the sides toward the center and press to deflate.

2. Butter a 3-quart (3-liter) charlotte mold and arrange the dough in it. Place in a proof box and let rise for 1 hour. Brush with egg wash. Preheat the oven to 400 degrees (204°C).

3. Sprinkle with the oatmeal and slash two lines with a razor blade across the surface of the loaf. Place in the center of the oven for 15 minutes, then reduce the heat to 350 degrees (177ºC) and continue baking for another 20 minutes.

4. Remove from the oven and keep in a warm place for 15 to 20 minutes so the dough doesn’t soften and the bread collapse on itself. After an hour, the dough should still be warm and can be cut and served. The center should look buttery and have a yeasty, cheesy smell.

Provence-Style Pizza
(Pissaladière)
The pissaladière is a French pizza that’s usually made from a pizza dough rolled very thin and covered with onions, garlic, anchovies, olives, and olive oil. Other ingredients such as tomatoes, green peppers, tuna, and cheese can be used to vary the filling.
YIELD: 1 large pizza-style loaf
Dough for one large pissaladière
1¼ cups (296 milliliters) water, at about 80 to 90 degrees (27 to 32°C)
2¼-ounce (7-gram) packages active dry yeast or 2.6-ounce (17-gram) packages active fresh yeast
1 pound (454 grams) all-purpose organic flour (3 generous cups)
2 tablespoons virgin olive oil
1 teaspoon salt
Filling
4 tablespoons virgin olive oil
8 cups (1 kilogram) sliced onions, loosely packed
4 to 5 cloves garlic, peeled, crushed and chopped (1 tablespoon)
½ teaspoon salt
½ teaspoon freshly ground black pepper
3 2-ounce (57-gram) cans anchovies in oil
Generous dozen (12-to-13) Spanish or Greek oil-cured black olives
1. Mix the water and yeast and let rest at room temperature for 10 minutes. Place 2 cups (300 grams) of flour in the bowl of an electric mixer. Add the water-yeast mixture, olive oil, and salt and beat on medium speed with a dough hook for about 3 minutes. Then add the remaining flour. Mix to incorporate the flour, then turn the dough out on a board and knead by hand for about 2 minutes until the dough is smooth and satiny. Oil a bowl, place the dough in it, and turn over to coat with the oil all around. Cover with a towel and let rise for 1 hour at room temperature, at about 75 to 80 degrees (23 to 27°C). The dough should double in volume. Check by making indentations with your fingers. If the holes remain, the dough has raised enough.

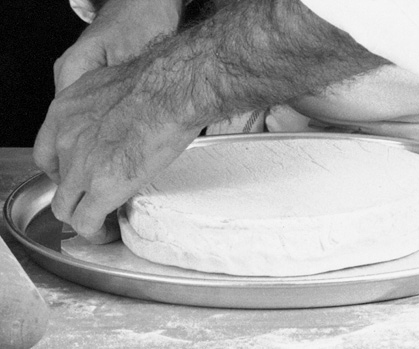
2. Make the filling. Heat 3 tablespoons of the oil in a saucepan and add the onions. Cook on medium to high heat for about 10 minutes, until the onions are cooked and lightly brown. Add the garlic and salt. (It is a small amount of salt because the anchovies are salty.) Add the pepper. Spread the dough out by hand on the table or directly on the cookie sheet.

3. Preheat the oven to 425 degrees (218°C). Oil a 16- by 12-inch (40.6- by 30.5-centimeter) cookie sheet or 2 round pans. Spread out the dough with your hands to enlarge and line the pans. The dough should be about ¼ inch (6 millimeters) thick all around.

4. Arrange the cooked onions on the dough and the anchovies in a crisscross pattern on top. Remove the pits from the olives, cut them in half, and position one in each anchovy diamond. Sprinkle the “pizza” with the remaining tablespoon of olive oil and bake for 30 minutes in the oven.

5. Allow it to cool in the pan for at least 10 to 15 minutes. Brush again with olive oil before serving. It should be served at room temperature.

Croissants and Pain au Chocolat
(Croissants)
Croissants are the essence of the French breakfast. They are never eaten at other meals. The large twisted croissants bought in cafés in the morning are often made with a mixture of shortening and butter. The small straight croissants are usually made with only butter. For pain au chocolat, strips of dough are rolled up in rectangular pieces (about 3 x 5 inches/7.6 x 13 centimeters) and stuffed with a piece of chocolate. They are baked at the same temperature and for the same amount of time as the straight and crescent-shaped rolls. Croissant dough requires skill to make. It has some of the qualities of puff paste as well as of brioche. It acquires flakiness through the rolling and folding technique of puff paste, but it is also a yeast dough that needs proofing before cooking. We made our croissants with organic all-purpose flour (which is high-gluten, hard-wheat, elastic flour). Small croissants are about 1¼ to 1½ ounces (35 to 42 grams) each; large croissants are about 3 ounces (85 grams) each. See technique for puff paste before starting the croissant dough.
YIELD: 20 small croissants and 8 pain au chocolat
1¼-ounce (7-gram) package active dry yeast or .6-ounce (17-gram) package active fresh yeast
1 tablespoon sugar
1 generous cup (237 milliliters) milk, at approximately 90 to 100 degrees (32 to 38°C)
3 sticks unsalted butter, softened (1½ cups/340 grams)
1 pound (454 grams) organic, all-purpose, unbleached flour (a good 3 cups)
1½ teaspoons salt
2 tablespoons extra flour to mix with the butter
1½ teaspoons salt
1. For croissants: Place the yeast, sugar, and milk in a bowl. Mix well and let it proof for about 5 to 10 minutes at room temperature. Meanwhile, cut 2½ sticks (11/4 cups/283 grams) of the butter into 3 lengthwise slices. Place on a plate and refrigerate. Place the flour with the remaining 1/4 cup (57 grams) of butter, salt, and yeast-milk mixture in the bowl of an electric mixer and mix on low speed using the flat beater for about 10 seconds, until it forms a ball.

2. Place on a floured board and roll the dough into a rectangle approximately 20 inches (51 centimeters) long by 12 inches (30 centimeters) wide. Use the extra flour to help in the rolling. Arrange the slices of butter, one next to another, on top two-thirds of the pastry, covering it to within about 1 inch (2.5 centimeters) from the edge.

3. Lift the unbuttered third and fold on the buttered part.

4. Fold the remaining third over and press all around the edges.

5. On a floured board roll the dough into a 24- by 12-inch (61- by 30-centimeter) rectangle and fold it so that the sides meet in the center.

6. Fold the dough again to create a four-layered piece of dough (this is called a double turn). Let rest refrigerated for at least 30 minutes. Then roll the dough into a 24- by 12-inch (61- by 30-centimeter) rectangle once again and give it another double turn. Refrigerate for another 2 hours, at which point the dough can be rolled into croissants or left refrigerated overnight.

7. After a few hours (or overnight) in the refrigerator, the dough will have risen.

8. Flatten the dough with the palm of your hand. Roll it into a rectangle approximately 12 inches (30 centimeters) wide by 25 inches (63 centimeters) long. Cut the rectangle in half lengthwise to make 2 strips, approximately 6 inches (15 centimeters) wide by 25 inches (63 centimeters) long.

9. Cut into triangles about 5 inches (13 centimeters) at the base. For the small croissants, each triangle will weigh about 2 ounces (57 grams). If the dough gets rubbery at any time, just let it rest again in the refrigerator. Remember that cold temperature and time are allies.

10. Starting at the base of the triangle, use both hands to roll the dough, spreading it out as you roll forward to extend the croissant.

11. Wet the apex of the triangle with water. Keep rolling the dough on itself until you reach the apex where the dough will stick.

12. Line a cookie sheet with parchment paper and arrange the croissants, bent into a crescent shape or straight, on top. Notice that the points of the croissants are tucked under. Brush the croissants with water to eliminate any flour left on top and to prevent them from drying out.

13. Insert the tray of croissants into a proof box (see page 446) and tie the bag closed. Be sure the plastic doesn’t touch the croissants. Let them rise in a warm place at a temperature of 70 to 75 degrees (20-25°C) for about 1½ hours (or less, depending on humidity), until the croissants almost double in size. Preheat the oven to 425 degrees (218°C). Brush with an egg wash. Place in the oven for approximately 15 to 18 minutes. Freeze the remaining unbaked croissants for later use or repeat the rising and cooking procedures.

14. For pain au chocolat: You can use pieces of bittersweet chocolate but, if making a great many, it is easier to melt chocolate and spread it in a strip on a piece of parchment or wax paper approximately 3½ inches (9 cm) wide and 1/8 to ¼ inch (1/3 to 2/3 cm) thick. Refrigerate or cool until it begins to set and then cut into sticks approximately ¾ inch (2 centimeters) wide by running your knife through it. Allow the chocolate to harden further and, when completely cold, lift the strips of chocolate from the paper.

15. To make a few pains au chocolat, cut pieces of chocolate and arrange them on the dough. Cut the remaining strips of croissant dough crosswise into pieces 3 inches wide (7½ centimeters) and 5 inches (12½ centimeters) long. Dampen with water and place a piece of chocolate on top along one edge. Roll tightly and place, seam-side down, on a cookie sheet lined with parchment paper. Let rise in a proof box for approximately 1 to 1½ hours, depending on the humidity and temperature.

16. Preheat the oven to 400 degrees (204°C). Brush with an egg wash and bake in the oven for 15 to 20 minutes.

Brioche Dough
(Pâte á Brioche)
Brioches are the small, moist and buttery cakes eaten for breakfast throughout France. In parts of the country, like Lyon, this yeast-risen dough is used to encase sausage, goose liver, game, and other pâté. The brioche dough is not as difficult to make as puff paste. It is easiest to use a large mixer rather than beating by hand, but both methods give excellent results. The dough should be very satiny and elastic. A brioche mousseline, which is especially good, is a brioche dough loaded with butter.
YIELD: 18 to 20 small brioches or 1 large brioche
½ teaspoon sugar
¼ cup (59 milliliters) lukewarm water
1 (¼ -ounce/7-gram) package active dry yeast, or ½ cake fresh yeast flour
4 large eggs
2 sticks (1 cup/227 grams) unsalted butter, cut into ½ inch (13 millimeter) pieces and at room temperature
½ teaspoon salt
1. In a bowl, mix the sugar, water, and yeast until smooth. Set the mixture aside and let it proof for 5 minutes (the yeast will make it foam or bubble). Place the remaining ingredients in the bowl of an electric mixer. Using the flat beater, start mixing on low, adding the yeast mixture. When all the ingredients hold together, scrape the sides and bottom, picking up any loose pieces. Place on medium speed and beat for 5 minutes. Scrape the sides and bottom twice more during the process so the ingredients are well blended. The dough should be elastic, velvety, and hold in a lump around the beater. It should separate easily from the beater if pulled.

2. If you are making the dough by hand instead of by machine, make a well in the flour, add the yeast mixture, eggs, butter, and salt, and mix until it comes together. Work it for at least 10 minutes. Grab the dough on both sides,

3. lift it from the table and

4. flip it over, slapping it on the table. Repeat for about 8 minutes.

5. The dough should be very satiny. Place the dough in a bowl, cover with a towel, set in a draftless, warm place, and let rise until it has doubled in bulk (about l½ to 2 hours).

6. Break the dough down by pushing and lifting with your fingers. If you are not going to use the dough immediately, wrap it in a towel and plastic wrap and place it in the refrigerator to prevent the dough from developing too much. It can be made a day ahead.

7. To make small brioches, generously butter individual brioche molds. Divide the dough into balls the size of a small golf ball (about 2½ to 3 ounces/71 to 85 grams) and roll on the table in a circular motion to make the ball round and give body to the brioche. With the side of your hand, “saw” a small piece of the brioche in a back and forward motion. This forms a small lump or “head,” which should remain attached to the body of the brioche.

8. Lift the brioche by the “head” and place in the buttered mold.

9. Push the head down into the brioche. Arrange the molds on a cookie sheet and slip into a proofing box (see page 446). Let the brioche rise at room temperature for 2½ hours, until barely doubled in bulk.

10. A large brioche (brioche parisienne) is done similarly, but slits are cut all around to give texture to the finished brioche. Let the brioche rise in a proofing box in a warm place for about 3½ hours or until barely doubled in bulk.

11. Preheat the oven to 350 degrees (177°C). Bake the small brioches in the oven for approximately 25 minutes, and the large one for approximately 45 minutes. They should be golden. Let cool completely. Keep in a plastic bag to avoid drying out.

Brie in Brioche Dough
(Brie en Brioche)
The brie in brioche makes a nice presentation to be served at the end of a dinner. Serve the cheese in slices with its own brioche. In the photographs that follow, the decorations were made with regular pie dough. It stands out because it doesn’t brown as much as the brioche dough during baking. Of course the decorations can be made with strips of brioche dough. You need a not-too-ripe, 2-pound (908-gram) brie, preferably Brie de Meaux, and the brioche dough described in the previous technique. This will serve 12 to 14.
1. Spread out a piece of the brioche dough with your hands or roll it with a rolling pin to about 1 inch (2.5 centimeters) larger than the brie all around and about 1/2 inch (12 millimeters) thick. Place on a cookie sheet lined with parchment paper. Place the brie on top. Fold the edges of the dough back onto the brie.
2. Roll out another piece of dough 1/2 inch (12 millimeters) thick and 1 to 2 inches (2.5 to 5 centimeters) larger than the brie all around. Brush with egg wash (1 egg plus 1 egg yolk, beaten).

3. Cover the brie, egg-washed side down, and press the dough on the sides so it sticks to the bottom layer. Trim it all around.

4. Brush the dough with egg wash and decorate with little strips of pie dough, puff paste, or brioche dough. Decorate to your fancy with strips to imitate flowers, borders, etc. Brush the decorations with the egg wash and let brie proof for about 20 minutes at room temperature.

5. Preheat the oven to 375 degrees (190°C). Bake for about 30 minutes until golden brown. Let the brie rest at room temperature for a couple of hours, otherwise the cheese will be too runny inside. If done several hours ahead, and the brioche is cold, place in a warm oven for 10 minutes, just to warm up the brioche without heating the cheese. Cut into slices and serve.

Making Cream Puff Dough Cases
(Récipient en Pâte á Choux)
These come in handy to fill with a garnish from poached cucumber for fish to peas for poultry or veal.
¼ cup (59 milliliters) water
2 teaspoon (10 grams) unsalted butter
Dash salt
¼ cup (38 grams) all-purpose organic flour
1 large egg
Put the water with the butter and a dash of salt in a saucepan and bring to a boil. When boiling, add the flour all at once and mix well with a wooden spatula for about 10 to 15 seconds, until the mixture is combined well together. Beat 1 egg in a bowl. Transfer the water-flour mixture to a clean bowl and add 1 tablespoon of the egg mixture at a time, mixing to incorporate. Use the whole egg, making sure the mixture is worked until it is smooth after each addition.
1. Preheat the oven to 350 degrees (177ºC). Butter about 9 muffin cups and place the pan in the freezer so the butter gets very hard. Using approximately 2 teaspoons of cream puff mixture in each cup, spread with your finger to coat the bottom and sides of the mold thinly. (Don’t worry if the coating is not spread evenly all over.)

2. Place the muffin pans in the oven for 12 to 14 minutes, until nicely cooked and browned. Let cool a few minutes and remove from the pan. Place on a cookie sheet and keep warm in a low oven. Use as needed.

Ratatouille Ravioli
(Ravioli á la Ratatouille)
YIELD: 6 to 8 servings
3 tablespoons olive oil
1 large, coarsely chopped onion (about 6 ounces/1½ cups/170 grams)
¾ pound (340 grams) unpeeled eggplant (2 small), coarsely chopped
½ pound (227 grams) green peppers, seeded and coarsely chopped (1¼ cups)
¾ pound (340 grams) zucchini (2), coarsely chopped
¾ pounds (340 grams) tomatoes, seeded and coarsely chopped (2 cups)
3 cloves garlic, crushed and chopped (2 teaspoons)
1 teaspoon salt
Dash cayenne pepper
Ravioli Parsley Dough
2 cups (300 grams) all-purpose organic flour
¼ teaspoon salt
½ cup (19 grams) loosely packed Italian parsley
3 large egg yolks
¼ cup (70 milliliters) water
1 tablespoon olive oil
1. To make the ratatouille mixture: Heat the olive oil in a large saucepan. When hot, add the onion and sauté 2 minutes. Add the eggplant and green peppers and cook for 5 minutes over medium heat, stirring occasionally, until browning begins. Then add the zucchini, tomatoes, garlic, and salt. Mix well, cover, and cook over medium heat for about 20 minutes. Remove the cover and cook over medium heat, stirring occasionally, until most of the liquid has evaporated, 12 to 15 minutes. Add a dash of cayenne, remove to a bowl, and cool. When cool, put the ratatouille in a food processor and pulse a few times to chop coarsely. Or, chop it by hand.
To make the ravioli dough: Process the flour, salt, and parsley in a food processor for about 30 seconds. Add the egg yolks, water, and oil, and process again until the mixture begins to pull away from the sides of the bowl and form into a ball. Press together, wrap in plastic wrap, and refrigerate for at least 1 hour. When ready to roll, divide the dough into 4 segments. Run each segment through the pasta machine on the large setting.

2. Push the dough back through the machine several times, changing the setting, until you reach the level (usually #7) where the dough becomes extremely thin (less than 1/16 inch/1.6 millimeters thick). Each quarter of the dough will give you a rectangle about 24 inches (61 centimeters) long by 5 inches (12.7 centimeters) wide. Cut each rectangle in half crosswise, giving you 2 rectangles, each 12 inches (30.5 centimeters) long by 5 inches (12.7 centimeters) wide. Place one of these rectangles on a piece of waxed paper and brush it with water.

3. Fill a pastry bag fitted with a 1/2-inch (1.3-centimeter) plain tube with the cold ratatouille mixture. Pipe neat mounds (about 1 tablespoon each) of the ratatouille mixture approximately 1 inch (2.5 centimeters) apart in 2 rows the length of the dough.

4. Place the other rectangular piece of dough on top, pressing with your fingers in between the stuffing so the top layer of dough sticks to the wet surface of the bottom layer.

5. Using an inverted shot glass or the dull side of a cookie cutter about the size of the mounds, press around each mound to compact the stuffing into uniform rounds.

6. Using a larger cutter, cut the ravioli into neat rounds. Repeat with the remaining dough and filling until they are used up. The trimmings can be rerolled for immediate use or cut into pieces and used as a garnish in soup.

7. Lift up and remove the trimmings of the dough from the waxed paper. Since the ravioli are all arranged on the waxed paper, it is easier to place them with the paper on a tray in the freezer or refrigerator if you are not going to use them right away, or if you are, cook them immediately by sliding them into boiling water to cook gently for 4 to 5 minutes.

8. To make square ravioli, use the same technique as in steps 3 and 4, pressing with your fingers in between the dough-covered mounds. Then cut between the mounds, making square ravioli.

9. To improve the appearance of square ravioli, press around the mounds with a cookie cutter or inverted shot glass so the stuffing is marked and defined neatly inside the squares. When ready to serve, slide into boiling water and cook gently for 4 to 5 minutes. The green ravioli dough will get paler during the cooking. Lift from the water and serve immediately with melted or brown butter.

Fettuccine
(Fettuccine)
YIELD: About 6 servings
2⅓ cups (350 grams) all-purpose organic flour
2 large egg yolks
2 tablespoons oil
⅓ cup (79 milliliters) water
1. Combine all of the ingredients in the bowl of the food processor and process until the mixture forms into a ball (about 15 to 30 seconds). If too dry, add another tablespoon of water. Place the dough on a floured board and roll very thin—mine came out to about a 16-inch (41-centimeter) rough disk. Place directly on the rolling pin to dry for at least 15 to 30 minutes.

2. Return the dough to the board, fold it in half or fourths, and cut it into strips approximately ⅜-inch (1 centimeter) wide to make fettuccine or tagliatelle. The less it is dried, the faster the fettuccine will cook. Bring 3 to 4 quarts (2.8 to 3.8 liters) of water to a strong boil with ½ teaspoon salt. Add the fettuccine, return to the boil, stir with a fork to separate the strands, and cook for approximately 2 to 3 minutes, depending on the dryness of the pasta, until the fettuccine is cooked al dente (still firm to the bite) or to your taste. Top with butter, Parmesan cheese, salt, and pepper and serve.

Potato-Dill Gnocchi
(Gnocchi aux Pommes de Terre)
There are three types of gnocchi—gnocchi Parisenne, gnocchi Romaine, and potato gnocchi. The Parisian gnocchi is made from cream puff dough seasoned with Parmesan cheese, formed into small dumplings, poached in water, then usually baked in a white sauce and served au gratin all puffed up like little quenelles. The Roman gnocchi is made into a polenta from semolina and milk, cooled, cut into shapes and either fried or baked with butter, cream and cheese. The potato gnocchi is made with cooked potato, flour, and eggs and is poached and served with a sauce.
YIELD: About 6 servings
1 pound (454 grams) potatoes, unpeeled
Dash plus ½ teaspoon salt
1 cup (150 grams) or more organic all-purpose flour
½ cup (135 grams) cottage cheese
¾ cup (75 grams) grated Gouda or cheddar cheese
½ cup (30 grams) finely chopped dill or basil leaves
2 large eggs
To finish
2 tablespoons (28 grams) butter
1. Place the unpeeled potatoes in a saucepan, cover with water, and add a dash of salt. Bring to a boil and cook about 30 minutes, until just tender. Peel the potatoes while still warm and push through a food mill directly onto a wooden board.

2. Add the salt, flour, cottage cheese, grated cheese, and dill or basil, tossing gently to mix. Break in the eggs and mix to make a dough, using a bit more flour if the dough is too sticky, which will depend on the moisture in the potatoes. Mix lightly, wrap the dough in plastic wrap, and refrigerate until cold and firm, at least 1 hour.

3. Flour the board and roll one-third of the dough into a cylinder about 1 inch (2.5 centimeters) thick. Cut into ½-inch (1.25 centimeters) slices. Repeat with the remainder of the dough.

4. Using the tines of a fork dipped in flour, flatten the gnocchi rounds, making a design at the same time.

5. Place half the gnocchi rounds in boiling water. Bring to a boil and simmer for about 5 to 6 minutes, shaking the pan occasionally to prevent them from sticking to the bottom. Remove the gnocchi to ice water and, when cold, drain and set aside until serving time. At serving time, reheat the gnocchi in hot water for 4 to 5 minutes, then drain into a bowl. Add 2 tablespoons butter, a dash of salt and pepper, and toss to coat the gnocchi with butter. Serve immediately.
