

Serves 6
1 kg (2 lb 4 oz) waxy potatoes, such as pink-eye or kipfler
2–3 tablespoons Ross’s wholegrain mustard
150 g (5½ oz) crème fraîche
2 teaspoons lemon juice
50 g (1¾ oz) dill pickles, roughly chopped
2–3 tablespoons fresh dill, chopped
Scrub the potatoes well and cut into evenly sized chunks if they are large. Place in a large saucepan with enough cold salted water to cover. Bring to the boil, then reduce the heat to low and simmer until tender — you should be able to easily pierce through to the centre with a knife.
While the spuds cook, mix together the mustard, crème fraîche and lemon juice in a bowl until combined.
When the potatoes are cooked, drain them and immediately toss with the crème fraîche mixture, the dill pickles and the dill. Serve with pastrami, some smoked trout or as part of a barbecue meal. The salad would nearly become an entire meal in itself if you added chunks of grilled frankfurter to it.

Makes a 2 litre (70 fl oz) jar or 4 x 500 ml (17 fl oz) jars
These are a must-have in any pantry — once you have made up a batch they will keep for months. They are great to crack open when the boys come around to watch the cricket with a few beers.
1.5 kg (3 lb 5 oz) pickling onions, peeled
100 g (3½ oz) pure sea salt
PICKLING JUICE
1.25 litres (44 fl oz/5 cups) cider vinegar
1 teaspoon juniper berries
3 purple garlic cloves
1 teaspoon whole black peppercorns
3 bay leaves
1 tablespoon soft brown sugar
Put the whole peeled onions into a clean plastic bucket or similar-sized container and add the salt and 1 litre (35 fl oz/4 cups) water, stirring to combine. Place a plate directly over the top to keep the onions submerged and leave overnight.
Remove the onions from the salted water and rinse them in fresh water, then place them into sterilised glass jars.
Put the vinegar, juniper berries, garlic, peppercorns, bay leaves and sugar in a large saucepan and bring to the boil. As soon as it boils, remove from the heat and pour over the onions, being careful not to burn yourself, then seal each jar with a tight-fitting lid and set aside to cool.
The pickled onions need to sit for 1 month before consuming. Store for up to 6 months in the cupboard and keep them in the refrigerator after opening.

Yields about 3 kg (6 lb 12 oz)
At their Rare Food market stall in Hobart, Matthew and Ross occasionally sell a dry-cured nitrate-free bacon. It’s done with a salt and sugar cure and avoids the nasties that so many find affect their health – added sodium nitrate and sodium nitrite. At its best, this bacon is sweet, rich, smoky and glorious. At its worst it is very hard to cut, extremely salty and best used in small amounts in soups, pasta sauces or casseroles.
600 g (1 lb 5 oz) pure coarse sea salt
400 g (14 oz) soft brown sugar
4 kg (9 lb) piece of boned-out pork middle, including loin
In a large bowl, combine the salt and sugar. Sprinkle liberally in the base of a large non reactive tub that is big enough to fit the pork middle, cutting the pork if that makes more sense to cover the base.
Rub some more of the salt mixture over the pork and rub in well on all sides and edges. Lay the pork, skin side down, in the tub. Use the rest of the salt mixture to spread over the meat, then cover it well to keep out insects. Allow this meat to cure for 3–4 days in a cool place, ideally the refrigerator, making sure to rub the salt and sugar ‘slurry’ over the meat and turn over each day.
After the meat has cured, rinse off the sugar and hot or cold smoke.

STERILISING BOTTLES
For all preserving you need to have your bottles, jars and other equipment free of bacteria or moulds or anything that could prove harmful if allowed to stay in the jar and affect the food. All jars and lids should be spanking clean AND sterile.
A dishwasher will not only clean the jars and lids, but the heat of the water will sterilise them. If you’re hand washing jars, or using jars that have been stored for a while, you’ll need to sterilise them using boiling water or a hot oven. Many people take the clean jars and place in cold water then bring to the boil. (The risk of jars shattering comes when there is a great change in temperature; hence the cool jars in cool water to start.) The difficult thing is removing the hot jars from the water and keeping them sterile without dropping them, though you can buy special tongs for this purpose.
Clean jars can also be put into a cool oven and heated to 100°C (200°F). You need to be careful when you heat the lids because if you heat them much past 100°C the rubber seals can melt or harden. The simplest sterilising method is the microwave; you can kill bacteria and spores by placing empty, clean and dry jars in the microwave for about 30 seconds per jar. However, this won’t work for metal lids.
There are commercially available chemical sterilisers, often called sanitisers, which kill bugs too, and these are useful for sterilising lids, as well as the tools used for making salami or cheese. They’re often found in the baby section of supermarkets. We try to avoid chemicals, so tend to use a big pot of boiling water to sterilise most utensils, and a mix of dishwasher and boiling water for sterilising jars and their lids. Remember, when you go to fill the jars, the heat of the jar should be about the same as the heat of the ingredient; so hot liquids should go into hot jars, cold liquids into cold (again, to avoid the risk of the glass shattering).


Serves 4
There is probably nothing the world needs less than another interpretation of the classic niçoise salad … except if it’s one where you have smoked your own tuna, pickled your own olives and made the dressing from scratch. Keep it simple and let the quality of your homemade ingredients speak for themselves.
500 g (1 lb 2 oz) waxy potatoes, such as kipfler or pink fir apple, washed with skin on
1 teaspoon pure sea salt
200 g (7 oz) green beans
400 g (14 oz) smoked tuna, sliced
200 g (7 oz) ripe tomatoes, sliced
100 g (3½ oz) pickled olives
1 handful fresh basil leaves
100 ml (3½ fl oz) Matthew’s vinaigrette dressing
Put the potatoes into a large saucepan, cover with cold water and add the salt. Bring to the boil over medium–high heat, then reduce the heat to medium and cook for 15–17 minutes, or until tender. Add the beans for the last 3 minutes at the end of cooking. Drain the vegetables and rinse immediately in cold water. When cool enough to handle, cut the potatoes into thick slices.
Put the potato and beans in a large bowl. Add the smoked tuna, tomato, olives and basil leaves. Just before serving, pour over the vinaigrette, season with salt and freshly ground black pepper and toss to combine.


Makes about 1.25 litres (44 fl oz/5 cups)
Making vinegar is relatively simple in theory — we’ve all made it accidentally by leaving an open bottle of wine on the bench for a couple of weeks. To do it in a controlled way, you need to get a live mother, the cloudy, thick liquid that forms in the bottom of opened vinegar, to break down wine (or other alcohol) into vinegar. This takes time and not much else. We tend to use bits of leftover high-alcohol wines to start the vinegar and add to it over a couple of weeks as we have more. Good wine makes good vinegar, but is less likely to be kicking around as dregs in the bottom of the bottle. Hiccup.
1.5 litres (52 fl oz/6 cups) wine, red or white, or perhaps a mix of both
100 ml (3½ fl oz) mother from another wine vinegar, if you can get one (use a vinegar that hasn’t been pasteurised, the sort you need to keep in the fridge)
muslin (cheesecloth) or similar, for covering
Fill a 2 litre (70 fl oz) capacity wide-mouthed non-reactive container with the wine and the mother. Slosh it around and leave it somewhere that’s about 20°C (68°F) and stable in temperature. Cooler is fine, but it will just take longer to react. At some point the famed vinegar fly will start to hang around, probably within hours, so cover the container with the muslin.
Take the muslin off for a half hour or so every day, if you think of it, to let the wine really breathe. Don’t worry if you forget. The alcohol in the wine will gradually change to acetic acid, the flavour and sharpness we associate with vinegar. This will take roughly 2 weeks, but it does depend on the mother, the temperature and the amount of air that the wine is exposed to. Taste every day after the first week, and when it seems to be appropriately sharp, transfer to smaller, sterilised glass bottles — avoiding the mother if it’s large and snotty — and keep in the refrigerator. If the bottles are airtight, the vinegar could be stored in the pantry until opened. Once opened, store in the refrigerator as the vinegar keeps breaking down and will eventually lose its acidity otherwise.


Makes about 400 g (14 oz) cultured butter
Yields about 400 ml (14 fl oz) buttermilk
Chances are you have already made butter accidentally by over-whipping cream and splitting it. Making butter really is that easy. Making cultured butter is not much harder but will give a great flavoured butter that makes the commercial stuff look like a block of insipid grease by comparison.
1 litre (35 fl oz/4 cups)
pouring (whipping)
cream (35%)
2 tablespoons natural ‘live’
yoghurt or
cultured buttermilk (see
method)
1 tablespoon pure fine sea salt
or ½ teaspoon flaked sea salt
(optional)
Pour the cream into a large sterilised glass jar and stir in the yoghurt. Seal with a tight-fitting lid and stand at room temperature, about 20°C (68°F), for 12–24 hours — the longer the time, the stronger the flavour will be.
Transfer the cream to the refrigerator and cool for a few hours.
Put the cream into the bowl of an electric mixer with a paddle attachment or use a butter churn if you have one. Process or churn on low speed — as the cream turns to butter it will first become whipped cream, then small granules of butter will appear. This is closely followed by buttermilk, which separates out while the butter granules become larger. When the butter and the buttermilk are separated, drain off and reserve the buttermilk (this should be retained for cooking or for use as a culturing agent to make more butter).
Place 1 litre (35 fl oz/4 cups) chilled water into a sterilised glass jar and add the butter grains. Seal with a tight-fitting lid, then shake the jar for a few minutes — this helps to wash out the remaining buttermilk. If you want to make salted butter, you can add 1 tablespoon pure fine sea salt to the chilled water before shaking. (Alternatively, for salted butter with a nice crystalline crunch another option is to sprinkle in ½ teaspoon flaked sea salt when shaping the butter — see below). Drain and discard the liquid.
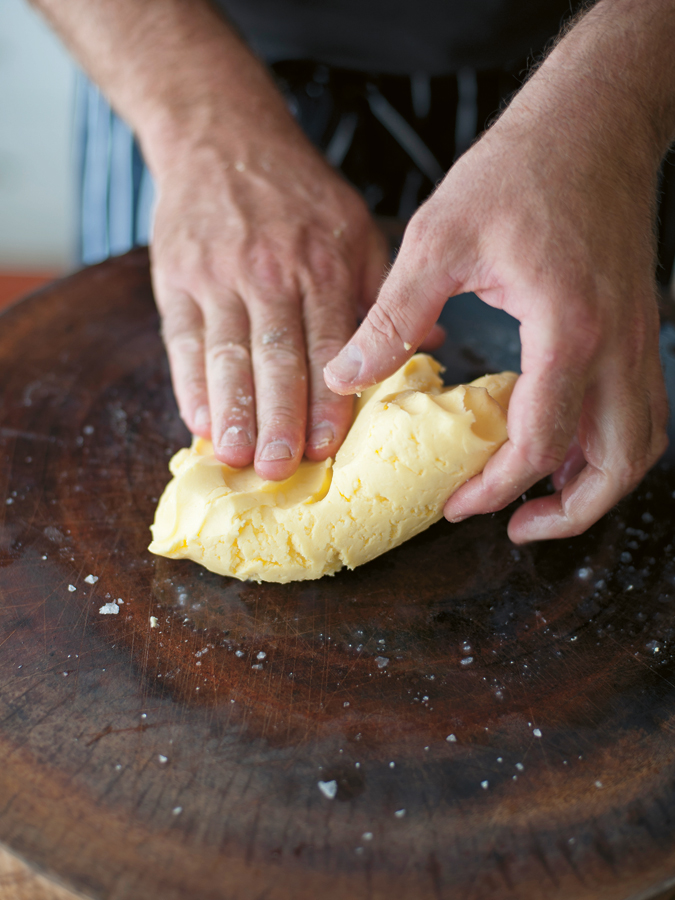
Transfer the washed butter to a clean chopping board. Use clean wet hands (or wooden butter pats if you have them) to gently work the butter grains together, kneading and squeezing out as much moisture as possible. You can divide it in half at this stage if it makes it easier to handle. Do this for about 5 minutes, then shape the butter and place in an airtight container. Store in the refrigerator for up to 2 weeks.
NOTE: It is simple to clarify butter. Place 200 g (7 oz) butter in a small saucepan over low heat. Gently melt the butter and continue to heat until it begins to boil gently (the slower the better, otherwise you may burn the milk proteins). A layer of foam will appear on top and the milk solids will drop to the bottom — in between is the liquid clarified butter. Continue to boil gently until most of the foam disappears and the liquid on top becomes clear and golden. Carefully pour off the liquid into a bowl or jar — try not to let any of the solids in (these you can throw out). Place the clarified butter in the fridge and when it is solidified you can use it.


Makes a 1 litre (35 fl oz) jar or 4 x 250 ml (9 fl oz) jars
The hardest thing about making dill pickles is finding the cucumbers. So the best way around that is to grow your own. Most garden centres will have at least one variety of pickling cucumber, although you can pickle any variety if you can’t find the smaller ones.
30 pickling cucumbers
1 bunch fresh dill
5 purple garlic cloves, peeled
1 tablespoon black mustard seeds
BRINE
450 ml (16 fl oz) white wine vinegar
75 g (2½ oz) pure sea salt
Place the brine ingredients in a saucepan with 1.5 litres (52 fl oz/6 cups) water and bring to the boil. Once the salt has dissolved, remove from the heat and allow to cool. Set aside.
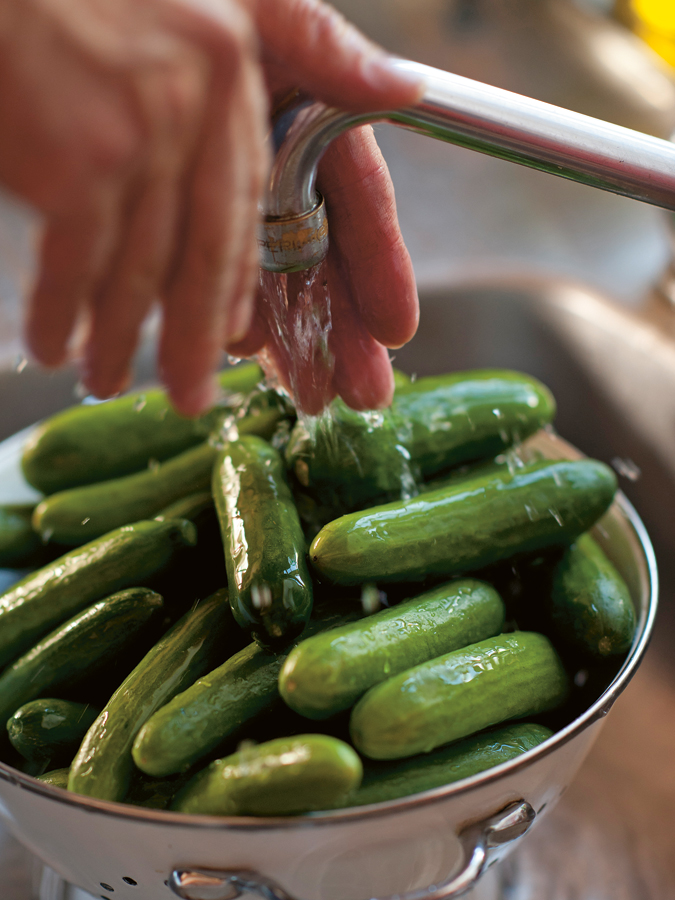
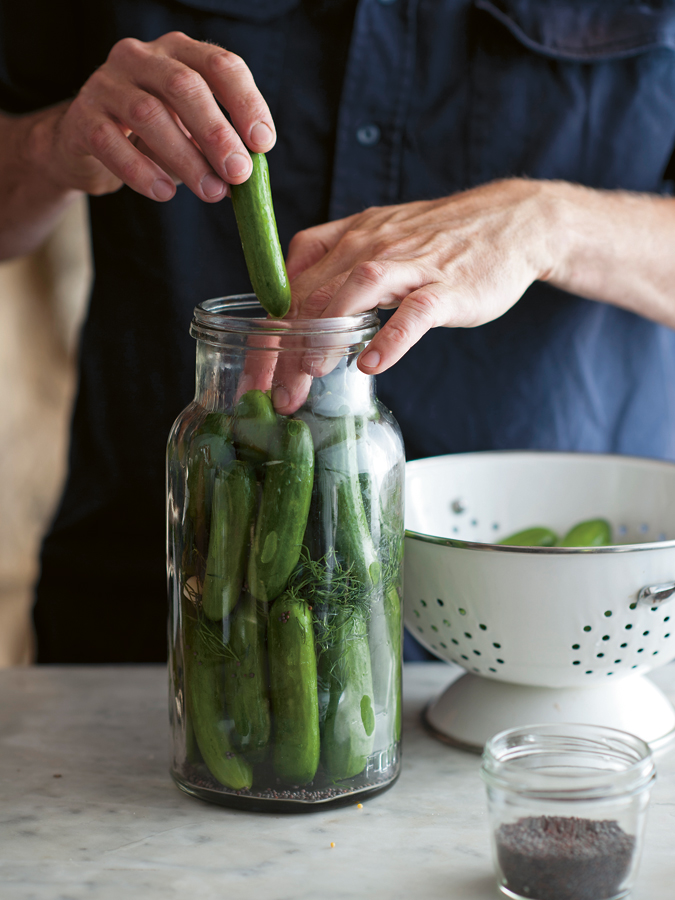
Wash the cucumbers in fresh cold water and drain well. Divide a few sprigs of dill in the bottom of sterilised glass jars. Pack the cucumbers into the jars, standing them upright lengthways as tightly as possible. Divide the garlic, mustard seeds and remaining dill between the jars and add another layer of cucumbers over the top if needed. Pour enough brine into each jar to fill it and seal with tight-fitting lids.
Lay a tea towel (dish towel) in the base of a stockpot or large saucepan — this will stop the jars from rattling in the pot. Place the jars in a single layer on the tea towel, then fill the pot with enough fresh water to cover the jars by at least 2 cm (¾ inch). Bring to the boil, then reduce the heat and simmer steadily for 20 minutes. Remove the pot from the heat, and when the jars are cool enough to handle, remove them from the pot and set aside to cool.
Store the dill pickles in a dark cupboard for at least 1 month before opening, then in the refrigerator once opened.

This method first appeared in Matthew’s book The Real Food Companion, but this volume wouldn’t be the same without including it.
Every Greek and Italian immigrant has their own way of pickling olives, but there are a couple of ways to get olives brined without using caustic soda. First, pick consistently coloured olives, and avoid any that are bruised or have marks. A good greengrocer will be able to get the right types for pickling for you. If you are using green olives, which are an unripe version of the black olive, hit them with a hammer to crack them or slit them with a knife (being crisper than black olives, the salt can penetrate more easily when the flesh is broken a little).
Place the whole black or slit green olives in a clean bucket of fresh water (or use a similar non-reactive container) and allow to soak. (Don’t mix up the colours — each needs to cure in its own time.) Change the water every day until they start to lose their really horrid, metallic character. Some people like to use boiling water to speed up the process. As the olives soak they are fermenting (you may start to see some bubbles form in the water) and will leach out some chemicals, which makes them good to eat.
When ready to brine (your taste buds will tell you — it usually takes 1–2 weeks for them to lose most of their bitterness, though they still won’t be delicious until brine-cured); drain the olives.
Take a separate clean bucket or similar non-reactive container and pour in enough water to completely cover the olives. Stir in enough salt so that a whole fresh egg floats readily on the surface — it’s about 1 cup of salt for each 2.5 litres (87 fl oz/10 cups) water. Submerge the olives in this brine by placing a plate over the top and weighing it down (tins of food or a water bottle are good) and then cover the bucket (to keep out any greeblies or dirt).
Leave the olives to cure for about 2 months. A cool dark place is best, to avoid mould that could grow on the surface. This white scum that forms, if you see it, should be scooped off the top to avoid it tainting the brine. Taste the olives before using.
Olives can then be stored under oil, in a marinade or left in the brine until ready to use. Drain off the brine, rinse them, and then transfer to sterilised glass jars. Top them up with oil (adding herbs if you like) or a brine solution made up of ½ cup salt to 10 cups water.
Always rinse the olives before eating, particularly if they’re bought. If they’re too salty, they can be soaked in water to reduce their intensity, though this may take a couple of days and as many changes of water.

Makes 1.5 litres (52 fl oz/6 cups) natural ‘live’ yoghurt
or 900 g (2 lb) Greek-style yoghurt (after draining)
Homemade muesli topped with thick ‘live’ yoghurt and fresh fruit may not be the breakfast of champions, but on Bruny Island it is certainly the breakfast of cheesemakers. This is a strained Greek-style yoghurt — straining increases the thickness of the yoghurt and also the protein content. Halsey is an American cheesemaker who works at the Bruny Island Cheese Co. This recipe, named after him, is one of the best we’ve tasted. We make it using full-cream (whole) milk (this can be raw milk from a farmer or unhomogenised milk from the shop) but it can also be made with skim milk. To start the fermentation, use a few spoons of commercial ‘live’ yoghurt as the starter.
1.5 litres (52 fl oz/6 cups) full-cream (whole) milk
60 g (2½ oz/¼ cup) natural ‘live’ yoghurt (see note)
muslin (cheesecloth) (optional)
Put the milk into a large saucepan over medium heat, stirring regularly to prevent it from catching on the base of the pan, until it reaches 80°C (176°F) — check using a kitchen thermometer.
Half-fill the sink with cold water and sit the pan in it, like a bain marie. Stir the milk until the temperature of the milk lowers to about 35°C (95°F).
Pour the warm milk into sterilised glass jars and evenly divide the yoghurt between the jars. Stir the contents of each jar for a couple of minutes to make sure the ingredients are well combined, then seal with tight-fitting lids.
Now you have to find something that will act as an incubator. Essentially you need to hold the temperature of the yoghurt at around 45°C (113°F) for 8–12 hours. This can be in the oven with just the pilot light left on, or on a very low setting with the door left slightly ajar. Alternatively you might try sitting the jars in a small esky with warm water or place in a large saucepan with warm water, then cover with a lid and wrap the pan in blankets (or take it to bed with you …whatever works!) — you may need to be a little bit creative and try a few different options before you get it right. Place the jars in your ‘incubator’ and leave undisturbed for a minimum of 8 hours, after which time the yoghurt should be completely set. If it is still runny, return it to the incubator for a further 4 hours.
At this point the yoghurt is ready to eat but if you prefer it a bit thicker (Greek-style), transfer it into a colander or sieve lined with a few layers of muslin, place over a bowl and let it drain for 1 hour. (If you want to make labne you need to hang it for longer — see the variation at the end of this recipe.) Return to sterilised jars, seal and refrigerate for up to 10 days.
NOTE: For your first batch, look for any yoghurt that has 'live cultures' on the label. Make sure to keep a few spoonfuls of your own yoghurt if it has turned out well, to use as your next starter culture. As long as you are making yoghurt every week, or more often, your culture will stay alive — this means that every subsequent batch becomes more of your own unique yoghurt.
VARIATION: To make labne, hang the yoghurt in the muslin-lined sieve set over a bowl for 24 hours, then drain the whey from the bowl and turn the yoghurt onto a fresh piece of muslin. Place back into the sieve over the bowl and drain for a further 24–48 hours, or until it weighs about 400 g (14 oz) — at this point it is still soft but rollable.