9-2 Linux File Structure and File Commands
9-3 Linux Administration Commands
9-4 Adding Applications to Linux
9-6 Troubleshooting System and Network Problems with Linux
• Demonstrate the logon/logoff process for Linux
• Examine how to add user accounts
• Develop an understanding of the Linux file structure and related file commands
• Understand how to use key Linux administration commands
• Explore the procedures for adding applications to the Linux system
• Demonstrate the use of Linux networking commands
• Investigate how to use Linux tools to troubleshoot Linux systems and networks
PID
This section demonstrates how to log on to Linux, add a new user account, and log out. This section assumes that Linux has already been installed on the user’s computer, and the user has root privileges. (Note: Many of the examples presented in this chapter require root access. Root access is the administrator mode for Linux—the root user has the rights to make changes to operating and user parameters.)
Root Access
The user has the rights to make changes to operating and user parameters.
The first example demonstrates how to log in to the system. The Linux computer is first powered up, the system initializes, and the system logon screen is displayed. This screen prompts for the username and password. If this is a new installation of Linux, log on as root and complete the following steps to create a user account.
A window will open for user login when Linux is running in a GUI (the default installation). This screen is where you enter the user account name and password. (If a user account has not been established, the administrator would log in as root to establish the user account name.) Linux will prompt for the password or the default password if the system is just being set up:
user account: root password: *******
Once logged into Linux (using the GUI interface), you will get a window similar to that shown in Figure 9-1. This is just one of the many possible Linux screens that can be displayed. The screens vary for each distribution for Linux. (Note: The root account should only be used for administration duties, such as installing software, establishing user accounts, installing drivers, and so on. Major changes to the Linux machine system are possible with the root account access.)
Figure 9-1. The main Linux GUI window
The easiest way to add a user to the Linux operating system is from the Linux main GUI. This is accomplished by clicking Applications > Other and then selecting the Users and Groups, as shown in Figure 9-2. This opens the Fedora User Manager window shown in Figure 9-3. This window is used to add and delete users as well as modify user properties. The window shows there are no current users on the system. Click the Add User icon, which opens the Create New User window, as shown in Figure 9-4.
Figure 9-2. Selecting the Fedora User Manager
Figure 9-3. The Fedora User Manager window
Figure 9-4. The Create New User window
A new user called usera will be created in this step, with the username being entered on the first line (refer to Figure 9-4). The username must be one continuous text entry containing no spaces. The full name is next entered followed by the password. The full name is used to map the username to a person. For example, usera doesn’t identify the name of the user on the account. The full name provides this information. The password entered is displayed with asterisks (*). This protects the privacy of the password. The next field requires that the password be reentered, to confirm that the password was correctly entered. The fifth line is for the login shell. The entry /bin/bash is pointing to the default Linux login shell. The login shell is used to set up the user’s initial operating environment.
The check on Create home directory means that a home directory called /home/usera is being established, and this is where usera will be placed after logging in. The line Create a private group for the user is also checked. Any user being added to the Linux system can belong to an existing group, or a new group can be created. In this case, a new group (usera) is being created. The next line is used to Specify user ID manually. If this option is not checked, the system will select the next available user ID number. The concept of a user ID is explained in Section 9-2. Click OK to complete this step and close the Create New User menu.
The user account for usera has now been established, as shown in the Fedora User Manager window (see Figure 9-5). Notice the entries for the User ID (1002), the Primary Group (User A), the Login Shell (/bin/bash), and the Home Directory (/home/usera). The next step is to log out as root and log in as usera. You can log out by clicking Desktop > Log Out in the Linux GUI screen, as shown in Figure 9-6. Once logged out, the login screen for Linux is displayed, except this time, the user can log on as usera. The user can also log out by entering the exit command from the command line.
Figure 9-5. The addition of the usera account displayed by the Fedora User Manager
Figure 9-6. Selecting the Log Out option for Linux
Network and system administrators typically use the command line for entering most Linux commands. The command line is a text-entry level for commands and is accessed from the main GUI window by clicking the Terminal emulation program icon shown in Figure 9-7. This places you in the Linux command line, as shown in Figure 9-8. The hostname of the Linux machine is usera@bookfedora.
Figure 9-7. Selecting the Terminal emulation program from the Linux GUI
Figure 9-8. The Linux command line showing the hostname of usera@bookfedora
Command Line
A text entry level for commands.
The objective of this section is for you to learn both the Linux file structure and how to use Linux commands to view files, file contents, and directory contents. The following Linux commands are presented in this section:
Listing Files: ls, ls -l, ls -la
Displaying File Contents: more, cat
Directory Operations: cd, pwd, mkdir, rmdir
File Operations: rm, mv, cp
Permissions and Ownership: chmod, chown, chgrp
The file structure in Linux is fairly complex, especially for users who are used to a Windows GUI. You should avoid doing this, because not all Linux GUIs are the same, and the command-line operations are much faster and more flexible. This section demonstrates how to successfully navigate the Linux file structure and to use the commands listed.
The\ first command examined is ls. This command is used to display the basic files in the directory and is executed from the command line, as shown in Figure 9-9. In this example, the user is root, and the files examined are located in root’s home directory.
Figure 9-9. The results of inputting the ls command from the command line
ls
Linux command that lists the basic files in the directory.
The next file command examined is ls -l. This command is called a long listing and lists file attributes, as shown in Figure 9-10. The second file listed in Figure 9-10 is install.log. On the far left of the install.log line are the permissions for the file listed in 10 character spaces. The first space is reserved for indicating if this is a directory (d), character (c), or block (b), or no entry specified ( ). In this case, no entry is specified for the install.log file ( ).
Figure 9-10. The results of inputting the ls -l command
ls -l
Linux command that lists file attributes.
The remaining nine character positions define three groups: the owner, the group, and everybody. Each group has three attribute settings: read, write, and executable. The attributes are turned on by setting the place value to 1. The concept of file attributes is further explained under the chmod command later in this section. Table 9-1 lists the attributes for the install.log file shown in Figure 9-10, and Table 9-2 provides a summary of the file attributes.
Table 9-1. File Attributes for the install.log File (Starting From the Left)
First character |
(-) |
Means no attribute specified |
Characters 2–4 |
Owner (rw-) |
The owner has read/write privileges |
Characters 5–7 |
Group (r--) |
The group has read privileges only |
Characters 8–10 |
Everyone else (r--) |
Everyone has read privileges only |
Owner of the file is root |
|
|
The group is root |
|
|
File size = 15,200 bytes |
|
|
File created July 10, 2012 |
|
|
Table 9-2. Summary of the Attribute Abbreviations Used in the File Permissions Block
d |
Directory |
c |
Character |
b |
Block |
r |
Read |
w |
Write |
x |
Executable |
- |
Not defined |
|
|
The long listing command ls -l can be modified to allow hidden files to be viewed by entering ls -la. The a extension instructs Linux to display all hidden files. Hidden files start with a period, such as . (home directory) and . (parent directory) and .bash_history and .bash_logout. Figure 9-11 shows the result of entering the ls -la command. The ls -la command can also be entered as ls -al. The ordering of the extension doesn’t matter. (Note: The bash files are applied to the shell that defines the environment the user works under. Bash stands for Bourne again shell.)
Figure 9-11. The results of entering the ls -la command
Hidden Files
Files that start with a period and that can only be viewed with the ls -la or ls -al command.
ls -la
Linux command that allows you to see hidden files in addition to the file attributes.
Bash
Bourne again shell.
The next file command demonstrated is more. This command is used in Linux to display the contents of a text file at a pace the user controls using the spacebar. Figure 9-12 provides an example of using the more command. This example uses the command to display the contents of the install.log file. If the information in the file exceeds one screen, a prompt is displayed indicating how much of the file contents has been displayed. In this example (see Figure 9-12), 5 percent of the file contents has been displayed. Pressing the spacebar will display the next page of contents of the install.log file contents, and the prompt at the bottom of the screen will display the new percentage that has been viewed. Press the spacebar to keep displaying the file contents until they have all been displayed or press Ctrl + C to exit the more command.
Figure 9-12. An example of using the more command
more
Linux command used to display the contents of a text file.
The next file command used to display file contents is cat, which stands for concatenate. This command is used to print the file text to the screen and works fine, as long as the contents of the file will fit on one screen. If the file is larger than one screen, the text will quickly scroll by. In the case of a large file, it is probably best to use the more command so that the contents of each page can be viewed. The advantage of cat is that it can be tied to other programs. This will be demonstrated later in the chapter.
cat
Linux command used to print the file text to the screen.
Figure 9-13 provides an example of using the cat command. In this example, cat is being used to view the contents of the password file in the /etc directory.
Figure 9-13. An example of using the cat command
The command cat /etc/passwd is being used, as shown in Figure 9-13. Notice that the command prompt is displayed at both the top and the bottom of the screen, indicating that the entire contents of the password file are displayed.
The password file contains the accounts of users and processes that can log on to the Linux operating system. The contents of each entry in the password file are divided into seven fields, and each file is divided by a colon (:). For example, the first line displayed is root:x:0:0:root:/root:/bin/bash. The first field specifies that the account is root. The root user can delete, modify, or do anything with the file. This entry is followed by an x. The encrypted passwords have been moved for security purposes to a file called shadow. During installation, the option to shadow passwords is normally presented. After x comes a colon followed by a zero. The zero is the user ID. This is a unique ID assigned to each account. This identifier is used throughout the Linux operating system to identify users and their files. Another zero follows the user ID. This is the group ID. Notice at the bottom of Figure 9-13 that the entry in the field for the usera user ID is 1001. Refer to Figure 9-5 to see where this ID was assigned. The root account belongs to the zero ID. Any user that belongs to the zero group belongs to the same group as root. After the second zero is :root. This root is the account description for the account. After this field is :/root, which is the home directory for the account. The user is placed into this account when logged on to the system. The last field is :/bin/bash. This defines the executable program that is used during user logon. In this case, bash is the command shell that will run.
The command to change directories in Linux is cd. The structure for the cd command is cd [destination-directory]. The command cd was used to change to the root directory /, as shown in Figure 9-14. At that point, the command ls -l was entered. This produces the results shown in Figure 9-14. This provides a long listing of the components of the root directory. The following are the directories normally encountered in the Linux file system that will always be there:
Figure 9-14. The long listing of the components in the root directory
cd
Linux command for changing directories.
• /bin: Contains all the binary programs and executables.
• /boot: Where the Linux kernel resides. A kernel is the actual operating system image that boots up when the computer is turned on. If the kernel is not there, Linux does not boot.
• /dev: Where the device files reside. Examples of device files are drivers for the monitor, keyboard, modem, and hard drive.
• /etc: Where Linux holds the majority of its configuration files. For example, a program running under Linux will have its configuration files located in /etc.
• /home: The directory where all user directories are located. Home directories for new user accounts are placed in this directory.
• /lib: The location for libraries that Linux uses, such as static and shared libraries.
• /lost+found: This directory is used to place files that have lost their identity, possibly due to hard drive errors.
• /mnt: The location where mounted directories are located. For example, an external drive will be mounted through this directory. Mount means that a file system has been made available to the user.
• /opt: This is where ‘optional’ software is typically installed.
• /proc: The status of the operating system is kept in this directory—for memory, hard drive, device drivers, memory usage, uptime (how long the computer has been running), and user IDs.
• /root: This is the root user ID home directory and is where the root user is placed at login.
• /run: The new directory is designed to allow applications to store the data they require in order to operate.
• /sbin: The system binary directory, the location where Linux keeps its system and executable program files.
• /srv: The directory where server working directories reside.
• /tmp: This directory is used as a temporary holding area for applications. This directory is available to all users logged onto the machine. The /tmp directory gets cleared out when the machine boots up.
• /usr: This is the location for the user files that are related to the user programs.
• /var: The files in this directory change over time. For example, system log files and mail folders appear here. From time to time, the system administrator will delete files in /var to clean up the drive.
The next command examined is pwd (print working directory). The Linux directory path is complicated, and this command is available for the user to find where he or she is currently located. This is useful when files are being moved or deleted. The user uses the pwd command to verify the current working directory, as demonstrated in Figure 9-15.
Figure 9-15. An example of the text displayed when entering the pwd command
pwd
Linux command to print the working (current) directory.
In this example, pwd returns /home/usera/, indicating we are in usera’s directory. The following information is returned by the pwd command:
usera: Account name
@localhost: Name of the Linux machine
usera: Name of the current directory
The second part of Figure 9-15 demonstrates that the name of the current directory changes if the directory changes. The third line shows that the command cd tmp (change directory tmp) is used to change the working directory to tmp. The prompt now displays [usera@localhost tmp], indicating that the current directory is tmp.
This section demonstrates the Linux command for creating or making a directory. The command is mkdir, for make directory. The structure for the command is mkdir [directory-name]. In the example shown in Figure 9-16, mkdir files is used to create a directory called files. The command ls is used to display the usera home directory contents and files is listed. The long listing of the directory using the ls -la command shows that files is indeed a directory, indicated by a d in the leftmost field of the attributes. The command to remove a directory is rmdir. The structure for the command is rmdir [directory-name]. This command requires that the directory being removed is empty.
Figure 9-16. An example of creating a directory using the mkdir command
mkdir
Linux command to make a directory.
rmdir
Linux command to remove a directory.
The purpose of a basic operating system is to create, modify, and delete files. The next example shows how to delete files in Linux. The command to delete a file is rm, short for remove. The command structure is rm [filename]. The command ls -al has been entered to display a long listing of files and hidden files in the directory, as demonstrated in Figure 9-17.
Figure 9-17. Using the rm command to remove a file in Linux
rm
Linux command to delete a file.
Notice that the directory contains two text files: test1.txt and test2.txt. The attributes for these files are listed on the left. These are read/write (rw) for the user, read/write (rw) for the group, and read only (r) for others. This means that any user in the group usera can also change the usera file. The owner of the file is usera, and the group is also usera. The next number is the file size, followed by the date and time the file was created and, lastly, the file name.
In this example, the file test2.txt will be removed using the command rm test2.txt, as shown in Figure 9-17. The test2.txt file is shown in the top of the screen. The command rm test2.txt is entered, and the files are redisplayed using ls -la, and the text2.txt file is no longer listed. The file has been deleted. Note that, in the Linux file system, there is not an undo option. This means that once a file is deleted, it is gone. What about a trash bin? Linux does not provide a trash bin to temporarily hold deleted files, but certain Linux GUIs do apply this concept.
The next example demonstrates how to move a file in Linux. The command to move a file is mv, short for move. The mv command serves two purposes:
• To rename a file
• To move the file to a different directory.
mv
Linux command for moving or renaming a file.
The command structure is mv [filename] [new-filename].
In this example, the mv command is used to rename the file text1.txt to text5.txt, as demonstrated in Figure 9-18. In this example, the cat command is used to display the contents of the test1.txt file. This is being done so that the contents of the files can be compared after the move. The mv command is next used to rename text1.txt to test5.txt. The contents of the test5.txt file are displayed using the cat command, showing that the contents of test1.txt and test5.txt are the same and only the filename has changed.
Figure 9-18. An example of using the mv command to rename a file
The next step is to show that files can be moved from one directory to another using the mv command. In this case, the test5.txt file will be moved from the usera directory to the usera/files subdirectory. The command for doing this is mv test5.txt files/, as shown in Figure 9-19. This specifies that the test5.txt file is to be moved to the files directory using the directory path files/. A logical next step is to verify that the file was moved to the files directory. The command cd files is entered, changing the working directory to files, as shown in Figure 9-19. The prompt now displays [usera@localhost files]. The command pwd (print working directory) also shows that the working directory is now /home/usera/files. The information for the prompt and for print working directory is slightly different, but both indicate that the working directory is files. The ls command shows that the test5.txt file has indeed been moved to the files directory. The long listing ls -la shows that the file properties have not changed. The owner of the file and group assignment have not changed.
Figure 9-19. An example of moving a file using the mv command
The command to copy files in Linux is cp. The structure of the command is cp [source filename] [destination filename]. In this example, a file called test5.txt will be copied to a new file called test6.txt. The ls command is first used to display the files in the usera@localhost files directory, as shown in Figure 9-20. The only file listed is test5.txt. The cp command is next used to copy the file to test6.txt, as shown in Figure 9-20. The ls command is used again to display the directory contents, and both files test5.txt and test6.txt are now displayed. The file was successfully copied.
Figure 9-20. An example of using the cp command
cp
Linux command to copy files.
The chmod command is used in Linux to change permissions on files and directories. The structure of the command is chmod [permissions setting] [filename]. For example, this command lets you specify if the file is readable (r), writable (w), or executable (x). A long list of the files in the usera account shows that the file test5.txt has rw in the attributes in the owner’s space, as shown in Figure 9-21. File test6.txt shows that the user has read (r)/write (w) privileges, the group has read (r)/write (w) privileges, and the outside world has read (r) privileges (-rw-rw-r--).
Figure 9-21. Using the chmod command to set file permissions
chmod
Command used in Linux to change permissions on files and directories.
chmod uses a value to turn a privilege on or off. The value is specified for the owner, the group, and others. Table 9-3 shows how the place values are established for the owner, group, and outside user. For example, a value of 4 0 0 turns on bit position 2, the read attribute for the owner (-r ). A value of 6 0 0 turns on bit positions 2 and 3, read and write for the owner (-rw ); and a value of 7 0 0 turns on bits 2, 3, and 4, setting read, write, and executable permissions for the owner (-rwx ). A value of 6 4 0 turns on bits 2, 3, and 5, setting read and write permissions for the owner and read permission for the group (-rw -r- ---).
Table 9-3. Attribute Settings for File Permissions
Bit Position |
1 |
2 |
3 |
4 |
5 |
6 |
7 |
8 |
9 |
10 |
|
Directory |
Owner |
Group |
Others |
||||||
Bit Values |
|
4 |
2 |
1 |
4 |
2 |
1 |
4 |
2 |
1 |
|
* |
r |
w |
x |
r |
w |
x |
r |
w |
x |
The directory bit can display the following attributes: d—directory; b—block; c—character;—no entry specified
Another way to determine the permission settings for each permission field (owner, group, others) is to assign the following values to each permission:
read: 4
write: 2
executable: 1
To turn on the read permission for the owner simply requires that a four (4) be placed in the first permission field. For example, chmod 4 0 0 [filename] sets read only permissions for the owner.
Turning on more than one permission requires that the sum of the permission values be entered. For example, turning on read/write privileges for the owner requires entering a six (6) in the proper permission field. The value is determined as follows:
Read: 4
write: 2
executable: 0
6
The zero is assigned to the executable because this permission is not desired. The command to enable read/write privileges for the owner is chmod 6 0 0 [filename].
The same steps can be applied to assigning permissions to all fields. For example, assume that the following permissions are specified:
owner: read, write, executable
group: read, executable
everyone: read, executable
The numeric entry for each permission field in the chmod command can be determined as follows:
|
owner |
group |
others |
read |
4 |
4 |
4 |
write |
2 |
0 |
0 |
executable |
1 |
1 |
1 |
|
7 |
5 |
5 |
Therefore, the command chmod 7 5 5 [filename] is used to set the permissions for the owner, group, and others.
In the example shown in Figure 9-21, read permission is to be given to the group for the test5.txt file. The command chmod 640 test5.txt is entered. The 6 sets the read/write privilege for the owner, the 4 sets the permission to read for the group, and the 0 clears any attributes for others. The ls command is next used to provide a long listing of the files in the usera account. The attributes for the test5.txt file have changed to (r w - r - - - - -), indicating that group now has read privileges.
In the next step, the world will be given the privilege to read the test5.txt file. The command chmod 644 test5.txt is entered. Again, the 6 sets the read/write privilege for the owner, the 4 sets the permission to read for the group, and the next 4 sets the permission for others to read the file. The attributes for the test5.txt file have now changed to (r w - r - - r - -), indicating that outside users have read privileges.
executable (x) permission
Allows the program or script to run.
The last example using chmod shows how to set the executable (x) permission for a file. An executable permission allows the program or script to run. The command chmod 744 test5.txt is entered. This instruction gives the owner read/write and executable privileges on the file and grants the group and everyone else read permission. The ls command is used to display a long listing. The attributes for the file test5.txt now show (r w x r - - r - -). This confirms that the permissions have been properly set. The result is shown in Figure 9-21.
The executable setting is used by Linux to distinguish files that can be executed (run) on the system. Files that do not have an x attribute are considered to be data files, libraries, and so on. The x is also used by Linux when the system searches for executable files on the hard drive.
The next Linux command examined is chown, which is used to change the ownership of the file. The structure of the command is chown [new owner] [filename]. This command can only be applied to files the user owns. The exception to this is root (the superuser), who can change permissions on any files. In this example, the ownership of the test5.txt file is going to be changed to a user called network. (Note: The new owner will be network, a user on this same Linux machine. In fact, changing ownership can only be done using existing users.) The long list of usera’s files directory shows two files: test5.txt and test6.txt (see Figure 9-22). The owner of test5.txt is usera. The objective of this exercise is to change ownership of the test5.txt file to network. The command chown network text5.txt is entered. A long list of the directory now shows that the ownership of test5.txt now resides with network. The steps for changing file ownership are shown in Figure 9-22.
Figure 9-22. An example of using the chown command to change file ownership
chown
Linux command used to change ownership of a file.
The file is still in usera’s directory, but the ownership has changed to network. The group attributes (permissions) will now have to be set by network if usera is to have permission to read, write, or execute this file, even though usera was the past owner and the file is in usera’s space. In fact, if usera tries to change permission on this file (test5.txt), Linux will prompt usera with the message changing permissions of ‘test5.txt’: Operation not permitted. This is shown in Figure 9-23.
Figure 9-23. The prompt displayed when an unauthorized user attempts to change file permissions
The Linux command chgrp is used to change group ownership of files. The structure of the command is chgrp [new group] [filename]. This example demonstrates how to change the group ownership of a file. In this example, the group for file test5.txt will be changed. Figure 9-24 shows the steps for this operation. A long listing of the usera files directory shows that the group associated with test5.txt is usera. The command chgrp mail test5.txt is next used to change group ownership of the file to mail. The long listing command is used again to list the file in the usera files directory. The screen shows that the owner is network and the group ownership of test5.txt has changed from usera to mail. This means that any members of the group mail now have read (r -) privileges.
Figure 9-24. An example of changing the group ownership of a file
chgrp
Linux command used to change group ownership of a file.
The objective of this section is for you to gain an understanding of the key Linux administration commands. The commands presented focus on those most often used by the network administrator:
man: Used to display the online text manual
ps: Used to examine processes running on the machine
su: Used to become another user on the system
mount: Used in Linux to mount an external drive
shutdown: Used to shut the Linux system down gracefully
This section concludes with an overview of some basic Linux shortcuts that will help simplify the administrator’s job.
The first command examined is man, used to display the online text manual for Linux. Manual pages for most Linux commands and features are available by simply entering the command man followed by the name of the option. For example, if you want to know how to use the ps command, entering man ps (see Figure 9-25) will display the contents of the manual lists for ps (see Figure 9-26).
Figure 9-25. An example of using the man command
Figure 9-26. The manual pages displayed by entering the command man ps
man
Command used to display the online text manual for Linux.
The manual pages provide extensive information about how to invoke the command, what options are available, what the fields mean that are displayed by the command—basically everything you need to know about the ps command.
There are many man pages on the Linux system, for utility programs, programming files, networking commands, and others. Adding the -k extension to the man command (for example, man -k network) instructs Linux to list all of the man pages that mention the specified topic. An example is provided (see Figure 9-27) that demonstrates how to use the man -k command to view all network-related man pages.
Figure 9-27. Using the man command to display all pages related to network
The ps command lists the processes (or programs) running on the machine. The command ps ux lists all the processes running, as shown in Figure 9-28. Each of the fields returned by the ps command is listed from left to right in Table 9-4.
Figure 9-28. An example of using the ps command to list the processes currently running on a Linux machine
Table 9-4. Fields Returned by Inputting the ps Command
Field |
Description |
User |
Identifies the owner of the process. |
PID |
Identifies the process ID, which is a number assigned to a process when it starts. For example, if PID1, then this is the first process started on the machine. |
%CPU |
Shows the % utilization of the CPU for that process. |
%MEM |
Specifies the % of memory being used by that process. |
VSZ |
The virtual size of the program. |
RSS |
Shows how much of the program (resident set size) is in memory. |
TTY |
Indicates if the process is interfacing with a terminal or a serial port. |
STAT |
The STAT (state field) indicates the status of the process: |
|
r—running |
|
z—zombie |
|
s—sleeping |
|
t—stopped |
START |
Indicates when the process started. This could list a time of minutes, hours, and/or days. It is not uncommon to have a process running for an extended period on Linux. |
Time |
Indicates the time the process has actually spent running. |
Command |
Lists the actual command that was invoked to start the process. |
ps
Linux command used to list processes running on the machine.
The reason to examine running processes is to determine what processes are using the most machine resources. If a machine is running slowly, the ps command can be used to determine what process is using the majority of the CPU time. In some cases, it becomes necessary to terminate (shut down) a process to free up the machine’s resources. The following are steps that should be followed to shut down a process:
1. Use the pscommand to identify the process using the computer’s resources (CPU and memory). Determine the PID for the process. For example, it has been determined that a process with a PID of 1023 must be shut down.
2. The network administrator should next contact the user of the process and inform him or her to shut down (kill) the process.
3. The command for killing the process is kill [PID]. An example is shown in Figure 9-29 for killing the process 1023. This command notifies the process to terminate. The process then begins closing files and libraries and shuts down immediately. Some processes are difficult to kill, so the command kill -9 [PID] can be used. An example is shown in Figure 9-29. This is the last-resort step for killing a process. The kill -9 command is somewhat messy in that the process is stopped without properly closing any open files, libraries, and so on.
Figure 9-29. An example of using the kill and kill -9 commands
kill [PID], kill -9 [PID]
Linux commands used to kill a process.
The su (substitute user) command is used to become another user on the system. This command assumes that the user has a valid account on the system and the password is known. The command structure is su [username]. Figure 9-30 shows an example of using this command. In this example, root is using the su command to log in as usera. This command is useful for administration. The administrator can be logged in as root to make some changes to the system that affect usera, such as checking FTP options or web access. The administrator can then use the su command to become usera and check to see if the changes worked. In fact, root user can use the su command and become any user on the system without knowing that user’s password. Any authorized user can use the su command as long as another valid user account and password are known.
Figure 9-30. An example of using the su command to become another user
su
Linux command used to become another user on the system.
The next command examined is mount, which is used to join an external file system, such as that found on a CD-ROM or floppy, to the Linux file system to allow the files to be accessed. The external drives (for example, USB and CD-ROM) don’t mount automatically unless the system has been previously configured to mount these drives. This means that a directory has to be provided to the Linux file system for the external device to mount to.
mount
Linux command used to access external drives.
Linux lists files in the fstab file (/etc directory) that contain the arguments used when the mount command for a specific drive is requested. Figure 9-31 shows a listing of the fstab file in the /etc directory.
Figure 9-31. Listing of contents for the fstab file
fstab
The file that contains the arguments used when the Linux mount command for a drive has been requested.
The contents of the fstab file shows the filesystems that will be available (mounted) at boot time. Linux now uses logical volume management to manage hard drives and their partitions, which adds another level of abstraction between the filesystem and the physical hard drive partitions. In this image, one logical volume handles the entire operating system and the other is designated for swap space.
The mount command enables a drive, file, and so on, to be mounted (refer to the man page for the mount options). There are two ways to mount a drive. In this case, the command will be issued to mount the computer’s CD-ROM.
Newly mounted files will overlay existing files in the mount directory; however, this is a virtual mount. No files are actually being written onto the mount file directory. The command df -kh will display the devices mounted on the system. The df command provides a breakdown of the file systems that have been mounted on the operating system. The -kh extension instructs the command to display the listing in k—kilobytes and h—human readable form. Figure 9-32 provides an example of using the mount command.
Figure 9-32. An example of using the mount and umount commands to mount and umount a USB drive
The command mount /dev/sdb1 media/usb is next used to mount the USB drive. Notice that the USB drive is called sdb1. The df -kh command can be used to verify the drive has been mounted. The listing now shows that the USB drive has been mounted.
It is important to understand that a drive must be unmounted before the media can be removed. The USB drive can be unmounted by using the command umount / media/usb, as shown in Figure 9-32. Note that you cannot unmount a device that has open files or directories. Entering the df -kh command now shows that the USB drive is no longer mounted. At this point, the USB drive can be removed.
umount
Linux command used to unmount a drive.
The shutdown command is used to shut the Linux system down gracefully. This means that all open files and libraries are closed before the system turns off. The command in Linux to gracefully shut the system down is shutdown -h now . This command immediately shuts down the operating system effective . Figure 9-33 shows an example of using this command.
Figure 9-33. An example of using the shutdown -h now command
shutdown -h now
Command used to gracefully shut down Linux.
Many of the tasks performed by the network or system administrator require repeated use of the same commands or require that lengthy file names be entered. This section presents some shortcuts available in Linux that help speed up the administrator’s job. The first shortcut examined is the up arrow. The up arrow can be used to display the previous command entered on the command line in Linux. Pressing the up arrow again displays the next previous command. This is a useful way to recall the history of commands entered on the command line. When you find the command that you need, simply press Enter to execute the command. Repeatedly pressing the up arrow will allow you to find a command previously executed. The history command can be used to display the commands stored in the Linux system buffer. The history buffer can store thousands of entered commands. (Note: The history buffer can also be used to determine if someone has been using your computer. Simply entering the history command will display all commands executed on the system. You will be able to identify the commands that you did not execute.)
Up Arrow
Used to display the previously entered commands stored in the Linux history buffer.
history
Command that displays the commands entered on the command line in Linux.
Another shortcut is the Tab key. This can be used to complete entries on the command line. For example, cd ho[tab] displays cd home. Linux searches for options that begin with ho to complete the entry. This is useful when long or complicated entries are used. In the case where there are multiple entries that satisfy the entry, the Tab key can be used to step through the options. Entering f [tab] will generate multiple possibilities. Pressing the Tab key will cycle you through each option. Pressing the Tab key twice will display all available Linux commands.
The objective of this section is to demonstrate the use of the Yellowdog Updater, Modified (YUM) to install and uninstall applications and to query the system’s database. YUM uses a database to keep track of the software installed on the system. This database is updated anytime new software is installed or software is removed. YUM keeps track of the name of the application, the version installed, and any associated files. The term YUM describes the entire package application and management system used in Fedora Linux. It is also the command to start the package manager: You obtain the manual listing for YUM by entering the command man yum. The text shown in Figure 9-34 will be displayed. The man page shows that there are many options for the command. YUM has been adopted by many other Linux distributions as an easy and efficient way to manage applications.
Figure 9-34. The man page for YUM
The first example of using YUM is a query all. When entered, the command yum list displays all the applications installed on the system. The yum list command is often used to search for an application on the Linux system. In this example, the command will be used to search for telnet. This can be done by using the yum list application command, as shown in Figure 9-35. The command for doing this is yum list telnet. In this case, telnet (a terminal emulation application for TCP/IP networks) is on the system, and in fact, there is a telnet-server.i686 1:0.17-51.fc16 and a telnet 1:0.17-51.fc16, which is the client.
Figure 9-35. Using the yum list telnet command to search for files in the Linux system
Telnet
Terminal emulation application for TCP/IP networks.
Another useful tool to find out where a file came from is the command yum provides [filename]. This command searches the system’s yum database and returns the name of the file that matches the query. Figure 9-36 shows an example of using this command.
Figure 9-36. An example of using the yum provides [filename] command
yum provides [filename]
Searches the yum database and returns the name of the file that matches the query.
The command yum provides zdiff was entered, and the name gzip-1.4-3.fc15.i686 was returned. This indicates that the file zdiff belongs to the gzip-1.4-3.fc15.i686 package. The next section demonstrates how to uninstall a package from the database. Uninstalling removes all files associated with that package. A prompt is displayed if a file is being removed that is also being used by another application. For example, assume that the telnet-server application is to be removed. It was shown in Figure 9-35 that the command yum list telnet command is used to search for telnet.
Every instance of telnet in the database is listed. In this case, the name telnet-server. i686 1:0.17-51.fc16 and telnet-0.17-20 (client) are listed.
An example is shown uninstalling both telnet applications in Figure 9-37. The telnet-server application is uninstalled using the command yum remove telnet-server. The telnet-client application is removed using the command yum remove telnet. The yum list installed command can be used to check if the application is still in the database.
Figure 9-37. The steps for uninstalling the telnet-server and telnet-client applications and verifying that the applications are no longer in the database
An expected task performed by network and system administrators is to add web service to the network. This section presents the steps for adding the Apache web service to the Linux operating system. Apache is the standard web service for Linux, similar to MIIS for Microsoft Windows.
The command for installing the Apache web service is yum install httpd, as shown in Figure 9-38. On occasion, a prompt will be displayed that a certain application is missing. In this case, the missing software packages can be found on the Internet. The command to start the web server is /etc/init.d/httpd start, as shown in Figure 9-39. This file was installed when the yum command was issued to install Apache. The screen displays the statement Starting httpd: [ OK ], which indicates that the service was successfully started.
Figure 9-38. The steps for installing the Apache web service
Figure 9-39. The steps for starting the Apache web service
httpd
The script that starts the web server.
Linux uses Firefox for an Internet web browser. The command for starting Firefox is firefox. The URL can be changed to the Linux machine simply by entering http://localhost/. Remember, the default name for the Linux machine is localhost. If the web service is working properly, the test page shown in Figure 9-40 should be displayed. This test page provides the administrator with information about the configuration files. Linux provides this as a default page for setting the web service.
Figure 9-40. Using the Mozilla Internet web browser to test the web installation
Firefox
The Linux web browser.
There are two directories and files that are important relative to the Apache installation. The first is the index.html file, located in the /var/www/html directory, as shown in Figure 9-41. This is the root directory for the web service. The test page actually resides in index.html. Users can build their web pages off this file and linked files.
Figure 9-41. The location of the index.html file
The second important directory and file is the httpd.conf file located in the /etc/httpd/conf directory. This is shown in Figure 9-42. This is the configuration file for the Apache web server that is read every time the service is started. The httpd.conf file is a text file and can be edited; however, the Apache server must be restarted for the changes to take effect, using the command /etc/init.d/httpd restart, as shown in Figure 9-43. Notice that the command is issued from the /etc/rc.d/init.d directory, and the command line displays the prompt:
Stopping httpd: [ OK ] Starting httpd: [ OK ]
Figure 9-42. The location of configuration file (httpd.conf) for the Apache web server
Figure 9-43. The steps for restarting the Apache server so that changes made to the httpd.conf configuration file can take effect
httpd.conf
The configuration file for the Apache web server.
This prompt indicates that the Apache web server has stopped and restarted. The Apache web server can be stopped using the command /etc/init.d/httpd stop. This provides an orderly (scripted) shutdown. The following output will be displayed on the terminal screen:
Stopping httpd: [ OK ]
The objective of this section is to demonstrate how to configure a Linux machine to run on the network. This section assumes that the Linux machine already has a network interface card (NIC) installed. Fedora Linux 16.0 is good at detecting all major brands of network interface cards and contains drivers for the NICs. Linux will automatically detect the card and may prompt you for the IP address, net mask, and gateway address during the installation of the operating system. Hardware installed after the initial system installation will still be detected by the autodetect feature running in Linux.
Ethernet cards in Linux are identified as eth0, eth1, eth2, and so on. The command ifconfig is used to report all the network devices recognized and running on the system. This command lists all the interfaces and the configurations for each interface. The configurations include the IP address, the net mask (subnet mask), the broadcast address, and the gateway. The ifconfig command also reports back on the status of the loopback (lo), as shown in Figure 9-44.
eth0, eth1, eth2, ...
The way Linux identifies the Ethernet interface cards.
ifconfig
Command that reports all the network devices recognized and running on the system, listing all the interfaces and the configuration for each.
Net Mask
Linux name for the subnet mask.
lo
The Linux symbol representing the loopback.
Figure 9-44. An example of using the ifconfig command to display the network interfaces and their configuration
The ifconfig command can also be used in Linux to change the IP address configuration for the network interface. The following examples will demonstrate configuring eth0, the default interface device on most Linux machines. The command ifconfig displayed the eth0 and lo, as shown in Figure 9-44. The IP address for the machine is currently 192.168.12.1. This example demonstrates how to change the IP address of the eth0 interface. The command ifconfig eth0 192.168.20.5 is entered on the command line, and the ifconfig command is used to display the interface settings (as shown in Figure 9-45). This applies the IP address to the network interface. The default values for the broadcast and subnet masks are used if no value is specified. In this case, the Bcast (broadcast) address is automatically updated to 192.168.20.255, the broadcast address for this class of network. The Mask (subnet mask) entry is automatically updated to the Class C subnet mask 255.255.255.0.
Figure 9-45. Using the ifconfig command to change the network interface IP address
A different subnet mask can be applied to the network interface by appending the subnet mask value to the ifconfig command. An example of this is shown at the bottom of Figure 9-45 using the command ifconfig Eth0 192.168.20.5 netmask 255.255.0.0.
Another set of commands used for controlling the network interfaces are ifdown [interface] and ifup [interface]. These commands enable the administrator to shut down and bring back up the network interface. This is useful when a machine is being subjected to a network attack and the network connection needs to be shut down quickly. The ifdown eth0 command brings down the Ethernet0 interface. The ifconfig command no longer displays the eth0 interface. The interface can be brought back online by issuing the ifup eth0 command. The ifconfig command now shows that the eth0 interface is available. The steps for shutting down and bringing up a network interface are shown in Figure 9-46.
Figure 9-46. Examples of using the ifdown and ifup commands
In some cases, it is necessary to shut down all network interfaces. The command for doing this is network stop. Linux will echo a response of the interfaces that are shutting down. Entering the ifconfig command will now display that no network interfaces are active. Part a of Figure 9-47 shows an example of stopping the network on Linux. The command for starting the network is network start, as shown in part b of Figure 9-47. Linux prompts that it is bringing up interfaces. Issuing the ifconfig command now displays that eth0 and lo are both available.
Figure 9-47. (a) Using the command network stop for shutting down all network interfaces; (b) using the command network start for bringing up all network interfaces
The next step is to provide a gateway address for the Linux network interface. This is accomplished using the route add default gw [ip address] command. Entering the route command without any arguments displays the different routes. This is shown in part a of Figure 9-48. The display shows that the default gateway is 192.168.12.254. This can be changed to 192.168.12.1 by issuing the command route add default gw 192.168.12.1, as shown in part b of Figure 9-48. Linux prompts you if an unreachable gateway address has been specified, as shown in part c of Figure 9-48. Linux displays this message if a gateway address outside the network address is specified. For example, the entry route add default gw 192.168.20.5 displays that the address is unreachable. This is because 192.168.20.0 is a different Class C network.
Figure 9-48. (a) Using the route command to display the network routes available on the machine; (b) changing the network’s default gateway address; (c) the Linux prompt for an unreachable gateway address
network stop
Shuts down all network interfaces.
network start
Brings up the network interfaces.
route add default gw
Linux command used to specify the gateway address.
The Linux network programs take their cue from a set of scripts in the etc/sysconfig/network-scripts directory. These scripts contain the values assigned to all network devices in the Linux operating system. This example looks at the contents of the ifcfg-eth0 script, which is the file associated with the Ethernet0 network interface. The cat command is used to display the file, as shown in Figure 9-49. These contents identify how eth0 will be configured when booting or when the network is started. The root user can modify this file as needed.
Figure 9-49. The steps for examining the contents of the ifcfg-eth0 script
This section demonstrates how to install SSH (the secure shell), which is similar to telnet except SSH encrypts the data traffic between the two hosts. SSH is a better tool for remote administration or remote work. The openssh-clients and openssh-server are provided with the Fedora distribution of Linux. Installing the openssh-client application is straightforward using Yum, as shown in Figure 9-50.
Figure 9-50. The listing of the openssh using Yum
openssh
The secure shell application for Linux.
The openssh client is installed on the Linux machine by entering the command yum install openssh-clients. The database can be queried using the command yum list installed | grep openssh. The openssh files installed are then listed as shown in Figure 9-50.
The command ssh [destination] can be used to establish an SSH connection. This assumes that the destination has an SSH server running. In this case, the destination is user@machine.edu. An example is shown in Figure 9-51.
Figure 9-51. Establishing an SSH connection
The installation of the SSH server is similar to the installation of the SSH client. The command yum install openssh-server is used to install the openssh-server. The installation can be verified in the same way that the installation was verified for the client.
There are many FTP client applications for Linux. This section demonstrates the use of the FTP application called ncftp. This application is popular with network administrators because of its ease with putting files on and getting files from the command line. The command used to start the application is ncftp [server-name], as demonstrated in Figure 9-52. An FTP server session with 192.168.12.2 is being requested. The screen prompts that a connection is being established, and then the prompt salsa Microsoft FTP service (Version 5.0) is displayed. (Note: salsa is our example Windows 2003 server machine.) The screen next prompts Logging in... | Anonymous user logged in. The anonymous login is listed because a user was not specified with the ncftp command. The command ncftp -u [server-name] can be used to instruct the FTP server to prompt you for the user’s password. (See the man page for ncftp for more instructions.) The Linux box then replies Logged in to 192.168.12.2, indicating that a connection has been established. The prompt on the Linux machine now shows ncftp / >.
Figure 9-52. Using ncftp to start an application
ncftp
An FTP application for Linux.
DNS is used for name resolution (see Chapter 5, “Configuring and Managing the Network Infrastructure”). In Linux, the list of information for the DNS service is found in a file in the /etc directory called resolv.conf . This is shown in Figure 9-53. This file contains the list of the IP addresses for the DNS servers. The contents of an example resolv.conf file are listed in Figure 9-54. Two entries are shown for this file. The first is search localdomain, and the second entry is nameserver 192.168.12.1. This listing shows the search sequence for resolving names to an IP address. Multiple name services can appear in this list, but remember, this is a search order. Linux will not perform any name resolution if this file is empty.
Figure 9-53. The location of the DNS resolv.conf file in Linux
Figure 9-54. The contents of the example resolv.conf file
resolv.conf
Contains the list of DNS servers for the Linux machine.
This section demonstrates how to change the hostname of a Linux machine. The name of the Linux machine is located in the /etc/sysconfig/network file. The root user can be changed using the command hostname [name]. In this case, the example is showing that the hostname is being changed to chile-one as shown in Figure 9-55. You must log off and back on for the change to take place.
Figure 9-55. An example of using the hostname command to change the name of the Linux machine
Linux has many options available for troubleshooting hardware and software problems. This section presents some of the options available to the administrator and the user. The following Linux troubleshooting commands are presented in this section:
dmesg
reboot
last
who
w
nmap
chkconfig
netstat -ap
The first command examined is dmesg, which is used to display the boot process for Linux. This command is useful if a certain application fails to be recognized or boot properly. This file will display errors that can be used to better understand why a process failed. This command is available to any user on the system, but remember: Only root will be able to fix the problems. This file can contain a large amount of text, so the command can be piped to more using the command dmesg | more, as shown in Figure 9-56. This screen shows the text from the last Linux boot process. This provides information on the system devices detected, how memory is configured, hard drive information, and any errors coming from the software.
Figure 9-56. An example of using the dmesg command piped to more
dmesg
Command used to display the boot processes for Linux, used to identify why certain processes failed.
A useful Linux command to use when the system is not operating correctly due to either hardware or software problems is reboot. This command gracefully shuts down the system so that it is properly configured on reboot. If a Linux machine needs to be rebooted, use the reboot command; do not press the Reset button on the PC. Figure 9-57 shows the reboot command. The best directory to look for troubleshooting information is the /var/log directory. Figure 9-58 provides a listing of the /var/log directory. Many of the files have a .1, .2, .3, and so on following the filename and represent older log files, respectively. For example:
boot.log
boot.log.1
boot.log.2
boot.log.3
Figure 9-57. Entering the reboot command
Figure 9-58. The listing of the /var/log directory
reboot
Command used to gracefully shut down the Linux machine and reboot.
These files are renamed at regular intervals (hence the .1, .2, .3, ... extensions) and are kept in storage. It is important to understand that these are rolling log files. The 1 becomes 2, pushing 2 to 3, 3 to 4, and so on. Eventually, the file is deleted and replaced. A summary of the useful troubleshooting files in the var/log directory follows:
• boot.log: Keeps track of the boot processes.
• lastlog: Keeps track of user login; requires the use of the last command to display its contents.
• maillog: Keeps a log of mail activity.
• messages: Contains most of the system messages that report any software or hardware errors. This is an important troubleshooting file.
• secure: Keeps track of any users entering or exiting the system and keeps track of security violations, such as unauthorized users attempting login.
• spooler: File for mail management.
The last command is extremely useful in security. This command accesses the login file and reports of logins to the Linux system. Figure 9-59 provides an example of using the last command. This command lists all users that have logged on to the system since the last reboot or for the past month. The login information displayed includes the account name, day, date, and time. This command is useful if the administrator suspects that someone has gained unauthorized access to the Linux machine. The information displayed by the last command shows that there are two users on the system. The first listed is usera, who logged in from localhost on Feb. 11 at 12:48 and is still logged in. The other account, root, is currently logged in and has logged into and out of the system many times.
Figure 9-59. Using the last command to display the Linux login activity
last
Command used to display logins to the Linux system.
Two other ways to check for users on the system are to enter either the command who or w. The who command displays the names of the users presently logged into the system. The w command provides similar information and provides additional details on each user, such as the following:
• from: Specifies the domain where the user is logging in from
• login time: Indicates when the user logged in
• idle: Indicates if the user has been busy on the system
• what: Displays the last command entered by the user
who
Linux command that displays the names of the users presently logged into the system.
w
Linux command that displays the names of the users presently logged into the system plus additional details on each user.
Figure 9-60 provides examples of the text displayed by using w and who commands.
Figure 9-60. Examples of the text displayed by the w and who commands
An excellent security tool that runs on Linux is nmap. The application can be installed using the command yum install nmap, if not already installed. This is a port scanner that is used by the network administrator to scan a local computer or other computers internal to the network to determine what network ports and services are being made available to users. For example, the command nmap localhost was entered to scan the Linux machine named localhost. Figure 9-61 shows the results of the scan. The scan shows that the ftp, telnet, smtp (email server), sunrpc (network file server), and X11 (the GUI for Linux) are all available. Notice that each service has a port number assigned to it. (The concept of port number was presented in Chapter 5.) For example, FTP is on port 21 and is running TCP. Telnet is running on port 23 and is also running TCP. The network administrator may decide that the FTP or non-secure telnet service is a security threat and that it needs to be disabled. Note that this command can also be used to scan machines outside your network by simply substituting an IP address for the machine name. For example, nmap 192.168.12.5 can be used to scan the machine at IP address 192.168.12.5. (Note: You should only use the nmap port scanning utility on your own machines!)
Figure 9-61. The results of using the nmap command to scan the Linux machine named localhost
nmap
A Linux port scanner.
The next command examined is chkconfig, which allows the administrator to enable and disable services at boot time. Figure 9-62 shows the options for the chkconfig command.
Figure 9-62. The options for the chkconfig command
chkconfig
Command used by administrators to enable and disable services at boot time.
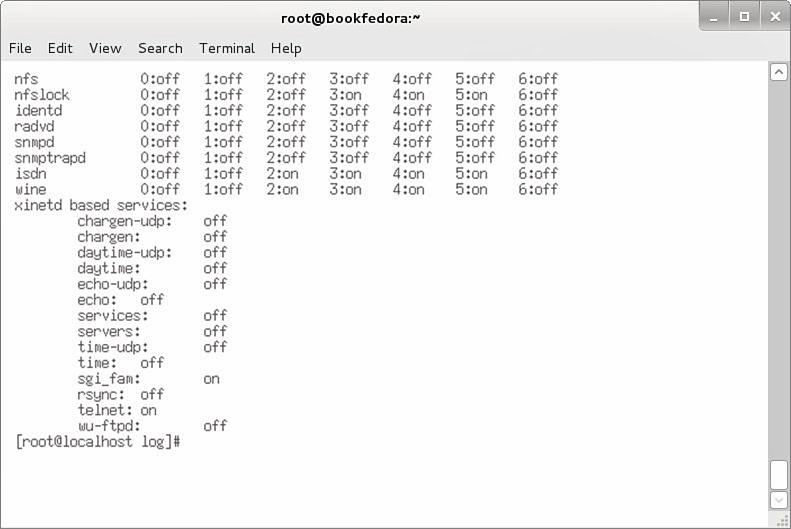
The administrator used the nmap command to check to see what network services were running. It was found that the FTP service was running (see Figure 9-61). The network administrator decided to disable the FTP service. The network administrator can use the chkconfig --list command to view the services running on the system. The command is shown at the bottom of Figure 9-62. The results of entering the chkconfig --list command are provided in Figure 9-63. The last line displayed shows wu-ftpd: on. This indicates that the FTP server is on. The FTP service can be disabled by using the command chkconfig wu-ftpd off, as shown in Figure 9-64. The chkconfig --list command can be used again to verify the service is off. The verification that wu-ftpd is off is provided in Figure 9-65.
Figure 9-63. The results of entering the chkconfig --list command
Figure 9-64. Using the chkconfig wu-ftpd off command to disable the ftp service
Figure 9-65. Using the chkconfig --list command to verify the service has been disabled
Another command used by the network administrator is netstat -ap. This command provides information about the network connections that exist on the system. This includes internal programs and connections to the outside world. This command is very useful when the network administrator wants to determine if a machine is being used by unauthorized users, for example, as a music server for the Internet. The netstat command will list the connection, and it will list the name of the program that is allowing the connection to be made. Figure 9-66 provides an example of using this command. In this example, the netstat -ap | more command is used. This pipes the file contents to more to make it easier to view the entire contents. The far right side of Figure 9-66 shows whether the connection is in the listen or established mode. Listen means that the program is waiting for a connection to be started. Established means that a connection has already been made. For example, a TCP connection is established at port 3102, and the name of the program is in.telnetd, which is the telnet-server.
Figure 9-66. An example of using the netstat -ap command to view the network connections running on the machine
netstat -ap
Provides information about the network connections.
This section examines some of the management tools available with the Fedora 16 distribution. The previous sections in this chapter examined the Linux command structure as input from the command line interface. Although it is true that the network and system administrators insist that any member of the network management staff fully understand Linux operation from the command line, they also understand the benefits of using the well-developed GUIs available for Linux, such as those available with the Fedora 16.0 distribution. The obvious benefits of using the GUI management tools are time savings and the dependencies for any software installation/deletion are automatically checked for you.
In Fedora 16, the System Config tools, which are the system administration tools, are all prefixed with system-config followed by the name of the tool. To get to the tools, log in as root and, at the command line, enter system-config- tool-name. The menu for the tool being requested will be displayed.
system-config- tool-name
Linux command for displaying the system configuration GUI for a specified tool.
ls system-config- *
Linux command for listing the system configuration tools.
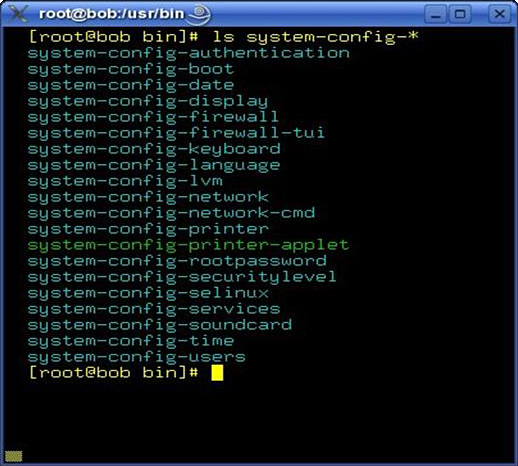
The list of system configuration tools can be displayed by changing the directory to /usr/bin and entering the following command from the prompt [ root@bob bin] ls system-config-*. The list generated by this command is provided in Figure 9-67. There are many configuration options available for the user and the administrator. A few of the menus are discussed next. The GUIs are fairly intuitive and typically don’t need a lot of discussion to understand how they work. Examples of the system-config GUIs are provided next.
Figure 9-67. The list of the system-config- files
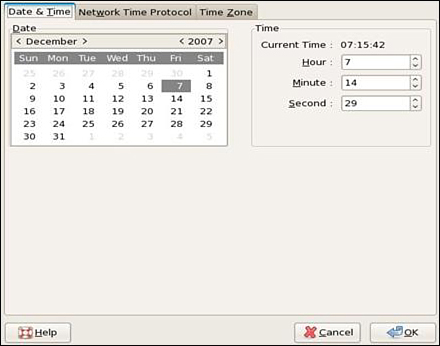
For example, system-config-date is the GUI that allows you to change the time and date for the computer. Entering the command system-config-date will display the menu shown in Figure 9-68. This menu also allows you to set the time zone and also enables you to point this menu (via an IP address) to a time server for obtaining the current time for your location.
Figure 9-68. The system-config-date menu
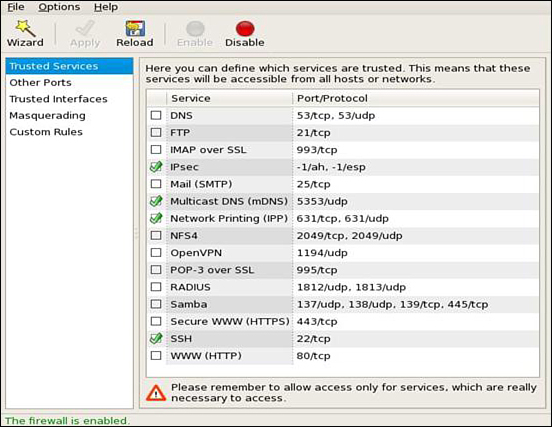
The next GUI menu displayed (see Figure 9-69) is for the firewall. The firewall menu settings can be displayed by entering system-config-firewall at the command line. You can disable a firewall, configure additional settings, or modify the firewall configurations. This allows you to open ports and block ports, and all the settings are GUI based, which simplifies the tasks. For example, if you want to block port 80 (HTTP), simply click the check box for WWW (HTTP) and click Disable. On the left side of the menu are other options, such as selecting other ports that are not defined on the main menu screen. You also have settings for trusted services, masquerading (network address translation), and a place for setting custom rules for your firewall.
Figure 9-69. The system-config-firewall menu
There are many important issues that the network/system administrator faces, but security should be the top concern. When you first go out to install a new service or are maintaining existing systems, the most important issue is the system security and preventing outside threats. You want to fully understand the implications of installing the software and how the installation can possibly affect the overall network. The following is a list of some of the questions that should be asked:
• Who will be the users of the software, and what applications are they going to be running?
• Will they need special permissions?
• Will the software being installed require a firewall?
• Does the software introduce any security threats?
Regardless of the installation, you will have to set limits for security reasons. You don’t want your system to get hacked, and firewall protection is a very good start.
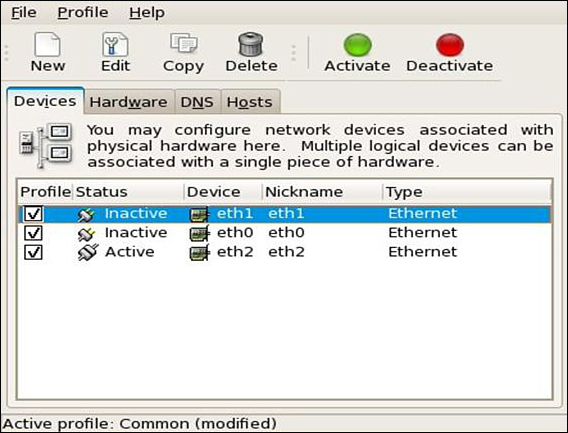
Figure 9-70 shows the menu for the network settings. This menu is displayed by entering the system-config-network command when logged in as root. This is a good place to start when setting up your computer on a network for the first time. This tool allows you to set the IP address, subnet mask, host name, and DNS server address. You can also activate or deactivate the networking devices (for example, NICs) from this menu by selecting the check box for device and clicking the Activate or Deactivate button.
Figure 9-70. The system-config-network menu
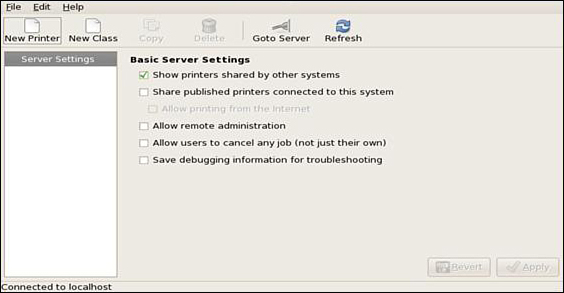
The next menu, shown in Figure 9-71, is for system-config-printer. This menu is used for adding various types of printers to the system. The Fedora software will have most of the commonly used printer drivers installed with the software; however, not all drivers will be there. In the case of a missing printer driver, the system administrator will have to download the driver from a CD or from the Internet. The best locations to locate a printer driver are the manufacturer’s website. In some cases, you might have to do an Internet search for the driver, but make sure you download the driver from a trusted site.
Figure 9-71. The system-config-printer menu
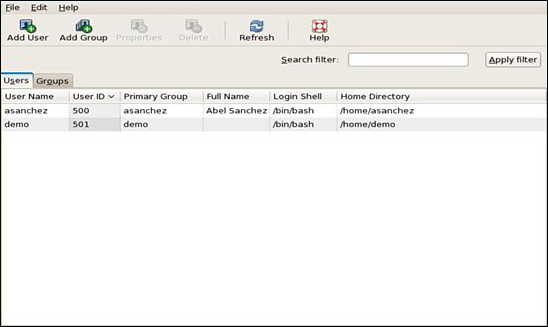
The next menu is for system-config-users. This menu (see Figure 9-72) is used for the management of the users. You can add/modify/delete users and groups from this menu. Examples of users with their Username, User ID, Primary Group, Full Name, Login Shell, and Home Directory are displayed.
Figure 9-72. The system-config-users menu
This chapter presented numerous examples of using commands to administer the Linux operating system. You should appreciate the complexity of configuring the Linux network server and the fact that administering a computer network requires the input of personnel with varied skills. You should also understand that this has only been an introduction to the Linux operating system. The chapter demonstrated how to use many commands, one of the most important of which is how to read the online text man pages. There is a wealth of information about Linux on the Internet. The online distributions for Linux can be found at www.biblio.org. The Linux concepts that you should understand from this chapter include the following:
• The logon/logoff procedures for Linux
• The steps for adding users to a Linux machine
• The Linux file structure and related file commands
• The use of key Linux administration commands
• How to add applications to Linux
• How to place a Linux machine on the network
• How to configure web services for Linux
• The procedures and tools for using Linux to troubleshoot Linux systems and networks
The following are sites where you can download a bootable version of Linux running off one CD. This means you don’t have to create dual-boot partitions on your computer or set up a separate machine running Linux. These bootable versions are available from both Fedora and Knoppix. The latest “live” version from Fedora is available at http://fedoraproject.org (698 MB) and will fit on one CD.
Knoppix is available from http://knoppix.net or from a mirror site, such as http://cs.wisc.edu/pub/mirrors/linux/knoppix/. As of this writing, Knoppix is at version 6.7.1. The file size is approximately 698 MB and will fit on a CD.
The files for Fedora “Live” and Knoppix are ISO images, and the ISO image is a disk image of an ISO 9660 file system. The file needs to be converted into a functional file system before using. This is done when the file is written to a CD using software capable of writing ISOs to CD and making the CD bootable. Most CD burning software for Windows, Mac OS, and Linux will have this capability. Once you write the ISO file to CD, the CD can be used to boot the computer, and you will have Linux running on your computer after the boot process is complete.
1. What are the steps for entering the menu to add a user in Linux?
2. What is the purpose of the Linux login shell?
3. How can Linux be closed from the Linux GUI?
4. How is the command line accessed in Linux?
5. What is the Linux command to only list files?
6. What Linux command provides a long file listing that includes file attributes?
7. What Linux command lists hidden files and file attributes?
8. What two Linux commands can be used to display file contents?
9. How do the more and cat commands differ?
10. What is the user ID for root?
11. What directory are the binary process and executables located in Linux?
12. What is typically placed in the /etc directory?
13. Match the following directories to their content:
1. /boot a) location of all user directories
2. /dev b) system log files, email folders
3. /home c) location of user files related to user programs
4. /mnt d) location of the Linux kernel
5. /root e) drivers for monitors
6. /tmp f) the home directory for root
7. /usr g) temporary holding area for applications
8. /var h) the location of mounted directories
14. What is the Linux command for displaying a working directory?
15. What is the Linux command for creating a directory named chile?
16. List the command for removing a file named aaron.
17. List the command to rename a file named aaron.txt to bueno.txt.
18. The command chmod 411 drb.txt is entered. What does this do?
19. The command chmod 644 djb.txt is entered. What does this do?
20. The command chmod 755 krcb.txt is entered. What does this do?
21. The permissions for the file hbmbb.txt need to be set so that only the owner has permission to read and write the file. List the command that does this.
22. List the command to set the permissions on the text file dapab.txt to the following:
Owner: read/write
Group: read
Outside: no access
23. List the commands for setting the permissions on bc.txt to the following:
Owner: read/write/executable
Group: read/write
Outside: read
24. The new owner of the file CQ.txt is dd. Enter the command to change ownership.
25. The new group for the jc.txt is heaven. Enter the command to change ownership.
26. What command displays the online text manual for Linux?
27. List the command that returns all man pages that mention the topic Apache.
28. Why is the ps -a command used?
29. How is a program with a PID of 1020 shut down?
30. What command can be used as a last resort to kill a process?
31. Root is logged onto a Linux machine and needs to become another user to verify the changes made to the user’s account. What command is used for root to become the user?
32. Usera is logged into Linux and wants to become userb. What is the command, and what are the steps required to make this happen?
33. What information is contained in the fstab file?
34. What is kudzu?
35. List the command for mounting a USB drive.
36. List the Linux command that is used to verify a drive has been mounted.
37. What command must be entered before the media can be removed from a drive that has been mounted?
38. List the command to gracefully shut down the Linux system.
39. The last command entered from the command line in Linux can be repeated by pressing what key?
40. What command can be entered in Linux to display previously entered commands?
41. What is the keystroke that can be used to complete entries on the command line?
42. List the command to search for installed applications on Linux. Use the pipe command to display only results with wu-ftpd in them.
43. What command is used to find out where a file comes from?
44. What is the Linux command to uninstall an application?
45. What is the Linux command for installing an application?
46. How is a service controlled by xinetd enabled after installation?
47. What command starts the Apache web server?
48. The script for starting the Apache web server is found in what directory?
49. The index.html file is found in what directory in Linux?
50. The httpd.conf file is located in what directory in Linux?
51. The Apache web server can be restarted using what command?
52. What is the Linux command for listing all network interfaces running on the system?
53. What is the subnet mask called in Linux?
54. How is the Ethernet1 network interface card identified in Linux?
55. The ifconfig command is entered and lo is displayed. What is this?
56. List the command to change the IP address of the Ethernet0 network interface to 10.10.20.5 with a subnet mask of 255.255.255.0.
57. List the command to shut down the Ethernet1 network interface.
58. What command can be used to verify that a network interface is down?
59. What is the command to bring a network interface back online?
60. What command shuts down all network interfaces?
61. List the Linux command for starting the network interfaces.
62. What command can be used to verify that the network has started?
63. List the command for adding a gateway address for the Linux network interface.
64. The Linux network programs use a set of scripts found in what directory?
65. What is the command to install the openssh-server in Linux?
66. FTP is being used to connect to another machine. List the command that instructs the FTP server to prompt for a user’s password.
67. The Washington University FTP server is to be installed on a Linux machine. Provide the command and steps required to install the server and make the services available.
68. The list of information for the DNS service is found in what directory in Linux?
69. List the command for changing the hostname of the Linux machine to chip.
70. Why is the dmesg command used?
71. What is the Linux command to reboot?
72. Match the following Linux troubleshooting files with their content:
1. boot.log a) keeps track of user login
2. lastlog b) log of mail activity
3. maillog c) keeps track of the boot process
4. messages d) tracks users entering or exiting the system
5. secure e) report on hardware or software errors
6. spooler f) mail management
73. List two commands to check for users that have logged onto the system since the last reboot.
74. Which command lists all users that have logged onto the system since the last reboot?
75. What is the command to scan a computer to determine what network ports and services are being made available to users?
76. List the command used to enable and disable services at boot time.
77. The services running on a Linux machine can be listed by entering what command?
78. Write the command to disable the wu-ftpd service.
79. Identify the command that provides information about network connections that exist on the system.
80. In Fedora 16, the System Config tools, (system administration tools), are all prefixed how?
81. How can the system tools be displayed in Linux? Specify the directory and the command used to list all tools.
82. What is the purpose of the system-config-date tool?
83. What is the purpose of the system-config-firewall tool?
84. What questions should the network administrator ask when setting the security for a new computer installation?
85. What tool is used for the network settings? What options are available through this tool?
86. You suspect that someone has broken into a computer. Discuss the steps you might take to correct the problem.
87. You are attempting to install the Apache web server, and a prompt is displayed that states a certain application is missing. Describe how this problem can be corrected.
88. What questions should you ask when installing new software on any machines attached to your network?
89. What steps can you take to find a printer driver that isn’t included with a Linux distribution?
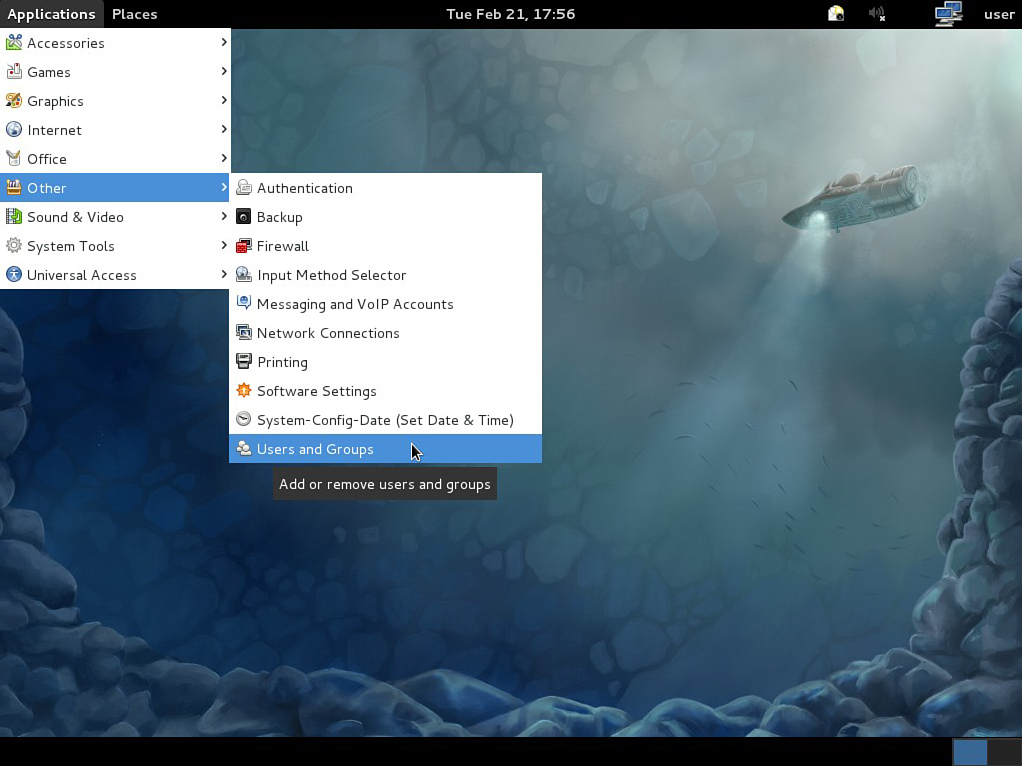
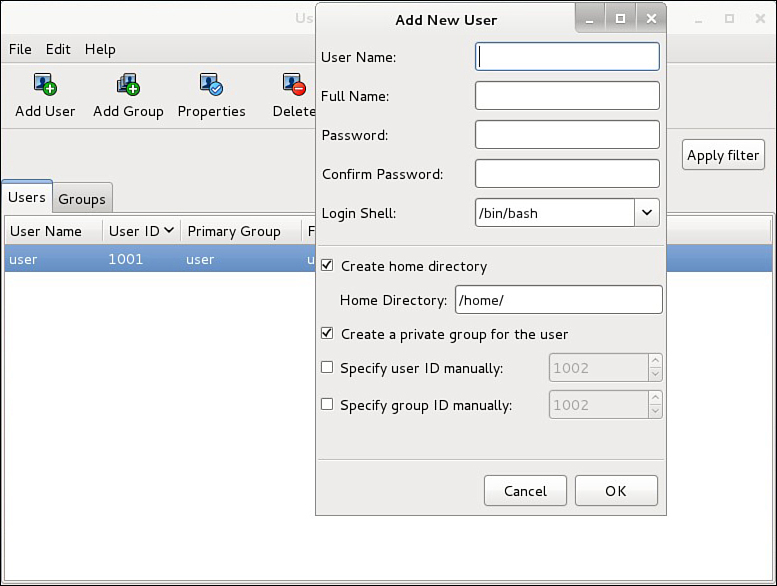

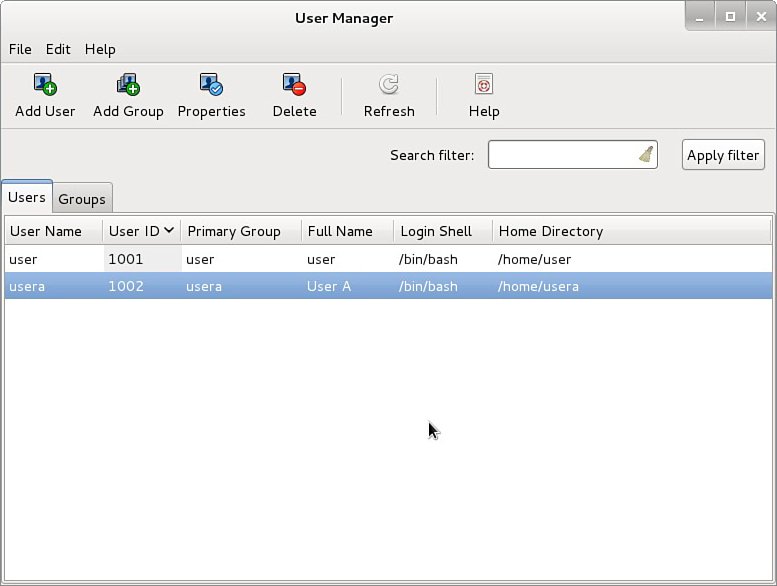


![Screenshot shows a Linux command screen. Command prompt reads as follows: [usera@localhost usera]$](graphics/09fig08.jpg)

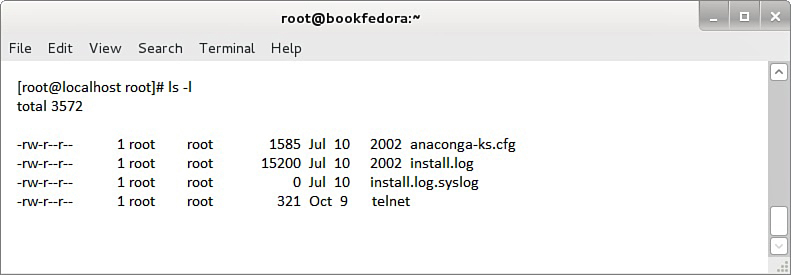
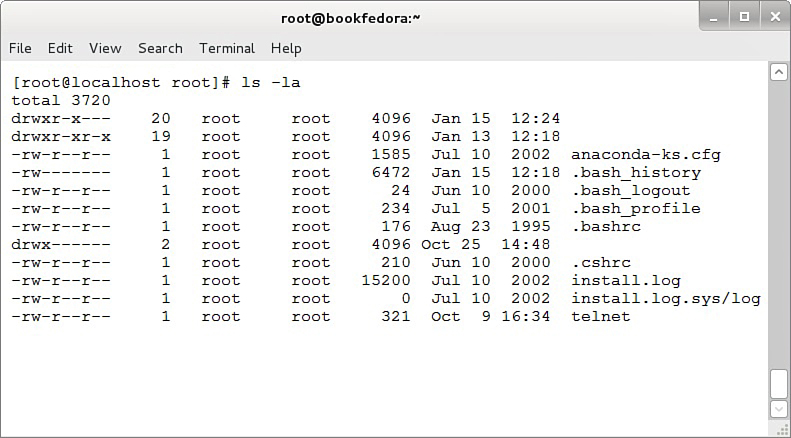
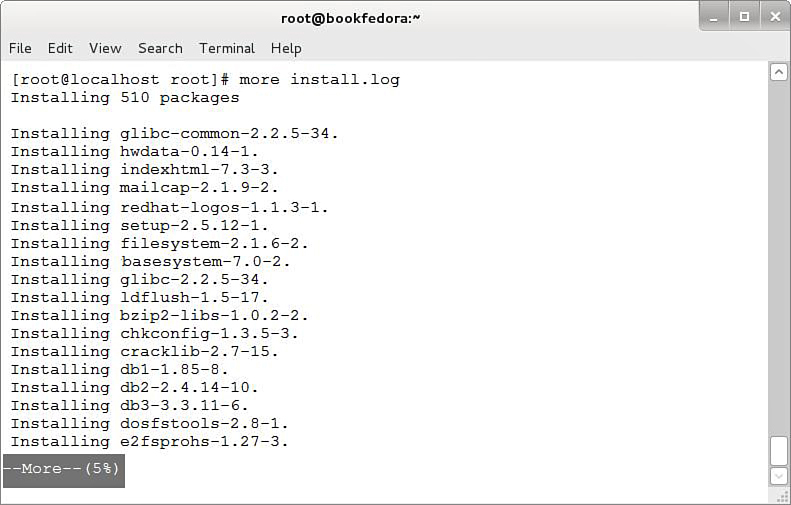

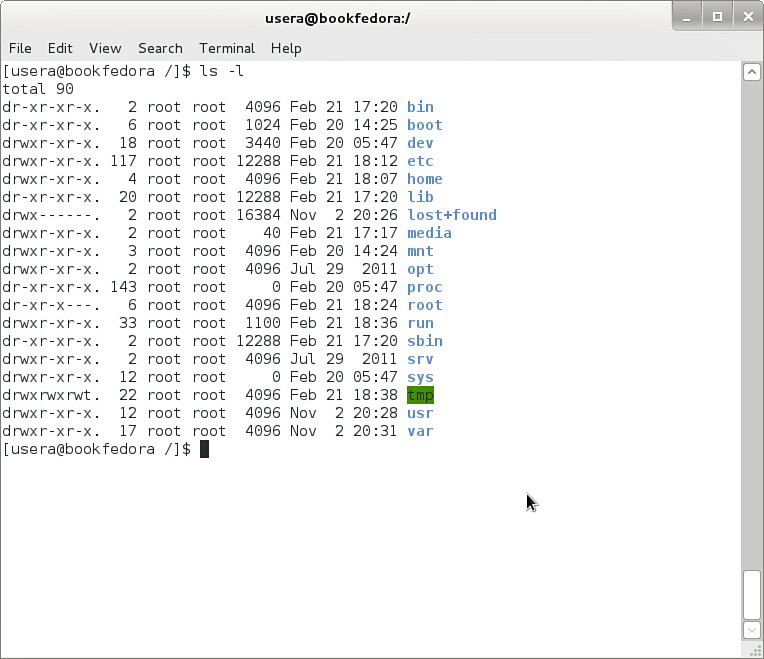
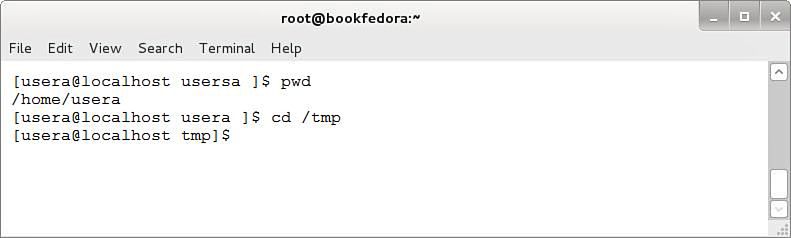
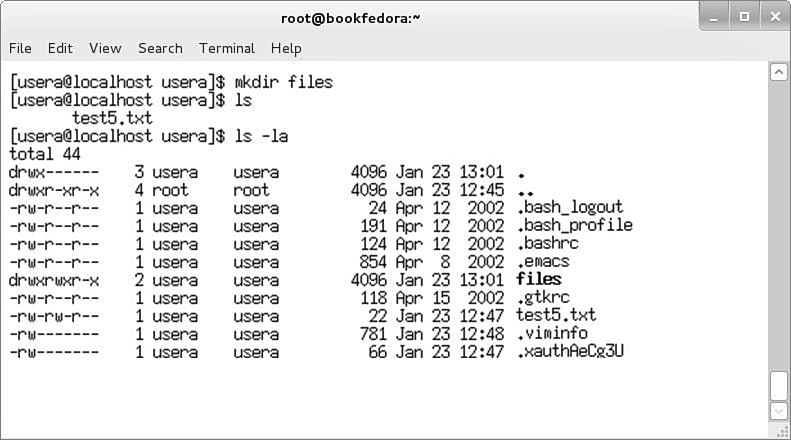
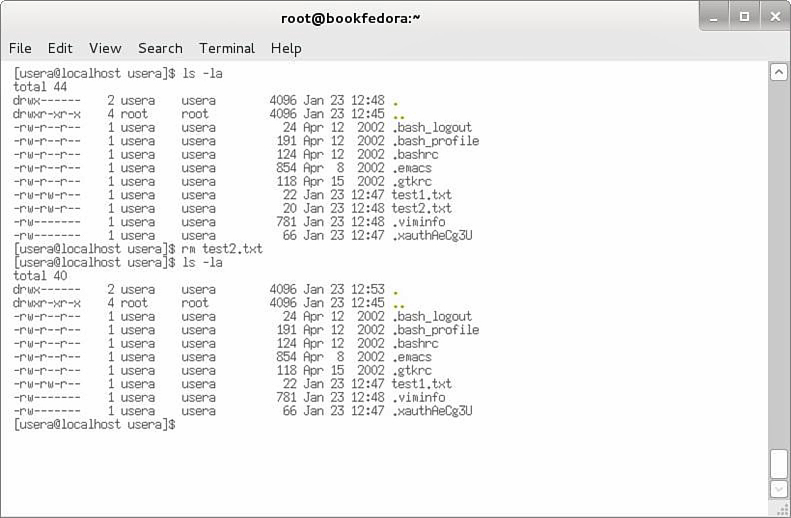
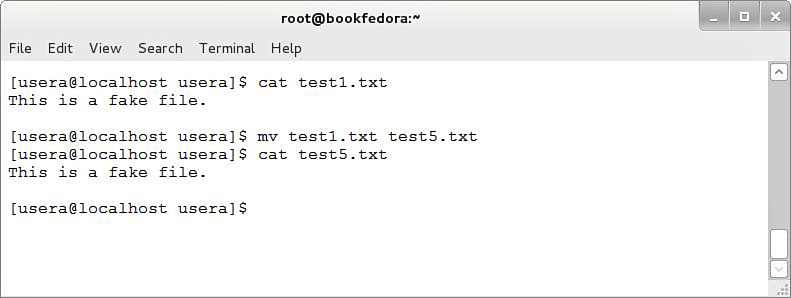
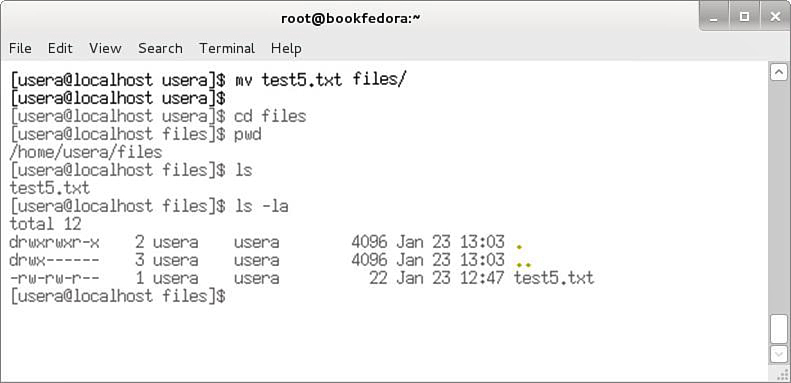
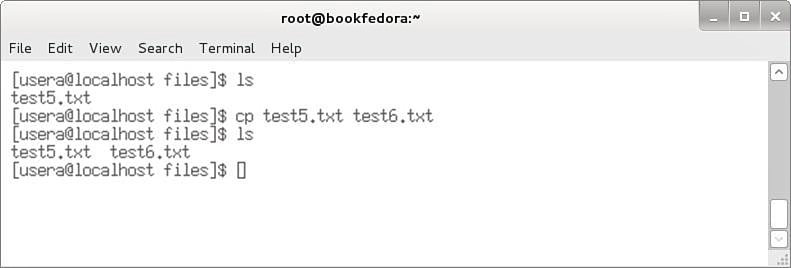
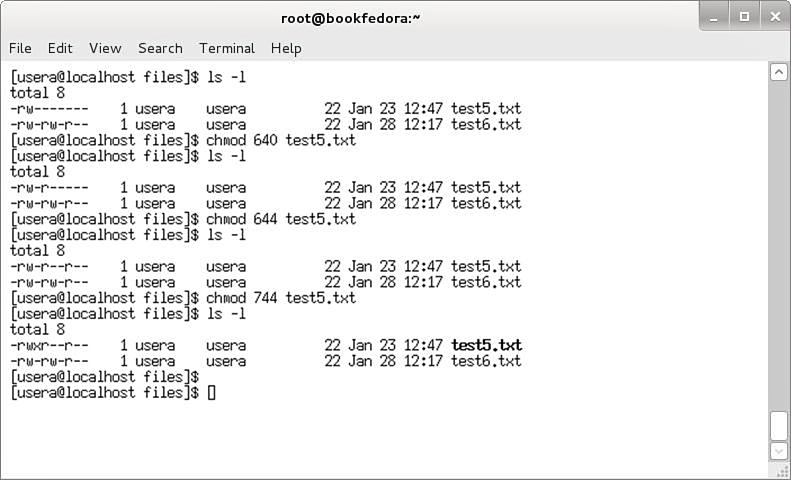
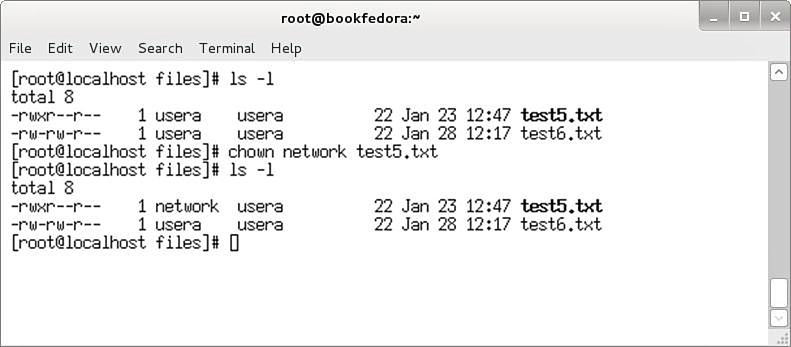
![Screenshot shows a Linux command screen with the following tabs: File, Edit, View, Search, Terminal, and Help. The command reads: [user@localhost files]$ chmod 755 test5.txt chmod: changing permissions of 'test5.txt': Operation not permitted [user@localhost files]$ 0](graphics/09fig23.jpg)
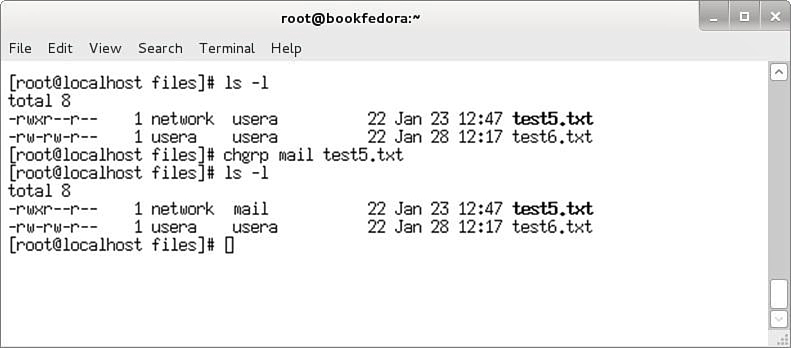
![Screenshot shows a Linux command screen with the following tabs: File, Edit, View, Search, Terminal, and Help. The m a n command is executed [root@localhost]¥ man ps [usera@local host] ¥](graphics/09fig25.jpg)
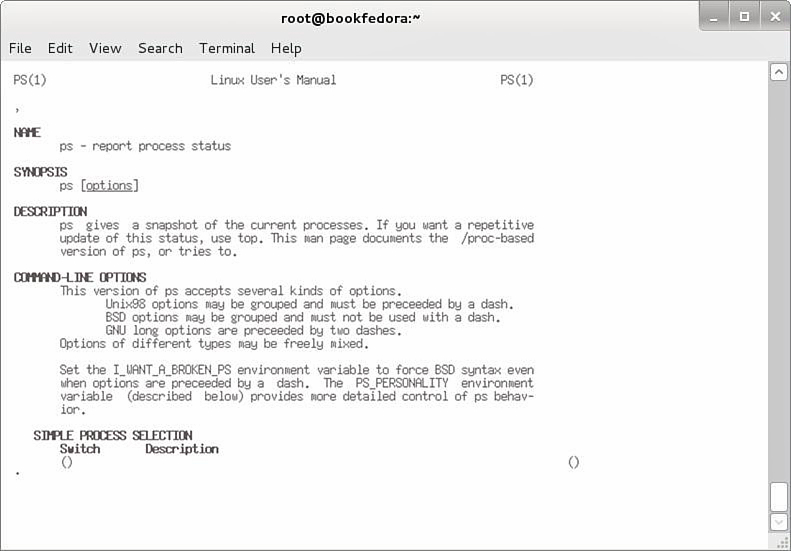
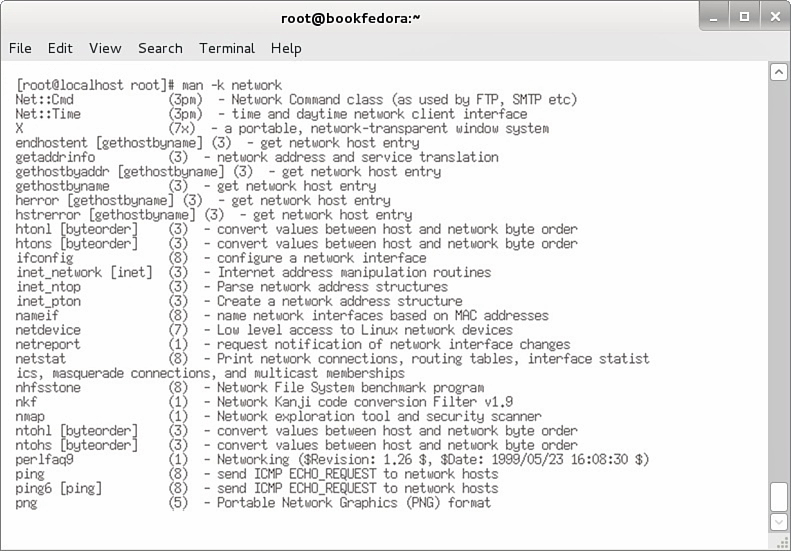

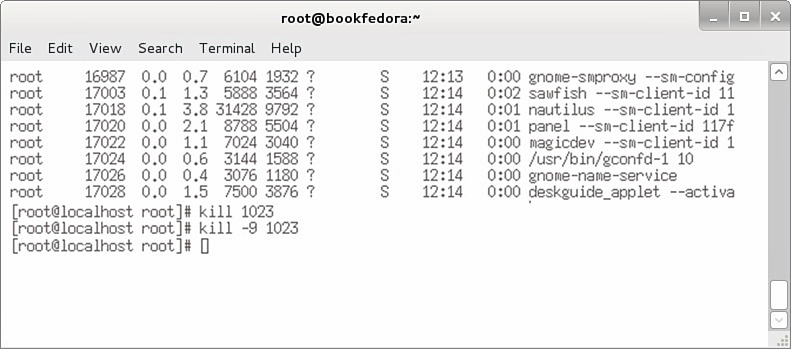
![Screenshot shows a Linux command screen with the following tabs: File, Edit, View, Search, Terminal, and Help. The s u command is executed. Command prompt reads as follows: [root@chile tmp]# su usera [usera@chile usera]$](graphics/09fig30.jpg)
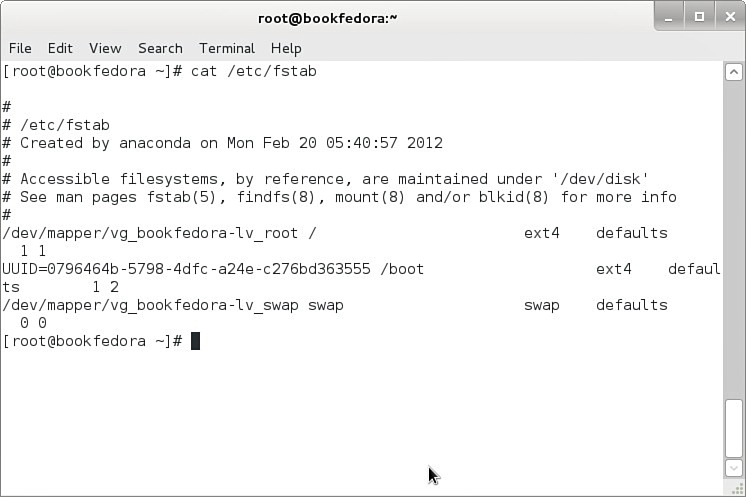

![Screenshot shows a Linux command screen with the following tabs: File, Edit, View, Search, Terminal, and Help. The shutdown h now command is entered. [root@localhost root]# shutdown h now](graphics/09fig33.jpg)
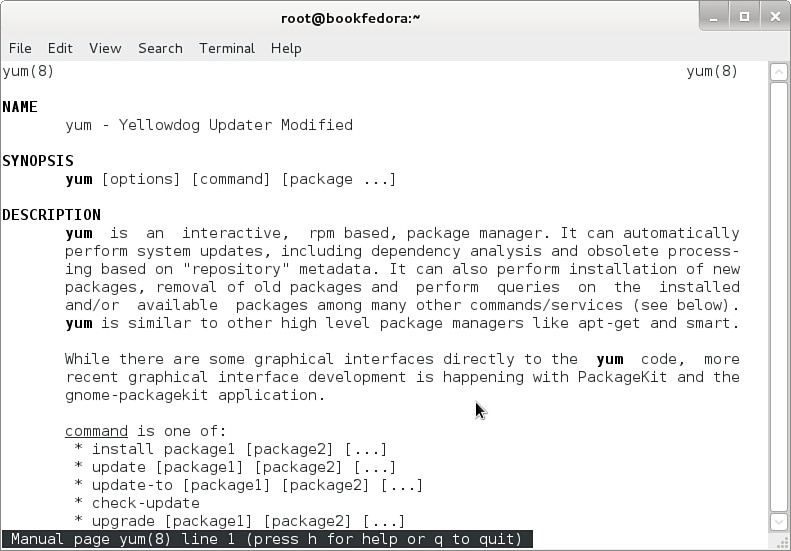
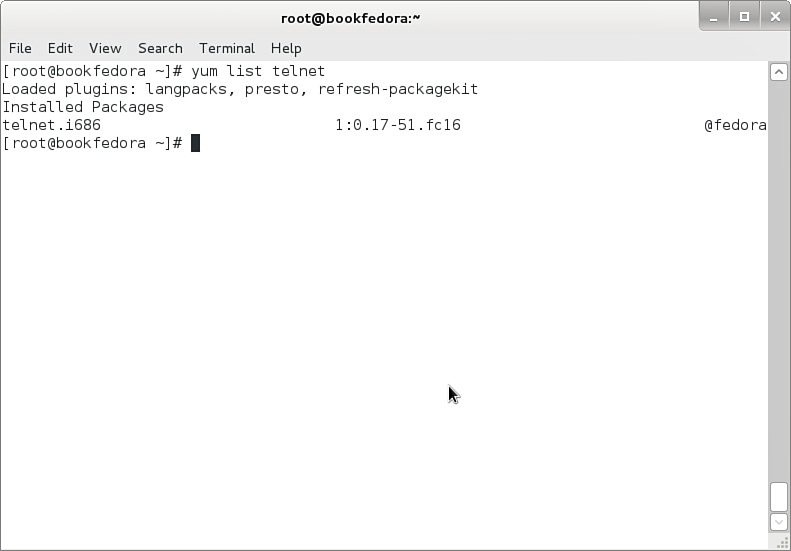
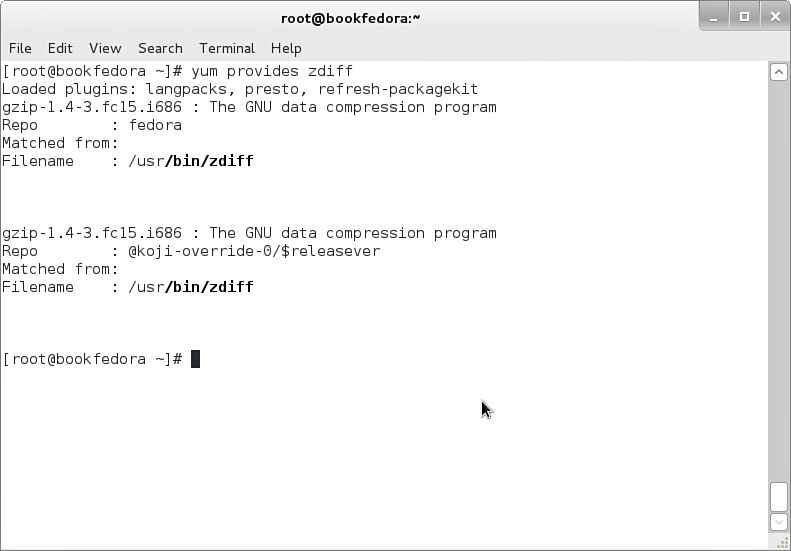

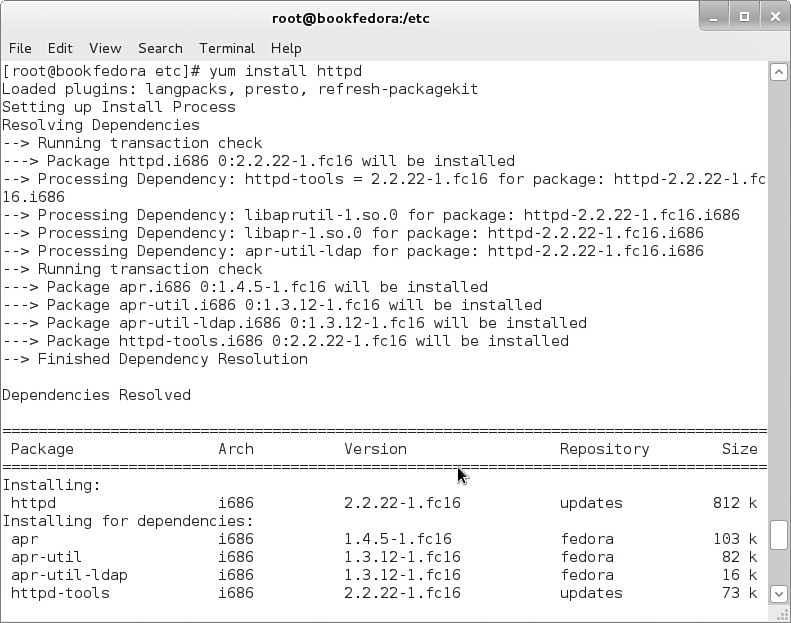
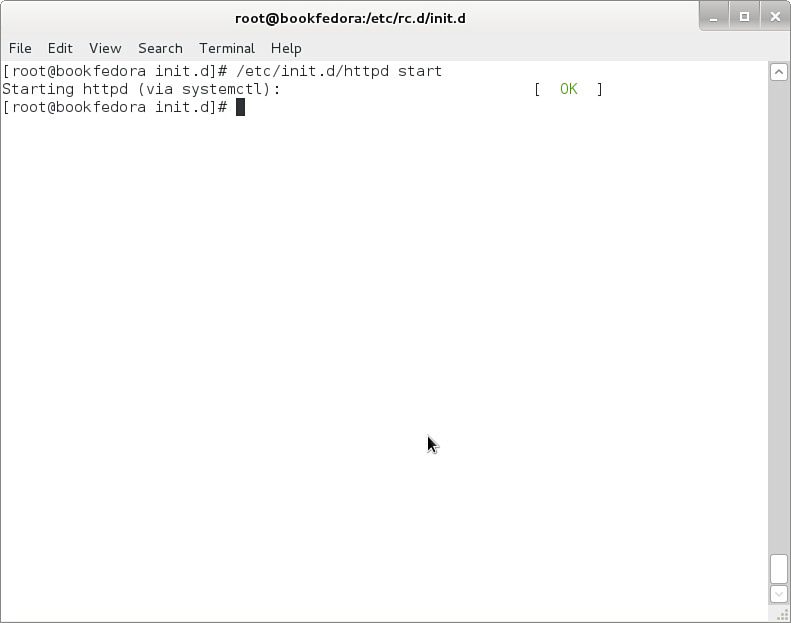
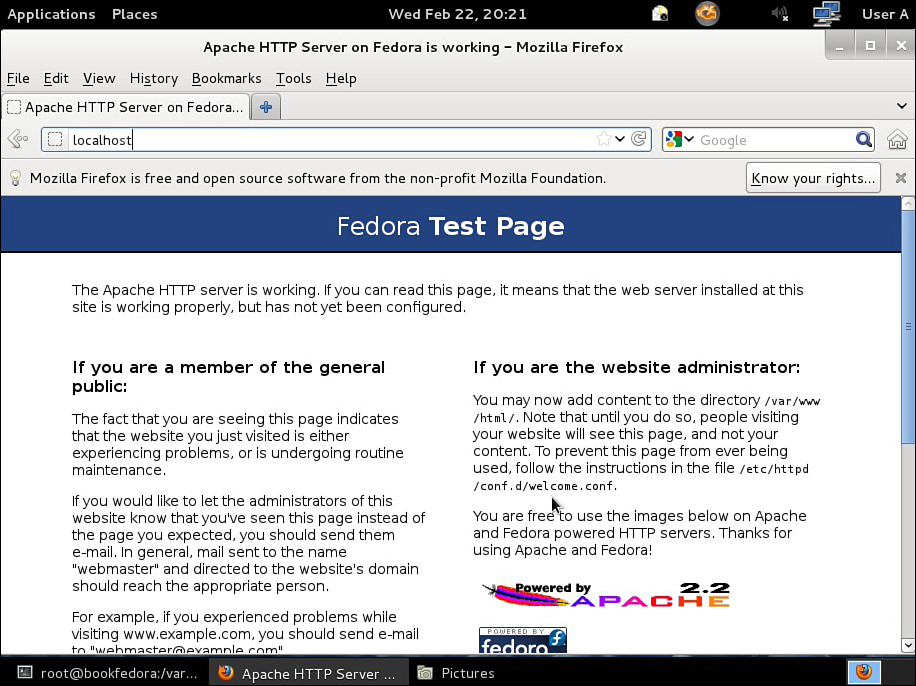


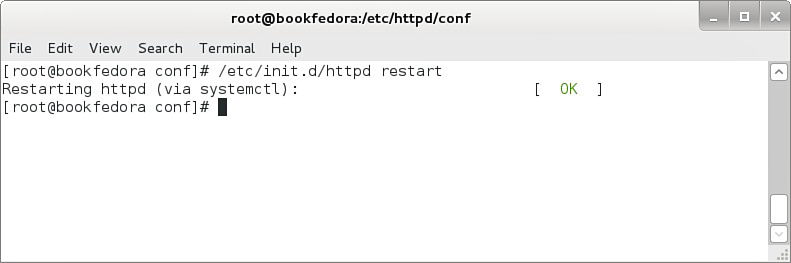


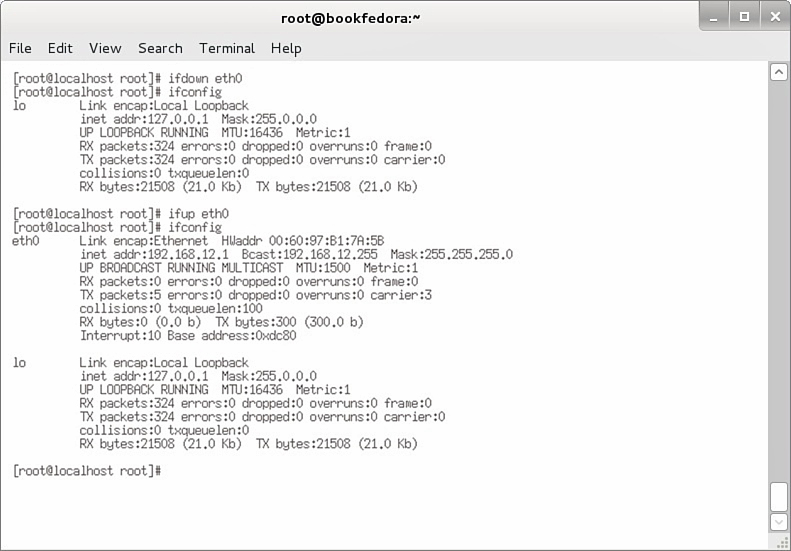
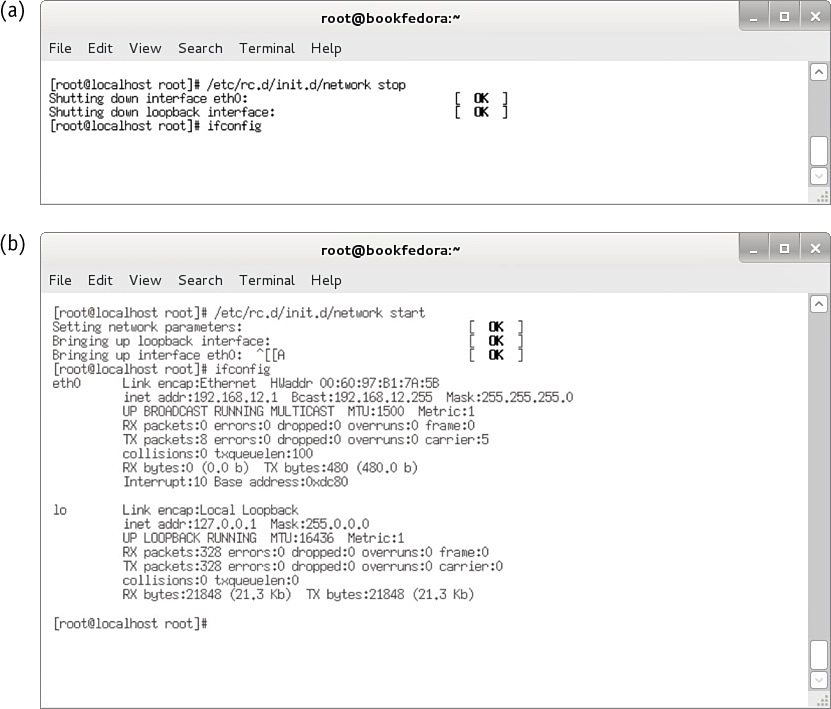
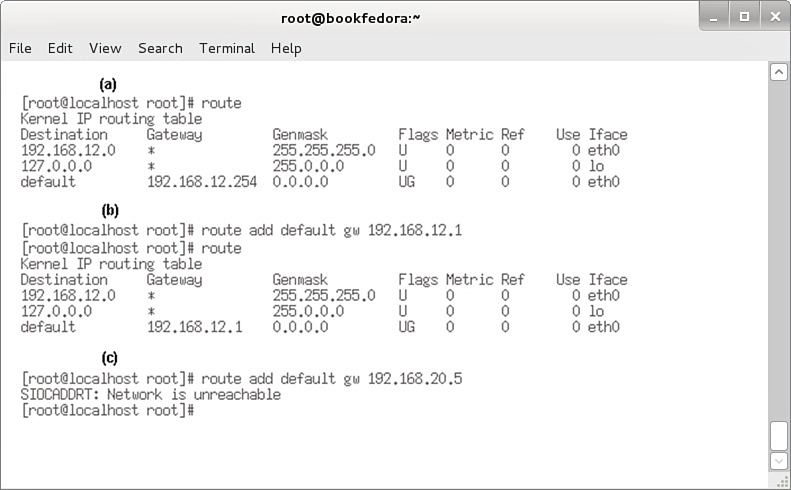

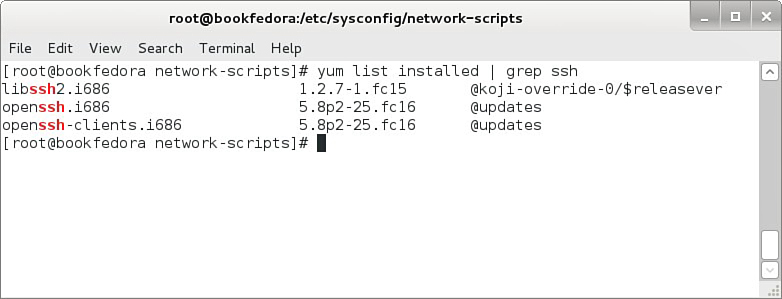
![Screenshot shows the establishing an SSH connection with the following tabs displayed: File, Edit, View, Search, Terminal, and Help. The command reads: [root@localhost RPMS]# ssh user@machine.edu](graphics/09fig51.jpg)
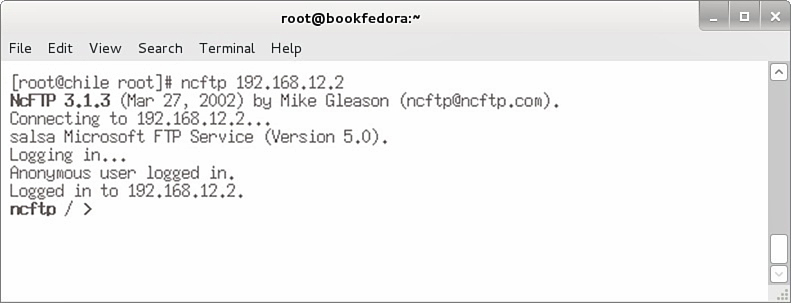
![Screenshot shows the command to locate DNS resolv.conf file in Linux with the following tabs: File, Edit, View, Search, Terminal, and Help. The command reads: [root@localhost etc]# Is resolv.conf Resolv.conf [root@localhost]# pwd /etc [root@localhost]#](graphics/09fig53.jpg)
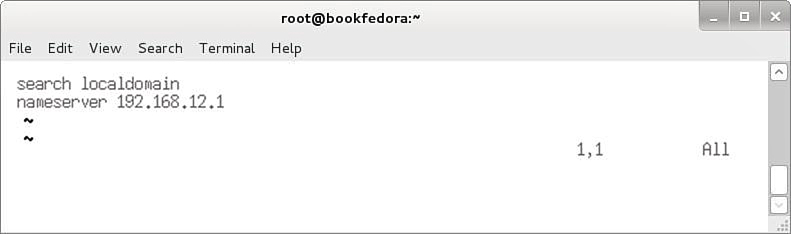
![Screenshot shows the change of host name with the following fields: File, Edit, View, Search, Terminal, and Help. The command reads: [root@chile root]# hostname chile-one [root@chile root]# []](graphics/09fig55.jpg)
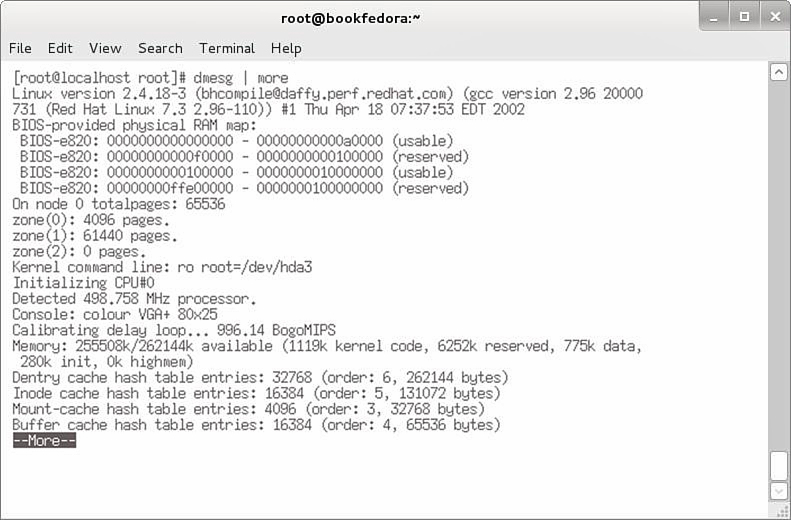
![Screenshot shows the command for reboot with the following fields: File, Edit, View, Search, Terminal, and Help. The command reads: [root@localhost root]# reboot](graphics/09fig57.jpg)


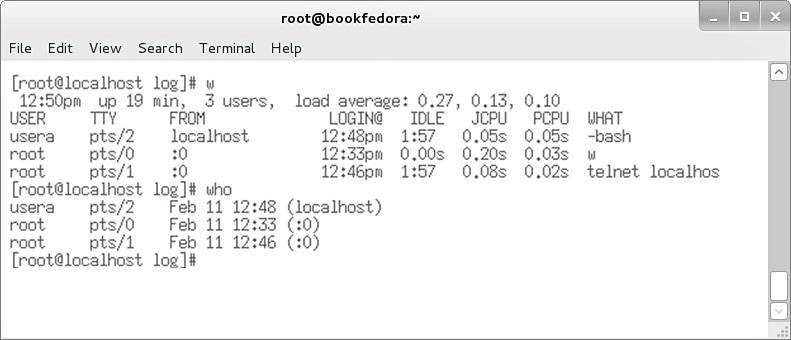
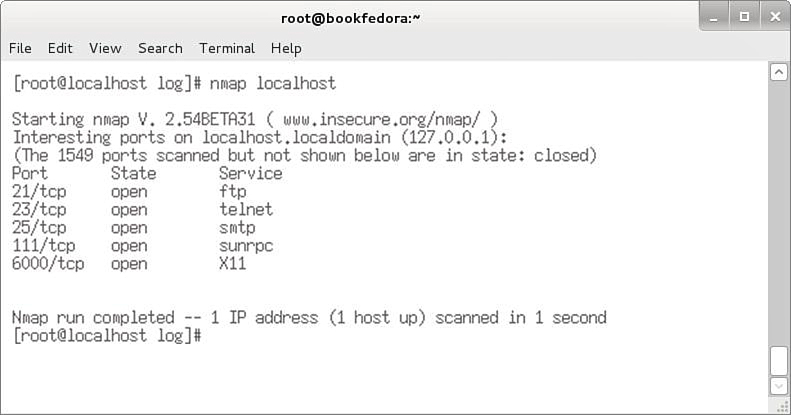


![Screenshot shows the command for chkconfig wu-ftpd off with the following fields: File, Edit, View, Search, Terminal, and Help. The command reads: [root@localhost log]# chkconfig wu-ftpd off [root@localhost log]#](graphics/09fig64.jpg)