Chapter 18
Your Mac Pro is a near-perfect machine right out of the box, but it might become less than perfect over time. On the hardware side, you might want to add more memory or put in a bigger hard drive. On the software side, you might want to install the newest versions of OS X and your apps. This chapter shows you how to upgrade your Mac Pro hardware and software.
Review the Mac Pro's Internal Components
Remove the Mac Pro Case
You can upgrade the Mac Pro memory and hard drive by removing the case to access Mac Pro's internal components. Unlike Mac notebooks such as the MacBook Pro and the MacBook Air, and unlike Mac desktops such as the iMac and Mac mini, the Mac Pro comes with an external case designed to allow for easy removal. You do not require any special tools or expertise, and it takes only a few seconds to open the case and close it again when you have finished working with Mac Pro's components.
Remove the Mac Pro Case
Remove the Case
 Shut down Mac Pro if it is currently running.
 Disconnect the Mac Pro power cord.
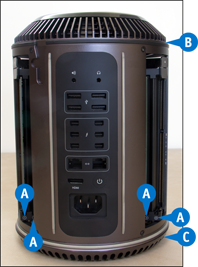
 Turn Mac Pro so that you can see the back.
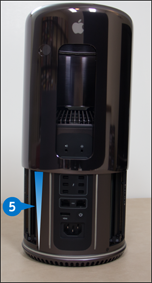
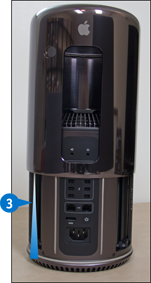
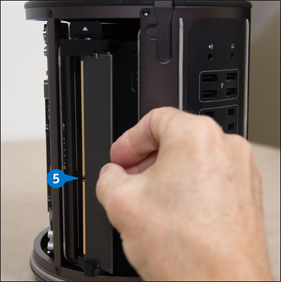
 Slide the case latch to the right to release the case.
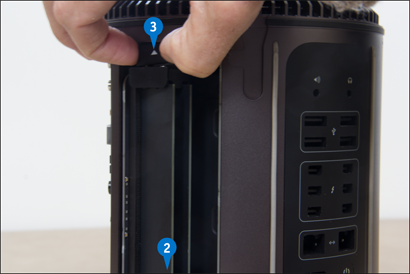
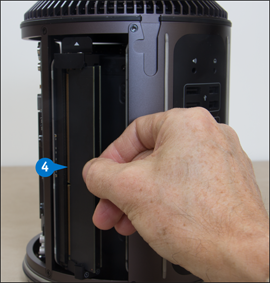
 Lift the case straight up until it clears the top of the unit.
Close the Case
Position the case over the top of Mac Pro.
Line up the port openings on the case with the ports in back of Mac Pro.
Carefully slide the case over Mac Pro until you hear the latch click into place.
Review the Mac Pro's Internal Components
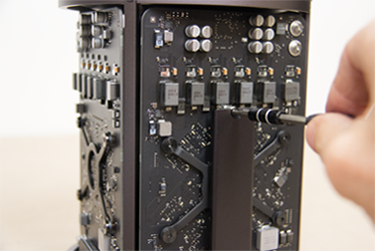
When you remove the Mac Pro case, you expose several of the machine's internal components. Although you do not need to know the name and purpose of every visible component to work with Mac Pro internally, you do need to know the location of those components you can change: the memory modules and the hard drive. Beyond that, Mac Pro is a marvel of engineering, so it is worthwhile to see how Apple managed to fit so much inside such a small package.
This component is the internal random access memory (RAM) that the Mac Pro processor uses to manipulate and store data from OS X and your applications. There are four memory slots, each of which contains a memory module. You can replace these memory modules, as described in the next section, “Upgrade the Memory.”
B Fan
Mac Pro is kept cool by a single fan at the top, which pulls air vertically through the machine, with the hot air generated by the components expelled through the top.
C Intake
The Mac Pro fan not only expels hot air through the top, but it also brings in cool external air through a bottom intake grate.
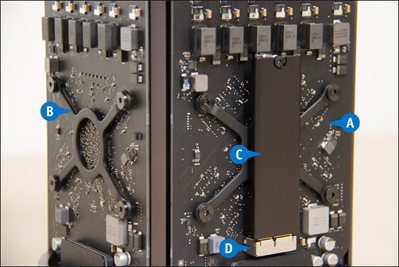
This component contains the graphics processing unit (GPU), which is a dedicated processor for handling Mac Pro graphics. The graphics card also includes onboard video random access memory (VRAM) that enables the GPU to keep data in memory without using up system memory.
B Second Graphics Card
Your Mac Pro comes with a second graphics card identical to the first and so offers twice the graphics performance.
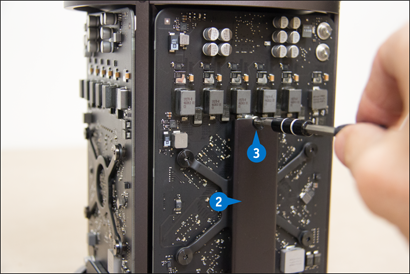
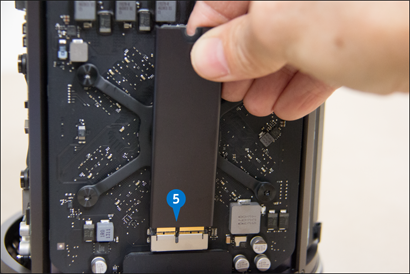
C Hard Drive
This is the solid-state drive (SSD) that Mac Pro uses as internal storage for OS X, your applications, and your data. You can replace this drive with another, as described in the section “Upgrade the Hard Drive.”
D Hard Drive Connector
This component connects the hard drive to the Mac Pro's input/output system, which the processor uses to move data to and from the hard drive.
Upgrade the Memory
The Mac Pro has four memory module sockets, two on one side of the rear ports and two on the other side of the ports. You need to upgrade your memory by using identical modules. The module sockets are numbered from 1 to 4, and you need to use up the module sockets in numeric order. For example, if you want to use only two sockets, then you must insert the memory modules in sockets 1 and 2. See the first tip in this section to learn what type of memory to use.
Upgrade the Memory
Turn off and unplug Mac Pro, remove the case, and touch something metal to ground yourself.
Note: See the section “Remove the Mac Pro Case” for the details on taking off the case.
Orient Mac Pro so that the first bank of memory modules (slots 1 and 2) is facing you.
Lift up the ejector tab that appears above the memory modules.
Carefully slide the memory module out of its socket.
Orient the new memory module over the memory socket so that the module's notch lines up with the socket's ridge.
 Slide the memory module into the thin horizontal channels on the ends of the socket and then carefully press the module into place.
 Repeat steps 4 to 6 to replace the other memory module.
 Press the lever at the top of the modules to pivot the modules back into the locked position.
 Repeat steps 3 to 8 to upgrade the other bank of memory modules, if needed.
Upgrade the Hard Drive
Your Mac Pro comes with a single internal hard drive, which is mounted over one of the graphics cards. The hard drive is held in place by a single screw, so you can easily replace it with another drive if you require more capacity. See the tip in this section to learn what type of drive you should purchase. Remember that you will need to restore your system from a backup after installing the new drive; see Chapter 17.
Upgrade the Hard Drive
Turn off and unplug Mac Pro, remove the case, and touch something metal to ground yourself.
Note: See the section “Remove the Mac Pro Case” for the details on taking off the case.
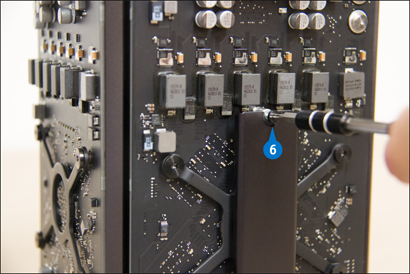
Orient Mac Pro so that the hard drive is facing you.
Using a T8 Torx driver, remove the screw that holds the hard drive in place.

Remove the hard drive by carefully pulling it out of the connector.
Insert the new hard drive into the connector.
Insert the screw to hold the new hard drive in place.
Update OS X
To make sure that OS X is currently up to date with the latest features and fixes, you can update the software. Apple makes OS X updates available from time to time. These updates fix problems, add new features, and resolve security issues. You can reduce computer problems and maximize online safety by installing these updates as they become available. OS X displays a notification when new updates are ready, and you can initiate the update either by using that notification or by using the App Store.
Update OS X
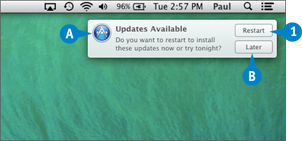
A This notification appears when updates become available.
Click Restart.
Mac Pro restarts and then installs the OS X updates.
B If you do not want to perform the update now, you can click Later and then click when you want to be reminded.
Install Selected Updates
Click App Store ( ).
).
The App Store appears.
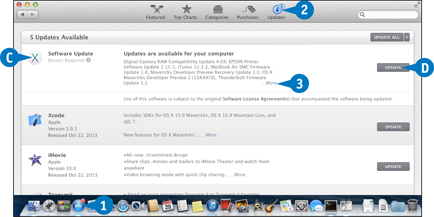
Click Updates.
The App Store connects with the Apple servers and checks for new updates.
C OS X updates appear here.
D If you want to install all the available OS X updates, click this Update button. Skip to step 5.
Click More.
The App Store displays the list of available OS X updates.
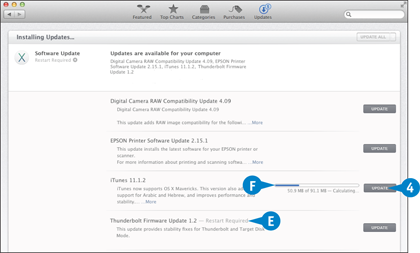
E If you install any updates that say Restart Required, Mac Pro will restart automatically to complete the installation.
Click Update beside the update you want to install.
F The App Store displays the update download and install progress.
For some updates, your Mac Pro prompts you to restart the computer.
If you have any unsaved work, save and close those documents.
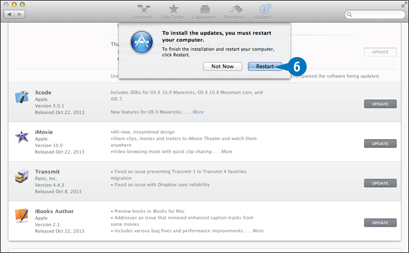
Click Restart.
Update Third-Party Apps
If you have installed third-party (that is, non-Apple) apps on your Mac Pro, you can ensure that those apps have the latest features and fixes by updating the apps. Most developers create updates to their apps from time to time, and they make those updates available via the App Store. These updates fix bugs, implement new features, and more, so you can ensure that your apps continue to run smoothly by installing app updates as they become available.
Update Third-Party Apps

Click App Store ().
The App Store appears.
Click Updates.
The App Store checks for new updates.
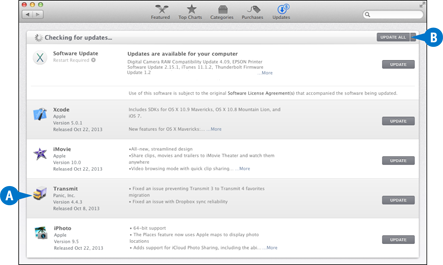
A App updates appear here.
B If you want to install all the available updates, click Update All. Skip to step 4.
App Store displays the list of available app updates.
C To find out more information about an update, click More.
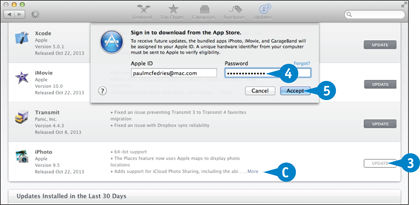
Click Update beside the app update you want to install.
If the App Store asks you to sign in, type your App Store password.
Click Accept.

D The App Store displays the update download and install progress.
Repeat step 3 for each app you want to update.
TIPS
Is there a way to have apps updated automatically?
Yes, you can configure Mac Pro to download and install app updates automatically. This is useful if you have many apps installed and do not want to check constantly for updates. In the Dock, click System Preferences ( ), click App Store, and then select the Install app updates option (
 changes to
  ).
).
Are all third-party apps updated via the App Store?
No, some apps come with their own updating mechanisms. For example, most versions of the Microsoft Office productivity suite and most software Adobe makes come with their own software updating tools. These normally run on an automatic schedule, such as once per week.