
FIGURE 17.1. A new form can be added to the open VBA project by selecting UserForm from the Insert menu.
| Chapter 17 | CREATING CUSTOM FORMS |
Although ready to use and convenient, the built-in dialog boxes will not meet all of your VBA application’s requirements. Apart from displaying a dialog box on the screen and specifying its initial settings, you can’t control the dialog box’s appearance. You can’t decide which buttons to add, which ones to remove, and which ones to move around. Also, you can’t change the size of a built-in dialog box. Therefore, if you’re looking to provide a custom interface, you need to create a user form.
A user form is like a custom dialog box. You can add various controls to the form, set properties for these controls, and write VBA procedures that respond to form and control events. Forms are separate objects that you add to a VBA project by choosing Insert | UserForm from the Visual Basic Editor. Forms can be shared across applications. For example, you can reuse the form you designed in Microsoft Excel in Microsoft Word or any other application that uses Visual Basic Editor.
To create a custom form, follow these steps:
1. Press Alt-F11 or select Developer | Visual Basic to switch to the Visual Basic Editor window.
2. Choose Insert | UserForm.
A new folder called Forms appears in the Project Explorer window. This folder contains a blank UserForm object. The work area automatically displays the form and the Toolbox with the necessary tools for adding controls (see Figure 17.1).
FIGURE 17.1. A new form can be added to the open VBA project by selecting UserForm from the Insert menu.
The Properties window (see Figure 17.1) displays seven properties that you can set: Appearance, Behavior, Font, Misc, Picture, Position, and Scrolling. To list form properties by category, click the Categorized tab in the Properties window. To find out information about a specific property, click the property name and press F1. The online help will be launched with the property description topic.
After adding a new form to your VBA project, you should assign a unique name to it by setting the Name property. You can also set the form’s title by using the Caption property.
All VBA applications that use the Visual Basic Editor share features for creating custom forms. You can share your forms by exporting and importing form files or by dragging a form object to another project. To import or export a form file, choose File | Import File or File | Export File. Before you export a form file, be sure to select it in the Project Explorer window. Before dragging a form to a different VBA application, arrange the VBE windows so that you can see the Project Explorer window in both applications, then drop the form on the name of another project in the Project Explorer.
When you design a form, you insert appropriate controls into it to make it useful. The Toolbox (Figure 17.2) contains standard Visual Basic buttons for all the controls that you can add to a form. It may also contain additional controls that have been installed on your computer. Controls available in the Toolbox are known as ActiveX controls. These controls can respond to specific user actions, such as clicking a control or changing its value.
You will learn how to use the Toolbox controls throughout the remaining sections of this chapter. If you have other applications installed on your computer that contain ActiveX controls that you’d like to use, you can also place them in the Toolbox. Let’s take a few minutes and add a Date and Time Picker ActiveX control to the Toolbox. This control is one of several controls included in the Microsoft Windows Common Controls 6.0 located in the MSCOMCT2.OCX file.

FIGURE 17.2. The Toolbox displays the controls that can be added to your custom form.
Please note files for the “Hands-On” project may be found on the companion CD-ROM. |
|
Hands-On 17.1. Adding an ActiveX Date and Time Picker Control to the Toolbox. |
1. Open a new workbook and save it as C:\VBAExcel2016ByExample\Chap17_VBAExcel2016.xlsm.
2. Switch to the Visual Basic Editor window and select VBAProject (Chap17_VBAExcel2016.xlsm) in the Project Explorer window. Use the Properties window to rename the project VBA_Forms.
3. Choose Insert | UserForm to add a new form to the selected project.
A default user form named UserForm1 appears with the accompanying Toolbox.
4. Right-click the Controls tab in the Toolbox and choose New Page from the shortcut menu.
A New Page tab appears in the Toolbox.
5. Right-click the New Page tab in the Toolbox and choose Rename. If this option is not available, make sure you are right-clicking the New Page tab.
6. In the Caption box, type Extra Controls as the new name.
7. In the Control Tip Text box, type the following description: Additional ActiveX Controls.
8. Click OK to return to the Toolbox.
9. Right-click anywhere within the new page area and choose Additional Controls from the shortcut menu. If this option is not available, make sure you are right-clicking the page area in the Toolbox and not the Extra Controls tab itself.
10. When the Additional Controls dialog box appears, click the checkbox next to Microsoft Date and Time Picker Control 6.0, as shown in Figure 17.3.

FIGURE 17.3. You can add to the Toolbox additional ActiveX controls that are installed on your computer.
11. Click OK to close the Additional Controls dialog box.
The DTPicker control now appears on the Extra Controls page in the Toolbox (see Figure 17.3).
The standard Visual Basic controls are described below. You will use many of these controls in this chapter’s Hands-On projects.
|
Select Objects |
Select Objects is the only item in the Toolbox that doesn’t draw a control. Use it to resize or move a control that has already been drawn on a form.
|
Label |
The Label control is often used to add captions, titles, headings, and explanations to your forms. You can use the label to assign a title to those controls that don’t have the Caption property (for example, text boxes, listboxes, scrollbars, and spin buttons). You can define an accelerator (shortcut) key for the label. For example, by pressing Alt and a specified letter, you can activate the control that was added to the form immediately after adding the Label control and setting its Accelerator property. To add a title or a keyboard shortcut to an existing control, add a Label control and type a letter from its caption in its Accelerator property in the Properties window. Next, choose View | Tab Order, and make sure that the name of the label appears before the name of the control that you want to activate with the assigned keyboard shortcut. You will learn how to use the Tab Order dialog box later in this chapter (see Figure 17.6).

FIGURE 17.6. The Tab Order dialog box lets you organize the controls on the form in the order you would like to access them.
|
Text Box |
Text boxes are the most popular form controls because they can be used to either display or request data from the user. You can enter text, numbers, cell references, or formulas in them. By changing the setting of the MultiLine property, you can enter more than one line of text in a text box. The text lines can automatically wrap when you set the WordWrap property. If you set the EnterKeyBehavior property to True when the MultiLine property is also set to True, you’ll be able to start a new line in the text box by pressing Enter. Another property, EnterFieldBehavior, determines whether the text is selected when the user selects the text field. Setting this property to 0 (fmEnterFieldBehaviorSelectAll) will select the text within the field. Setting this property to 1 (fmEnterFieldBehaviorRecallSelect) will only select the text that the user selected the last time he activated this field. If you want to limit the number of characters the user can enter in a text box, you can do this by specifying the exact number of characters in the MaxLength property.
|
Frame |
Frames allow you to visually organize and logically group various controls placed on the form. Later in this chapter, you will find an example of the Info Survey form that uses two frames. One of them organizes Hardware and Software option buttons into one logical group; the second frame groups the checkboxes related to the computer type (see Figure 17.4).

FIGURE 17.4. The Info Survey custom form allows the user to quickly enter data by making appropriate selections from various controls placed on the form.
|
Command Button |
A command button carries out a command when it is clicked. In this chapter you will learn how to execute VBA procedures from command buttons.
|
Option Button |
An option button lets you select one of a number of options. Option buttons usually appear in groups of two or more buttons surrounded by a frame control. Only one option button can be selected. When you select a new option button, the previously selected option button is automatically deselected. To activate or deactivate an option button, set its Value property to True or False. True means that the option is activated; False indicates that the option is deactivated.
|
Check Box |
Checkboxes are used for turning specific options on and off. Unlike option buttons, you can select one or more checkboxes. If the checkbox is selected, its Value property is set to True; if the checkbox is not selected, its Value property is set to False.
|
Toggle Button |
A toggle button looks like a command button and works similarly to an option button. When you click a toggle button, the button stays pressed. The next click on the button returns it to the normal (unpressed) state. The pressed toggle button has its Value property set to True. The unpressed toggle button has its Value property set to False.
|
Listbox |
Instead of prompting the user to enter a specific value in a text box, sometimes it’s better to present a list of available choices from which to select. The listbox reduces the possibility of data entry errors. The listbox entries can be typed in a worksheet, or they can be loaded directly from a VBA procedure using the AddItem method. The RowSource property indicates the source of data displayed in the listbox. For example, the reference $A$1: $B$8 will display in the listbox the contents of the specified range of cells.
The listbox can display one or more columns when you set the ColumnCount property. Another property, ColumnHeads, can be set to True to display the column titles in the listbox.
The user may select more than one item in the listbox if the MultiSelect property is set to True.
|
Combo Box |
The combo box is a control that combines a text box with a listbox. This control is often used to save space on the form. When the user clicks the down arrow located to the right of the combo box, the box will drop open to reveal a number of items from which to choose. The user may enter a new value if you set the MatchRequired property to False. The ListRows property determines how many items will appear when the user drops down the list. The Style property determines the type of combo box. To let the user select an item from the list, use 0 (fmStyleDropDownCombo). Set the Style property to 2 (fmStyleDropDownList) to limit the user’s selection to the items available in the combo box.
|
Scrollbar |
This control allows you to place horizontal and vertical scrollbars on your form. Although normally used to navigate windows, scrollbars can be used on your form to enter values in a predefined range. The current value of the scrollbar is set or returned by the Value property. The scrollbar’s Max property lets you set its maximum value. The Min property determines the minimum value. The LargeChange property determines by what value the Value property should change when the user clicks inside the scrollbar. When programming the behavior of the scrollbar, don’t forget to set the SmallChange property that determines how the Value property changes when you click one of the scroll arrows.
|
Spin Button |
The spin button works similarly to a scrollbar. You can click an arrow to increment or decrement a value. The spin button is often used with a text box. The user can then type the exact value in the text box or select a value by using the arrows. The technique of using the spin button with a text box is discussed later in this chapter.
|
Image Control |
The image control lets you display a graphical image on a form. This control supports the following file formats: *.bmp, *.cur, *gif, *.ico, *.jpg, and *.wmf. Like other controls in the Toolbox, the image control has a number of properties that you can set. For example, you can control the appearance of the picture with the PictureSizeMode property. This property has three settings:
• 0 (fmPictureSizeModeClip) crops the part of a picture that does not fit within the picture frame.
• 1 (fmPictureSizeModeStretch) stretches the picture horizontally or vertically until it fills the entire frame area.
• 3 (fmPictureSizeModeZoom) enlarges the picture without distorting its proportions.
|
MultiPage Control |
The MultiPage control displays a series of tabs at the top of the form. Each tab acts as a separate page. Using the MultiPage control, you can design forms that contain two or more pages. You can place a different set of controls on each form page to make the data more readable. It’s much easier to click a form tab than move around in a long form using scrollbars. By default, each MultiPage control appears on your form with two pages. New pages can be added by using the shortcut menu or the Add method from within a VBA procedure.
|
TabStrip Control |
Although the TabStrip and MultiPage controls look almost alike, each has a different function. The TabStrip lets you use the same controls for displaying multiple sets of the same data. Suppose that the form shows students’ exams. Each student has to pass an exam in the same subjects. Each subject can be placed on a separate page (tab), and each tab will contain the same controls to collect data, such as the grade received and the date of the exam. When you activate any subject tab, you will see the same controls. Only the data in these controls will change.
|
RefEdit Control |
This control is specific to forms created in Microsoft Excel, as it allows you to select a cell or a range of cells in a worksheet and pass it to your VBA procedure. You can see how this control works by taking a look at some of the built-in dialog boxes in Excel. For example, the Consolidate dialog box accessed from the Data tab’s Data Tools group has a RefEdit control labeled Reference that lets you specify the range of data that you want to consolidate. To temporarily hide the dialog box while selecting a range of cells, click the button on the right of the RefEdit control.
When you create a custom form, you place various controls that are available in the Toolbox on an empty form. The type of control you select depends on the type of data the control will have to store and the functionality of your form. The Toolbox can be moved around on the screen. You can also change its size, or close it when all controls are already on the form and all you want to do is work with their properties. The Toolbox display can be toggled on and off by choosing View | Toolbox. To add a new control to a form, first click the control image in the Toolbox and then click the form or draw a frame. Clicking on a form (without drawing a frame) will place a control in its default size. The standard settings of each control can be looked up in the Properties window. For example, the standard text box size is 18 × 72 points (see the Height and Width properties of the text box). After placing a control on a form, the Select Object button (represented by the arrow) becomes the active control in the Toolbox. When you double-click a control in the Toolbox, you can draw as many instances of that control as you want. For example, to quickly place three text boxes on your form, double-click the text box control in the Toolbox and then click three times on the form.
When you drag a control on a form, Visual Basic adjusts the control so that it aligns with the form’s grid. You can set the grid to your liking by using the Options dialog box.
To access grid options:
1. Choose Tools | Options.
2. Click the General tab in the Options dialog box.
The Form Grid Settings area lets you turn off the grid, adjust the grid size, and decide whether you want the controls aligned to the grid.
As you already know, the best way to understand a complex feature is to apply it in a real-life project. In this section, you will create a custom form for a coworker who requested that you streamline the tedious process of entering survey data into a spreadsheet. While working with this form (Figure 17.4), you will have the chance to experiment with many controls and their properties. Also, you will learn how to transfer data from your custom form to a worksheet (Figure 17.5).
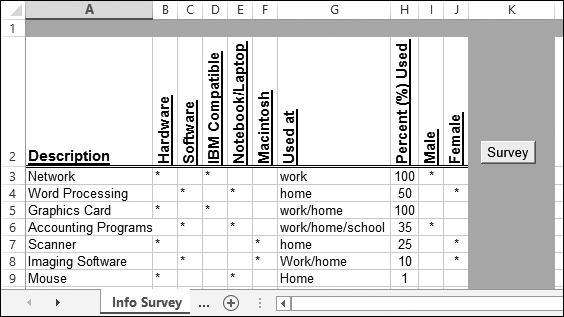
FIGURE 17.5. Each time the Info Survey form is used, the user’s selections are written to the worksheet.
Before you can begin programming, you need to perform several tasks. The tasks listed below are described in Custom Project 17.1.
1. Step 1 (Custom Project 17.1a): Insert a new form into your VBA project and set up this form’s initial properties like the Name and Caption properties that will allow you to identify the form.
2. Step 2 (Custom Project 17.1b): Adjust the size of the form so that all controls required by the application can be easily placed on the form and the form does not look crowded.
3. Step 3 (Custom Project 17.1c): Place the required controls on the form.
4. Step 4 (Custom Project 17.1d): Adjust other properties of the form and its controls.
5. Step 5 (Custom Project 17.1e): Set the tab order of the controls on the form.
6. Step 6 (Custom Project 17.1f): Prepare a worksheet to receive the data.
7. Step 7 (Custom Project 17.1g): Display the completed custom form.
8. Step 8 (Custom Project 17.1h): Write a procedure to initialize the form.
9. Step 9 (Custom Project 17.1i): Write a procedure that populates the listbox control.
10. Step 10 (Custom Project 17.1j): Write procedures that control option buttons.
11. Step 11 (Custom Project 17.1k): Write a procedure that synchronizes text box with the spin button control.
12. Step 12 (Custom Project 17.1l): Write a procedure that closes the form.
13. Step 13 (Custom Project 17.1m): Write a procedure that transfers data to a worksheet.
14. Step 14 (Custom Project 17.1n): Start using the completed InfoSurvey application.
Follow the step below to get started with the Info Survey application.
|
1. Choose Insert | UserForm to add a blank form to the VBA_Forms (Chap17_VBAExcel2016.xlsm) project.
2. In the Properties window, double-click the Name property and type InfoSurvey to change the default form name.
We will use this name later on to refer to this UserForm object in VBA procedures.
3. Double-click the Caption property and type the new title for the form: Info Survey.
The name Info Survey will appear in your form’s titlebar.
4. Double-click the BackColor property, click the Palette tab, and select a color for the form background.
When a default form inserted in your project is too large or too small to fit all the controls properly, you can change its size by using the mouse or by setting the form properties in the Properties window.
To resize the form with the mouse, click on an empty part of the form. Notice that several selection handles appear around the form. Place the mouse pointer over any selection handle located in the middle of a side, drag the handle to the position you want, and then release the mouse button.
You can also place the mouse pointer over the selection handle located at the undocked corner and drag the handle to the position you want. Release the mouse button.
To resize the form using the Properties window, you will need to enter new values for the form’s Height and Width.
NOTE |
Each new form has a default size of 180 × 240. The form’s dimensions are in points. One point equals 1/72 inch. |
Click in the form’s title bar. In the Properties window, double-click the Height property and enter a new value. Do the same for the Width property if you need to adjust the form’s width as well. To avoid extra work, figure out how much space you really need and resize the form before adding the desired controls.
After setting the initial properties for our custom form Info Survey, we need to adjust the size of the form so that all the controls that we need to place on this form will fit nicely.
|
1. Click the form’s titlebar (where the words “Info Survey” appear).
2. In the Properties window, double-click the Height property and enter the value 252.75.
3. In the Properties window, double-click the Width property and enter the value 405.75.
Now we are ready to proceed with placing the required controls on the Info Survey form. We will model this form after Figure 17.4.
The UserForm toolbar contains a number of useful shortcuts for working with forms, such as making controls the same size, centering a control horizontally or vertically, aligning control edges, and grouping and ungrouping controls. To display this toolbar, choose View | Toolbars | UserForm.
|
Hands-On 17.1c. Adding Buttons, Checkboxes, and Other Controls to a Form (Step 3) |
1. Click the Frame control in the Toolbox.
The mouse pointer changes to a cross accompanied by the symbol of the selected control.
2. Point to the upper left-hand side of the form, then click and drag the mouse to draw a small rectangle.
When you release the mouse button, you will see a small rectangle titled Frame1. When the frame is selected, various selection handles will appear in its sides, and the Properties window’s titlebar will display Properties-Frame1.
3. In the Properties window, double-click the Caption property and replace the selected default caption, Frame1, with Main Interest.
4. Click the Option Button control in the Toolbox. Next, click inside the Main Interest frame that you’ve just added to your form. Click and drag the mouse to the right until you see a rectangle with the default label OptionButton1.
5. In the Properties window, change the option button’s Caption property to Hardware.
6. Use the method presented in Step 4 to add another option button to the Main Interest frame. Change the Caption property of this option button to Software.
The option buttons are used whenever the user has to select one choice from a group of mutually exclusive choices. If the user can select more than one choice, checkboxes are used.
7. Click the List Box control in the Toolbox.
The mouse pointer will change to a cross accompanied by the symbol of the selected control.
8. Click below the Main Interest frame, and drag the mouse down and to the right to draw a listbox.
When you release the mouse button, you will see a white rectangle. Figure 17.4 shows the listbox populated with hardware entries.
9. Insert a frame below the listbox. Change the frame’s Caption property to Gender. Add two option buttons inside this frame, and change the first button’s Caption property to Male and the second one to Female (see Figure 17.4).
10. Click the Frame control in the Toolbox and draw a rectangle to the right of the frame labeled Main Interest.
11. Change the Caption property of the new frame to Computer Type.
12. Click the Check Box control in the Toolbox, and click inside the empty frame that you have just added. The CheckBox1 control should appear inside the frame.
13. Change the Caption property of the CheckBox1 control to IBM/Compatible.
14. Place two more checkboxes inside the frame labeled Computer Type. Use the Caption property to assign the following titles to these checkboxes: Notebook/Laptop and Macintosh. The final result should match Figure 17.4.
Unlike option buttons, which are mutually exclusive, checkboxes allow the user to activate one or more options simultaneously. The checkbox can be checked, unchecked, or unavailable at a particular time. An unavailable checkbox has its label grayed out and is therefore inactive (cannot be selected). The checked box has an x in front of its caption. The checkbox that has the focus is indicated by a dotted line around the caption.
Use option buttons when only one option can be selected at a given time. Use checkboxes to have the user select any number of options that apply.
15. Click the Label control in the Toolbox.
16. Click the empty space below the frame labeled Computer Type. The Label1 control should appear.
17. Change the Caption property of Label1 to Used at.
18. Click the Combo Box control in the Toolbox.
19. Click the empty space below the Used at label and drag the mouse to draw a rectangle. Release the mouse button.
The combo box displays a list of available choices only after you click the down arrow placed at the right of this control. The combo box is sometimes referred to as a drop-down list and is used to save valuable space on the screen. Although the user can only see one element of the list at a given time, the current selection can be quickly changed by clicking on the arrow button.
20. Click the Label control in the Toolbox.
21. Click on the empty part of the form just below the Used at combo box. A label control will appear. Change the Caption property for this label to Percent (%) Used.
22. Click the Text Box control in the Toolbox.
23. Click to the right of the Percent (%) Used label control to place a default size text box.
24. Click the Spin Button control in the Toolbox, and then click to the right side of the text box control. A default size spin button will appear. The final result is shown in Figure 17.4.
The spin button has two arrows that are used to increment or decrement a value in a given range. The maximum value is determined by the setting of the Max property, and the minimum value is set with the Min property. The spin button has the same properties as the scrollbar, with two differences. The spin button does not have a scroll box, and it lacks the LargeChange property. A text box is usually placed next to the spin button. This allows the user to enter a value directly into the text box or use the spin buttons to determine the value. If the spin button has to work with the text box, your VBA procedure must ensure that the value of the text box and the spin button are synchronized. In this example, you will use the spin button to indicate the percent of interest that the user has in the selected hardware or software product.
25. Double-click the Command Button control in the Toolbox. Recall that by double-clicking the control in the Toolbox, you indicate that you want to create more than one control using the selected tool.
26. Click in the top right-hand corner of the form. This will cause CommandButton1 to appear.
27. Click below CommandButton1. CommandButton2 will appear.
28. Change the Caption property of CommandButton1 to OK and CommandButton2 to Cancel.
Most custom forms have two command buttons, OK and Cancel, which enable the user to accept the data entered on the form or dismiss the form. In this example, the OK button will transfer the data entered on the form to a worksheet. The user will be able to click the Cancel button when he’s done inputting the data. To make the buttons respond to user actions, you will write appropriate VBA procedures later in this chapter.
29. Click the Image control in the Toolbox.
30. Click the mouse below the Cancel button, and drag the mouse to draw a rectangle. Release the mouse button. The final result is shown in Figure 17.4.
The form will display a different picture depending on whether the Hardware or Software option button is selected. The images will be loaded by a VBA procedure.
31. Click the titlebar, or click on any empty area of the form to select it.
32. Press F5 or choose Run | Run Sub/UserForm to display the form as the user will see it. Visual Basic switches to the active sheet in the Microsoft Excel window and displays the custom form you designed.
If you forget to select the form, the Macro dialog box will appear. Close the dialog box, and repeat Steps 31 and 32.
33. Click the Close button (x) in the top right-hand corner of the form to close the form and return to the Visual Basic Editor.
Note that the OK and Cancel buttons placed on the form aren’t functional yet. They require VBA procedures to make them work. After you’ve added controls to the form, use the mouse or the Format menu commands to adjust the alignment and spacing of the controls.
The Info Survey form design is now completed. From now on you should feel comfortable designing any form you want. When working with controls, it is worthwhile to learn some shortcuts. For example, here’s how you can quickly copy and move controls:
• To copy a control, click the Select Objects tool in the Toolbox and select the control (a selected control will have handles at its sides), hold down the Ctrl key, position the mouse pointer inside the control, and press the left mouse button. Drag the pointer to the position you want, and release the mouse button. Then change the control’s Caption property.
• To select an entire group of controls, click the Select Objects tool in the Toolbox and start drawing a rectangle around the group of controls that you want to move together. When you release the mouse button, all the controls will be selected. (You can also select more than one control by holding down the Ctrl key while clicking each of the controls you want to select—don’t just read about it, try it now!)
• To move the selected group of controls to another position on the form, click within the selected area and drag the mouse to the desired position.
After you have placed controls on your form but before you begin to write procedures to control the form, you should assign your own names to the controls. Although Visual Basic automatically assigns a default name to each control (OptionButton1, OptionButton2, and so on), these names are difficult to distinguish in a procedure that may reference objects of the same class that have almost identical names. Assigning meaningful names to the controls placed on your form makes VBA procedures referencing these controls much more readable.
Before you change the Name property, make sure that the titlebar of the Properties window displays the correct type of the control. For example, to assign a new name to the frame control, click the frame control on the form. When the Properties window displays “Properties-Frame1,” double-click the Name property and type the new name in place of the highlighted default name. Do not confuse the name of the control with the control’s title (caption). For example, on the Info Survey form, the default name of the frame control is Frame1, but the title of this control is Main Interest. The control’s title can be changed by setting the Caption property. While the control’s caption allows the user to identify the purpose of the control and may suggest the type of data expected, it is the name of the control that will be used in the code of your VBA procedures to make things happen.
Let’s go back to our form to make adjustments to the controls’ properties.
|
1. Assign names to the controls placed on the Info Survey form as shown below. To assign a new name to a control, perform these steps:
○ Click the appropriate control on the form.
○ Double-click the Name property in the Properties window.
○ Type the corresponding name as shown in the Name Property column.
Object Type |
Name Property |
|
First option button |
optHard |
|
Second option button |
optSoft |
|
Listbox |
lboxSystems |
|
Third option button |
optMale |
|
Fourth option button |
optFemale |
|
First checkbox |
chkIBM |
|
Second checkbox |
chkNote |
|
Third checkbox |
chkMac |
|
Combo box |
cboxWhereUsed |
|
Text box |
txtPercent |
|
Spin button |
spPercent |
|
First command button |
cmdOK |
|
Second command button |
cmdCancel |
|
Image |
picImage |
The controls that you placed on the Info Survey form are objects. Each of these objects has its own properties and methods. You’ve just changed the Name property for all the objects that will be referenced later from within VBA procedures. The control properties can be set during the design phase of your custom form or at runtime (that is, when your VBA procedure is executed).
Let’s now set some properties for selected controls.
2. Change the object properties as shown in the following table.
To set a property, click a control on the form, locate the desired property in the Properties window, and type the new value in the space to the right of the property name. For example, to set the ControlTipText property of the lboxSystems control, click the listbox control on the Info Survey form and locate the ControlTipText property in the Properties window. In the right-hand column of the Properties window, type the text you want to display when the user positions the mouse pointer over the listbox control—in this case, Select only one item.
Object Name |
Property |
Change to: |
|
lboxSystems |
ControlTipText |
Select only one item. |
|
spPercent |
Max |
100 |
|
spPercent |
Min |
0 |
|
cmdOK |
Accelerator |
O |
|
cmdCancel |
Accelerator |
C |
|
picImage |
PictureSizeMode |
0-fmPictureSizeModeClip |
The Accelerator property indicates which letter in the object name can be used to activate the control with the keyboard shortcut combination. The specified letter will appear underlined in the object’s caption (title). For example, after displaying the form, you will be able to quickly select OK by pressing Alt+O.
The remaining properties of the Info Survey form objects will be set directly from VBA procedures.
The user can move around a form by using the mouse or the Tab key. Because many users prefer to navigate through the form using the keyboard, it is important to determine the order in which each control on the form is activated. Follow these steps to set the tab order in the Info Survey form.
|
1. In the Forms folder in the Project Explorer window, double-click the InfoSurvey form.
2. Choose View | Tab Order.
The Tab Order dialog box appears. This box displays the names of all the controls on the Info Survey form in the order that they were added. The right side of the dialog box has buttons that allow you to move the selected control up or down. To move a control, click its name and click the Move Up or Move Down button until the control appears in the position you want.
3. Rearrange the order of controls of the Info Survey form as shown in Figure 17.6.
4. Close the Tab Order dialog box by clicking OK.
5. Activate the Info Survey user form and tab through the controls. Press the Tab key to move forward. Press Shift+Tab to move backward.
6. Close the Info Survey form.
If you’d like to change the order in which the controls are activated, reopen the Tab Order dialog box and make the appropriate changes.
After the user selects appropriate options on the custom form and clicks OK, the selected data will be transferred to a worksheet. However, before this happens, we need to prepare a worksheet to accept the data and give the user an easy interface for launching your form. Follow the steps below to get your worksheet ready.
|
Hands-On 17.1f. Preparing a Worksheet to Store Custom Form Data (Step 6) |
1. Activate the Microsoft Excel window.
2. Double-click the Sheet1 tab in the Chap17_VBAExcel2016.xlsm workbook, and type the new name for this sheet: Info Survey.
3. Enter the column headings as shown in Figure 17.5 earlier in this chapter.
4. Select row 1 through column K, and change the background of all cells to your favorite color (use the Fill Color button in the Font section of the Home tab). You may also want to change the background color of column K as shown in Figure 17.5.
The easiest way to launch a custom form from a worksheet is by clicking a button. The remaining steps walk you through the process of adding the Survey button to your Info Survey worksheet.
5. Choose Developer | Controls | Insert.
6. Click the Button control on the Form Controls toolbar. Click in cell K2 to place a button. When the Assign Macro dialog box appears, type DoSurvey in the Macro name box, and click OK. You will write this procedure later.
7. When you return to the worksheet, the button (Button1, if it is your first button) to which you assigned the DoSurvey macro should still be selected. Type the new name for this button: Survey. If the button is not selected, use the right mouse button to select it. Choose Edit Text from the shortcut menu, and type Survey for the button’s new name. To exit Edit mode, click outside the button.
8. Save the changes you’ve made to Chap17_VBAExcel2016.xlsm.
Each UserForm has a Show method that allows you to display the form to the user. In the example below, you will prepare the DoSurvey procedure. Recall that in the previous section you assigned the DoSurvey procedure to the Survey button placed in the Info Survey worksheet.
|
1. In the Visual Basic Editor window, select the VBA_Forms (Chap17_VBAExcel2016.xlsm) VBA project in the Project Explorer window and choose Insert | Module.
2. In the Properties window, change the new module’s name to ShowSurvey.
3. Enter the following procedure to display the custom form:
Sub DoSurvey()
InfoSurvey.Show
End Sub
Notice that the Show method is preceded by the name of the form object as it appears in the Forms folder (InfoSurvey).
4. Save the changes made to the Chap17_VBAExcel2016.xlsm workbook.
5. Switch to the Microsoft Excel window and click the Survey button. The Info Survey form appears.
NOTE |
If an error message appears after you click the Survey button, you have not assigned the required macro to this button as instructed in Step 6 (Custom Project 17.1f). To correct this problem, click OK to the message, right-click the Survey button, and choose Assign Macro from the shortcut menu. Click the DoSurvey macro name in the listbox, and click OK. Now click the Survey button to display the form. |
6. Close the Info Survey form by clicking the Close button (x) in the top right-hand corner of the form.
Before we can utilize this form we need to program in some events.
In addition to having properties and methods, each form and control has a predefined set of events. An event is some type of action, such as clicking a mouse button, pressing a key, selecting an item from a list, or changing a list of items available in a listbox. Events can be triggered by the user or the system.
To specify how a form or control should respond to events, you write event procedures. When you design a custom form, you should anticipate and program events that can occur at runtime (while the form is being used). The most popular event is the Click event. Every time a command button is clicked, it triggers the appropriate event procedure to respond to the Click event for that button. A form itself can respond to more than 20 separate events, including Click, DblClick, Activate, Initialize, and Resize. Table 17.1 lists events that are recognized by various form controls. If a control recognizes a specific event, the table cell displays “Y”; otherwise, it is blank. Take a few minutes now to familiarize yourself with the names of the events. For example, take a look at the AddControl event in the table. You can see at a glance that this event is only available for three objects: UserForm, Frame, and MultiPage control. Excel events were covered in detail in Chapter 15, “Event-Driven Programming.”
TABLE 17.1. Form and control events
Each form you create contains a form module for storing VBA event procedures. To access the form module to write an event procedure or to find out the events recognized by a specific control, you can:
• Double-click a control.
• Right-click the control, and choose View Code from the shortcut menu.
• Click the View Code button in the Project Explorer window.
• Double-click any unused area of the UserForm.
When you execute any of the above actions, a Code window will open for the form as shown in Figure 17.7. Notice the title in the Microsoft Visual Basic titlebar: Chap17_VBAExcel2016.xlsm-InfoSurvey(Code). A form module contains a general section as well as individual sections for each control placed on the form. The general section is used for declaration of form variables or constants.

FIGURE 17.7. The combo box above the Code window lists the available event procedures for the UserForm.
You can access the desired section by clicking the down arrow to the right of the combo box in the upper-right corner. This combo box, the Procedure box, displays the event procedures that are recognized by the control selected in the combo box on the left. Events that already have procedures written for them appear in bold.
Before the user can accomplish specific tasks with a custom form, you must usually write several VBA procedures. As mentioned earlier, each form created in the Visual Basic Editor has a module for storing procedures used by that form. Before displaying a custom form, you may want to set initial values for controls. To set the initial values, or default values, that the controls will have every time the form is displayed, write an Initialize event procedure for a user form. The Initialize event occurs when the form is loaded but before it’s shown on the screen.
Suppose that you want the Info Survey form to appear with the following initial settings:
• The Hardware button is selected in the Main Interest frame.
• The listbox below contains the items that correspond to the selected Hardware option button.
• None of the Computer Type checkboxes are selected.
• The combo box below the Used at label displays the first available item, and the user cannot add a new item to the combo box.
• The text box next to the spin button displays the initial value of zero (0).
• The image control displays a picture related to the selected Hardware option button.
|
Hands-On 17.1h. Writing a Procedure to Initialize the Form (Step 8) |
1. In the Project Explorer window, double-click the InfoSurvey form.
2. Double-click the background of the form to open the Code window for the active form.
When you double-click the form or a control, the Code window opens to the form or control’s Click event. In the procedure definition, Visual Basic automatically adds the keyword Private before the Sub keyword. Private procedures can be called only from the current form module. In other words, a procedure that is located in another module of the current project cannot call this particular (Private) procedure.
There are two combo boxes above the Code window. The combo box on the left displays the names of all form objects. The combo box on the right shows the event procedures recognized by the selected form object.
3. Click the down arrow in the Procedure box on the right, and select the Initialize event. Visual Basic displays the InfoSurveyUserForm_Initialize procedure in the Code window:
Private Sub UserForm_Initialize()
End Sub
4. Type the form’s initial settings between the Private Sub and EndSub keywords. The complete UserForm_Initialize procedure is shown below:
Private Sub UserForm_Initialize()
'select the Hardware option
optHard.Value = True
'turn off the Software option and all the check boxes
optSoft.Value = False
chkIBM.Value = False
chkNote.Value = False
chkMac.Value = False
'display a zero in the text box
txtPercent.Value = 0
'call ListHardware procedure
Call ListHardware
'populate the combo box
With Me.cboxWhereUsed
.AddItem "Home"
.AddItem "Work"
.AddItem "School"
.AddItem "Work/home"
.AddItem "Home/school"
.AddItem "Work/home/school"
End With
'select the first element in the list box
Me.cboxWhereUsed.ListIndex = 0
'load a picture file for the Hardware option
Me.picImage.Picture = LoadPicture("C:\VBAExcel2016HandsOn\cd.bmp")
End Sub
To simplify the event procedure code, you can use the Me keyword instead of the actual form name. For example, instead of using the statement:
InfoSurvey.cboxWhereUsed.ListIndex = 0
you can save time typing by using the following statement:
Me.cboxWhereUsed.ListIndex = 0
This technique is especially useful when the form name is long. Notice also that the first element of the listbox has the index number zero (0). Therefore, if you’d like to select the second item in the list, you must set the ListIndex property to 1. The UserForm_Initialize procedure calls the outside procedure (ListHardware) to populate its listbox control with the hardware items. The code of this procedure is shown in Step 5 below.
Notice that the UserForm_Initialize procedure ends with loading a picture into the image control. Make sure that the specified graphics file can be located in the indicated folder. If you don’t have this file, enter the complete path of a valid picture file that you want to display.
5. Double-click the ShowSurvey module in the Project Explorer window and enter in the Code window the ListHardware procedure as shown below:
Sub ListHardware()
With InfoSurvey.lboxSystems
.AddItem "DVD Drive"
.AddItem "Printer"
.AddItem "Fax"
.AddItem "Network"
.AddItem "Joystick"
.AddItem "Sound Card"
.AddItem "Graphics Card"
.AddItem "Modem"
.AddItem "Monitor"
.AddItem "Mouse"
.AddItem "External Drive"
.AddItem "Scanner"
End With
End Sub
Now that you’ve prepared the UserForm_Initialize procedure and the ListHardware procedure, you can run the form to see how it displays with the initial settings.
6. Launch the form by clicking the Survey button in the Info Survey worksheet.
After the form is displayed, the user can select appropriate options or click the Cancel button. When the user clicks the Software option button, the listbox should display different items. At the same time, the image control should load a different picture. The next section explains how you can program these events.
In the preceding section, you prepared the ListHardware procedure to populate the lboxSystems listbox with the Hardware items. You can use the same method to load the Software items into the listbox.
|
1. Activate the ShowSurvey module and enter the code of the ListSoftware procedure, as shown below:
Sub ListSoftware()
With InfoSurvey.lboxSystems
.AddItem "Spreadsheets"
.AddItem "Databases"
.AddItem "CAD Systems"
.AddItem "Word Processing"
.AddItem "Finance Programs"
.AddItem "Games"
.AddItem "Accounting Programs"
.AddItem "Desktop Publishing"
.AddItem "Imaging Software"
.AddItem "Personal Information Managers"
End With
End Sub
When the user clicks the Software button in the Info Survey form, the hardware items from the listbox should be replaced with the software items and vice versa. Let’s write procedures that will control the Hardware and Software buttons in the Main Interest frame.
|
1. Activate the InfoSurvey form, and double-click the Software option button located in the Main Interest frame.
2. When the Code window appears with the optSoft_Click procedure skeleton, highlight the code and press Delete.
3. Click the down arrow in the upper right-hand combo box, and select the Change event procedure. Visual Basic will automatically enter the beginning and end of the optSoft_Change procedure for you.
4. Enter the code of the optSoft_Change procedure as shown below:
Private Sub optSoft_Change()
Me.lboxSystems.Clear
Call ListSoftware
Me.lboxSystems.ListIndex = 0
Me.picImage.Picture = LoadPicture("C:\VBAExcel2016_ByExample\books.bmp")
End Sub
The optSoft_Change procedure begins with a statement that uses the Clear method to remove the current list of items from the lboxSystems listbox. The next statement calls the ListSoftware procedure to populate the listbox with software items. In other words, when the user clicks the Software button, the procedure removes the hardware items from the listbox and adds the software items. If you don’t clear the listbox prior to adding new items, the new items will be appended to the current list. The statement Me.lboxSystems.ListIndex = 0 selects the first item in the list. The final statement in this procedure loads a picture file to the image control. Be sure to replace the reference to this file with the complete path to a valid picture file that is located in your computer. Because the user may want to reselect the Hardware button after selecting the Software button, you must create a similar Change event procedure for the optHard option button.
5. Enter the following optHard_Change procedure, just below the optSoft_Change procedure:
Private Sub optHard_Change()
Me.lboxSystems.Clear
Call ListHardware
Me.lboxSystems.ListIndex = 0
Me.picImage.Picture = LoadPicture("C:\VBAExcel2016_ByExample\cd.bmp")
End Sub
6. Launch the form by clicking the Survey button in the Info Survey worksheet and check the results.
When you click the Software option button, you should see the software items display in the listbox below. At the same time, the image control should display the assigned picture. After clicking the Hardware option button, the listbox should display the appropriate hardware items. At the same time, the image control should display a different picture.
7. Close the form by clicking the Close button in the form’s upper-right corner.
The Info Survey form has a text box in front of the spin button control. To indicate a percent of time that the selected Hardware or Software item is used, the user can type a value in a text box or use the spin button. The initial value of the text box is set to zero (0). Suppose the user entered 10 in the text box and now wants to increase this value to 15 by using the spin button. To enable this action, the text box and the spin button have to be synchronized. Each of these objects requires a separate Change event procedure.
|
Hands-On 17.1k. Synchronizing the Text Box with the Spin Button (Step 11) |
1. Right-click the spin button and choose View Code from the shortcut menu.
2. Enter the spPercent_Change procedure as shown below:
Private Sub spPercent_Change()
txtPercent.Value = spPercent.Value
End Sub
Using the spin buttons will cause the text box value to go up or down.
3. Working in the same Code window, enter the following txtPercent_Change procedure:
Private Sub txtPercent_Change()
Dim entry As String
On Error Resume Next
entry = Me.txtPercent.Value
If entry > 100 Then
entry = 0
Me.txtPercent.Value = entry
End If
spPercent.Value = txtPercent.Value
End Sub
The txtPercent_Change procedure ensures that only values from 0 to 100 can be entered into the text box. The procedure uses the On Error Resume Next statement to ignore data entry errors. If the user enters a non-numeric value in the text box (or a number greater than 100), Visual Basic will reset the text box value to zero (0). Each time a spin button is pressed, a text box value is incremented or decremented by one.
After displaying the form, the user may want to cancel it by pressing the Esc key or clicking the Cancel button. To remove the form from the screen, let’s prepare a simple procedure that uses the Hide method.
|
Hands-On 17.1l. Writing a Procedure that Closes the Form (Step 12) |
1. Double-click the Cancel button and enter the following cmdCancel_Click procedure:
Private Sub cmdCancel_Click()
End Sub
The Hide method hides the object but does not remove it from memory. This way, your VBA procedure can use the form’s objects and properties behind the scenes when the form isn’t visible to the user. Use the Unload method to remove the form both from the screen and from memory resources:
Unload Me
When the form is unloaded, all memory associated with it is reclaimed. The user can’t interact with the form, and the form’s objects can’t be accessed by your VBA procedure until the form is placed in memory again by using the Load statement.
When the user clicks the OK button, the form’s selections should be written to the worksheet. The user can quit using the form at any time by clicking the Cancel button. Let’s write a procedure that will copy the form’s data to the worksheet when the OK button is clicked.
|
Hands-On 17.1m. Transferring Form Data to the Worksheet (Step 13) |
1. In the Visual Basic Editor window, double-click the InfoSurvey form in the Project Explorer.
2. Double-click the OK button on the Info Survey form and enter the cmdOK_Click procedure shown below:
Private Sub cmdOK_Click()
Dim r As Integer
Me.Hide
r = Application.CountA(Range("A:A"))
Range("A1").Offset(r + 1, 0) = Me.lboxSystems.Value
If Me.optHard.Value = True Then
Range("A1").Offset(r + 1, 1) = "*"
End If
If Me.optSoft.Value = True Then
Range("A1").Offset(r + 1, 2) = "*"
End If
If Me.chkIBM.Value = True Then
Range("A1").Offset(r + 1, 3) = "*"
End If
If Me.chkNote.Value = True Then
Range("A1").Offset(r + 1, 4) = "*"
End If
If Me.chkMac.Value = True Then
Range("A1").Offset(r + 1, 5) = "*"
End If
Range("A1").Offset(r + 1, 6) = Me.cboxWhereUsed.Value
Range("A1").Offset(r + 1, 7) = Me.txtPercent.Value
If Me.optMale.Value = True Then
Range("A1").Offset(r + 1, 8) = "*"
End If
If Me.optFemale.Value = True Then
Range("A1").Offset(r + 1, 9) = "*"
End If
Unload Me
End Sub
The cmdOK_Click procedure begins by hiding the user form. The statement:
r = Application.CountA(Range("A:A"))
uses the Visual Basic CountA function to count the number of cells that contain data in column A. The result of the function is assigned to the variable r. The next statement:
Range("A1").Offset(r + 1, 0) = Me.lboxSystems.Value
enters the selected listbox item in a cell located one row below the last used cell in column A (r + 1).
Next, there are several conditional statements. The first one tells Visual Basic to place an asterisk in the appropriate cell in column B if the Hardware option button is selected. Column B is located one column to the right of column A; hence there’s a 1 in the position of the second argument of the Offset method. The second If statement enters the asterisk in column C if the user selected the Software option button. Similar instructions record the actual checkbox values. In column G, the procedure will enter the item selected in the Used at combo box. Column H will show the value entered in the Percent (%) Used text box, and columns I and J will identify the gender of the person who submitted the survey.
Your application is now ready for the final test. Take off your programming hat and enjoy the result of your work from the user’s standpoint. As you work with the form, think of improvements you would like to make to enhance the user’s experience.
|
1. Switch to the Microsoft Excel Info Survey worksheet, and click the Survey button.
2. When the form appears, select appropriate options and click OK.
3. Activate the form several times, each time selecting different options.
4. Save the changes made to the Chap17_Excel2016.xlsm workbook.
This chapter has shown you how you can program custom user forms. Let’s quickly summarize what you’ve learned in this chapter’s project:
• For custom VBA applications that require user input, you placed the desired controls on a custom form. You made sure the user could move around the form in a logical order by setting the tab order (see Hands-On 17.6).
• For the form to respond to user actions, you wrote VBA procedures in a Form module. You set the initial values of controls by using the Properties window or writing the UserForm_Initialize procedure.
• To ensure that the data collected via the custom form is properly reported in Excel, you wrote VBA procedures that transferred Form data to a worksheet.
In the next chapter, you will learn how to format Excel worksheets with VBA.

