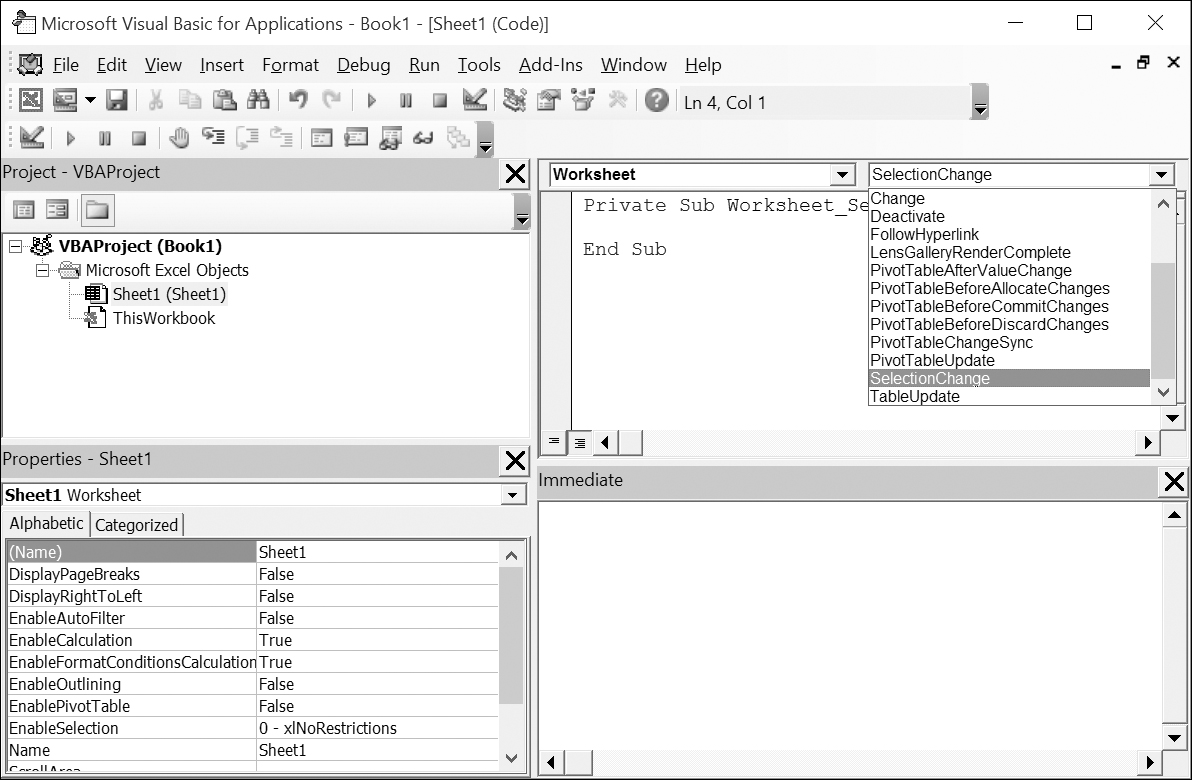
FIGURE 15.1. You can find out the event names in the Code window.
| Chapter 15 | EVENT- DRIVEN PROGRAMMING |
How do you disable a built-in shortcut menu when a user clicks on a worksheet cell? How do you display a custom message before a workbook is opened or closed? How can you validate data entered in a cell or range of cells?
To gain complete control over Microsoft Excel, you must learn how to respond to events. Learning how to program events will allow you to implement your own functionality in an Excel application. The first thing you need to know about this subject is what an event is. An event is an action recognized by an object. An event is something that happens to objects that are part of Microsoft Excel. Once you learn about events in Excel, you will find it easier to understand events that occur to objects in Word or any other Microsoft Office application.
Events can be triggered by an application user (such as you), another program, or the system itself. So, how can you trigger an event? Suppose you right-clicked a worksheet cell. This particular action would display a built-in shortcut menu for a worksheet cell, allowing you to quickly access the most frequently used commands related to worksheet cells. But what if this particular built-in response isn’t appropriate under certain conditions? You may want to entirely disallow right-clicking in a worksheet or perhaps ensure that a custom menu appears on a cell shortcut menu when the user right-clicks any cell. The good news is you can use VBA to write code that can react to events as they occur. The following Microsoft Excel objects can respond to events:
• Chart sheet
• Query table
• Workbook
• Application
You can decide what should happen when a particular event occurs by writing an event procedure.
A special type of VBA procedure, an event procedure, is used to react to specific events. This procedure contains VBA code that handles a particular event. Some events may require a single line of code, while others can be more complex. Event procedures have names, which are created in the following way:
ObjectName_EventName()
In the parentheses after the name of the event, you can place parameters that need to be sent to the procedure. The programmer cannot change the name of the event procedure.
Before you can write an event procedure to react to an Excel event, you need to know:
• The names of the particular object and event to which you want to respond.
Figure 15.1 illustrates how objects that respond to events display a list of events in the Procedure drop-down list in the Code window. Also, you can use the Object Browser to find out the names of the events, as shown in Figure 15.2.
• The place where you should put the event code.
Some events are coded in a standard module; others are stored in a class module. While workbook, chart sheet, and worksheet events are available for any open sheet or workbook, to create event procedures for an embedded chart, query table, or the Application object, you must first create a new object using the With Events keywords in the class module.
FIGURE 15.1. You can find out the event names in the Code window.

FIGURE 15.2. You can also find out the event names in the Object Browser.
At times you will want to trigger a certain operation when a user invokes an Excel command. For example, when the user attempts to save a workbook you may want to present him with the opportunity to copy the active worksheet to another workbook. Your first event procedure in this chapter explores this scenario. Once this event procedure is written, its code will run automatically when a user attempts to save the workbook file in which the procedure is located.
|
Please note files for the “Hands-On” project may be found on the companion CD-ROM. |
|
1. Open a new workbook and save it as C:\VBAExcel2016_ByExample\Chap15_VBAExcel2016.xlsm.
2. Change the name of Sheet1 in the Chap15_VBAExcel2016.xlsm workbook to Test.
3. Type anything in cell A1 and press Enter.
4. Switch to the Visual Basic Editor screen.
5. In the Project Explorer, double-click ThisWorkbook in the Microsoft Excel Objects folder under VBAProject (Chap15_VBAExcel2016.xlsm).
6. In the ThisWorkbook Code window, enter the following Workbook_BeforeSave event procedure:
Private Sub Workbook_BeforeSave(ByVal SaveAsUI As Boolean, Cancel As Boolean)
If MsgBox("Would you like to copy " & vbCrLf & "this worksheet to " & vbCrLf & "a new workbook?", vbQuestion + vbYesNo) = vbYes Then
Sheets(ActiveSheet.Name).Copy
End If
End Sub
The above event procedure uses a MsgBox function to display a two-button dialog box asking the user whether the current worksheet should be copied to another workbook. If the user clicks the Yes button, Visual Basic will open a new workbook and copy the active worksheet to it. The original workbook file will not be saved. If, however, the user clicks No, the Excel built-in save event will be triggered. If the workbook has never been saved before, you will be presented with the Save As dialog box where you can specify the filename, the file format, and its location.
7. Switch to the Microsoft Excel application window, click the File tab, and choose Save.
The Workbook_BeforeSave event procedure that you wrote in Step 6 will be triggered at this time. Click Yes to the message box. Excel will open a new workbook with the copy of the current worksheet.
8. Close the workbook file created by Excel without saving any changes. Do not close the Chap15_VBAExcel2016.xlsm workbook.
9. Click the File tab and choose Save to save Chap15_VBAExcel2016.xlsm.
Notice that again you are prompted with the dialog box. Click No to the message. Notice that the workbook file is now being saved.
But what if you wanted to copy the worksheet file to another workbook and also save the original workbook file? Let’s modify our Workbook_BeforeSave procedure to make sure the workbook file is saved regardless of whether the user answered Yes or No to the message.
10. Change the Workbook_BeforeSave procedure as follows:
Private Sub Workbook_BeforeSave(ByVal SaveAsUI As Boolean, Cancel As Boolean)
Dim wkb As Workbook
Set wkb = ActiveWorkbook
Cancel = False
If MsgBox("Would you like to copy " & vbCrLf & "this worksheet to " & vbCrLf & "a new workbook?", vbQuestion + vbYesNo) = vbYes Then
Sheets(ActiveSheet.Name).Copy
wkb.Activate
End If
End Sub
To continue with the saving process, you need to set the Cancel argument to False. This will trigger the Excel built-in save event. Because copying will move the focus to the new workbook that does not contain the customized Workbook_BeforeSave procedure, you need to activate the original workbook after performing the copy. We can get back pretty easily to the original workbook by setting a reference to it at the beginning of the event procedure and then issuing the wkb.Activate statement.
NOTE |
If you’d rather call your own saving procedure, set the |
Private Sub Workbook_BeforeSave(ByVal SaveAsUI As Boolean, Cancel As Boolean)
' abort the built-in save event
Cancel = True
' call your own saving procedure
MyCustomSaveProcedure
End Sub
11. Type anything in the Test worksheet in the Chap15_VBAExcel2016.xlsm file, then click the Save button on the Quick Access toolbar.
When you click Yes or No in response to the message box, Excel proceeds to save the workbook file (you should see the flashing message in the status bar). If you clicked Yes, Excel also copies the Test worksheet to another workbook. After all these tasks are completed, Excel activates the Chap15_VBAExcel2016.xlsm workbook.
12. If you answered Yes in the previous step, close the workbook file created by Excel without saving any changes. Do not close Chap15_VBAExcel2016.xlsm.
Now that you know how to use the Cancel argument, let’s look at the other argument of the Workbook_BeforeSave event—SaveAsUI. This argument allows you to handle the situation when the user chooses the Save As option. Suppose that in our procedure example we want to prompt the user to copy the current worksheet to another workbook only when the Save option is selected. In cases when the file has not yet been saved or the user wants to save the workbook with a different filename, the default Save As dialog box will pop up and the user will not be bothered with the copy prompt. The following step takes this situation into consideration.
13. Modify the Workbook_BeforeSave event procedure as follows:
Private Sub Workbook_BeforeSave(ByVal SaveAsUI As Boolean, Cancel As Boolean)
If SaveAsUI = True Then Exit Sub
Dim wkb As Workbook
Set wkb = ActiveWorkbook
Cancel = False
If MsgBox("Would you like to copy " & vbCrLf & "this worksheet to " & vbCrLf & "a new workbook?", vbQuestion + vbYesNo) = vbYes Then
Sheets(ActiveSheet.Name).Copy
wkb.Activate
End If
End Sub
14. Switch to the Chap15_VBAExcel2016 application window, click the File tab, and choose Save As | Excel Macro-Enabled Workbook.
Notice that you are not prompted to copy the current worksheet to another workbook. Instead, Excel proceeds to run its own built-in Save As process. When the Save As dialog box appears, click Cancel.
You can use the Application object’s EnableEvents property to enable or disable events. If you are writing a VBA procedure and don’t want a particular event to occur, set the EnableEvents property to False.
To demonstrate how you can prevent a custom event procedure from running, we will write a procedure in a standard module that will save the workbook after making some changes in the active sheet. We will continue working with the Chap15_VBAExcel2016 file because it already contains the Worksheet_BeforeSave event procedure we want to block in this demonstration.
|
This Hands-On requires prior completion of Hands-On 15.1.
1. Choose Insert | Module to add a standard module to VBAProject (Chap15_VBAExcel2016.xlsm) and rename it StandardProcedures.
2. In the module’s Code window, enter the following EnterData procedure:
Sub EnterData()
With ActiveSheet.Range("A1:B1")
.Font.Color = vbRed
.Value = 15
End With
Application.EnableEvents = False
ActiveWorkbook.Save
Application.EnableEvents = True
End Sub
Notice that prior to calling the Save method of the ActiveWorkbook property, we have disabled events by setting the EnableEvents property to False. This will prevent the Workbook_BeforeSave event procedure from running when Visual Basic encounters the statement to save the workbook. We don’t want the user to be prompted to copy the worksheet while running the EnterData procedure. When Visual Basic has completed the saving process, we want the system to respond to the events as we programmed them, so we enable the events with the Application.EnableEvents statement set to True.
3. Switch to the Chap15_VBAExcel2016.xlsm application window and choose View | Macros | View Macros. In the Macro dialog box, select EnterData and click Run.
Notice that when you run the EnterData procedure, you are not prompted to copy the worksheet before saving. This indicates that the code you entered in the Hands-On 15.1 Workbook_BeforeSave event procedure is not running.
4. Close the Chap15_VBAExcel2016 workbook.
Events occur in response to specific actions. Events also occur in a predefined sequence. Table 15.1 demonstrates the sequence of events that occur while opening a new workbook, adding a new worksheet to a workbook, and closing the workbook.
TABLE 15.1. Event sequences |
||
Action |
Object |
Event Sequence |
Opening a new workbook |
Workbook |
NewWorkbook
WindowDeactivate
WorkbookDeactivate
WorkbookActivate
WindowActivate |
Inserting a new sheet into a workbook |
Workbook |
WorkbookNewSheet
SheetDeactivate
SheetActivate |
Closing a workbook |
Workbook |
WorkbookBeforeClose
WindowDeactivate
WorkbookDeactivate
WorkbookActivate
WindowActivate |
A Worksheet object responds to such events as activating and deactivating a worksheet, calculating data in a worksheet, making a change to a worksheet, and double-clicking or right-clicking a worksheet. Table 15.2 lists some of the events to which the Worksheet object can respond.
TABLE 15.2. Worksheet events (a partial listing) |
|
Worksheet Event Name |
Event Description |
|
This event occurs upon activating a worksheet. |
|
This event occurs when the user activates a different sheet. |
|
This event occurs when the user selects a worksheet cell. |
|
This event occurs when the user changes a cell formula. |
|
This event occurs when the user recalculates the worksheet. |
|
This event occurs when the user double-clicks a worksheet cell. |
|
This event occurs when the user right-clicks a worksheet cell. |
Let’s try out these events to get the hang of them.
This event occurs upon activating a worksheet.
|
Hands-On 15.3. Writing the Worksheet_Activate() Event Procedure |
1. Open a new workbook and save it as Chap15_WorksheetEvents.xlsm in your VBAExcel2016_ByExample folder.
2. Insert a new worksheet to the current workbook.
3. Switch to the Visual Basic Editor window.
4. In the Project Explorer window, double-click Sheet2 under VBAProject (Chap15_WorksheetEvents.xlsm) in the Microsoft Excel Objects folder.
5. In the Sheet2 Code window, enter the code shown below:
Dim shtName As String
Private Sub Worksheet_Activate()
shtName = ActiveSheet.Name
Range("B2").Select
End Sub
The example procedure selects cell B2 each time the sheet is activated. Notice that the shtName variable is declared at the top of the module.
6. Switch to the Microsoft Excel application window and activate Sheet2.
Notice that when Sheet2 is activated, the selection is moved to cell B2. Excel also stores the sheet name in the shtName variable that was declared at the top of the module. We will need this value as we work with other event procedures in this section.
This event occurs when the user activates a different sheet in a workbook.
|
Hands-On 15.4. Writing the Worksheet_Deactivate() Event Procedure |
This Hands-On exercise uses the Chap15_WorksheetEvents workbook created in Hands-On 15.3.
1. Switch to the Visual Basic Editor window. In the Sheet2 Code window, enter the Worksheet_Deactivate procedure as shown below:
Private Sub Worksheet_Deactivate()
MsgBox "You deactivated " & shtName & "." & vbCrLf & "You switched to " & ActiveSheet.Name & "."
End Sub
The example procedure displays a message when Sheet2 is deactivated.
2. Switch to the Microsoft Excel application window and click the Sheet2 tab.
The Worksheet_Activate procedure that you created in Hands-On 15.3 will run first. Excel will select cell B2 and store the name of the worksheet in the shtName global variable declared at the top of the Sheet2 code module.
3. Now click any other sheet in the active workbook.
Notice that Excel displays the name of the worksheet that you deactivated and the name of the worksheet you switched to.
This event occurs when the user selects a worksheet cell.
|
Hands-On 15.5. Writing the Worksheet_SelectionChange() Event Procedure |
1. In the current workbook, insert a new worksheet.
2. Switch to the Visual Basic Editor window. In the Project Explorer window, double-click Sheet3 under VBAProject (Chap15_WorksheetEvents.xlsm) in the Microsoft Excel Objects folder.
3. In the Sheet3 Code window, enter the Worksheet_SelectionChange procedure as shown below:
Private Sub Worksheet_SelectionChange(ByVal Target As Excel.Range)
Dim myRange As Range
On Error Resume Next
Set myRange = Intersect(Range("A1:A10"), Target)
If Not myRange Is Nothing Then
MsgBox "Data entry or edits are not permitted."
End If
End Sub
The example procedure displays a message if the user selects any cell in myRange.
4. Switch to the Microsoft Excel application window and activate Sheet3. Click on any cell within the specified range A1:A10.
Notice that Excel displays a message whenever you click a cell in the restricted area.
This event occurs when the user changes a cell formula.
|
Hands-On 15.6. Writing the Worksheet_Change() Event Procedure |
1. In the Visual Basic Editor window, activate the Project Explorer window and double-click Sheet1 in the Microsoft Excel Objects folder of Chap15_WorksheetEvents.xlsm.
2. In the Sheet1 Code window, enter the Worksheet_Change event procedure as shown below:
Private Sub Worksheet_Change(ByVal Target As Excel.Range)
Application.EnableEvents = False
Target = UCase(Target)
Columns(Target.Column).AutoFit
Application.EnableEvents = True
End Sub
The example procedure changes what you type in a cell to uppercase. The column where the target cell is located is then autosized.
3. Switch to the Microsoft Excel application window and activate Sheet1. Enter any text in any cell.
Notice that as soon as you press the Enter key, Excel changes the text you typed to uppercase and autosizes the column.
This event occurs when the user recalculates the worksheet.
|
Hands-On 15.7. Writing the Worksheet_Calculate() Event Procedure |
1. Add a new sheet to the Chap15_WorksheetEvents workbook. In cell A2 of this newly added sheet, enter 1, and in cell B2, enter 2. Enter the following formula in cell C2: = A2+B2.
2. Switch to the Visual Basic Editor window, activate the Project Explorer window, and double-click the sheet you added in Step 1.
3. In the Code window, enter the code of the Worksheet_Calculate procedure as shown below:
Private Sub Worksheet_Calculate()
MsgBox "The worksheet was recalculated."
End Sub
4. Switch to the Microsoft Excel application window and modify the entry in cell B2 on the sheet you added in Step 1 by typing any number.
Notice that after leaving Edit mode, the Worksheet_Calculate event procedure is triggered and you are presented with a custom message.
This event occurs when the user double-clicks a worksheet.
|
Hands-On 15.8. Writing the Worksheet_BeforeDoubleClick() Event Procedure |
1. Enter any data in cell C9 on Sheet2 of the Chap15_WorksheetEvents workbook.
2. In the Visual Basic Editor window, activate the Project Explorer window and open the Microsoft Excel Objects folder. Double-click Sheet2.
3. In the Sheet2 Code window, type the code of the procedure as shown below:
Private Sub Worksheet_BeforeDoubleClick(ByVal Target As Range, Cancel As Boolean)
If Target.Address = "$C$9" Then
MsgBox "No double-clicking, please."
Cancel = True
Else
MsgBox "You may edit this cell."
End If
End Sub
The example procedure disallows in-cell editing when cell C9 is double-clicked.
4. Switch to the Microsoft Excel application window and double-click cell C9 on Sheet2.
The Worksheet_BeforeDoubleClick event procedure cancels the built-in Excel behavior, and the user is not allowed to edit the data inside the cell. However, the user can get around this restriction by clicking on the formula bar or pressing F2. When writing event procedures that restrict access to certain program features, write additional code that prevents any workaround.
This event occurs when the user right-clicks a worksheet cell.
|
Hands-On 15.9. Writing the Worksheet_BeforeRightClick() Event Procedure |
1. In the Visual Basic Editor window, activate the Project Explorer window and double-click Sheet2 in the Microsoft Excel Objects folder.
2. In the Sheet2 Code window, enter the code of the Worksheet_BeforeRightClick procedure as shown below:
Private Sub Worksheet_BeforeRightClick(ByVal Target As Range, Cancel As Boolean)
With Application.CommandBars("Cell")
.Reset
If Target.Rows.Count > 1 Or Target.Columns.Count > 1 Then
With .Controls.Add(Type:=msoControlButton, before:=1, temporary:=True)
.Caption = "Print…"
.OnAction = "PrintMe"
End With
End If
End With
End Sub
The example procedure adds a Print option to the cell shortcut menu when the user selects more than one cell on the worksheet.
3. Insert a new module into the current project and enter the PrintMe procedure as shown below:
Sub PrintMe()
Application.Dialogs(xlDialogPrint).Show arg12:=1
End Sub
The PrintMe procedure is called by the Worksheet_BeforeRightClick event when the user selects the Print option from the shortcut menu. Notice that the Show method of the Dialogs collection is followed by a named argument: arg12:=1. This argument will display the Print dialog box with the preselected option button “Selection” in the Print area of the dialog box. Excel dialog boxes are covered in the next chapter.
4. Switch to the Microsoft Excel application window and right-click on any single cell in Sheet2.
Notice that the shortcut menu appears with the default options.
5. Now select at least two cells in the Sheet2 worksheet and right-click the selected area.
You should see the Print option as the first menu entry. Click the Print option and notice that instead of the default “Print active sheet,” the Print dialog displays “Print Selection.”
6. Save and close the Chap15_WorksheetEvents.xlsm workbook file.
NOTE |
The Worksheet_BeforeRightClick event procedure relies on the CommandBar object to customize Excel’s built-in context menu. Before Excel 2010, the CommandBar object was the only way to create, modify, or disable context menus. Excel 2016 still supports CommandBars for compatibility; however, you should rely on the RibbonX model (as discussed in Chapter 19) to add your own customizations to context menus. |
Workbook object events occur when the user performs such tasks as opening, activating, deactivating, printing, saving, and closing a workbook. Workbook events are not created in a standard VBA module. To write code that responds to a particular workbook you can:
• Double-click the ThisWorkbook object in the Visual Basic Editor’s Project Explorer.
• In the Code window that appears, open the Object drop-down list on the left-hand side and select the Workbook object.
• In the Procedure drop-down list (the one on the right), select the event you want. The selected event procedure stub will appear in the Code window as shown below:
Private Sub Workbook_Open()
place your event handling code here
End Sub
Table 15.3 lists some of the events to which the Workbook object can respond.
TABLE 15.3. Workbook events (a partial listing) |
|
Workbook Event Name |
Event Description |
|
This event occurs when the user activates the workbook. This event will not occur when the user activates the workbook by switching from another application. |
|
This event occurs when the user activates a different workbook within Excel. This event does not occur when the user switches to a different application. |
|
This event occurs when the user opens a workbook. |
|
This event occurs before the workbook is saved. The |
|
This event occurs before the workbook is printed and before the Print dialog appears. The example procedure places the full workbook’s name in the document footer prior to printing if the user clicks Yes in the message box. |
|
This event occurs before the workbook is closed and before the user is asked to save changes. |
|
This event occurs after the user creates a new sheet in a workbook. |
|
This event occurs when the user shifts the focus to any window showing the workbook. |
|
This event occurs when the user shifts the focus away from any window showing the workbook. |
|
This event occurs when the user opens, resizes, maximizes, or minimizes any window showing the workbook. |
Let’s try out the above events to get the hang of them.
This event occurs when the user activates the workbook. This event will not occur when the user activates the workbook by switching from another application.
|
Hands-On 15.10. Writing the Workbook_Activate() Event Procedure |
1. Open a new workbook and save it as Chap15_WorkbookEvents.xlsm in your C:\VBAExcel2016__ByExample folder.
2. Switch to the Visual Basic Editor window. In the Project Explorer window, double-click ThisWorkbook in the Microsoft Excel Objects folder.
3. In the ThisWorkbook Code window, type the Workbook_Activate procedure as shown below:
Private Sub Workbook_Activate()
MsgBox "This workbook contains " & ThisWorkbook.Sheets.Count & " sheets."
End Sub
The example procedure displays the total number of worksheets when the user activates the workbook containing the Workbook_Activate event procedure.
4. Switch to the Microsoft Excel application window and open a new workbook.
5. Activate the Chap15_WorkbookEvents workbook. Excel should display the total number of sheets in this workbook.
This event occurs when the user activates a different workbook within Excel. This event does not occur when the user switches to a different application.
|
Hands-On 15.11. Writing the Workbook_Deactivate() Event Procedure |
1. In the Visual Basic Editor window, activate the Project Explorer window and double-click ThisWorkbook in the Microsoft Excel Objects folder under VBAProject (Chap15_WorkbookEvents.xlsm).
2. In the ThisWorkbook Code window, type the Workbook_Deactivate procedure as shown below:
Private Sub Workbook_Deactivate()
Dim cell As Range
For Each cell In ActiveSheet.UsedRange
If Not IsEmpty(cell) Then
Debug.Print cell.Address & ":" & cell.Value
End If
Next
End Sub
The example procedure will print to the Immediate window the addresses and values of cells containing entries in the current workbook when the user activates a different workbook.
3. Switch to the Microsoft Excel application window and make some entries on the active sheet. Next, activate a different workbook.
This action will trigger the Workbook_Deactivate event procedure.
4. Switch to the Visual Basic Editor screen and open the Immediate window to see what entries were reported.
This event occurs when the user opens a workbook.
|
1. Double-click the ThisWorkbook object in the Microsoft Excel Objects folder under VBAProject (Chap15_WorkbookEvents.xlsm).
2. In the ThisWorkbook Code window, type the Workbook_Open procedure as shown below:
Private Sub Workbook_Open()
ActiveSheet.Range("A1").Value = Format(Now(), "mm/dd/yyyy")
Columns("A").AutoFit
End Sub
The example procedure places the current date in cell A1 when the workbook is opened.
3. Save and close Chap15_WorkbookEvents.xlsm and then reopen it.
When you open the workbook file again, the Workbook_Open event procedure will be triggered and the current date will be placed in cell A1 on the active sheet.
This event occurs before the workbook is saved. The SaveAsUI argument is read-only and refers to the Save As dialog box. If the workbook has not been saved, the value of SaveAsUI is True; otherwise, it is False.
|
Hands-On 15.13. Writing the Workbook_BeforeSave() Event Procedure |
1. In the Visual Basic Editor screen, activate the Project Explorer window and open the Microsoft Excel Objects folder under VBAProject. (Chap15_WorkbookEvents.xlsm). Double-click ThisWorkbook.
2. In the ThisWorkbook Code window, type the Workbook_BeforeSave procedure as shown below:
Private Sub Workbook_BeforeSave(ByVal SaveAsUI As Boolean, Cancel As Boolean)
If SaveAsUI = True And ThisWorkbook.Path = vbNullString Then
MsgBox "This document has not yet " & "been saved." & vbCrLf & "The Save As dialog box will be displayed."
ElseIf SaveAsUI = True Then
MsgBox "You are not allowed to use " & "the SaveAs option. "
Cancel = True
End If
End Sub
The example procedure displays the Save As dialog box if the workbook hasn’t been saved before. The workbook’s pathname will be a null string (vbNullString) if the file has not been saved before. The procedure will not let the user save the workbook under a different name—the SaveAs operation will be aborted by setting the Cancel argument to True. The user will need to choose the Save option to have the workbook saved.
3. Switch to the Microsoft Excel application window and activate any sheet in the Chap15_WorkbookEvents.xlsm workbook.
4. Make an entry in any cell of this workbook, click the File tab, and choose Save As | Excel Macro-Enabled Workbook.
The Workbook_BeforeSave event procedure will be activated, and the ElseIf clause gets executed. Notice that you are not allowed to save the workbook by using the SaveAs option.
This event occurs before the workbook is printed and before the Print dialog appears.
|
Hands-On 15.14. Writing the Workbook_BeforePrint() Event Procedure |
1. In the Visual Basic Editor window, activate the Project Explorer window and double-click the ThisWorkbook object in the Microsoft Excel Objects folder under VBAProject (Chap15_WorkbookEvents.xlsm).
2. In the ThisWorkbook Code window, type the Workbook_BeforePrint event procedure as shown below:
Private Sub Workbook_BeforePrint(Cancel As Boolean)
Dim response As Integer
response = MsgBox("Do you want to " & vbCrLf & "print the workbook’s full name in the footer?", vbYesNo)
If response = vbYes Then
ActiveSheet.PageSetup.LeftFooter = ThisWorkbook.FullName
Else
ActiveSheet.PageSetup.LeftFooter = ""
End If
End Sub
The example procedure places the workbook’s full name in the document footer prior to printing if the user clicks Yes in the message box.
3. Switch to the Microsoft Excel application window and activate any sheet in the Chap15_WorkbookEvents.xlsm workbook.
4. Enter anything you want in any worksheet cell.
5. Click the File | Print, and click the Print button.
Excel will ask you if you want to place the workbook’s name and path in the footer.
This event occurs before the workbook is closed and before the user is asked to save changes.
|
Hands-On 15.15. Writing the Workbook_BeforeClose() Event Procedure |
1. In the Visual Basic Editor window, activate the Project Explorer window and double-click ThisWorkbook in the Microsoft Excel Objects folder under VBAProject (Chap15_WorkbookEvents.xlsm).
2. In the ThisWorkbook Code window, type the Workbook_BeforeClose event procedure as shown below:
Private Sub Workbook_BeforeClose(Cancel As Boolean)
If MsgBox("Do you want to change " & vbCrLf & " workbook properties before closing?", vbYesNo) = vbYes Then
Application.Dialogs(xlDialogProperties).Show
End If
End Sub
The example procedure displays the Properties dialog box if the user responds Yes to the message box.
3. Switch to the Microsoft Excel application window, and close the Chap15_WorkbookEvents.xlsm workbook.
Upon closing, you should see a message box asking you to view the Properties dialog box prior to closing. After viewing or modifying the workbook properties, the procedure closes the workbook. If there are any changes that you have not yet saved, you are given the chance to save the workbook, cancel the changes, or abort the closing operation altogether.
This event occurs after the user creates a new sheet in a workbook.
|
Hands-On 15.16. Writing the Workbook_NewSheet() Event Procedure |
1. Open a new workbook and save it as Chap15_WorkbookEvents2.xlsm in your C:\VBAExcel2016__ByExample folder.
2. Switch to the Visual Basic Editor window, and in the Project Explorer window, double-click ThisWorkbook in the Microsoft Excel Objects folder under VBAProject (Chap15_WorkbookEvents2.xlsm).
3. In the ThisWorkbook Code window, type the Workbook_NewSheet event procedure as shown below:
Private Sub Workbook_NewSheet(ByVal Sh As Object)
If MsgBox("Do you want to place " & vbCrLf & "the new sheet at the beginning " & vbCrLf & "of the workbook?", vbYesNo) = vbYes Then
Sh.Move before:=ThisWorkbook.Sheets(1)
Else
Sh.Move After:=ThisWorkbook.Sheets(ThisWorkbook.Sheets.Count)
MsgBox Sh.Name & " is now the last sheet in the workbook."
End If
End Sub
The example procedure places the new sheet at the beginning of the workbook if the user responds Yes to the message box; otherwise, the new sheet is placed at the end of the workbook.
4. Switch to the Microsoft Excel application window and click the New Sheet Button (+) (at the bottom of the screen). Excel will ask where to place the new sheet.
Let’s try out some of the events related to operations on workbook windows.
This event occurs when the user shifts the focus to any window showing the workbook.
|
Hands-On 15.17. Writing the Workbook_WindowActivate() Event Procedure |
1. In the Visual Basic Editor window, activate the Project Explorer window and double-click the ThisWorkbook object in the Microsoft Excel Objects folder under VBAProject (Chap15_WorkbookEvents2.xlsm).
2. In the ThisWorkbook Code window, enter the Workbook_WindowActivate event procedure as shown below:
Private Sub Workbook_WindowActivate(ByVal Wn As Window)
Wn.GridlineColor = vbYellow
End Sub
The example procedure changes the color of the worksheet gridlines to yellow when the user activates the workbook containing the code of the Workbook_WindowActivate procedure.
3. Switch to the Microsoft Excel application window and open a new workbook.
4. Arrange Microsoft Excel workbooks vertically on the screen, by choosing View | Arrange All to open the Arrange Windows dialog. Select the Vertical option button and click OK. When you activate the worksheet of the workbook in which you entered the code of the Workbook_WindowActivate event procedure, the color of the gridlines should change to yellow.
This event occurs when the user shifts the focus away from any window showing the workbook.
|
Hands-On 15.18. Writing the Workbook_WindowDeactivate() Event Procedure |
1. In the Visual Basic Editor window, activate the Project Explorer window and double-click the ThisWorkbook object in the Microsoft Excel Objects folder under VBAProject (Chap15_WorkbookEvents2.xlsm).
2. In the ThisWorkbook Code window, enter the Workbook_WindowDeactivate procedure as shown below:
Private Sub Workbook_WindowDeactivate(ByVal Wn As Window)
MsgBox "You have just deactivated " & Wn.Caption
End Sub
The example procedure displays the name of the deactivated workbook when the user switches to another workbook from the workbook containing the code of the Workbook_WindowDeactivate procedure.
4. Switch to the Microsoft Excel application window and open a new workbook.
Excel displays the name of the deactivated workbook in a message box.
This event occurs when the user opens, resizes, maximizes, or minimizes any window showing the workbook.
|
Hands-On 15.19. Writing the Workbook_WindowResize() Event Procedure |
1. In the Visual Basic Editor window, activate the Project Explorer window and double-click the ThisWorkbook object in the Microsoft Excel Objects folder under VBAProject (Chap15_WorkbookEvents2.xlsm).
2. In the ThisWorkbook Code window, enter the Workbook_WindowResize procedure as shown below:
Private Sub Workbook_WindowResize(ByVal Wn As Window)
If Wn.WindowState <> xlMaximized Then
Wn.Left = 0
Wn.Top = 0
End If
End Sub
The example procedure moves the workbook window to the top left-hand corner of the screen when the user resizes it.
3. Switch to the Microsoft Excel application and activate the Chap15_WorkbookEvents2.xlsm workbook.
4. Click the Restore Window button to the right of the menu bar.
5. Move the Chap15_WorkbookEvents2.xlsm window to the middle of the screen by dragging its title bar.
6. Change the size of the active window by dragging the window borders in or out.
As you complete the sizing operation, the workbook window should automatically jump to the top left-hand corner of the screen.
7. Click the Maximize button to restore the Chap15_WorkbookEvents2.xlsm workbook window to its full size.
An Excel workbook can respond to a number of other events, as shown in Table 15.4.
TABLE 15.4. Additional workbook events |
|
Workbook Event Name |
Event Description |
|
This event occurs when the user activates any sheet in the workbook. The SheetActivate event occurs also at the application level when any sheet in any open workbook is activated. |
|
This event occurs when the user activates a different sheet in a workbook. |
|
This event occurs when the user changes the selection on a worksheet. This event happens for each sheet in a workbook. |
|
This event occurs when the user changes a cell formula. |
|
This event occurs when the user recalculates a worksheet. |
|
This event occurs when the user double-clicks a cell on a worksheet. |
|
This event occurs when the user right-clicks a cell on a worksheet. |
|
This event occurs when a new chart is created in the workbook. |
|
This event occurs after the workbook is saved. |
|
This event occurs after the workbook is installed as an add-in. |
|
This event occurs when the workbook is uninstalled as an add-in. |
|
This event occurs when you click any hyperlink in Microsoft Excel. |
In Excel, PivotTable reports provide a powerful way of analyzing and comparing large amounts of information stored in a database. By rotating rows and columns of a PivotTable report, you can see different views of the source data or see details of the data that interests you the most. When working with PivotTable reports programmatically, you can determine when a PivotTable report opened or closed the connection to its data source by using the PivotTableOpenConnection and PivotTableCloseConnection workbook events and determine when the PivotTable was updated via the SheetPivotTableUpdate event. Table 15.5 lists events related to PivotTable reports. If you haven’t worked with PivotTables programmatically, Chapter 22, “Programming PivotTables and PivotCharts,” will get you started writing VBA code for creating and manipulating PivotTables and PivotCharts. You will find it easier to delve into the PivotTable event programming after working through Chapter 22.
TABLE 15.5. Workbook events related to PivotTable reports |
|||
Workbook Event Name |
Event Description |
||
|
Occurs after a PivotTable report opens the connection to its data source. This event requires that you declare an object of type Application or Workbook using the |
||
|
Occurs after a PivotTable report closes the connection to its data source. This event requires that you declare an object of type Application or Workbook using the |
||
The
|
This event occurs after the sheet of the PivotTable report has been updated. This event requires that you declare an object of type Application or Workbook using the
|
||
This event takes the following two arguments:
|
This event occurs after changes to a PivotTable. For example, after making changes to a PivotTable you can write code to display a message:
| ||
|
This event occurs after a cell or range of cells (that contain formulas) inside a PivotTable are edited or recalculated. This event will not occur when a PivotTable is refreshed, sorted, filtered, or dilled down on. |
||
|
This event occurs immediately before changes to a PivotTable are discarded. It is used with the PivotTable’s OLAP (online analytical processing) data source. |
||
|
This event occurs immediately before changes are committed against the OLAP data source for a PivotTable. |
||
|
This event occurs immediately before changes are applied to the PivotTable’s OLAP data source. |
||
As you know, you can create charts in Excel that are embedded in a worksheet or located on a separate chart sheet. In this section, you will learn how to control chart events no matter where you’ve decided to place your chart. Before you try out selected chart events, perform the tasks in Hands-On 15.20.
|
1. Open a new Excel workbook and save it as Chap15_ChartEvents.xlsm.
2. Enter sample data as shown in Figure 15.3.
3. Select cells A1:D5, and choose Insert | Charts | Insert Column Chart | 2-D | Clustered Column.
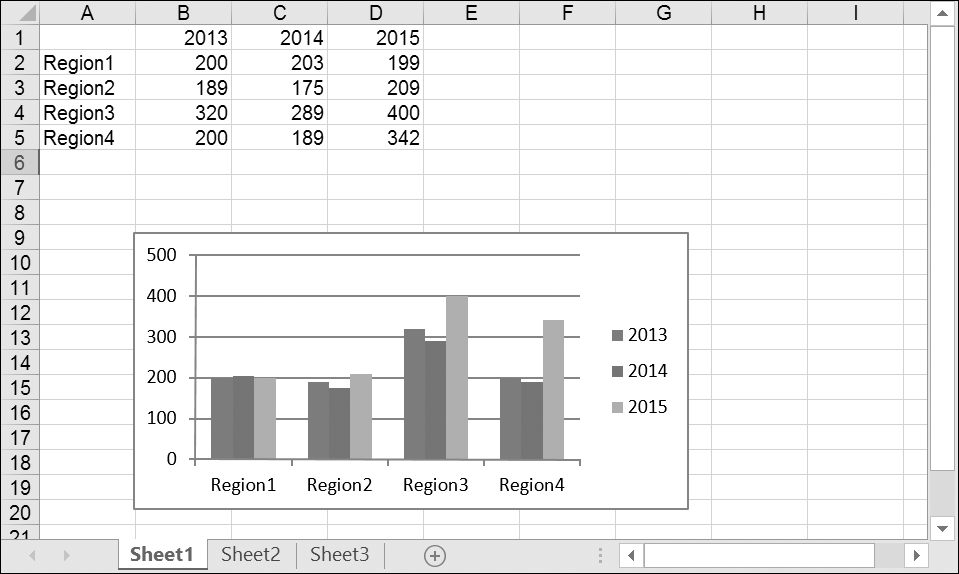
FIGURE 15.3. Column chart embedded in a worksheet.
4. Size the chart as shown in Figure 15.3.
5. Using the same data, create a line chart on a separate chart sheet, as shown in Figure 15.5. To add a new chart sheet, right-click any sheet tab in the workbook and choose Insert. In the Insert dialog box, select Chart and click OK. On the Design tab in the Chart Tools group, click the Select Data button. Excel will display the Select Data Source dialog box. At this point, click the Sheet1 tab and select cells A1:D5. Excel will fill in the Chart data range box in the dialog box as in Figure 15.4. Click OK to complete the chart. Now, change the chart type to Line chart with Markers by choosing the Change Chart Type button in the Chart Tools Design tab. In the Change Chart Type dialog box, select Line chart in the left pane, and click the button representing the Line chart with Markers. Click OK to close the dialog box.
6. Change the name of the chart sheet to Sales Analysis Chart.

FIGURE 15.4. Creating a chart in a chart sheet.

FIGURE 15.5. Line chart placed in a chart sheet.
Excel charts can respond to a number of events, as shown in Table 15.6.
TABLE 15.6. Chart events |
|
Chart Event Name |
This event occurs when … |
|
The user activates the chart sheet. |
|
The user deactivates the chart sheet. |
|
The user selects a chart element. |
|
The user changes the value of a chart data point. The Chart object should be declared in the class module using the |
|
The user plots new or changed data on the chart. |
|
The user changes the size of the chart. The Chart object should be declared in the class module using the |
|
An embedded chart is double-clicked, before the default double-click action. |
|
An embedded chart is right-clicked, before the default right-click action. |
|
A mouse button is pressed while the pointer is over a chart. |
|
The position of a mouse pointer changes over a chart. |
|
A mouse button is released while the pointer is over a chart. |
We will start by writing event procedures that control a chart placed on a separate chart sheet as shown in Figure 15.5. Events for a chart embedded in a worksheet like the one in Figure 15.3 require using the WithEvents keyword and are explained in the section titled “Writing Event Procedures for Embedded Charts.”
This event occurs when the user activates the chart sheet.
This event occurs when the user deactivates the chart sheet.
This event occurs when the user selects a chart element.
ElementID returns a constant representing the type of the selected chart element. Arguments Arg1 and Arg2 are used in relation to some chart elements. For example, the chart axis (ElementID = 21) can be specified as Main Axis (Arg1 = 0) or Secondary Axis (Arg1 = 1), while the axis type is specified by Arg2, which can be one of the following three values: 0 – Category Axis, 1 – Value Axis, and 3 – Series Axis.
This event occurs when the user plots new or changed data on the chart.
This event occurs when the user right-clicks the chart.
This event occurs when a mouse button is pressed while the pointer is over a chart.
The Button argument determines which mouse button was pressed (MouseDown event) or released (MouseUp event): 1 – left button, 2 – right button, and 4 – middle button. The Shift argument specifies the state of the Shift, Ctrl, and Alt keys: 1 – Shift was selected, 2 – Ctrl was selected, 4 – Alt was selected. The x, y arguments specify the mouse pointer coordinates.
|
1. In the Visual Basic Editor window, activate the Project Explorer window and open the Microsoft Excel Objects folder under VBAProject (Chap15_ChartEvents.xlsm).
2. Double-click the chart object Chart1 (Sales Analysis Chart).
3. In the Code window, enter the code of the following event procedures:
Private Sub Chart_Activate()
MsgBox "You’ve activated the chart sheet."
End Sub
Private Sub Chart_Deactivate()
MsgBox "It looks like you want to leave the " & "chart sheet."
End Sub
Private Sub Chart_Select(ByVal ElementID As Long, ByVal Arg1 As Long, ByVal Arg2 As Long)
If Arg1 <> 0 And Arg2 <> 0 Then
MsgBox ElementID & ", " & Arg1 & ", " & Arg2
End If
If ElementID = 4 Then
MsgBox "You’ve selected the chart title."
ElseIf ElementID = 24 Then
MsgBox "You’ve selected the chart legend."
ElseIf ElementID = 12 Then
MsgBox "You’ve selected the legend key."
ElseIf ElementID = 13 Then
MsgBox "You’ve selected the legend entry."
End If
End Sub
Private Sub Chart_Calculate()
MsgBox "The data in your spreadsheet has " & vbCrLf & "changed. Your chart has been updated."
End Sub
Private Sub Chart_BeforeRightClick(Cancel As Boolean)
Cancel = True
End Sub
Private Sub Chart_MouseDown(ByVal Button As Long, ByVal Shift As Long, ByVal x As Long, ByVal y As Long)
If Button = 1 Then
MsgBox "You pressed the left mouse button."
ElseIf Button = 2 Then
MsgBox "You pressed the right mouse button."
Else
MsgBox "You pressed the middle mouse button."
End If
End Sub
4. Activate the chart sheet and perform the actions that will trigger the event procedures that you’ve written. For example, click the chart legend and notice that this action triggers two events: Chart_MouseDown and Chart_Select.
To capture events raised by a chart embedded in a worksheet, you must first create a new object in the class module using the keyword WithEvents.
The WithEvents keyword allows you to specify an object variable that will be used to respond to events triggered by an ActiveX object. This keyword can only be used in class modules in the declaration section. In the following example procedure, we will learn how to use the WithEvents keyword to capture the Chart_Activate event for the embedded chart you created in Hands-On 15.20.
|
Hands-On 15.22. Writing the Chart_Activate() Event Procedure for an Embedded Chart |
1. Activate the Visual Basic Editor window. In the Project Explorer, select VBAProject (Chap15_ChartEvents.xlsm).
2. Choose Insert | Class Module.
In the Class Modules folder, you will see a module named Class1.
3. In the Properties window, rename Class1 to clsChart.
4. In the clsChart class module Code window, type the following declaration:
Public WithEvents xlChart As Excel.Chart
The above statement declares an object variable that will represent the events generated by the Chart object.
The Public keyword will make the object variable xlChart available to all modules in the current VBA project. Declaring an object variable using the WithEvents keyword exposes all of the events defined for that particular object type. After typing the above declaration, the xlChart object variable is added to the drop-down Object list in the upper-left corner of the Code window, and the events associated with this object variable appear in the Procedure drop-down listbox in the upper-right corner of the Code window.
5. Open the Object drop-down listbox and select the xlChart variable.
The Code window should now show the skeleton of the xlChart_Activate event procedure:
Private Sub xlChart_Activate()
End Sub
6. Add your VBA code to the event procedure. In this example, we will add a statement to display a message box. After adding this statement, your VBA procedure should look like the following:
Private Sub xlChart_Activate()
MsgBox "You’ve activated a chart embedded in " & ActiveSheet.Name & "."
End Sub
After entering the code of the event procedure, you need to inform Visual Basic that you are planning on using it (see Step 7).
7. In the Project Explorer window, double-click the object named ThisWorkbook, and enter in the first line of the ThisWorkbook Code window the statement to create a new instance of the class named clsChart:
Dim myChart As New clsChart
This instruction declares an object variable named myChart. This variable will refer to the xlChart object located in the class module clsChart. The New keyword tells Visual Basic to create a new instance of the specified object.
Before you can use the myChart object variable, you must write a VBA procedure that initializes it (see Step 8).
8. Enter the following procedure in the ThisWorkbook Code window to initialize the object variable myChart:
Sub InitializeChart()
' you must run this procedure before event procedures
' written in clsChart class module can be triggered for
' the chart embedded in Sheet1
' connect the class module with the Excel chart object
Set myChart.xlChart = Worksheets("Sheet1").ChartObjects(1).Chart
End Sub
9. Run the InitializeChart procedure.
After running this procedure, the event procedures entered in the clsChart class module will be triggered in response to a particular event. Recall that right now the clsChart class module contains the Chart_Activate event procedure. Later on you may want to write in the clsChart class module additional event procedures to capture other events for your embedded chart.
10. Activate the Microsoft Excel application window and click the embedded chart in Sheet1.
At this time, the xlChart_Activate event procedure that you entered in Step 6 above should be triggered.
11. Save and close the Chap15_ChartEvents.xlsm workbook file.
If you want your event procedure to execute no matter which Excel workbook is currently active, you need to create the event procedure for the Application object. Event procedures for the Application object have a global scope. This means that the procedure code will be executed in response to a certain event as long as the Microsoft Excel application remains open.
Events for the Application object are listed in Table 15.7. Similar to an embedded chart, event procedures for the Application object require that you create a new object using the WithEvents keyword in a class module.
TABLE 15.7. Application events |
|
Application Event Name |
Event Description |
|
This event occurs whenever all pending calculations and all of the resultant calculation activities have been completed and there are no outstanding queries. |
|
This event occurs when the user creates a new workbook. |
|
This event occurs when a Protected View window is activated. |
|
This event occurs immediately before a Protected View window or a workbook in a Protected View window opens. |
|
This event occurs immediately before editing is enabled on the workbook in the specified Protected View window. |
|
This event occurs when a Protected View window is deactivated. |
|
This event occurs when a workbook is opened in a Protected View. |
|
This event occurs when any Protected View window is resized. |
|
This event occurs when the user opens a workbook. |
|
This event occurs when the user shifts the focus to an open workbook. |
|
This event occurs when the user shifts the focus away from an open workbook. |
|
This event occurs when the user adds a new sheet to an open workbook. |
This event occurs when a new chart is created in any open workbook. If multiple charts are inserted or pasted, the event will occur for each chart in the insertion order. If a chart object or chart sheet is moved from one location to another, the event will not occur. However, the event will occur if the chart is moved between a chart object and a chart sheet. |
|
|
This event occurs before an open workbook is saved. |
|
This event occurs before an open workbook is printed. |
|
This event occurs before an open workbook is closed. |
|
This event occurs when the user installs a workbook as an add-in. |
|
This event occurs when the user uninstalls a workbook as an add-in. |
|
This event occurs after the workbook is saved. |
|
This event occurs when the user either drills through the recordset or invokes the rowset action on an OLAP PivotTable. |
|
This event occurs when the user activates a sheet in an open workbook. |
|
This event occurs when the user deactivates a sheet in an open workbook. |
|
This event occurs when the user clicks any hyperlink in Microsoft Excel. |
|
This event occurs after a cell or range of cells that contain formulas inside a PivotTable are edited or recalculated. |
This event occurs before changes are applied to a PivotTable. |
|
|
This event occurs before changes are committed against the OLAP data source for a PivotTable (immediately before Excel executes a COMMIT TRANSACTION). |
|
This event occurs before changes to a PivotTable are discarded. |
|
This event occurs after the sheet of the PivotTable report has been updated. |
|
This event occurs when the user changes the selection on a sheet in an open workbook. |
|
This event occurs when the user changes a cell formula in an open workbook. |
|
This event occurs when the user recalculates a worksheet in an open workbook. |
|
This event occurs when the user double-clicks a worksheet cell in an open workbook. |
|
This event occurs when the user right-clicks a worksheet cell in an open workbook. |
|
This event occurs when the user shifts the focus to an open window. |
|
This event occurs when the user shifts the focus away from the open window. |
|
This event occurs when the user resizes an open window. |
|
This event occurs after a PivotTable report connection has been closed. |
|
This event occurs after a PivotTable report connection has been opened. |
|
This event occurs after Microsoft Excel saves or exports data from any open workbook to an XML data file. |
|
This event occurs after an existing XML data connection is refreshed or new XML data is imported into any open Microsoft Excel workbook. |
|
This event occurs before Microsoft Excel saves or exports data from any open workbook to an XML data file. |
This event occurs before an existing XML data connection is refreshed or new XML data is imported into any open Microsoft Excel workbook. |
|
|
This event occurs when the local copy of a workbook that is part of a document workspace is synchronized with the copy on the server. This event has been deprecated; it’s used only for backward compatibility. |
Let’s try a couple of event procedures for the Application object.
|
Hands-On 15.23. Writing Event Procedures for the Application Object |
1. Open a new workbook and save it as Chap15_ApplicationEvents.xlsm in C:\VBAExcel2016__ByExample.
2. Switch to the Visual Basic Editor window, and in the Project Explorer window select VBAProject (Chap15_ApplicationEvents.xlsm).
3. Choose Insert | Class Module.
4. In the Properties window, change the class module name to clsApplication.
5. In the clsApplication Code window, type the following declaration statement:
Public WithEvents App As Application
This statement uses the WithEvents keyword to declare an Application object variable.
6. Below the declaration statement, enter the event procedures as shown below:
Private Sub App_WorkbookOpen(ByVal Wb As Workbook)
If Wb.FileFormat = xlCSV Then
If MsgBox("Do you want to save this " & vbCrLf & "file as an Excel workbook?", vbYesNo, "Original file format: " & "comma delimited file") = vbYes Then
Wb.SaveAs FileFormat:=xlWorkbookNormal
End If
End If
End Sub
Private Sub App_WorkbookBeforeSave(ByVal Wb As Workbook, ByVal SaveAsUI As Boolean, Cancel As Boolean)
If Wb.Path <> vbNullString Then
ActiveWindow.Caption = Wb.FullName & " [Last Saved: " & Time & "]"
End If
End Sub
Private Sub App_WorkbookBeforePrint(ByVal Wb As Workbook, Cancel As Boolean)
Wb.PrintOut Copies:=2
End Sub
Private Sub App_WorkbookBeforeClose(ByVal Wb As Workbook, Cancel As Boolean)
Dim r As Integer
Dim p As Variant
Sheets.Add
r = 1
For Each p In Wb.BuiltinDocumentProperties
On Error GoTo ErrorHandle
Cells(r, 1).Value = p.Name & " = " & ActiveWorkbook.BuiltinDocumentProperties.Item(p.Name).Value
r = r + 1
Next
Exit Sub
ErrorHandle:
Cells(r, 1).Value = p.Name
Resume Next
End Sub
Private Sub App_SheetSelectionChange(ByVal Sh As Object, ByVal Target As Range)
If Selection.Count > 1 Or (Selection.Count < 2 And IsEmpty(Target.Value)) Then
Application.StatusBar = Target.Address
Else
Application.StatusBar = Target.Address & "(" & Target.Value & ")"
End If
End Sub
Private Sub App_WindowActivate(ByVal Wb As Workbook, ByVal Wn As Window)
Wn.DisplayFormulas = True
End Sub
7. After you’ve entered the code of the above event procedures in the class module, choose Insert | Module to insert a standard module into your current VBA project.
8. In the newly inserted standard module, create a new instance of the clsApplication class and connect the object located in the class module clsApplication with the object variable App representing the Application object, as shown below:
Dim DoThis As New clsApplication
Public Sub InitializeAppEvents()
Set DoThis.App = Application
End Sub
Recall that you declared the App object variable to point to the Application object in Step 5 above.
9. Now place the mouse pointer within the InitializeAppEvents procedure and press F5 to run it.
As a result of running the InitializeAppEvents procedure, the App object in the class module will refer to the Excel application. From now on, when a specific event occurs, the code of the event procedures you’ve entered in the class module will be executed.
If you don’t want to respond to events generated by the Application object, you can break the connection between the object and its object variable by entering in a standard module (and then running) the following procedure:
Public Sub CancelAppEvents()
Set DoThis.App = Nothing
End Sub
When you set the object variable to Nothing, you release the memory and break the connection between the object variable and the object to which this variable refers. When you run the CancelAppEvents procedure, the code of the event procedures written in the class module will not be automatically executed when a specific event occurs.
Now let’s proceed to try triggering the application events you coded in the class module.
10. Switch to the Chap15_ApplicationEvents workbook in the Excel application window. Click the File tab and choose New. Select Blank Workbook, and click Create.
11. Click the File tab and choose Save As. Save the workbook opened in Step 10 as TestBeforeSaveEvent.xlsx.
12. Type anything in Sheet1 of the TestBeforeSaveEvent.xlsx workbook and save this workbook.
Notice that Excel writes the full name of the workbook file and the time the workbook was last saved in the workbook’s title bar as coded in the WorkbookBeforeSave event procedure (see Step 6). Every time you save this workbook file, Excel will update the last saved time in the workbook’s title bar.
13. Take a look at the code in other event procedures you entered in Step 6 and perform actions that will trigger these events.
14. Close the Chap15_ApplicationEvents.xlsm file and other workbooks if they are currently open.
A query table is a table in an Excel worksheet that represents data returned from an external data source, such as an SQL Server database, a Microsoft Access database, a Web page, or a text file. Excel provides two events for the QueryTable object: BeforeRefresh and AfterRefresh. These events are triggered before or after the query table is refreshed. You can create a query table as a standalone object or as a list object whose data source is a query table. The list object is discussed in detail in Chapter 21, “Using and Programming Excel Tables.”
When you retrieve data from an external data source such as Access or SQL Server using the controls available on the Excel Ribbon’s Data tab, Excel creates a query table that is associated with a list object. The resulting table is easier to use thanks to a number of built-in data management features available on the Ribbon. The next Hands-On demonstrates how to create a query table associated with a list object and enable the QueryTable object’s BeforeRefresh and AfterRefresh events. This exercise assumes that you have Microsoft Access and a sample Northwind 2007.accdb database installed on your computer.
|
1. Open a new Microsoft Excel workbook and save it as Chap15_QueryTableEvents.xlsm in your C:\VBAExcel2016__ByExample folder.
2. Choose the Data tab. In the Get External Data group, click the From Other Sources button and choose From Microsoft Query.
3. In the Choose Data Source dialog box, select <New Data Source> and click OK.
4. In Step 1 of the Create New Data Source dialog box, enter SampleDb as the data source name, as shown in Figure 15.6.

FIGURE 15.6. Use the Create New Data Source dialog box to specify the data source that will provide data for the query table.
5. In Step 2 of the Create New Data Source dialog box, select Microsoft Access Driver (*.mdb, *.accdb) from the drop-down list.
6. In Step 3 of the Create New Data Source dialog box, click the Connect button.
7. In the ODBC Microsoft Access Setup dialog box, click the Select button.
8. In the Select Database dialog box, navigate to the C:\VBAExcel2016__ByExample folder and select the Northwind 2007.accdb file, then click OK to close the Select Database dialog box.
9. In Step 4 of the Create New Data Source dialog box, select the Inventory on Order table in the drop-down listbox, as shown in Figure 15.7.

FIGURE 15.7 Use Step 4 of the Create New Data Source dialog to specify a default table for your data source.
10. Click OK to close the Create New Data Source dialog box.
11. In the Choose Data Source dialog box, the SampleDb data source name should now be highlighted. Click OK.
12. In the Query Wizard–Choose Columns dialog box, click the button with the greater than sign (>) to move all the fields from the Inventory on Order table to the Columns in your query box.
13. Click the Next button until you get to the Query Wizard–Finish dialog box.
14. In the wizard’s Finish dialog box, make sure the Return Data to Microsoft Excel option button is selected and click Finish.
15. In the Import Data dialog box, the current worksheet cell is selected. Click cell A1 in the current worksheet to change the cell reference. Next, click the Properties button. Excel will display the Connection Properties dialog box. Check Refresh the data when opening the file and click OK. Click OK to exit the Import Data dialog box.
After completing the above steps, the data from the Inventory on Order table in the Northwind 2007 database should be placed in the active worksheet.
To write event procedures for a QueryTable object, you must create a class module and declare a QueryTable object by using the WithEvents keyword. Let’s continue.
16. Save the changes in the Chap15_QueryTableEvents.xlsm workbook.
17. Switch to the Visual Basic Editor window and insert a class module into VBAProject (Chap15_QueryTableEvents.xlsm).
18. In the Properties window, rename the class module clsQryTbl.
19. In the clsQryTbl Code window, type the following declaration statement:
Public WithEvents qryTbl As QueryTable
After you’ve declared the new object (qryTbl) by using the WithEvents keyword, it appears in the Object drop-down listbox in the class module.
20. In the clsQryTbl Code window, enter the two event procedures shown below:
Private Sub qryTbl_BeforeRefresh(Cancel As Boolean)
Dim Response As Integer
Response = MsgBox("Are you sure you " & " want to refresh now?", vbYesNoCancel)
If Response = vbNo Then Cancel = True
End Sub
Private Sub qryTbl_AfterRefresh(ByVal Success As Boolean)
If Success Then
MsgBox "The data has been refreshed."
MsgBox "The query failed."
End If
End Sub
The BeforeRefresh event of the QueryTable object occurs before the query table is refreshed. The AfterRefresh event occurs after a query is completed or canceled. The Success argument is True if the query was completed successfully.
Before you can trigger these event procedures, you must connect the object that you declared in the class module (qryTbl) to the specified QueryTable object. This is done in a standard module as shown in Step 21.
21. Insert a standard module into VBAProject (Chap15_QueryTableEvents.xlsm) and rename it QueryTableListObj.
22. In the QueryTableListObj Code window, enter the declaration line and the procedure as shown below:
Dim sampleQry As New clsQryTbl
Public Sub Auto_Open()
' connect the class module and its objects with the Query object
Set sampleQry.qryTbl = ActiveSheet.ListObjects(1).QueryTable
End Sub
This procedure creates a new instance of the QueryTable class (clsQryTbl) and connects this instance with the first list object on the active worksheet.
NOTE |
A query table associated with a list object can only be accessed through the ListObject.QueryTable property. This query table is not a part of the Worksheet. QueryTables collection. To find out whether a query table exists on a worksheet, be sure to check both the QueryTables and ListObjects collections. This can be done easily by entering in the Immediate window the following statements:
|
23. Run the Auto_Open procedure.
After you run this initialization procedure, the object that you declared in the class module points to the specified QueryTable object.
In the future when you want to work with the QueryTable object in this workbook file, you won’t need to run the Auto_Open procedure. This procedure will run automatically upon opening the workbook file. |
24. Switch to the Microsoft Excel application window. In the worksheet where you placed the Inventory on Order table from the Microsoft Access database, choose Data | Refresh All. Excel will now trigger the qryTbl_BeforeRefresh event procedure and you should see the custom message box. If you click Yes, the data in the worksheet will be refreshed with the existing data in the database. Excel will then trigger the qryTbl_AfterRefresh event procedure and another custom message will be displayed.
25. Close the Chap15_QueryTableEvents.xlsm workbook file.
There are two events in Excel that are not associated with a specific object: the OnTime and OnKey events. These events are accessed using the methods of the Application Object: OnTime and OnKey.
The OnTime event uses the OnTime method of the Application object to trigger an event at a specific time. The syntax is:
Application.OnTime(EarliestTime, Procedure, LatestTime, Schedule)
The Procedure parameter is the name of the VBA procedure to run. The EarliestTime parameter is the time you would like the procedure to run. Use the TimeValue function to specify time as shown in the examples below. LatestTime is an optional parameter that allows you to specify the latest time the procedure can be run. Again, you can use the TimeValue function to specify a time for this parameter. The Schedule parameter allows you to clear a previously set OnTime event. Set this parameter to False to cancel the event. The default value for Schedule is True.
For example, you can have Excel run the specified procedure at 4:00 p.m. as shown below:
Application.OnTime TimeValue("4:00PM"), "YourProcedureName"
To cancel the above event, run the following code:
Application.OnTime TimeValue("4:00PM"), "YourProcedureName", , False
To schedule the procedure five minutes after the current time, use the following code:
Application.OnTime Now + TimeValue("00:05:00"), "YourProcedureName"
The Now function returns the current time. Therefore, to schedule the procedure to occur in the future (a certain amount from the current time), you need to set the value of the EarliestTime parameter to:
Now + TimeValue(time)
To trigger your procedure on July 4, 2016, at 12:01 a.m., type the following statement on one line in the Immediate window and press Enter:
Application.OnTime DateSerial(2016, 7, 4) + TimeValue("00:00:01"), "YourProcedureName"
You can use the Application object’s OnKey method to trigger a procedure whenever a particular key or key combination is pressed. The syntax of the OnKey method is as follows:
Application.OnKey(Key, Procedure)
where Key is a string indicating the key to be pressed and Procedure is the name of the procedure you want to execute. If you pass an empty string (“”) as the second parameter for the OnKey method, Excel will ignore the keystroke.
The key parameter can specify a single key or any key combined with Shift, Alt, and/or Ctrl. For a letter, or any other character key, use that character. To specify a key combination, use the plus sign (+) for Shift, percent sign (%) for Alt, and caret (^) for Ctrl in front of the keycode.
For example, to run your procedure when you press Ctrl-a, you would write the following statement:
Application.OnKey "^a", "YourProcedureName"
Special keys are entered using curly braces: {Enter}, {Down}, {Esc}, {Home}, {Backspace}, {F1} or {Right}. See the list of keycodes in Table 13.4 (Chapter 13). For example, to run the procedure named “NewFolder” when the user presses Alt-F10, use the following code:
Application.OnKey "%{F10}", "NewFolder"
To cancel an OnKey event and return the key to its normal function, call the OnKey method without the Procedure parameter:
Application.OnKey "%{F10}"
The above code will return the key combination Alt+F10 to its default function in Excel, which is to display the Selection and Visibility pane on the right side of the Excel screen.
While using the OnKey method is a quick way to assign a shortcut to execute a VBA procedure or macro, a better way is to use the Options button in the Macro dialog to assign a Ctrl+key combination to a procedure.
When using the OnKey events, keep in mind that reassigning frequently used Excel shortcuts (such as Ctrl+P for Print) to perform other customized processes may make you an unpopular developer among your users.
In this chapter, you gained hands-on experience with events and event-driven programming in Excel. These are invaluable skills, whether you are planning to create spreadsheet applications for others to use or simply automating your worksheet daily tasks. Excel provides many events to which you can respond. By writing event procedures, you can change the way objects respond to events. Your event procedures can be as simple as a single line of code displaying a custom message, or more complex with code including decision-making statements and other programming structures that allow you to change the flow of your program when a particular event occurs. When a certain event occurs, Visual Basic will simply run an appropriate event procedure instead of responding in the standard way. You’ve learned that some event procedures are written in a standard module (workbook, worksheet, and standalone chart sheet) while others (embedded chart, application, and query table) require that you create a new object using the WithEvents keyword in a class module. You’ve also learned that you can enable or disable events using the EnableEvents property. In the final section of this chapter you also learned how to use two Application object methods to execute procedures at a specific time or in response to the user pressing a key or a key combination.
The next chapter takes you through the process of accessing Excel dialog boxes with VBA.
