
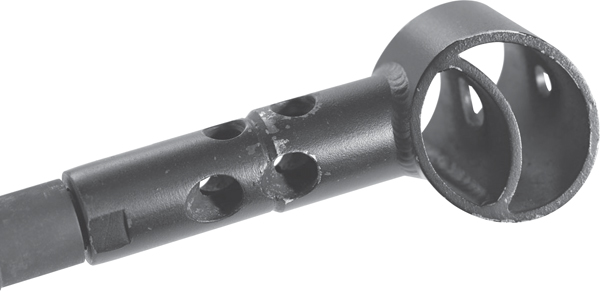
The only real difference between the A1 and the A2 is, the A2 lacks the three bottom slots.
If you were to believe the anti-gunners, a flash hider is such a psychological inducement to evil behavior that it’s a wonder anyone is alive in the factories that make them.
What does a flash hider do and what exactly is flash?
The only real difference between the A1 and the A2 is, the A2 lacks the three bottom slots.
First, disregard the notion that flash is unburnt powder. If you have not combusted all the powder the case contained in its travel through 16 inches of bore, you’re using the wrong powder. In some handgun cartridges, the powder has been fully combusted before the bullet leaves the case. In rifles, the powder has all been burned by the time the bullet is 3 or 4 inches down the bore. Actually, the bright flash we see is incandescence.
The powder burns at a high pressure and temperature. The confined combustion temperature of your average rifle powder is on the order of 3,500 to 3,700 degrees, Fahrenheit. That gas leaves the muzzle in an expanding bubble. At that temperature the gas is incandescent, and the glow happens to be in a part of the spectrum we can see. Also, the uncorking pressure of rifle ammo, typically 10,000 PSI or higher, produces a smooth-surfaced gas bubble. It expands too quickly to mix until it has sufficiently cooled.
An example of incandescence is your common light bulb. The electricity flows through the filament, and the filament glows due to the electrical resistance of the material involved. The filament, due to electrical resistance, is heated up until it is hot enough to be incandescent, and the glow is in the visible spectrum, which throws off … light. The filament is not consumed, it is not burning, it simply ejects photons due to the heat. Turn the light off, electrical flow stops, and the filament cools and stops emitting photons.
The muzzle flash of your rifle is the same principle. The hot gases, expanding into the cool air, emit photons from heat, not from burning powder. A flash hider hides most of this by creating turbulence. By mixing the cooler ambient air with the expanding bubble in a random pattern, there is no longer a large flat surface, or bubble, to glow.
There are two types of muzzle devices — flash hiders, already explained, and muzzle brakes (or compensators) that use gas differently. A third type of muzzle device is simply a place to mount a suppressor.
Flash hiders keep muzzle flash down in the visible spectrum. In the Infrared, they don’t do squat. In fact, a rifle may produce a visible muzzle flash only part of the time but through a thermal scope it will flash every time. Hot gas is hot gas, even if it isn’t incandescent in the visible spectrum. A thermal scope will see it every single time.
An AR barrel with no flash hider is problematic. In a rifle length 20-inch barrel it isn’t too bad, as there is enough length and time for cooling and pressure loss to keep flash manageable. Also, there are a lot of uses where the shooter doesn’t really care if there is a visible flash or not. A deer hunter, for instance, cares not one whit about muzzle flash. Target shooters are not bothered by it. Most matches are held in broad daylight, and cardboard targets aren’t going to notice muzzle flash. But the rest of us want a flash hider.
The basic A1 and A2 flash hiders do a very good job. The A2 differs only in that it has three of the slots closed, so that when you are firing prone, in a dusty environment, you will not be kicking up so much dust that everyone will be able to point and say, “Over there!” The closed bottom allows you to perform some tuning later on.

The baffles and exhaust ports are meant to change the direction of gas flow to the benefit of the shooter.
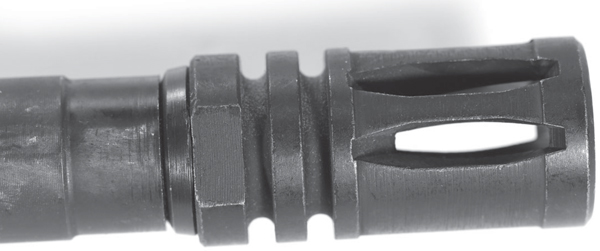
The next flash hider to consider is known as the Vortex. The real-deal, actual Vortex is made by Smith Enterprise. It's longer than the A1/A2, and has only three or four (depends on the caliber) open-ended slots. The tines of the Vortex are thicker than the slot walls of the A1/A2, and its slot is machined along a slight spiral, angled path. As a result, the Vortex does a much better job of turbulating the gas flow of the muzzle blast, thus hiding the flash. (Yes, turbulating. It's my book, I get to invent words now and then.) The one drawback is that the open ends of the tines can catch on stuff like vines, branches or gear.
Everyone from the smallest machine shop to massive offshore manufacturers have made copies of the Vortex design. I’m as much in favor as saving money as the next guy, but when it comes to intellectual property, I’m also interested in protecting it. So buy original if you can.
There are more kinds of flash hiders: ones with slots, drilled holes, ports, vanes, grooves, you name it. All of these are marketed as improvements, but between the A1/A2 and the Vortex, there isn’t a whole lot of improvement to be gained.
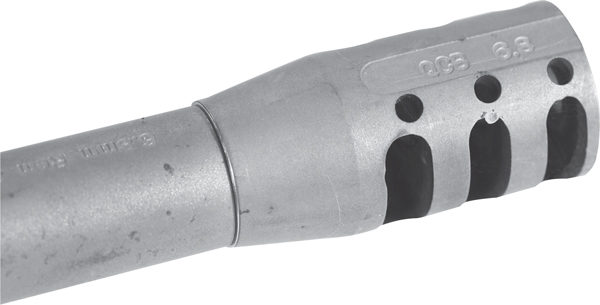
The Colt Competition muzzle brake has more top slots on the right than the left. That design keeps a right-handed shooter on center.
A muzzle brake is a simple thing in theory, and a difficult thing in the real world. A brake directs hot, high pressure gases, turning the gas flow into something we can use.
Newton’s Third Law tells us that for every action there is an opposite and equal reaction. When the bullet begins to move, the rifle begins to recoil. We can calculate the movement force precisely because we know the bullet’s mass and velocity, and we know the rifle’s mass and velocity. The first approximation is muzzle velocity multiplied by mass. For a .223/5.56 with a 55-grain bullet leaving at 3,000 fps, that comes to 165,000 gr. fps. The rifle weighs 7.5 pounds. There are 7,000 grains to a pound. So, our first estimate will be that the rifle will recoil at a velocity of 3.142 fps. (The actual total recoil is derived via calculus, as the bullet does not spend the entire bore time at 3,000 fps. I’ll leave that as an exercise for the really math-happy reader to solve.)
The same estimate, using a hunting rifle in .30-06, with a 180 grain bullet at 2,500 fps out of an 8-pound rifle, gives us 8.035 fps as the recoil velocity. Even if you’ve never fired an AR before, you can clearly see that the recoil it generates isn’t all that onerous.
The muzzle blast is basically a jet nozzle, and we can also calculate that. If we take a basic .223/5.56 load, with 25 grains of powder, and we burn and eject it, we have extra recoil. The hot gases jet out at over 4,000 fps, in some loads as high as 5,000 fps. We’ll use the lower figure. 25 grains (we’ll assume it all ejects at full velocity) at 4,000 fps is an additional 100,000 gr. fps in recoil. That adds 1.90 fps to the recoil velocity of the AR. (The .30-06? It adds 50 grains of powder at 4,000 fps, for an extra 3.57 fps. Ouch.)
But, what if we redirect those gases? A brake can jet them out to the sides or top, or cause them to slam into a fixed barrier, decelerating them. You can use the leverage the barrel provides, and not just negate the added gas component to recoil, but pretty much negate all the recoil. And that’s what a muzzle brake does.
You will notice that there is no mention of turbulence or of reducing flash. That’s because most muzzle brakes are actually flash enhancers. They redirect gases as smoothly and cleanly as possible. A good muzzle brake is loud, as the gases are re-directed back at you, or the guy next to you. They are dangerous, as the 4,000+ fps gases have been smoothly (smooth means efficient, and efficient means no loss of momentum) squirted up or to the sides — or both. You do not want to be standing next to someone shooting a braked rifle in any caliber.
A low profile, but effective brake, this one from PRI.
Despite the assurances of manufacturers, there is no such thing as a device that is an effective muzzle brake and flash hider. You have to pick one. The one kinda-sorta exception to this is a suppressor. It really does a good job of dampening muzzle flash, most of the time, and it does kind of reduce felt recoil. But that’s not why you buy one, is it? You buy one because it is quiet.
In the past, “muzzle devices” could mean anything from a flash hider to a blank firing adapter, screw-in chokes or a rebar cutter. Now, it means something with which to attach a suppressor.
Suppressors come in two flavors: direct-thread and QD, or quick detach. Direct thread is just that, you simply screw your suppressor onto the barrel using the same threads on which the flash hider was attached. This has the virtues of being simple, cheap and light. It also means you have to be a little more careful when using it, to make sure it stays tight. And you can’t easily go swapping it from rifle to rifle, especially when it is hot.

The Surefire suppressor mount can be a flash hider (like this) or a muzzle brake (a different part), but each has a special indexing design so your rifle has return-to-zero repeatability.
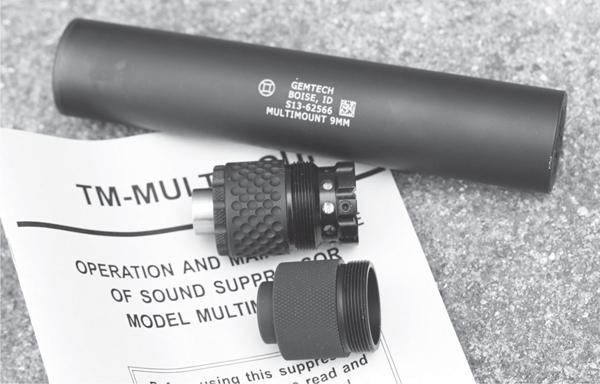
Pistol suppressors need a booster, rifles do not. On a 5.56 or 7.62, not a problem. But if you want to use a suppressor on a 9mm handgun and carbine, you’ll need two different rear caps.
That’s why suppressor manufacturers make quick detach mounting systems. The mount, or muzzle device, is screwed onto your barrel and locked in place with some sort of locking compound. The favored one currently is Rocksett. The suppressor attaches to the mount, using a fast-pitch thread and ratchet system. Once the ratchet clicks to the end, the suppressor won’t move. The advantages are, you can easily move the suppressor from rifle to rifle (each needs to have a muzzle device pre-installed) and it can also be removed and locked up, if you so desire.
The downsides are, you have to buy a muzzle device for each rifle you want to suppress. You also have the extra weight of the muzzle device. A suppressor built to use a muzzle device typically weighs more than the identical model built as a direct thread suppressor.
Muzzle devices can be flash hiders when the suppressor is off, muzzle brakes, or simply an attachment point with no extra function.
Unless you live in a state where a threaded muzzle is a no-no (and why do you live there?) then you’ll want to have something on the muzzle.
The threads on your standard .223/5.56 AR are 1⁄2-28. That is, the nominal thread diameter is .500 inches, and there are 28 turns to the inch of threaded section. Other calibers will have different thread pitches, in order to prevent installing the wrong (as in, undersized) flash hider onto a barrel where it can cause a problem. You can have a die of that pitch on hand, if you want to clean up the threads, but for most installations it won’t be necessary. A die is the thread-cutter that cuts the barrel threads, a tap is the tool that cuts the threads that would fit onto the barrel. I can see one instance where a 1⁄2-28 die would be useful, and that is if the original lathe operator cut the threads to the large side of the tolerances, and the flash hider maker cut them to the small end. You could use the tap to open up the flash hider threads, but the die is more useful, as it is somewhat adjustable for bringing down in diameter overly large threaded diameters.
Colt uses a cone washer. It is tapered on the inside and out, a section of a cone that is compressed, creating tension to hold the flash hider in place.

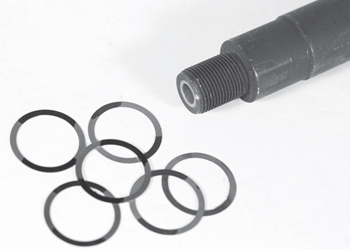
Two of the three washers you do not want to use on the back of your suppressor or muzzle brake. But they are just fine for use with a flash hider.
To attach a flash hider, you need a washer of some kind and a wrench. The wrench is most likely a 3⁄4-inch open end. Flash hider washers come in three kinds — split, crush and peel. The split washer is a common industrial and hardware store type. The washer is cut into a “C” and then bent so it forms a spiral. It is heat-treated so it acts like a spring. As you tighten the flash hider down, with the washer between the flash hider and the barrel shoulder, the springiness of the washer loads the flash hider so it won’t unscrew later. This is easy, fast, simple, somewhat ugly and definitely not mil-spec.
The second washer is mil-spec, kinda. It is the crush washer. This washer is a simple circle of steel, but the flats are both angled to the bore. Think of the top of a funnel, made of steel, and the top rim cut off. As you tighten the crush washer down, the flex of the small steel cone acts to load the flash hider, keeping it from loosening.
Both of these washers have the same problem — timing. There is just none built in. If the threads of your barrel are not timed to the shoulder, then when the flash hider is tightened it may not be properly aligned. If you are using an A1, no problem, it’s all the same. But the A2 has to have the non-slot side down. The only way you can adjust the timing is to either lathe turn the barrel shoulder back, or cut the rear face of the flash hider. Luckily, the flash hider is not a hardened piece of steel and it is easy enough to do that.
Enter the peel washer. The peel washer is simply multiple layers of foil, glued together. To adjust the timing of the flash hider, use a knife to catch the edge of a layer and peel some off. The drawback of the peel washer is that it does not load the flash hider, and you have to use Loctite to secure it once you determine the proper timing.
Any flash hider installation is a “cut and try” operation. You cannot simply spin it on, torque it with a wrench, and call it done. Which brings us to the torque limits for the flash hider. The mil spec for this is spelled out in the official military torque settings section, per TM 9-1005-213-23&9. And that guide is oh so unhelpful. The recommendation is to hand tighten the flash hider and then use a wrench to turn it 1⁄14th of a turn more until it is aligned. 1⁄14th? Seriously? What that means is that almost every flash hider in existence is overtightened.
Which leads us to the High Power shooters. In Chapter 2, we discuss a very expensive barrel that is made to shoot small groups, consistently at long distances. High Power shooters aren’t required to use flash hiders on their rifles, as the rules committee allows them to shoot with bare muzzle (in case the competitor happens to reside in a State not allowing them). But those who do insist on a flash hider don’t want to be using a wrench on the muzzle, after spending a lot of money to have a primo barrel installed. These folks time a flash hider so it comes up properly aligned with hand pressure. And not much of that, either. This involves either machining the barrel shoulder or filing the rear of the flash hider, until it hand tightens to just the right spot. Then they take it off, degrease the flash hider and muzzle threads and use a liberal application of heavy-duty Loctite. That’s right, their flash hider is essentially glued in place.
Works for them.
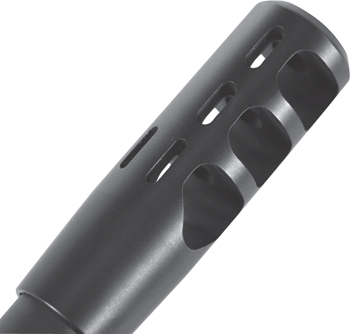
The Noveske is an interesting bit of gear that serves a very useful purpose. The Pig is a flash hider, but it is also a sound re-director and a gas flow adjuster all in one. It's derived from the “Krink” muzzle brake, which increased gas dwell time on an AK SBR. It also changes the nature of the muzzle blast. Namely, it directs more of the noise forward, less to the sides and back, without being a suppressor. Yes, I have determined this by carefully (oh so carefully) walking to locations that I would not advise you doing.
The secret to this working is a backwards cone inside of the larger housing. The downside is, regular disassembly and cleaning is required. I know this because a friend of mine wanted to remove his to try something else. "J," as we’ll call him, is a high-volume shooter. He has worn out barrels in practice. The Noveske would not come off. It finally took two of us, with tools, heat and a vise to wrestle it off. Strangely, it weighed a lot more than a new one we happened to have there for comparison.
It would not come apart, so Ned Christiansen took it back to his shop and split it with a wire EDM machine. Yowza! It was packed with carbon like an abused suppressor.
That’s how we know. If you have one, and you can still get it apart, take it off and clean it. If you can’t, you’ll at least know why and what the outcome will be. Kept clean, it is a great addition to your AR.
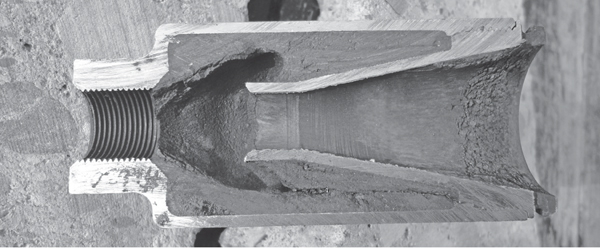
The Noveske KX3. This one left uncleaned after use and packed full of powder residue. Don’t do this, clean your pig.

The most effective muzzle brake to be had, the McArthur PRGS-1.
The muzzle brake replaces the flash hider. Unscrew the flash hider, clean the threads and screw on the muzzle brake. Secure it by one of several methods. The first, and most elegant is, to screw the muzzle brake on until it bottoms out against the shoulder of the barrel, correctly timed for your needs. This isn’t always possible, simply because the threads of the barrel and the threads of the brake may not be in agreement. The brake/comp can bottom out upside-down for all you know.
You can use a peel washer, as with the flash hider, to adjust the timing to clock properly.
Or you can use a lock nut. This is simply a nut of the correct thread pitch, screwed on before the brake. Once the brake is on the muzzle and almost bottoms out, time it. Then unscrew the lock nut until it contacts and stops against the brake.
There is no mil-spec for this, there is no industry standard; there is only what works. The bare install — the brake on the barrel — requires a lot of work and special tools to make it fit correctly. The peel washer is easy and adjustable. The lock nut is very secure, but does take up space on the threaded portion of the muzzle meaning fewer threads by which to hold the brake.
Any muzzle brake has two components to its action: forward and up. The upward force dampens the muzzle rise, which is created by the offset lever of stock and body. Even the in-line stock of the AR-15 can create upwards movement. You see, the typical military stance, and one adopted by a lot of shooters, in effect negates the in-line design.
The military stance uses what I call the “bazooka hold.” The rifle is mounted as high as possible, with the toe of the stock touching, and the head upright. This means that the contact point of the stock, on your body, is off-line of the thrust of recoil, which is directly back through the buffer tube. The rifle pivots up, since the contact point is below the centerline.
How much it pivots depends on how tightly you hold it, how much of the stock toe is in contact, and the power of the load you are firing. There is also a slight lateral movement, outwards (to the right for a right-handed shooter, left for a southpaw) due to the contact point being off your own centerline. The rifle recoils, pushing on your right side, your body twists slightly in response and the muzzle wavers outboard.
The muzzle brake has to be timed at a slight angle, with the ports relieved similarly, so as to counteract the movement. Since this movement is different for every person, it becomes a personal detail. Also, if your shooting style changes, or you change the load — powder, weight, bullet — the gas flow of the muzzle and the brake changes and must be re-tuned.
The other component is forward force. As the gas exits the bore and enters the brake, it crashes into the baffles, the faces of the slots or ports cut into the brake. The impact of the gas jolts the rifle forward, counteracting the rearward recoil. The amount of forward jolt depends on the barrel length (shorter means higher pressures at uncorking) powder charge (more powder means more gas mass) and the size of the clearance holes in the face plates (larger holes mean less face plate surface area, thus less jolt).
The simplest method to lessen the forward force is to bore out the clearance holes. Alas, this requires a lathe. Sure, you could just reach in with a hand reamer in a T-handle, or a dremel tool, but if you open the holes off-center, you will change the characteristics of the comp, and probably not for the better.
The easiest way, if you don’t own a lathe, is to change the powder you use, and/or the powder charge. This becomes an interesting dance, as you have to meet a power requirement in 3-Gun or multi-gun competition. You need a reliable and accurate load. And you want a balanced recoil-dampening comp.
Frankly, for most people, tuning a comp is a waste of time. Until you’ve shot enough to have worn out your first barrel, all comps are the same. They will all dampen recoil. They will all not quite match your shooting form and style. And your shooting form and style, until you have had enough experience, will change on its own more than the differences between the comps.
Once you have settled on a particular style, and use it consistently, then you can get fussy about tuning comps. Here’s how to do that.
The JP Enterprise “Tank” brake. For when you absolutely, positively, have to clear off the benches on either side of you.
Determine your stance and form. Set up a shooting box — a defined area marked out on the ground — with a target 10 yards away from this spot. Take your time to get comfortable. Practice running up to and into the box, stop suddenly while bringing the rifle onto the target. If your gun club won’t allow this, find one that does, because this is a lot of what you’ll be doing in competition.
Once you have found a consistent position, run up to and into the box again, plant and aim. And stop. Load the rifle, without moving your feet. Lift the rifle and fire five rounds into the center of the target as quickly as you can.
Unload and analyze. Look at the group. Is it centered? Is it even? Or did the rounds track up and to the right? Recall what the dot or sights did during the five shots. Did the rifle recoil straight up? Angled to the side? Stay put? You are doing this not to improve your speed, but analyze the recoil track. If the rifle went straight up and down, cool. Your work is mostly done. If it just hung on the target with no upwards or lateral movement, you’re done here. Your comp is as correctly tuned as it can be to your current stance and skill level. Get to practicing for the next match. If not, you have some adjustments to make.
If the rifle tracked up and to the right (right-handed shooters) then you have to tilt the comp to the right. Not much, just a bit. Recall how the dot or sights tracked. The high-right group happened at a particular angle. Select a tilt on the brake that is half the angle the sights moved.
This is where muzzle brake installation method can make a difference. Make changes with the rifle unloaded, ideally held in a vise to hold the Reaction Rod (see sidebar earlier in this chapter). Eyeball the angle — use a pencil, held in one of the baffle slots, to indicate the attitude — and unscrew the brake. If you torqued the brake down bare, you’ll need a peel washer. Remove the brake, install the peel washer and hand tighten. Note the angle and start peeling off layers of the washer until the brake is no longer tilted to the outboard side. You will have to unscrew the brake to its new position by the smallest amount, which means probably just a few layers of the peel washer.
If the brake was originally installed with a peel washer, add just a few layers to tilt it to the right, or remove most of the washer, turning it nearly a full rotation.
If you used a lock nut, life is easier. Loosen the lock nut, tilt the bake, retighten the lock nut.
Get back down to the range and repeat the drill. Keep adjusting it until you have the angle right for you.
There is a drawback as related to competition. Clever stage designers will lay out the targets and obstacles so you can’t always get into a comfortable, identical, firing stance. They will make you shoot from awkward positions. If your stance changes, the brake angle you need changes. So, in some situations, you may find that not only is the brake not helping you, it may actually be a hindrance.
That’s the main reason I worked myself into a more-or-less neutral firing stance and don’t use the “bazooka hold.” With the brake vertical, I can count on it being less of a problem in those awkward stage locations.
The most effective way to tune a brake for decreasing forward thrust is to bore out the clearance holes in a lathe. Lacking such a machine tool, your option is to change powder charge, bullet weight, or both. The two variables you can control are the amount of powder you use, and the amount of gas mass produced at the muzzle. The caveat here is that unless you also adjust burn rate (more powder, slower rate) you will simply be increasing recoil and velocity.
The second option is to change bullet weight. Here you want a heavier bullet to reduce gas mass, since you won’t need as much powder to boot a hefty projectile up to the threshold velocity for the power you need.
This is what Production Division handgun competition shooters do. Instead of loading a 115- or 124-grain bullet to the threshold velocity, they load a 147- or 150-grain to threshold. At the threshold, they get the same power factor, which is weight times speed. But the heavier bullet uses less powder, and as a result there is less of a jet-nozzle effect from the gases. You aren’t scored on the gas component of recoil, but your hands feel the difference.
With the threshold power factor at 125, a 124-grain bullet needs to go no less than 1,008 fps. A 147-grainer needs to speed along at less than 850 fps. A typical powder charge for the 124-grain bullet is 5 grains of powder. For the 147 to make 850 fps, the charge is more like 3.4 grains. The one-third less powder weight alone will make the jet-nozzle effect much less.
Similarly with the .223/5.56. A 55-grain bullet needs to be going no less than 3,000 fps. That can be done with as little as 23 grains of powder. However, a 77-grain bullet needs to only make 1950 fps. That is absurdly slow, but demonstrates the difference since you can get a 77-grain bullet out the muzzle with as little as 18 grains of powder. (Of course, in this example, you risk producing so little gas pressure that you don’t cycle the rifle, but that’s not the problem right now.)
Another alternative is to try different brakes on other shooters’ rifles. If you find an off-the-shelf brake that produces just the right amount of forward thrust, buy it.
Suppressor mounts come in three types: flash hiders, muzzle brakes, and suppressor-specific. Of the three, the latter is actually the one not requiring timing. All brakes need timing, and some flash hider mounts do too, but not because of hiding flash. It’s because they must control vibrational dynamics and ensure return-to-zero mount and dismount.
Suppressor-specific mounts have a much harder life than flash hiders and muzzle brakes. Suppressors work, in part, by turning noise into heat. A suppressor gets hot, very hot, and the mount simply bakes in the heat. As a result, you cannot depend simply on torque to keep the mount tight. Threaded fasteners work by using the threads as tiny springs. The threads flex as you torque up a part. One of the attributes of steel is that when it gets hot enough the spring tension of a part can change. So if you simply wring it on “farmer tight” and blast away, it may come loose.

Top, the AAC, bottom the YHM muzzle device for mounting suppressors. Each manufacturer has a proprietary design and there is no “one size fits all” mount.
You need a thread-locking compound of some kind. The first thought is Loctite. However, when Loctite gets too hot, the compound breaks down, the sheet becomes a granular layer and it loses its locking ability. That’s actually how you remove something held in place with Loctite — you heat it up. Now, the decrease isn’t a complete loss of strength. If you have used a propane torch to burn out Loctite, the granular layer that remains will still interfere with self-loosening. You’ll have to work to remove the part. But it isn’t as tight as it was.
Rocksett reacts differently. While the sheet will heat up, it retains strength and, when it cools, reforms a sheet holding the threads tight. To remove Rocksett, soak the joint in water at least overnight, a full day is better.
The process is similar to a muzzle brake, with one exception — flat shims. Many of the makers offer shim washers that are flat. If you use non-flat shims (and a peel washer is the very definition of non-flat) you may tip the mount when you tighten it in place. That can be very bad. A tipped mount means a tipped suppressor and that risks a baffle strike, which can be annoying or scrap a suppressor — costing you a grand and six month’s waiting.
Surefire uses stackable, color-coded washers to let you properly time your suppressor.
Clean the thread, barrel and mount. Hand install the mount. Check clocking, as with the muzzle brake above. Use the flat washers to adjust timing until it aligns properly when torqued. Consult the instructions that came with the suppressor for the correct torque value. If none is listed, you can go with 1⁄8th more of a turn with the open-end wrench, once it is hand tight. Then, there’s one more step before you can lock things down.
Get out the suppressor that will be mounted on that device, and your Geissele alignment rod. What, you don’t have a Geissele alignment rod? Then set everything aside until you do. Yes, you’ll have to wait for a week or so for it to be delivered, but in the event you discover that your suppressor was seriously misaligned, it will be the best week you ever waited.
Make sure the rifle is unloaded. Mount the suppressor. Slide the rod in and check alignment. If it passes muster, then you can proceed. If it doesn’t, make it straight.
Remove the suppressor, mount and shims, if any. Keep the shims together in order. Use an aerosol degreaser, making everything squeaky-clean dry. Apply Rocksett to the barrel threads and let the goo ooze down around the threads. Cover them from front to back. Slide the shims on, then hand screw the mount into place. Next, use your wrench to torque it down. Each manufacturer has their own idea of suitable torque limits for the mount. If they don’t list a specific value, assume that 1/8th of a turn will be the correct amount.
Once done, leave it alone. Unlike some types of Loctite, which can set in seconds, Rocksett needs 24 hours to properly cure. Shooting too soon can weaken the bond. If it won’t align, either the threads are not cut axial and straight or there is a mismatch in the shoulders of the barrel and the mount. Specifically, in the latter, the thread ending portion.
Threads must be cut on a lathe, so the center of the threaded surface is in the same place as the center of the bore, not the exterior of the barrel. A good lathe operator can use a plug in the bore, and an index gage, to adjust the lathe so the barrel is spinning around the center of the bore. That allows them to cut the threads on-center to the bore. Threads cut while using the barrel exterior as the index may result in the center of the threads (and thus the mount, and suppressor) off-center from the bore by a few thousandths of an inch. This may not be a problem if the clearance holes in the baffles are larger than the error in machining.
However, the thread surface also has to be straight. That is, the threads cannot be tipped in relation to the axis of the bore. That is a big no-no. A very small angle adds up to a big misalignment 7 inches later when the bullet arrives at the front plate of the suppressor.
A mis-machined thread is not something you can correct with hand tools. In fact, you can’t do anything but find a good machinist to shorten the barrel by the threaded amount, and then do a proper threading job. If the threaded portion of the existing barrel goes back further than the shortest barrel length allowed by law (as 16-inch carbine barrels do) then you are out of luck.
However, if the barrel thread shoulder and the mount shoulder are in disagreement, you can work with that.
When a round object such as a barrel is threaded, the surface is turned down to the major diameter of the threads. That is, the size of the thread tops. For an AR-15 barrel, that dimension is .500 inches. The threading tool is applied and the threads are cut. However, the job is not all done. You see, the threading tool can’t cut the threads right up to the shoulder created by the first cut. There’s a short section that is still 0.500" in diameter that lacks a thread.
A good machinist uses a parting tool to make a relief cut at the back of the threads. That takes the 0.500 inch section down to the depth of the thread bottom, below the minor diameter of the threads.
On the mount, the threads are cut the same way, but on the inside. The bore is threaded all the way to the rear face of the mount. Without a relief cut behind the threads, the mount can stop before contacting the barrel shoulder. That tips the mount, and is a very insecure torquing point.
If that is the situation for your rifle mount setup, you need a lathe to correct the barrel. And you have to remove the barrel to do that. Or, you can simply take the mount to your local machinist, discuss the problem, and have him relieve the rear of the mount, clearing the offending section of barrel thread.
If after all that your mount still doesn’t tighten straight, the threads are misaligned and you need a new barrel.
Mount makers realize that a lot of barrels aren’t cut properly, so they tend to put extra effort in to make sure theirs is right.
The term “pinned and welded” comes to us courtesy the moronic NFA, or National Firearms Act of 1934. Barrels on rifles and shotguns that are short are referred to as “short barreled rifles” (SBR) or “short barreled shotguns” (SBS). These are controlled as if they were machine guns and require a transfer approval from the Feds, and a one-time payment of $200 tax to the same.
A rifle may not have a barrel shorter than 16 inches, without transfer approval and taxation. Anything over 16 inches is fine, and anything under is not. Colt ships rifles with 16.1" barrels. Other makers ship 16.25" barrels. As long as it is over, it is kosher. Under, and it is taxable, and must be approved.
But the barrel makers are set up to make scads of barrels that are 14.5" long, because that is the military spec. And we discussed why in the barrel chapter. So, there you are, looking at a dirt-cheap 14.5-inch barrel at a gun show, but can’t buy it because it is too short. What to do?
A quirk in the barrel length interpretation is that if a part is permanently attached to the barrel making it effectively longer than 16 inches, the barrel is considered longer than 16 inches. So, if you permanently attach a flash hider to your 14.5-inch barrel, giving it a net length of 16+ inches, you’ve done it. I have to emphasis “net length” because the threaded portions of both the barrel and flash hider will overlap, and you’ll lose those. So, a 14.5-inch barrel needs a flash hider that has an overall length of something like 2.5 inches, so you end up with a 16-inch barrel or longer.
Another concern is what is considered “permanently” attached. The ATF regulations that cover this are both specific and general. They are specific in that there are no chemical fasteners or bonding agents that meet their standards. No epoxy, Loctite, JB Weld, none of that will do for them. They want a high-temperature solder, with a melting point of 1125 degrees Fahrenheit or more, or a welded bond. Heating a barrel muzzle and device to 1125 degrees-plus is not good for the barrel. Welding is the answer.
One way is to tack-weld it at three or four points equidistant around the barrel. A continuous weld would be better, but they don’t require it. Another way is the “pin and weld” method. Here, you fit the flash hider, muzzle device, muzzle brake or simple extension to the barrel. Drill a hole through the flash hider, but not through the barrel. The idea is to drill deep enough to “dimple” the barrel at the threads or the shank behind the threads. Press a short section of rod into the hole, so it rests in the dimple, and would prevent the flash hider being unscrewed. Then, the last step is to weld a bead of steel over the end of the section of rod, trapping it in place, thus preventing the flash hider from coming unscrewed.
This locks the flash hider in place and extends the barrel without pumping any more heat into it than absolutely necessary.
There are drawbacks, however. Once the flash hider (or whatever) is permanently attached, you cannot remove anything attached to the barrel that is smaller than the flash hider. Your gas block or front sight is trapped in place, as is the barrel nut assembly. Once the device is pinned and welded, the barrel is permanently trapped the way it is.
As a result, you have to build it, and then see if it works. If it doesn’t, you must undo the weld to make any changes. And when you do so, you have technically created an SBR.
You can’t legally build an SBR “temporarily” and then once it works properly, pin and weld it. But if you own an SBR you can build an upper for it, test it, debug it and then pin-and-weld the barrel, putting the resultant upper on a non-SBR.
As a result, there is a good case to be made for the non-pinned design of gas block and front sight assembly, as you can change those even with a pinned-and-welded barrel.